
The tattoos that tend to look the best five years from now are not always the ones that blew up on day one. In my experience, pieces with confident linework and solid saturation age more predictably than ultra-fine, hyper-detailed ink placed on high-movement skin. That means choosing placement and scale with long-term wear in mind, not just how it photographs. Below are 21 bold tattoo placement ideas that match how you live now and how the work will look later.
1. Bold Traditional Rose on Outer Forearm

I’ve seen outer forearm roses hold their personality for years because the skin there tolerates heavy outlines and saturation. Tell your artist you want strong black outlines and slightly larger petals so the negative space breathes, and avoid ultra-fine detailing in the center that will soften. Session time is usually one to two hours for a 4–6 inch piece and pain ranks low to moderate. The common mistake is shrinking the design to fit on the wrist; too small and the petals fuse. For showing it off, roll up a rolled sleeve t-shirt and add a leather cuff on the opposite arm to balance the visual weight.
2. Blackwork Mandala on the Shoulder Cap
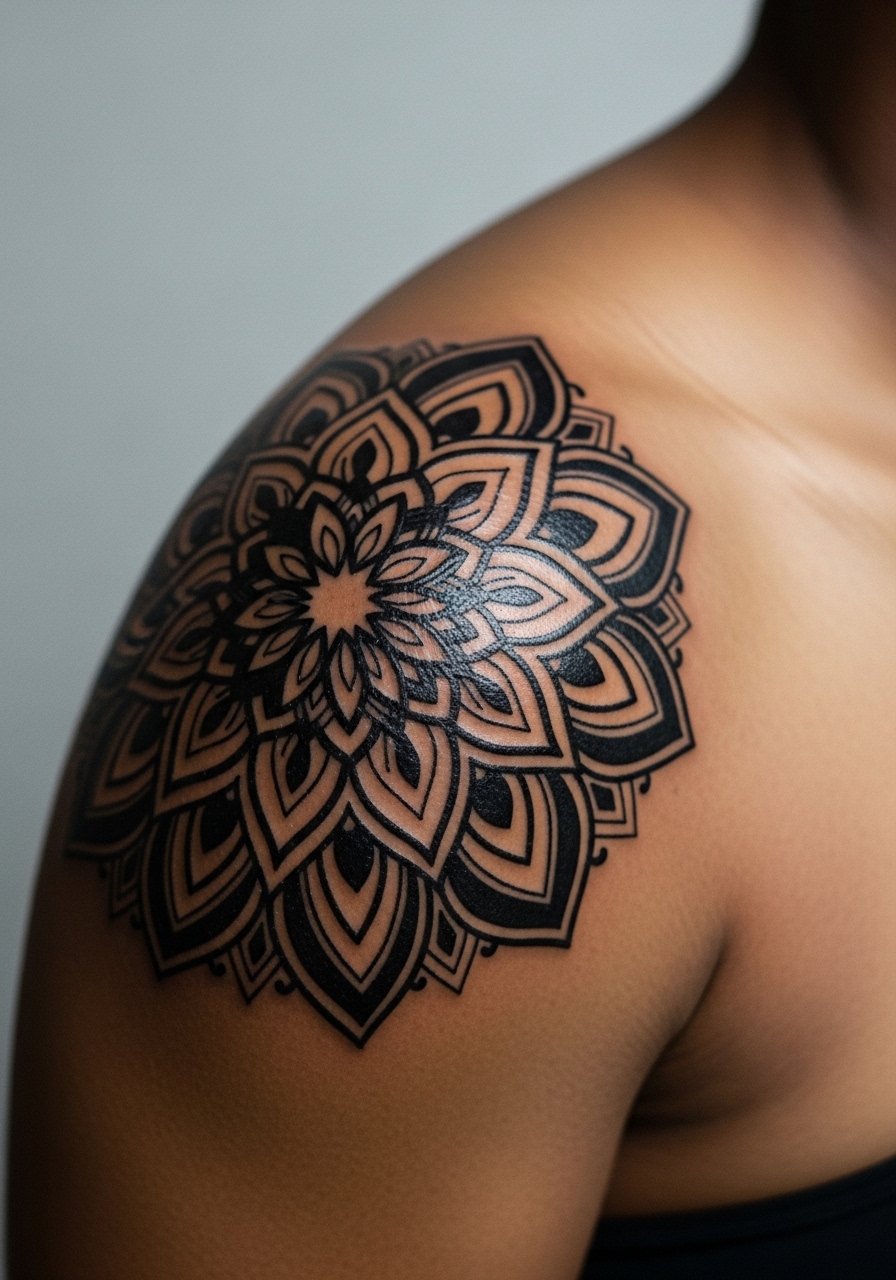
There’s something about a mandala that sits on the rounded shoulder and reads sculptural from multiple angles. For best longevity ask for spacing between concentric lines, not ultra-tight packing, so stipple shading can settle without blur. Expect two sessions for a 5–8 inch piece and low to moderate pain. Artists sometimes overfill the inner rings, which leads to muddiness at year three. During the session wear a sleeveless tank so the artist can access the cap cleanly and you stay comfortable.
3. Tribal Dragon Full Sleeve That Follows Arm Flow
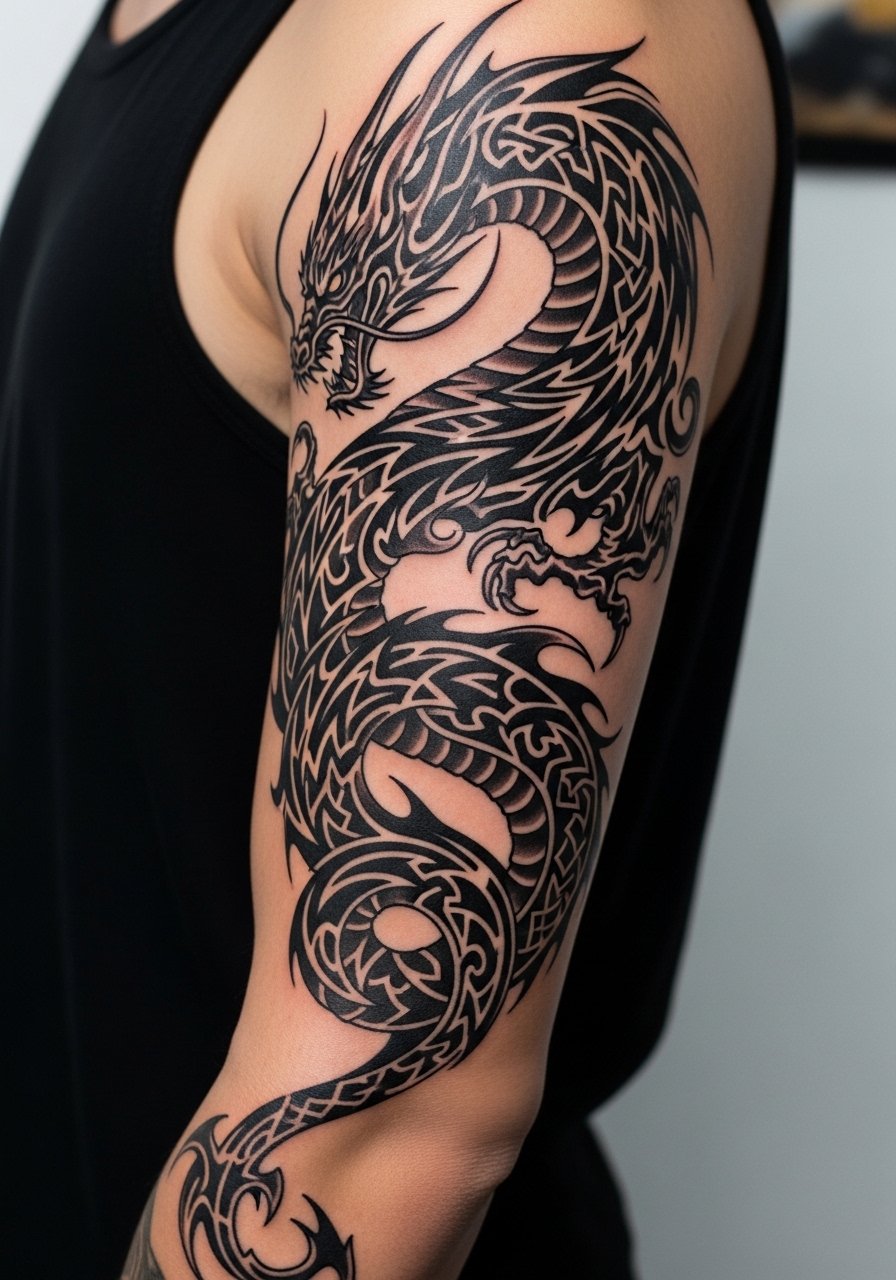
A full tribal dragon sleeve is about storytelling along the arm’s flow, not a single emblem. In consultations emphasize where you want the focal points to sit around the elbow and bicep so the scales and curves follow muscles. This is a multi-session commitment, usually several long sessions, and blowout risk increases near the inner elbow if the artist packs too much black. One mistake is asking for too many tiny scales; they blur with movement. Plan for touch-ups after the initial healing window for saturation boosts. For appointment comfort choose a loose fit button shirt you can roll or pull aside without tugging skin.
4. Fine Line Script on the Inner Wrist

Fair warning: wrist skin moves and gets washed a lot, so fine script needs a confident, slightly bolder hand to age well. Ask your artist for a slightly heavier lineweight than you think you want and keep lettering spaced. Session time is often brief, under an hour, and pain is low to moderate. The controversy around micro script on high-wear areas shows two camps: one says fine line fades fast and requires frequent touch-ups, the other argues that with correct placement and depth it can settle nicely. Expect touch-ups at one to three year intervals. If you plan to show it off, cuff a pair of cuffed slim jeans and stack a thin bangle on the opposite wrist.
5. Watercolor Floral Along the Collarbone
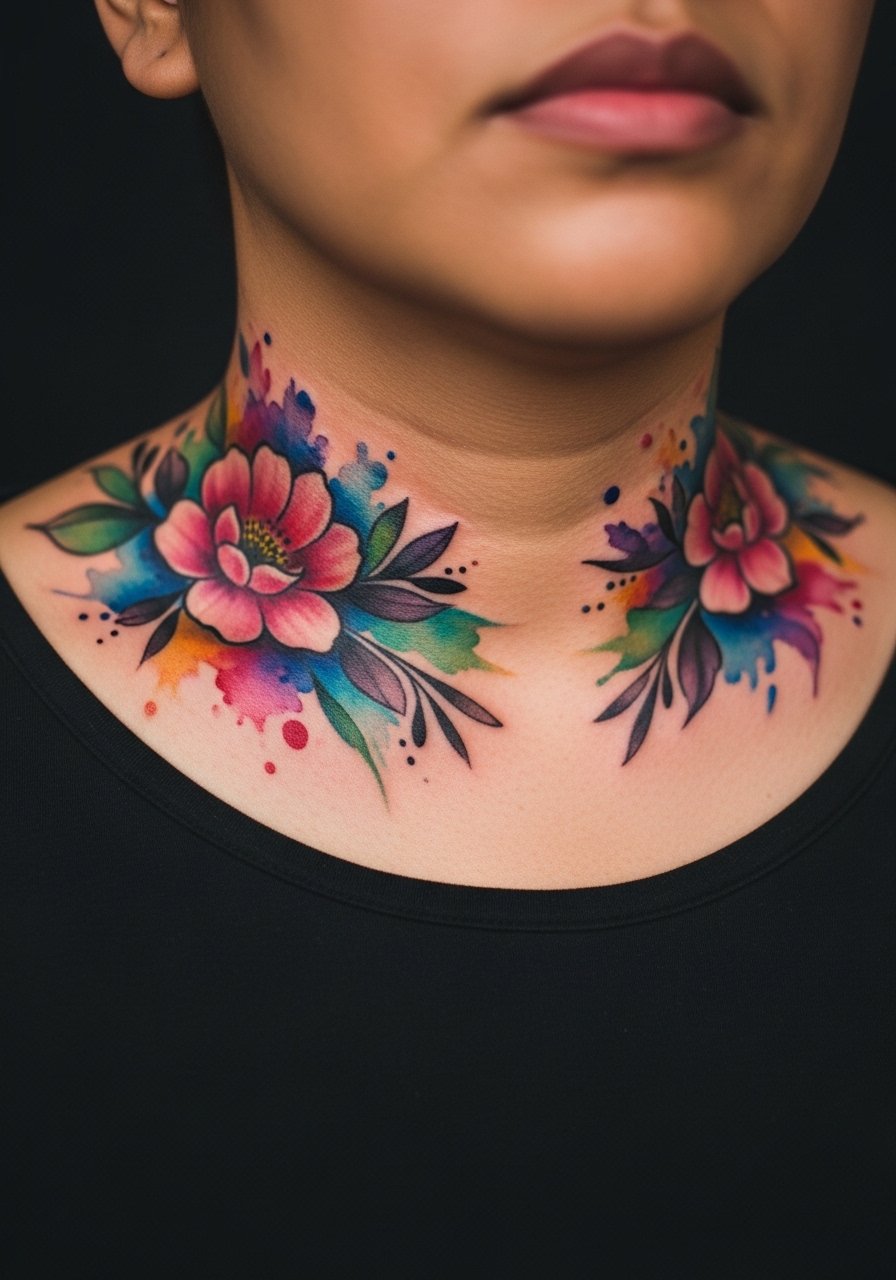
Collarbones frame watercolor beautifully because the collarbone highlights gradients and washes without too much stretching. Request paintersly edges with defined black anchors so the color has structure as it fades. One session often does a medium piece, though a touch-up for color vibrancy is common at one or two years. The frequent mistake is using only soft color without any linework, which can bruise-looking as pigment disperses. For show-off outfits try an off shoulder top in earth tones; the neckline traces the design without covering it.
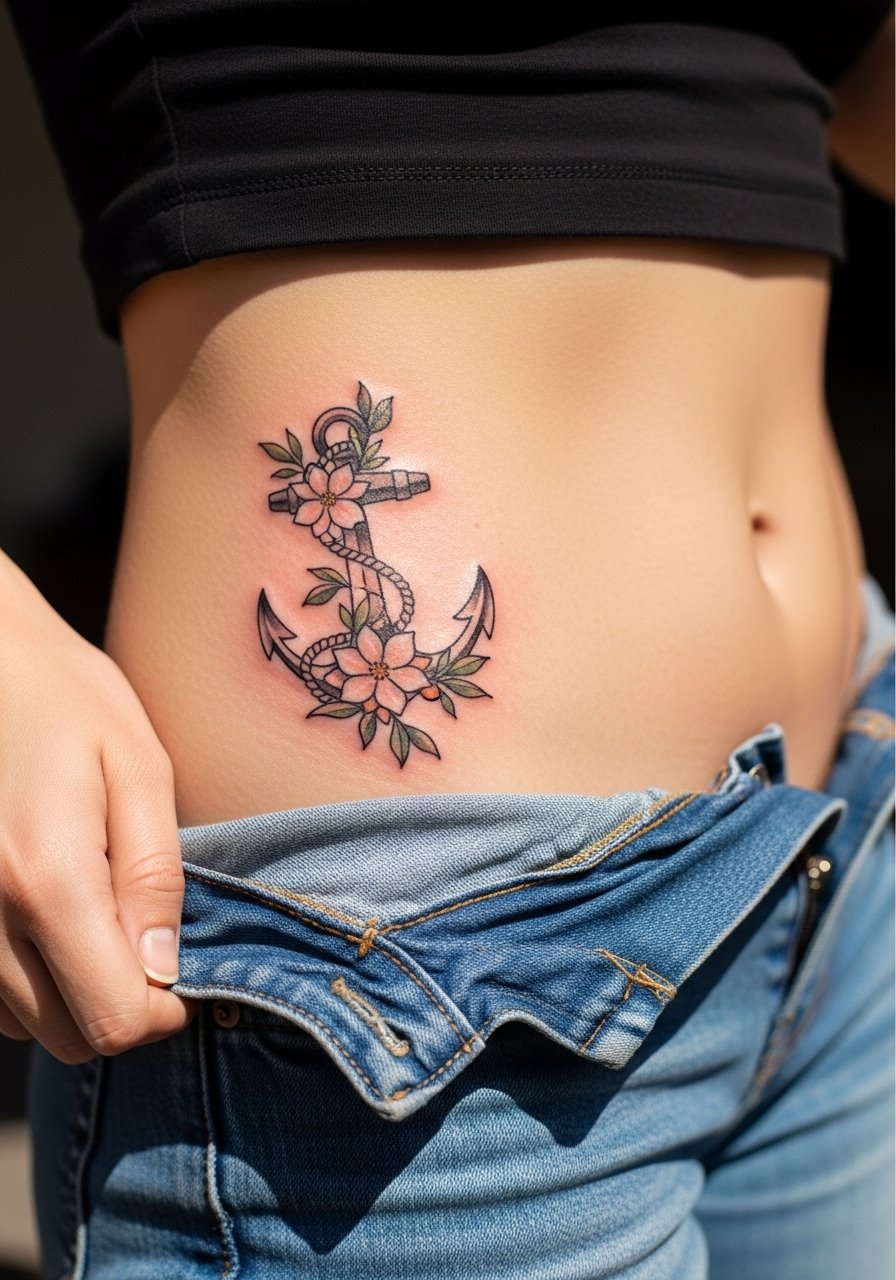
6. American Traditional Anchor on Outer Calf
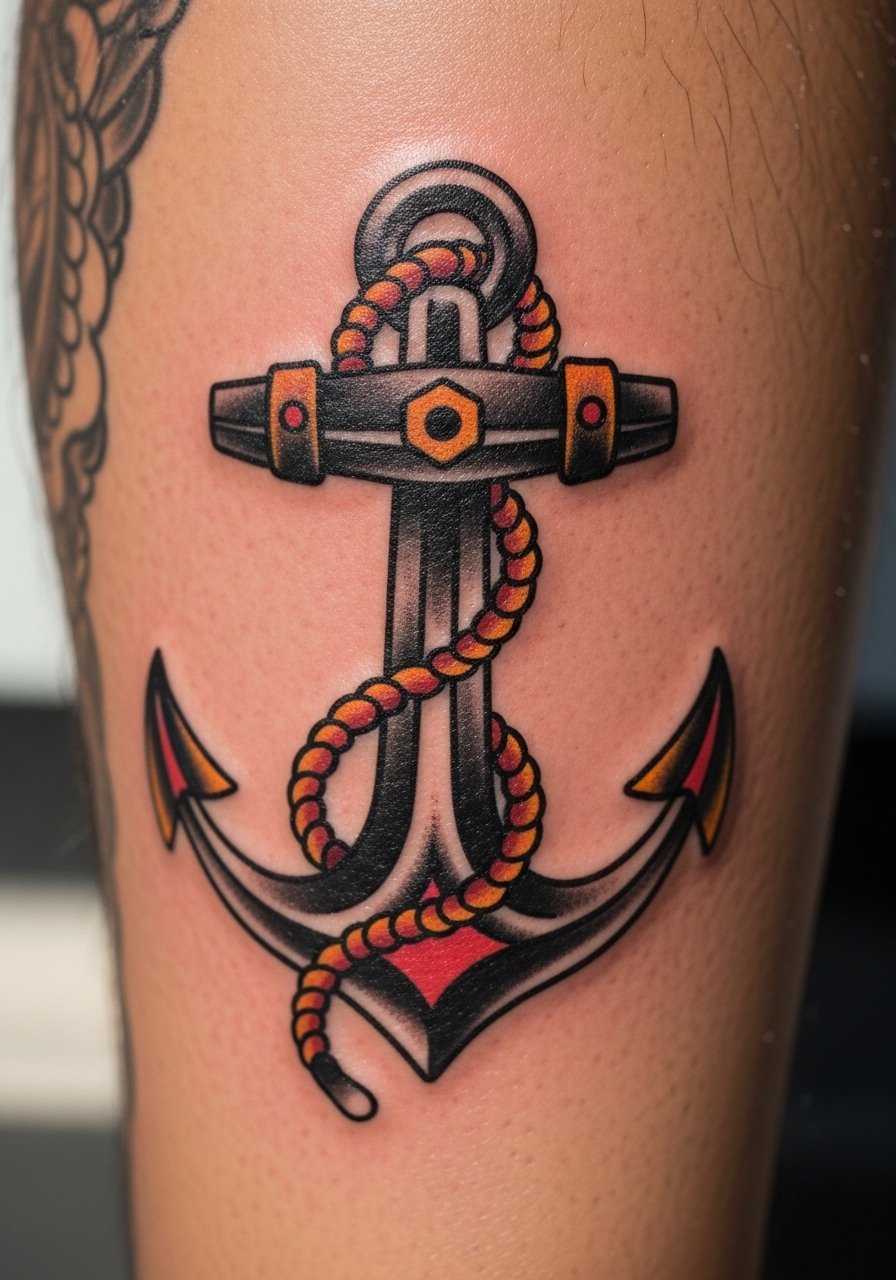
Outer calf work handles bold traditional styles well because the area tolerates saturation and shrinks less with movement. A 5–7 inch anchor usually finishes in a couple of sessions and pain is low. Tell the artist you want heavy outlines and flat color blocks rather than tiny gradients so the piece stays legible while you wear shorts. One error is placing heavy black on the inner calf where rubbing from clothing accelerates wear. For session day, wear loose drawstring shorts so the artist can roll the leg up without pressure.
Pre-Session Essentials
The forearm, wrist, collarbone and calf pieces above need different prep from intimate or high-movement spots, so these five items smooth the studio day and the first week.
-
Stencil transfer paper kit. Lets you preview the line placement on skin for forearm and collarbone pieces before the needle touches skin.
-
Topical numbing cream. Applied as directed before the session it takes the edge off calf and wrist sensitivity without changing linework.
-
Thin protective film roll. Useful for early coverage on wrist and outer calf pieces that face friction from clothing.
-
Fragrance-free body wash. Cleanses healing areas gently during showers without irritating linework on collarbones and forearms.
-
Aquaphor healing ointment. A thin layer supports early moisture balance for saturated traditional work and fine line pieces during the initial days.
7. Bold Blackwork Geometric on the Side Neck
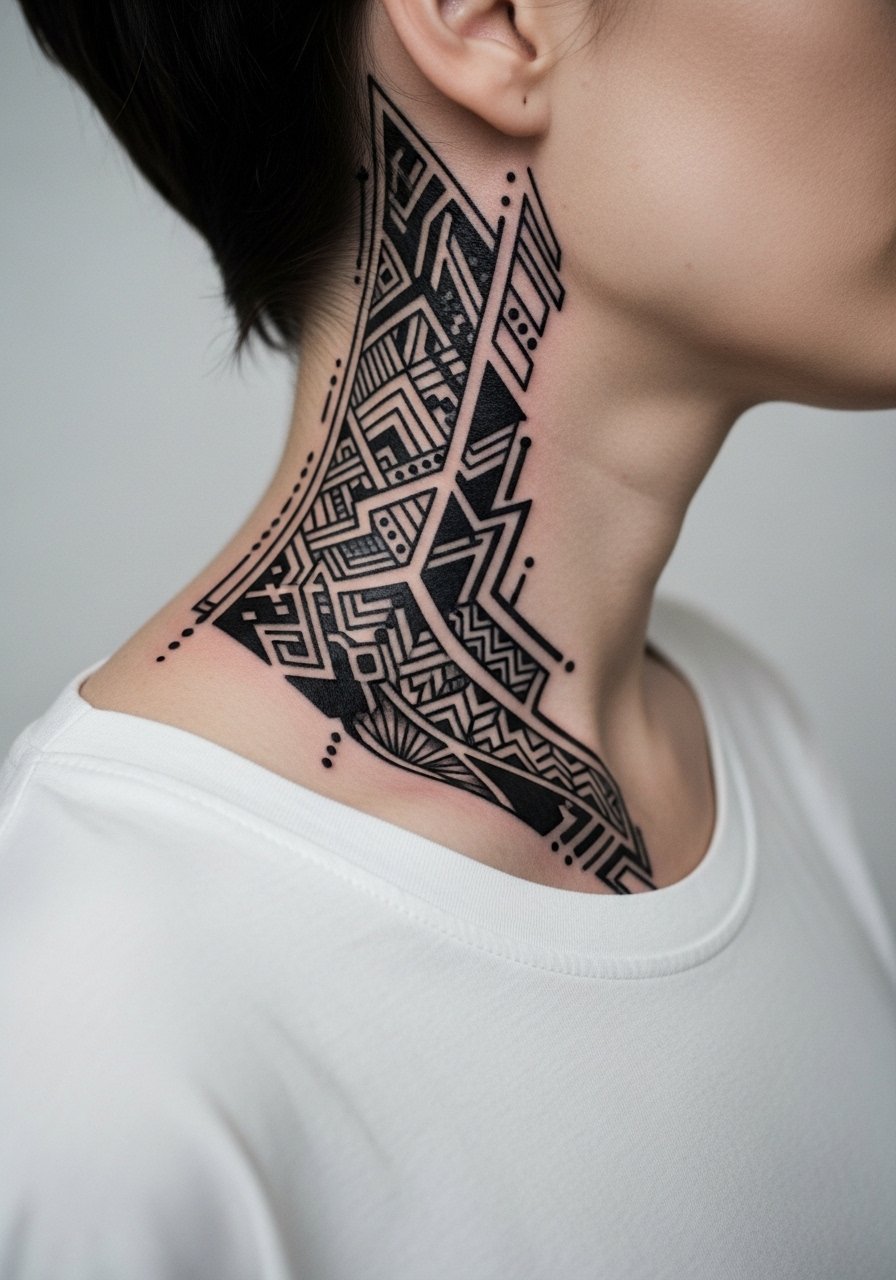
Neck ink demands attention and it also raises concealability questions for work. Artists split into two camps: some say neck pieces are an authentic move worth the trade-off, others warn that visibility impacts certain professions. The middle ground is nape or side placements you can hide under hair or collars. A small-medium geometric runs one to two sessions and pain is moderate. Tell your artist how often you need to conceal it, and ask them to scale the piece accordingly. For shoot day wear a v-neck t-shirt or open-collar shirt so you can test how hideable the placement is before booking.
8. Neo-Traditional Floral Wrap on Outer Thigh
Outer thigh sleeves are forgiving during weight fluctuation and let large neo-traditional motifs wrap curves naturally. Sessions are longer and usually spread across several visits for complex color and shading. A common mistake is pushing detail too close to areas that stretch with clothing; keep focal elements on the outer quadrant where distortion is less. Pain is moderate and most people schedule three to six sessions. For showing it off try a high slit skirt or shorts while alternating thigh-high socks for a balanced look.
9. Japanese Koi Across the Upper Back
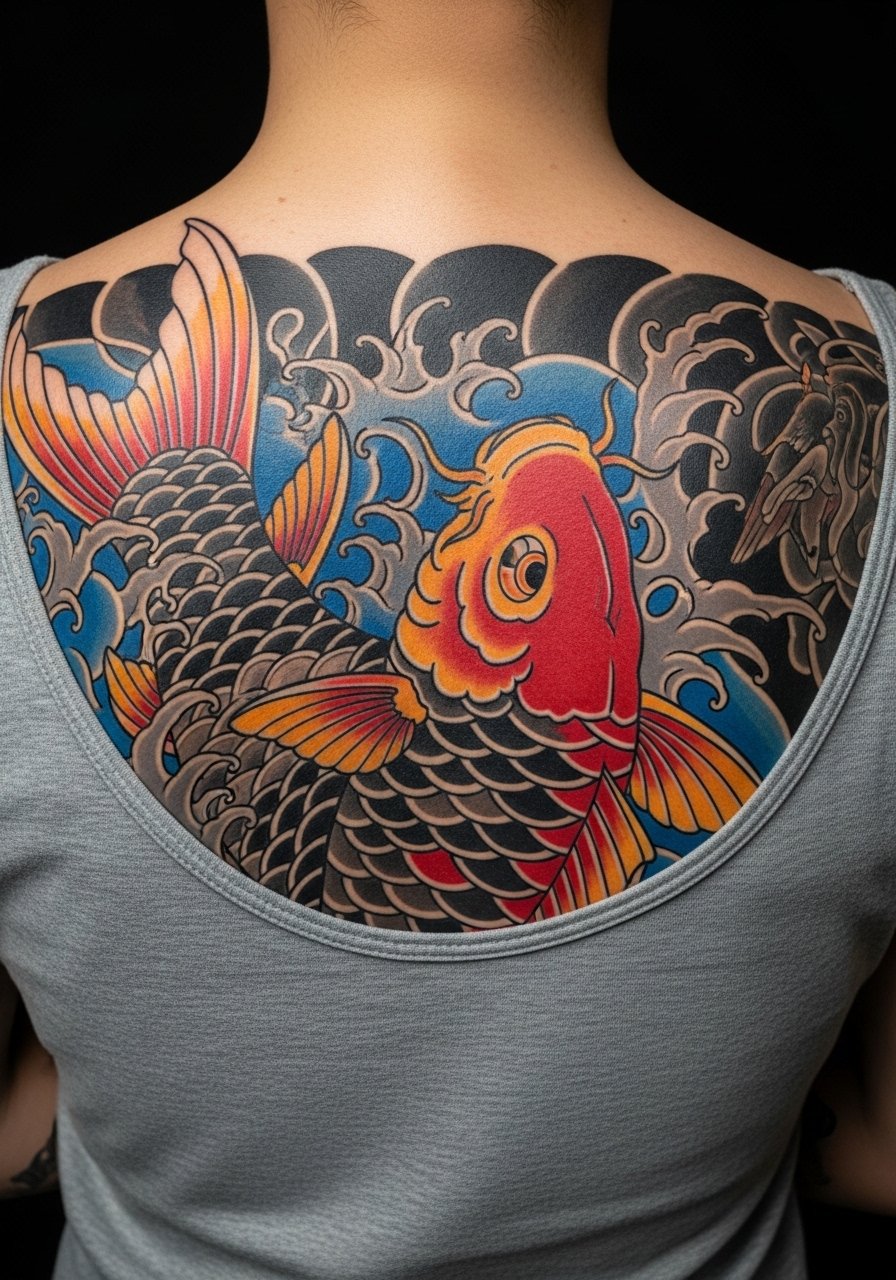
The upper back is a great large canvas for Irezumi-style koi because it handles sweeping compositions and layered waves. Expect multiple long sessions and plan your staging so the head and tail flow with shoulder blades. The common error is compressing too much narrative into one area without negative space, which muddles scales and waves over time. Pain varies with hours spent lying prone. When you book bring a robe or loose low back tank to stay comfortable between long stretches.
10. Bold Symbol on the Finger

Finger tattoos are quirky and visible, but they fade faster because of washing and constant friction. Two camps argue this point: one says the fade risk makes fingers bad long-term bets, the other accepts touch-ups as part of the look. If you want longevity, go for bold simple geometry or a solid glyph instead of micro-detail. Sessions are quick, pain is sharp but short, and touch-ups are common every six to twelve months. For everyday wear consider minimal rings that do not sit over the ink so friction is reduced.
11. Ornamental Mandala on the Ribcage
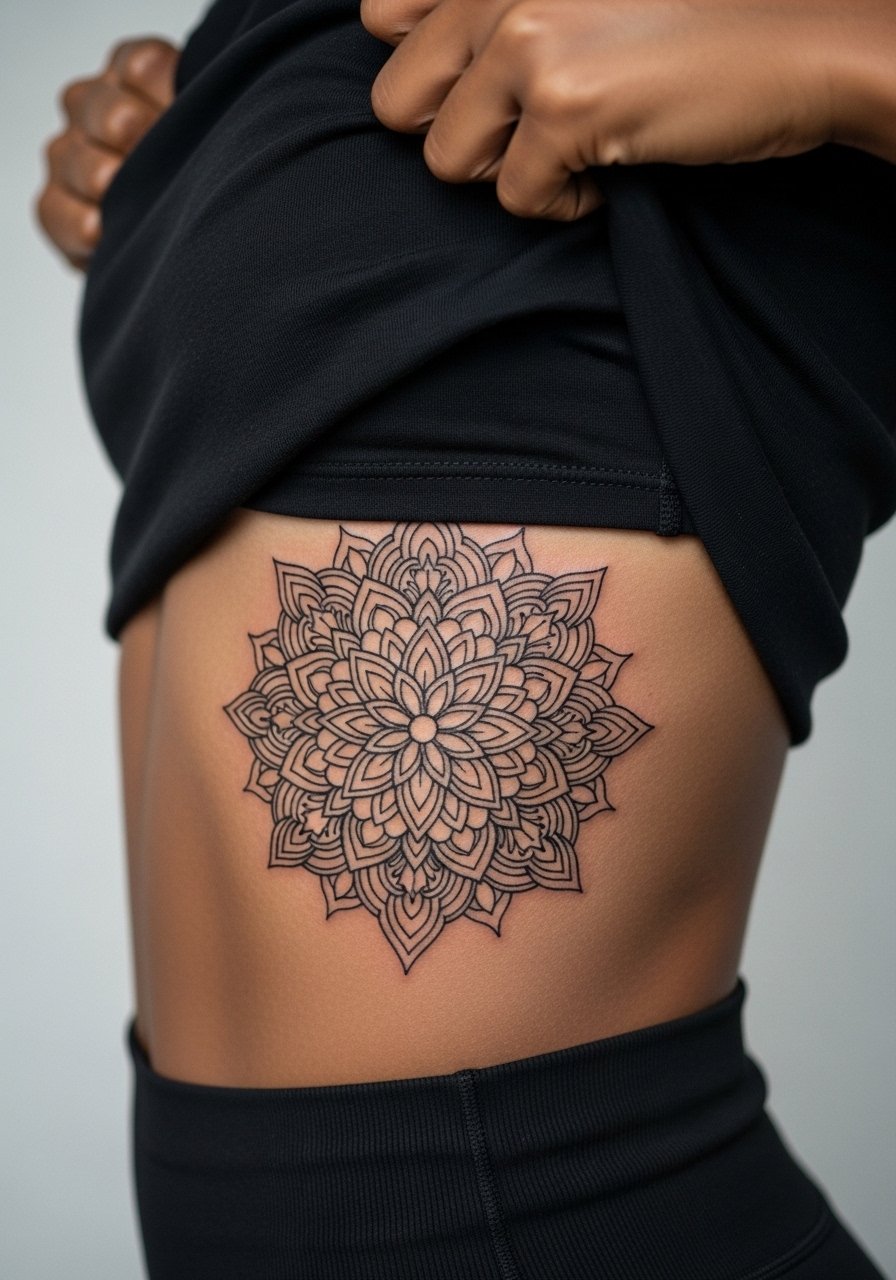
Ribcage placements contour beautifully, which makes ornamental mandalas feel intimate and sculptural. Pain is high for most people because the needle works over bone and you have to breathe through the session. Artists disagree about fine line on ribs: one camp warns that the area stretches and blurs lines, the other says correct needle depth and spacing can keep it crisp. Practical advice is to split the work into short sessions and plan two sessions so you can assess how the first pass settles. For the appointment wear a loose tank you can lift to expose only the area being worked.
12. Tribal Pattern Around the Ankle
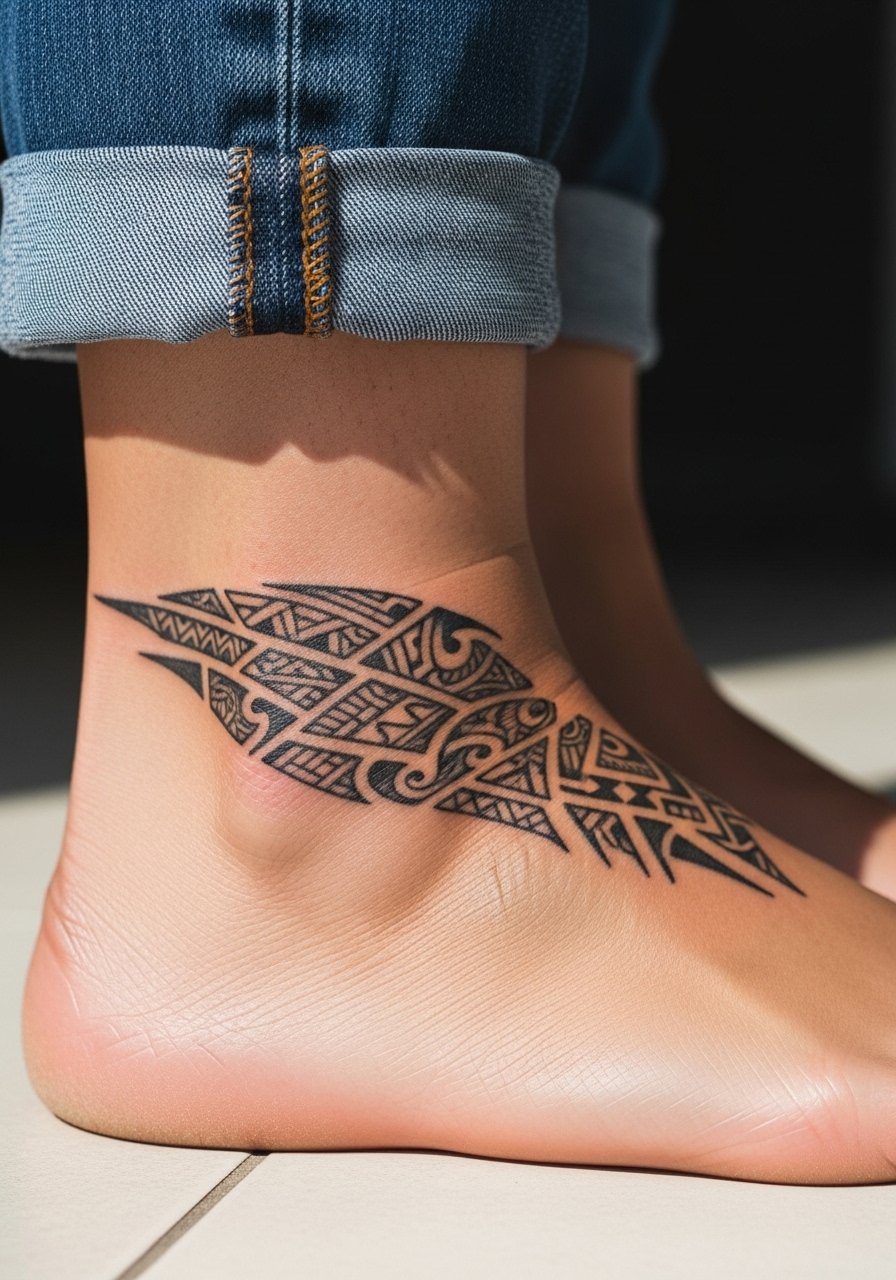
Ankle tattoos are discreet and flashable when you want them to be. The skin there tolerates bold blackwork well but beware of placement too low where sandals scrape at the design. One-session pieces are common and pain is moderate. A frequent mistake is going too small with intricate tribal knots. Choose a slightly larger scale so negative space separates elements. Pair the healed look with strappy sandals and cropped pants that frame the ankle without hiding it.
13. Around-the-Ear Circling Design Revealed by Hair Tucks
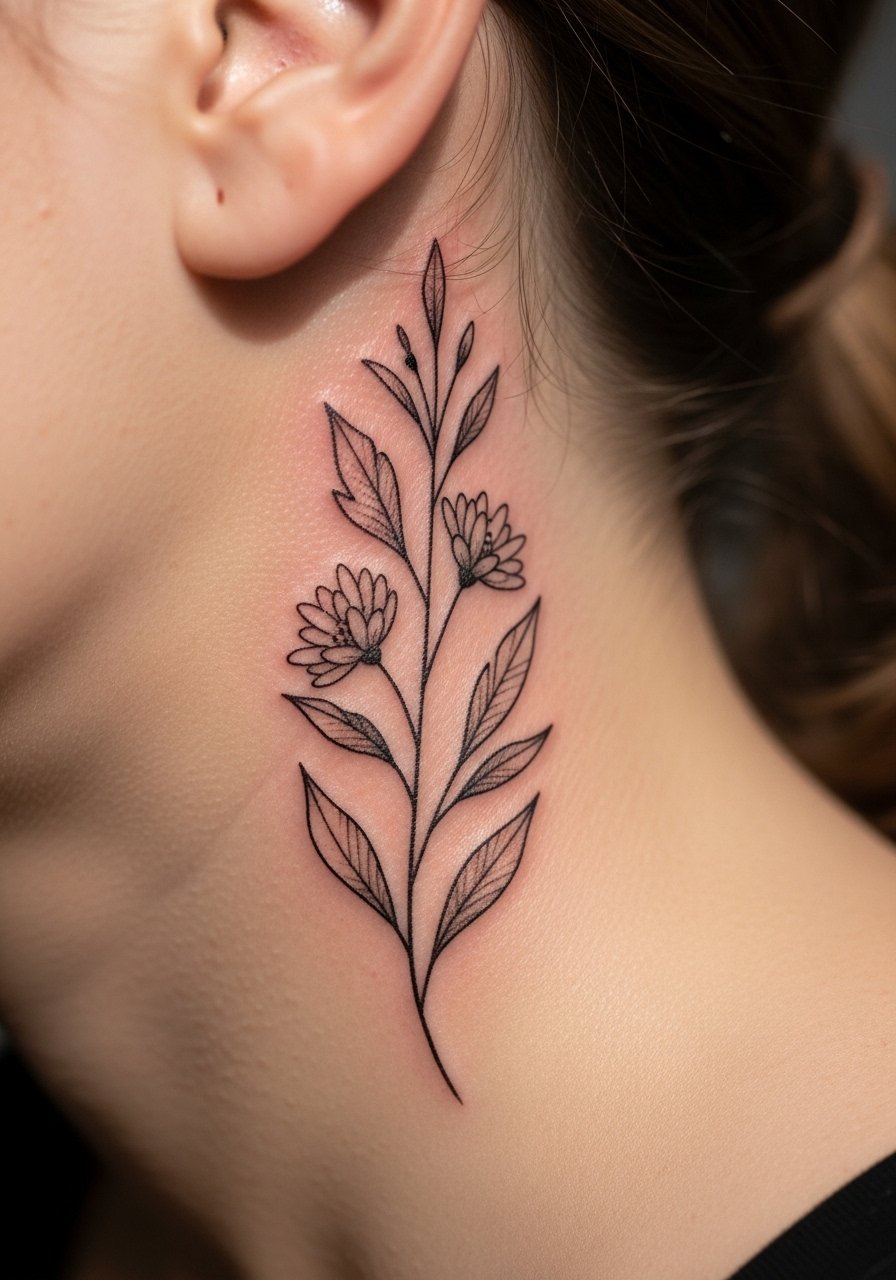
Around-the-ear pieces are subtle until you tuck hair and they appear. Because this spot sits near delicate tissue ask for skin-safe spacing and avoid heavy black that can pool near hair follicles. Sessions are short and pain is low to moderate. The unique appeal is surprise rather than constant visibility, so design the curve to peek when you move. For the appointment tie hair back and wear a loose tank top so the artist can clean the nape without interference.
14. Large Low-Visibility Bold Work on the Glutes
Glute placements offer privacy for large, bold pieces and they age predictably because the area sees less sun and abrasion. Pain can be significant near the tailbone and sessions often require repositioning. The mistake is loading too much detail into a curved panel; plan big shapes that read at a distance. Booking a multi-hour session means bringing comfortable layers to rest in between passes. Because glute work is intimate, confirm studio comfort and sanitary practices when you book.
15. Shoulder-Blade Draping Florals or Wings
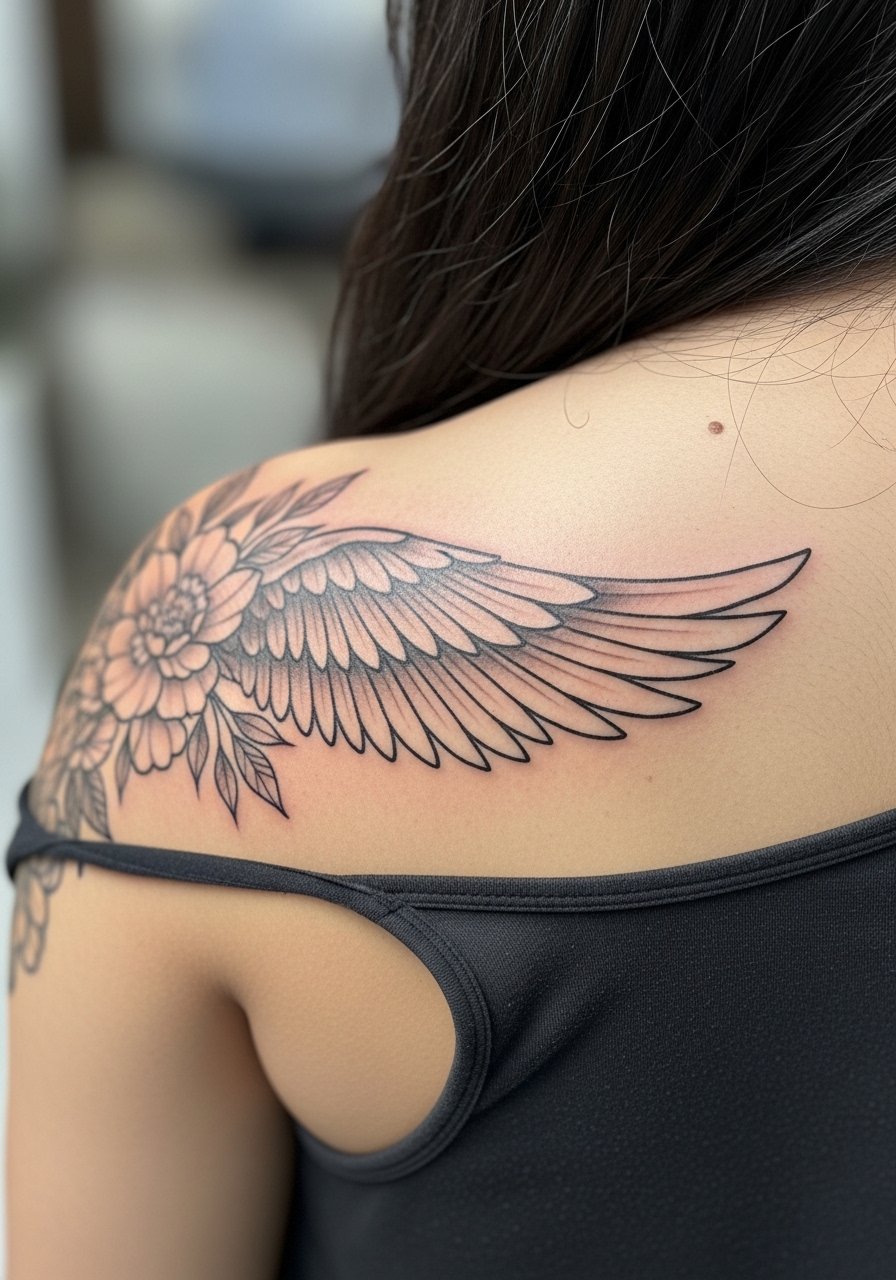
Shoulder blades are ideal for designs that need a gentle slope to flow, such as draping florals or stylized wings. Pain is low and a medium-sized piece can be done in one to two sessions. Avoid packing intricate details into the area where movement will soften tiny dots and hairline shading. Artists recommend leaving breathing room around the spine so the motif reads when you wear open-back styles. For evenings try an open-back dress that highlights the drape without competing.
16. Ribcage Script That Follows Body Contour
Ribcage script that tracks body contour creates a private reveal when you move, but be realistic about pain. Sessions are often split into short sittings to manage discomfort from breathing. A common mistake is choosing tiny lettering density; give letters extra spacing to avoid blurring as the skin relaxes. Two camps debate this placement: one emphasizes the sensual upside and accepts the pain, the other advises beginners to start elsewhere. Discuss your pain tolerance and session pacing with the artist. For the appointment bring a side slit dress so you can test how the piece shows when you are dressed.
17. Fine Line Sternum Botanical
Sternum tattoos read intimate and central, and they require careful planning because the area moves with breathing. Pain can be high for many people and artists often suggest one or two shorter sessions rather than a marathon. The healed look favors simple stem-and-leaf compositions with clear spacing. A mistake is overcomplicating the central motif, which smudges as tissue settles. For the session wear a fitted sports bra so the artist can access the area cleanly and you can stay modest.
18. Micro-Realism on the Inner Bicep
Inner bicep pieces sit in a soft, pliable area that can blur if you request hairline detail too small. For micro-realism ask the artist to scale up features slightly and use stipple shading rather than ultra-fine continuous lines. Sessions are moderate in length and pain is moderate. The common mistake is expecting the same crispness you see on flat skin; the curve and motion of the arm change how details read. Wear a tank on session day so the artist can raise the arm and access the area with ease.
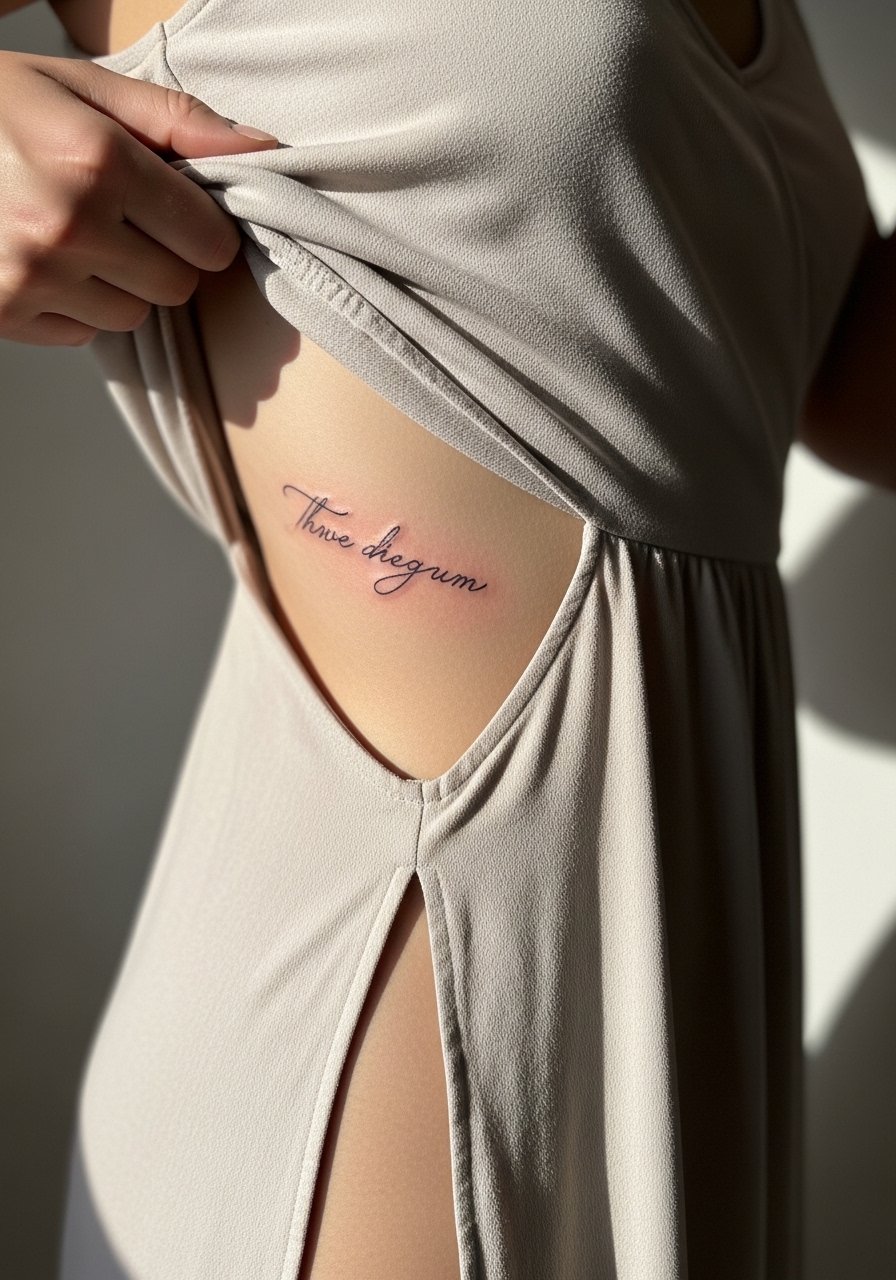
19. Lower Back Bold Motif
Lower back placements suit centralized bold symbols or mandalas that sit above high-waisted clothing. The skin there tolerates saturation and seasonal sun exposure usually determines how the piece ages. Plan composition so the motif aligns with your natural waistline and avoid placing important detail where belt friction sits. Sessions are moderate and pain is manageable. For studio comfort bring a loose top you can lift slightly without full exposure.
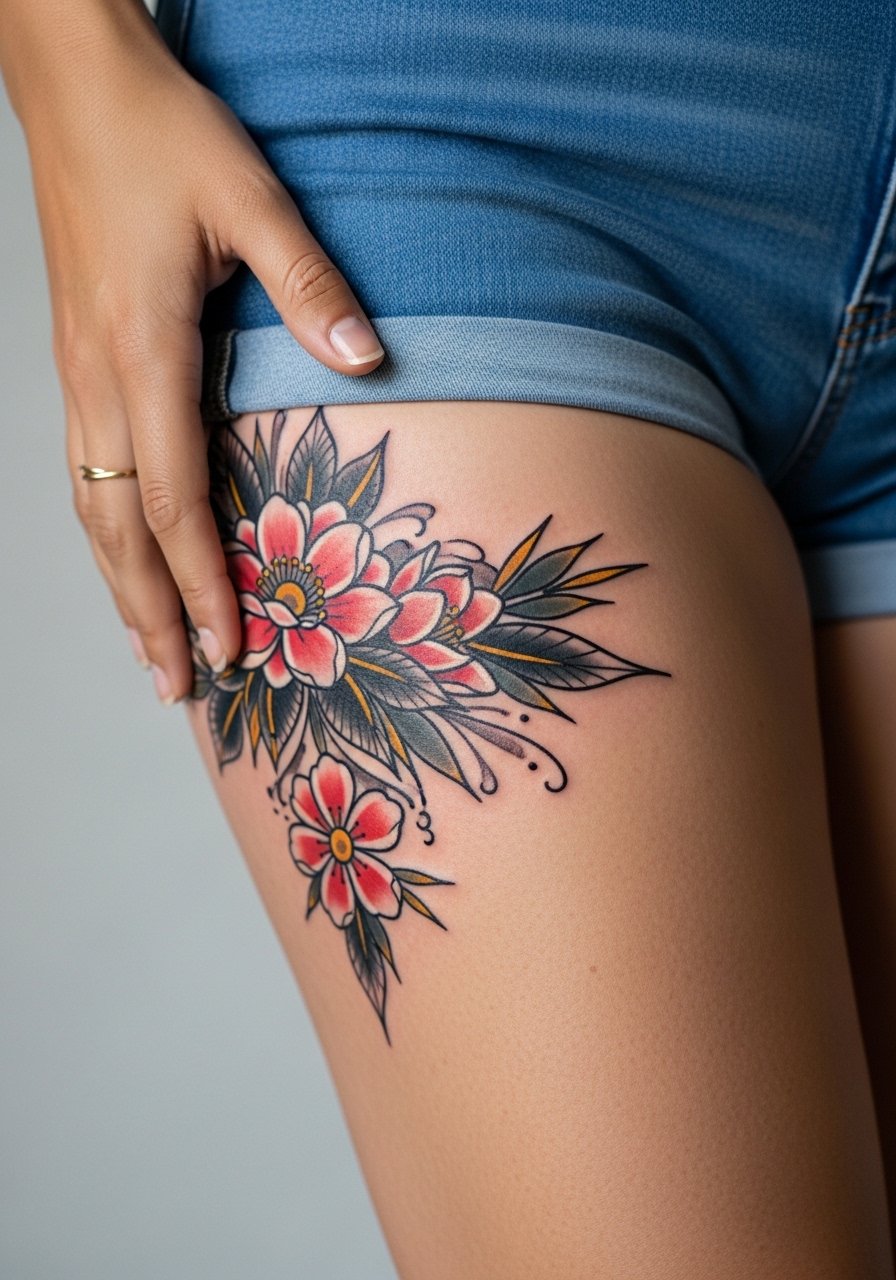
20. Hip Anchor or Floral on the Upper Hip and Thigh Junction
Hip placements are flirtatious and practical because they are easy to conceal. Work that crosses from hip to upper thigh should focus its focal point on the outer hip to minimize distortion with movement and weight changes. Pain is moderate and sessions can be short. A common oversight is not discussing long-term body changes; talk size and placement with your artist if your body is likely to change. For showing off try a high-waisted skirt or swimwear that frames the piece.
21. Back of Hand Bold Motif
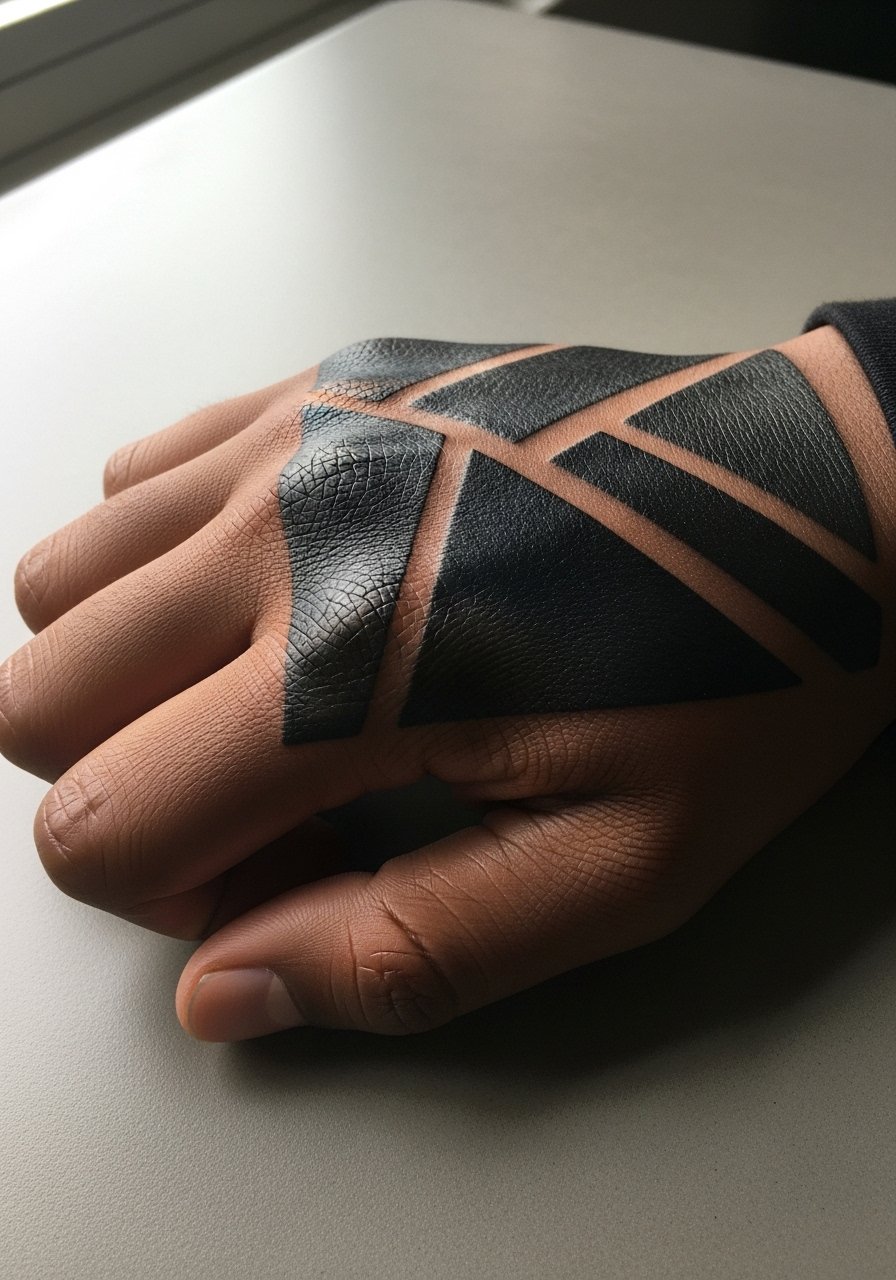
Back-of-hand tattoos are very visible and face similar fade issues to finger work, plus they can affect glove-wearing jobs. Two groups view these pieces differently: one accepts regular touch-ups as part of the aesthetic, the other avoids the spot if career considerations matter. If you go ahead, choose a compact bold motif with heavy linework rather than fine shading. Sessions are short but the healing process is tricky because of constant use. Consider timing around work cycles and seasonal glove use.
Frequently Asked Questions
Q: How much does a bold forearm rose cost compared to a watercolor collarbone piece?
A: Prices vary by studio and region, but expect forearm work to run modestly less than collarbone watercolor if the latter needs color layering. Think of cost in ranges and sessions rather than exact numbers, and always ask for session estimates during the consultation.
Q: Will fine line wrist script need touch-ups more often than a bold blackwork mandala on the shoulder?
A: Yes, wrists are high-movement and high-wash spots so fine line tends to need touch-ups sooner than shoulder blackwork. Plan for an initial touch-up window at around one year and then check annually depending on how the ink settles.
Q: Are neck tattoos worth the visibility trade-off if I need to hide ink for interviews sometimes?
A: It depends on placement and hair/clothing habits. Side or nape placements you can conceal under collars or hair are the compromise many choose. Discuss concealability with your artist and test how the design looks with the outfits you wear to interviews.
Q: How do I find artists who specialize in bold traditional or blackwork styles without naming specific people?
A: Search style-specific studio listings and filter for terms like "bold blackwork tattoo [city] studio." Check location tags, tattoo directories, and convention guest lists. Spending time in local shop portfolios and visiting studios for consultations helps more than scrolling single images.
Q: Do ribcage mandalas and ribcage script require different session pacing because of pain?
A: Yes, the ribcage reacts to breathing and bone proximity so shorter sessions with breaks are common. Many artists prefer splitting work into two shorter passes so you can manage pain and the artist can assess how the first pass heals before continuing.
Q: What should I wear to a sternum or ribcage session to stay modest and comfortable?
A: A fitted sports bra or bandeau that exposes only the target area is ideal. It gives the artist clean access and keeps you covered. If you plan to photograph the healed piece later, try a backless dress or a wide-neck top that frames the design without hiding it.
