
Fine line tattoos dominate feeds right now, but the ones that still read sharp at year five are not always the ones that looked best fresh. Micro-realism and very tight linework can sing or they can smear depending on placement, spacing, and touch-up plans. Below are 21 micro sleeve ideas for men with placement notes, how they age, what to ask your artist, and practical wardrobe tips that help the ink show off.
1. Micro-Realism Portrait on the Inner Forearm
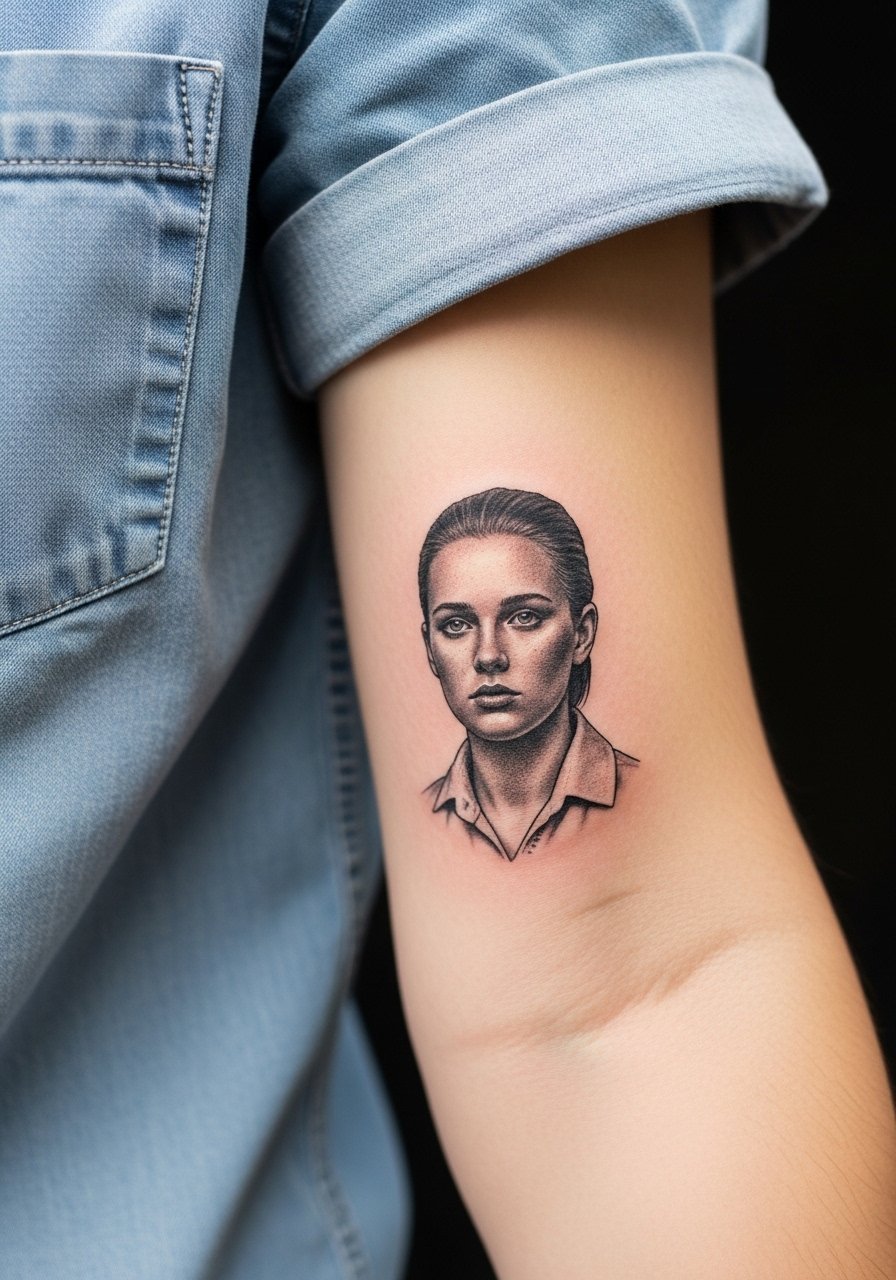
I recommend this when you want a readable likeness without committing to a full sleeve. Pain is moderate, around a 4 to 5 out of 10, and most artists will complete a focused portrait in a single 1.5 to 3 hour session. Tell your artist you want slightly increased spacing between hairline strokes so the tiny details have breathing room as the ink settles. A common mistake is requesting ultra-dense shading, which looks crisp fresh and then softens into muddiness by year three. Expect a touch-up around year two or three for micro-realism on thin skin. For showing it off, wear a rolled cuff chambray shirt or pull up a short sleeve so the portrait sits in a neat window of fabric.
2. Fine Line Geometric Row on the Wrist
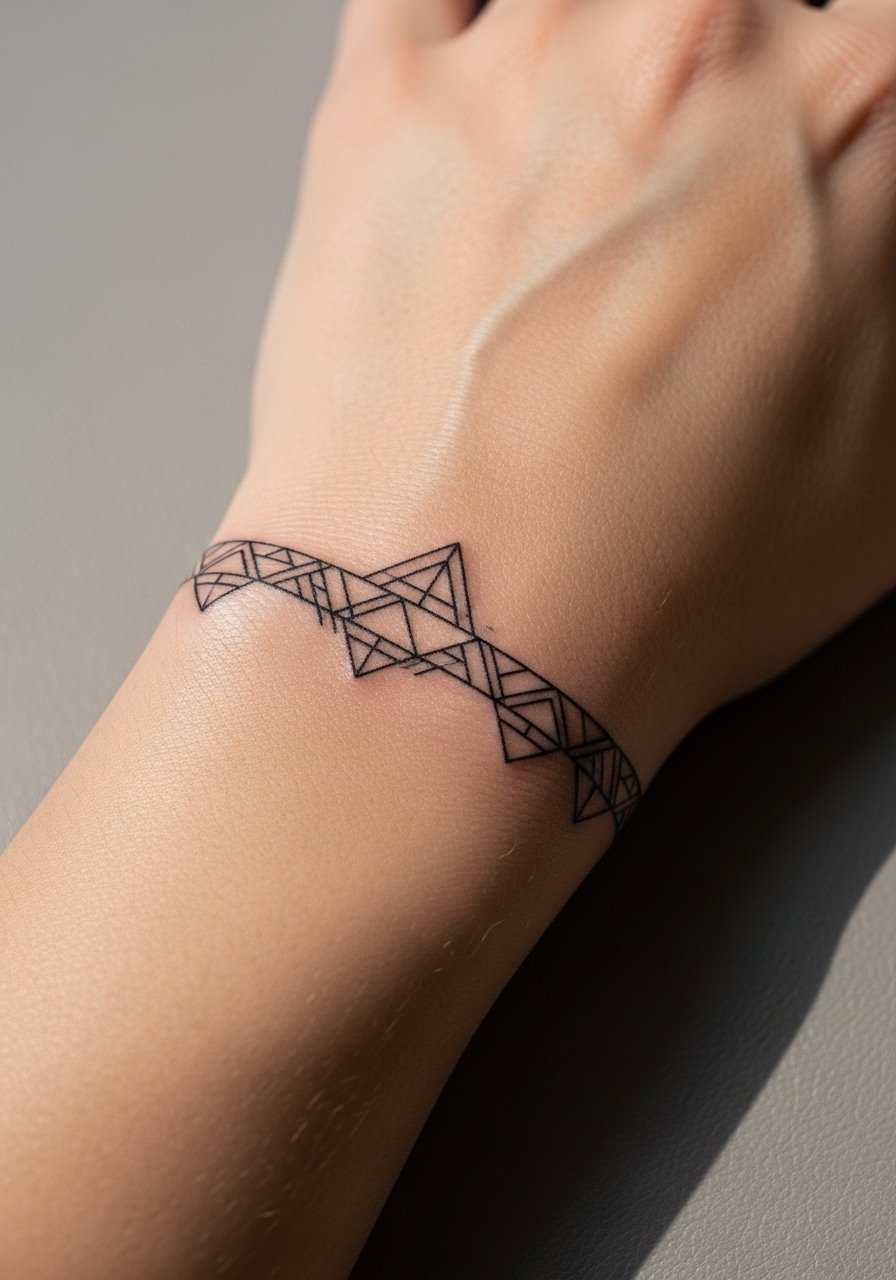
This is a classic micro sleeve starter for people building toward a patchwork forearm. The wrist is high-movement and friction-prone so expect faster fading than on the inner arm. Session time is short, usually under an hour per element, and the pain is around a 3 out of 10. The biggest mistake is making the shapes too small and packed together. Artists disagree about longevity here. One camp says fine line on the wrist blurs quickly and needs boldening early. The other camp argues careful depth and spacing make it hold up. Ask where your artist stands and plan touch-ups every 1 to 2 years. Pair it with a slim leather watch on the opposite wrist to keep attention balanced.
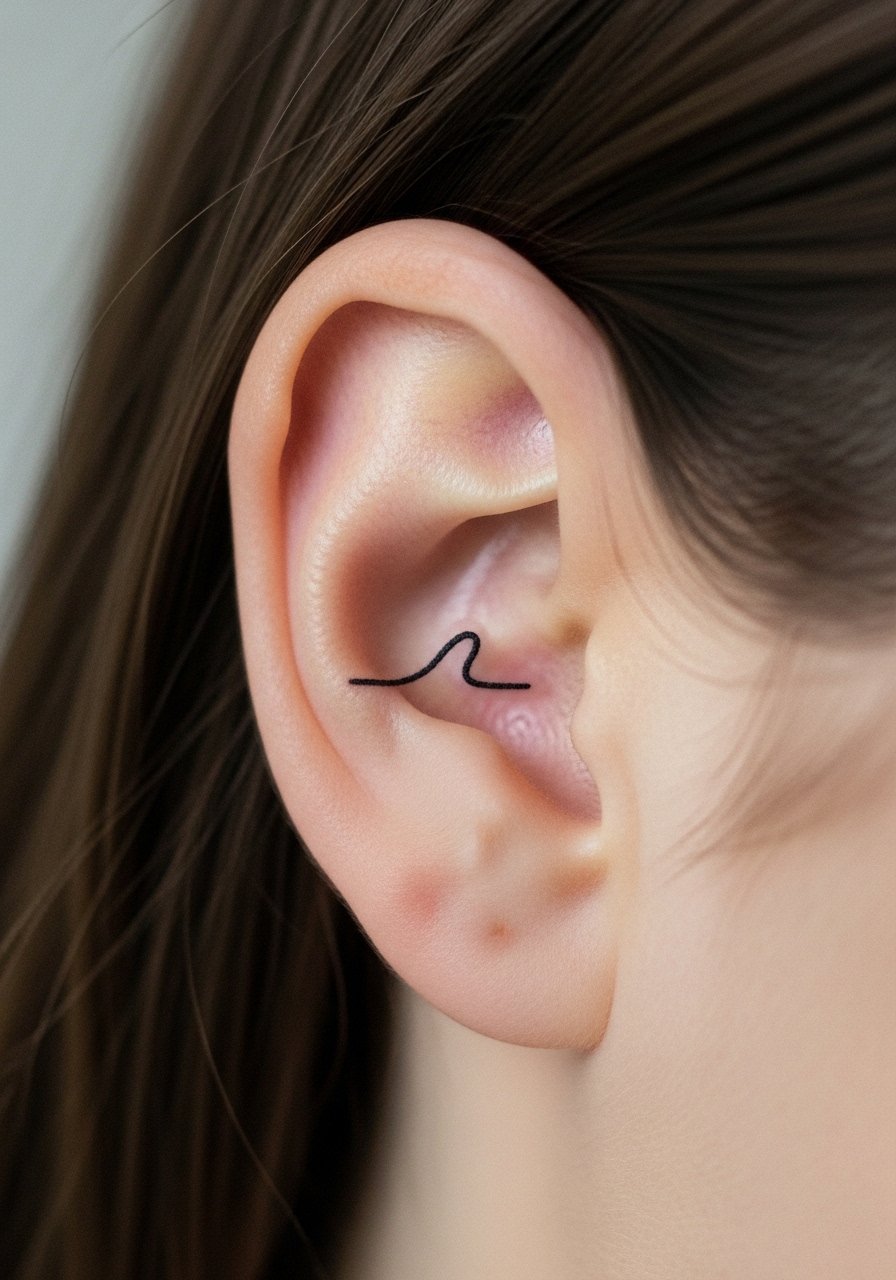
3. Botanical Micro Sketch Behind the Ear
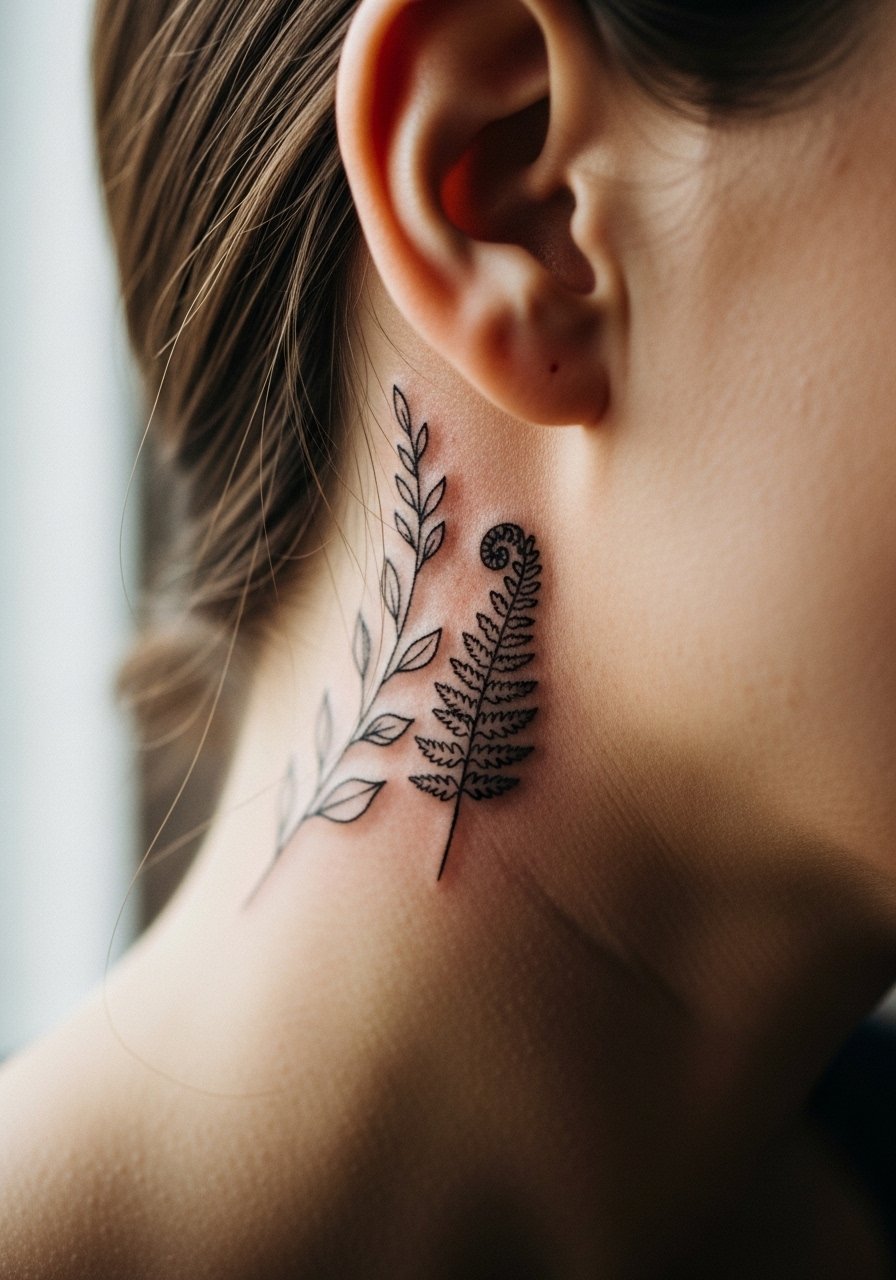
Behind-ear micros are subtle and work well if you want small visible pieces without full visibility. Expect a quick single-session appointment under an hour and low pain, often a 2 to 3 out of 10. Tell your artist to keep the stems thin but not hairline thin so the pieces survive regular washing and hair friction. A common mistake is asking for dense dot shading in that tiny space. That looks great fresh and then blurs as hair rubs the area. For the session, tie hair back and bring a basic tee. Style-wise, side-parted hair or a shaved undercut complements this placement, and a simple stud earring set can help frame it.
4. Animal Micro-Realism on the Collarbone
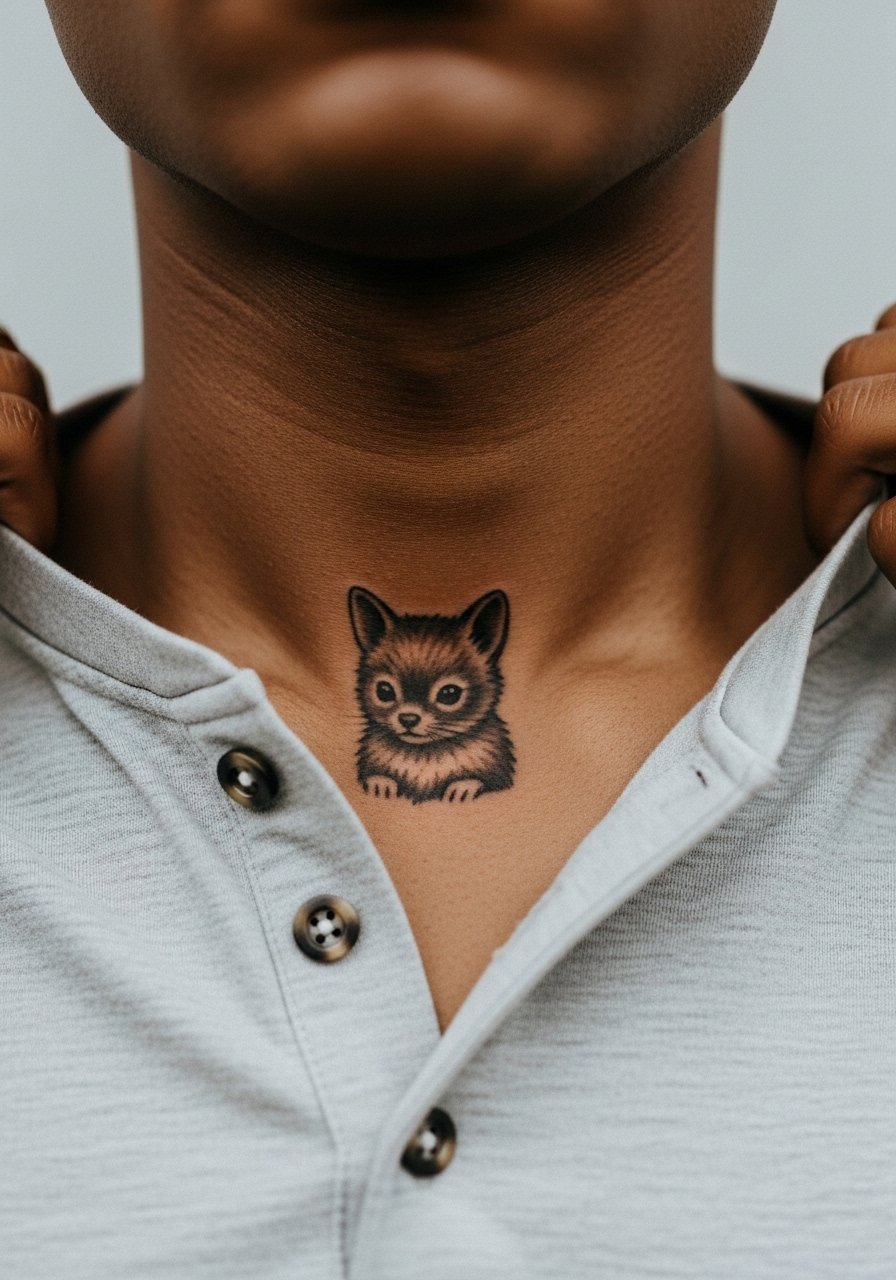
The collarbone reads high visibility and suits motifs with symbolic weight like a pet or spirit animal. Pain can climb to a 6 out of 10 because of thin skin over bone, and most micro-realism here is a one-session job of one to two hours. During consultation, specify that you want subtle contrast rather than heavy saturation, which helps prevent dense patches from turning into indistinct gray with time. A typical mistake is asking for extreme fine details without considering the bone surface underneath. For showing it off, open-collar henleys and v-neck tees frame the area well. Try an open collar henley shirt for casual reveals and easy shoulder access on appointment day.
5. Constellation Script on the Ribcage
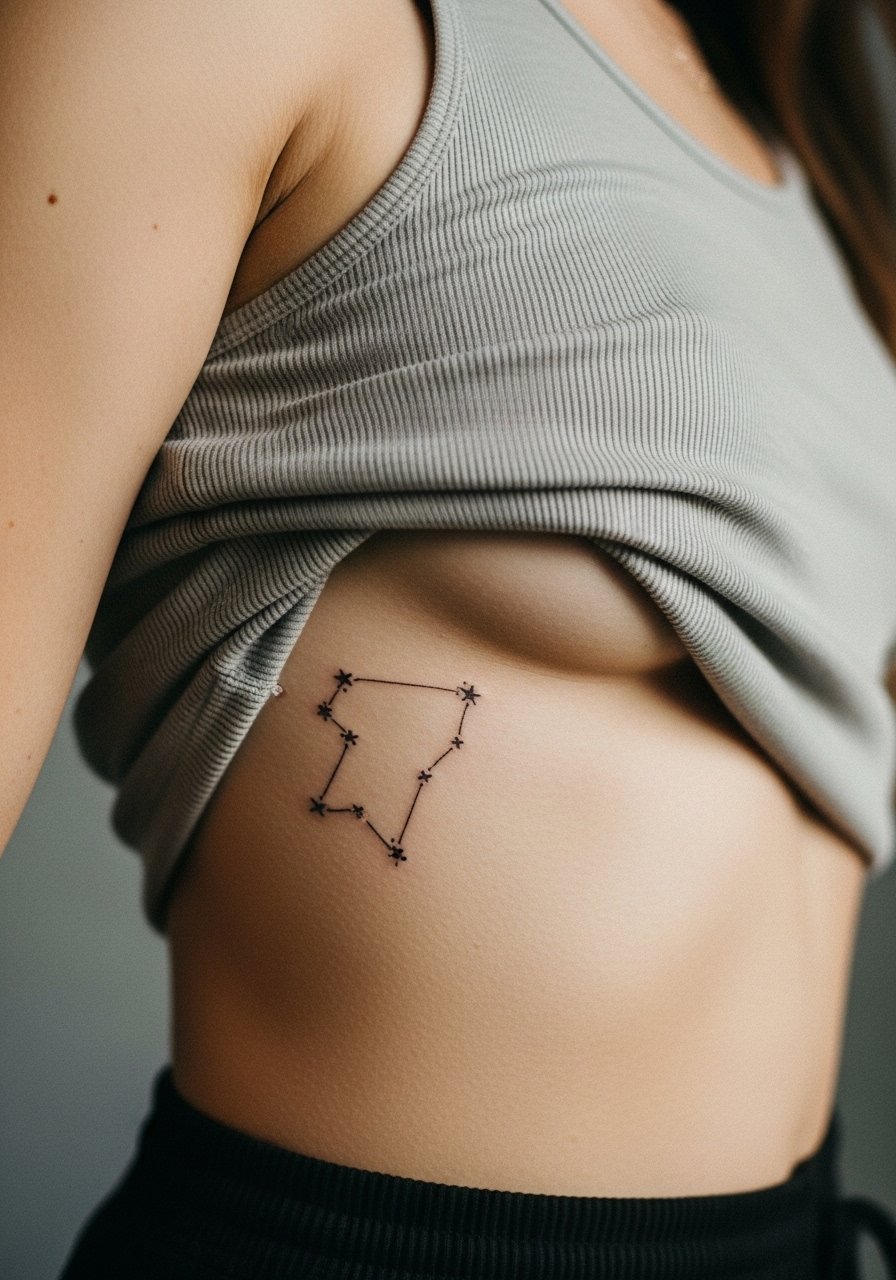
Fair warning, the ribcage is one of the higher pain spots, often a 7 to 8 out of 10, because you are working over bone and thin skin. A neat constellation or short script looks intimate and stays private under shirts, but it can blur if lines are too thin. The debate is loud here. One camp says fine line on ribs is risky because natural movement and breathing cause early blurring. The other camp says with slightly increased line weight and spacing it can last. Ask your artist which approach they prefer. Expect a single longer session and plan for a touch-up in two to three years if the design is densely packed. For sessions, wear a loose tank that lifts easily.
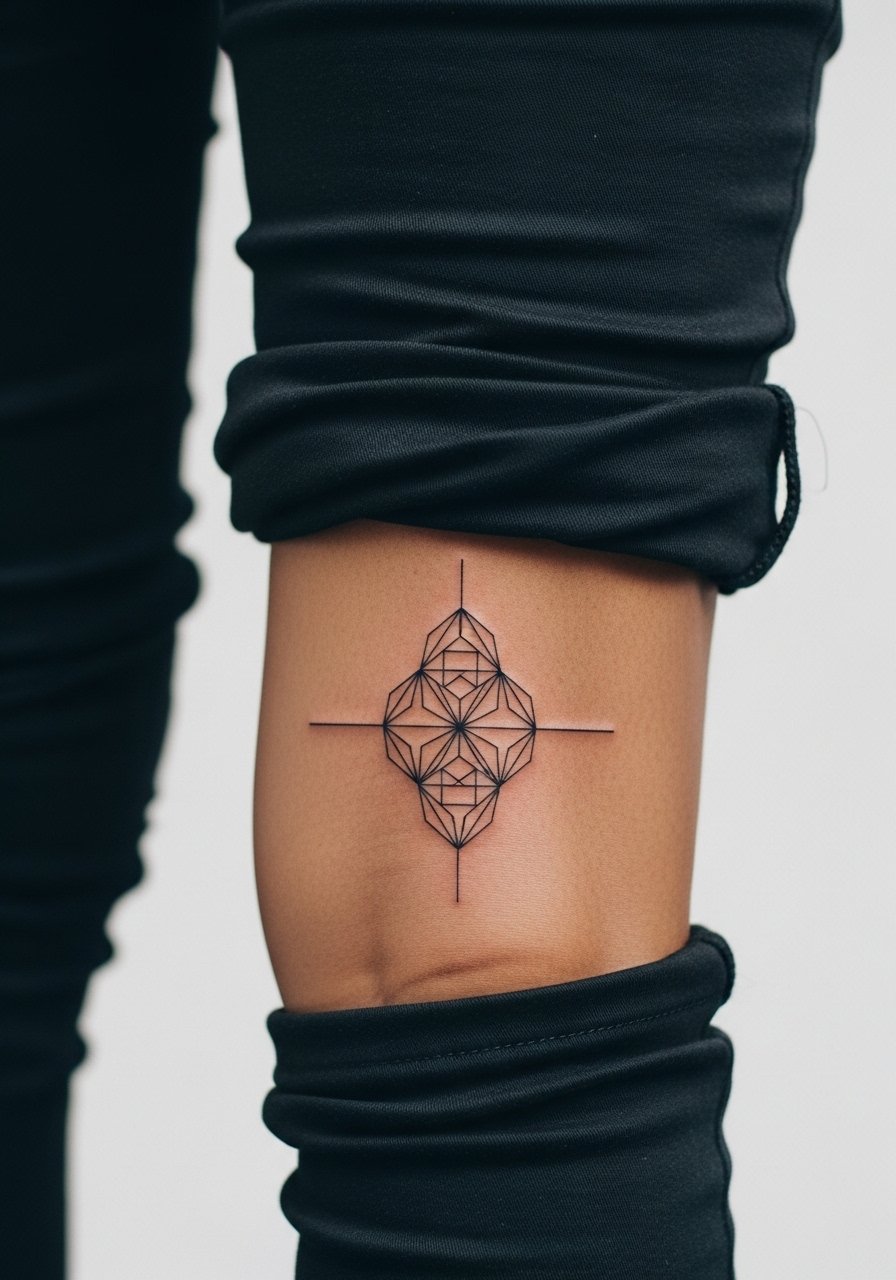
6. Minimalist Symbol Quarter Sleeve Start (Shoulder to Mid-Bicep)

This is a practical route if you want a micro sleeve without committing to a full wrap. Pain is mild to moderate, around a 4 out of 10, and the shoulder area tolerates touch-ups well. Tell your artist you want the symbols spaced so you can add connecting pieces later. Mistake to avoid is asking for tiny symbols with identical line weight, which can merge visually as more pieces get added. Expect 1 to 2 sessions depending on how many symbols you start with, and plan a touch-up at year three if you build density quickly. For showing it off, a fitted muscle tee shows the quarter sleeve cleanly while keeping a low commitment feel.
Studio Day Picks
The inner forearm portrait, wrist rows, and collarbone pieces above each ask for different prep and a few targeted items to smooth the session and first week.
-
Stencil transfer paper kit. Lets you preview placement directly on skin before the needle hits, which helps avoid small misalignments on the inner forearm and collarbone pieces.
-
Plant-based aloe healing balm. Gentle hydration for delicate fine line work after the initial protective film comes off.
-
Thin protective film roll. Useful for wrapping small wrist or finger tattoos during busy days when friction risk is high.
-
Fragrance-free gentle body wash. Cleanses healing skin without irritating the fine line and micro-realism pieces covered in the first ideas.
-
Aquaphor healing ointment. A thin layer in the first 48 hours can lock in moisture for tight micro-realism pores without clogging.
7. Delicate Line Behind-Knee Geometric
Behind-knee placement gives crisp results because the skin there is softer, but healing is tricky. Expect a higher maintenance period because friction and sweat from daily movement can irritate the area. Pain varies, often a 5 out of 10 during placement. A frequent mistake is choosing extremely intricate tessellations that need perfect stillness to sit. For longevity, ask the artist to space lines slightly and avoid dense dot shading where sweat accumulates. Plan for a touch-up at year two if you rely on very thin lines. During healing, wear loose pants and skip intense cardio. For the session, bring loose drawstring shorts or pants so the artist can work without fabric pressing on the area.
8. Micro Peony Botanical on Inner Arm
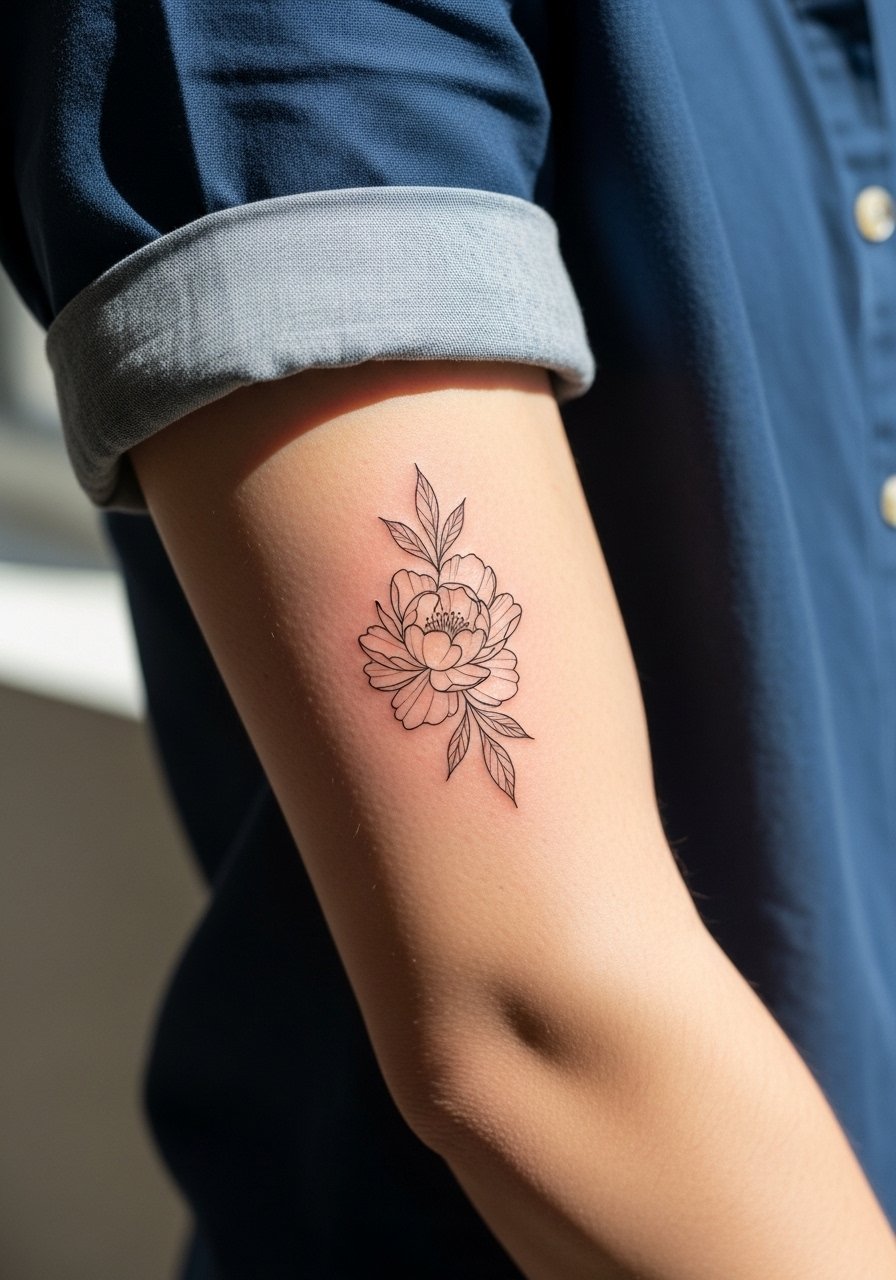
The inner arm is forgiving for botanicals and ages better than wrist or hand placements. Pain is mild, about a 3 to 4 out of 10. Ask for line variation and light stipple shading to give the peony depth without dense fills that can grey out. A common misstep is insisting on super-fine petal veins that disappear after a year. Expect the piece to hold nicely for two to three years before a softening that might need a light touch-up. For showing it off, rolled cuffs in navy or gray complement the piece without competing. Try a short sleeve button down men for casual reveals.
9. Scalp Micro Design Outline
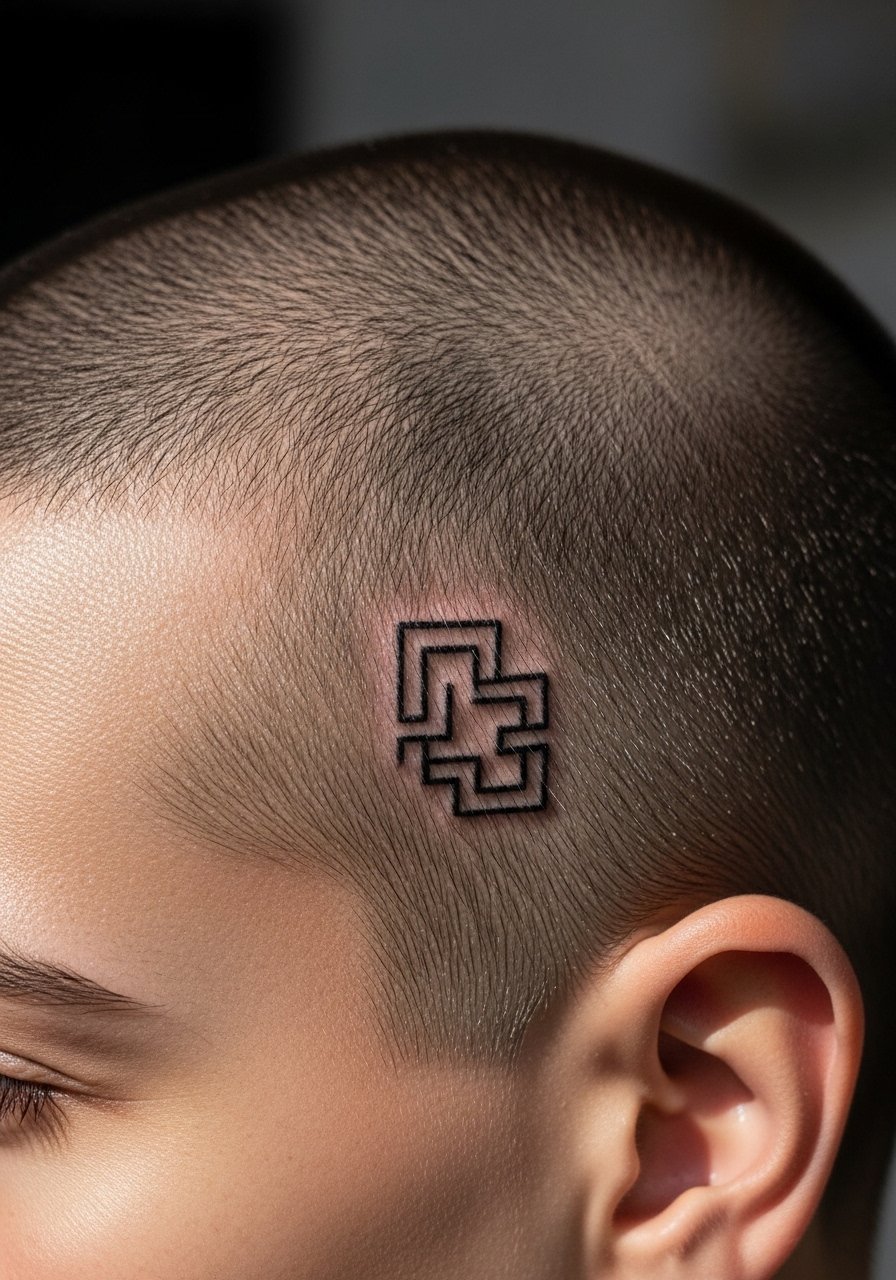
Scalp micros are for people who want maximum discretion with a bold personal marker. Expect a quick appointment but a different sensation because the needle is working on thin, fibrous skin and nerve endings. Pain is variable, often a 6 out of 10 for sensitive scalps. Tell your artist you want simple outlines rather than dense shading. A common mistake is asking for detailed textures that read muddled once hair regrows. Scalp tattoos may need more frequent touch-ups than arm work because of sun exposure and hair growth patterns. For discovery, search hashtags and local directories to find artists who do scalp work.
10. Inner Ear Tiny Icon
Inner ear icons are low-commitment and great as a first test of micro work. Sessions are extremely short and pain is low, usually a 2 out of 10. The mistake people make is expecting extremely crisp detail at that scale. Ask for a bold outline with minimal internal detail so the icon keeps its shape. Longevity is good because the area sees little sun, though cleaning and aftercare matter. For the appointment, keep hair tied back and wear a casual tee. The design is discreet so you can decide later if you want matching pieces on the other side.
11. Wrist Micro Animal Portrait
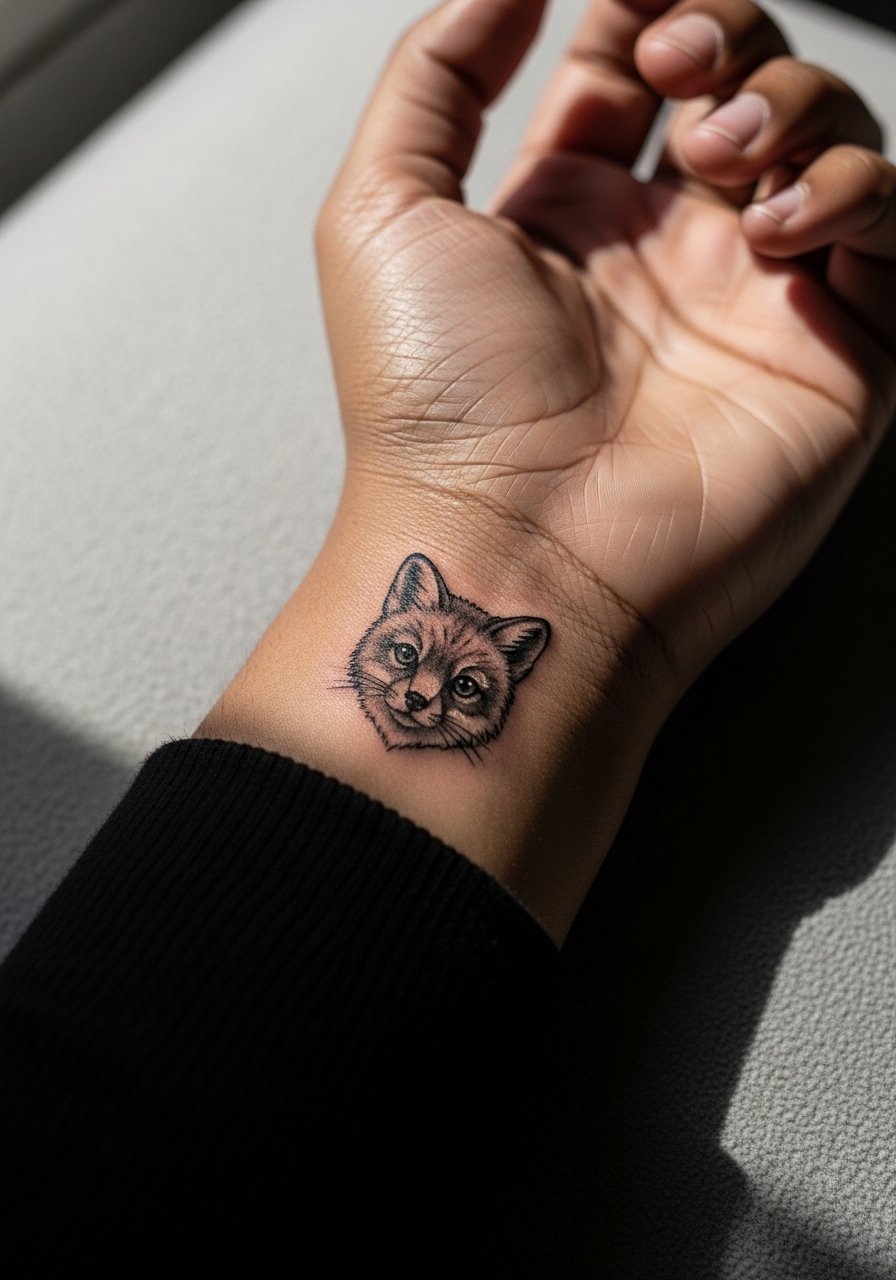
Wrist portraits are a daily-visible option but the wrist is a high-fade zone. Expect a 1 to 2 hour session and pain around a 3 to 4 out of 10. One mistake is asking for extreme micro detail without spacing. Tell the artist to emphasize midtones and slightly bolder contour lines so the portrait keeps its character as it ages. Touch-ups are more likely at year two for wrist work. For showing it off, wear a minimalist watch on the opposite wrist and keep bands slim so the tattoo remains the focal point. A minimalist leather strap watch pairs well.
12. Forearm Row of Micro Botanicals

Building a forearm row is a smart way to grow toward a patchwork micro sleeve. Pain is low to moderate, session time varies by how many pieces you add, usually 30 to 90 minutes per sitting. The key is rhythm. Ask for consistent spacing and a unifying scale so new additions read cohesive. A common error is random scaling where one sprig is tiny and the next is oversized, which makes future fills awkward. Over five years expect softening in the tiniest strokes and plan touch-ups as you add density. For session comfort, wear a loose long-sleeve tee you can push up easily.
13. Minimalist Outline on the Scalp Nape
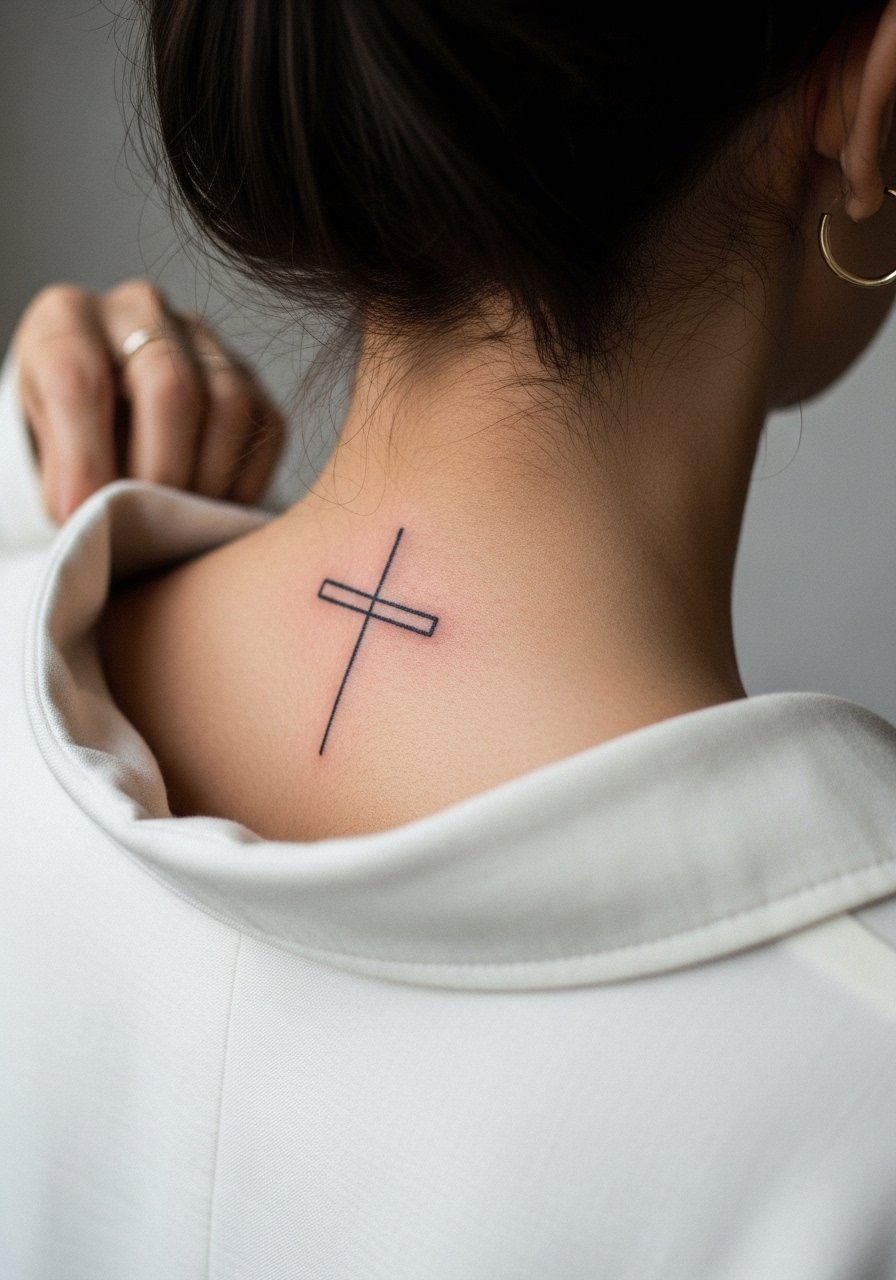
A small nape outline is discreet with strong impact when hair is short or tied up. Pain is moderate, often a 4 out of 10. The mistake is placing dense shading where the skin moves with neck motion. Ask for clean outlines and minimal internal work. Healed results last well but may require a touch-up because the area sees frequent friction from collars and hair. For showing it off, a wide-neck shirt or short haircut exposes the piece thoughtfully.
14. Geometric Mandala Quarter Patch on Upper Arm
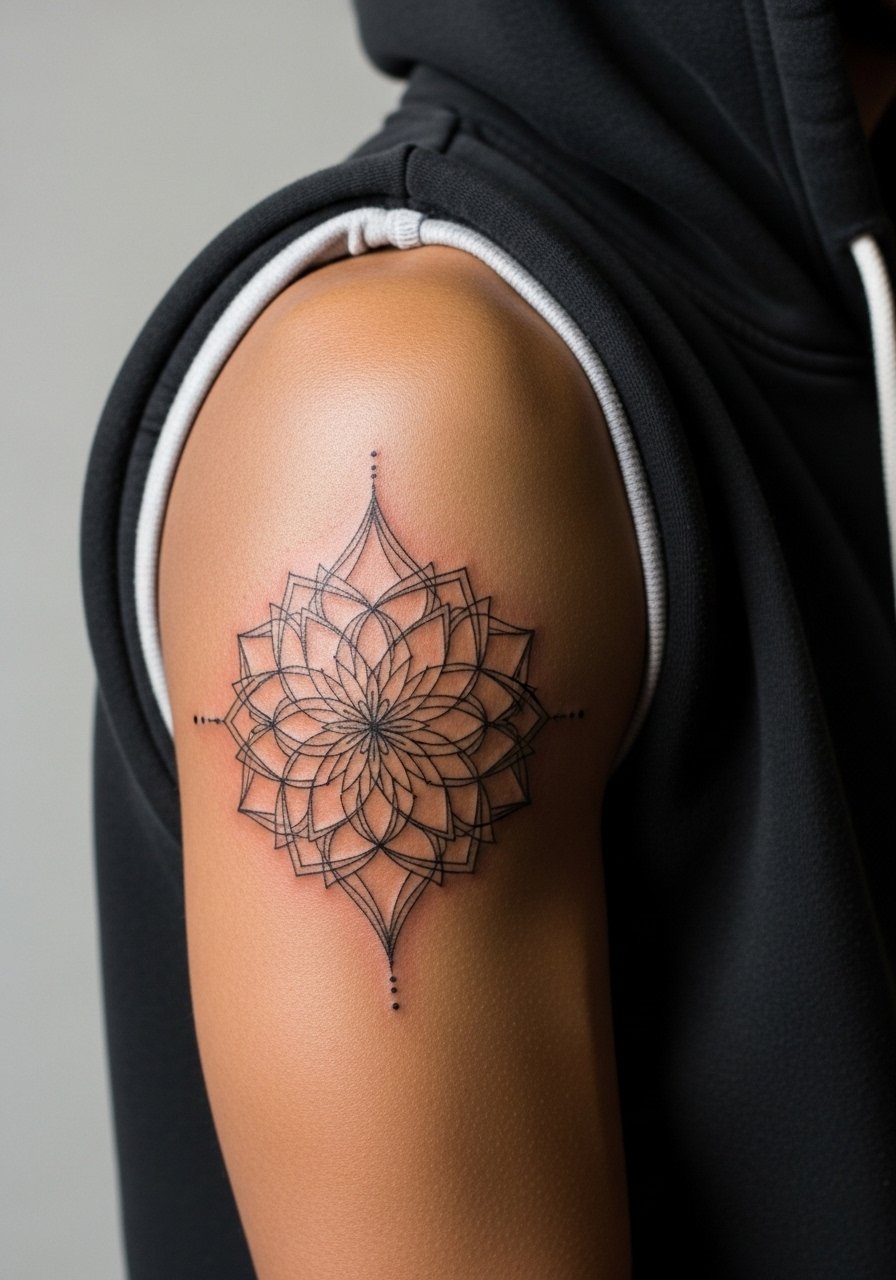
Upper-arm geometry gives mandalas room to breathe and ages more predictably than wrist or ribcage placements. Pain is mild at roughly a 3 out of 10. The consultation note should request spacing between concentric lines because small dense rings will turn into a gray area over time. An error people often make is shrinking the mandala to fit a small space. Keep it large enough and the pattern will remain readable at year five. Session time varies, but small mandala patches are typically one session. For session wear, a loose tank keeps the area accessible.
15. Single-Line Mountain Range Along the Forearm
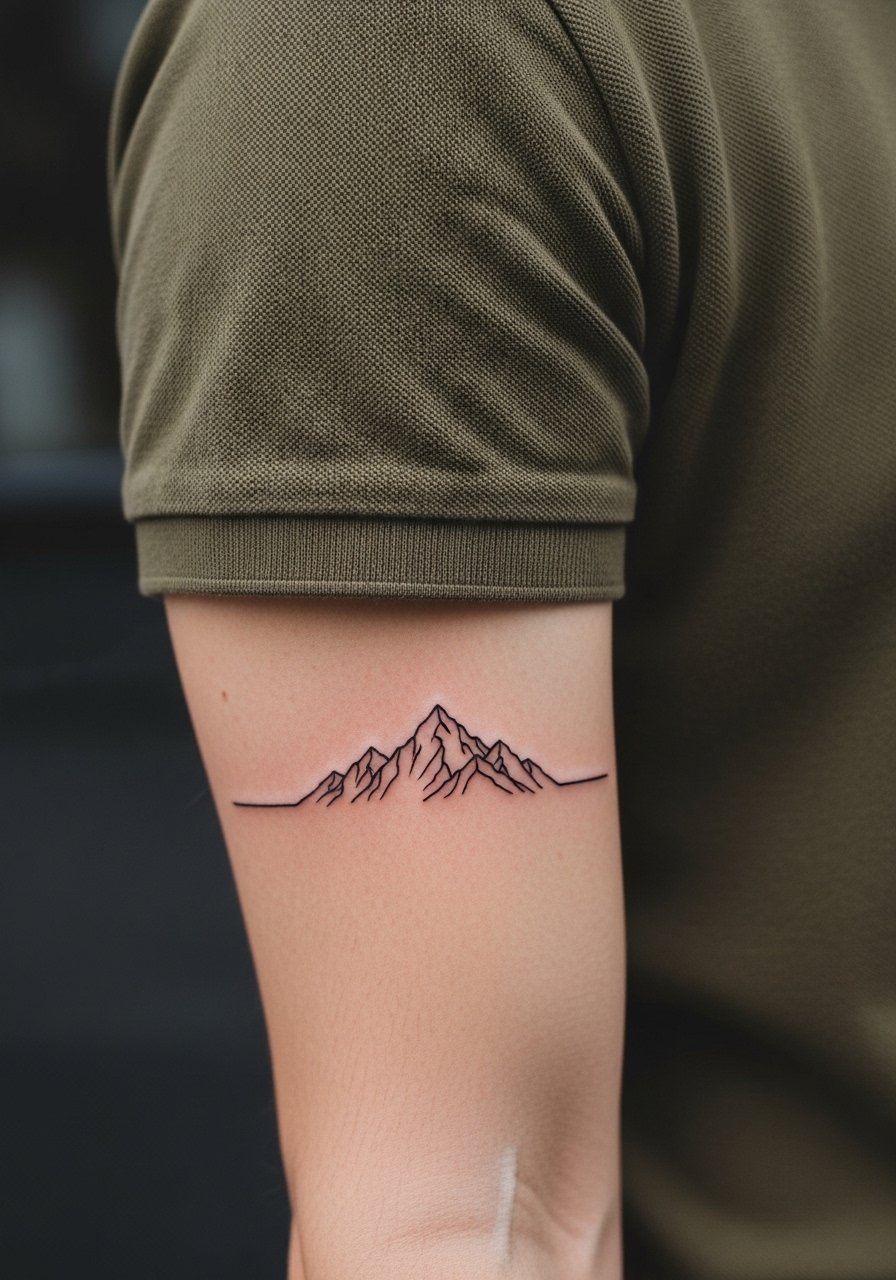
A continuous single-line motif reads well across the forearm and gives a sleeve-like flow without filling the whole arm. Pain is low and sessions are quick. The common mistake is making the line too thin where the peaks cluster. Ask your artist to keep slight variance in weight so peaks remain distinct after healing. Expect stable results for three to five years provided you avoid sun damage. For show-off pairing, rolled-sleeve polos in earth tones complement the linear aesthetic. Try an olive slim fit polo for a clean frame.
16. Small Script Band Around the Forearm
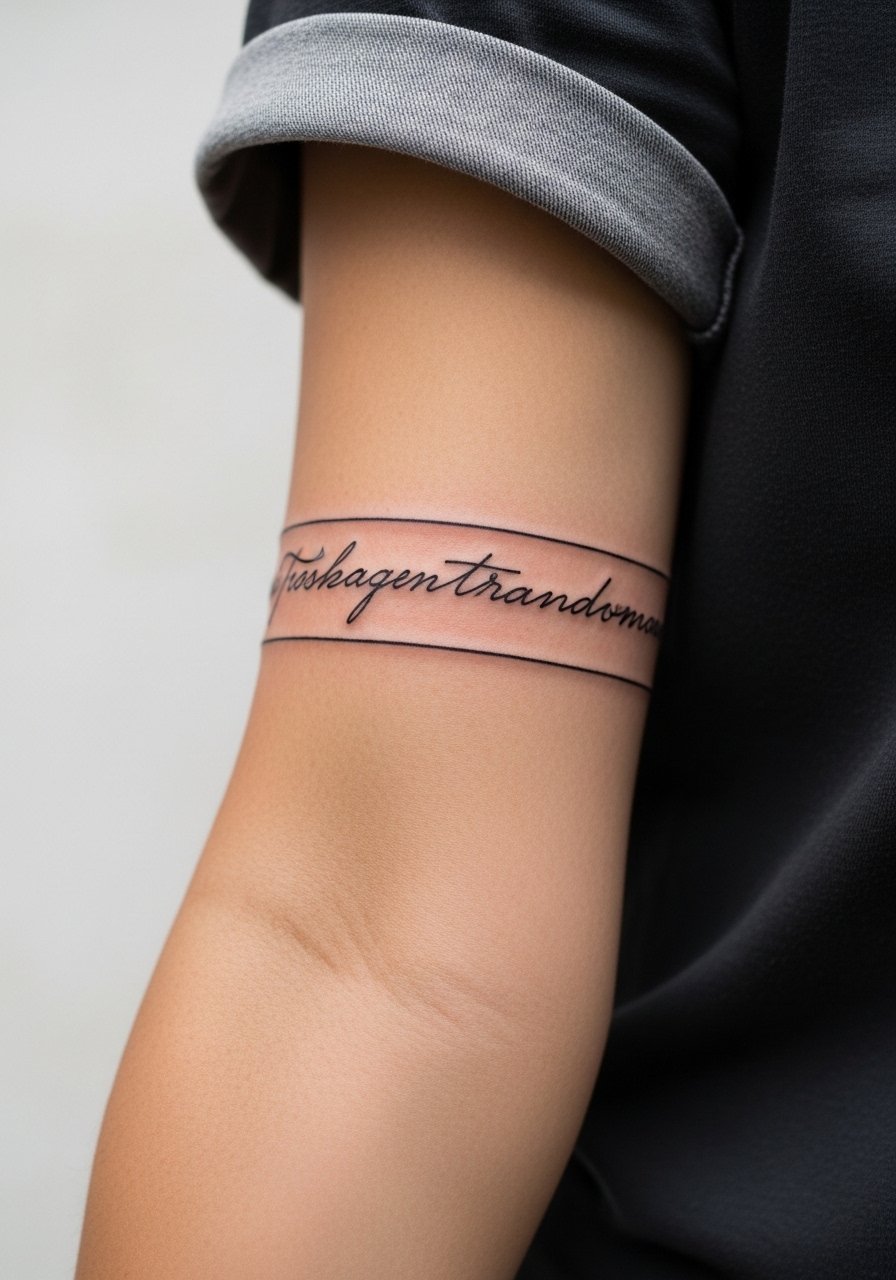
A minimalist script band works as a micro sleeve anchor when the lettering is spaced for longevity. Pain is low and session time is short. Avoid very thin cursive that loses letter counters with age. Ask for a slightly heavier stroke on letters that carry weight so readability remains at year three. The common mistake is requesting tiny, dense cursive that looks unreadable later. For the session, short sleeves are ideal, and for daily wear a thin chain pendant keeps the neck area visually balanced when combined with arm text.
17. Tiny Nautical Row Along the Wrist Edge
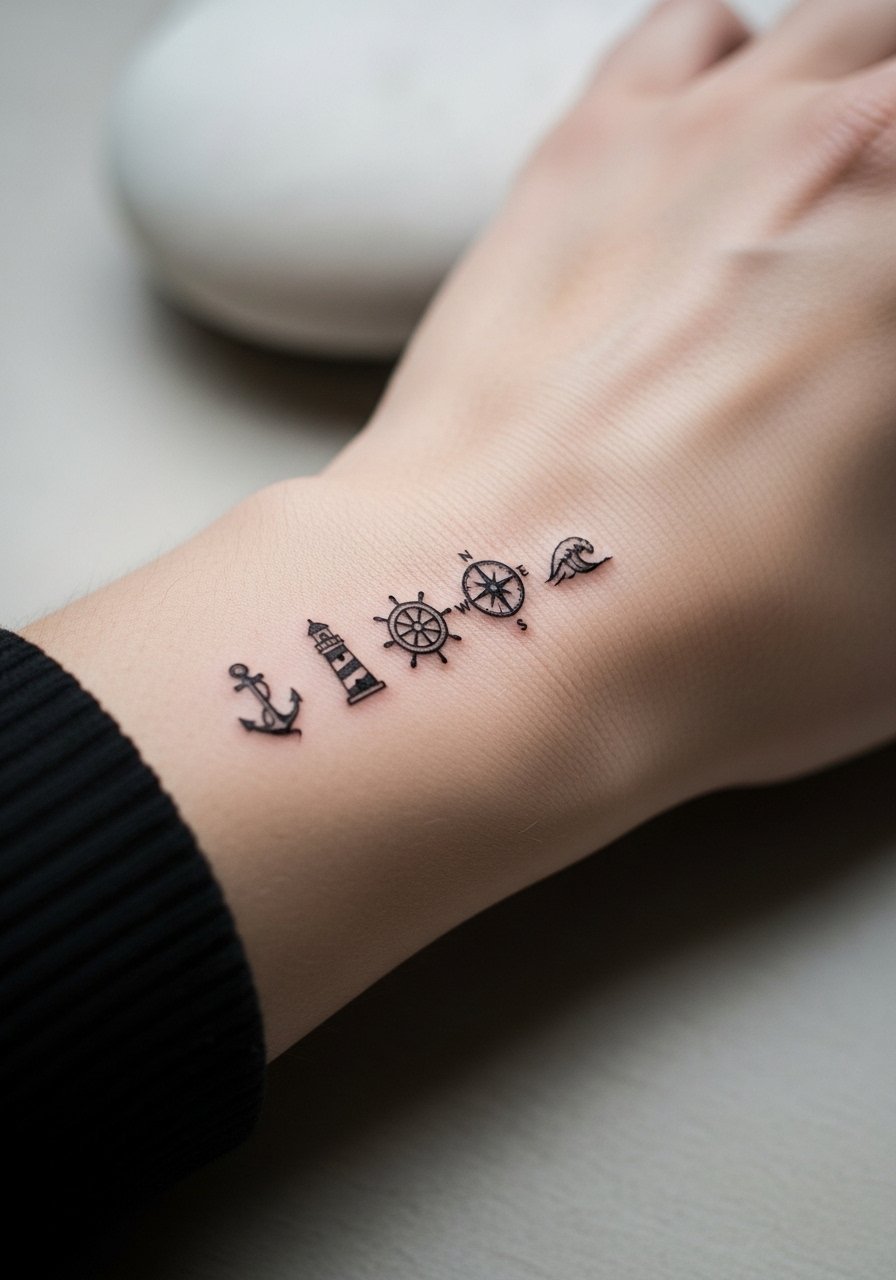
A small nautical row adds a sleeve hint without full commitment. The wrist edge is high-traffic so expect faster fading. Sessions are short and pain is mild. The mistake is packing too many motifs in a tight band. Leave breathing space between symbols and plan touch-ups every 1 to 2 years. For styling, a thin leather cuff bracelet on the opposite arm balances the composition and keeps the wrist band from feeling isolated.
18. Fine Line Arrow Cluster on the Inner Forearm
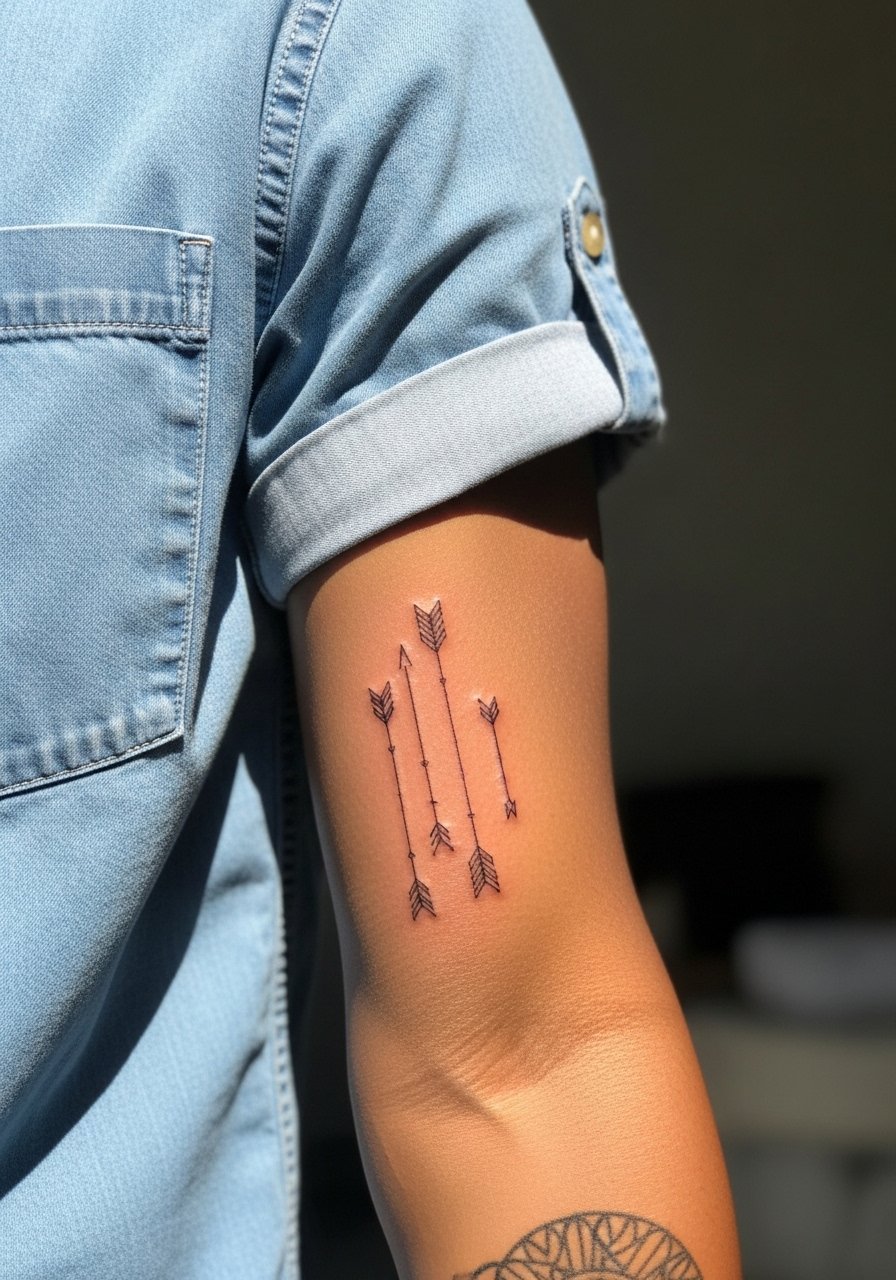
Arrows are classic micro motifs that age cleanly if given room. Inner forearm is forgiving so minor softening still reads as intent. The main mistake is making each arrow identical in size and pitch. Ask your artist to vary angle and spacing for movement and longevity. Sessions are brief, and touch-ups are minimal unless you add density. For session day wear, a short-sleeve button-up gives good access while keeping things casual.
19. Micro Script Coordinates Near the Collarbone
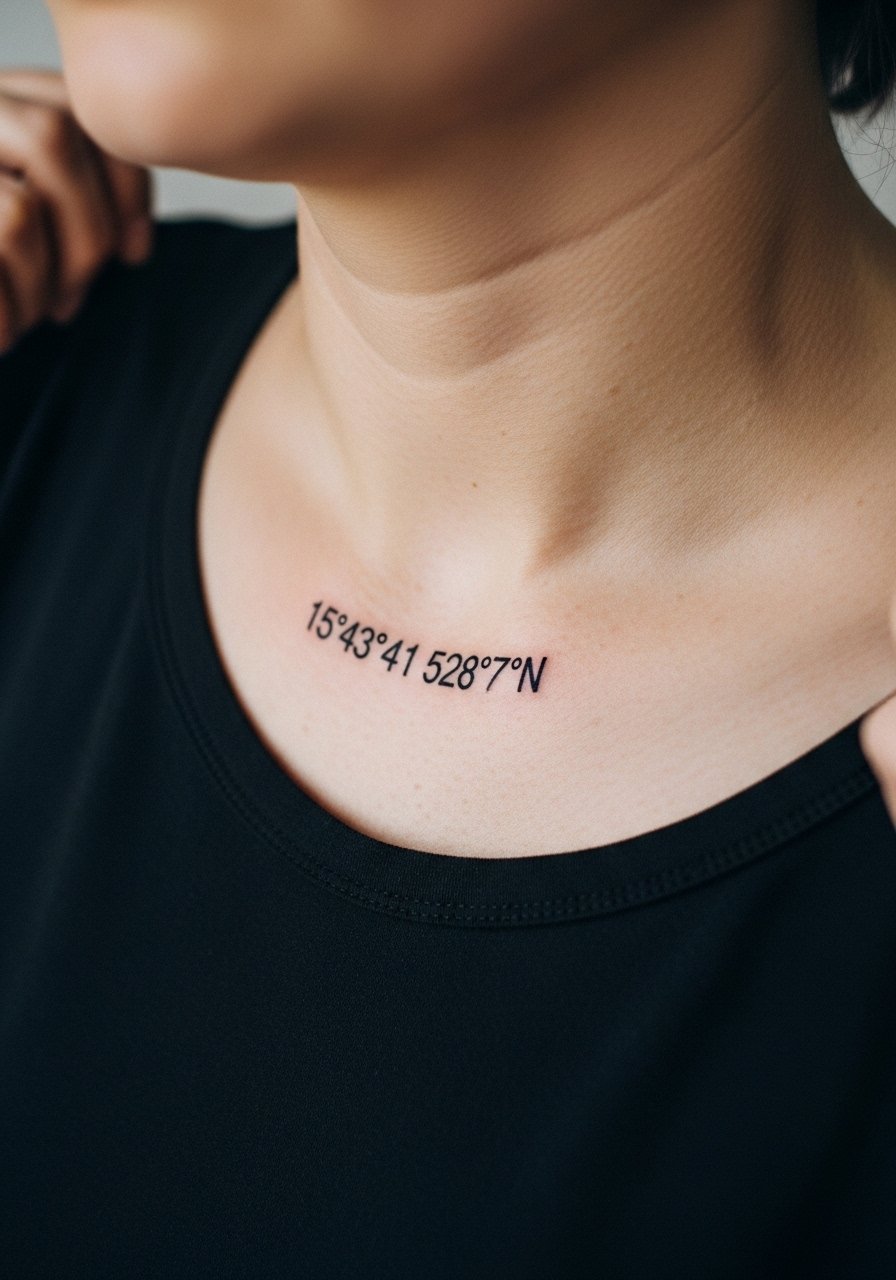
Coordinates make tidy, discreet markers and the collarbone placement elevates visibility. Expect moderate pain and a concise session. The common error is tiny lettering with tight kerning. Ask for slightly larger numerals or spacing so the numbers stay legible at year five. For showing the piece, open-collar shirts and v-necks work well. A v neck cotton tee men is easy for layering and subtle reveals.
20. Delicate Dot Work on the Inner Bicep
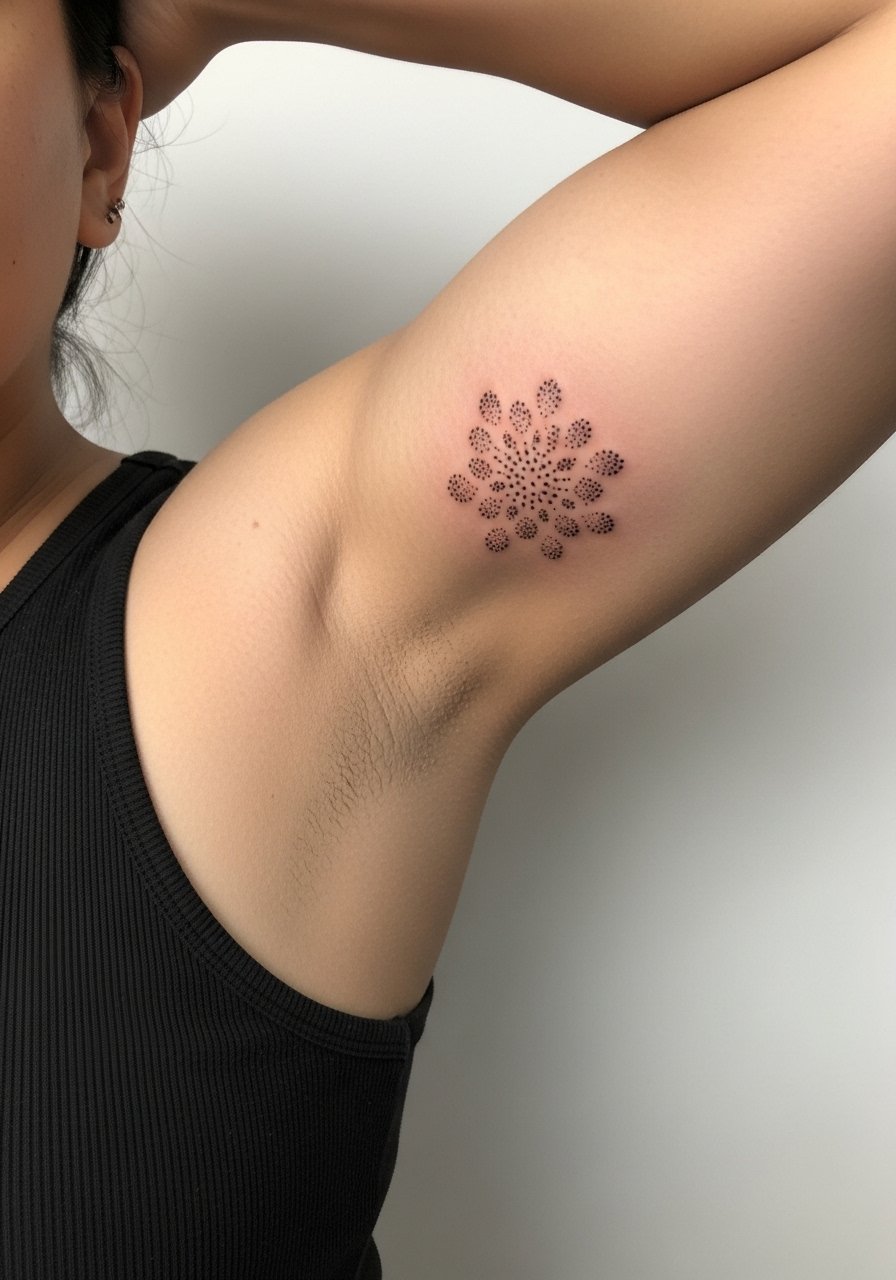
Inner bicep pieces sit in a protected spot but can be tricky because of arm motion. Expect a moderate pain level and a one-session appointment for small clusters. The mistake is overusing dense stippling in a tiny area. Ask for wider dot spacing to prevent the dots from merging into a patch over time. Healed results can look consistent for several years, but heavy density will need a touch-up after two to three years. For the session, wear a loose tank top to let the artist work without fabric interference.
21. Ankle Constellation with Subtle Linework
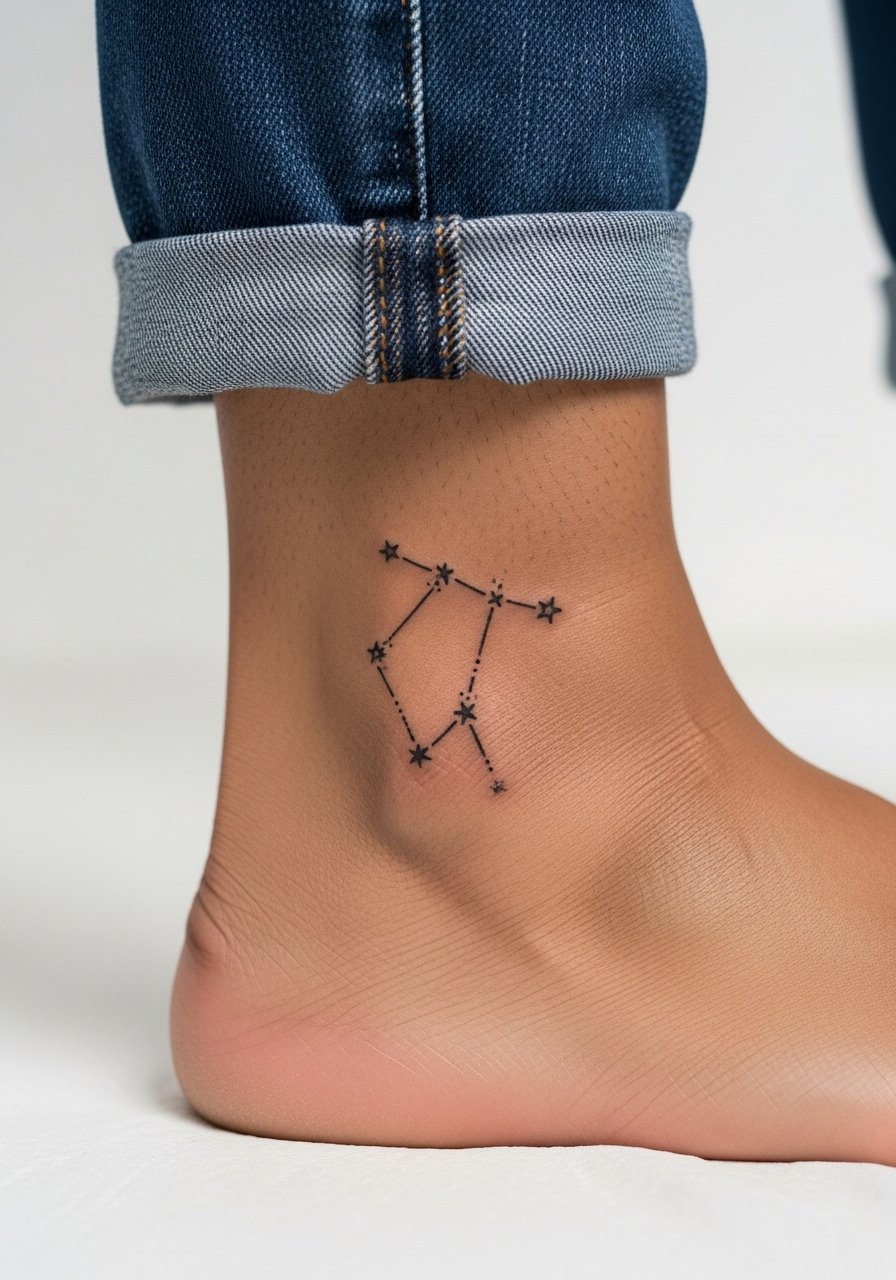
Ankle constellations are a low-visibility option that can still contribute to a micro sleeve across the leg and lower arm. Expect a short appointment and mild to moderate pain. A frequent misstep is choosing ultra-fine star dots clustered too tightly. Ask your artist for small gaps between points and slightly bolder pinpricks so the pattern keeps definition as you wear socks and shoes. Touch-ups may be needed sooner than forearm pieces because of constant rubbing. For showing off, roll pant cuffs or wear sandals that frame the ankle cleanly.
Frequently Asked Questions
Q: Will micro-realism portraits on the forearm hold up better than fine line pieces on the wrist?
A: It depends on placement and spacing. Micro-realism can hold up well on the inner forearm because there is less direct friction and sun exposure. Fine line on the wrist faces more movement and rubbing, so expect more frequent touch-ups. Talk to your artist about slightly increasing contrast and spacing for either placement.
Q: Are ribcage fine line pieces worth the pain and touch-up trade-off?
A: Artists split into two camps. One group says ribs are too mobile for tight fine line and that blur shows quickly. The other group argues that with correct depth and spacing, ribs can look excellent for years. If you pick ribs, plan for a higher pain session and a likely touch-up window around year two or three.
Q: How often should I plan touch-ups for a growing forearm micro sleeve made of botanicals and small portraits?
A: Expect touch-ups every 1 to 3 years depending on each piece and sun exposure. Botanicals on the inner forearm usually need less frequent work than wrist portraits. Build touch-up time into your plan when you schedule additions so the whole area stays cohesive.
Q: What should I wear to a session for shoulder to mid-bicep work so the artist has access?
A: A sleeveless hoodie or a sleeveless hoodie you can easily remove or pull off one arm is perfect. Loose fit keeps fabric from pressing on fresh ink while you get settled.
Q: Do scalp and nape micros require different aftercare or artists with special experience?
A: Yes. Scalp and nape areas need an artist comfortable with hair-bearing skin and the particular risks of ingrown hair and sun exposure. Expect slightly different healing advice and possibly more regular touch-ups because hair growth patterns and sun exposure affect how the ink ages.
