
Fine line and tiny motifs are trending, but a lot of small henna pieces fade or smear faster than people expect. Uneven application, quick fading without sealing, and confusing placement choices cause the most regret I see when folks try DIY or pick a flash without thinking it through. Below are 21 small, simple henna ideas that handle those problems, with what to ask for in a consultation and how to show them off.
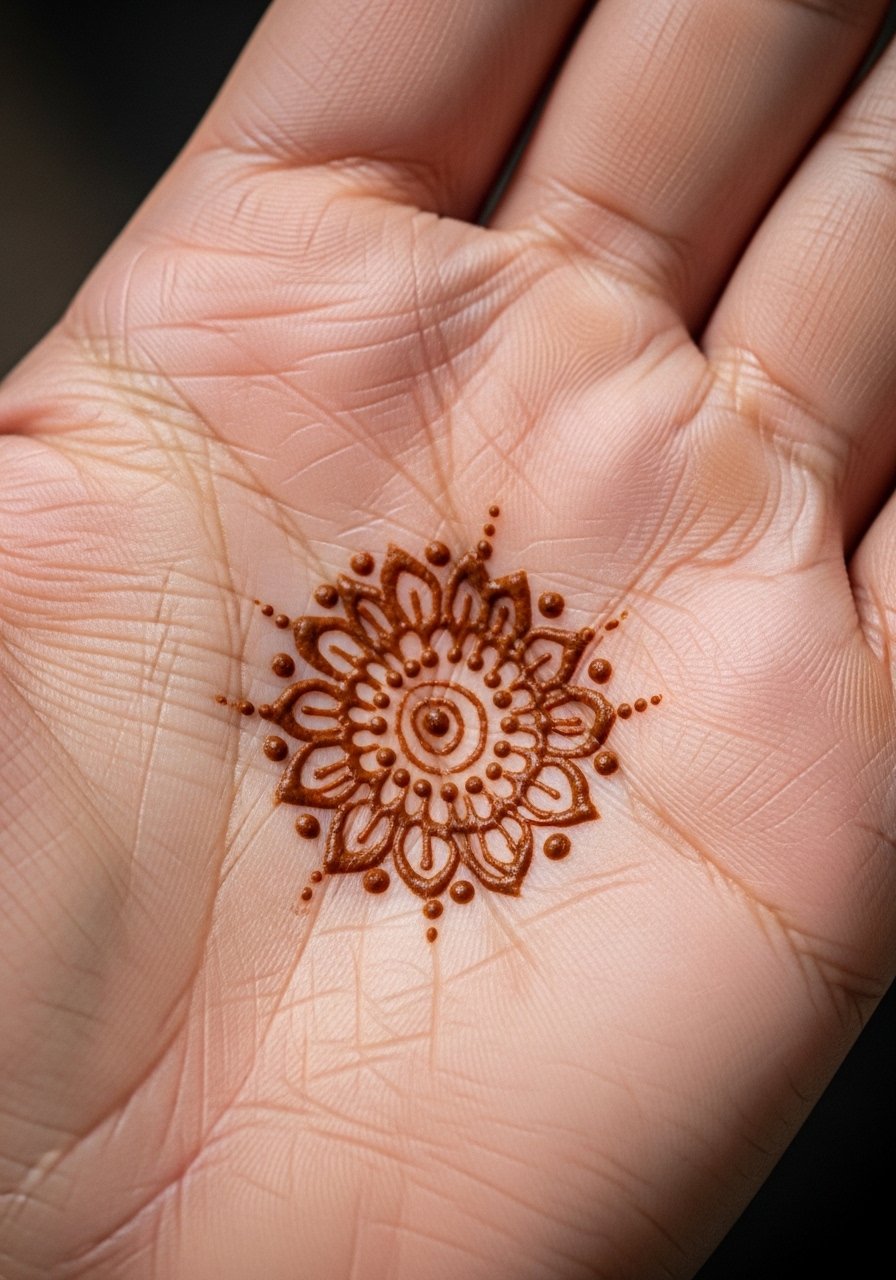
1. Simple Palm Henna Circle Design
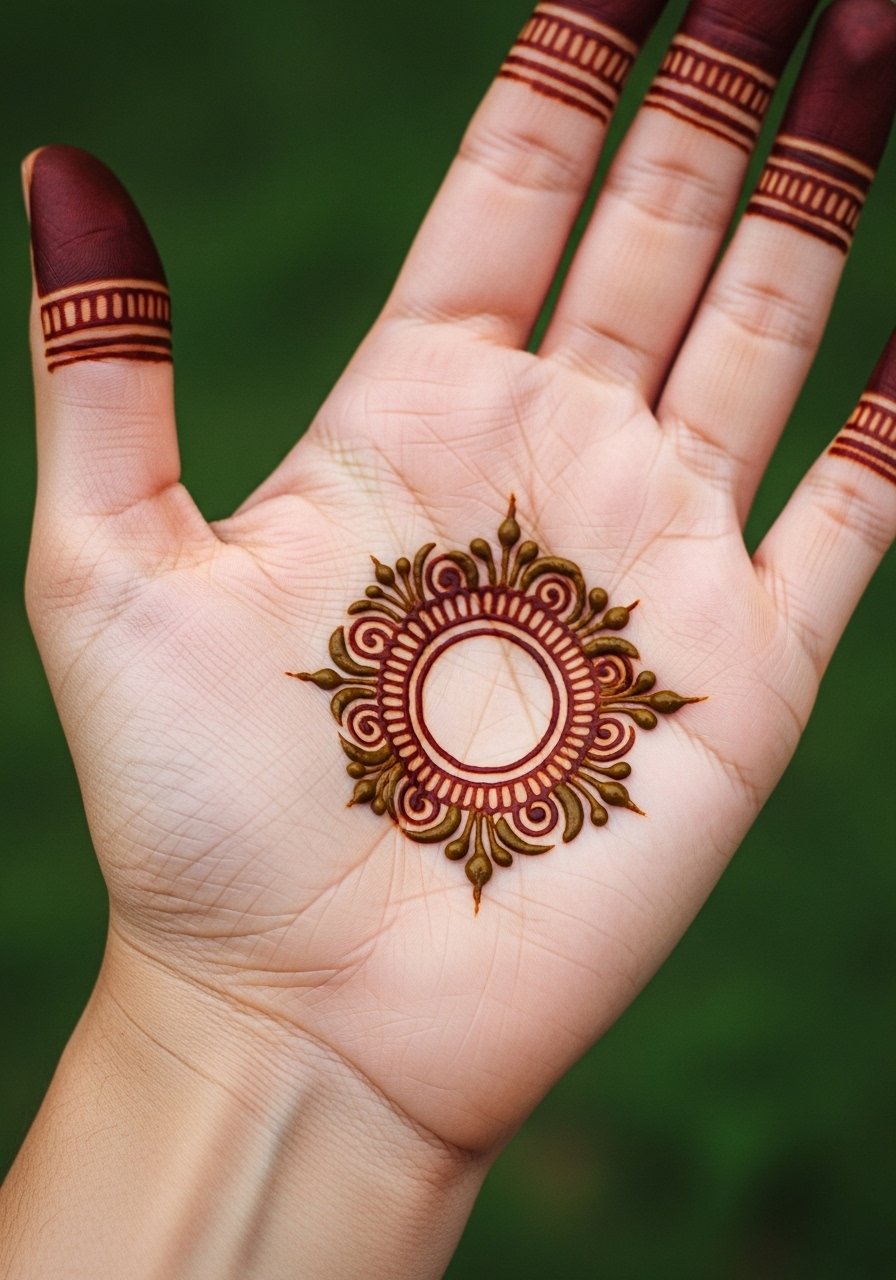
I recommend this for someone who wants a bold stain in a tiny footprint. Tell the artist you want a 2 to 3 inch single-session circle with solid inner fill and a thin outer ring so the palm develops contrast as it heals. Common mistakes are making the inner details too tight, which blurs as the palm sheds quickly, and asking for too many dots that trap moisture. Pain is negligible for the palm in short sessions. For showing it off, open-palm poses work well with a neutral nail polish set and sleeveless tops for full visibility. Expect the darkest stain at 48 hours and gradual lightening after one to two weeks.
2. Half Flower Henna on Side of Hand
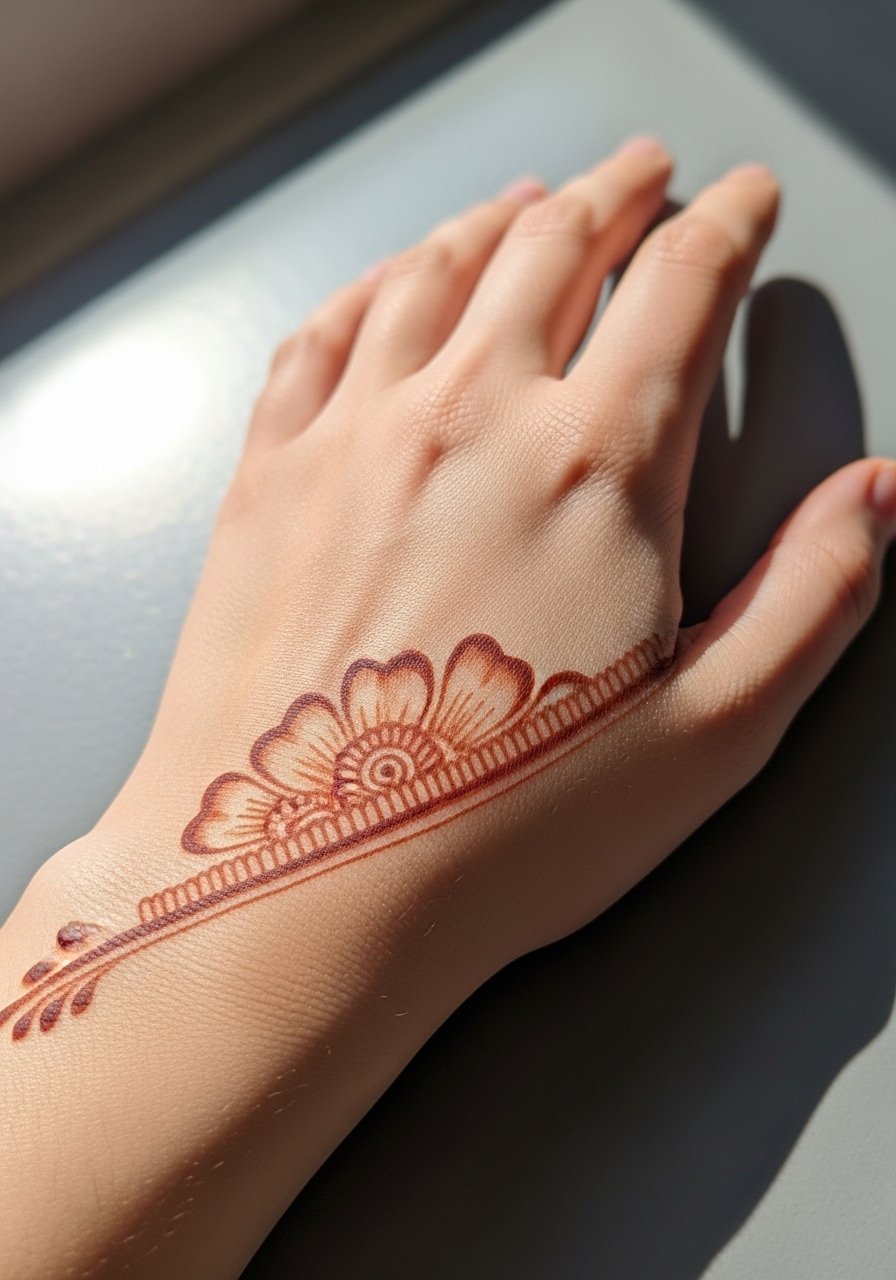
This edge placement reads elegant without covering the whole hand. Ask for scallop-shaped petals with a tiny dot trail toward the wrist to keep the shape readable as the stain fades. A common mistake is placing petals too close to the knuckle line where movement breaks the design. Session time is brief, under 20 minutes, and pain is low. For showing it off, stack thin rings on other fingers and pair with a boho blouse with rolled cuffs so the edge sits against fabric rather than rubbing. This design ages well for about a week to ten days before softening.
3. Paisley with Dots
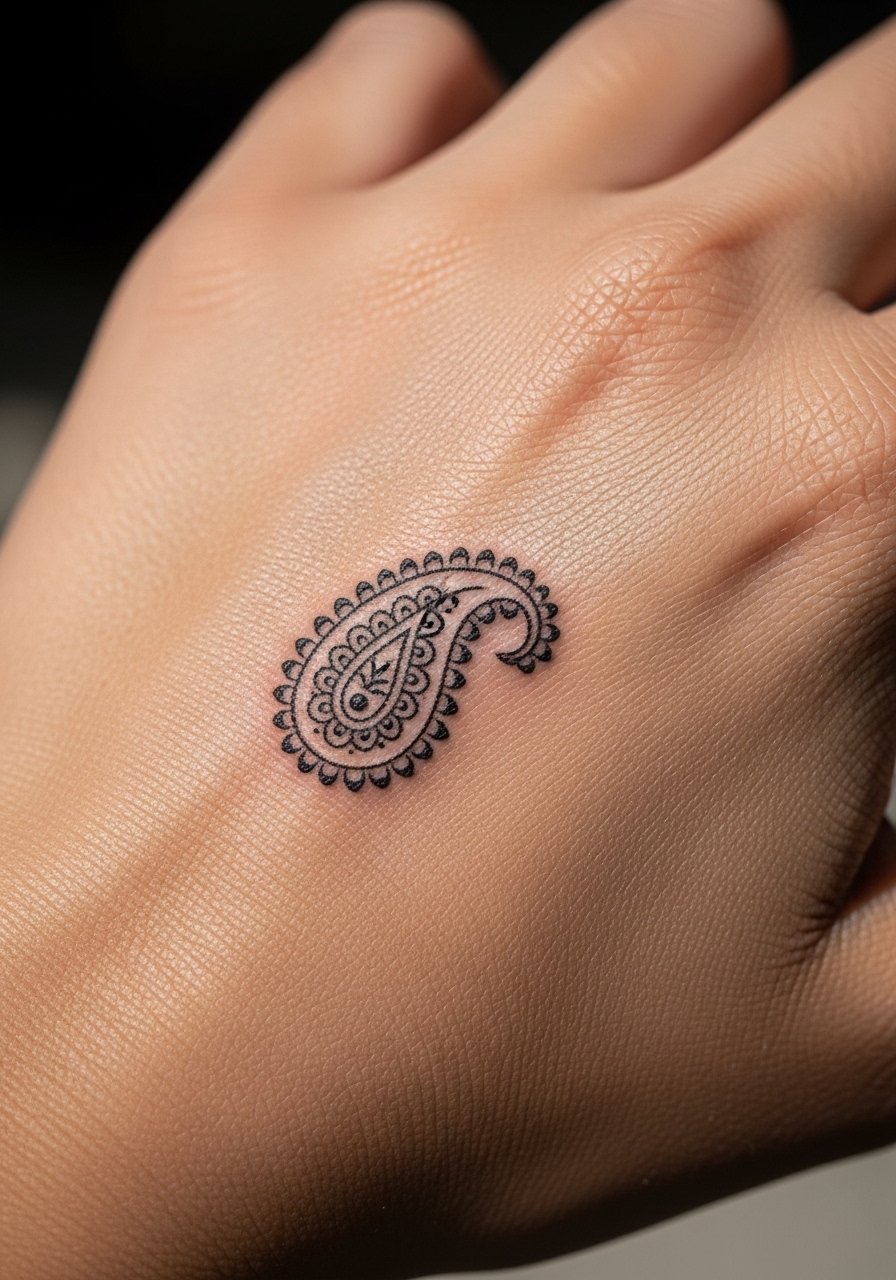
Paisley is a reliable practice piece if you want to build control over curved linework and tiny fillings. Ask for a single teardrop with two concentric inner details and a dot trail to anchor the shape. The mistake I see is over-detailing the interior, which fills in on hands. This placement has moderate blowout risk if the artist presses too deep because back-of-hand skin is thin. Session time is 15 to 30 minutes. Pair it with a stacked bracelet look using a dainty bracelet stack to frame the design without covering it. Expect the dots to remain legible longer than dense shading.
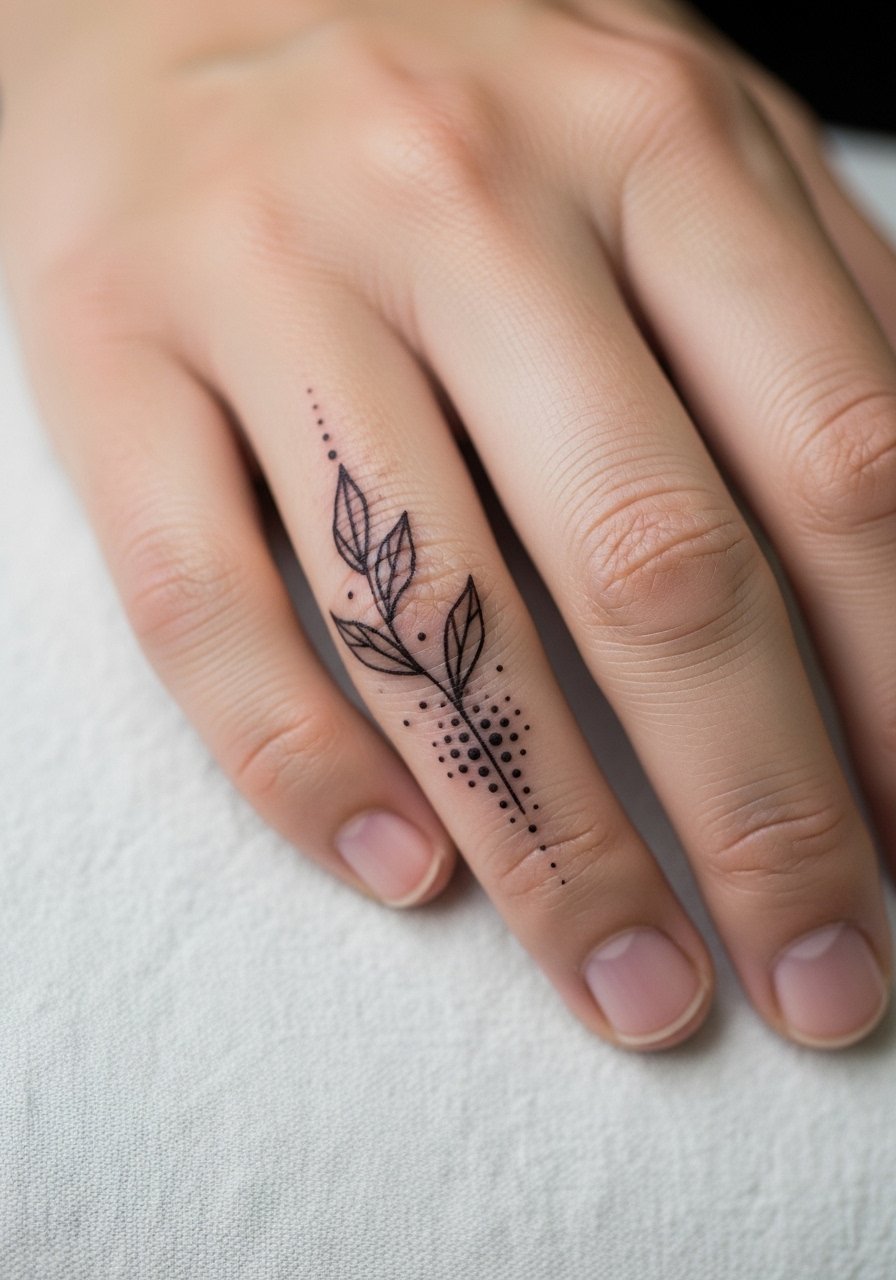
4. Tiny Vine Extension from Wrist
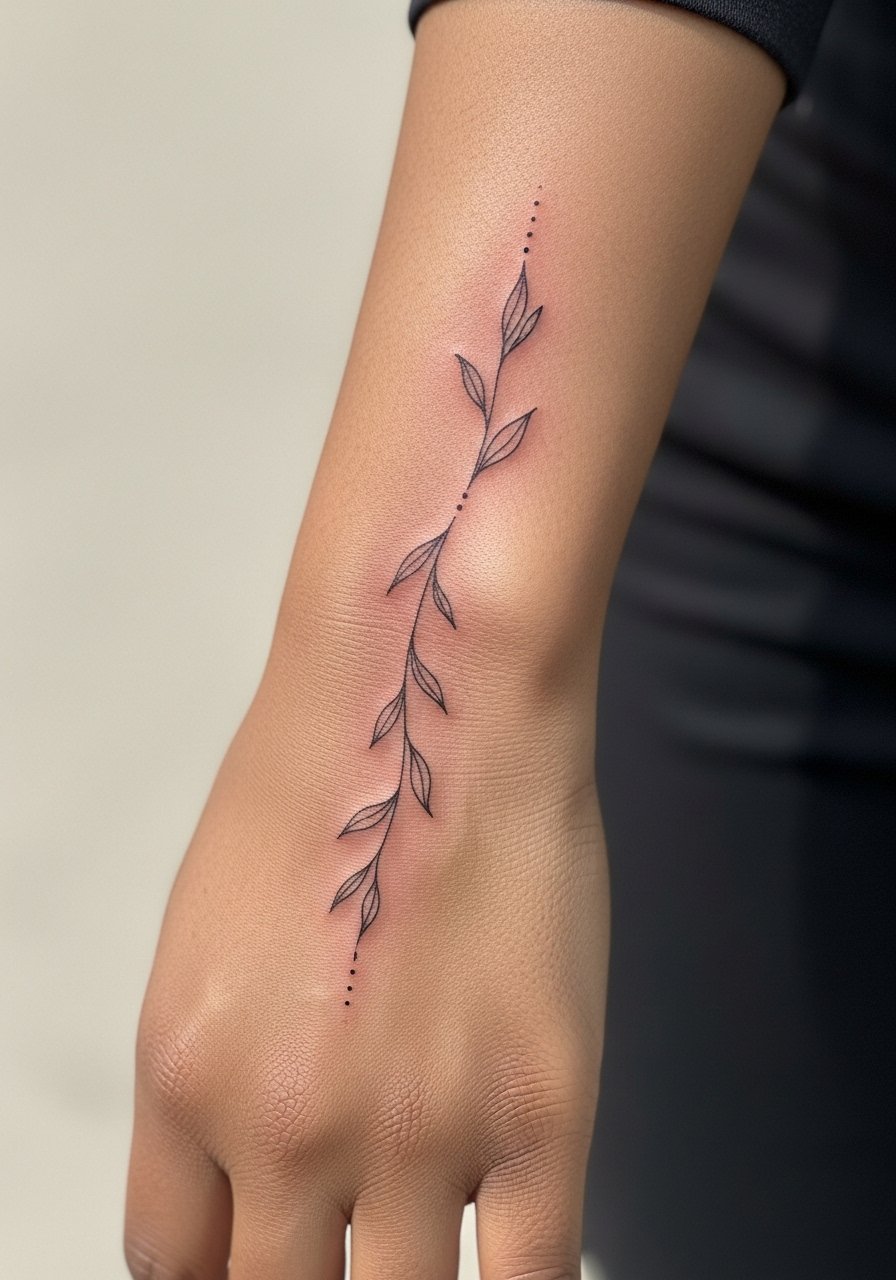
This linear piece is a subtle everyday option that flows with movement. Tell your artist you want spaced leaves and light dot shading so each element breathes and avoids merging later. The main mistake is packing leaves too tightly, which makes touch-ups more likely. Pain is low at the wrist, and the session usually runs 15 to 25 minutes. For showing it off, pair the vine with a red nail polish manicure or thin bracelet so the hand reads cohesive without distraction. Over two years, fine line vines can soften and may need a touch-up if you want crisp edges.
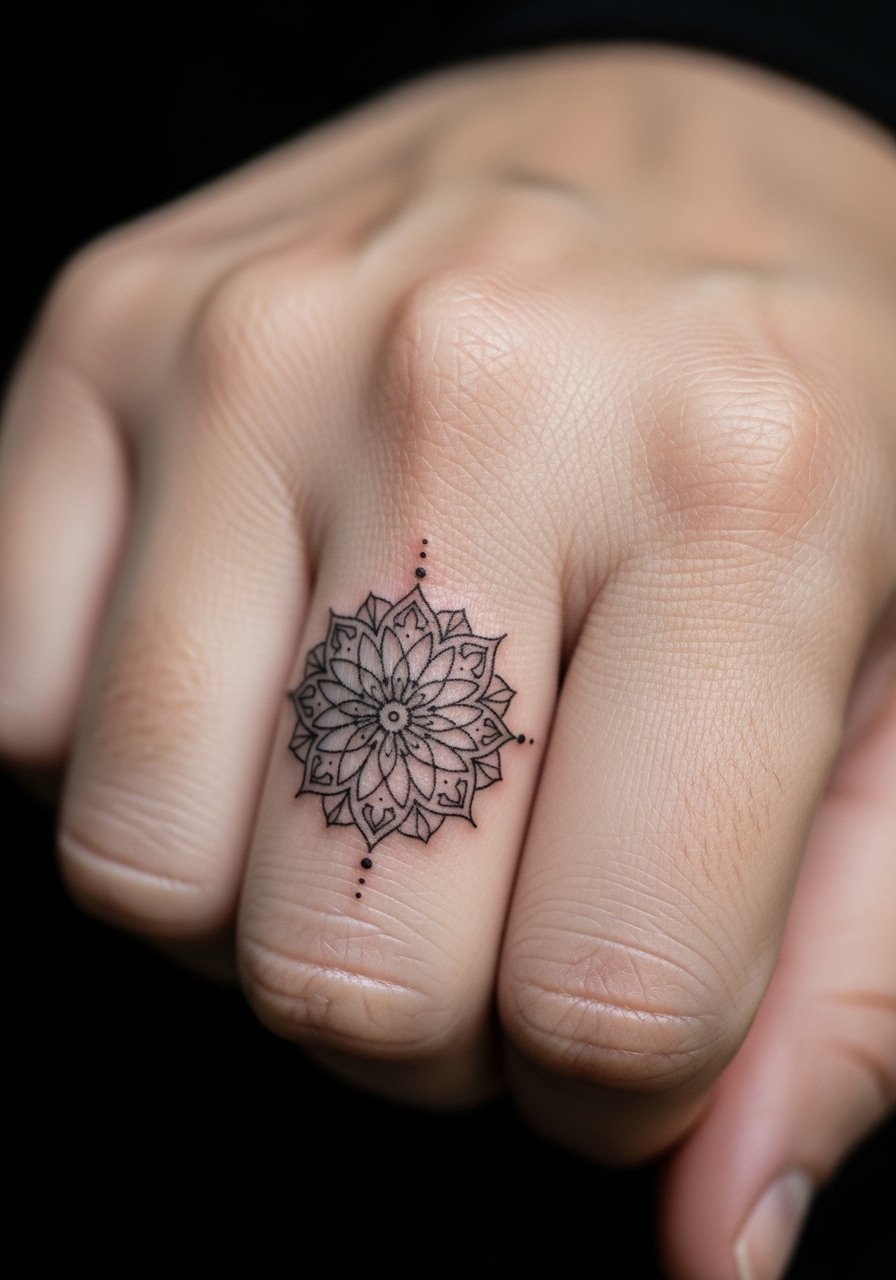
5. Central Dot Petal Mandala on Palm
A compact mandala builds satisfaction as the circle grows from a single dot to petals, which helps practice spacing. Ask for clear spacing between petals and a bold center so the palm's natural darkening highlights the motif. A common error is making inner petals too tight, which muddies during palm shedding. Session time is short, under 30 minutes. For the appointment wear, keep hands bare and avoid jewelry. Culturally, mandalas draw on meditation traditions, so many people pick slightly altered motifs rather than direct sacred symbols. Healed contrast peaks at day two and then softens over a week.
6. Glove Style Minimal Finger Rings
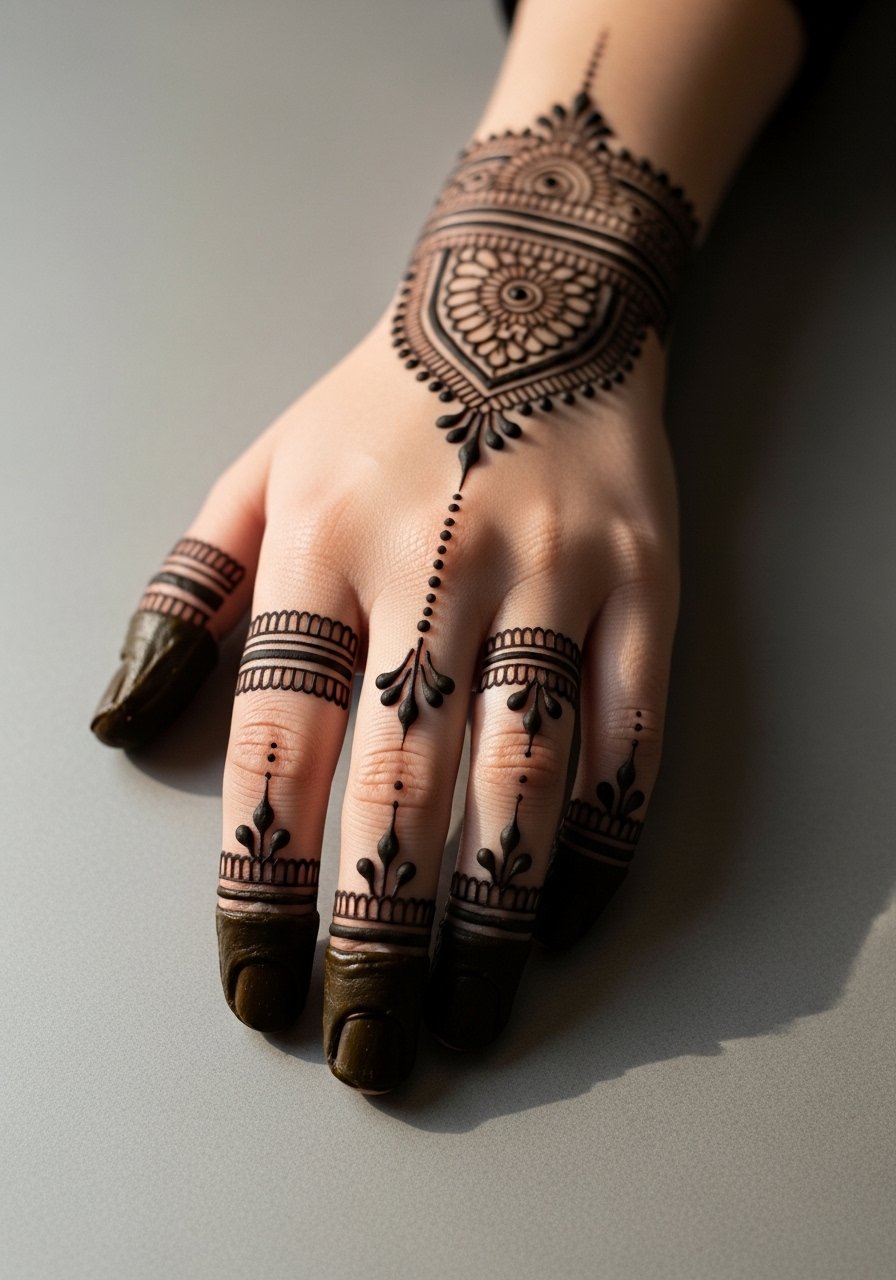
Glove motifs create the illusion of jewelry without metal. When booking, ask for symmetrical points at each knuckle and thin negative-space bands on the fingers so the pattern breathes. Artists split on how dense glove coverage should be for long wear. One camp prefers open negative space to avoid quick fading from finger activity. The other camp says denser fills give stronger initial contrast. Choose the open approach if you want longevity. Session time ranges from 30 to 50 minutes and finger tips may feel sensitive for some. Pair this look with a matching pink nail polish set and avoid tight gloves for the first 48 hours.
Pre-Session Essentials
The palm, fingers, and wrist pieces above all face friction, so a few practical items make the session smoother and the first week easier.
-
Stencil transfer paper kit. Lets you preview the linework on skin before committing, especially helpful for the edge petals and glove ring layouts in ideas above.
-
Topical numbing cream. Applied about 45 minutes before can reduce discomfort on sensitive finger pads without changing the henna application.
-
Thin protective film roll. Keeps palm and finger designs cleaner during the first days of shedding and frequent handwashing.
-
Fragrance-free gentle body wash. Cleans the area without stripping oils that help deepen the stain in the first 48 hours.
-
Aquaphor healing ointment. A thin layer can protect designs from excess rubbing while the stain sets during the early window.
7. Curved Petal Half-Flower on Hand Edge
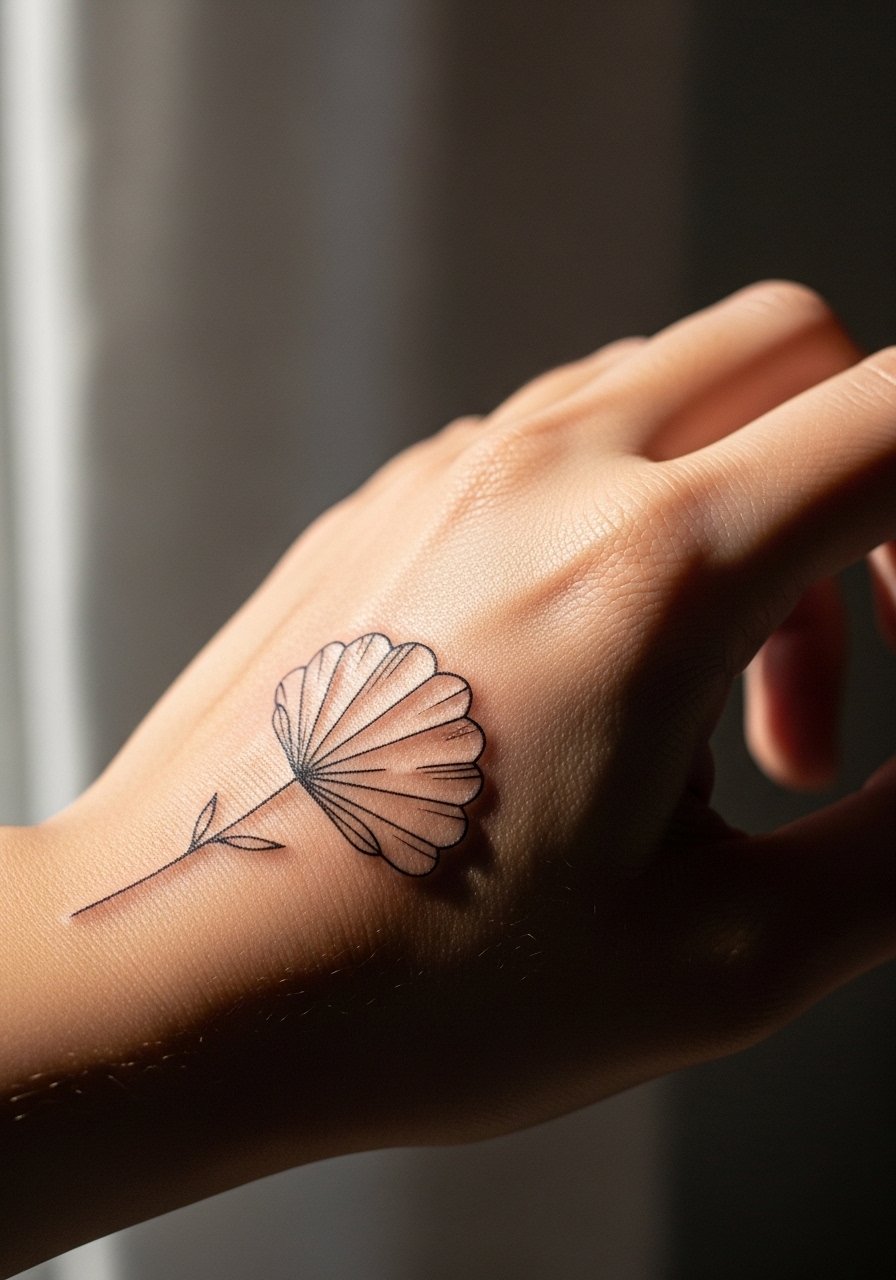
This is a modern take on edge florals that stays understated. In consultation, request scalloped petals with a tapered stem so the design follows the hand contour and resists smudging. People often ask for tiny interior lines that vanish as the skin flakes, so stick to single petal outlines with a central dot. Session time is quick, under 20 minutes, and pain is low. For wearing after the session, stacked thin rings on other fingers plus a thin stackable rings gold set complements the edge placement without covering it. Visually it reads delicate for about a week.
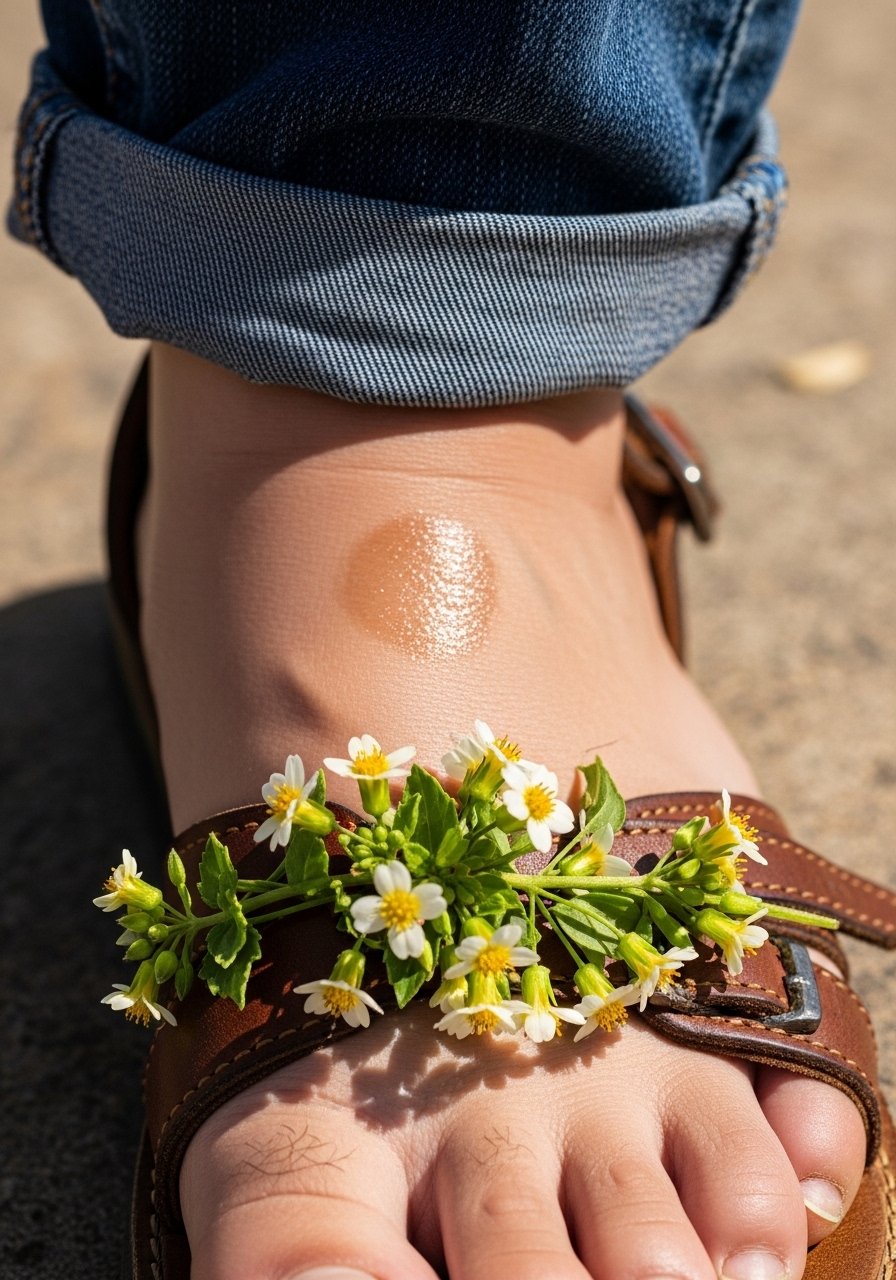
8. Simple Flower Henna for Top of Foot
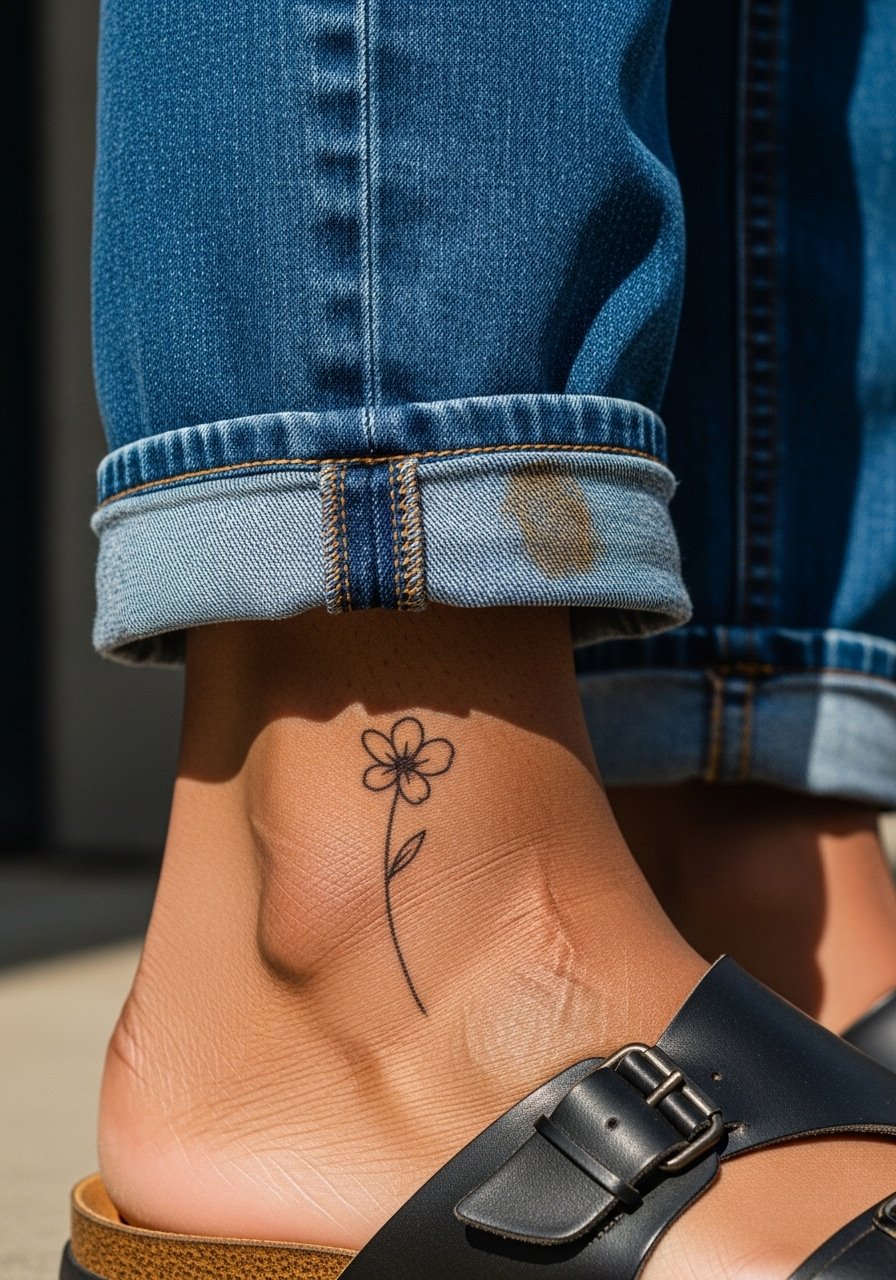
Top-of-foot flowers are a great small statement for summer open sandals. Ask for a one-inch bloom with a few leaf accents so it stays clear when shoes rub. The common mistake is adding too many stems that irritate in shoes. Foot placements bruise slightly in sensitive people and session comfort depends on footwear choice. For showing it off, wear open toe sandals and a delicate anklet to frame the art. Healed contrast holds for about ten days when friction is minimal.
9. Leaf and Dot Dip-Dye Look on Fingers
This dip-dye effect uses drops and dots to create a gradient along a finger. Tell your artist you want a staggered dot trail and single-leaf motifs that decrease in size toward the tip for a tapered look. Mistakes include placing large dots near joints where constant motion erases detail. Session time is short, often under 15 minutes. For styling, keep the look visible with a minimalist loose cotton shirt and short sleeves. Because fingers see the most wear, expect the smallest dots to fade first.
10. Small Sun Motif at Thumb Base
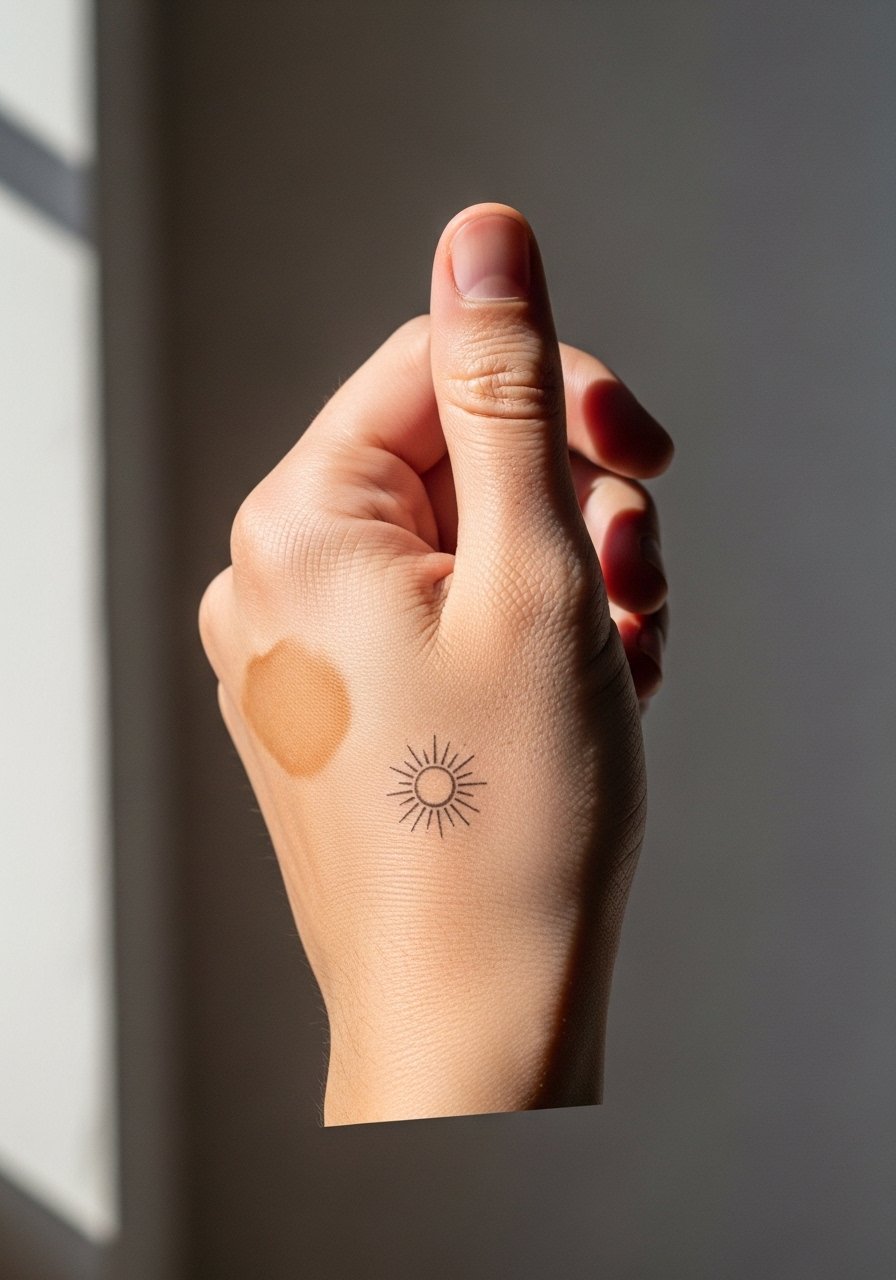
A compact sun at the thumb base works as a focal tiny symbol that still gets good stain development. Ask for an open circle center and short rays rather than dense fill so it reads clearly as the skin sheds. Errors happen when rays are too close together and merge with thumb movement. Session is under 15 minutes and discomfort is low. This placement pairs well with a neutral manicure and a neutral nail polish set for contrast. Expect peak color at 48 hours and gradual softening after that.
11. Micro Mandala Behind the Knuckle
A tight mandala behind the knuckle can be a refined accent if you keep the motif open and avoid heavy inner fills. During consult, emphasize spacing between layers and a single bold center so the pattern remains legible. The knuckle area moves a lot and many artists caution about durability there. One camp says knuckles need thicker lines to survive, while another prefers more negative space so the pattern does not crack as the skin stretches. Choose the spacing approach and ask for a mock transfer. Session time is brief and pain is mild. This area may need touch-ups sooner than a static forearm design.
12. Minimalist Ankle Chain

Ankle chain motifs read like jewelry and are a summer staple. Ask for spaced link shapes rather than continuous fill so friction with shoes does not erase the pattern. The common mistake is placing links too close to the bone where shoes rub. Session time is 15 to 30 minutes and the ankle is moderately sensitive. For show-off outfits, pair with dainty anklet chain jewelry and sandals. Expect a clear look for about ten days with minimal shoe contact.
13. Tiny Script Word on Outer Wrist
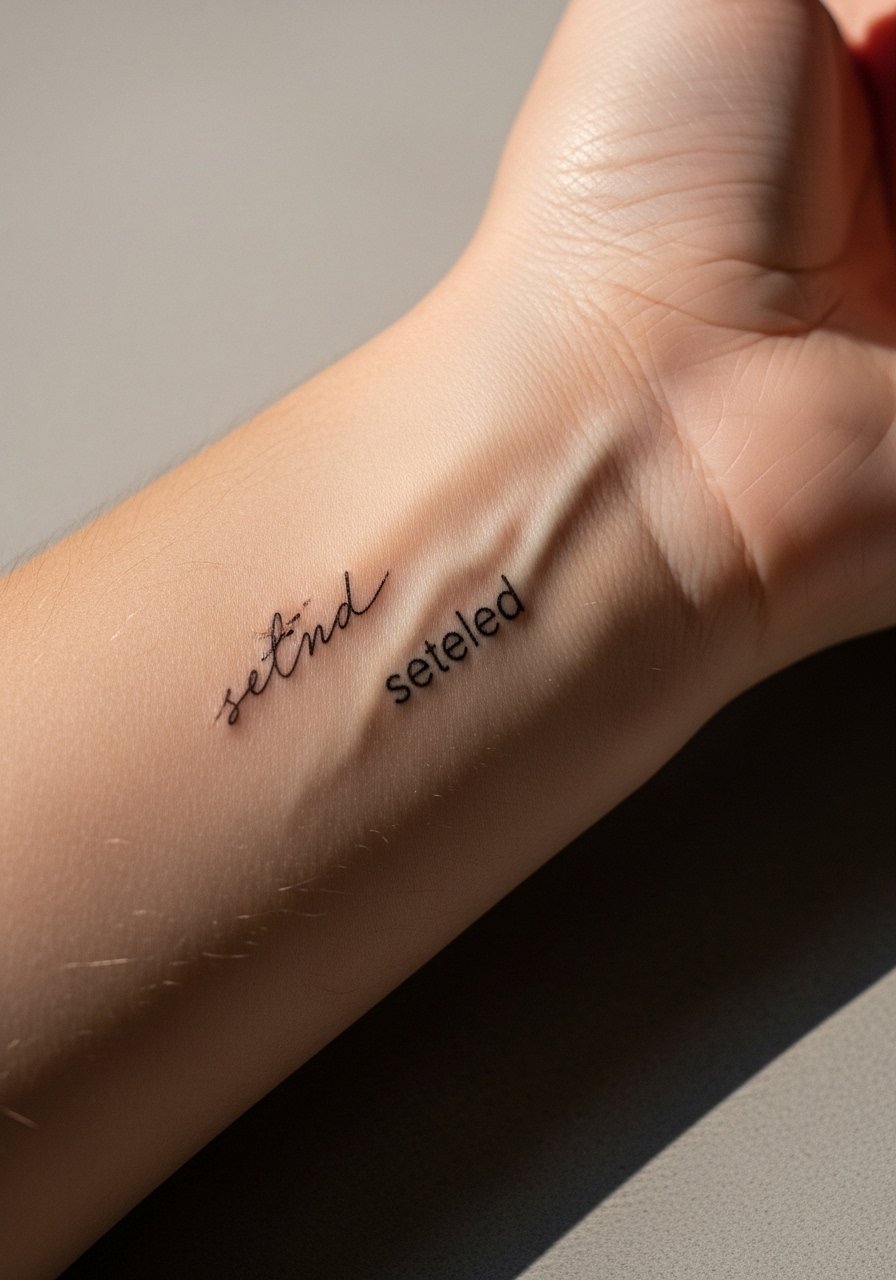
Lettering needs exact instructions because small script can blur. Bring the exact word and preferred font sample and ask for slightly larger spacing than the iPad mock so the letters have room to heal. The error I see is requesting ultra-tiny cursive that becomes illegible after a week. Session time is short and discomfort is low on the outer wrist. For styling, a loose button-down shirt with sleeves you can roll frames the area well. If the script has cultural significance, consider a subtle variation rather than direct religious text.
14. Tiny Crescent Moon on Finger Side
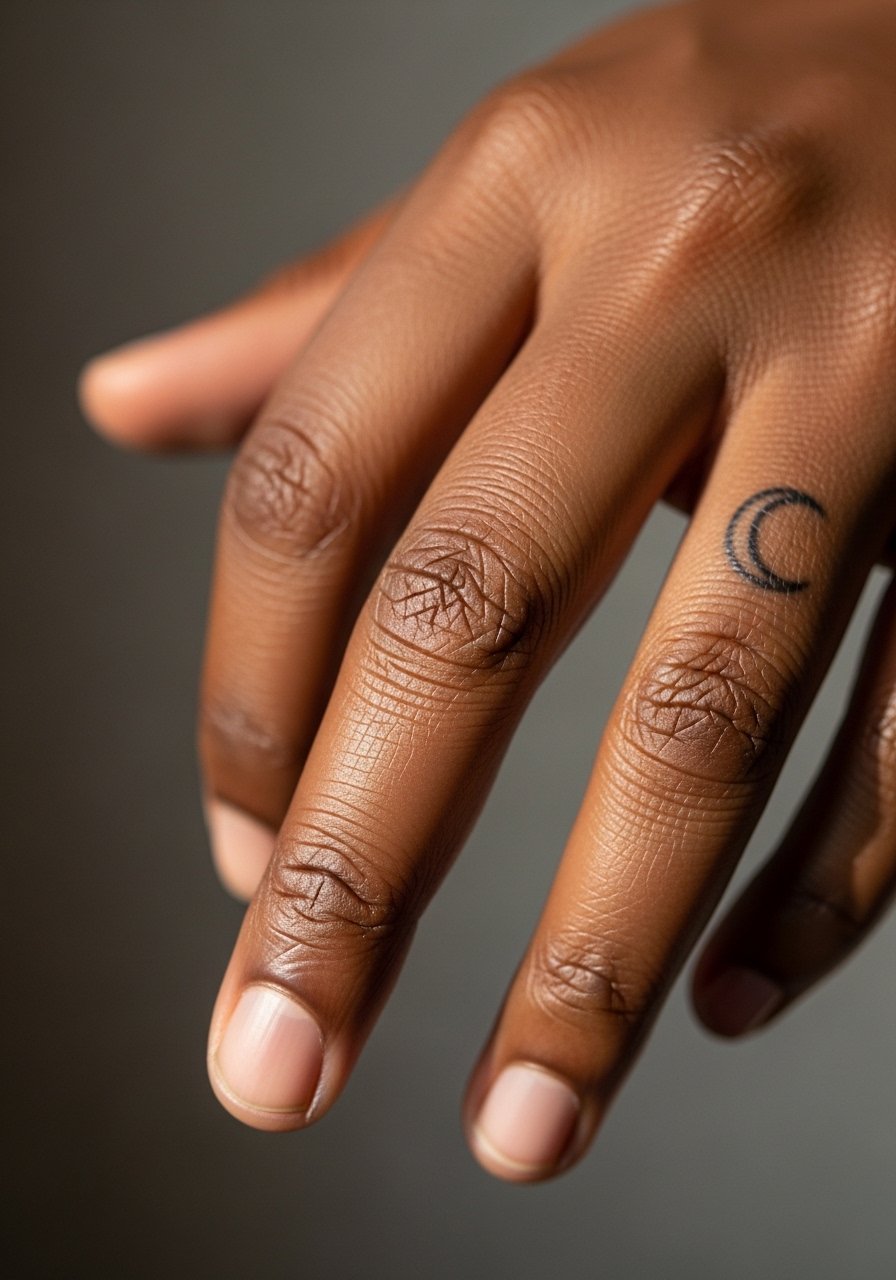
A tiny crescent fits snug on the finger side and reads as a discreet accent. Ask for a simple open crescent with a thin outline and no inner shading so it survives frequent hand use. Errors include overfilling the crescent and placing it on friction zones. Session time is under 10 minutes and pain is minimal. This placement works with short sleeves and a sleeveless tank top women at the session so the area is easy to access. Expect the finest lines to fade first.
15. Petite Paisley Accent Behind Ear Area
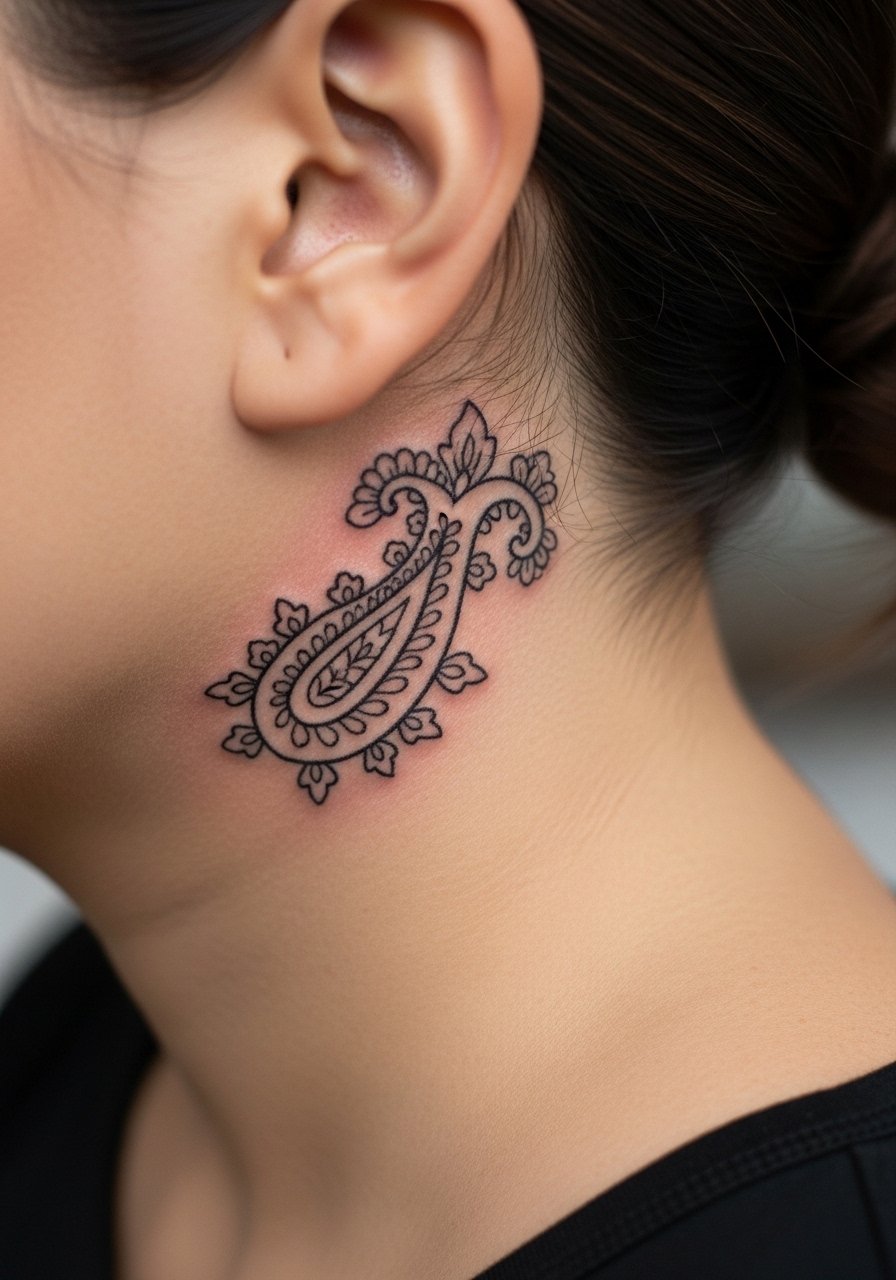
Behind-the-ear henna is subtle and easy to hide with hair. Specify that the motif sits below the hairline on the neck and is under two inches so it reads as an accent. The common mistake is picking a motif that is too detailed for the small surface. Session comfort is high because the area is shallow and quick to complete. Wear hair up or bring clips for the appointment. Because this placement neighbors sensitive neck skin, ask the artist about any extra precautions. It stays discreet and shows up nicely when hair is tucked back.
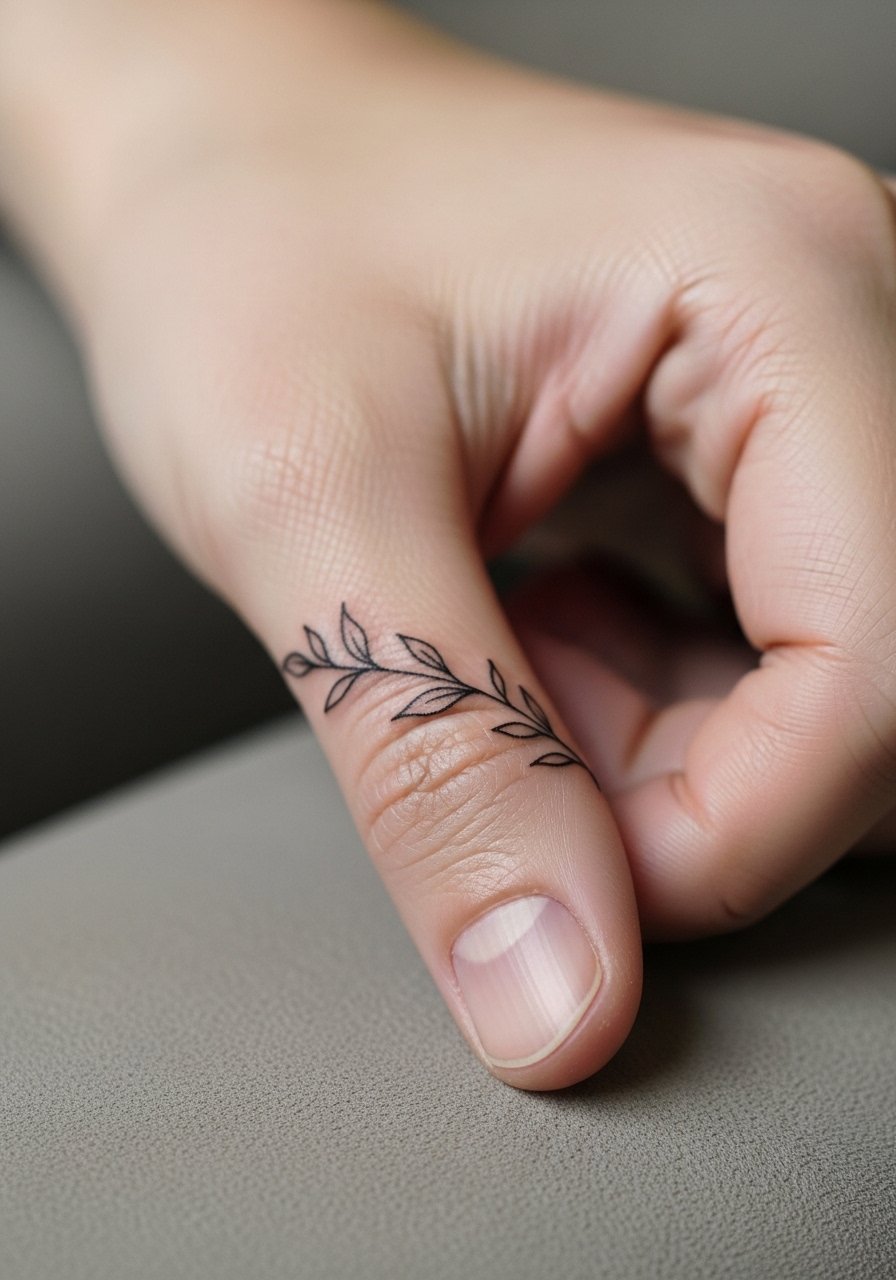
16. Single Leaf on Inner Wrist
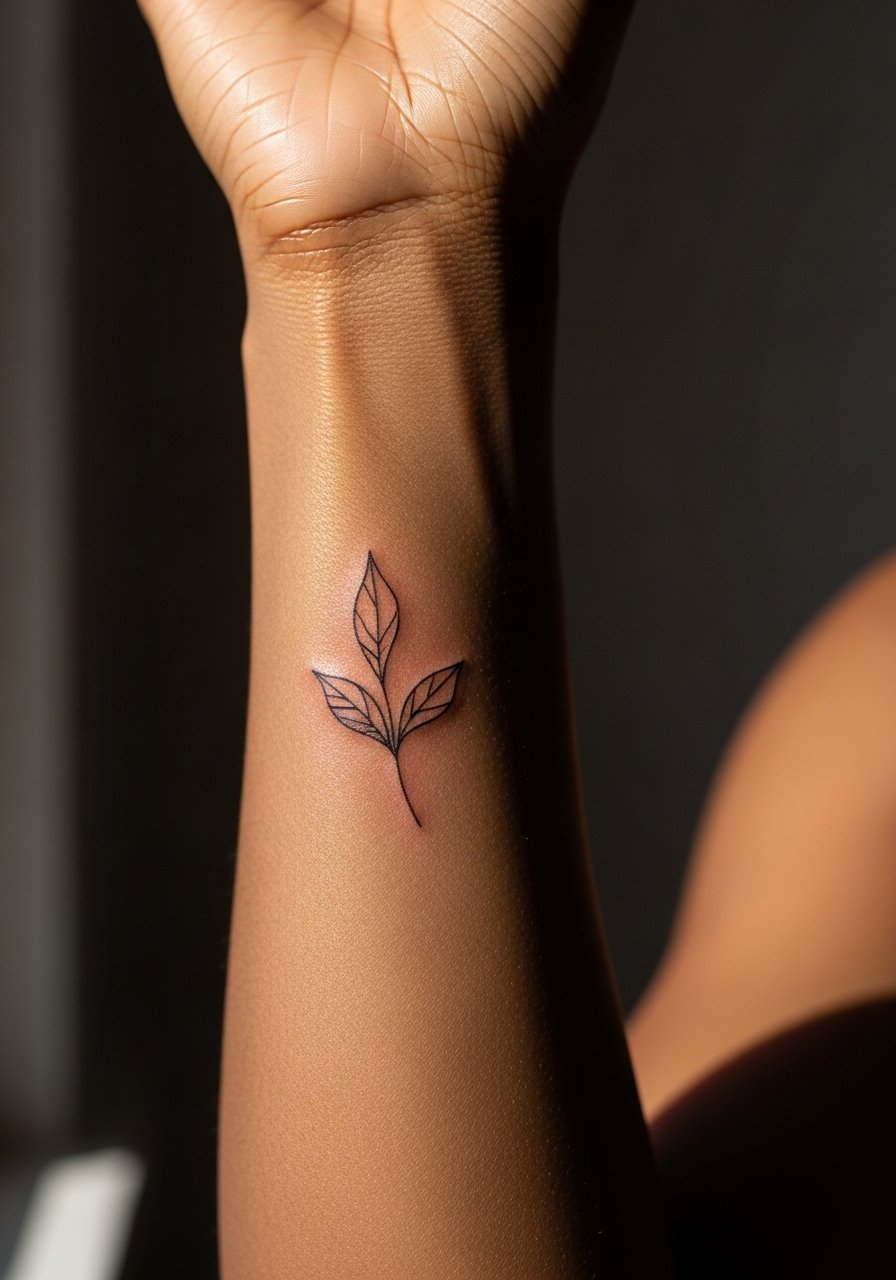
A single inner wrist leaf feels personal and intimate. Tell the artist you want the vein line slightly off center to keep the leaf readable when you bend the wrist. A common mistake is centering the vein and making the leaf look flat when movement changes the shape. Session is comfortable and quick. For showing it off, a thin chain pendant necklace sits above the wrist area to balance the composition. Inner wrist pieces often need touch-ups sooner than arms because of washing.
17. Foot Henna with Flowers and Leaves
Top-of-foot clusters let you mix florals and leaves without overcomplicating. Ask for a focal bloom with two or three leaf sprigs so the design breathes and avoids smudging under shoe straps. The usual error is trying to cram a half-foot sleeve into a tiny space. Session comfort varies with lying position and footwear convenience. For styling, choose open sandals and add a dainty anklet chain for a layered look. Expect the design to fade faster where shoes rub.
18. Minimal Constellation on Side Ankle
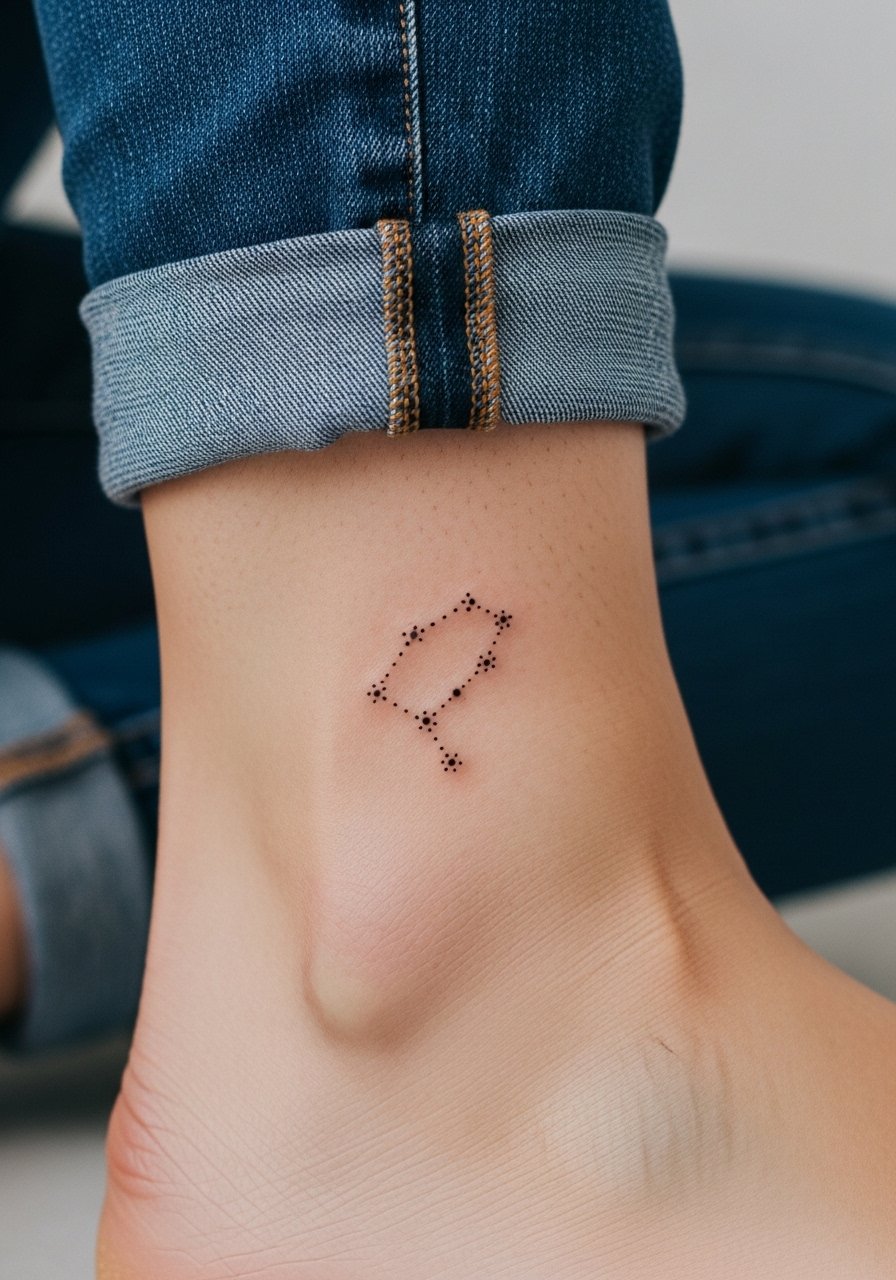
This one is subtle and modern. Ask for a spaced layout with variable dot sizes so the pattern reads as a tiny map rather than clutter. Common mistakes include overly compact star clusters that merge with movement. Session is quick and discomfort is low. For show-off outfits, low-rise sandals or rolled pants display the piece; try a open toe sandals women look. The constellation often lasts about ten days when not trapped by tight shoes.
19. Micro Geometric Triangle on Upper Forearm
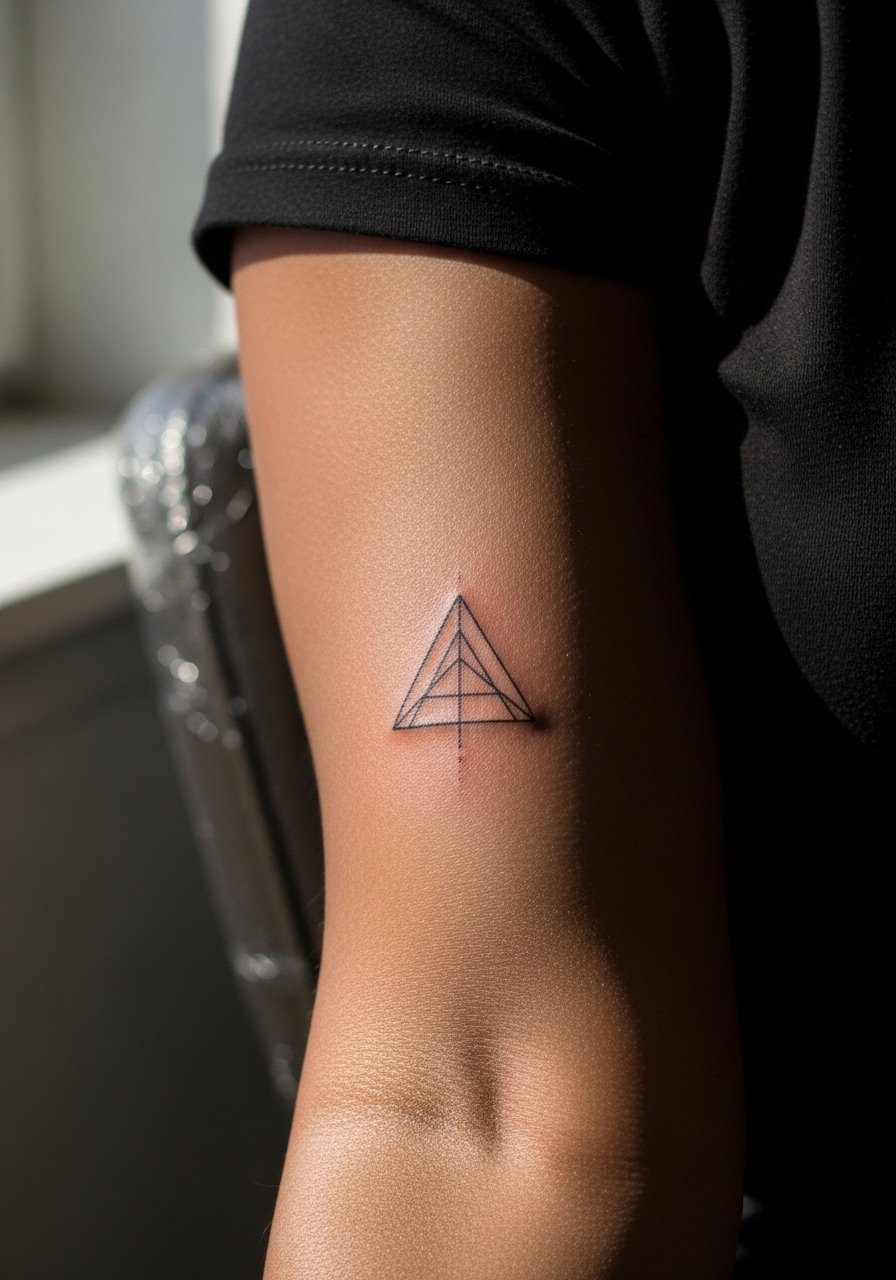
A micro geometric triangle reads sharp and modern at a small scale. For longevity, ask for bold outer edges with deliberate negative space inside, not dense shading. A common error is shrinking the triangle too much and losing the shape after a week. Session time is under 20 minutes and pain is minimal on the forearm. Pair it with a rolled-up linen shirt in cream so the arm contrast holds, using a loose linen drawstring pants vibe for casual wear. If you want layered geometry later, keep spacing between elements.
20. Tiny Dot Cluster Near Nail on Ring Finger
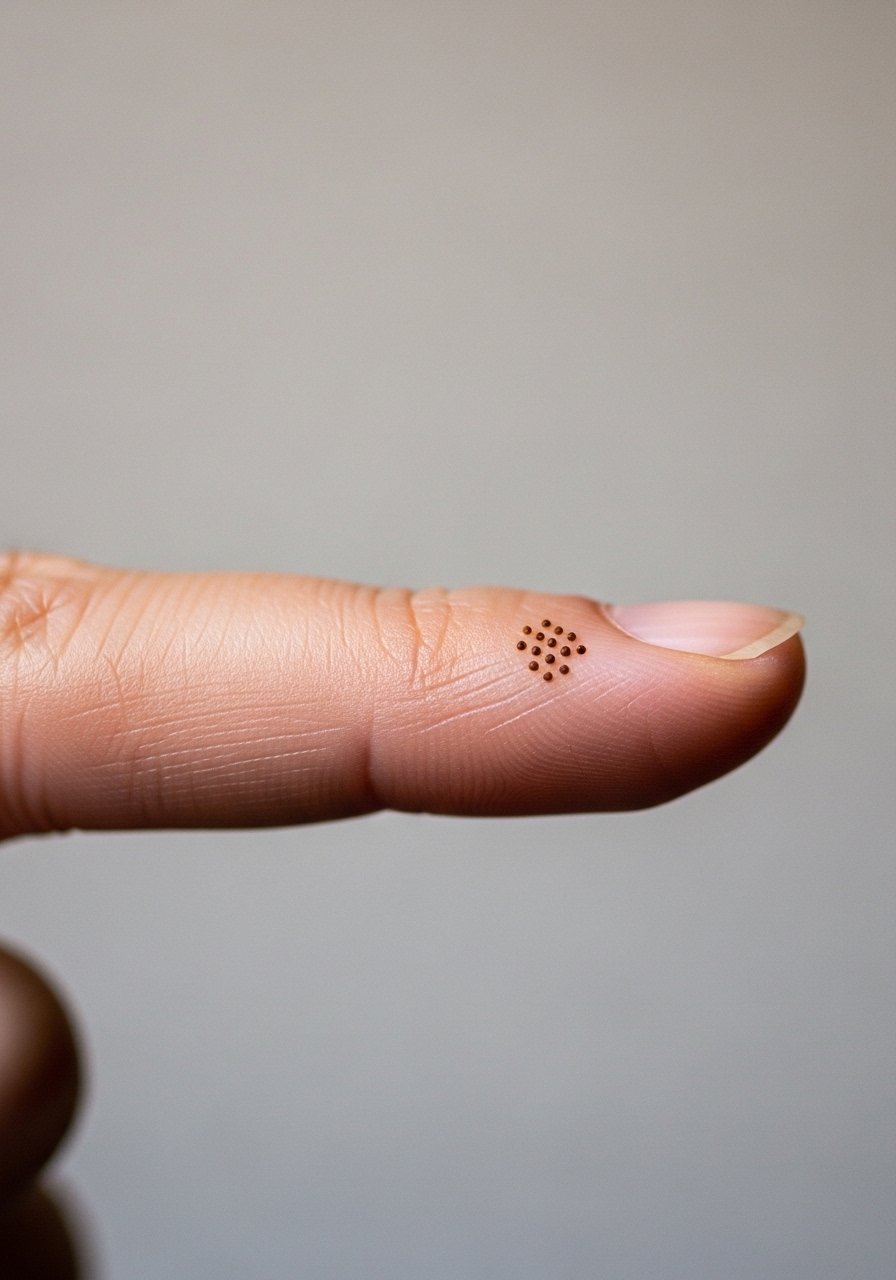
A near-nail dot cluster is a delicate accent that avoids joints. Ask for a crescent of three to five dots decreasing in size toward the nail so the group survives washing. The mistake is placing dots over the joint where movement smudges them. Session time is very short and most people report minimal discomfort. For session wear, short sleeves help and a sleeveless tank top women is fine. The smallest dots change first as you use your hands.
21. Vine That Wraps the Thumb Web
The thumb web is a playful spot for a small vine that peeks out when you hold things. Ask for wide spacing and very small leaves because the skin there moves and can blur details. The common mistake is asking for dense shading that disappears with friction. The session is short but may feel odd because of hand positioning. For showing it off, short sleeves and open-hand gestures work well and a neutral nail polish set keeps attention on the art. Expect this area to need a touch-up sooner than flat forearm pieces.
Frequently Asked Questions
Q: How long do small simple henna tattoos usually last on hands and feet?
A: Henna on the palms and soles tends to darken fastest and shows a strong stain for about seven to ten days before fading. On the back of the hand or top of the foot they usually remain visible up to two weeks but start softening after the first week. If you want longer color, plan to reapply or book a quick refresh after the first week.
Q: Why do finger and knuckle designs fade faster than forearm pieces?
A: Fingers and knuckles move constantly and face more washing and friction, which accelerates flaking and lightening. Tiny dots and ultra-fine lines on joints are the first to disappear. If you like a finger design, ask for slightly bolder dots or spaced elements so the shape stays readable longer.
Q: Are there controversies about fine line henna versus bolder fills for longevity?
A: Yes, artists fall into two camps on this. One camp says finer lines fade faster on mobile skin and recommend larger negative spaces or thicker outlines. The other camp argues that careful depth and spacing let fine line settle well. Ask which approach your artist prefers and why before booking.
Q: What should I wear to my henna session for shoulder or foot placements?
A: For shoulder sessions, wear a loose tank top or button-down you can pull aside for access without stretching the skin. For foot work pick sandals or pants you can roll so the area is easy to reach. Comfort and clear access speed up the session.
Q: How can I avoid uneven application when I try DIY henna at home?
A: Practice the basic shapes on paper first and keep your cone pressure consistent so dots and lines match. Seal the paste gently with a sugar-lemon mix and avoid moving the area while it dries. If uneven results persist, consider a quick pro touch-up to even out the stain.
