
Fine line tattoos dominate feeds, but what looks fragile on a phone can blur on real skin a year in. Trends and reality often split. Some pieces that stun fresh need spacing and a bold counterpoint to last. This list hands you 27 small ideas that photograph well now and stand a better chance of staying crisp later, plus what to ask for in the consult.
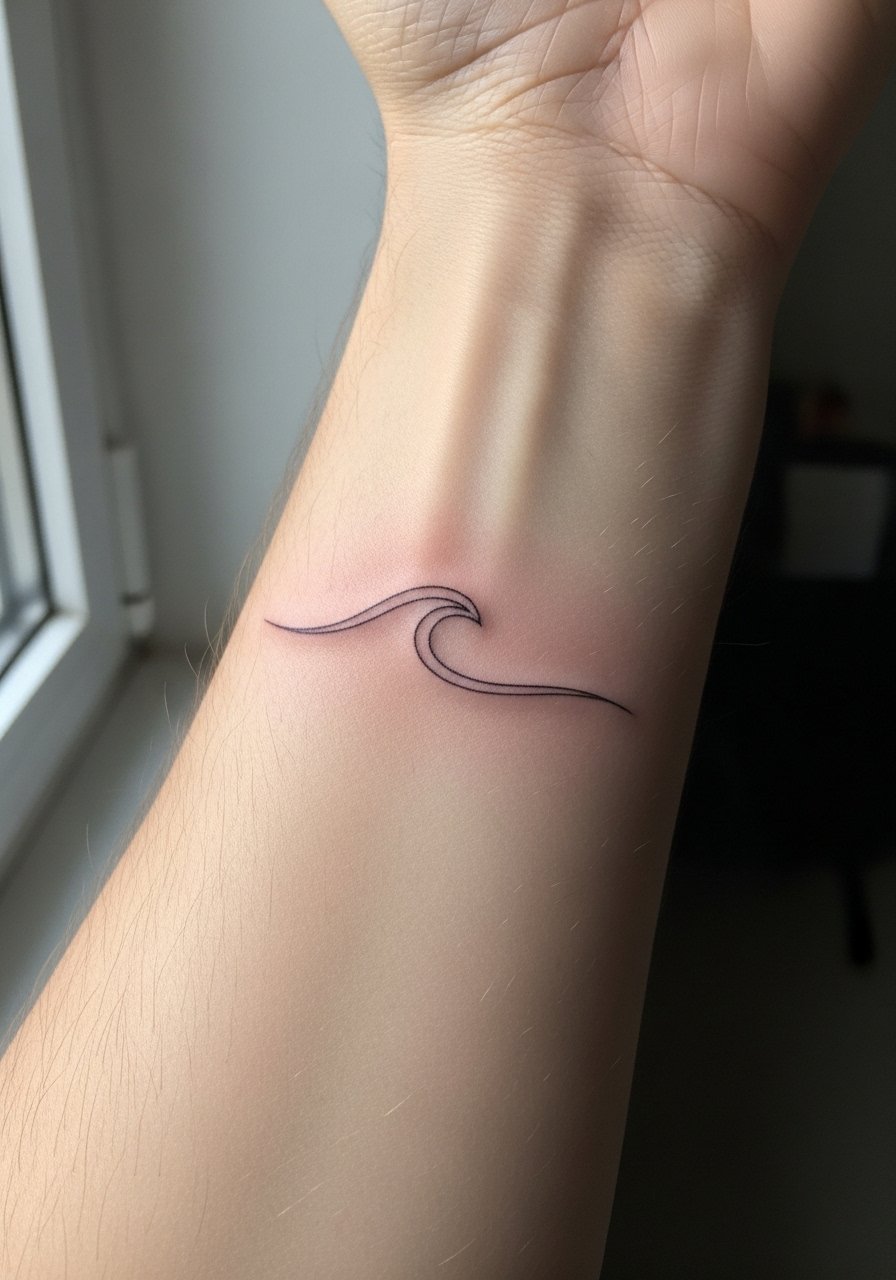
1. Fine Line Moon Phases on Inner Wrist

I have seen inner wrist moon phases that read beautifully for a year and others that fade into a blurred band. For better longevity, ask your artist for slightly heavier line weight than the flattest single-needle swipe, and include small gaps between crescents so dots do not merge. Pain is low to moderate and the session is quick, usually under 45 minutes. Expect a touch-up at six to twelve months for ultra-thin versions. For showing it off, try a thin gold bangle set on the opposite wrist to frame the moons without crowding the linework.
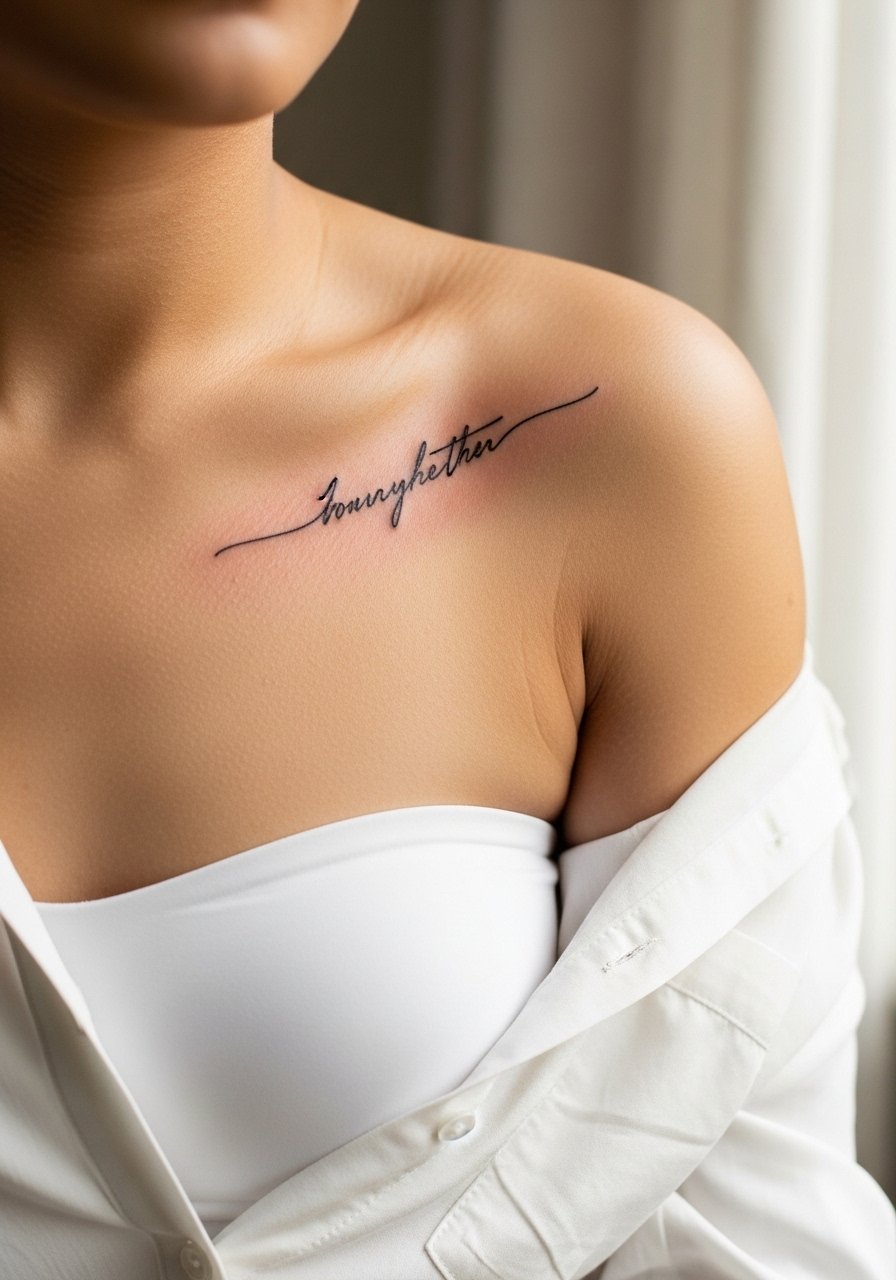
2. Minimalist Heartbeat Line at the Collarbone
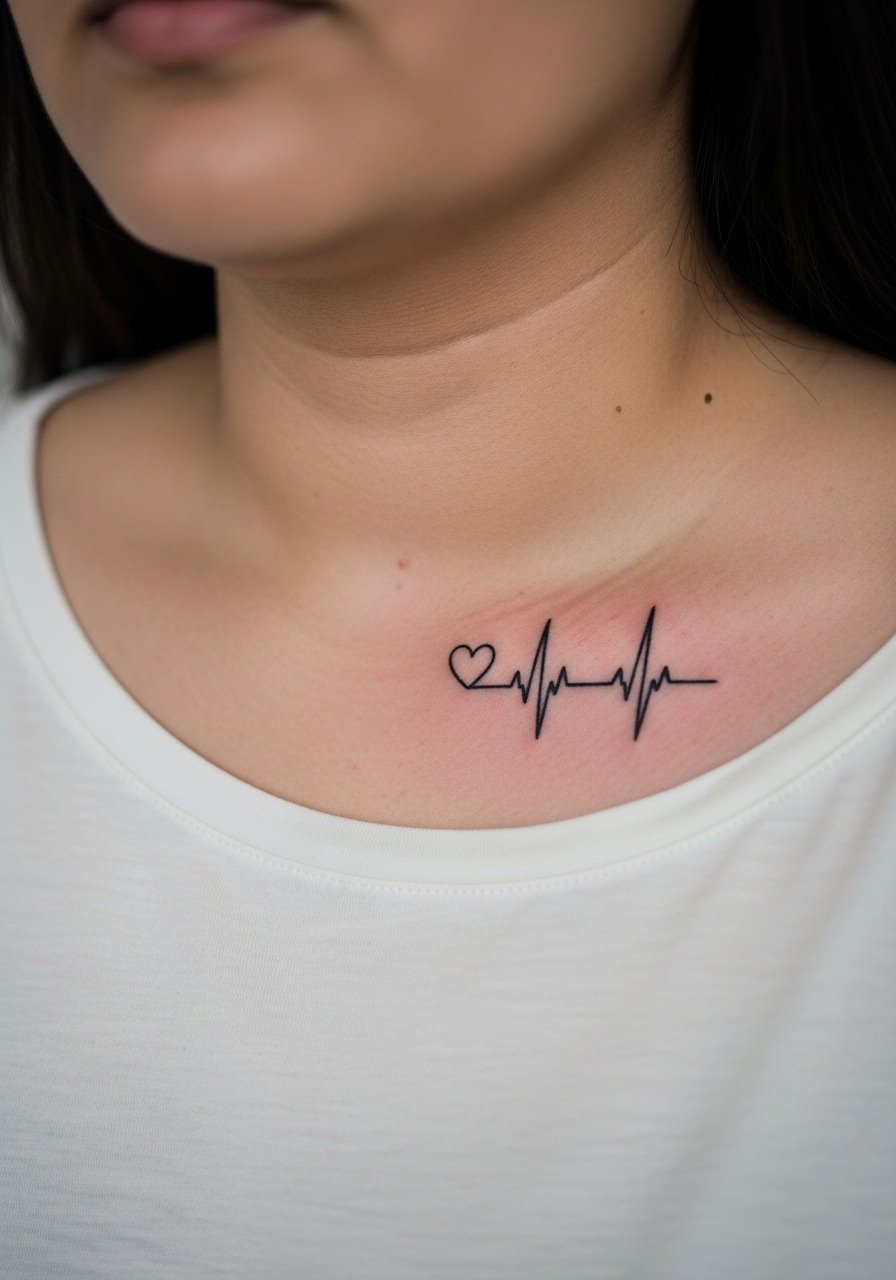
Fair warning: the collarbone sits on moving skin, and subtle scripts can migrate with weight and posture changes. A heartbeat line in clean single-line format works well when scaled to about two inches and placed where the clavicle bones create natural frame. The session feels like a low to medium discomfort with a 30 to 60 minute appointment typical. Tell your artist you want moderate spacing and a bit of extra saturation so the thin peaks keep shape after healing. Pair this with an off shoulder knit top when you want to show it off.
3. Minimalist Arrow on the Side Finger
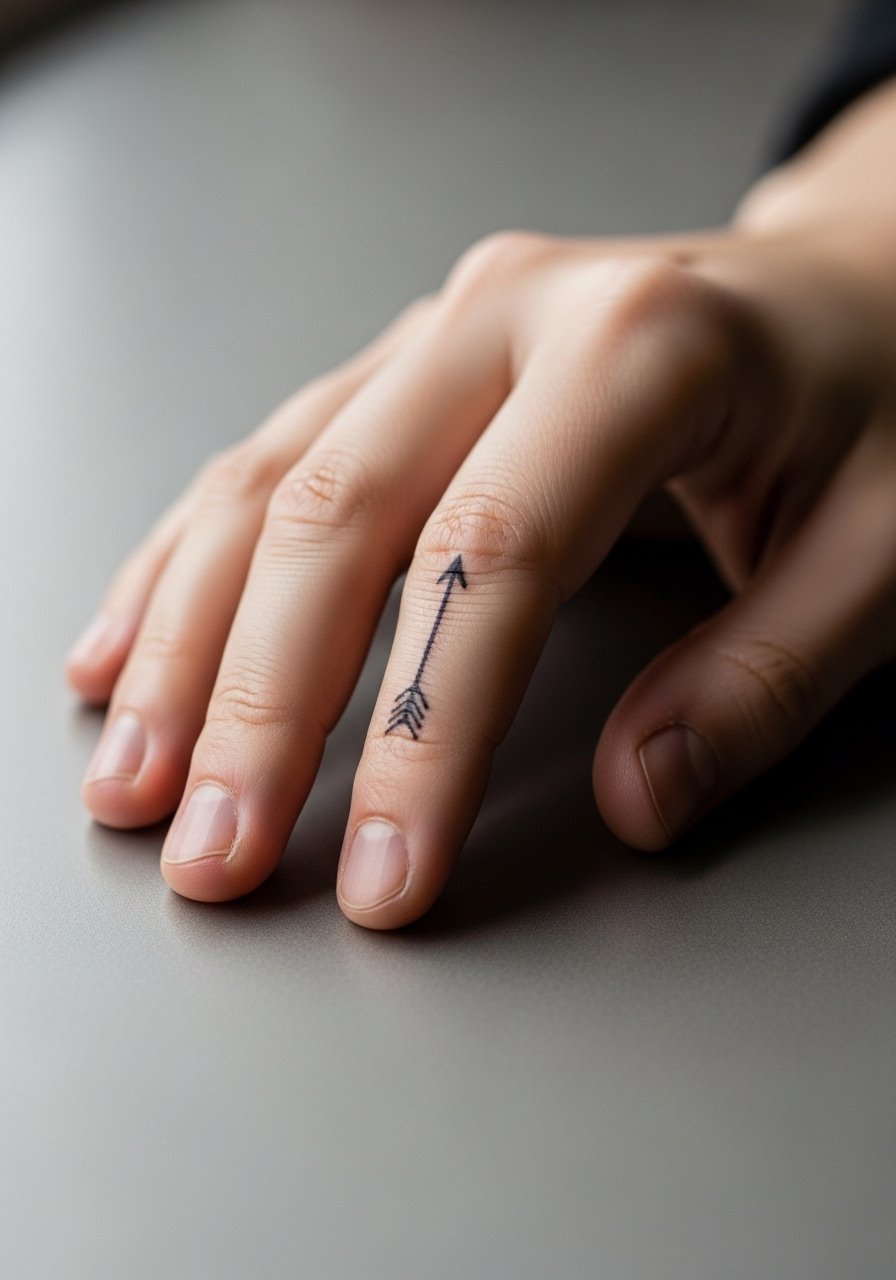
Finger work is small and honest about longevity. The side finger arrow reads as a daily reminder but needs bolder line than a micro script to avoid early blur. Expect faster fading because of frequent washing and friction, and plan a touch-up at three to nine months. The session is a quick sting, often under 20 minutes. Avoid getting the arrow too close to joint creases. The common mistake is asking for hairline strokes that vanish; instead request a compact 1-inch arrow with a slightly thicker shaft for permanence. Leave other fingers ring-free during the session for clean access.
4. Dainty Lotus on the Ankle

Ankle tattoos experience a lot of rubbing from socks and shoes, and heat in summer can make scabs stick. The lotus with soft gray fills holds best when the artist uses slightly denser shading rather than hair-thin lines. Pain runs moderate and sessions are short. Wear loose joggers or a skirt for the appointment so the artist can access the ankle without pressure. For show-off styling, pair the healed lotus with strappy heeled sandals and cropped straight-leg jeans to keep attention on the design. Plan a touch-up if you notice loss of contrast after several months.
5. Micro-Realism Butterfly on the Ribcage
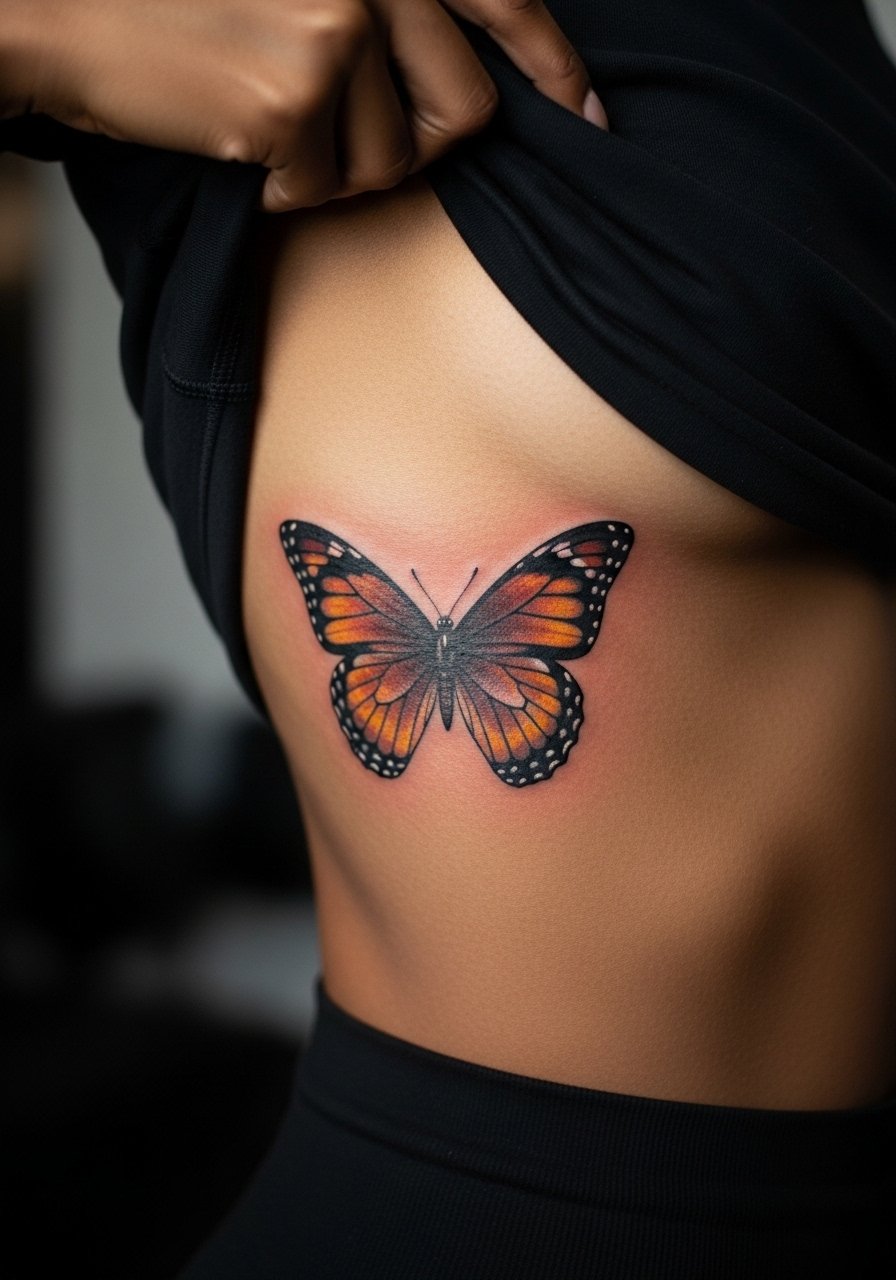
Ribcage sessions score high on pain but reward with a private, intimate placement. Micro-realism needs careful reference and a steady hand; too tiny and color highlights can bleed into gray over time. Tell the artist to prioritize contrast and leave small white spaces for wing detail so it reads at one and two years healed. Expect a longer session or split into two sittings for a 2×2 inch piece. A common mistake is shrinking the reference photo without adjusting shading. For session wear, bring a sports bra and a loose tee you can lift slightly so the artist can work without tugging.
6. Neo-Traditional Rose and Thorn on Inner Forearm
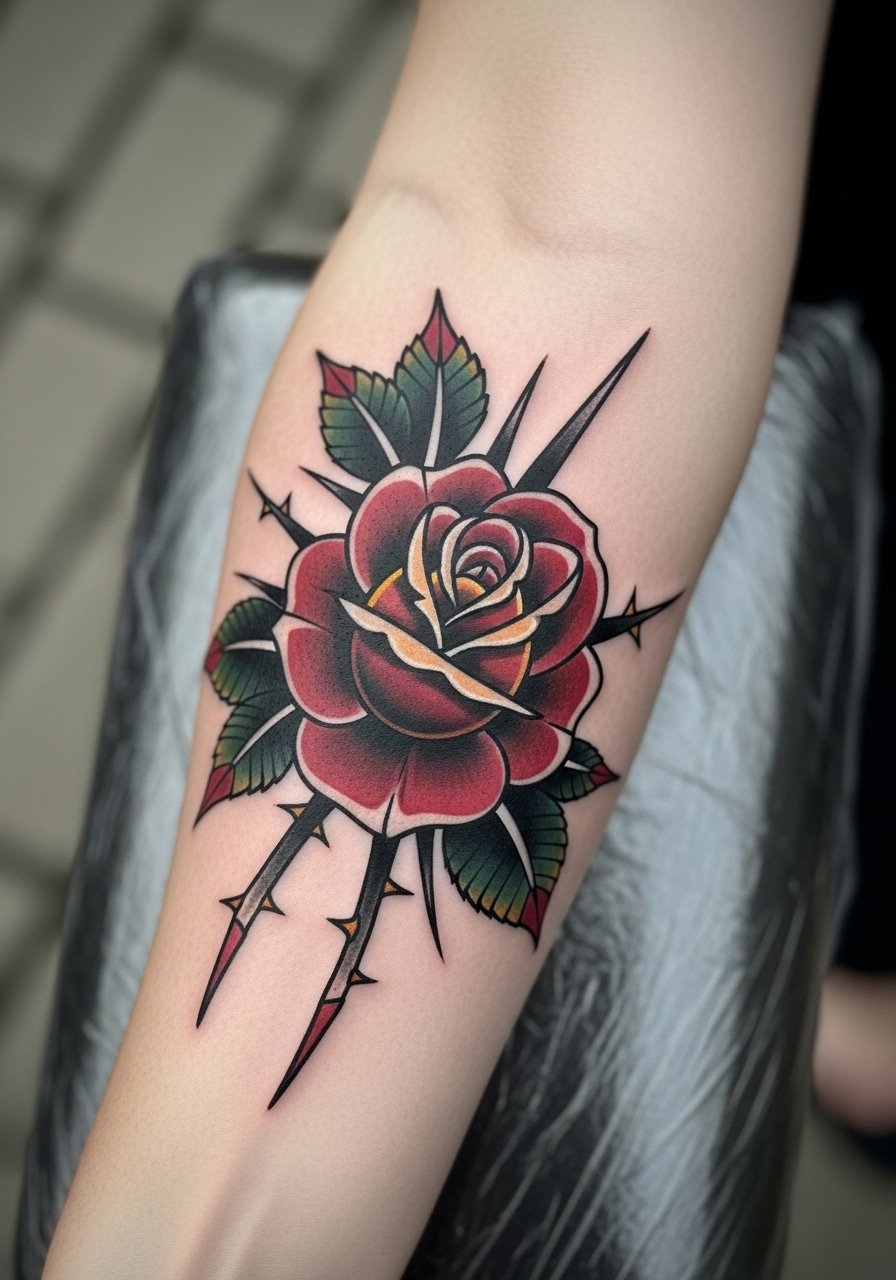
I've noticed neo-traditional pieces on forearms age well because the bold outlines and color saturation resist the blurring that fine line suffers. The inner forearm is moderate pain and ideal for a single three-inch piece in a single session. Ask for slightly wider outline to protect against blowout and request color saturation layered for longevity. The common mistake is asking for pastel fills without bold outlines. Pair this design with rolled cuff chambray shirts in ivory or sage and a rolled cuff blouse when you want to frame the forearm.
Pre-Session Essentials
The wrist, ankle and collarbone pieces above each need different prep. A few well chosen items smooth the appointment and protect fine line work during the first week.
-
Badger Tattoo Balm. A thinner balm that users recommend for dry winter wrists, helpful for the moon phases and ankle lotus when the skin gets flaky.
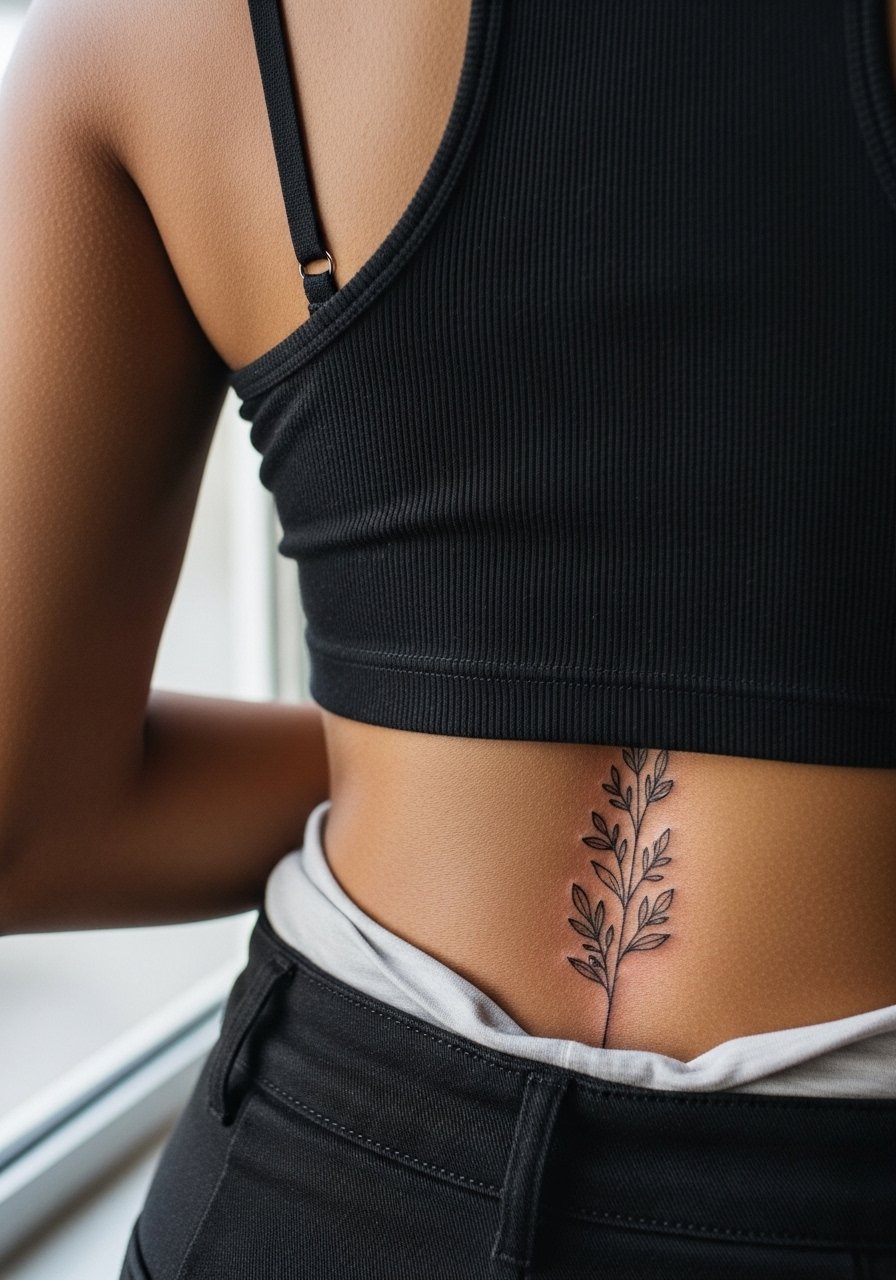
-
Kana Unscented Lotion. Fragrance-free and non-comedogenic for sensitive collarbone skin that can react during healing.
-
Hada Labo Lotion. Lightweight hydration that artists sometimes recommend on fine line work to prevent heavy occlusion.
-
Aussie Made Pure Tattoo Salve. An anti-inflammatory salve some guest artists suggest for ribcage sessions where swelling is common.
-
Second Skin tattoo bandage. Breathable protective film that helps on curved spots like the ankle and finger to reduce lifting edges in the first 48 hours.
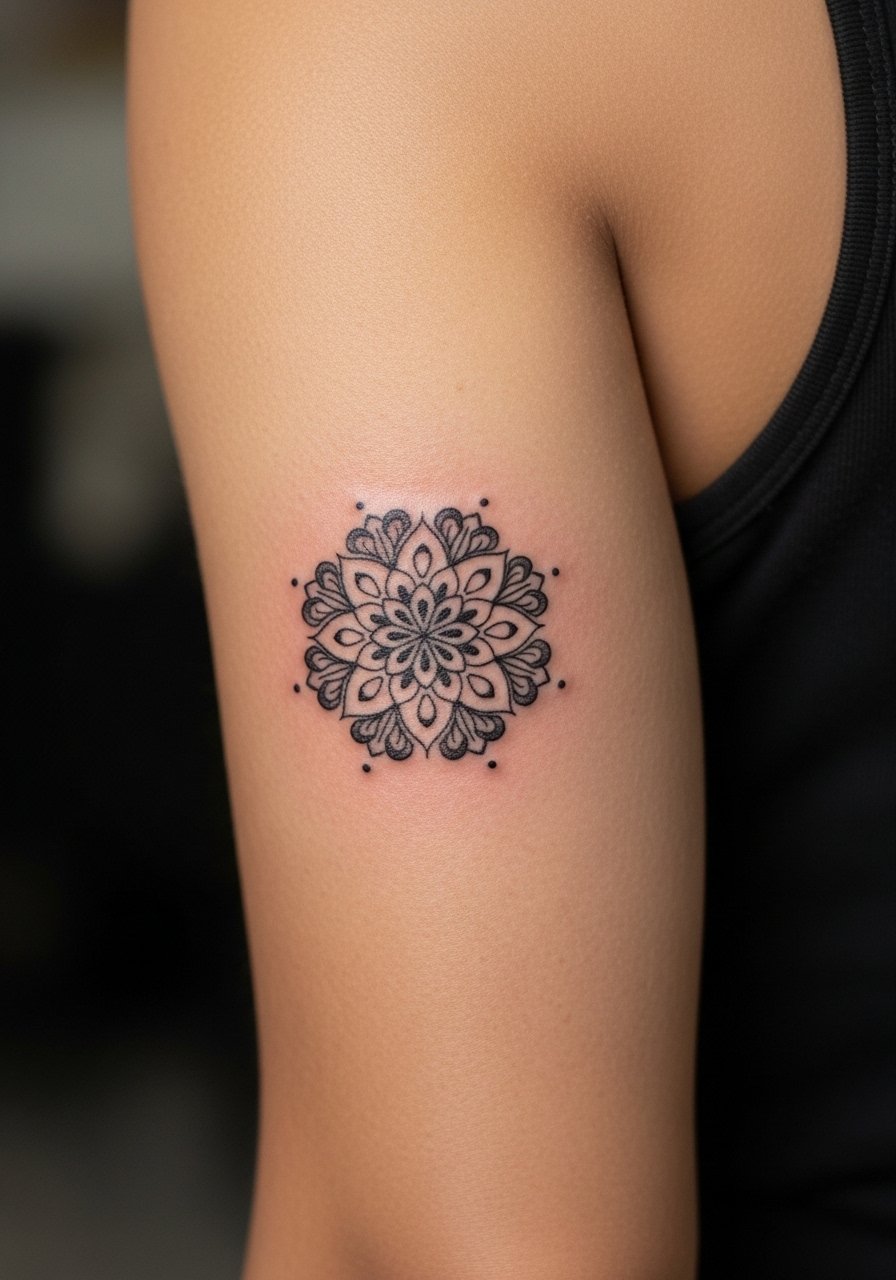
7. Blackwork Geometric Mandala on the Shoulder Blade
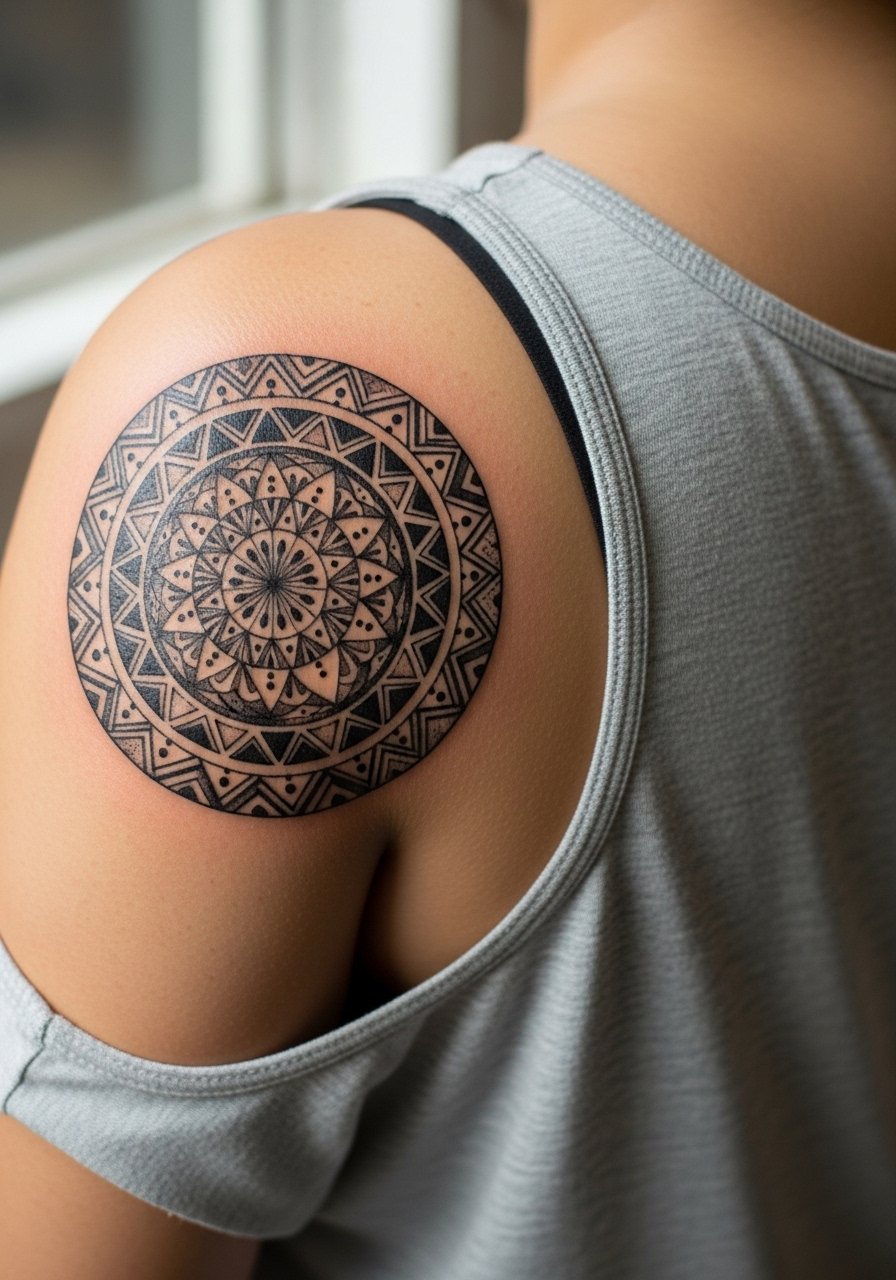
There's a clear debate in shops about how dense a mandala can be when small. The risk is overcrowding lines so they merge. For a 2.5-inch mandala, ask for negative space rings and crisp dot work so the pattern breathes. Shoulder blade placement is lower pain and photographs well under crop tops or matte black crop tops for contrast. If you plan to expand into a back piece later, leave an open border. For showing it off, a crop top black or side-slit bodysuit frames bold blackwork nicely.
8. Watercolor Heart with Drip on Outer Thigh
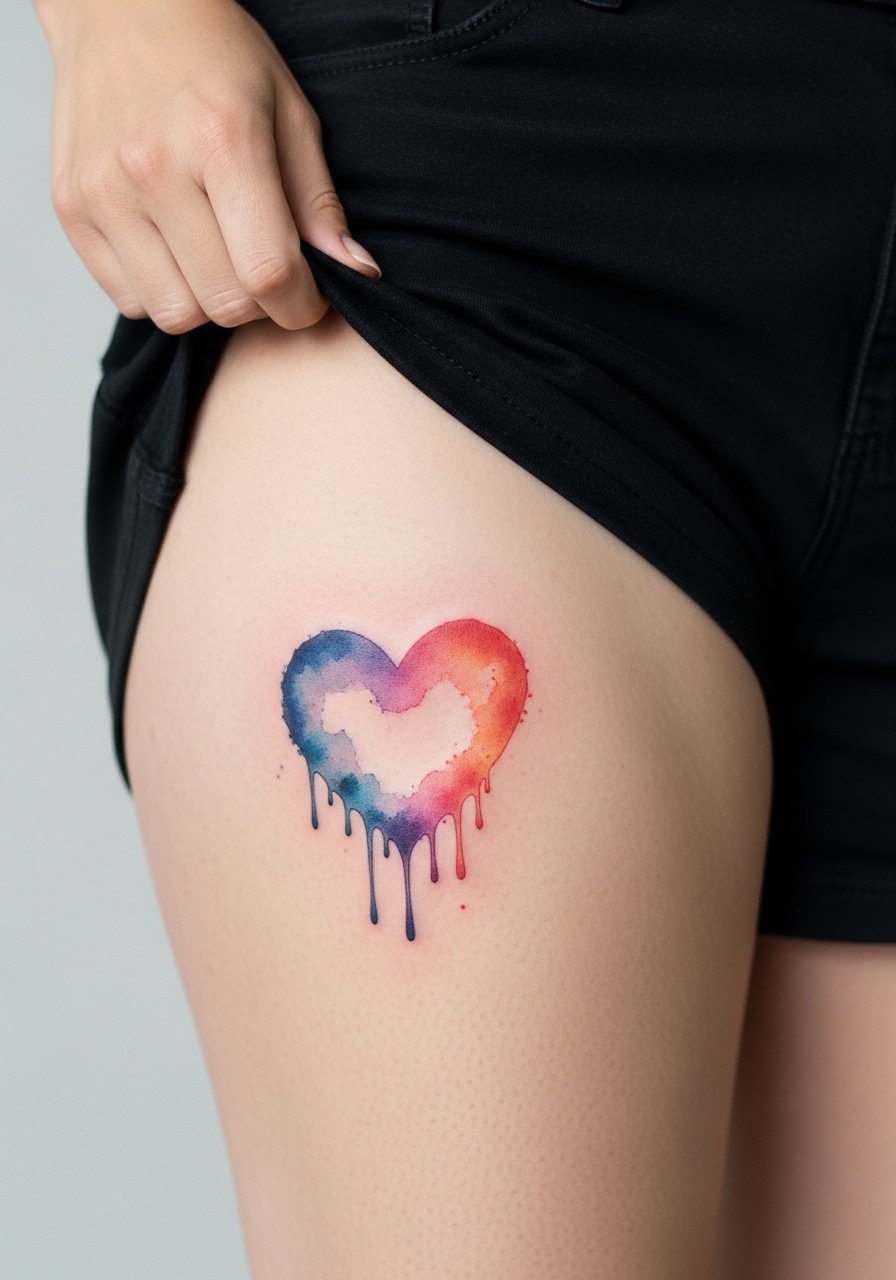
Watercolor looks stunning fresh but some artists prefer solid fills for longevity. If you want painterly edges, request saturated cores with softer outer washes so the central color maintains shape as edges diffuse. Thigh placement tolerates larger color and handles weight changes better than hips, but sudden weight loss can still distort fine lines. Session comfort is medium; wear loose shorts or a wrap skirt for access. Pair the healed piece with high waist mini skirt styles that show off the color without rubbing.
9. Ignorant Style Wave on the Calf

The ignorant style embraces uneven, playful lines that nod to nostalgia. Calf placement handles larger widths and the skin there is stable for 1-2 session work. The mistake is making the lines too precise; ask for a sketchy reference with thicker strokes where you want permanence. Calf pain is moderate and sessions can run up to an hour for a 3-inch width. For outfit pairing, cropped trousers and summer sandals highlight the whimsical curve.
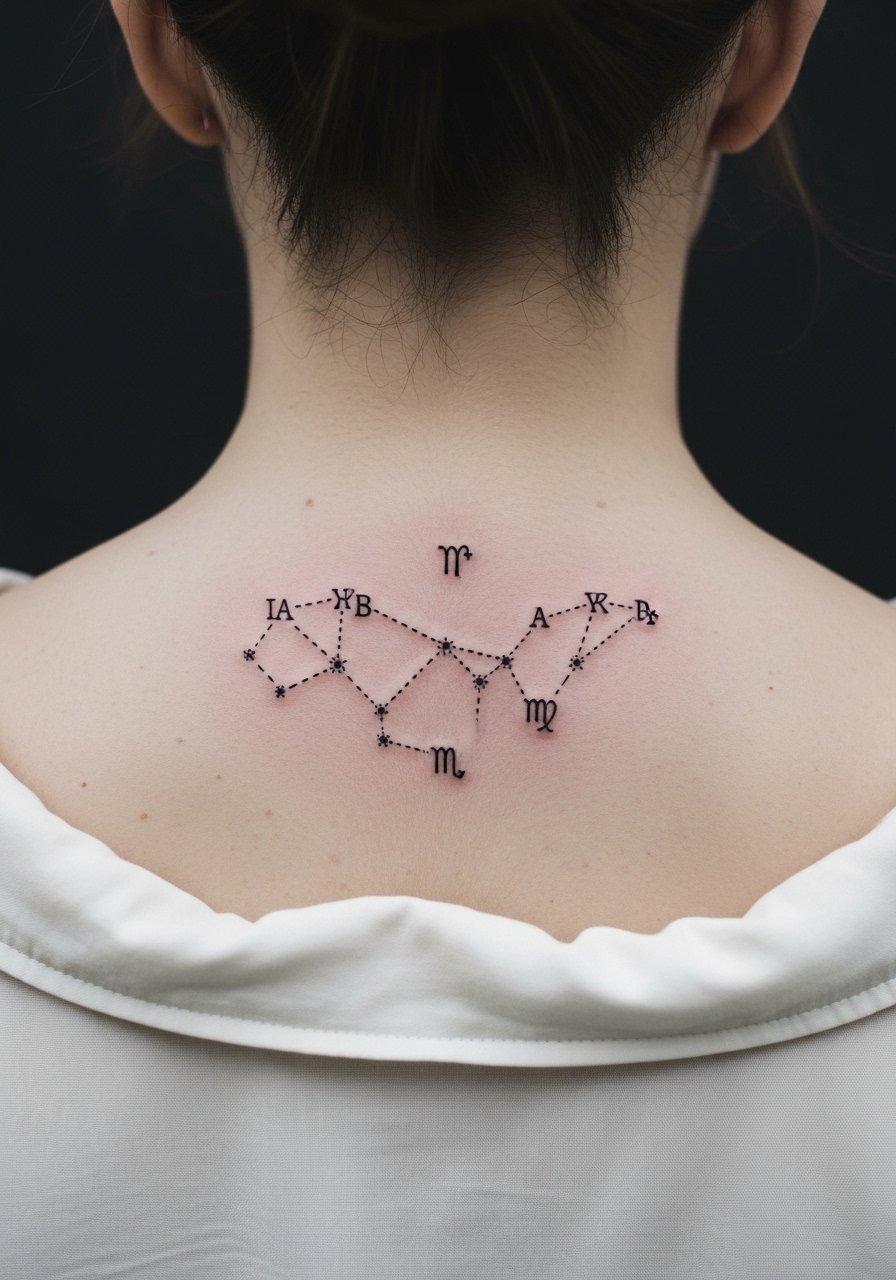
10. Fine Line Constellation at the Nape

Neck nape constellations are climbing in searches, but fine line here can soften if placed in dense clusters. Ask for slightly larger dots and subtle spacing, and place the cluster where hair can partially conceal it if you want privacy. Pain is low to moderate and sessions are fast. The dispute about fine line durability applies here too; one camp says nape skin holds detail, the other says hair movement and friction cause fading. Bring reference birth-chart pins if you want personalization and plan a touch-up at year one if the dots lose crispness. For styling, half-up hair styles or high neck blouses reveal the piece selectively.
11. Ornamental Henna-Inspired Vine on the Hip

Hip vines wrap curves beautifully, but they endure stretch from body changes. For a long-lasting result, ask for slightly bolder outline points where the design crosses the hip bone and avoid ultra-fine filler lines near the groin where friction is high. The session is low to medium pain and may take one hour for a 4-inch wrap. Since this area is intimate, confirm the artist's experience with curved placements and request healed photos on similar body types. Style with low-rise swimwear when you want summer visibility.
12. Traditional Anchor with Ribbon on Upper Arm

Classic American traditional pieces age well because linework and saturation read across years. The upper arm is forgiving, low on pain, and perfect for a 2.5-inch flash or custom piece. Ask for solid black outlines and layered color saturation to resist early fading. Avoid asking for tiny ribbons with thin script; scale up the banner text so it reads at a glance. For the session, a short-sleeve loose top works fine. A simple signet or cuff on the opposite arm balances the look.
13. Small Geometric Mountain Range on the Inner Wrist
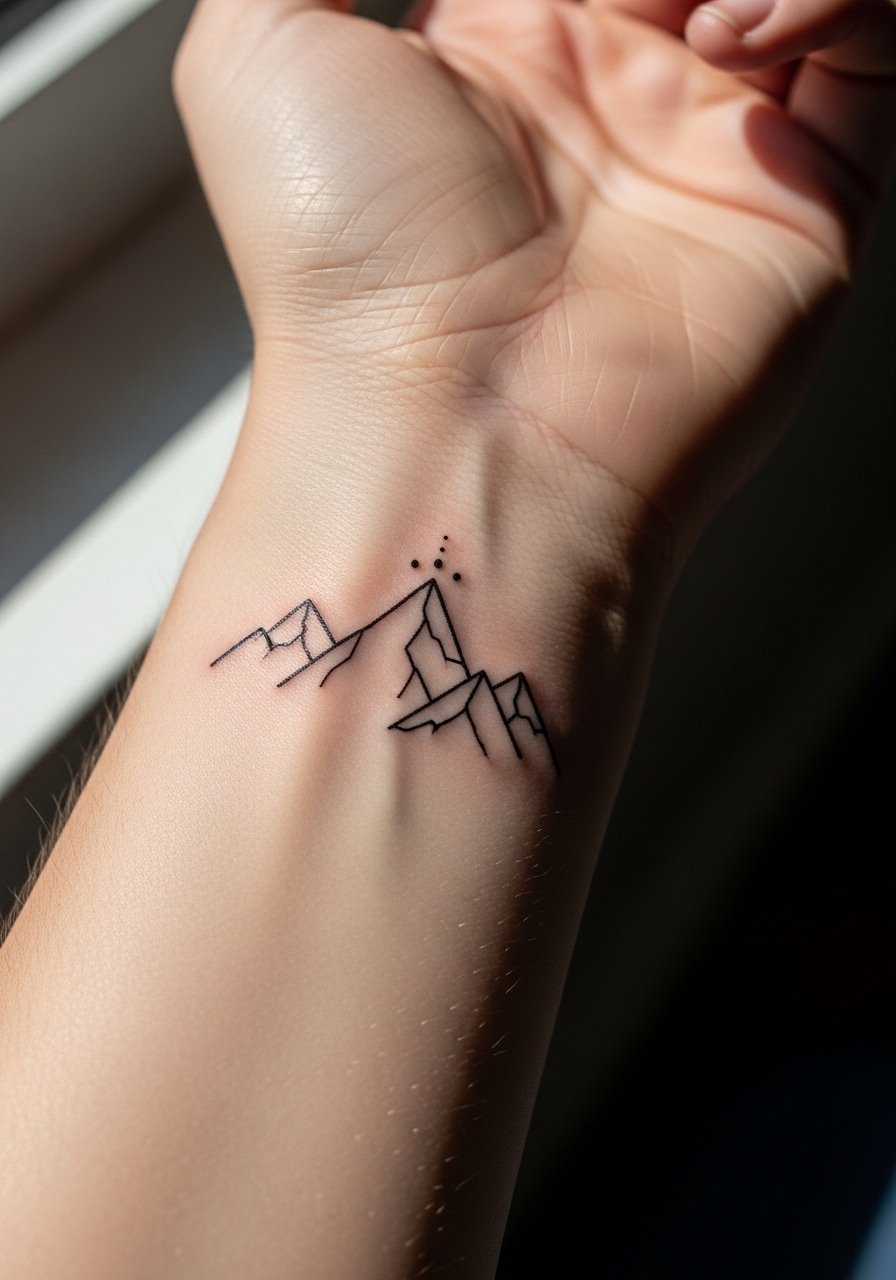
Most people pick tiny mountain ranges for meaning of place, but fine geometric peaks can blur if placed too small. Ask for clear negative space between peaks and slightly thicker anchor lines at the base. The wrist is exposed and susceptible to UV, so plan sun protection after healing. A quick session, moderate pain, and a six-week check-in for a touch-up is realistic. Style it with a thin chain pendant necklace that sits above the wrist when layered with bracelets.
14. Underboob Sternum Stars

Underboob or sternum placements are intimate and require a practitioner experienced in curved anatomy. The biggest mistake is asking for ultra-fine clusters that spread on the sternum; request slightly larger star points and clear spacing. Pain is higher on the sternum and sessions may be broken into short passes. Consider a fitted sports bra for the appointment so the artist can access the area safely. Many people prefer slight variations rather than exact symmetry to complement natural curves.
15. Miniature Script Behind the Ear

Text behind the ear needs exact wording in the prompt for clear image results and a careful stencil. The area hides well under hair and photographs best when short hair or a tucked style is chosen. Pain is low to moderate and sessions are short, but the tiny letters can blur if not given room. Ask for simple lowercase lettering with slightly increased ink weight and plan a touch-up at six months. For the session, wear your hair up or in a loose ponytail.
16. Tiny Micro-Realism Eye on the Inner Bicep
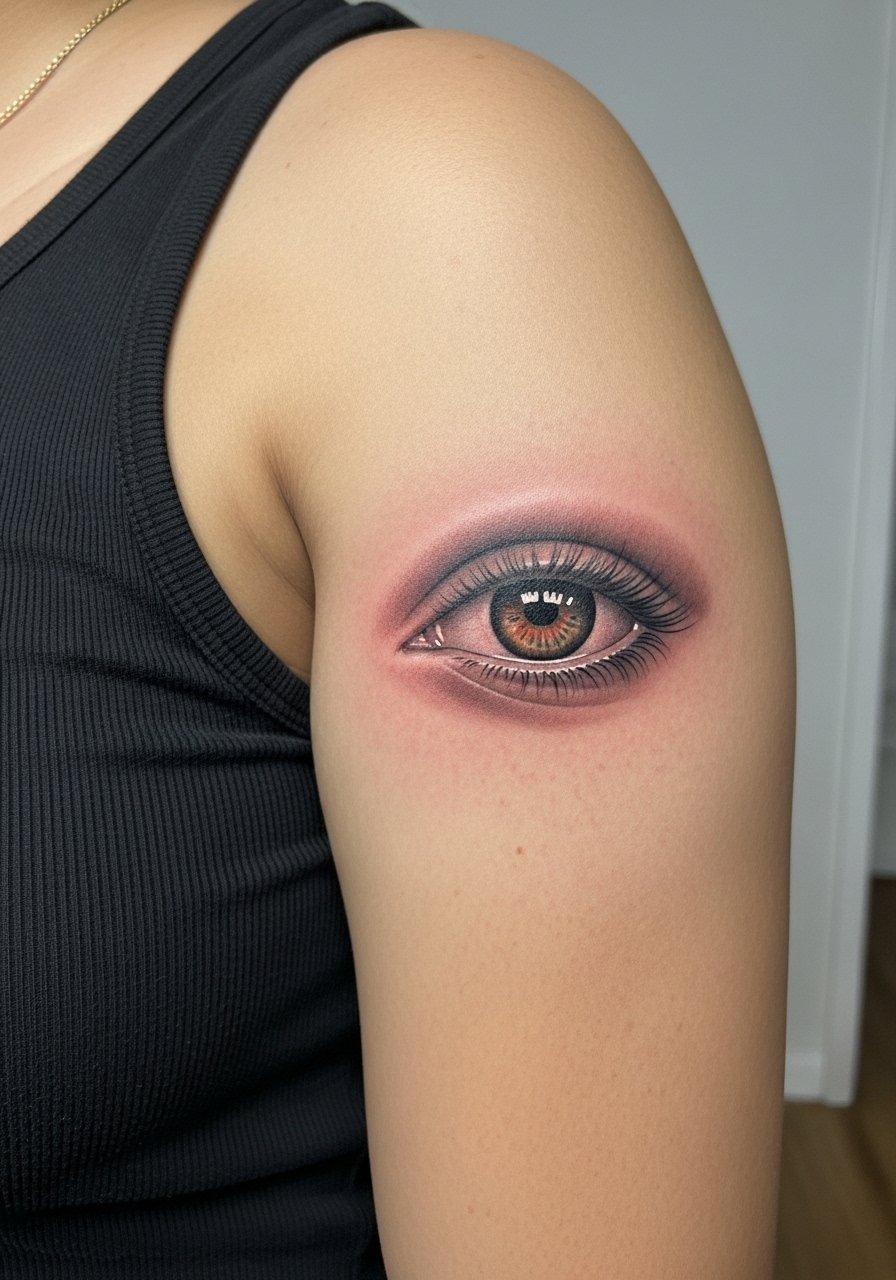
Inner bicep skin can be soft, which is great for shading but risky for blowout with overly dense dots. For an eye rendered small, ask your artist to prioritize crisp eyelid lines and light stipple shading for the iris. Pain varies but often sits at medium due to sensitivity. A common mistake is packing too much color into a tiny area. Wear a tank top to the session so the artist can raise your arm without tugging.
17. Spine-Parallel Tiny Botanical Line
Lower back lines show elegantly with open-back dresses, but the skin here can shift with posture. For a spine-parallel botanical, ask for slightly stronger stem lines and spaced leaves so the silhouette keeps definition. Sessions are moderate and can be done in a single sitting. If you plan weight changes, avoid very thin filigree near the waistline. Style with a low rise bikini bottom when you want to reveal it for summer.
18. Small Compass on the Top of the Foot
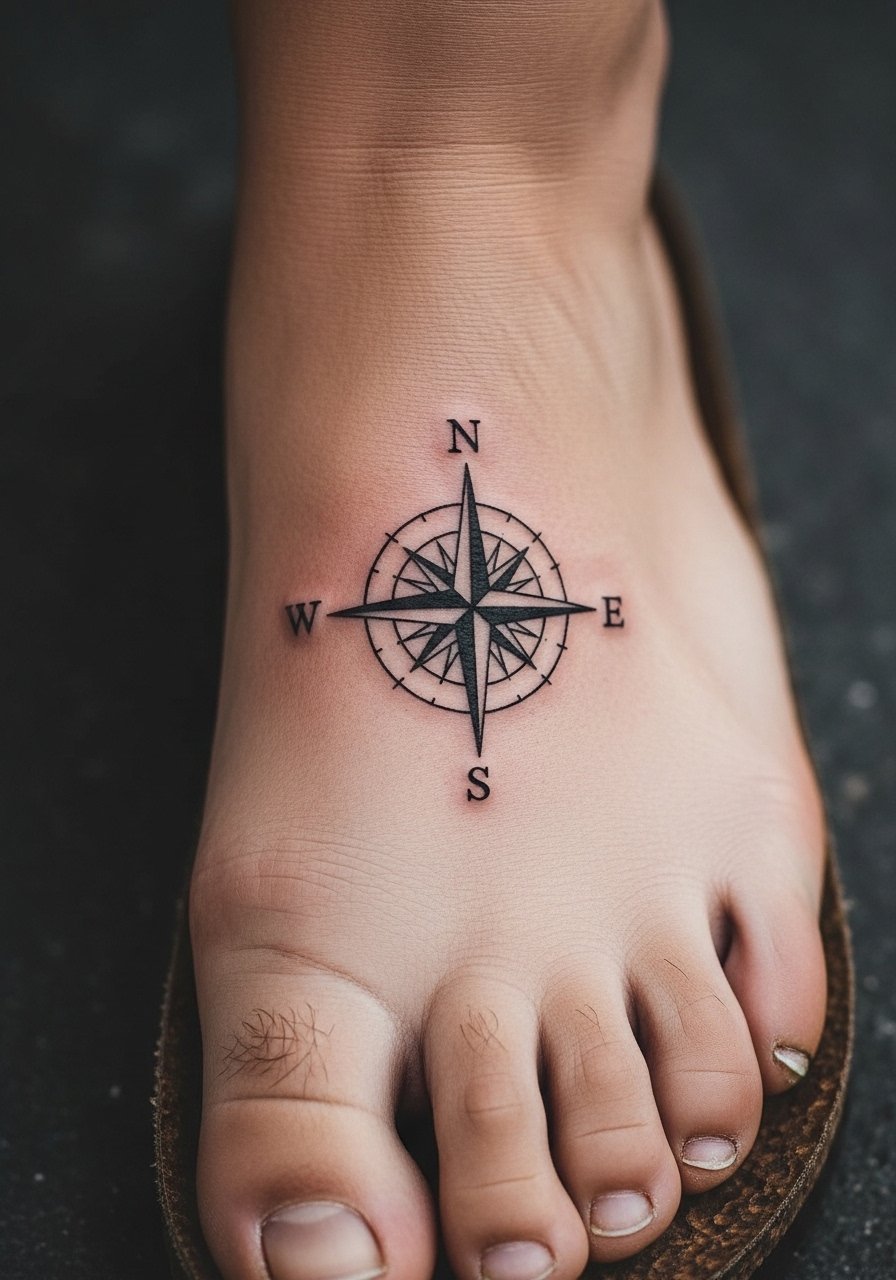
Top-of-foot tattoos endure abrasion from shoes and are prone to early fading. The fix is bold outline and minimal inner detail so the compass retains shape when washed frequently. Pain can be higher due to thin skin. Plan for a touch-up at six months. During the session, wear sandals you can easily remove and slip back on. For showing off, a delicate anklet pairs well without distracting from the compass.
19. Simple Line Galaxy on the Upper Thigh
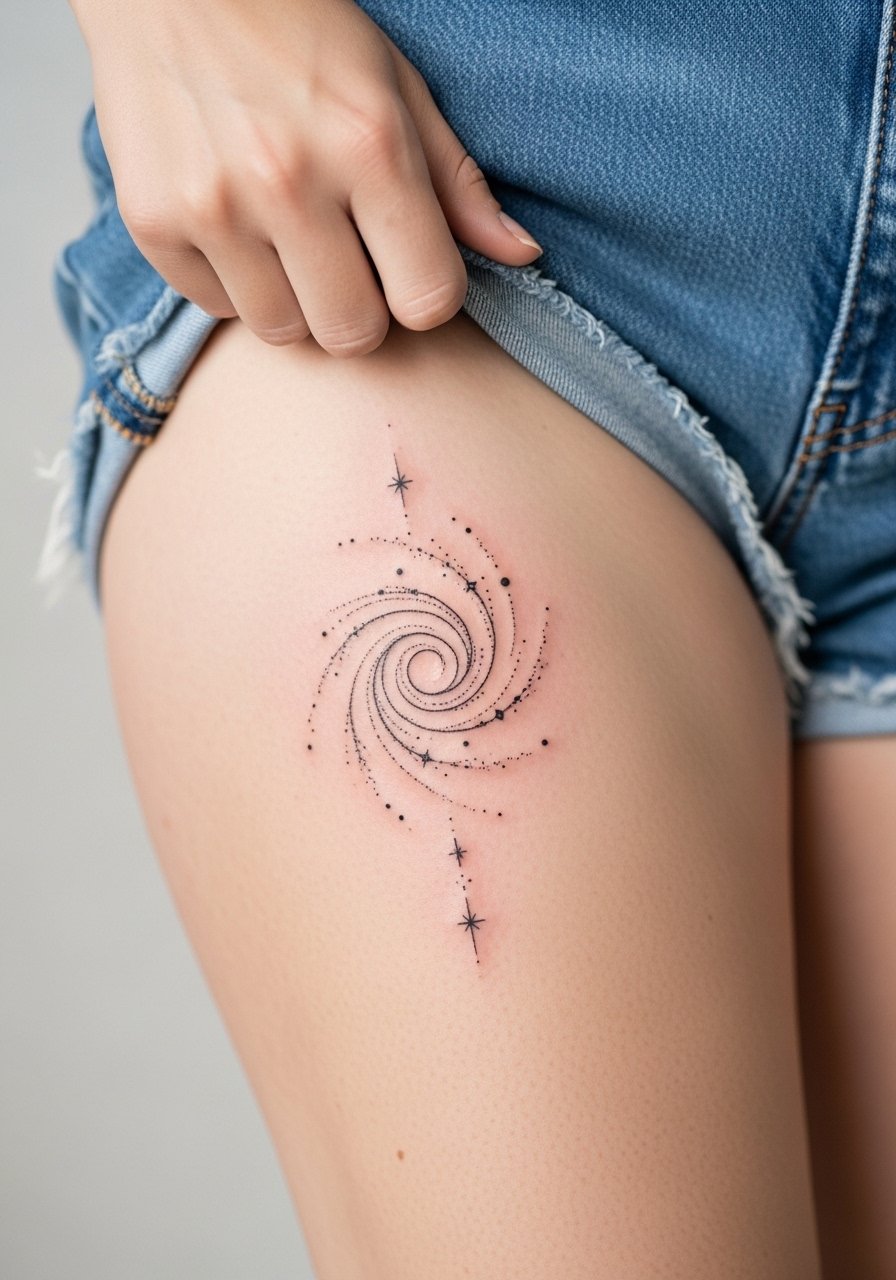
Upper thigh gives room for slight scale and texture, which helps linework survive shifting over time. Galaxy elements benefit from a mix of thin lines and tiny dot work around stars to keep depth. Sessions are comfortable and privacy-friendly. The common mistake is making the stars too dense, which turns into muddiness after a few years. For session wear, loose shorts or a wrap skirt let the artist work without discomfort.
20. Minimalist Single-Needle Crescent Behind the Ear
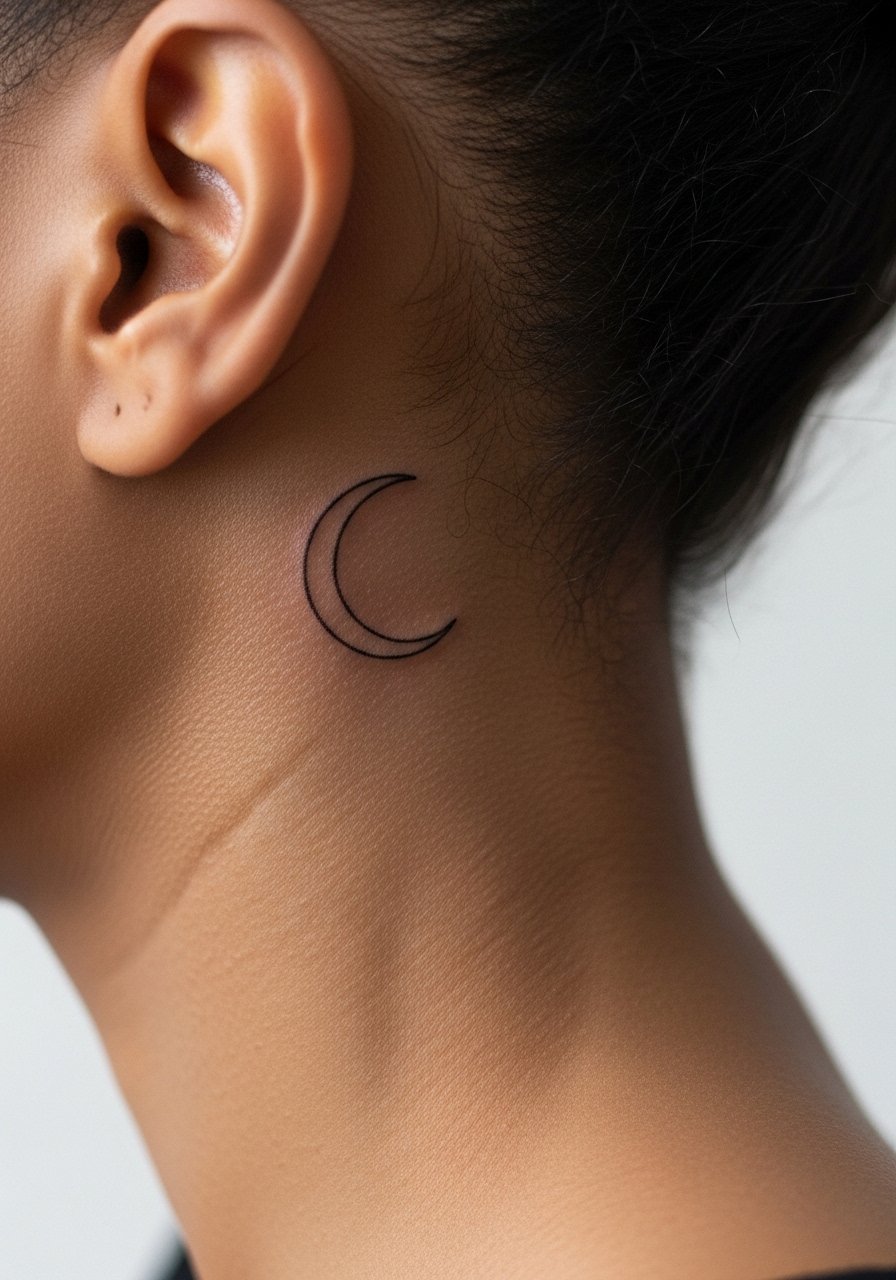
Behind the ear placements are discreet and need careful placement relative to the hairline. Single-needle crescents look elegant but can become faint on darker skin if the needle depth is too shallow. Talk to the artist about depth and modest line weight. Sessions are tiny and quick. Bring a picture of your preferred hair part for accurate stencil placement. Consider an updo on show days to reveal the moon.
21. Minimalist Wave on the Inner Forearm
Inner forearm waves photograph well and age better than ultra-thin wrist lines because the skin is more stable. Ask for a slightly increased stroke width and a tapered end to avoid hairline fading. Session is low to moderate pain and quick. Avoid cramming too many crests into a tiny space. Pair the piece with a rolled cuff blouse or a simple bracelet to keep attention on the line.
22. Small Mandala on the Back of the Arm Near the Tricep
Back-of-arm placements get occasional friction from bags, which can dull crisp dots. For mandalas, request thicker dot spacing and a slightly larger central motif so the design remains legible as it softens. Pain is moderate and sessions are usually under an hour. A common oversight is choosing extremely dense fill. Wear a loose tank to the appointment for easy access.
23. Hip Wrap Vine Near the Groin

Hip wrap designs move with the body and look great but are vulnerable to stretch. If you expect weight fluctuation, pick bolder anchor lines and avoid intricate internal filigree. The session is usually comfortable and quick for a 3-4 inch wrap. The common mistake is assuming tiny looped details will survive body changes. Style with cropped tanks or swimwear bottoms that compliment the curve when you want to show it.
24. Micro-Realism Floral on the Back of the Hand

Hand tattoos still carry professional considerations in some fields and face heavy wear from washing. Micro-realism on the hand needs bold focal petals and minimized tiny veins so the core stays readable. Pain is higher and fading is likely, so expect touch-ups sooner than other placements. If your line of work is strict, consider forearm placement instead. For the session, keep your hand relaxed and free of rings.
25. Small Script Along the Collarbone That Handles Weight Shifts
Collarbone scripts can stretch with significant weight changes, so a smart approach is to place the script parallel to the bone and use slightly heavier strokes in key letters for future legibility. The pain is low to moderate, and sessions tend toward 30 to 45 minutes. A common mistake is centering script where the skin tugs; ask the artist to mock the stencil while you move your shoulders. For showing off, a pearl necklace layer sits nicely above a short script.
26. Small Sun Glyph on the Calf Outer Side

Calf outer placements are sturdy and handle crisp glyphs well. The key is avoiding too many internal spokes that can blur into a sun disk. Sessions are comfortable for most people and healing is straightforward. For visibility, cropped pants reveal the graphic in summer. A common mistake is wanting an ultra-detailed face inside a two-inch sun; keep faces minimal or go larger.
27. Constellation as a Mini Birth Chart on the Nape
Personalized nape constellations are under-covered as a way to map a birth chart into a compact cluster. The consultation should include which planets or points you want represented and whether each dot should be a different size to keep hierarchy. Pain is low to moderate and the session is quick. A good practice is to request a mockup on your neck before the session to confirm placement relative to the hairline. Half-up hairstyles work best to reveal the cluster selectively.
Frequently Asked Questions
Q: Will fine line tattoos look worse faster on darker skin tones?
A: From what I have seen, the thinnest single-needle lines can read fainter on darker tones if the needle depth is not adjusted. Ask an artist experienced with that skin type for stronger line weight and slightly larger spacing so the design keeps shape over the first year. Photography can also be improved with adjusted lighting when you want to share images.
Q: How often do finger and hand tattoos need touch-ups compared with forearm pieces?
A: Hand and finger tattoos face more friction and washing, which accelerates fading. It is common to need touch-ups within six to twelve months for finger work, while forearms often hold longer, sometimes two to three years before a touch-up. Plan for a realistic touch-up timeline during your consult.
Q: Saniderm or dry healing, which camp should I pick for small fine line work?
A: The community splits on this. One camp prefers protective films that keep the area moist and reduce scabbing. The other camp worries about trapped moisture and skin reactions and prefers open air after the initial bandage. Ask your artist which method they use and why, and test any adhesive patch on a small area if you have sensitive skin.
Q: Do collarbone and ribcage pieces handle weight fluctuations differently?
A: Yes. Collarbones sit on more stable bone structure and generally handle moderate weight changes with less distortion. Ribcage and hip placements can show more movement if you gain or lose significant weight. If you expect body changes, pick placements closer to bone or request bolder outlines to reduce visible stretching.
Q: Can I wear regular clothes to appointments for hip, thigh and rib sessions?
A: Yes. For hips and thighs, bring loose shorts or a wrap skirt so the artist can shift fabric aside easily. For ribs and sternum, a fitted sports bra or a button-front top you can lift slightly works best. Wearing the right session clothing keeps the experience smoother and protects the stencil during setup.
Q: Are watercolor tattoos worth it given color bleed concerns?
A: Watercolor can be gorgeous but can soften faster than saturated blackwork. If you value the painterly look, ask for saturated focal points with softer outer washes so the core holds as edges mellow. Expect color-touch plans sooner than for blackwork and plan outfit choices that avoid chafing the area during healing.
