
Fine line trends dominate saved boards, but what actually holds up a few years down the road depends less on aesthetics and more on placement, spacing, and honest line weight. If you want stencils that look great fresh and still read clean after a touch-up, start with designs that leave room to breathe and match the anatomy. Below are 21 stencil ideas built for new artists, each with consultation notes, aging expectations, and wardrobe tips that make the finished piece work in real life.
1. Fine Line Daisy Outline on Wrist
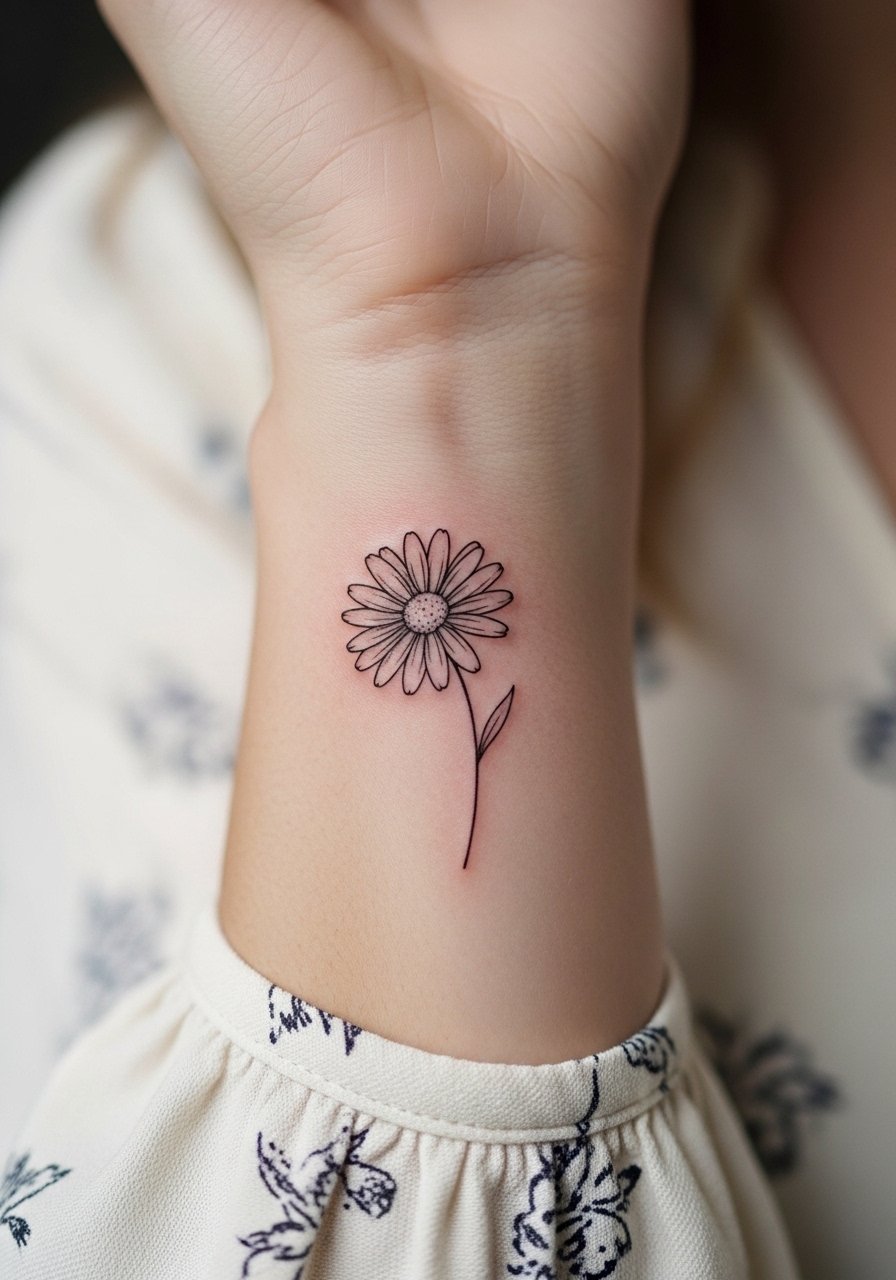
I recommend this when someone wants a delicate motif that still survives daily wear on the wrist. Tell your artist you want slightly bolder outlines than the reference so the petals keep their shape at year two. A common mistake is squeezing too many petals into a one-inch space, which causes merging as the ink settles. Expect a short session and a minor sensitivity around the bone. For showing it off, pair with a rolled cuff blouse and thin silver bangles, both of which frame the wrist without crowding the daisy.
2. Minimalist Heart with Teardrop on Inner Forearm
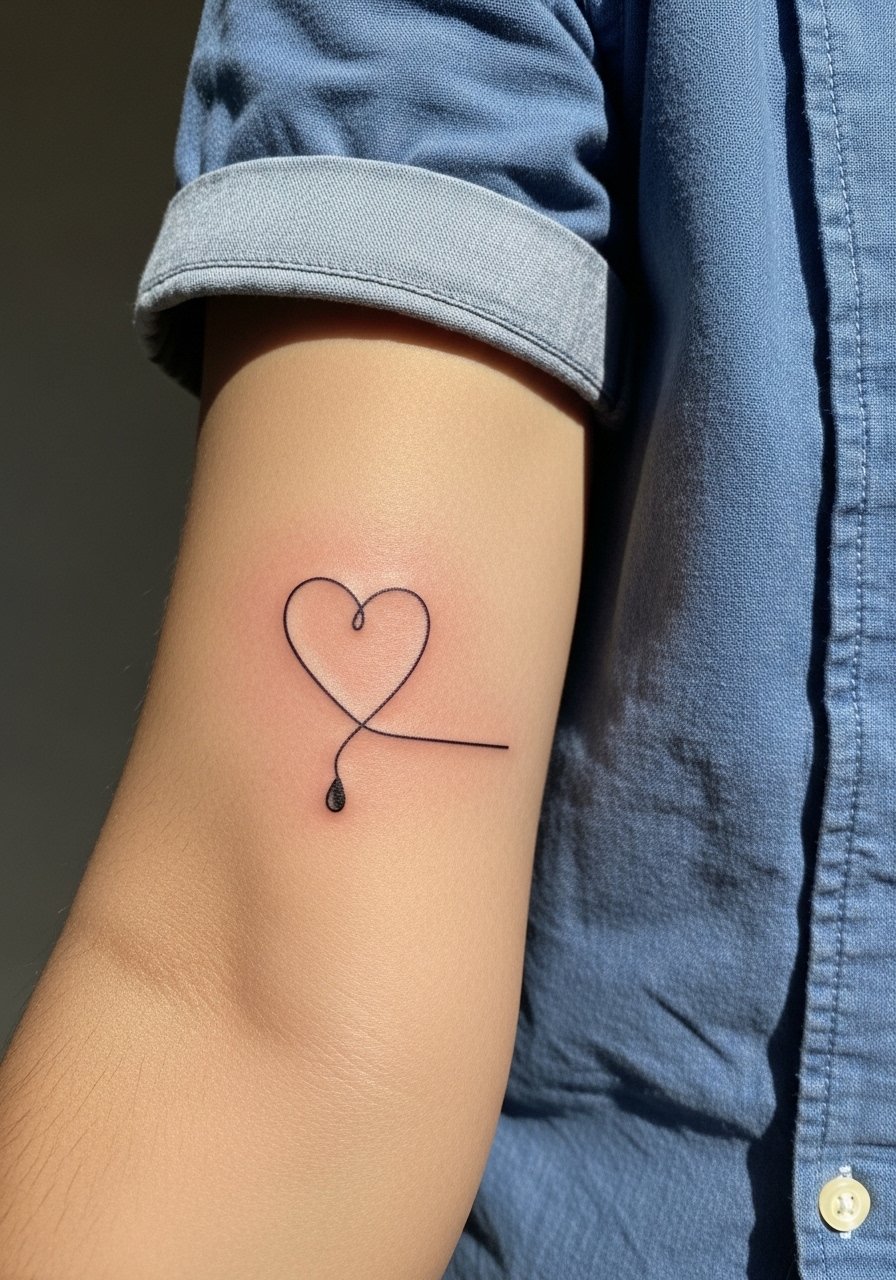
This stencil reads as private because forearm pieces can tuck or reveal easily. During the consult, ask for the heart to be scaled to one inch and for the teardrop to be proportional so negative space prevents early blurring. The biggest mistake is requesting near-microscopic details that will merge by year three. Pain is mild and the session is fast. Roll sleeves to show the piece with a chambray button shirt and a delicate leather cuff on the opposite arm for balance.
3. Crying Heart Traditional Flash on Ankle
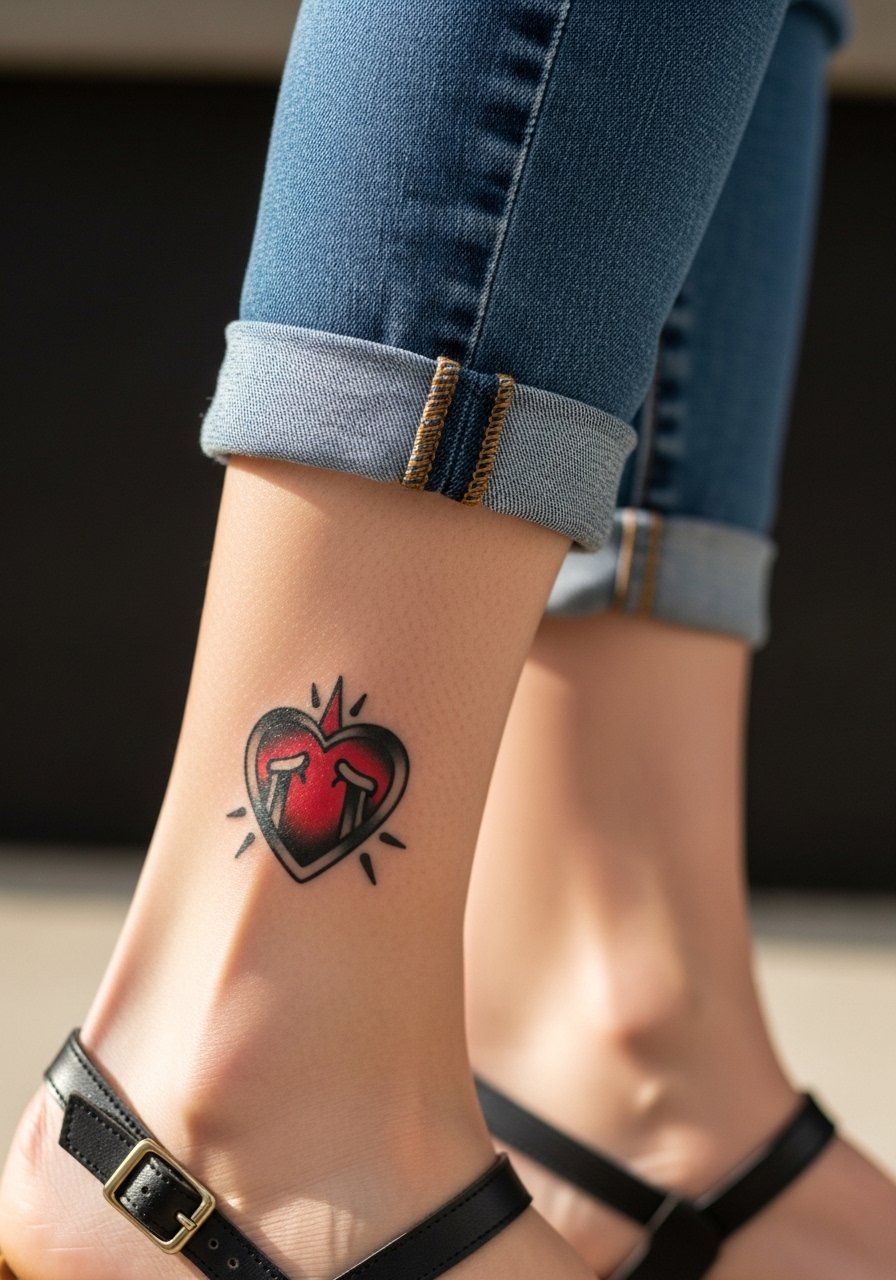
This retro flash looks great in summer footwear but remember ankles face constant friction. Ask for modest color saturation rather than full packing if you want less scabbing during healing. Artists sometimes go too small with traditional shading, which fades unevenly on the bony ankle. Session feels twingy by the bone, but is short. Show it off with strappy flat sandals and an ankle chain that draws attention without rubbing the fresh ink.
4. Dainty Floral Vine Wrist Wrap
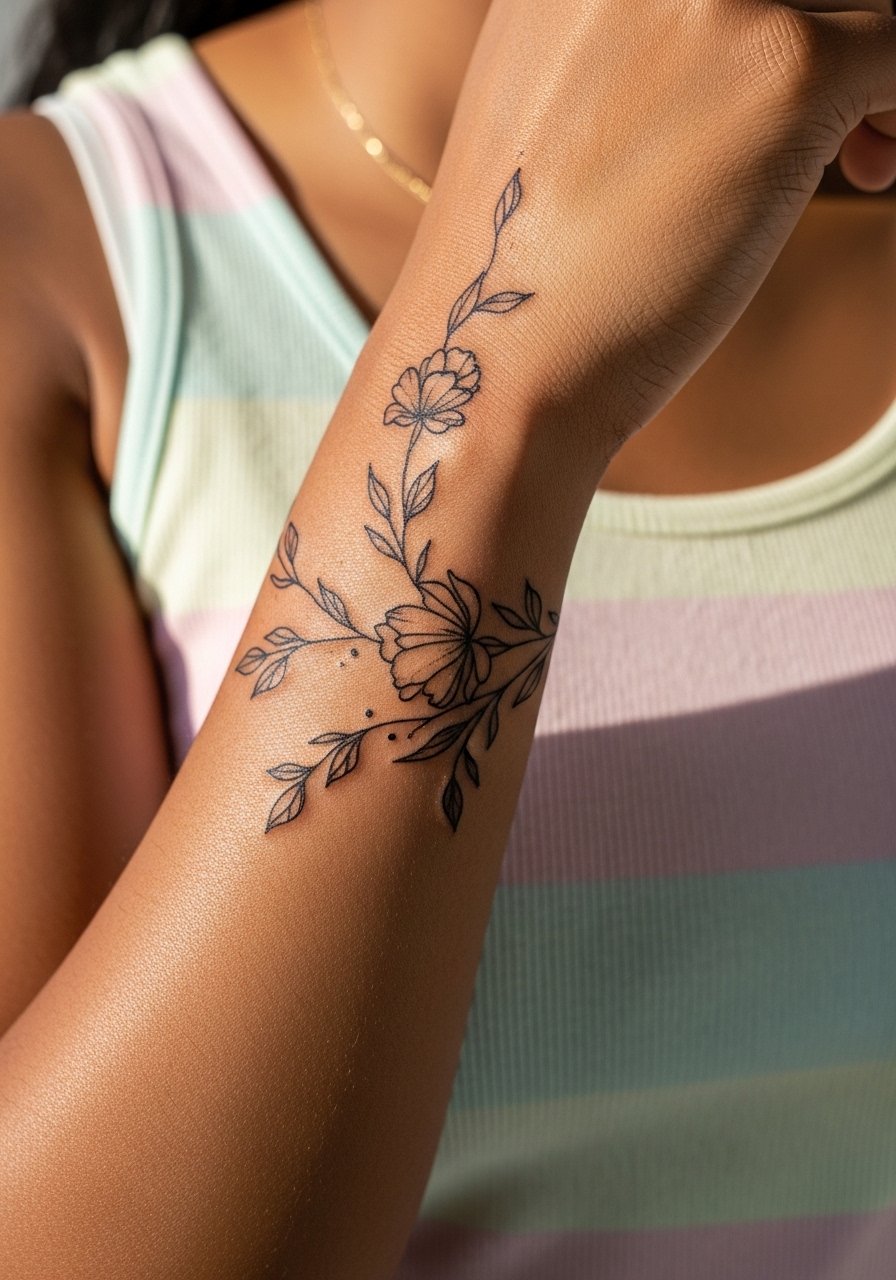
I suggest this when someone wants a band-like bracelet effect that can be scaled up later. Tell your artist to leave small gaps between leaves so stipple shading does not merge over time. The common error is over-detailing leaves in a narrow band, which looks cluttered after a year. Healing is straightforward but avoid tight bracelets for two weeks. For sessions and styling, wear a pastel cotton tank and plan to alternate with thin bangles on the opposite wrist so the vine reads as intentional jewelry.
5. Micro Bowtie on Collarbone
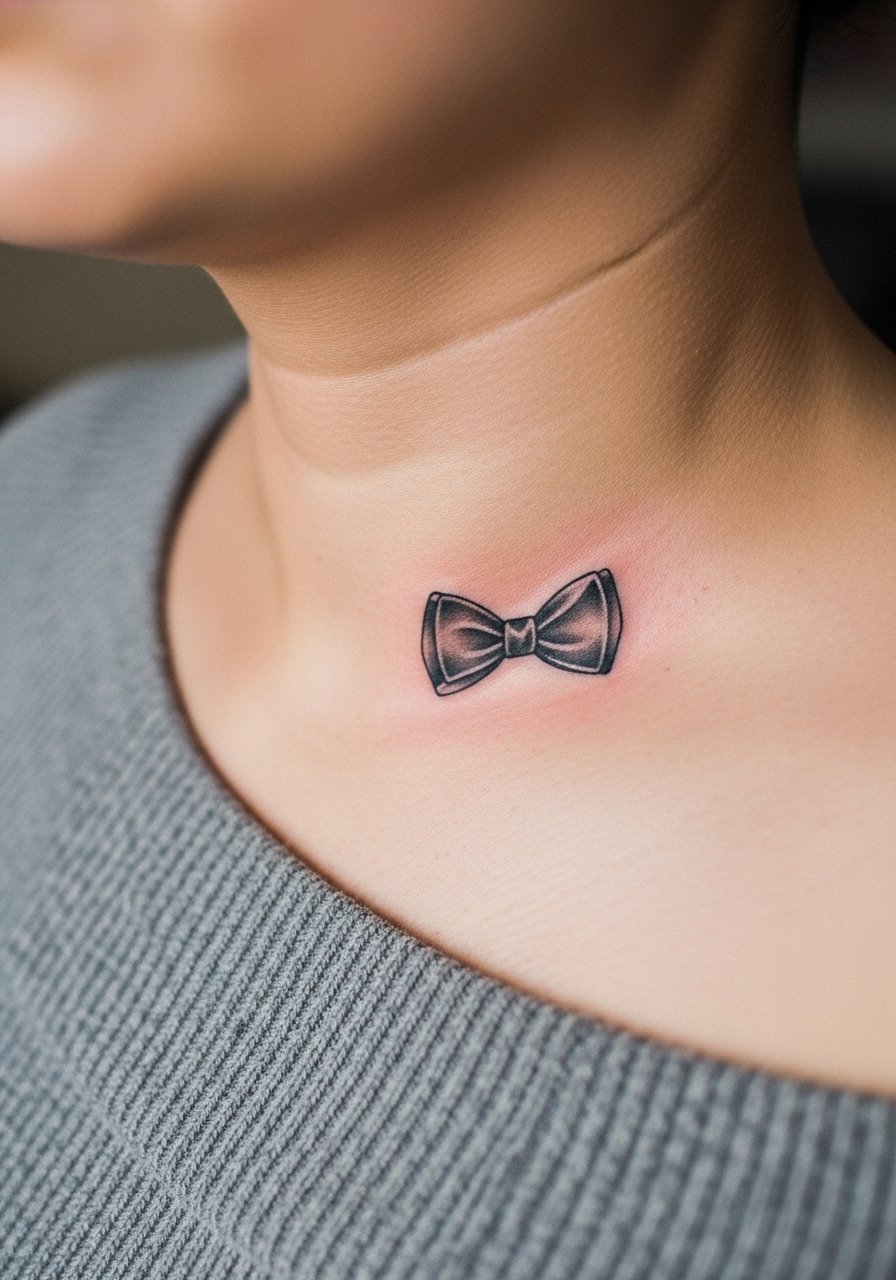
This playful micro piece is ideal for low-neck outfits that allow it to peek without dominating. Ask your artist for a tiny silhouette rather than dense shading to avoid an indistinct blob after two years. A mistake beginners make is requesting extra gray fill, which reduces the crisp micro edge. Expect a short, tolerable session. Show it off with an off shoulder sweater or strapless sundress so the bowtie appears intentionally placed.
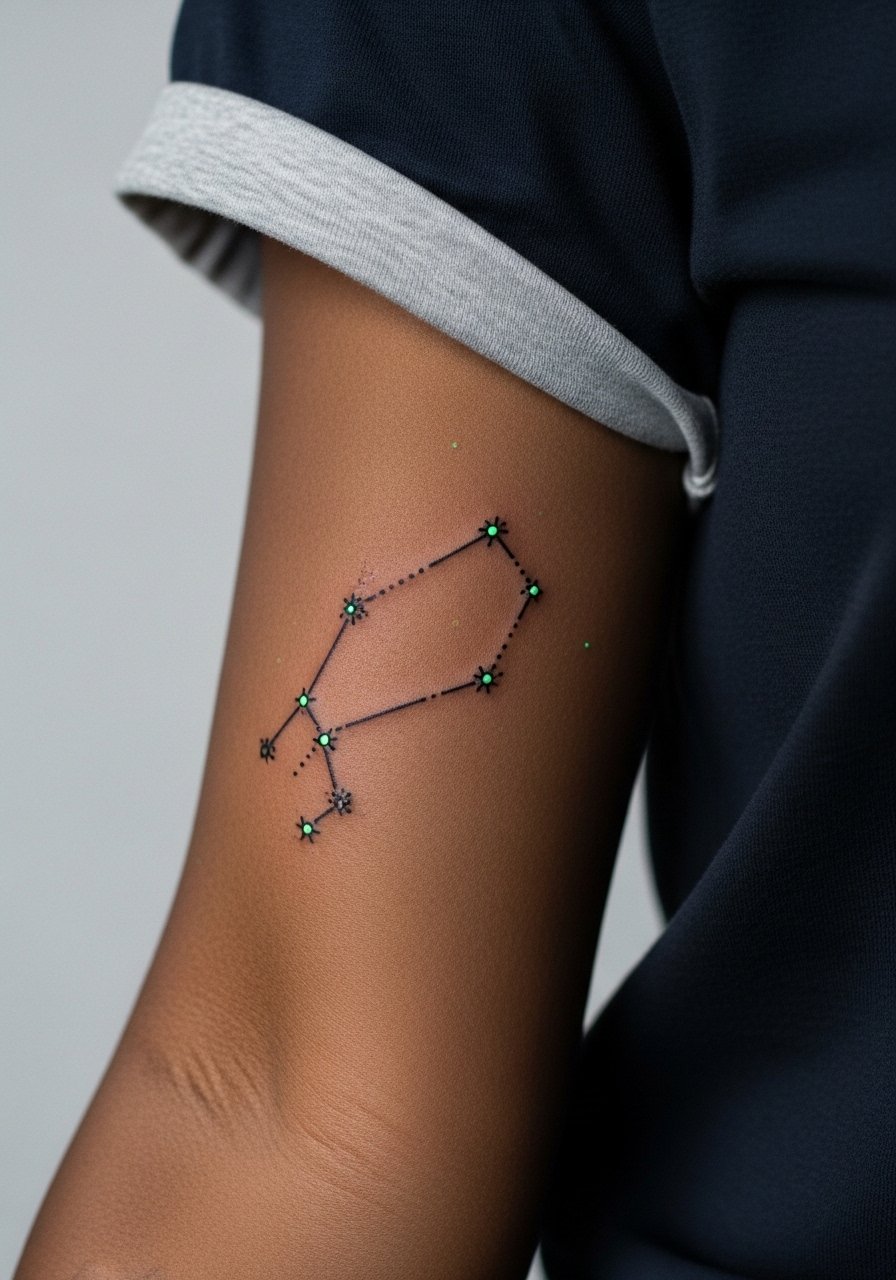
6. Tiny Star Cluster on Ribcage
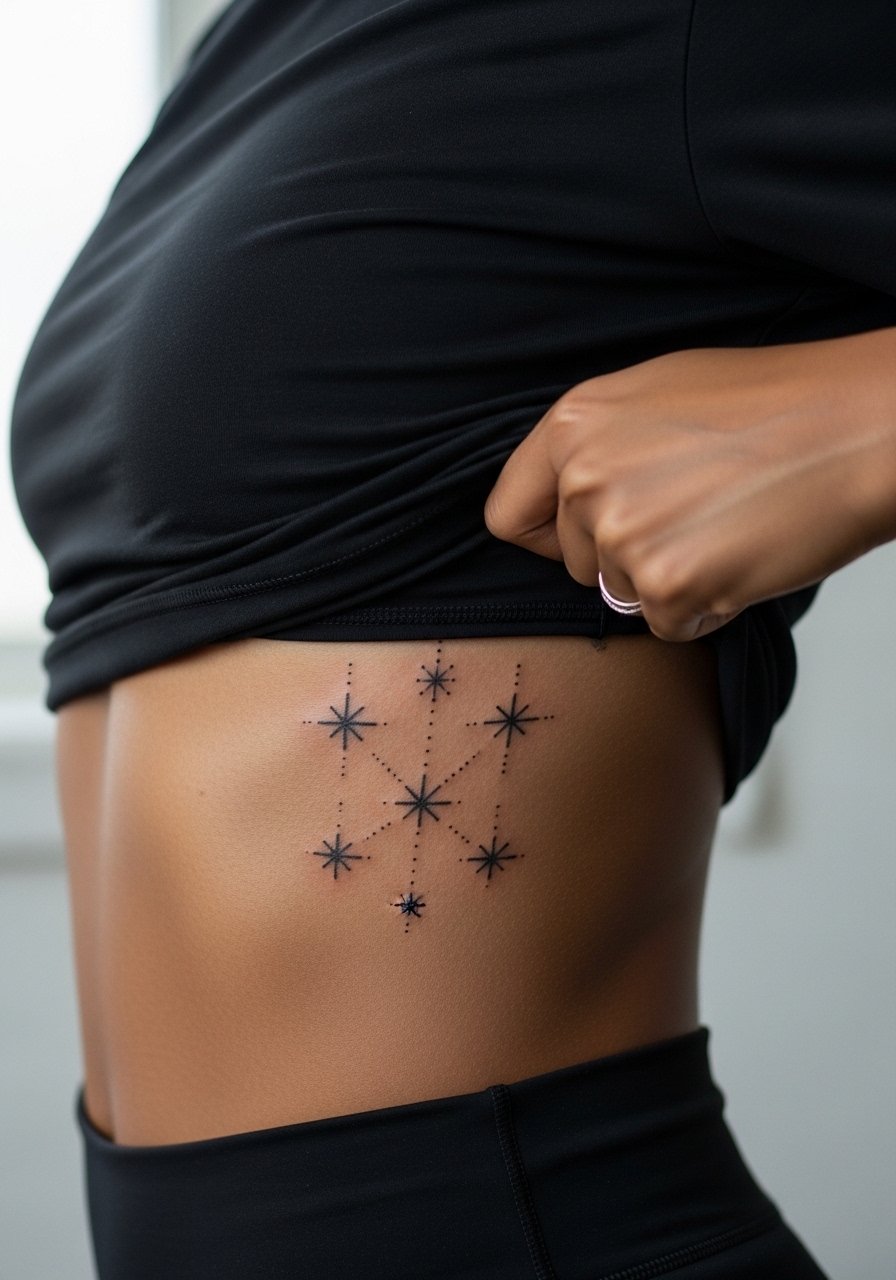
Fair warning, the ribcage rates higher on the pain chart, but it is excellent for private constellation motifs. Artists are split on fine line here. One camp says the skin stretch blurs lines within two years. The other camp says correct needle depth and spacing let fine line settle fine. Bring this up in consultation and ask the artist which side they practice. Keep the stars spaced to avoid merging and expect a possible touch-up at year two.
Studio Day Picks
The wrist and collarbone pieces above need different prep than the ribcage and ankle work, so a small kit tuned to those placements smooths the session and the first week.
-
Hildie & Jo stencil transfer solution. Helps stencils transfer crisply on curved or bony zones like the ankle and collarbone so the artist has a reliable guide.
-
Stencil stuff gel. Keeps transfers intact on clients who sweat or move, useful for wrist wraps and inner forearm placements.
-
Aussie soothing tattoo gel. Thinner texture that some clients prefer during dry climates, handy for gentle comfort on sensitive ribs.
-
Stencil transfer paper kit. Lets artists and clients preview scale on skin before committing, which matters for micro collarbone and daisy wrist pieces.
-
Aquaphor healing ointment. A thin first layer can help keep fine line work moisturized during the initial healing days without excessive crusting when used sparingly.
7. Fine Line Butterfly Silhouette on Thigh
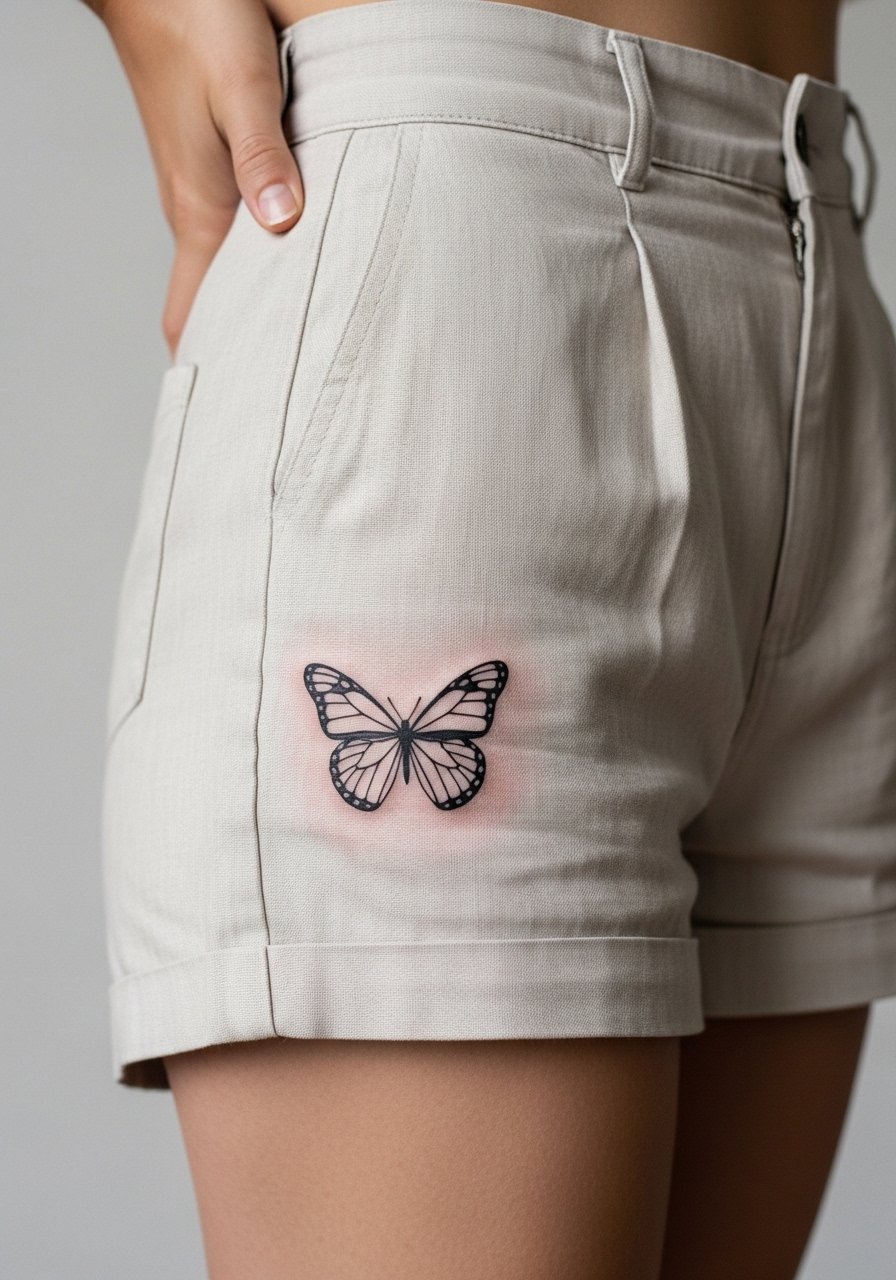
Thigh placements tolerate more movement and generally preserve detail better than wrists. For a butterfly, ask for clear wing margins and avoid excessive internal micro lines that will blur with thigh shifts. The common error is packing tiny veins into a small wing. Expect a medium-length session and mild soreness when sitting for long periods the first 48 hours. Pair with linen high waist shorts to show the piece off while keeping the area accessible for touch-ups.
8. Ornamental Lace Cuff on Upper Arm
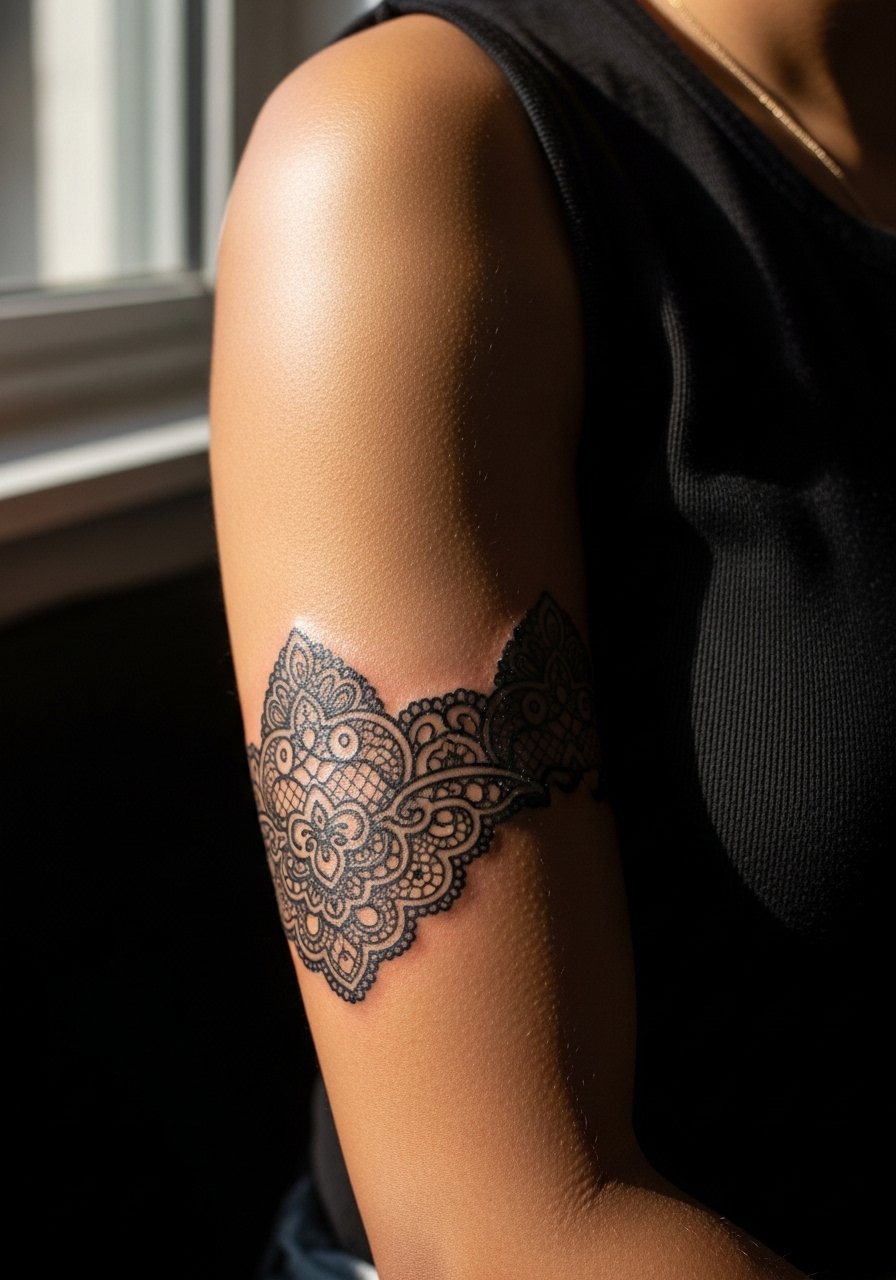
Upper arm bands age well because the skin is stable and less exposed to daily friction. Tell your artist you want negative space to mimic lace holes so the band breathes visually. A frequent mistake is crowding the cuff with too many small loops, which fills in during healing. Sessions may stretch longer for full lace patterning, but touch-ups are rare. For evenings out, an open-sleeve top or sleeveless bodysuit highlights the cuff without competing.
9. Cute Cat Silhouette with Whiskers on Shoulder
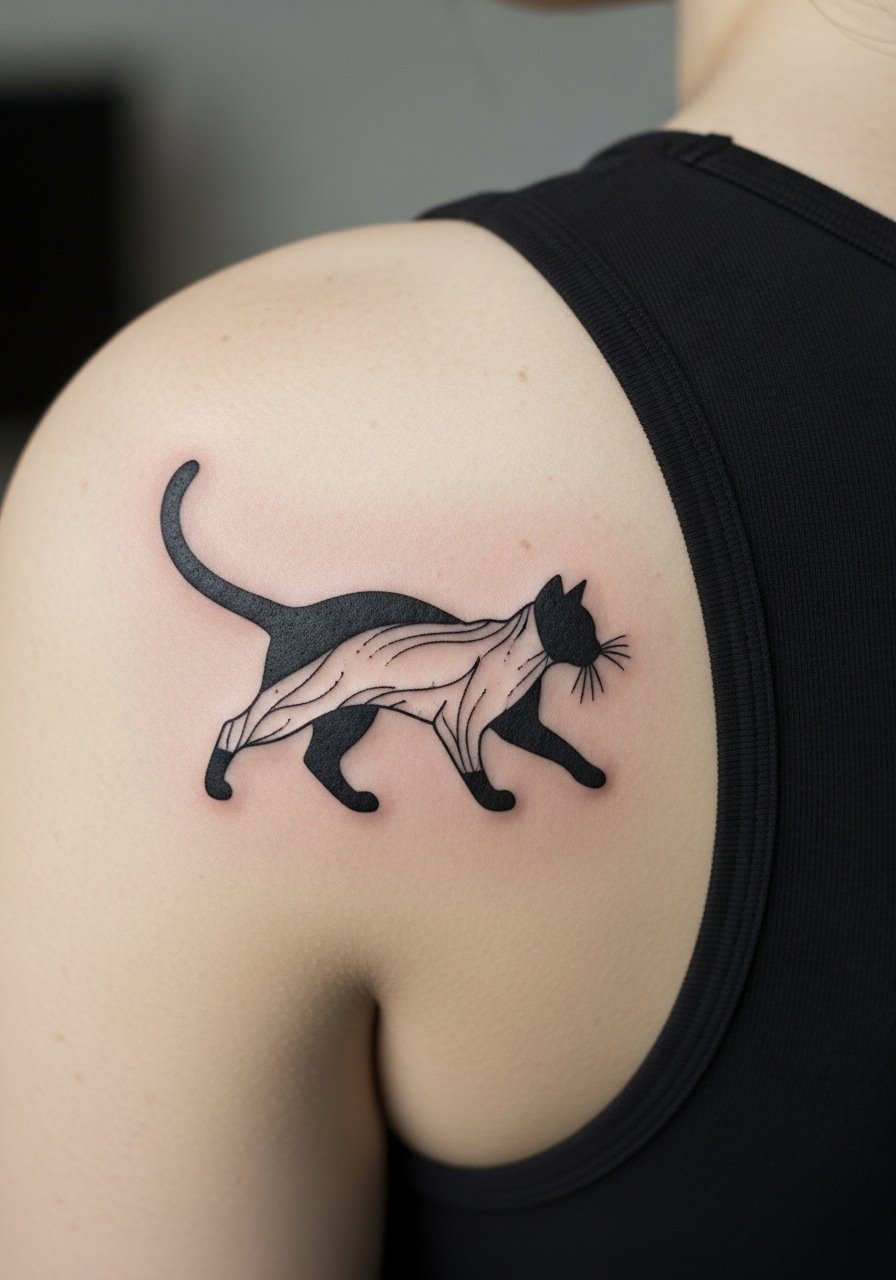
Pet motifs read well on the shoulder because the area is easy to conceal or display. Ask for whiskers to be etched with a single, slightly bolder line so they do not fade into the silhouette. The classic error is making whiskers hairline thin, which risks breakage in healing. Session is short and tolerable. Show it off with a sleeveless bodysuit or halter top so the silhouette sits clearly against solid fabric.
10. Minimalist Wave Line on Calf
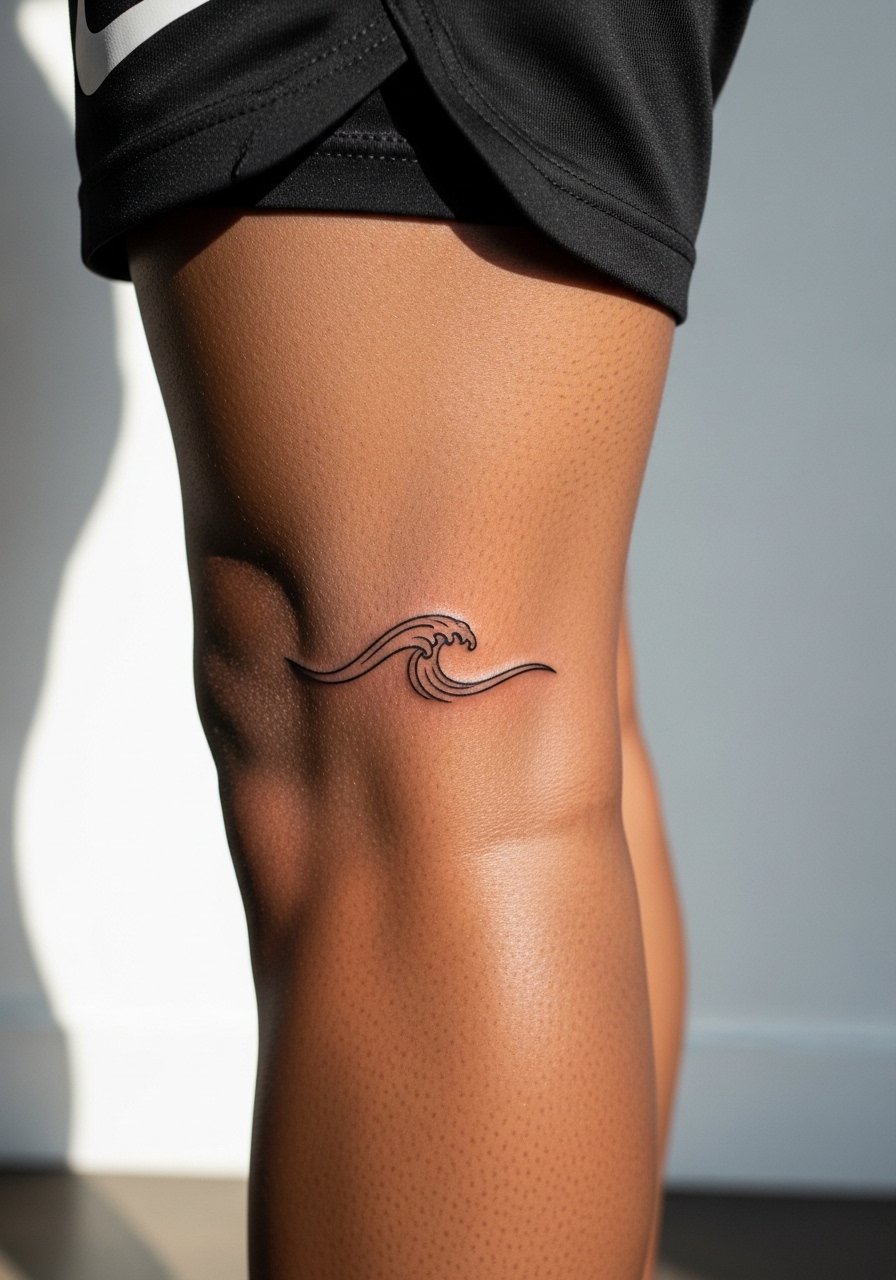
The calf is forgiving for motion-based motifs because muscle tone helps maintain line clarity. For a simple wave, ask your artist to keep the line continuous and avoid tiny oscillations that look noisy when viewed at a distance. A common mistake is placing the wave too close to the ankle where friction from socks blurs it. Sessions are comfortable and quick. Pair with rolled bootcut jeans or athletic bike shorts for seasonal visibility that frames the calf.
11. Tiny Mushroom Cluster on Inner Bicep
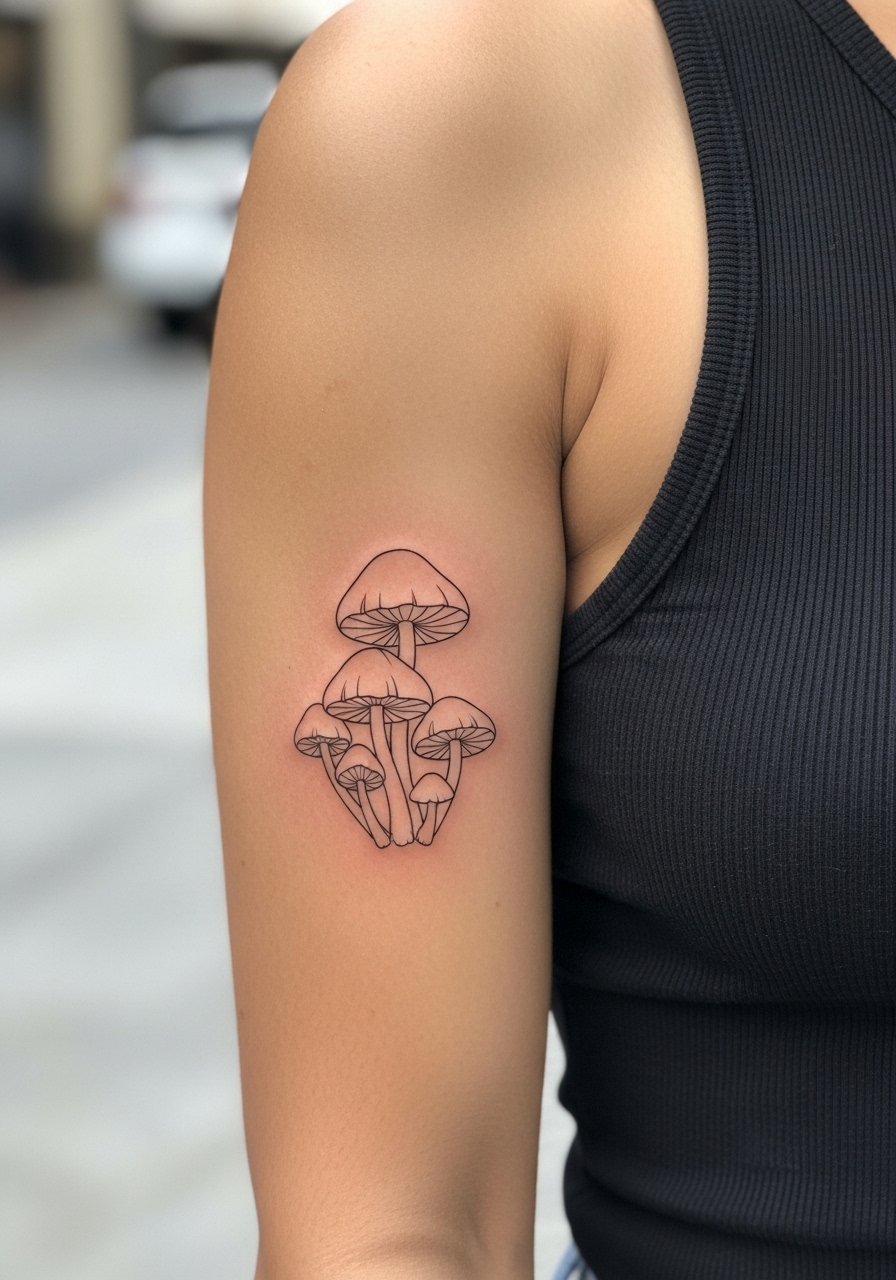
Inner bicep pieces can look crisp for years if spacing is considered, but the area is prone to friction from folds during movement. Ask the artist to space cluster stems and cap dots to avoid smudging. People often request ultra-small caps that merge after six months. Sessions feel tender with the arm held up, moderate on the pain scale. For the appointment, wear a loose tank top so the artist has clear access and you stay comfortable.
12. Dainty Crescent Moon Phases on Side Neck
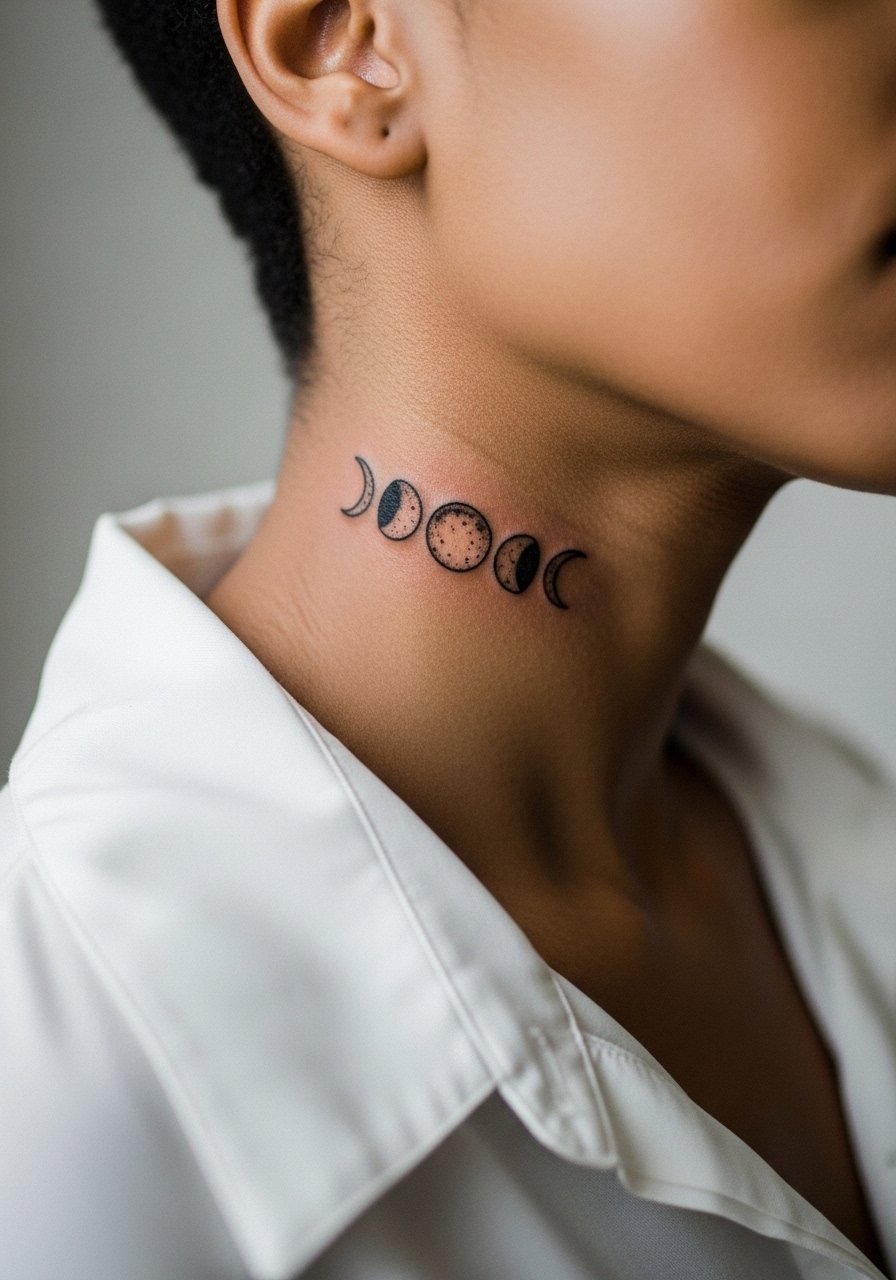
Neck placements carry visibility trade-offs and heal differently than torso pieces. When requesting phases, have the artist place them vertically to elongate the neck and keep gaps between crescents. The controversy over neck fine line longevity mirrors other fine line debates. One camp warns of early blur due to constant movement. The other camp says with correct spacing it holds. Ask your artist which approach they use, and consider a slightly larger scale for longevity.
13. Fine Line Strawberry with Seeds on Ankle Bone
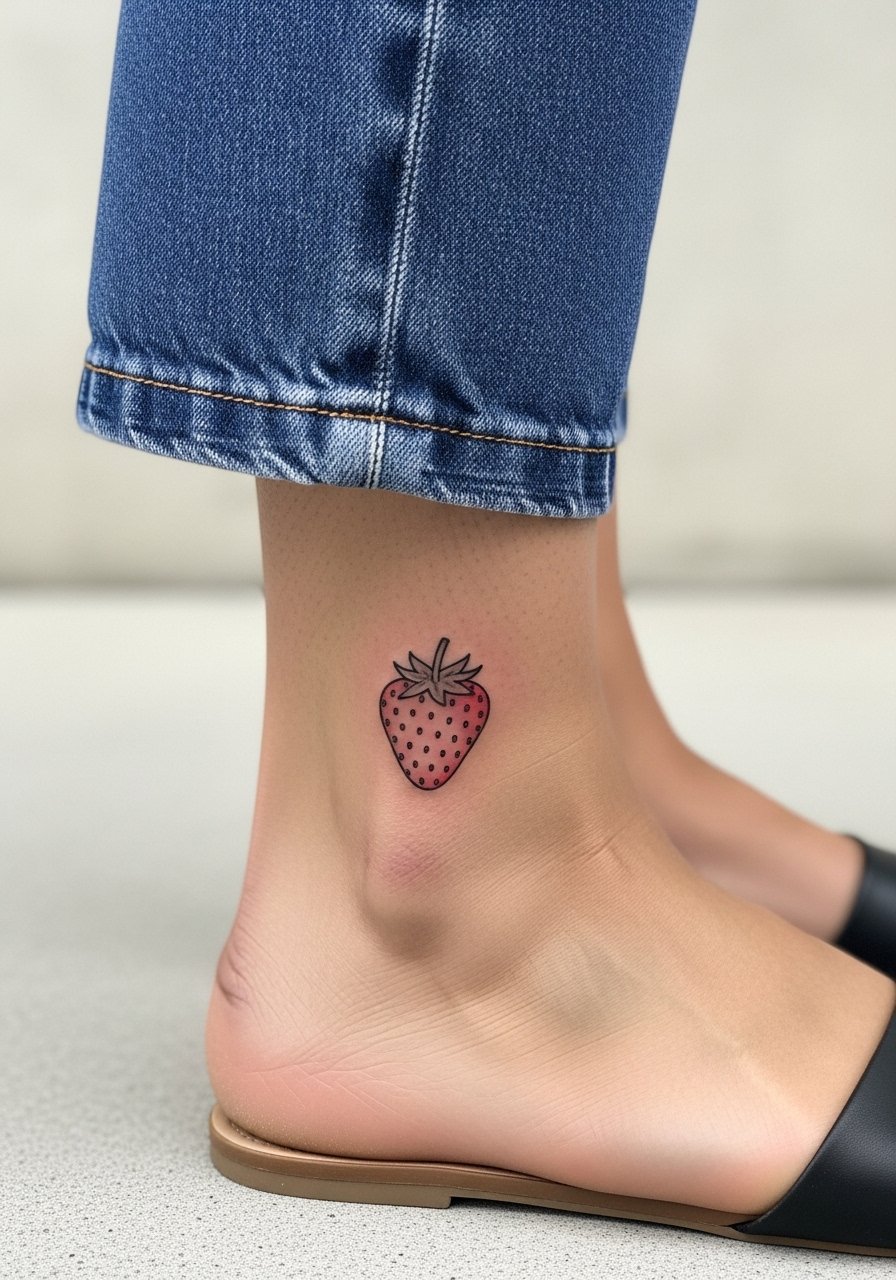
Ankle bone placements look charming in summer footwear but bones increase sensitivity and scab risk. For strawberries, ask for seed dots to be slightly larger and for the red fill to be light so it does not sit heavy during scabbing. Artists sometimes reduce the berry size too much, which loses detail after a season. Expect sharp pain near the ankle and a short session length. Show it off with cropped straight jeans and strappy sandals to frame the ankle without rubbing fresh ink.
14. Micro Script Word on Inner Wrist
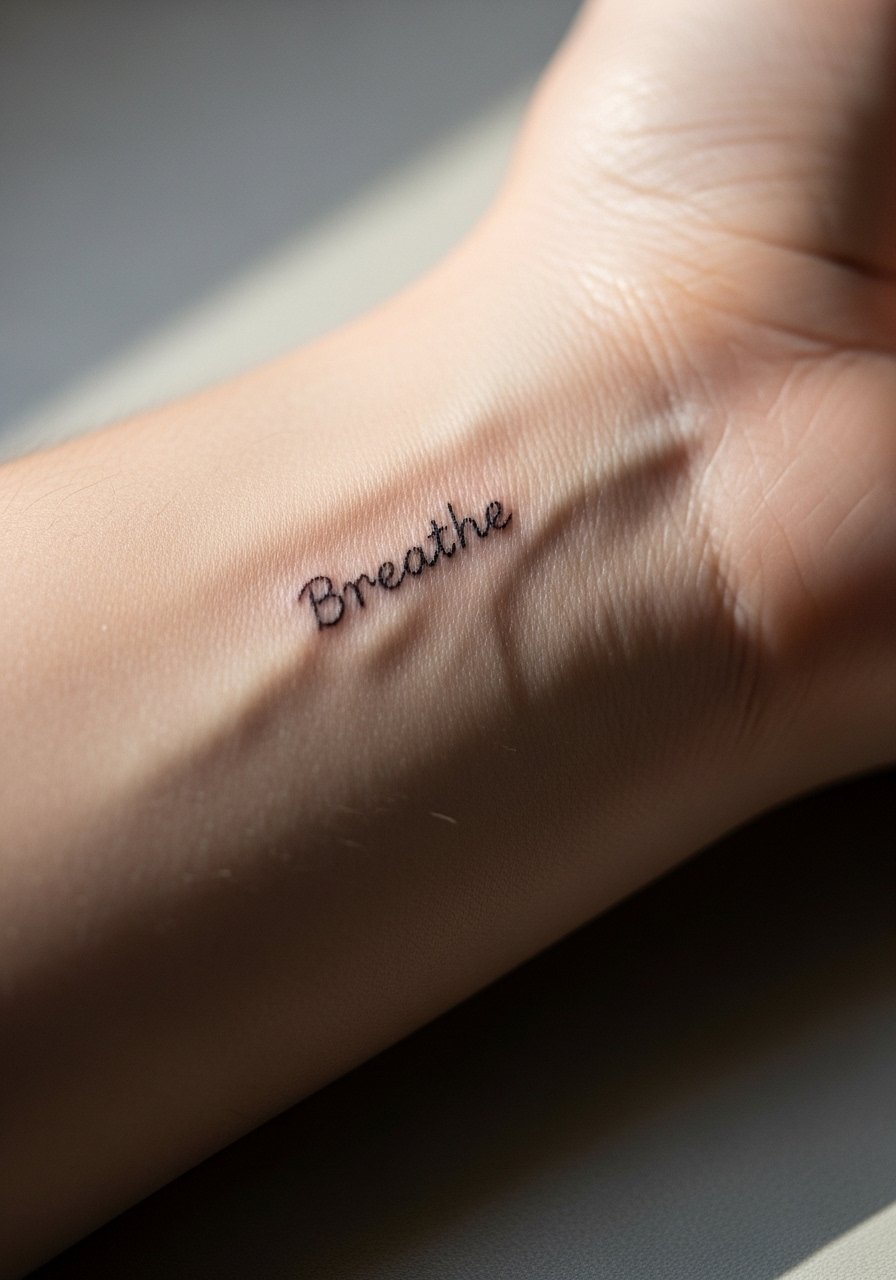
Micro script works when letter spacing and font weight are chosen for healing. Tell your artist the exact word and request a slightly thicker stroke for key downstrokes so the letters stay legible at 6 months. Common mistakes are choosing ornate scripts too tiny for one-inch spaces. Session is quick but sensitive on the wrist. For a polished look, wear a thin chain pendant necklace that draws attention to the wrist area without competing with the text.
15. Geometric Crescent Mandala on Upper Back
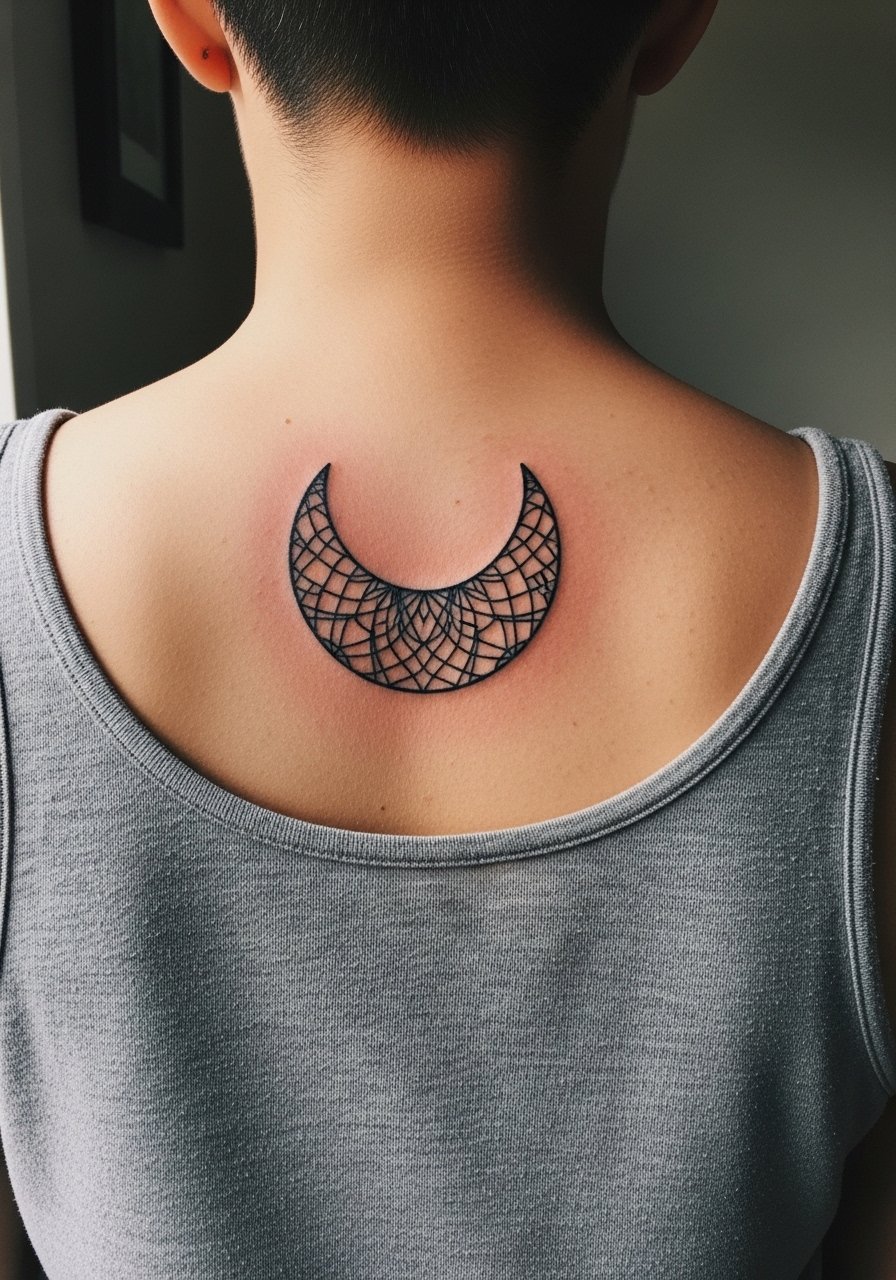
Upper back gives space for geometry to breathe, which helps complex mandalas age better than small dense versions. When booking, ask your artist to scale the negative space proportionally so dense centers do not merge. The frequent mistake is compressing too many concentric rings into a two-inch piece. Session length is moderate and comfortable when you can lie face down. Pair with an open-back dress or tank for evenings to display the mandala without covering it.
16. Minimalist Mountain Range Behind Ear
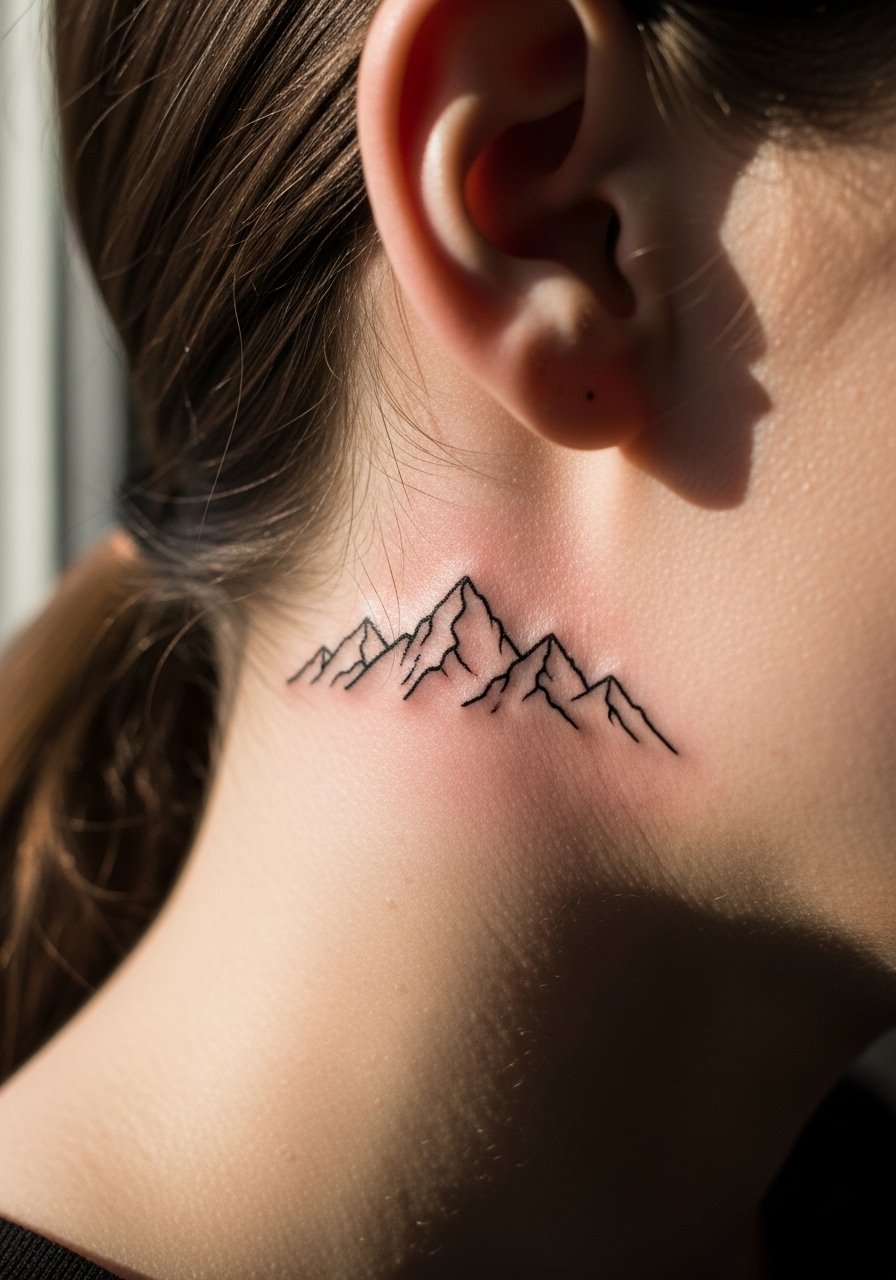
Behind-ear placements must be described precisely in the stencil phase so the artist avoids placing art on the ear itself. Keep the peaks simple and ask for a single-weight line to reduce blowout risk. People sometimes request micro shading too close to hairline, which complicates later cover or touch-up work. Session is quick but a bit sharp near the skull. Wear hair up on the appointment day so the artist has clear access.
17. UV Accent Constellation for Darker Skin
For darker skin tones, stencil transfer and contrast are real issues. Request a digital projection or slightly bolder base lines so the artist can map UV accents without guessing. One under-covered approach is pairing single-needle black outlines with UV pinpoints for a glow effect that reads differently in nightlife settings. The common error is expecting UV to replace strong base work; it should complement it. Book a consult to test placement under studio lighting before the appointment.
18. Whip Shaded Miniature Palm Tree on Ankle
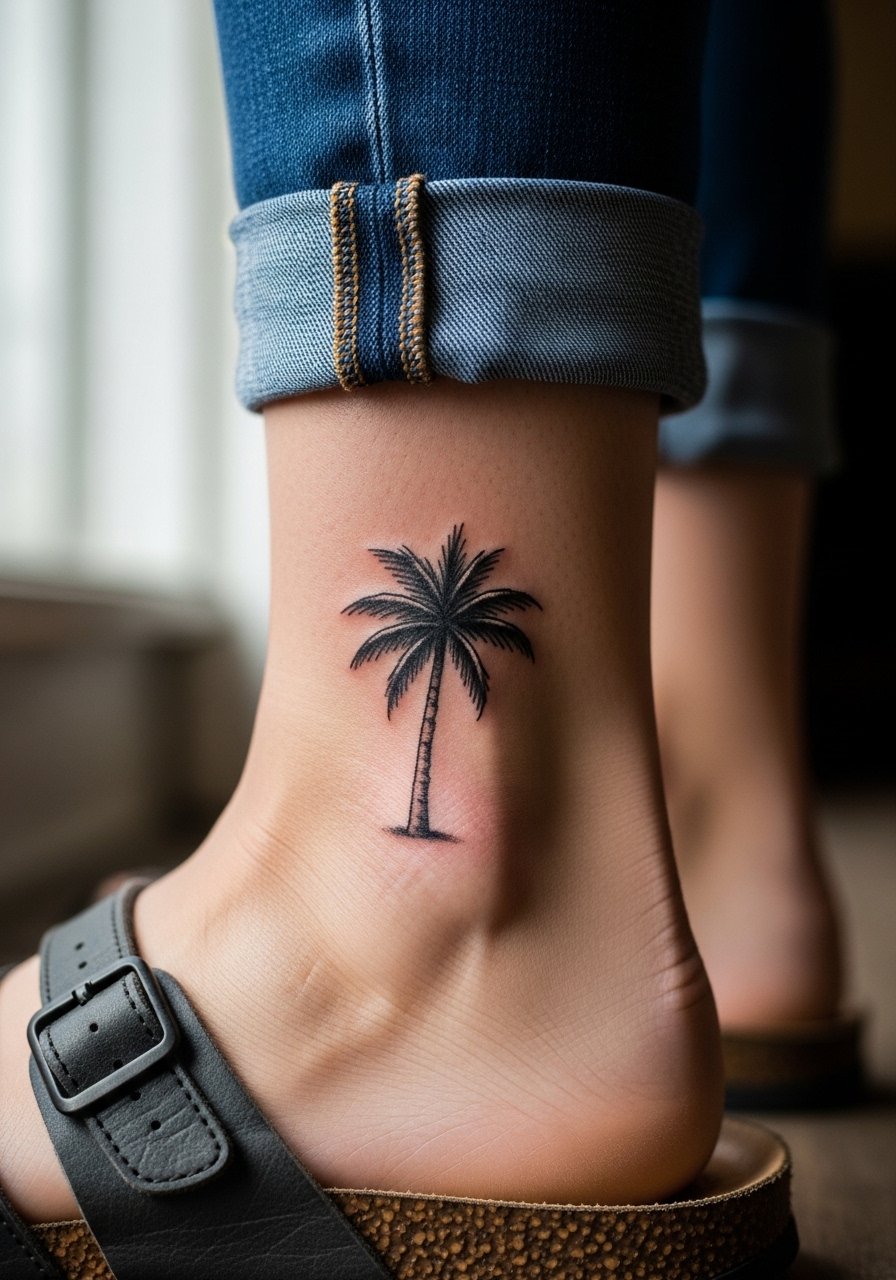
Whip shading gives texture without heavy saturation, which can be ideal on thin- skinned ankle areas. Ask the artist for looser shading rather than dense fill to avoid heavy scabbing. A mistake is requesting full tonal packing at a mini size, which heals into a muddy spot. Session is short but sensitive. Pair with cropped jeans and sandals to show the motif while keeping friction low.
19. Dot Work Tiny Sun on Finger Side
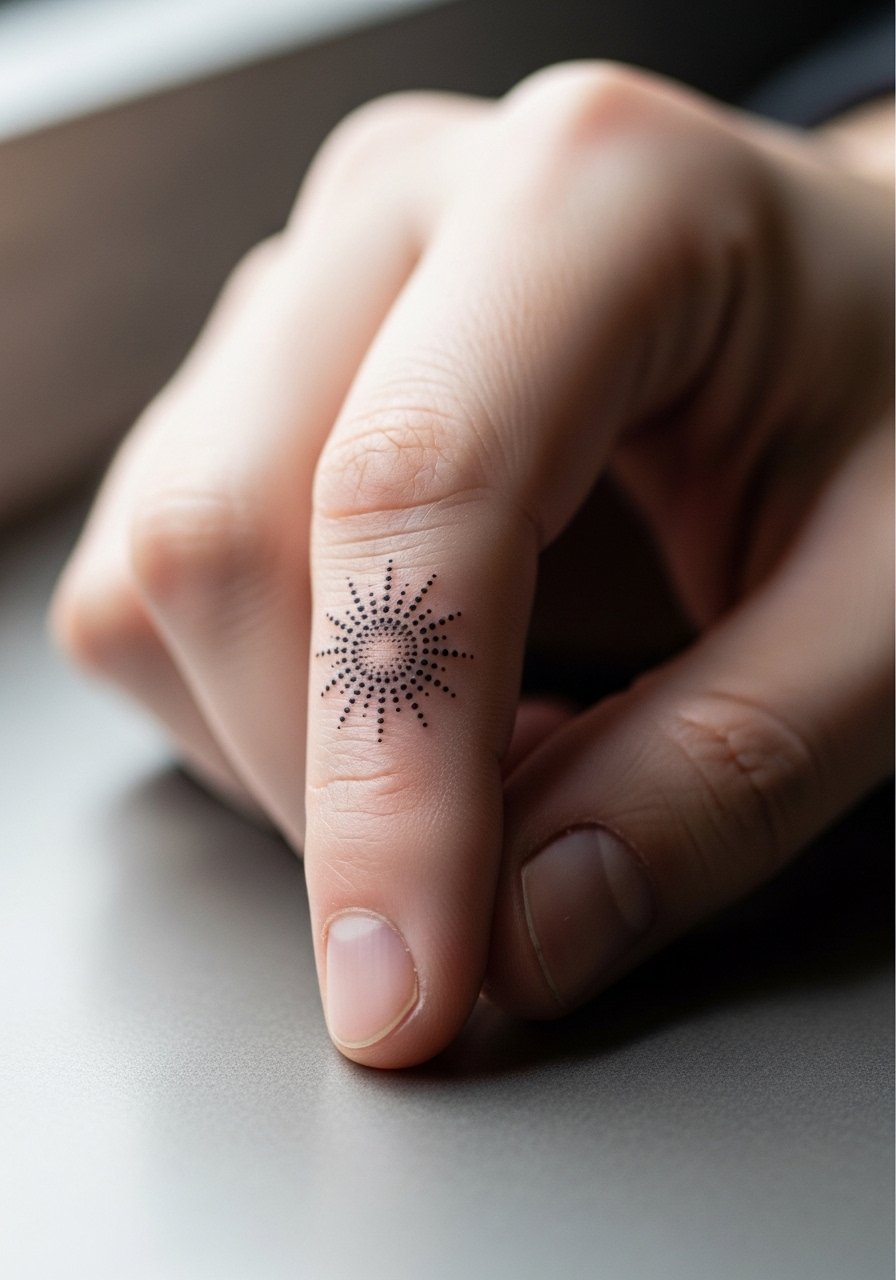
Side of finger pieces face heavy wear from washing and contact, which accelerates fading and requires more frequent touch-ups. If you choose this, ask for slightly denser dot work and accept that touch-ups will be part of the plan. The common error is treating finger work like forearm work and expecting the same longevity. Sessions are quick but the healing window is finicky. Consider a protective habit change and avoid rubbing the area excessively.
20. Micro Floral Hip Accent
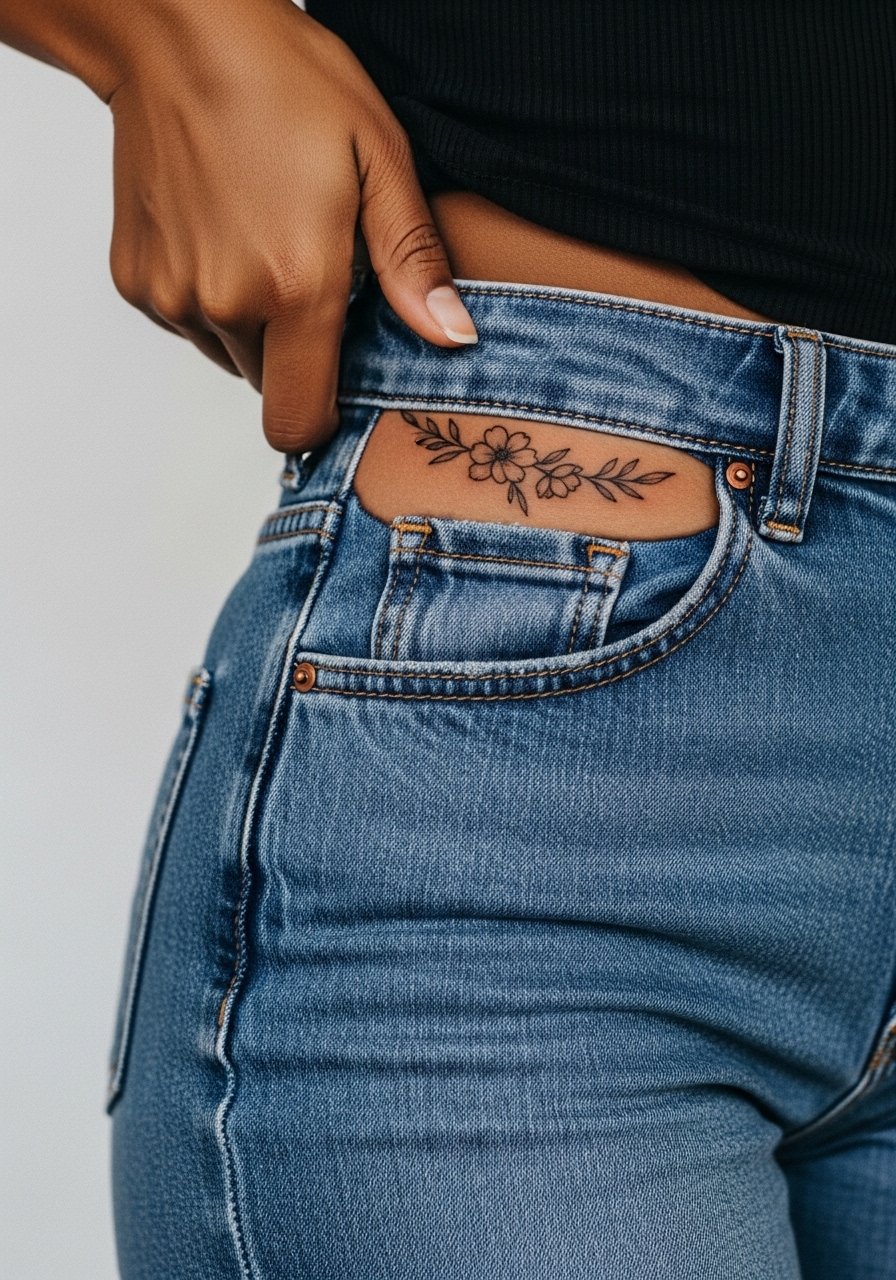
Hip placements age well if you account for weight fluctuation and garment friction. Ask for a slightly more open composition so the petals maintain shape with skin changes. A frequent mistake is packing detail into a narrow patch that stretches with time. Session is moderate and comfortable when you wear high-waisted bottoms to the appointment. For showing the piece, slip into high-waisted denim that reveals just the edge.
21. Stipple Shaded Tiny Crescent on Rib Edge
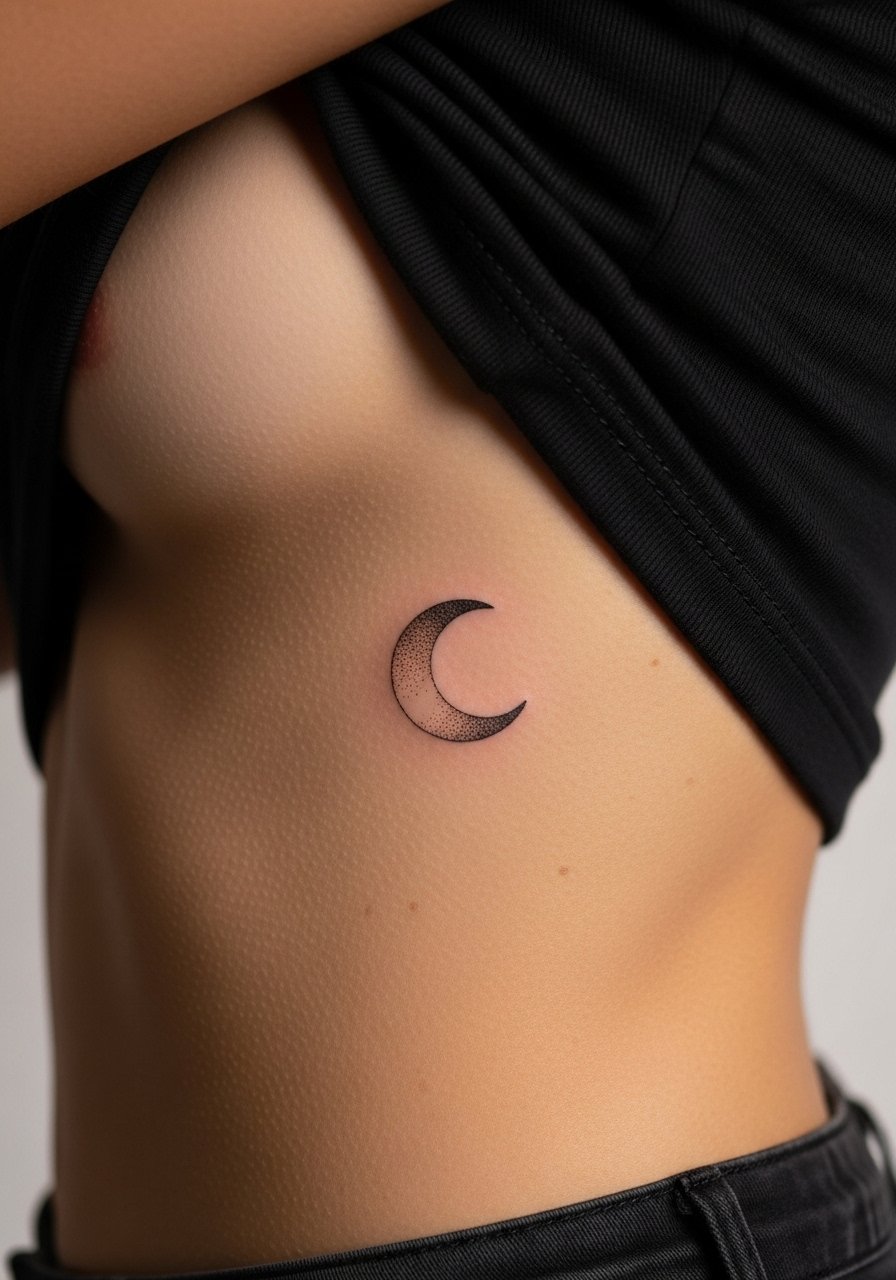
Rib-edge placements are intimate and can be dramatic, but they demand honest discussion about pain and aging. Ask for stipple shading with clear spacing to prevent dense patches that blur at year two. Some artists avoid heavy fineline on ribs entirely and recommend bolder work instead. If you proceed, plan for a longer session, and expect more tender healing. This placement benefits from pre-session rest and good hydration to make the pain more manageable.
Frequently Asked Questions
Q: Do fine line wrist and forearm stencils need different aftercare than ankle or rib pieces?
A: They do heal differently because wrists face constant hand movement and friction while ribs and ankles have different scab and pressure patterns. The practical approach is lighter ointment layers on fine line wrist work and more frequent gentle rinsing for ankle and rib areas that tend to scab more. Your artist should tailor recommendations to the placement and the ink density.
Q: How small is too small for micro script or micro symbols if I want them to stay legible?
A: If you want legibility at two years, avoid compressing script into less than one inch without thicker downstrokes. For symbols, ask the artist to scale elements so the negative space survives the settling process. This depends on skin type and placement, so a pre-session stencil on the skin is a reliable test.
Q: If I have darker skin, how should I test a stencil transfer before the session?
A: Request a digital projection or a light stencil transfer test so the artist can confirm contrast. Some artists use bolder base lines or different transfer solutions to make the stencil visible. From what I have seen, a short preview on the actual skin under shop lighting prevents surprises once the needle starts.
Q: Are UV ink accents worth it for visibility on darker skin tones?
A: UV accents can be a striking addition, but they should not replace solid base lines. Use UV as a highlight over strong black outlines or dots. Ask for a small patch test under studio lighting to see how the effect reads on your skin tone before committing to a full stencil.
Q: What should I wear to a collarbone or sternum session to make the artist's life easier?
A: Wear a wide-neck shirt or a strapless top that you can adjust so the artist only exposes the area needed. A strapless sundress or an open button shirt works well and keeps you comfortable during the session.
