
Fine line is everywhere online, and tiny upper back designs get the most likes the day they go up. The reality is different for a lot of guys. Movement and shirt rubbing can ghost delicate lines fast, sweaty sessions make scabbing a mess in summer, and hidden shop fees or canceled guest spots leave you stranded. Below are 21 tiny upper back tattoo ideas that balance how they look now with how they heal and age.
1. Downward Geometric Arrow Between the Shoulder Blades

When you want a tiny symbol of direction that reads clean at arm length, this arrow is the go-to. Tell your artist you want 1.5 inches of negative space around the shaft and firm, single-pass linework so the arrow has room to age. The most common mistake is shrinking the arrow too small, which causes dense lines to merge after a year. Expect a low-to-medium pain level across the upper back and a single short session. For long-term clarity ask for slightly thicker linework than a one-needle outline and plan a touch-up at 6–12 months if it softens.
2. Tribal Sun at the Base of the Neck
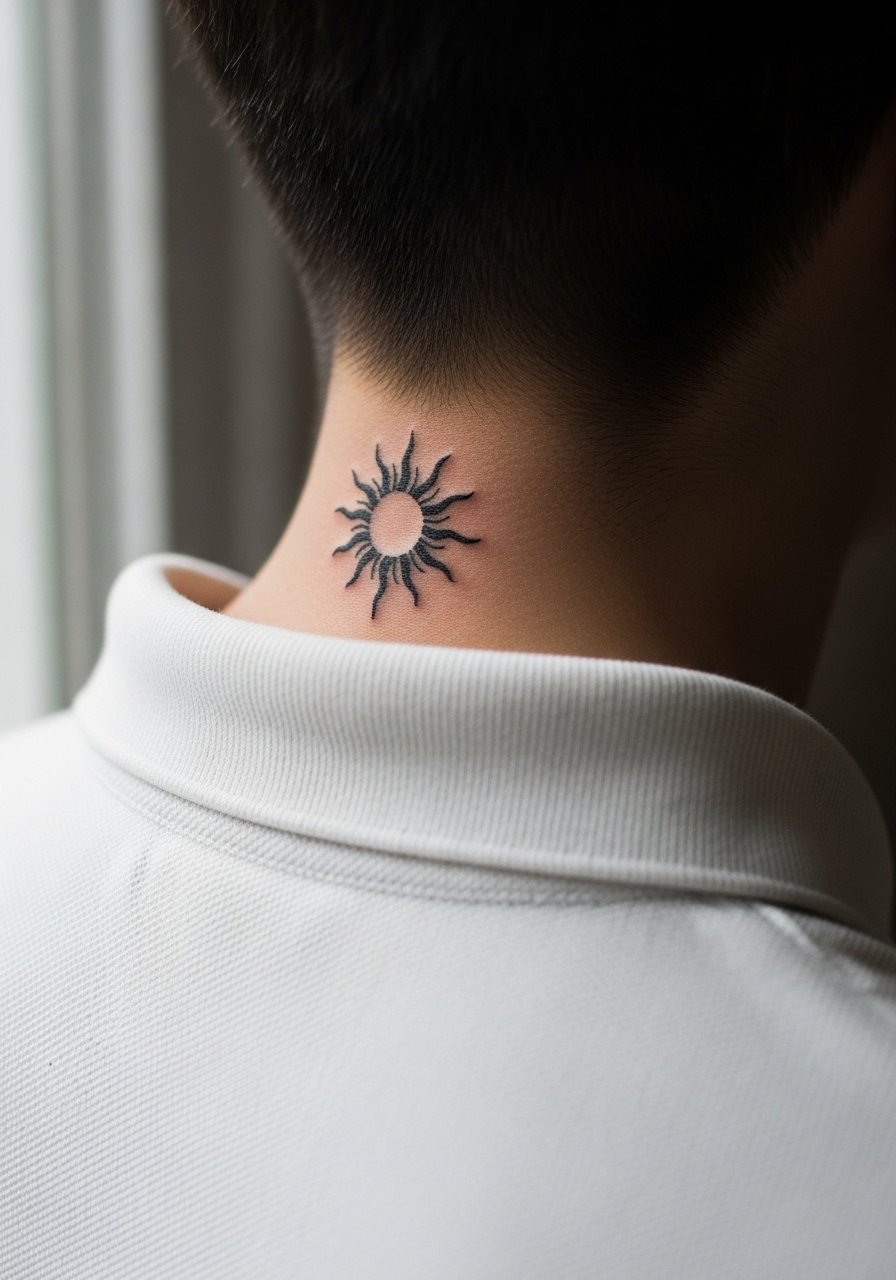
This compact tribal sun plays with the natural slope where the neck meets the back, so the design should follow trap muscle lines instead of sitting strictly symmetrical. Fair warning, the base of the neck sees shirt collars and sweating, so bring up scabbing concerns during consultation. For show-off pairing, use a polo shirt men slim fit with the top button undone so the motif peeks out in casual looks. Session time is short and healing is usually uneventful if you avoid tight collars for two weeks.
3. Fine Line Lion Outline on the Upper Left Shoulder Blade
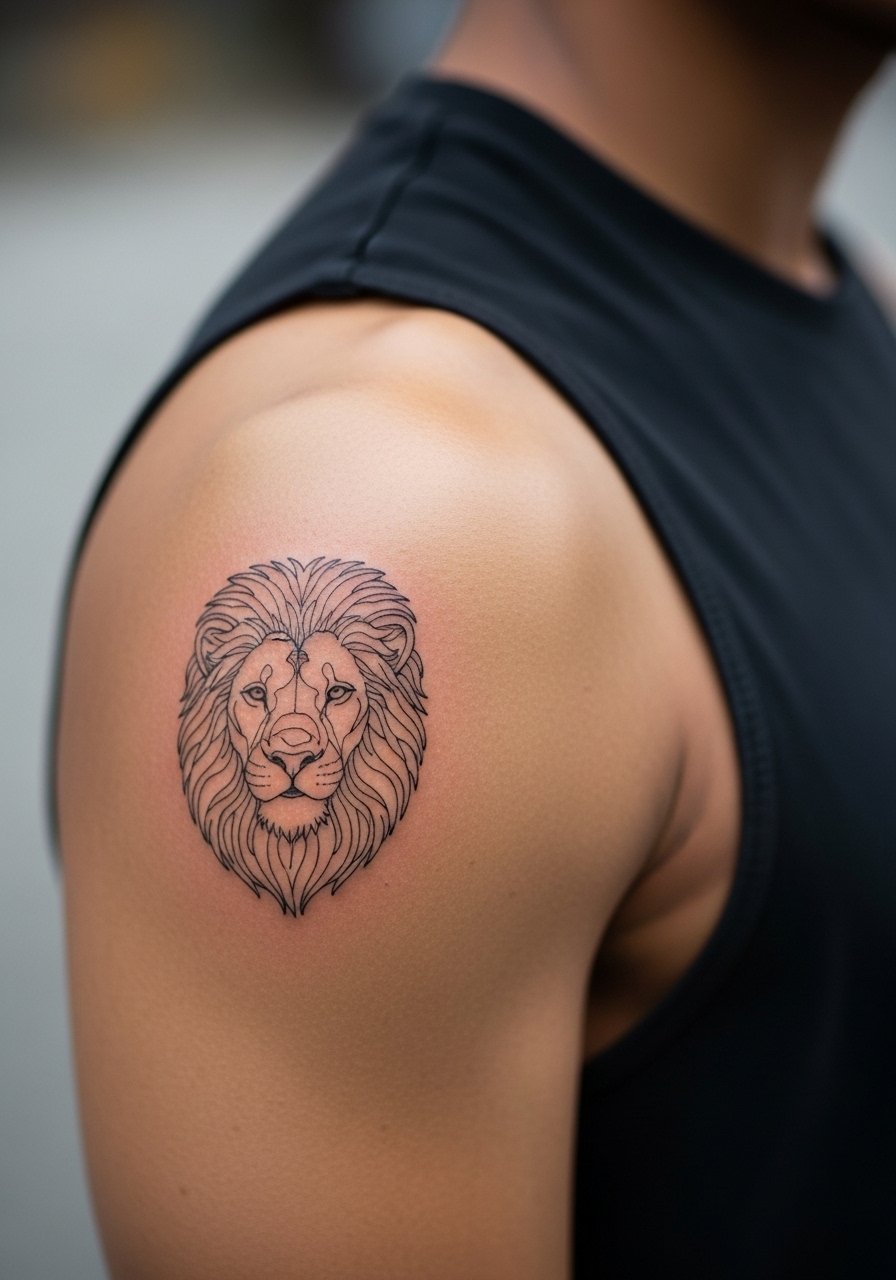
Artists are split on fine line on textured shoulder blades. One camp says single-needle work reads elegant and ages gently if spaced properly. The other camp warns that thin lines blur faster on high-movement areas. My take is ask for slightly heavier single-needle contours rather than feather-thin strokes and test a small patch if you have darker skin. The usual mistake is over-detailing the mane inside a small 1.5-inch area. Pain is low and session time is short, but plan a touch-up at year two if you want crisp edges long term. For visibility under tanks pick a solid muscle tank sleeveless men to frame the piece.
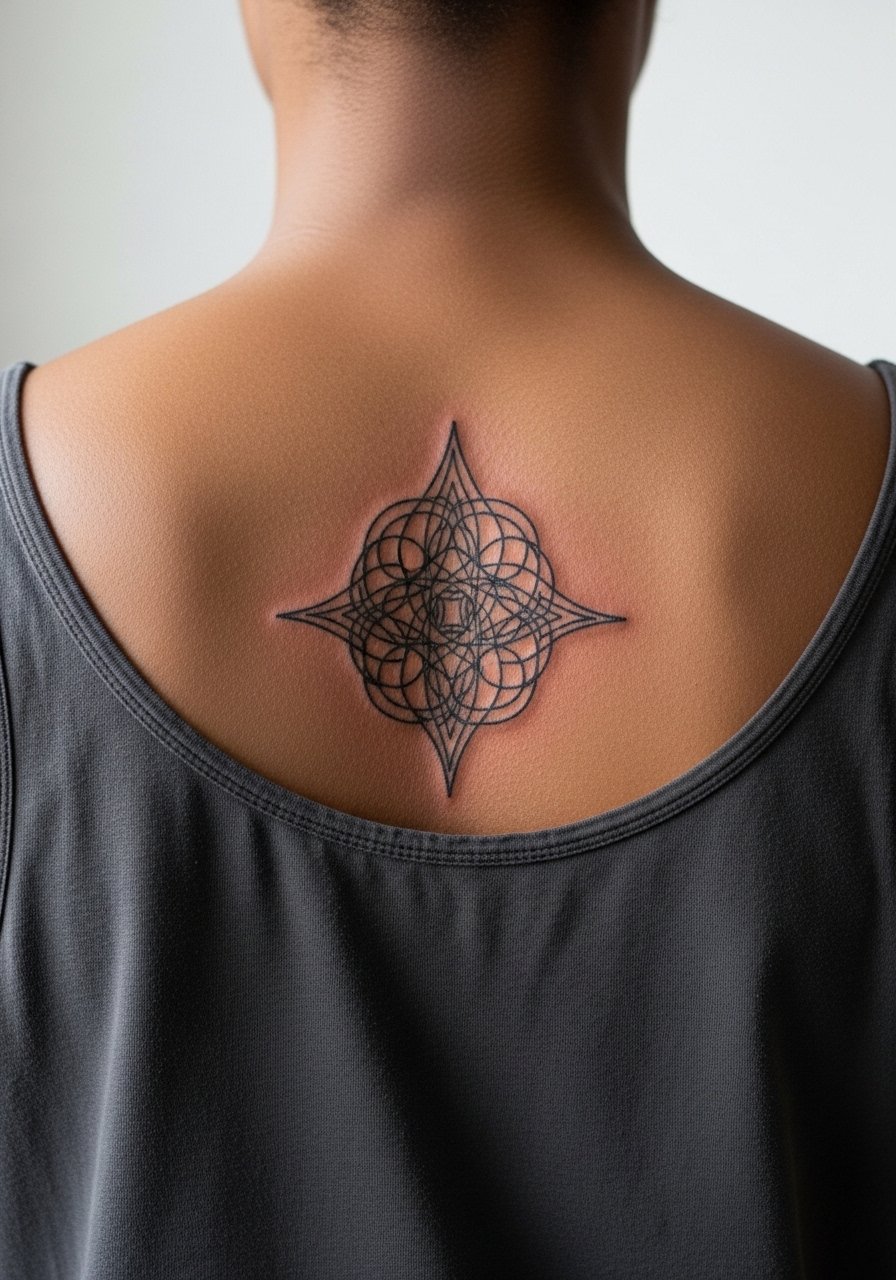
4. Micro-Realism Compass Rose Centered Between Shoulder Blades

Micro-realism in a tiny compass asks for deliberate session planning. Expect longer needle time because shading and tiny directional points need careful layering. The upside is a small, detailed compass reads personal without shouting. The common failure is compressing too many points into a 1.5-inch circle, which makes the star blur after a year. Ask your artist to break the design into clear negative-space rings and to book two short passes rather than one overworked session. Healed look at six months is crisp shading, and at two years the softer gray halo actually helps the shape read from a distance.
5. Ornamental Mandala Fragment Above the Spine
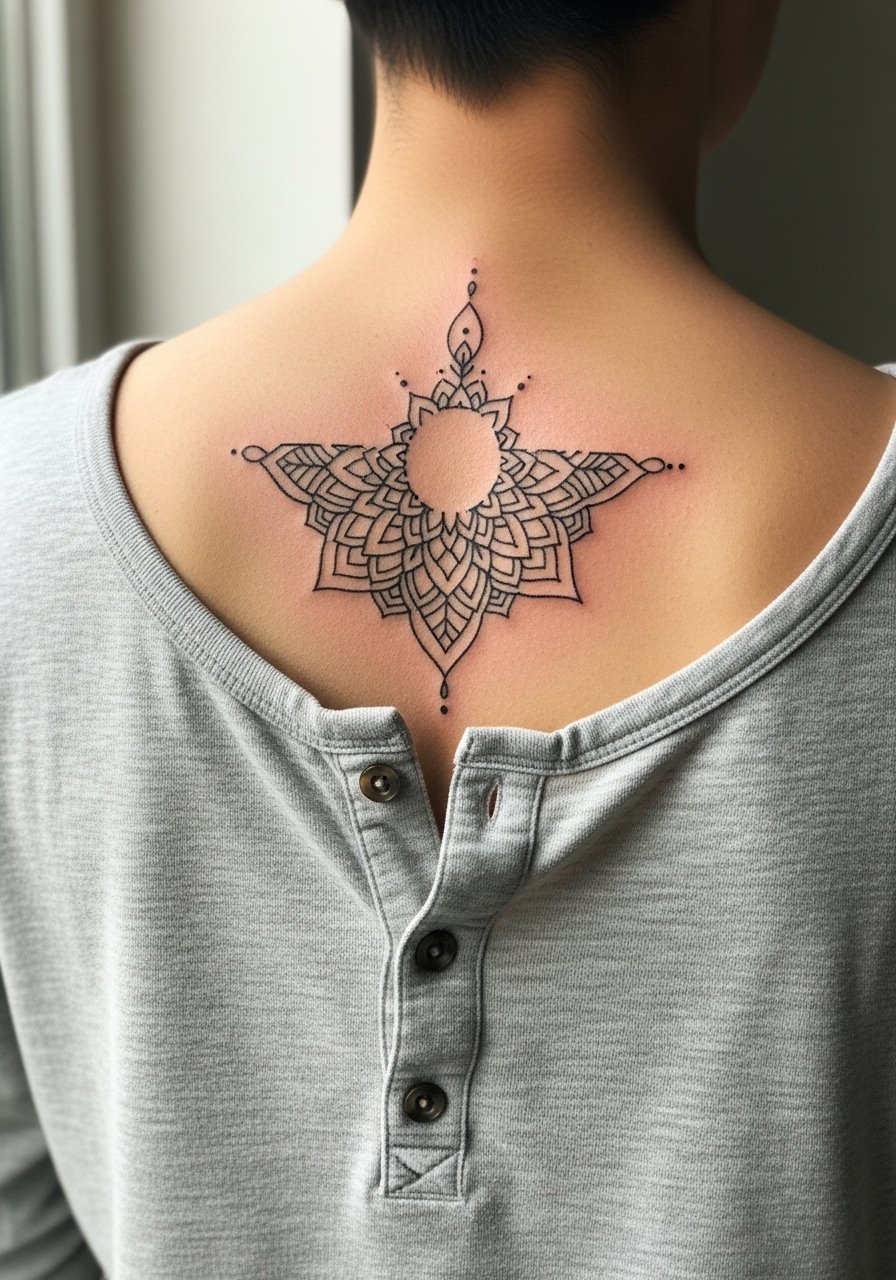
A fragment mandala that follows the spine curves avoids the too-small dense circle that clogs on the upper back. If you want this to last, ask for single-needle petal outlines with slightly wider spacing between repeat elements. There is a debate about fine line mandalas in tight spots. One side says fine line is the only way to keep them delicate, the other says a bit of line weight prevents early merging. Mention both camps in your consult and decide on line thickness together. Pair this with a backless henley men for warm-weather show-off looks.
6. Blackwork Skull with Subtle Flames on the Right Upper Back

If you want contrast that still fits under shirts, solid blackwork is forgiving on the upper back. The main thing to say to your artist is you want saturated fills and clean edges so the skull reads under low light. For gym-goers, be aware sweat can lift scabs and soften saturation during healing. The session feels like steady work rather than quick outlines because the fill takes time. Avoid tiny, detailed flames inside a 1.5-inch skull or the negative space will disappear over time. A solid gray tank top frames the piece without distracting.
Studio Day Picks
The first six designs above sit across collar and shoulder zones, so products that help with sweating, scabbing, and touch-ups matter more than standard balms.
-
Tea tree salve tattoo. Lighter than heavy balms, it helps with the trapped-sweat issue on the upper back without feeling greasy during summer sessions.
-
Aftercare spray tattoo. A quick mist dries faster than ointment for guys who sweat in the neck and shoulder zone, which reduces weeping in the first week.
-
Green Sheep balm tattoo. Less greasy than thick petroleum products and soaks into shirts less, useful for shoulder-blade pieces that rub.
-
Rice bran oil for skin tattoo. Natural oils can help preserve single-needle clarity for fine line pieces without over-clogging pores around the neckline.
-
Aquaphor healing ointment. A thin layer in the immediate days after a saturated blackwork session keeps scabs pliable on high-friction zones like shoulder blades.
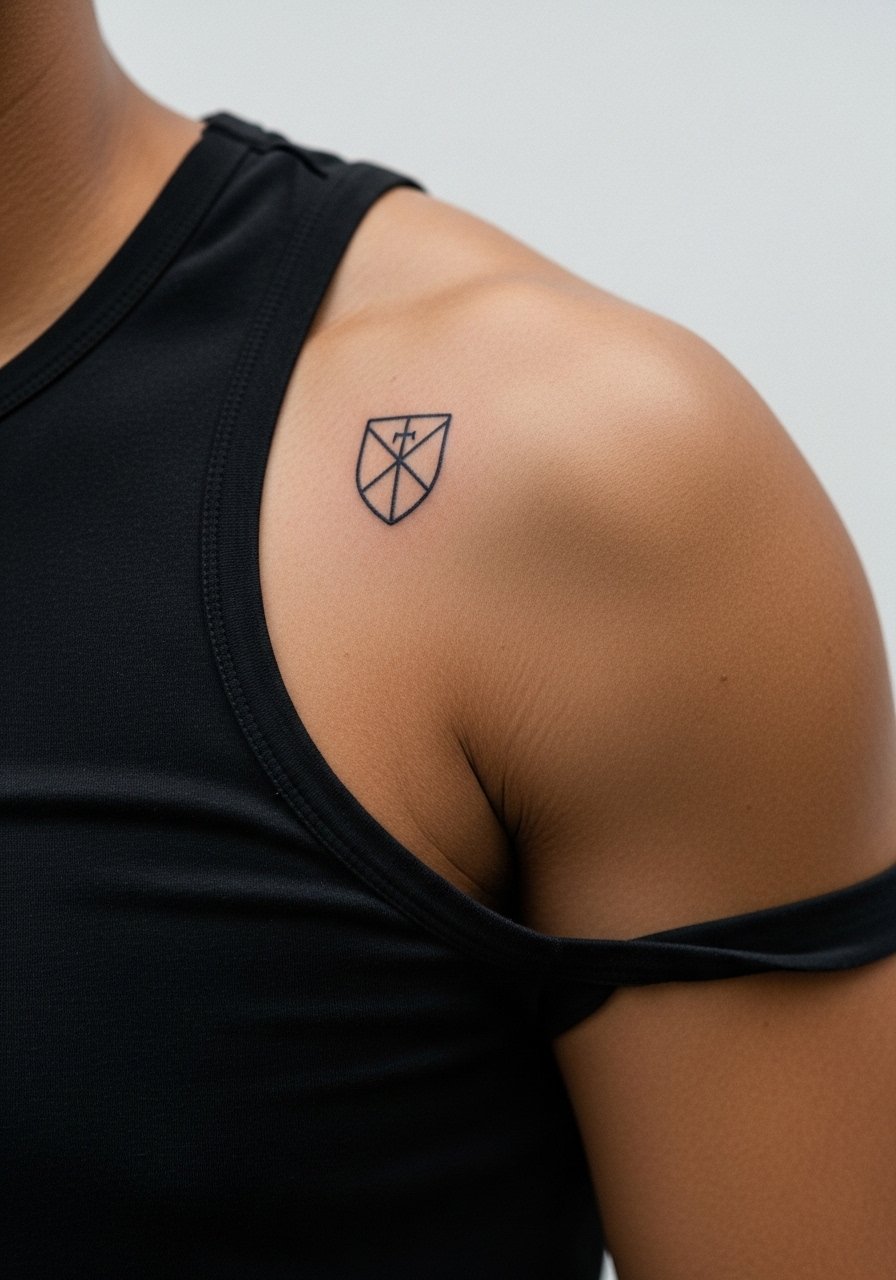
7. Minimalist Family Crest Initials Near the Neckline
Initials or a tiny crest near the neckline read discreetly under shirts and can be kept private while still being meaningful. The main recommendation is to keep the monogram between one and 1.5 inches and avoid filigree that translates poorly at that scale. In consult, clarify exact letter spacing and whether serifs are needed. For session-day comfort wear a loose button-down shirt you can pull aside easily. Healed at six months these hold well, but fine letter stems can blur without a touch-up at year two.
8. Neo-Traditional Anchor with Wave Lines Left Upper Back
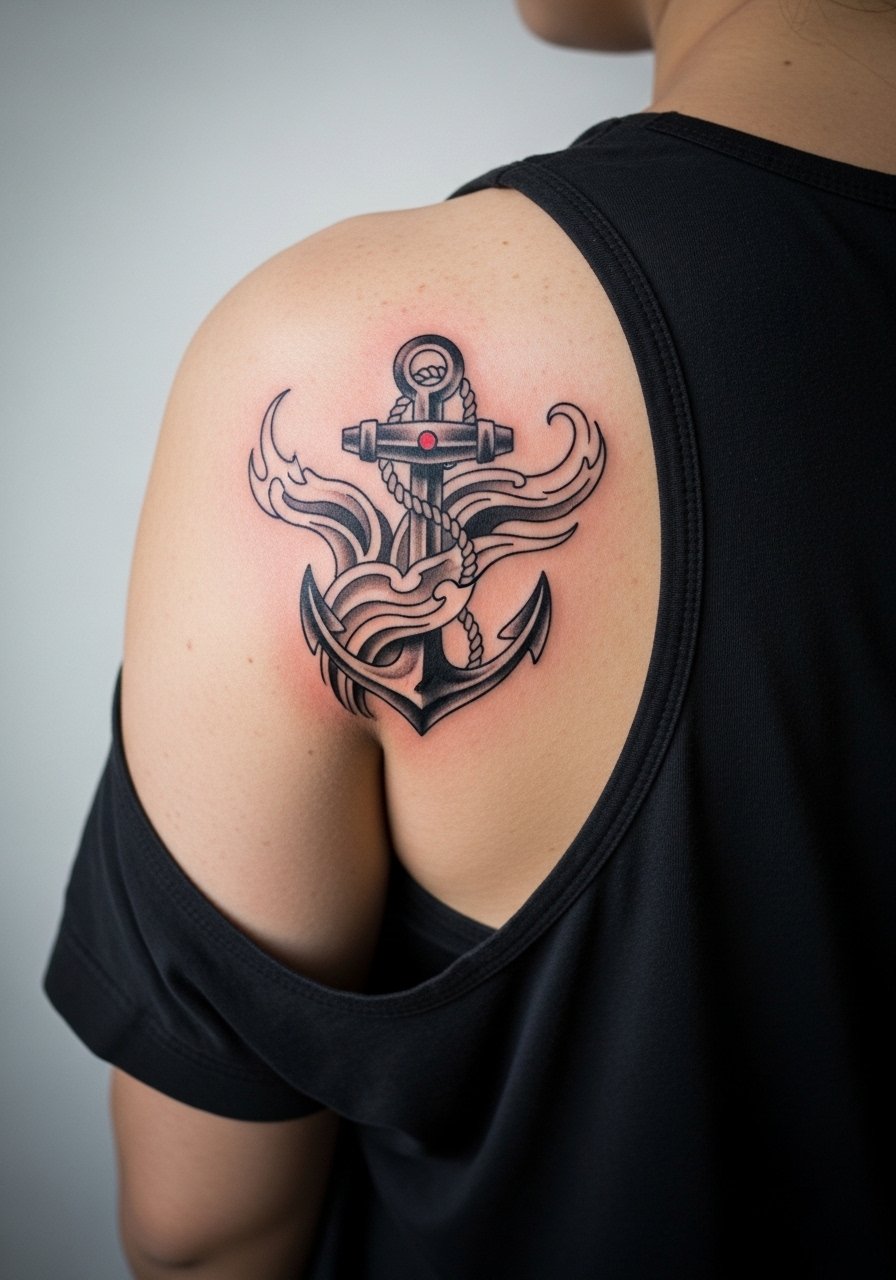
A compact neo-traditional anchor works with the trapezius muscle so the waves flow naturally when you move. Ask the artist to keep color accents minimal and to favor black and gray saturation so the anchor reads under shirts. Avoid over-detailing small rope twists inside a 2-inch anchor or the texture will cloud over time. The session may need two short passes to lock saturation without overworking the skin. For an off-duty look wear an asymmetrical crewneck or an asymmetrical crewneck sweatshirt to draw subtle attention to one shoulder.
9. Ignorant Style Abstract Dot Cluster Across the Upper Back
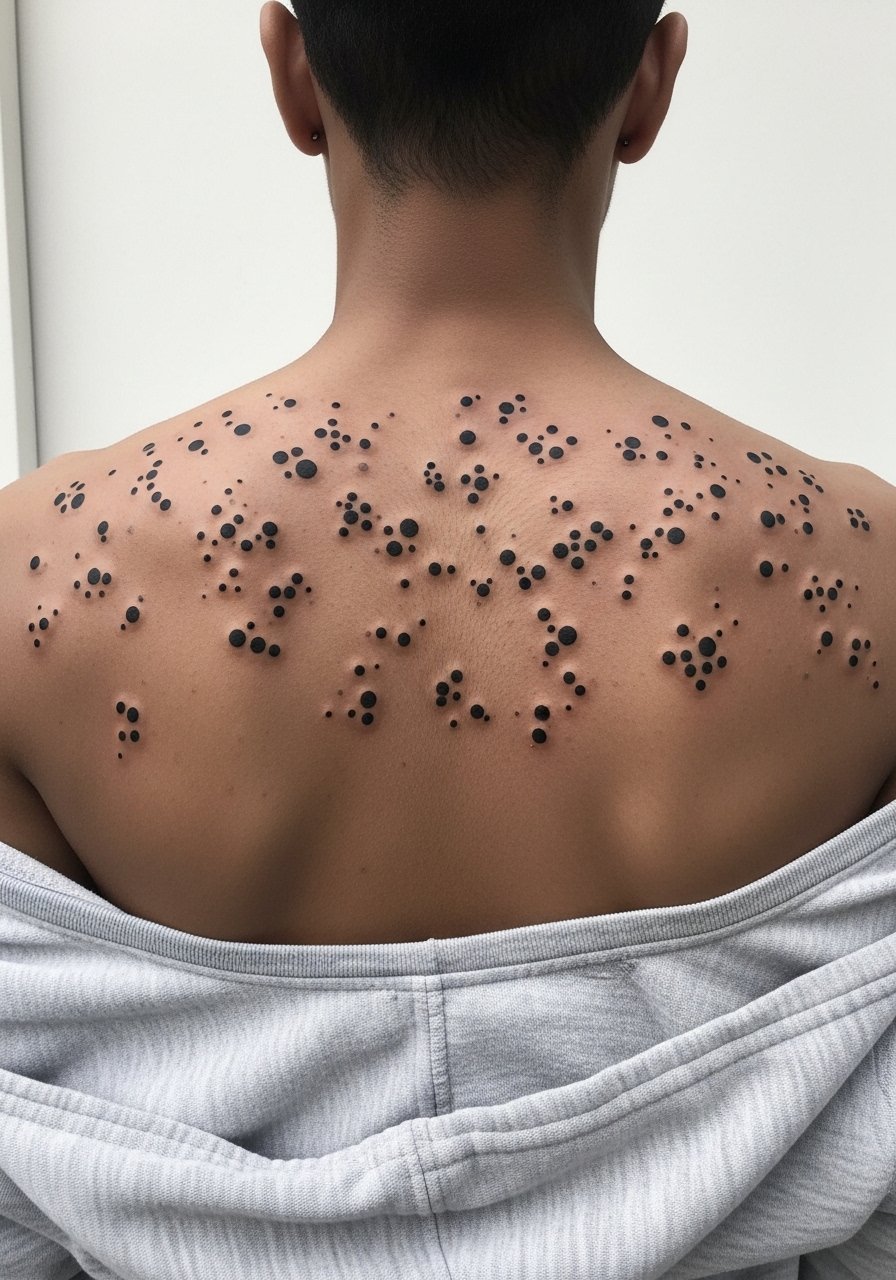
Ignorant dot clusters are rising because they mimic raw texture and tolerate movement. The risk is connecting dots too tightly or packing them into a tiny patch, which makes the cluster look muddy when healed. Tell your artist you want visible spacing between dots and a rough edge so the pattern breathes. Saniderm users point to less scabbing on mobile areas, while dry-healing supporters say film traps bacteria. Name both camps when asking about aftercare so you and the artist agree before the session. For wardrobe try an open back hoodie to show the texture without straps.
10. Fine Line Feather with Morse Code Underneath on the Right Shoulder Blade
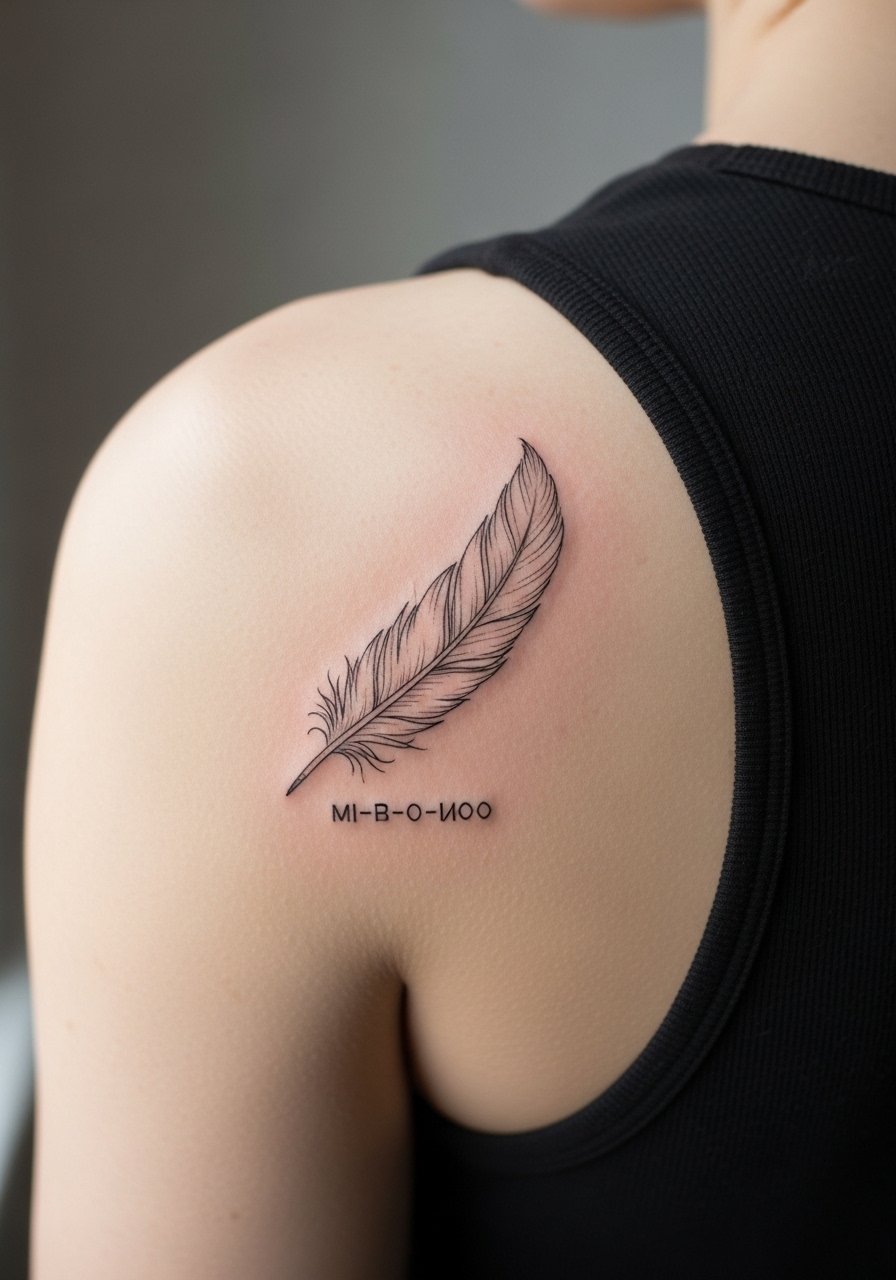
This two-part idea pairs a visual element with a hidden message that only you or close friends read. The most common mistake is squeezing the Morse dots too close together beneath the feather. Ask the artist for slightly longer spacing and to render the feather bar with gentle spacing so each dot remains a dot after healing. Expect low pain and a one-session appointment. If you want the message to last, plan a touch-up at six months, particularly if you wear backpacks or straps that rub the area during recovery.
11. Small Japanese Koi Outline Swimming Upward Along the Spine
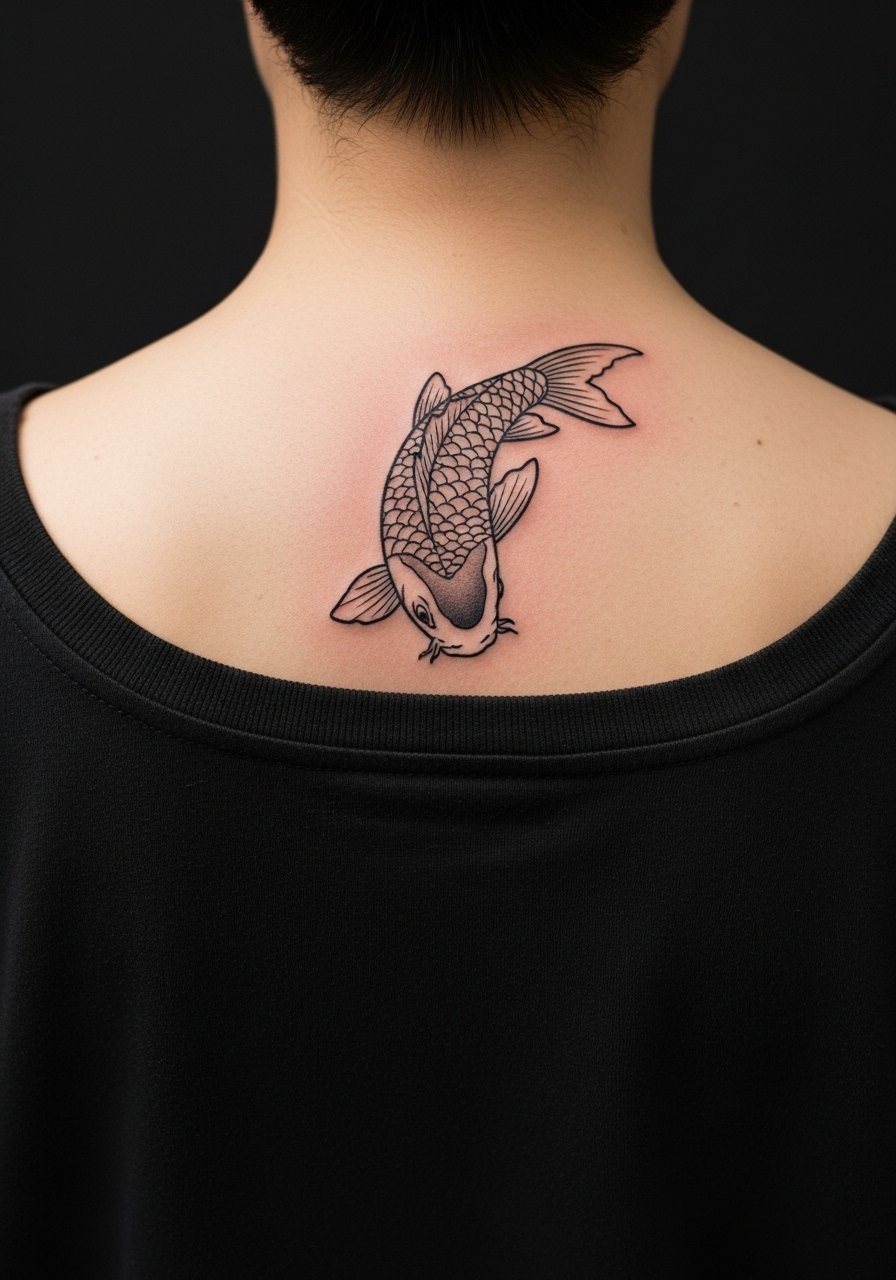
A spine-aligned koi is a classic compact option for perseverance symbolism. The trick is to design the koi elongated along the spine curve so movement gives the illusion of motion instead of compressing the fish into a round icon. Mention you want the head oriented upward and keep the body length around two inches for readable scales. Sessions can be slightly more uncomfortable if the needle tracks near the spine, so expect a medium pain level and short breaks. For showing it off, a mesh athletic shirt or low-back tee keeps the line visible without overexposure.
12. Geometric Sacred Symbol Fragment Center Upper Back
Sacred geometry fragments work when they echo the back's natural planes. The usual error is packing a full complex figure into a 1.5-inch circle. Instead, ask for a fragment that uses negative space and sharp anchor points. Line weight matters here because thin lines in dense geometry tend to blur faster on the upper back. The session is mostly precise linework with low discomfort. If you travel a lot in the sun, remember this placement is slightly more protected than exposed forearms, so the symbol usually holds better long term.
13. Micro-Realism Eagle Head Profile on the Upper Right Side
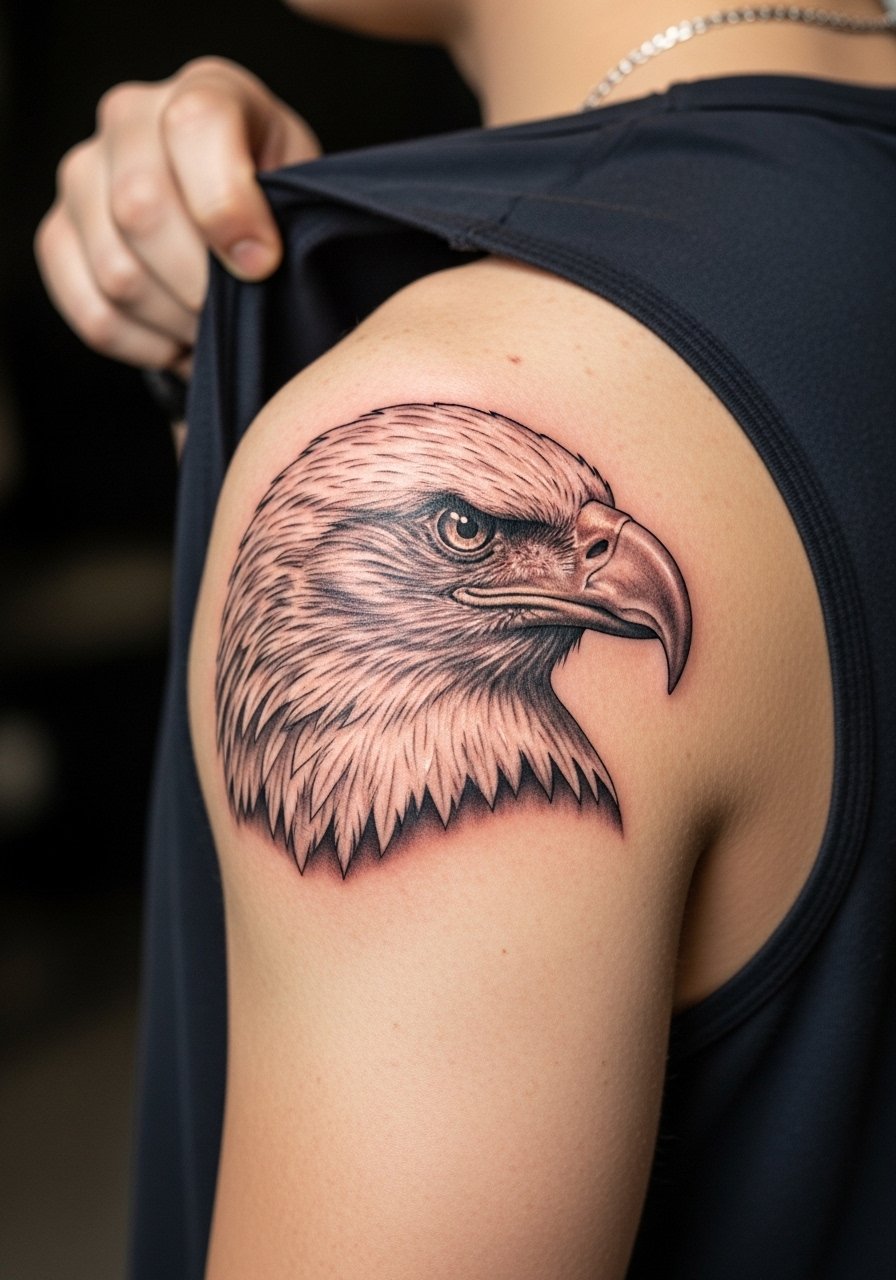
A tiny eagle head needs deliberate shading transitions to read as a bird rather than a gray smudge. Ask for clearly defined contrast points, like a dark eye and a lighter beak edge, and avoid stuffing tiny feather strokes into a 1.5-inch block. Micro realism here can take two short passes to build depth without overworking the skin. Gym wear can aggravate scabbing, so avoid heavy lifting for a week. For balance, pair with a minimalist watch on the opposite arm rather than heavy jewelry.
14. Tiny Spine-Curve Illusion: Row of Small Dots That Follow the Vertebrae
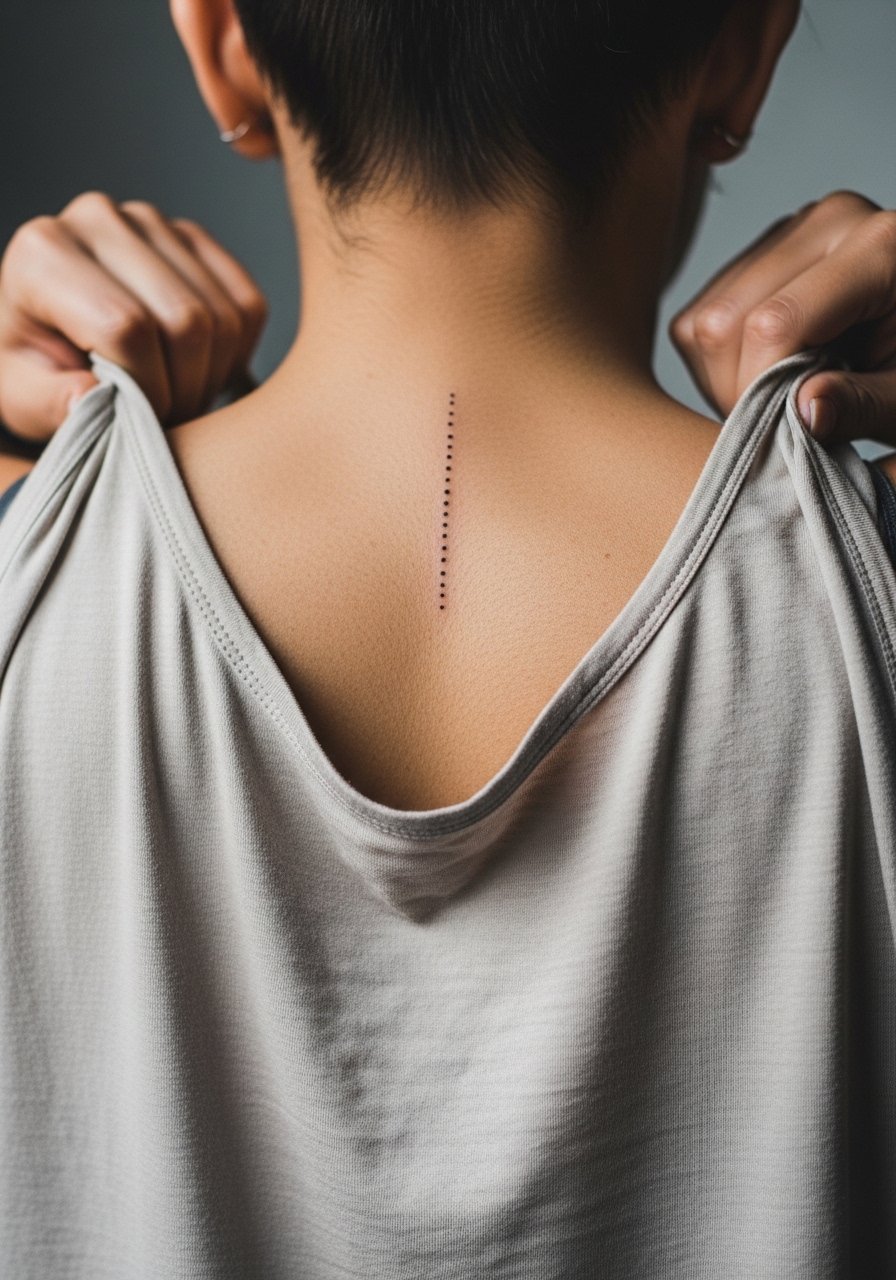
Designing a spine-following dot line gives motion when you bend and makes an eye-catching but discreet mark. The consultation tip is to request variable dot sizing so the curve reads three-dimensional instead of flat. A common mistake is exact symmetry that looks stiff when the body moves. Pain is moderate when needles track near the spine, so book a single focused pass and expect a brief rest if needed. This is great for guys who want something visible with low profile styling like rolled-up sleeves or a low back tee for summer.
15. Trap-Focused Mini Design Over the Upper Trapezius
If you want a piece that moves with muscle and shows when you flex, put it over the traps. Tell your artist you want the design to follow the muscle direction so the motif distorts softly instead of stretching oddly. The session feel is quick but you will notice more friction in the area during healing because straps and gym bags often rub there. For session wear pick an easy robe or a sleeveless gym shirt men so the artist can access the shoulder without fabric dragging across fresh ink.
16. Tiny Roman Numeral Row Along the Upper Spine
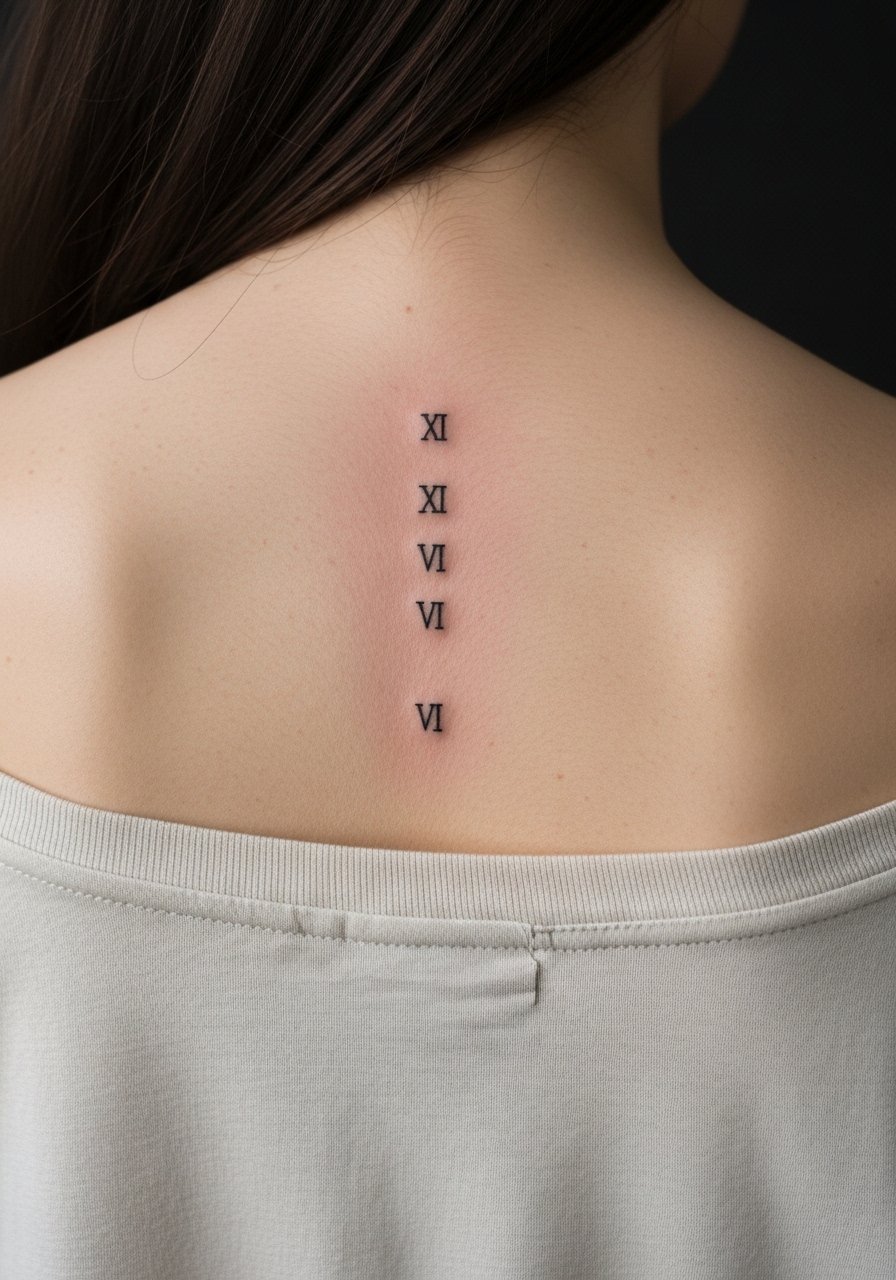
Roman numerals are deceptively tricky at tiny scale because thin serifs can close up when healed. Specify a slightly heavier main stroke and ask your artist to space characters so each numeral breathes. The usual mistake is using a decorative type that looks neat on paper but fails on skin. Expect low pain and a short session. For placement planning, try the numerals centered with the spine for symmetry and book a touch-up if stems start to soften after the first year.
17. Mini Constellation Cluster Between the Shoulder Blades
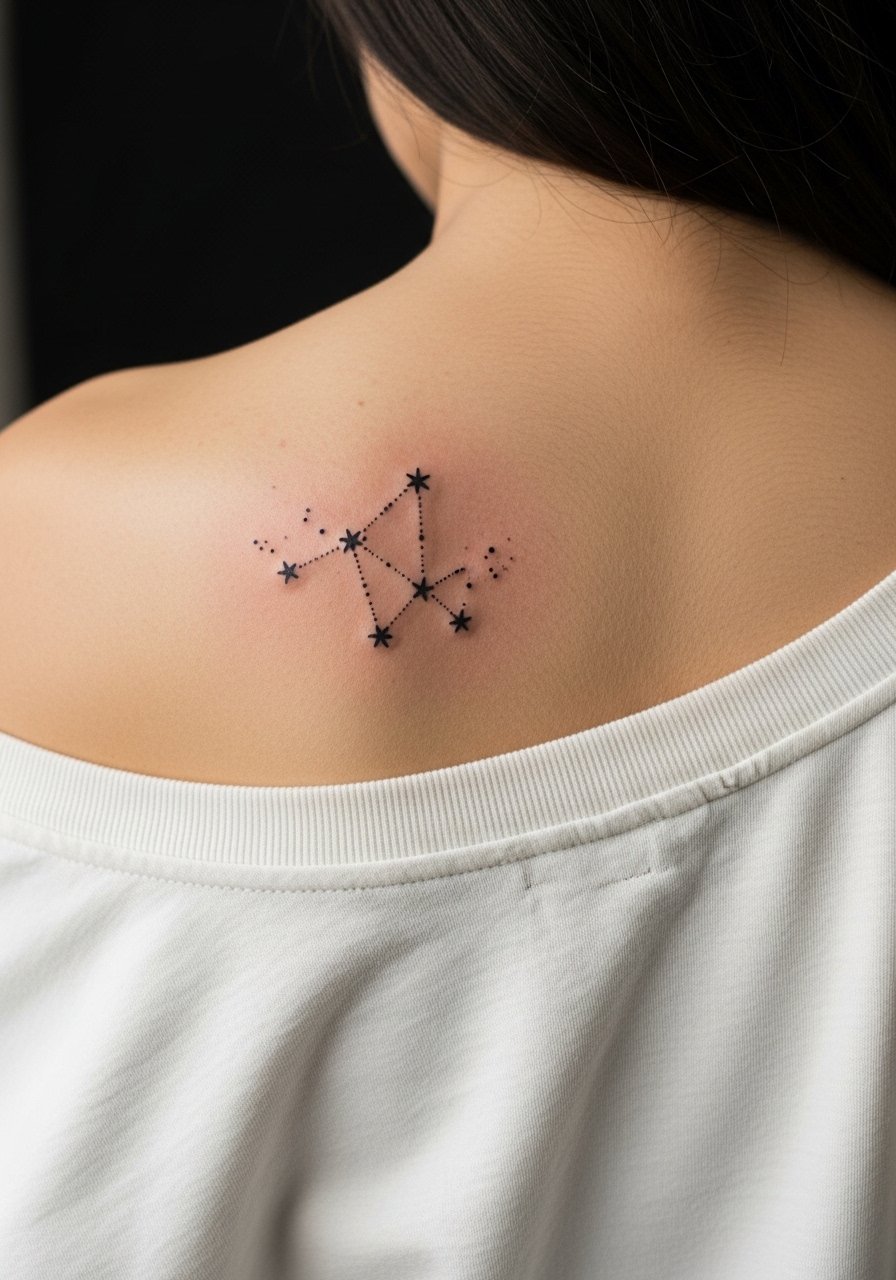
Constellation clusters are natural upper-back designs because they adapt to the flat space between the blades. The consultation detail to give is exact star placement and whether you want connecting lines. Lines should be slightly bolder than single-needle dots so they remain visible over time. The typical error is adding too many tiny stars close together, which reads as a patch of gray later. This heals well if you avoid backpacks for the first week. For show-off looks, pair with a fitted v neck tee men to frame the gap.
18. Tiny Laurel Wreath on the Left Shoulder Blade
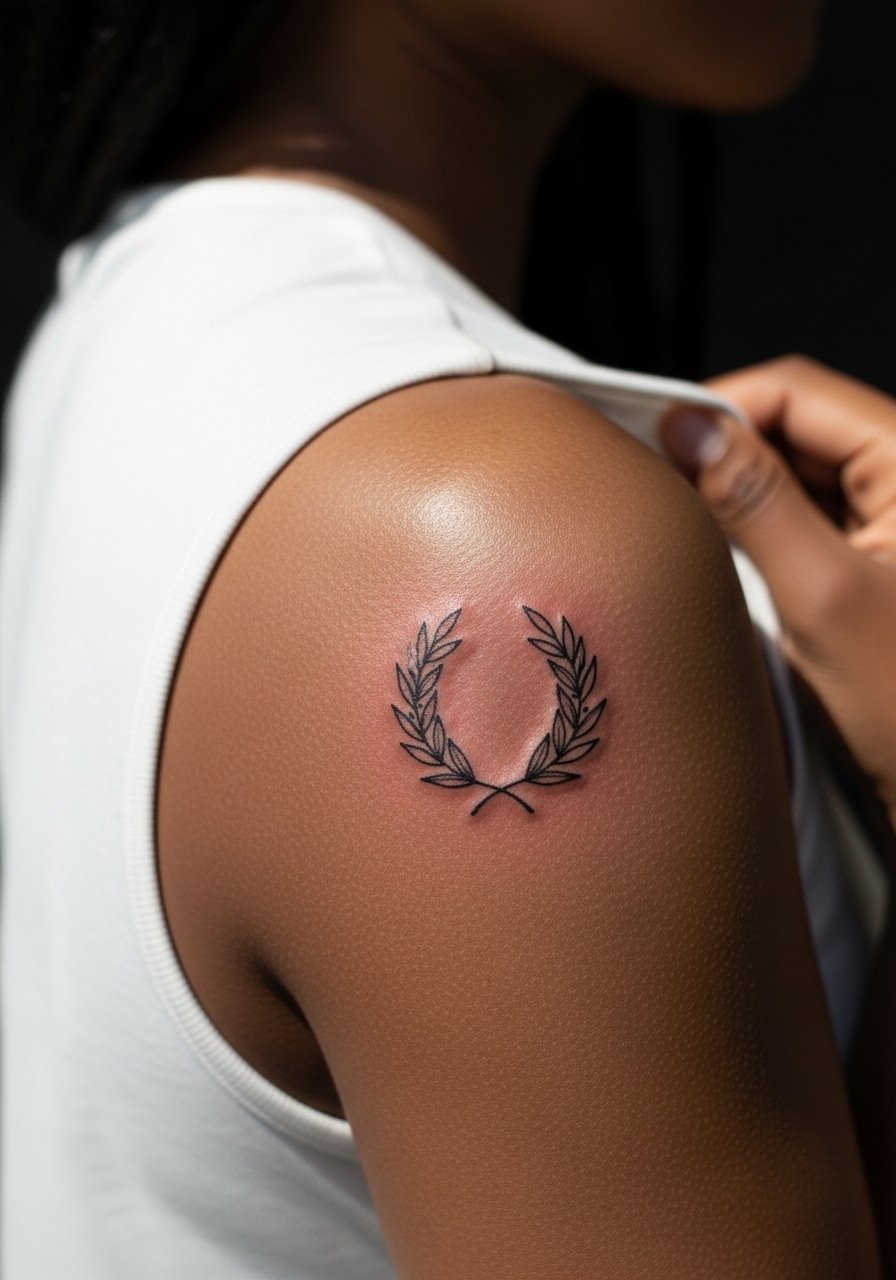
A laurel wreath reads clean if the leaf shapes are slightly simplified. Ask your artist to avoid intricate leaf veins in such a small motif and instead suggest subtle curves to suggest leaves. The common mistake is over-detailing, which blurs into a gray band after healing. Low pain, quick session, and it pairs with rolled sleeves or sleeveless tops for casual visibility.
19. Small Lightning Bolt Near the Base of the Neck
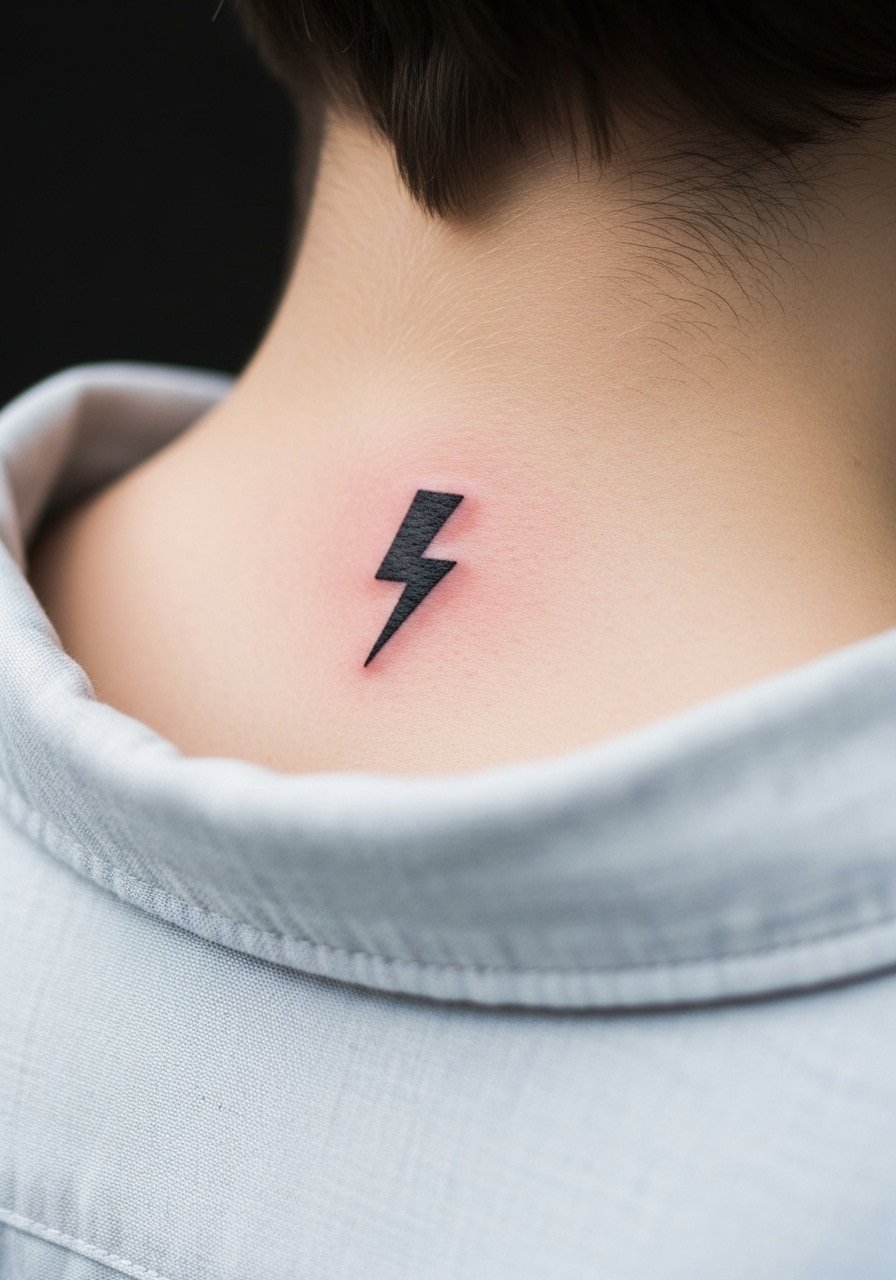
A tiny lightning bolt is a quick, high-contrast option and it ages well if kept simple. Tell the artist you want a clean, single-stroke bolt about one inch tall with clear negative space around it. The base-of-neck location sees collar friction, so avoid tight collars for the first week. For casual outfits a slim button down collar shirt with the collar open shows the bolt without overexposing the area.
20. Tiny Lock and Key Pair on Opposite Upper Back Sides
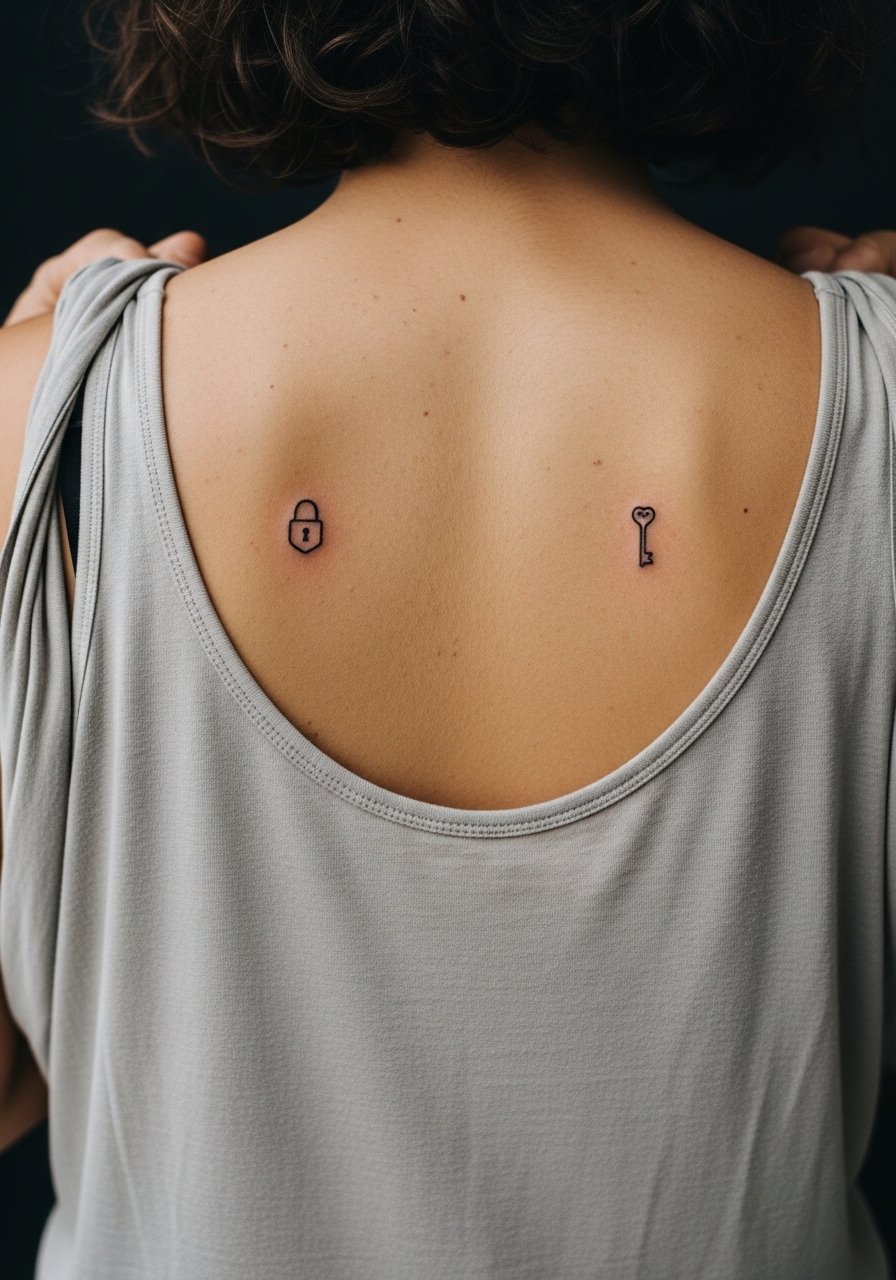
Pairing small lock and key icons across the upper back is a neat asymmetric approach that reads as a motif and as a hidden set. In consult say whether you want the key to be small and ornate or simplified. The session is brief and the two pieces heal similarly, but if you wear backpacks with straps that cross the top of the shoulders, delay heavy straps until crusting subsides. These are low-risk designs and hold well with modest line weight.
21. Tiny Mountain Range Arcing Along the Upper Back Ridge
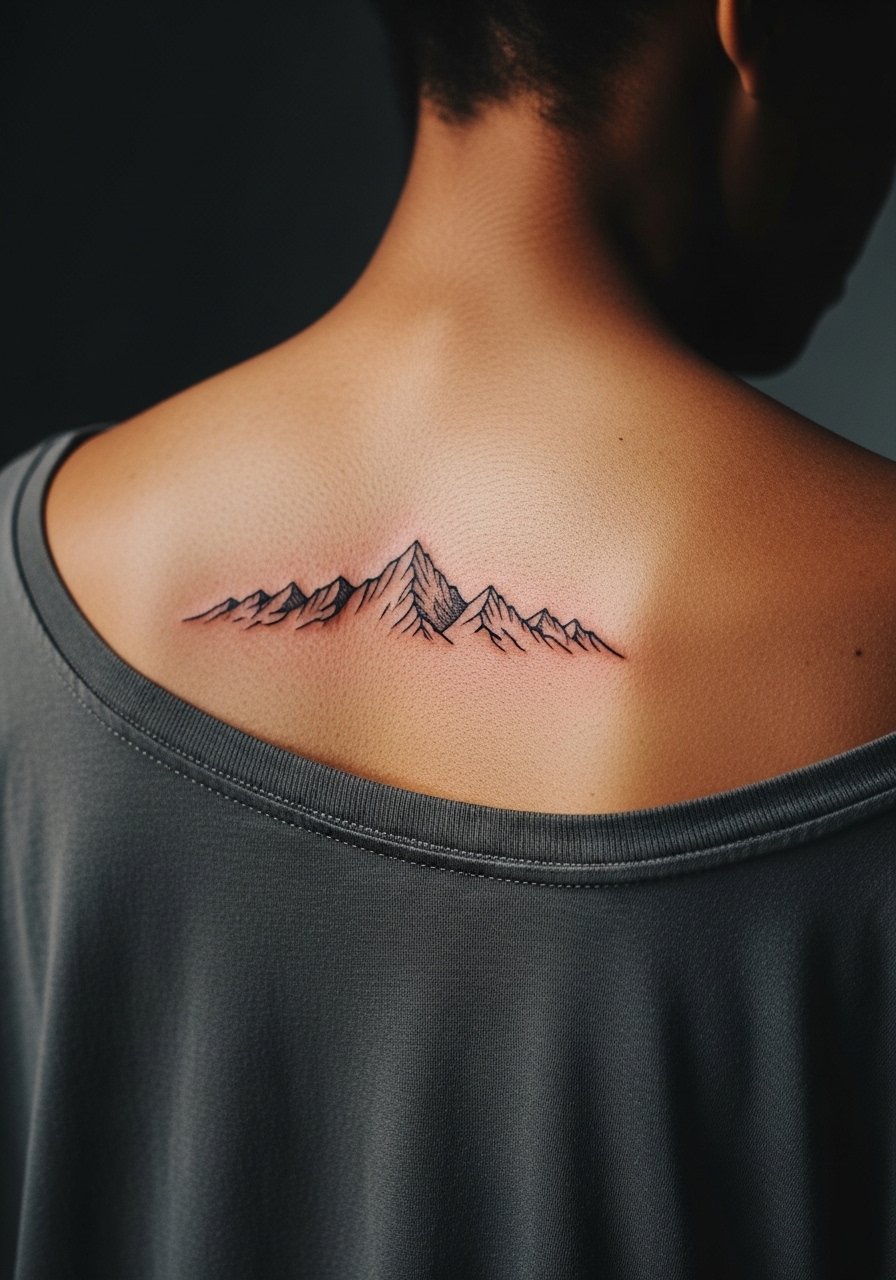
A small mountain silhouette that follows the top ridge makes a modest horizon when you rise and fall. The key consultation note is to ask for simplified peaks and avoid interior texture that will cloud at tiny scale. Expect low pain and a single session. A common mistake is adding shaded valleys in a small band, which softens into an indistinct gray later. For an outdoorsy look, pair the piece with rolled-up sleeves or a light jacket that frames the back opening.
Frequently Asked Questions
Q: Will a tiny fine line upper back tattoo fade faster because of movement and shirt rubbing?
A: It can. Fine line work ages faster on areas that see constant friction. From what I've seen, slightly heavier single-needle lines or targeted blackwork hold longer. Plan a touch-up at 6–12 months and avoid tight collars or backpacks during the early healing window.
Q: Saniderm or dry healing for an upper back tat, which camp should I join?
A: Artists and community members split on this. One camp prefers Saniderm because it keeps mobile areas moist and reduces scabbing. The other camp warns it can trap bacteria if not applied cleanly. Ask your artist which they trust for shoulder-blade work and follow their protocol for removal timing.
Q: How should I dress for a session that hits the upper back so the artist has clean access?
A: Wear easy access clothing like a loose tank or an open button-down you can pull aside. For collar-area pieces choose a loose polo or a wide-neck shirt you can adjust. If you plan to take a healed photo right after, a fitted v-neck tee can frame the space nicely. Consider bringing a robe or zip hoodie to avoid tugging fabric over fresh ink.
Q: Do tiny tattoos on darker skin tones require different line weight or approach?
A: Yes. On darker tones, thin single-needle lines sometimes fade into the skin more quickly. I recommend discussing slightly thicker line weight or more solid blackwork for critical outlines so the design keeps its shape. A small test patch or clear portfolio examples on darker skin help you set expectations.
Q: How long before I can hit the gym after getting a tiny upper back tattoo?
A: Avoid heavy shoulder-strapping or sweaty upper-body sessions for at least one week. Light cardio without strap pressure is usually fine after 48–72 hours if the area stopped weeping and you can keep it clean. Sweat can complicate scabbing, so err on the side of rest.
Q: What's a realistic touch-up timeline for tiny upper back designs like mandalas, fine line animals, or dot clusters?
A: Expect a touch-up window at 6–12 months for fine line work and small micro-realism pieces. Blackwork and solid fills often settle longer and may not need a revisit as soon. In my experience, planning one touch-up within the first year avoids chasing fading later on.
