
Fine line black and grey henna-inspired tattoos are having a moment, and not all of the hype holds up once the ink has settled. Trend pieces that look razor-sharp on day one can soften by year two if spacing and depth are wrong. Pick placements and line weights that work with your skin and lifestyle and you get a henna vibe that actually ages well. Below are 27 simple black and grey henna tattoo ideas with what to ask for, how they heal, and how to wear them.
1. Black and Grey Mandala Henna Mimic on Inner Wrist

I often point first-timers to a wrist mandala when they want the mehndi look without overcommitment. Ask for slightly increased spacing between petals and stipple shading so the dense center does not merge after a year. Expect a one-session piece that feels quick but tender, a 3 out of 10 on most pain charts. Common mistake is asking for very tight micro petals that swell into blotches. For showing it off, pair with a thin silver chain bracelet on the opposite wrist to frame the design without crowding the linework.
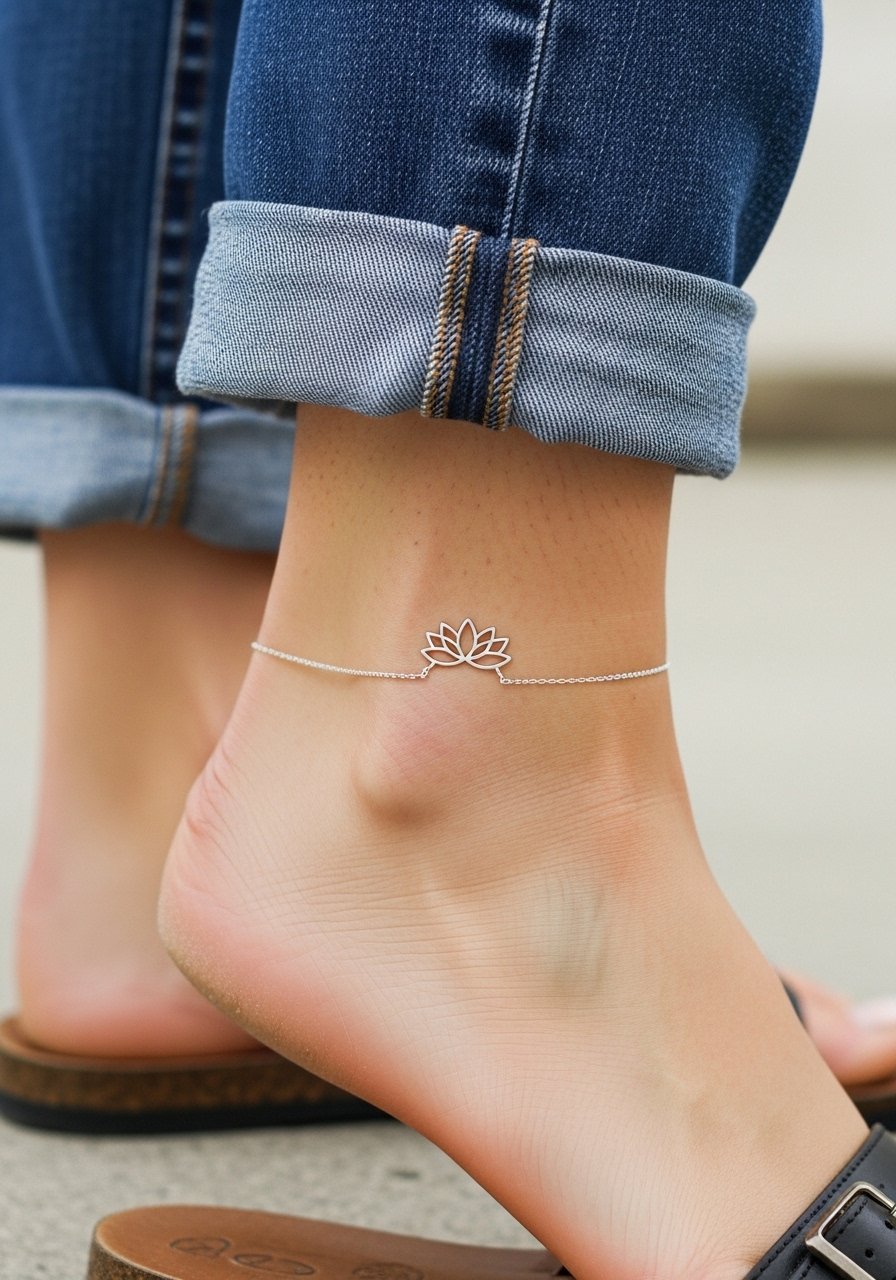
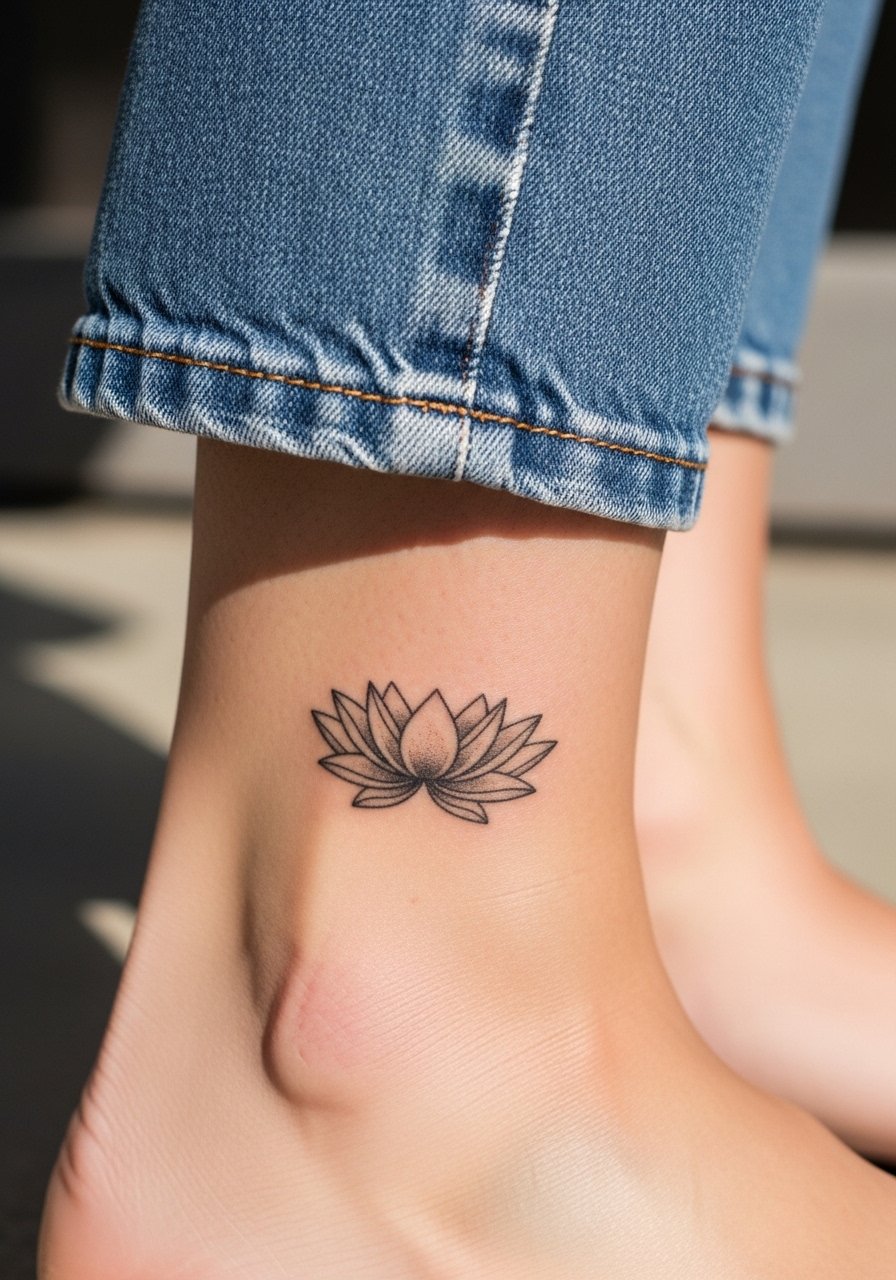
2. Simple Grey Lotus Outline at the Ankle
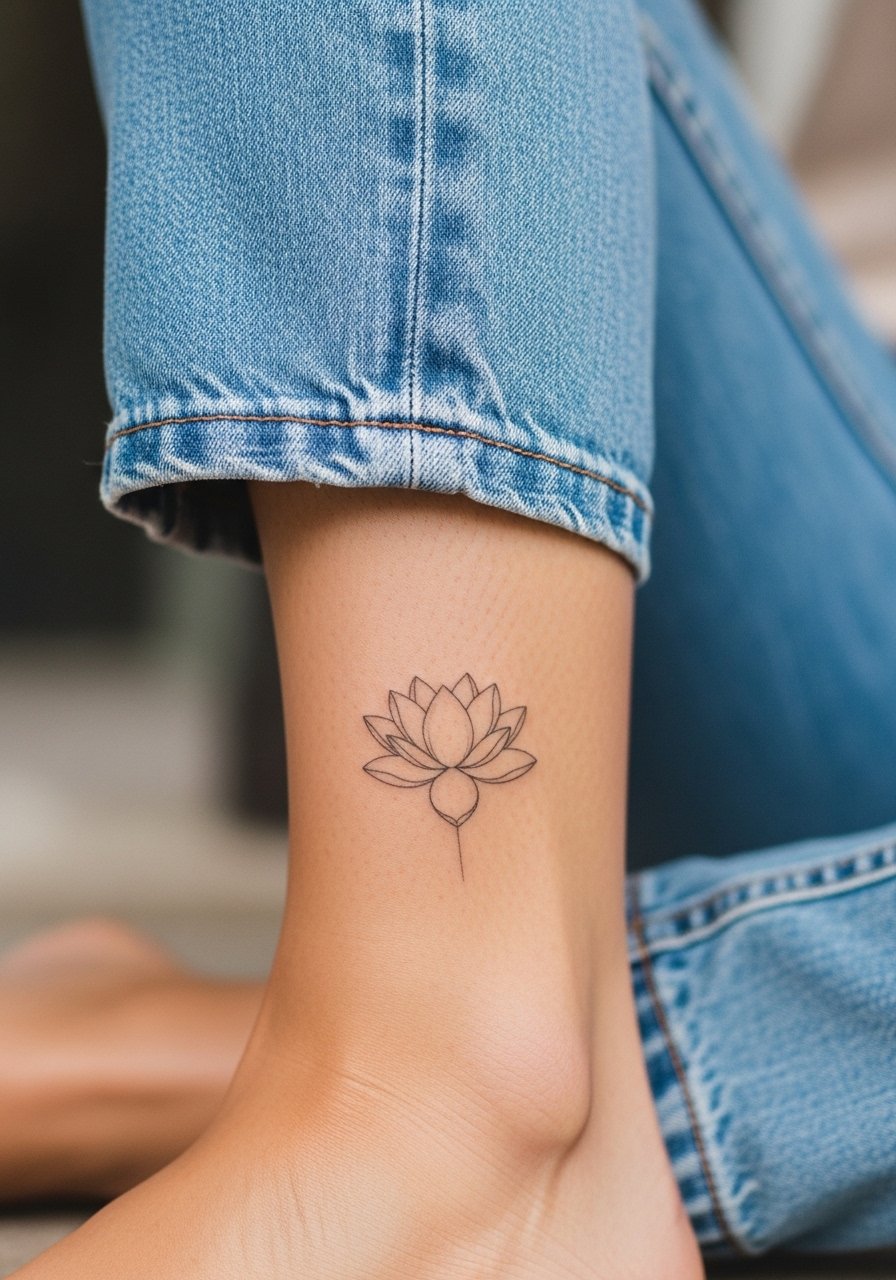
The inner ankle is ideal for a delicate lotus that reads like henna but stays subtle. Tell your artist you want a grey wash fill rather than solid black so the petals soften with time. The session is usually under an hour and the pain sits around 4 out of 10. A frequent error is requesting ultra-thin outline only, which can fade faster on constant ankle friction. For summer styling, pair the piece with strappy flat sandals to let the curve show without socks rubbing the area during healing.
3. Blackwork Vine with Grey Shading on Outer Forearm
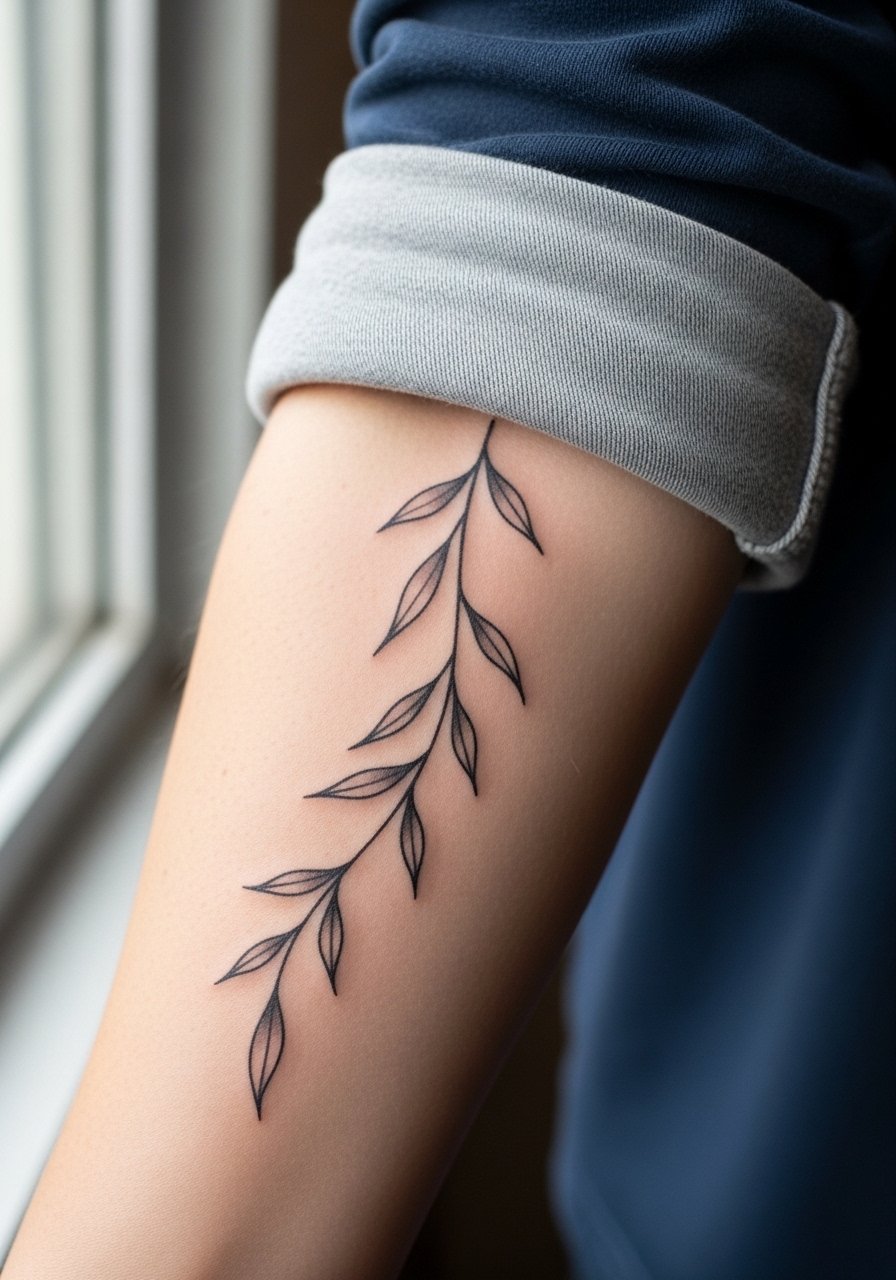
The outer forearm suits flowing vine work because the canvas moves with the arm rather than stretching awkwardly. When you consult, ask for a slightly bolder outline and layered grey wash instead of only fine lines so the pattern keeps contrast on a range of skin tones. Session time is 1 to 2 hours and expect mild soreness with light swelling. A common aging problem is going too fine on the outline, which can blur on oily skin. Show it off with a linen button down shirt rolled at the cuff so the vine sits naturally when you pose.
4. Minimalist Grey Henna Hand Motif on the Back of Hand
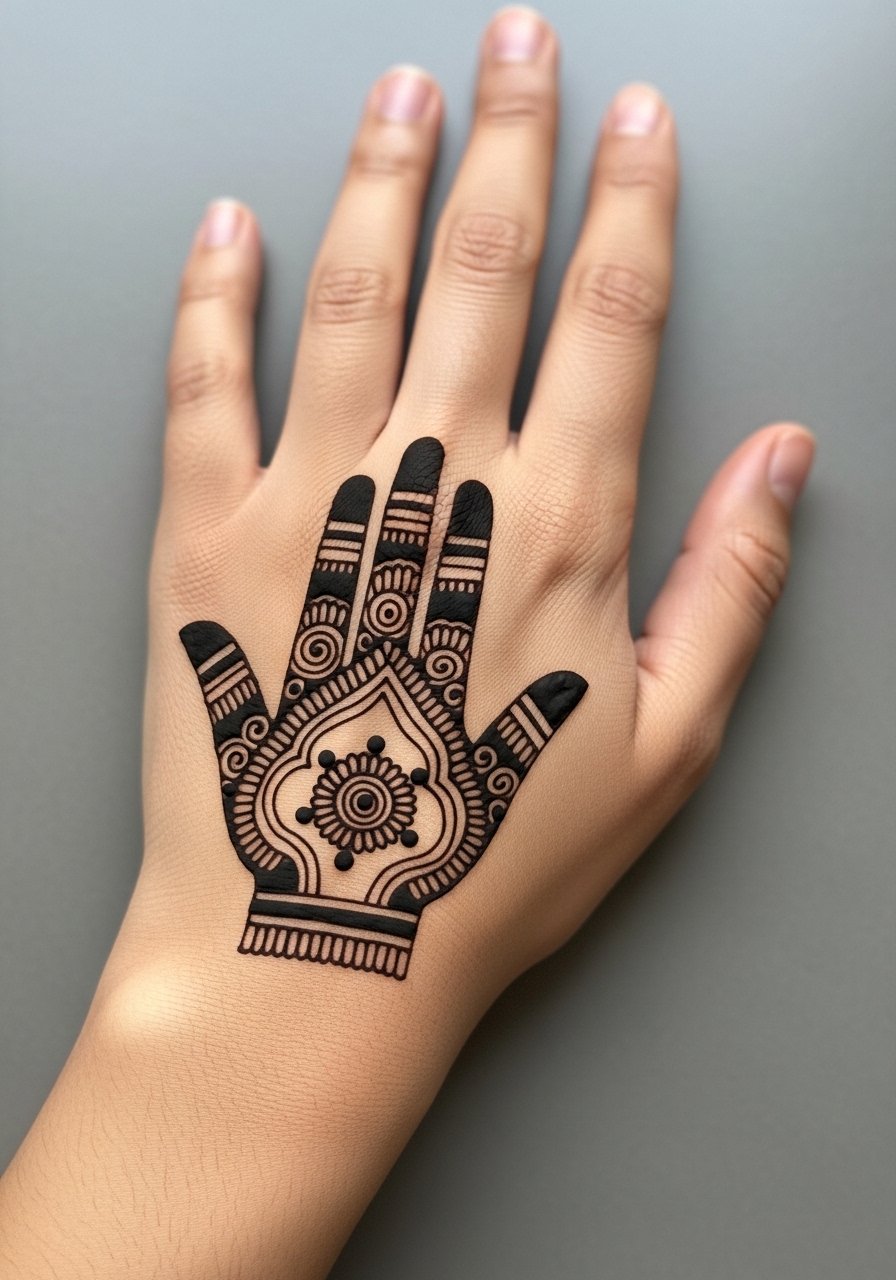
Hand placements can look henna-authentic from the first week, but they also get the most wear. Ask for slightly heavier grey fill with a single-needle outline to avoid early fade. The session is short but expect more sensitivity because skin over the knuckles is thin. Common mistake is asking for the densest possible pattern which needs frequent touch-ups. Hand tattoos still affect hiring in some industries, so weigh career impact before committing. For longevity, plan on a touch-up at year two if you want the hand motif to keep its sharpness.
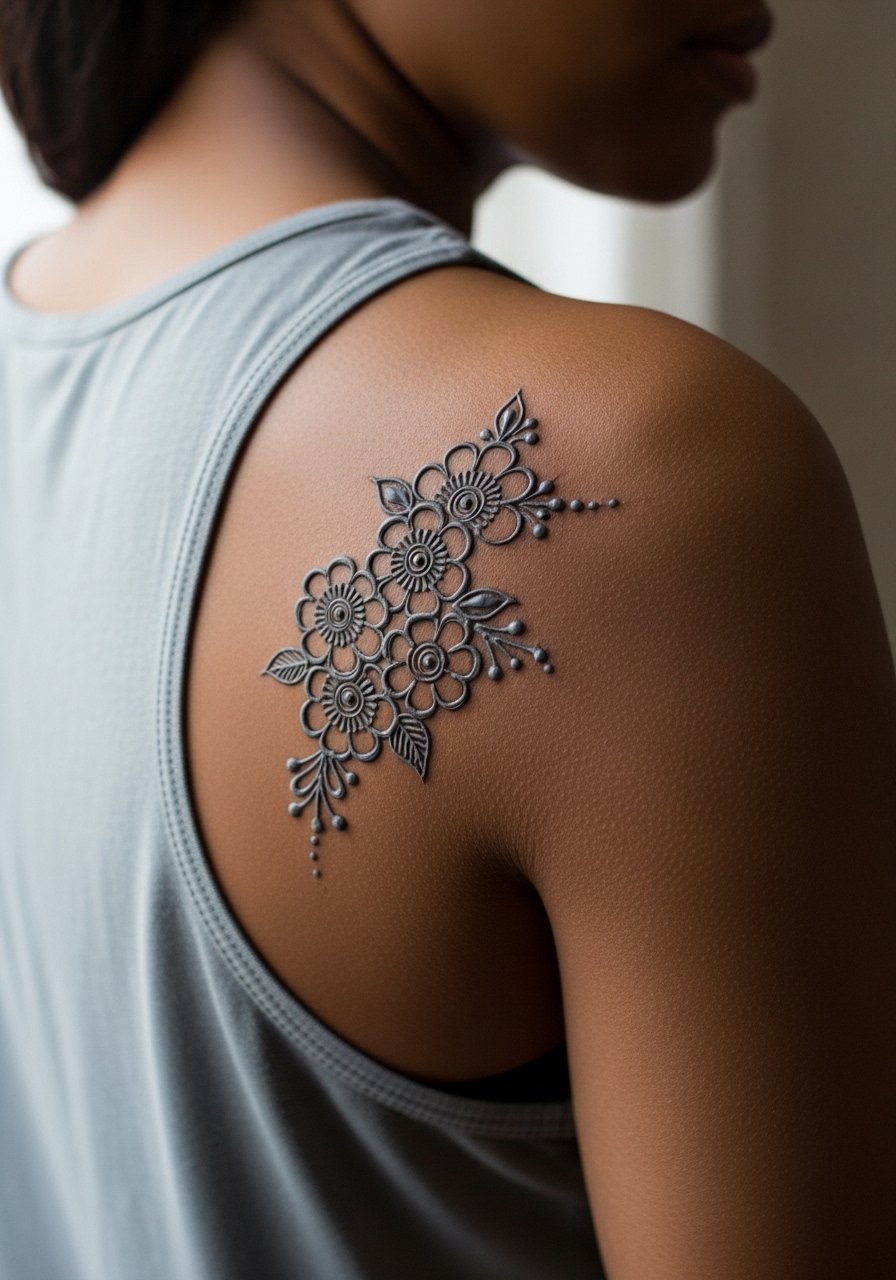
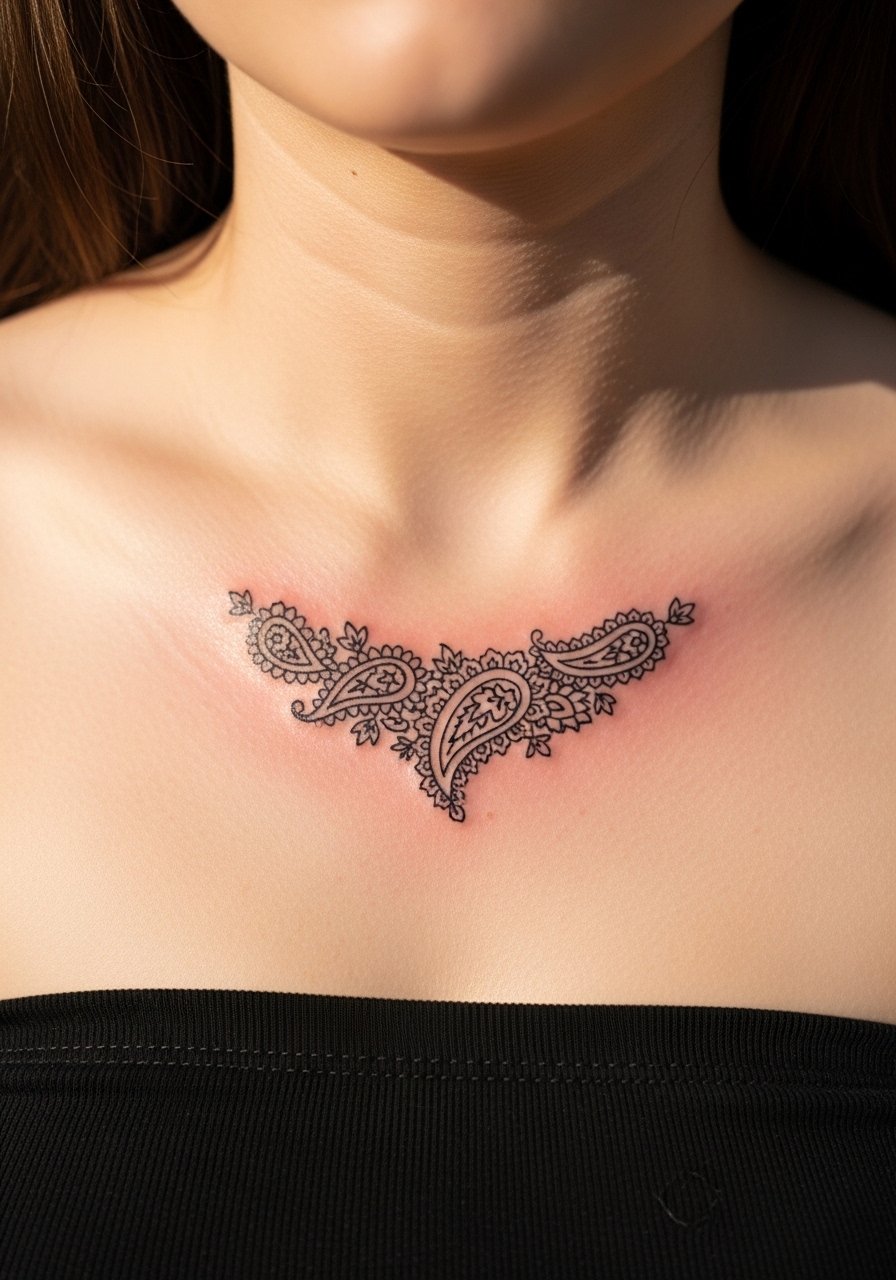
5. Black and Grey Paisley Swirl on the Collarbone
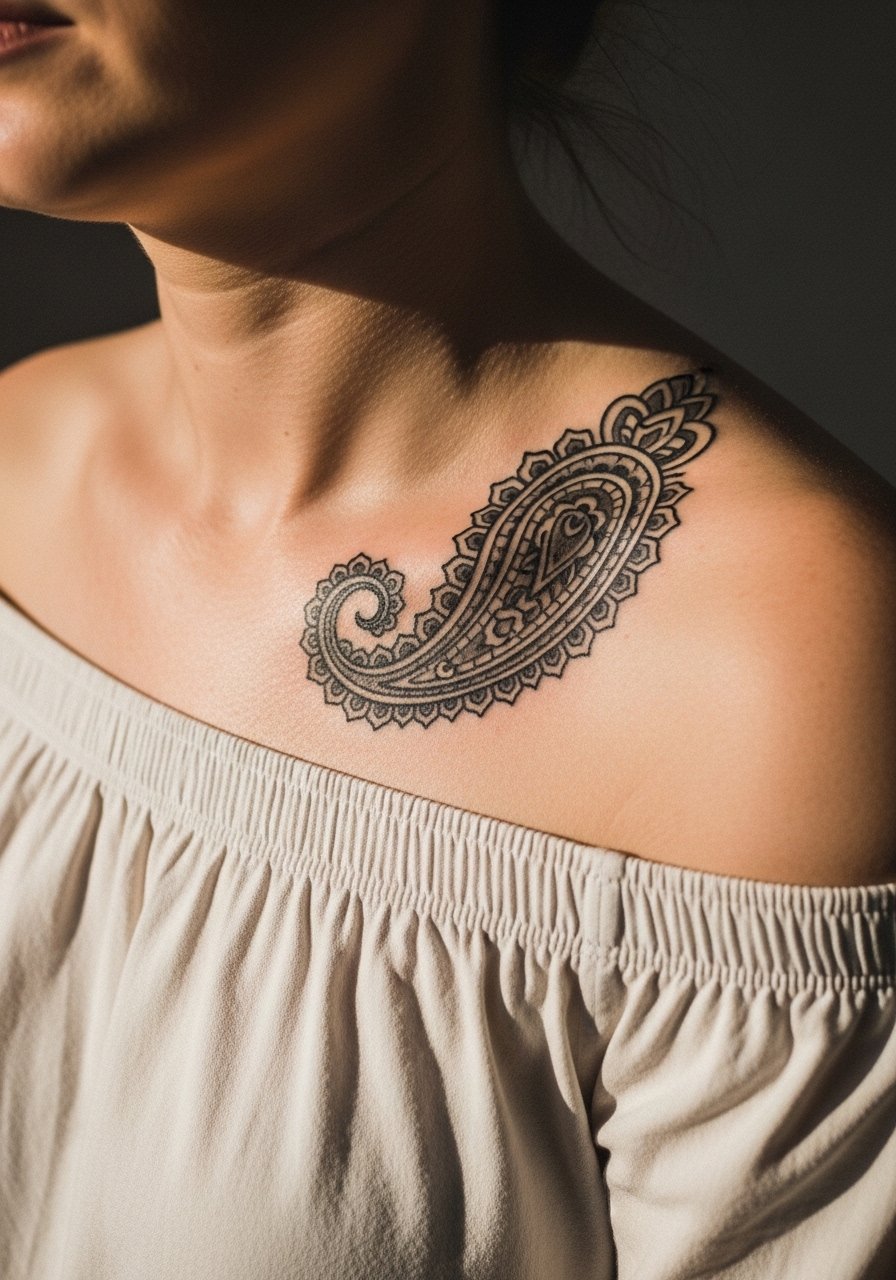
Collarbones take ornate paisley clusters well because the area resists dramatic stretch and shows off negative space. During the consult, specify layered grey tones and soft edges so the design ages like stain rather than a harsh ink block. It heals with minimal discomfort unless the needle grazes bone. A common error is pushing too much density into a 2-inch area which can age into muddied grey. For evening looks, pair the placement with an off shoulder blouse and a delicate chain necklace sitting above the swirl.
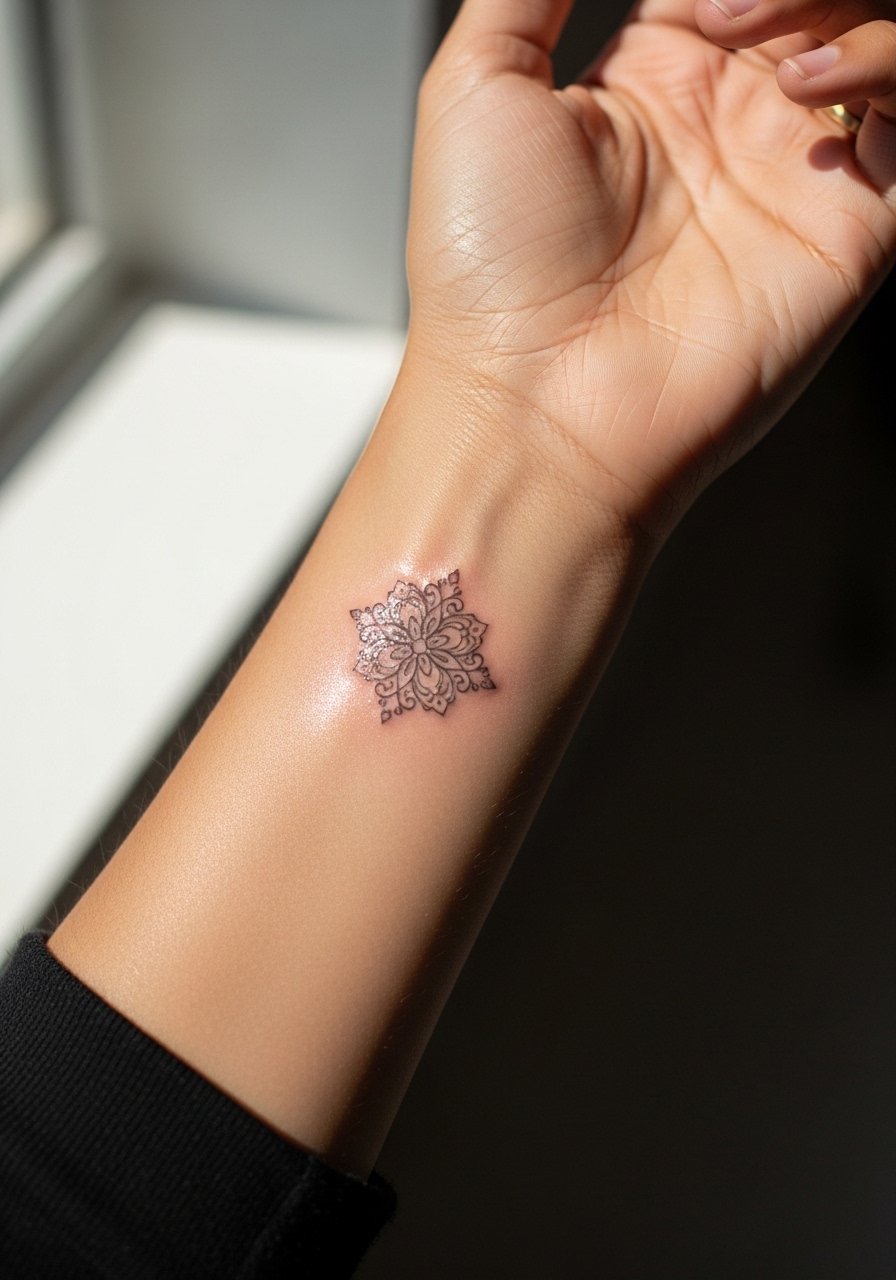
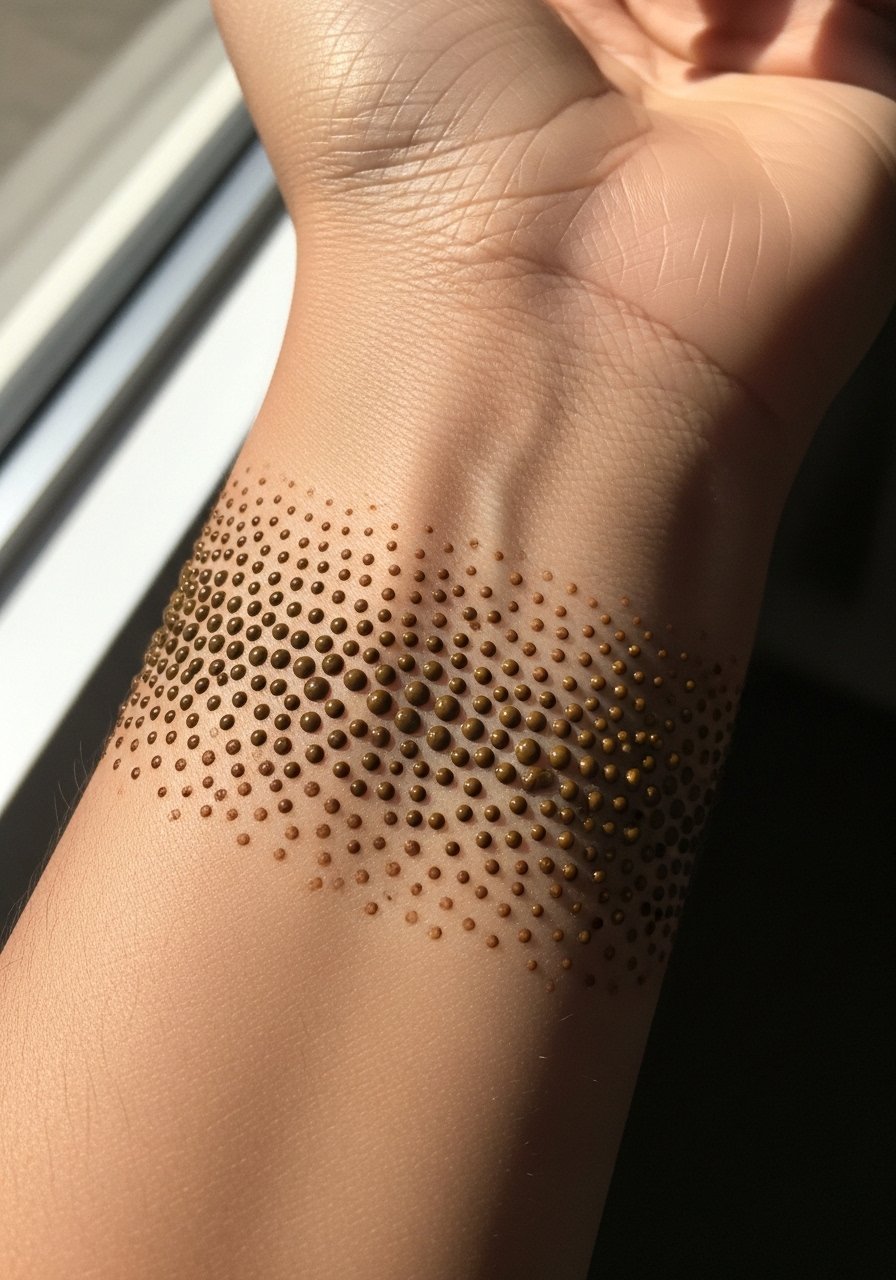
6. Fine Line Grey Henna Dotwork Band on Inner Wrist

Wrist dotwork is a reliable single-session option that heals fast with little itch. Ask for stipple shading that fades outward instead of solid fills so you get that gradual henna stain effect. The wrist is prone to friction from watches and bracelets, so tell your artist you want spacing that anticipates slight spreading. Expect touch-ups at year two if you want the band to stay crisp. For showing it off, a dainty bracelet stack on the opposite wrist complements the dotwork without masking it.
Studio Day Picks
The wrist and collarbone pieces above heal differently from larger work, so a few small items smooth the session and the first week.
-
Lemon sugar paste kit. Helps mimic a darker henna-like sheen on grey wash pieces during the first 48 hours without heavy greasing.
-
Monot turpine alcohol serum. Used sparingly by some artists to deepen grey tones after initial healing for designs that aim to look like henna stains.
-
Thin glycol balm. A lightweight option that reduces scabbing on hands and wrists where thicker balms can trap moisture.
-
Blow dryer heat kit accessory. Low heat settings speed the dry gloss stage for fresh ink without risking a blowout in fine line work.
-
Aquaphor healing ointment. Thin application in the first 48 hours helps keep fine line work from crusting excessively on high-friction zones.
7. Black Outline Henna-Inspired Leaf Chain on Upper Arm
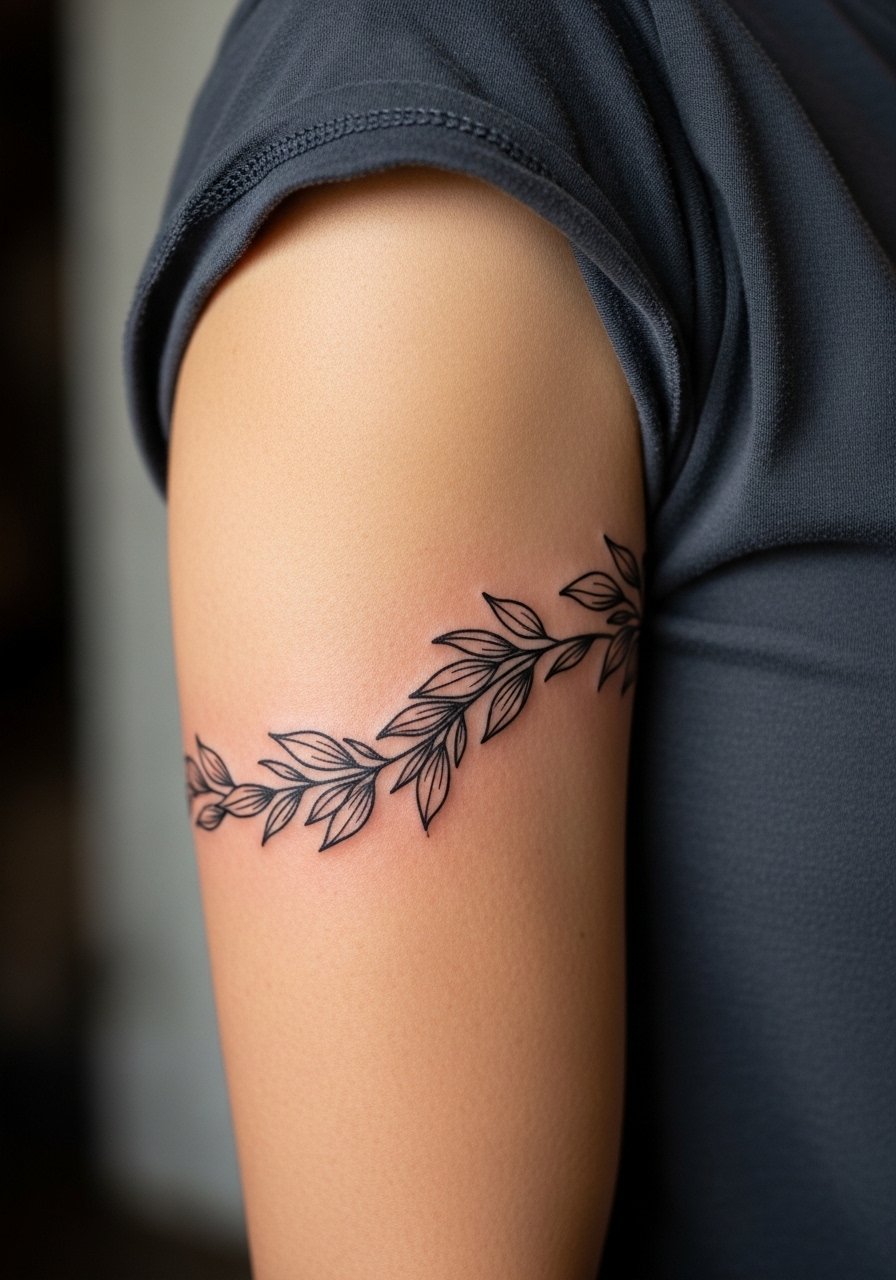
Upper arm wraps elongate the limb and read like traditional mehndi when spaced as a chain. Tell your artist you want clear negative spaces between leaves and soft grey fills to avoid early merging. Expect a 1 to 2 hour session with manageable soreness under the skin. The common mistake is making the leaves too compact which ages into an indistinct band. Pair this wrap with a gold bangle stack on the opposite arm so accessories echo the chain without crowding the pattern.
8. Soft Grey Mehndi Floral Cluster on the Shoulder Blade
Shoulder blade pieces heal well because the skin there moves with the scapula rather than stretching like the abdomen. Ask for blended grey washes that sit under bold outlines so the motif keeps depth without looking like a block of ink. The session feels like moderate pressure with low ongoing sensitivity. A mistake is packing too much small-detail into a small patch which flattens during the first year. For session access, wear a sleeveless linen tank so the artist can work without you shifting.
9. Black and Grey Geometric Henna Knot on the Calf

Calf placements let geometric knots breathe because the area has room for spacing and crisp edges. During consults, I ask people to show side-on photos so the knot follows muscle flow rather than sitting on a curve. Sessions run one to two hours and the calf is low on touch-up needs if linework has space. The usual pitfall is shrinking the knot to a size that blurs after healing. For outfits, pair the knot with an asymmetrical midi skirt or rolled slim joggers to let the geometry peek through.
10. Micro Grey Henna Script Initials on Finger or Neck Base

Micro script is meaningful and discreet but it can blur quickly in high-motion zones like fingers. Ask the artist for slightly bolder single-needle strokes rather than ultra-fine hairlines and request a touch-up window at three to six months. Expect a very short session with noticeable sensitivity on the finger. A common mistake is placing script across a knuckle where flexion causes early distortion. If you pick the neck base instead, a thin chain pendant necklace sits above the lettering without competing for attention.
11. Blackwork Henna Peacock Feather on Outer Thigh

The outer thigh takes larger, more decorative motifs with low risk of distortion from body shift. For a peacock feather, ask for a strong black spine and grey featherlets to keep motion in the design. Sessions can be longer and involve more repositioning, so plan for two to three hours and bring a loose bottom for session comfort. A misstep is requesting heavy saturation across the whole feather which can look dense on dark clothing. For summer, the feather pairs with high waist shorts and flowy skirts that reveal the curve when you move.
12. Grey-Washed Henna Wave Pattern Along the Ribcage
Fair warning, the ribcage rates high on the pain scale, often an 8 out of 10. That said, the space suits grey-wash waves because artists can pace the session around breaks. Ask for wider strokes and soft gradients rather than tiny compact motifs that stretch with breathing. A common aging problem is dense linework in tight areas which causes merging over time. Book ribs pre-summer for easier dry healing. If you want less sensitivity, request a slightly lighter session schedule with short breaks so you can manage the pain.
13. Simple Black Henna Sunburst on the Shoulder
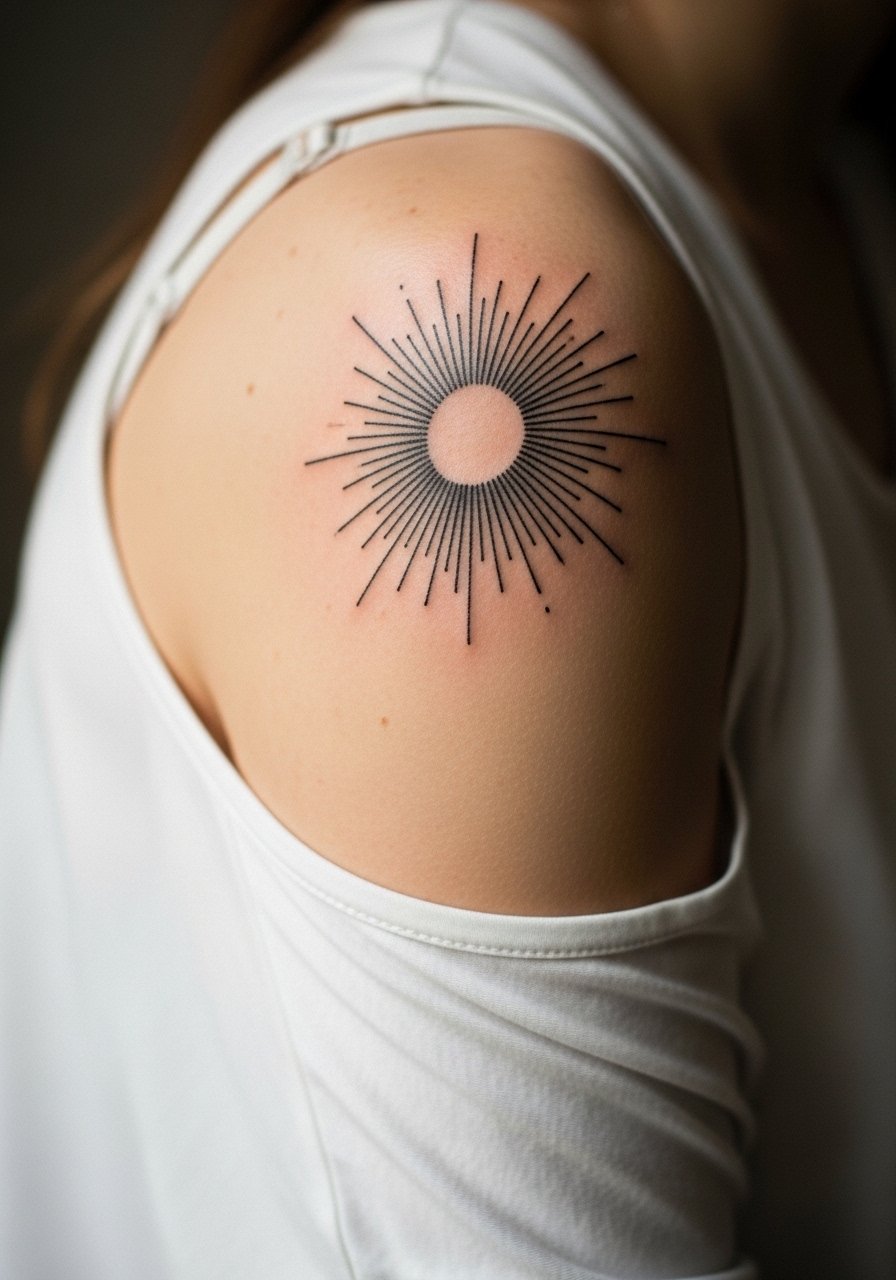
Shoulder sunbursts photograph well and stand out from a distance because of radial composition. Tell the artist you want thin rays with a soft grey center wash so the piece keeps a hand-applied henna look as it ages. Sessions are usually quick and healing is fast unless you sleep on that side. A mistake is packing too many tiny rays close to the center which can merge to a grey spot. For casual wear, try a crossbody bag leather and sleeveless tanks that leave the shoulder clean for display.
14. Knuckle Henna-Style Rings for Ring Alternatives
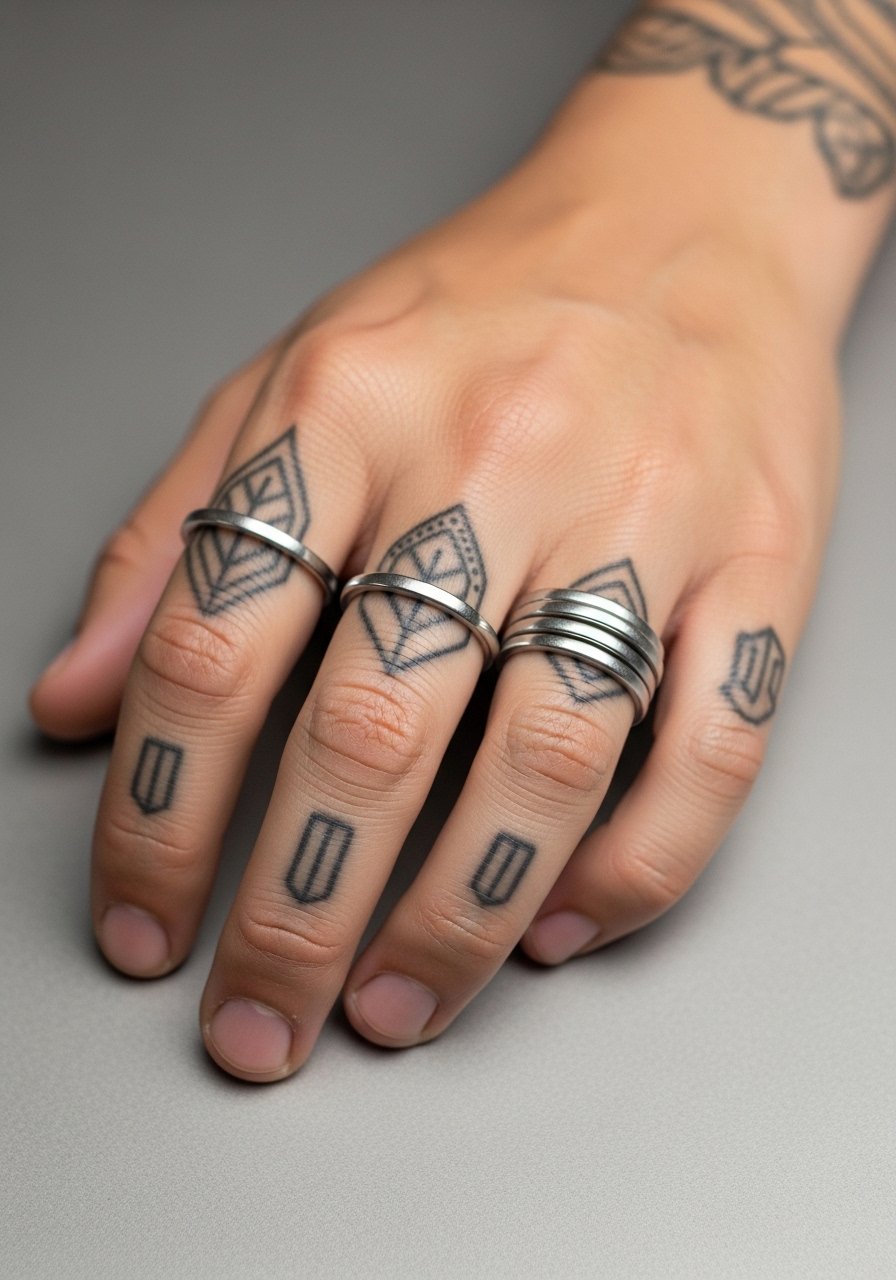
Knuckle tattoos carry a unique risk because the skin moves and receives so much abrasion. If you want ring replacements, ask for low-contrast grey shading rather than dense black outlines so wear reads like a softened henna band. Sessions are short and painful because of thin skin. Mistakes include choosing overly complex motifs that need frequent maintenance. Remember finger and knuckle work tends to need touch-ups every year if you want to keep lines defined. Handcare and avoidance of harsh detergents help longevity.
15. Lemon-Sugar Finish Accent on Small Motifs
A lesser-covered trick some people mention is using a light lemon-sugar finish during the first day to create a darker, glossier-looking surface that echoes fresh henna. If you try this, discuss it with your artist before application and do a patch test to check sensitivity. This tip is about aesthetic finishing only and does not replace proper healing routines. A mistake is overdoing syrup near open ink which can trap bacteria. Use the method for short-term visual effect and avoid prolonged application during the first 48 hours.
16. Minimalist Mehndi Sternum Linework
Sternum work needs specialized experience because the area moves with breathing and the skin varies in thickness. When you consult, ask whether the artist regularly tattoos around the sternum and request a lighter line weight that still leaves room for subtle grey shading. Sessions can be vulnerable due to sensitivity and positioning, so plan clothing that gives easy access. The common mistake is trying to pack a complex mandala into the sternum in one go which can flatten during healing. Think about session pacing and whether a second touch-up session is included.
17. Dot-Work Mandala Behind the Ear
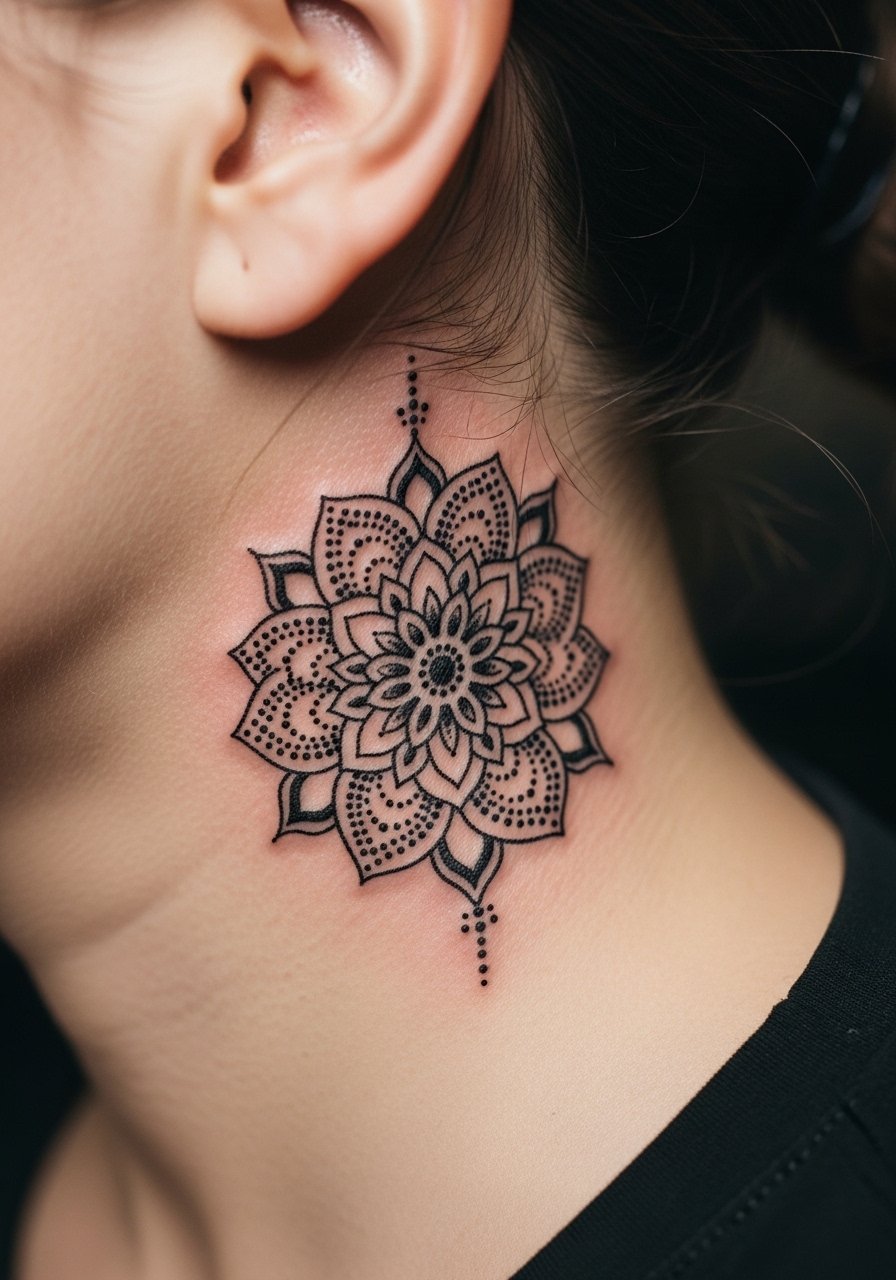
Behind-the-ear placements are discreet and heal quickly under hair coverage. For a dot-work mandala, request stipple shading and avoid dense central fills that could look like a spot when hair grows out. Sessions are brief and not too painful though placement sensitivity varies. Artists split on whether the area needs thicker lines to last. One group says thicker lines age better and another says fine dots settle beautifully if spaced right. Ask your artist which approach they prefer and why for this exact placement.
18. Ornamental Knot at the Neck Base

Neck-base knots are trending as a marriage of Celtic knotwork and mehndi rhythm. Tell your artist you want open negative space within the knot and soft grey fills to avoid a heavy block. Sessions are short but the area sees sun exposure so plan sun protection for healed ink. Mistakes include shrinking the knot too small which causes the lines to merge over time. For evening wear, a delicate chain necklace that sits just above the knot frames the area without competing.
19. Micro Dot Henna Wrist Band
A narrow dot band gives a meditative henna feel and usually heals in about ten days with low itch. Ask for gradient stippling that fades outward so the band reads soft rather than solid. Because wrists hit surfaces often, expect light touch-ups at year two if you want precision. A common error is requesting a dense solid band which will flake unevenly. Style the band with a dainty bracelet stack on the other wrist to keep attention balanced.
20. Fine Line Anklet Lotus
Anklet pieces sit at the intersection of seasonal show-off and constant rubbing. Request a grey wash in the petals and ask the artist to keep outlines slightly bolder than hairlines for durability. Sessions are short and pain is low. The pitfall is putting the design where socks or shoe straps will rub during initial healing. For footwear, pick sock-free options like strappy flat sandals to minimize friction in week one.
21. Calf Knot That Flows with Leg Movement

Knots on the calf should follow muscle lines so they keep form when you walk. Show artists photos of you standing so the design aligns with the leg rather than cutting across curves. Sessions are comfortable and tend to need fewer touch-ups than smaller dense work. Mistakes include forcing a symmetrical knot onto an asymmetrical limb which creates odd tension. If you plan tattoos that move with the body, ask about scaling up slightly to preserve negative space over time.
22. Paisley Mini Cluster Above the Collarbone
Mini paisleys above the collarbone make a strong visual without asking for a large commitment. Ask for layered greys and a thin outer contour so the cluster keeps depth as it softens. Healing is easy unless clothing rubs the area. The error people make is requesting dense repetition in a tiny area which compresses into a single grey patch. For jewelry, a thin chain pendant that rests above the cluster keeps the silhouette clean.
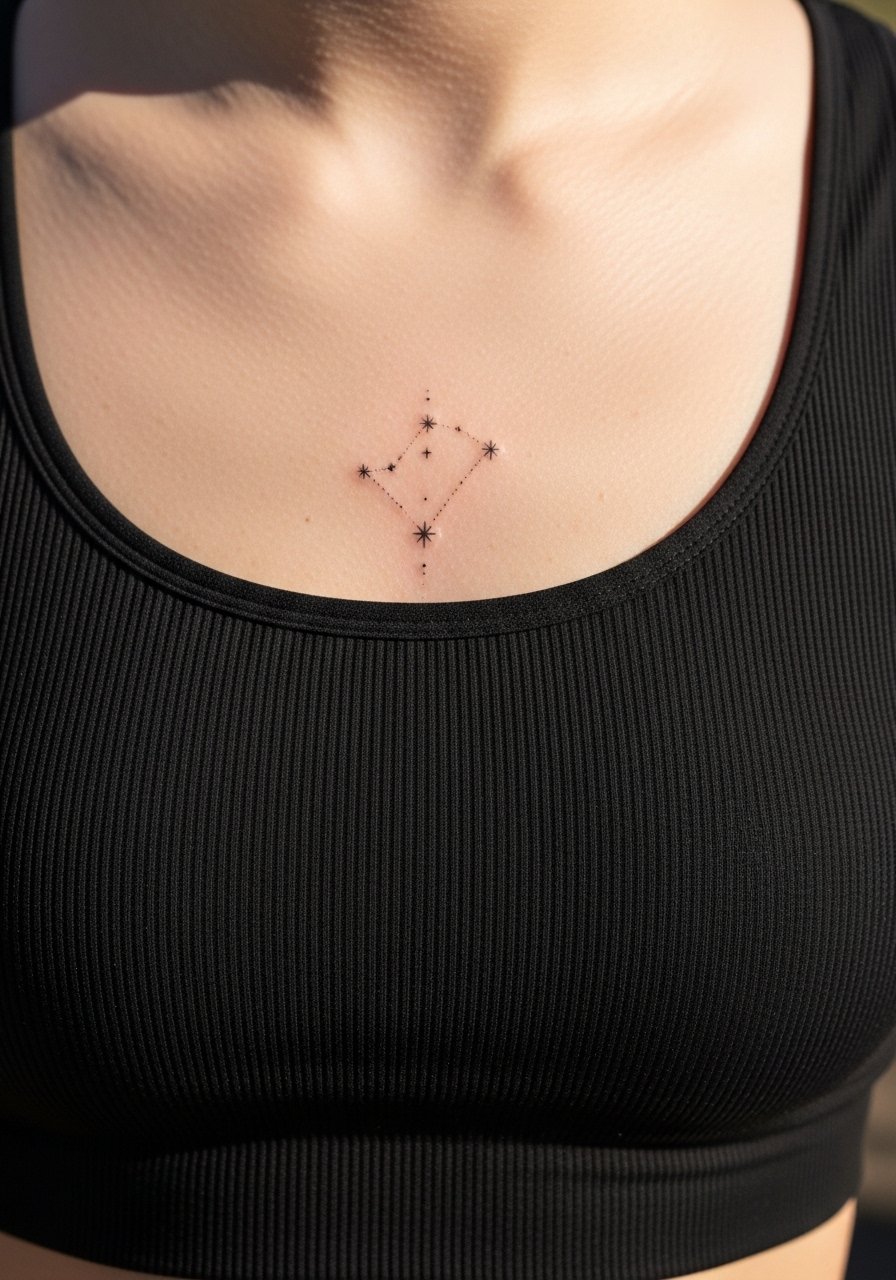
23. Minimalist Henna Constellation on the Wrist

Constellation bands on the wrist are ideal for micro dotwork and usually finish in one short session. Ask for gradual dot sizes and a subtle grey wash behind a few stars to create depth. Friction from sleeves is the main enemy so plan clothing accordingly. Expect a light touch-up at year three if you want absolute crispness. Pair this piece with a linen cuff bracelet on the opposite wrist for a textural contrast that keeps focus on the dots.
24. Forearm Vine Wrap Built for Stretch Resistance

If you worry about body changes stretching a forearm piece, choose a vine with clear spacing and negative areas that resist turning into blobs. Tell your artist you want slightly larger leaf sizes and thicker connecting stems so the design scales with minor skin shifts. Sessions take around an hour and discomfort is low. The frequent mistake is compressing too much fine detail into one strip. Wear a linen button down shirt you can easily roll for the session and to show off the wrap afterward.
25. Asymmetrical Calf Knot for Motion
Designs that bend with leg motion look deliberate rather than accidental. Ask your artist to map the knot to your calf curve so it breathes when you walk. Sessions are relaxed and healing is straightforward because the calf avoids daily abrasion. A common misstep is enforcing strict symmetry where the muscle curve calls for a staggered layout. Style with leather ankle boots off-season to frame the knot without compressing it.
26. Tiny Sunburst Micro on the Shoulder Cap

Micro sunbursts on the shoulder are quick and low-risk for distortion. Ask for narrow rays that splay outward and a soft grey center so the tiny piece looks alive as it settles. Sessions are short with light tenderness for a day. The mistake is cramming too many rays into a tiny diameter which can blur. If you want it to last sharp, plan a small touch-up in year two rather than expecting lifelong precision.
27. Grey Lotus Reminder Wrapped Around the Ankle
Ankle wraps that echo henna forms work well when the petals are open and not overfilled. Ask for a tapered grey wash in the petal bases and a slightly heavier outline on the outer edge so the form reads against shoes and socks. Sessions are brief and the ankle can feel tender for a couple days. The common mistake is placing the design where shoe straps will rub. For casual looks, cropped straight-leg jeans and sandals keep the lotus visible without daily abrasion.
Frequently Asked Questions
Q: Will fine line mandalas blur faster on inner wrists than on forearms?
A: Inner wrists see more friction and thinner skin, so fine line mandalas there tend to soften sooner than on forearms. Ask for more spacing in dense areas and slight grey washes to avoid a muddied core. If you want long-term crispness expect a touch-up at around year two or three depending on how often the area is exposed.
Q: How should I dress for a collarbone or sternum session to give the artist the best access?
A: For collarbone pieces wear an off-shoulder or button-down you can slide aside easily. For sternum choose a fitted sports bra or bandeau so only the immediate area is exposed. If you need a quick option consider a loose button-down shirt you can shift without full undressing.
Q: Is black henna safe to use around a henna-style tattoo session?
A: Avoid black henna products on skin because they can cause allergic reactions. For a henna look use grey wash tattoo techniques and cosmetic finishes that do not contain those reactive compounds. If you have sensitive skin, patch testing is the safer route before any topical application.
Q: Do ankle and foot henna-style tattoos need different aftercare than forearm pieces?
A: The main difference is friction and moisture. Ankles get rubbed by socks and shoes more often, so keep footwear off during the critical first days and avoid tight socks. Forearms are easier to protect from friction but may see more sun. Both respond well to a thin, breathable balm routine and keeping the area clean.
Q: Should I expect touch-ups for hand, finger, or knuckle henna-style tattoos?
A: Yes. Hands and fingers are high-wear zones and most people plan for maintenance touch-ups every one to three years if they want precise lines. Choosing slightly bolder outlines and accepting subtle greying makes the pieces read better between sessions.
