
Tattoo trends can look daring online and feel different in the chair. Bite mark tattoo drawings sit somewhere between novelty and a personal marker, and they raise three obvious issues up front: hygiene, bruising that distorts the canvas, and the risk of relationship-based regret. Read on for 27 ways to translate a bite impression into a lasting design and what to ask before you book.
1. Fine Line Bite on Inner Forearm
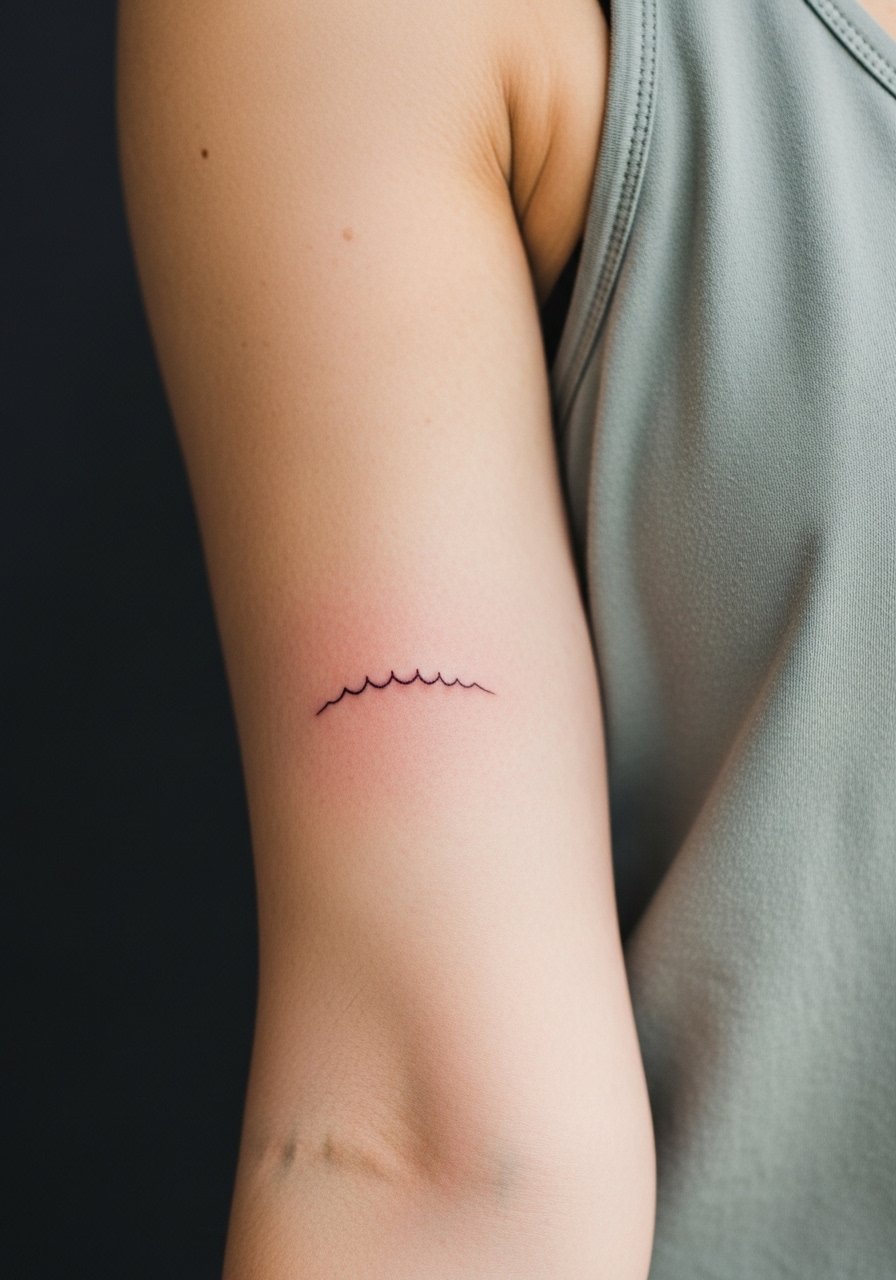
I recommend fine line when you want a discreet, document-like impression that reads like a delicate scar. Tell your artist you want single-needle linework with soft stipple shading to suggest depth rather than heavy shading. Common mistakes include going too dark at first, which ages into a muddy patch. Pain on the inner forearm is moderate and the session is usually short. For showing it off pair with a racerback tank so the arm silhouette stays clean and the linework is visible without competing prints.
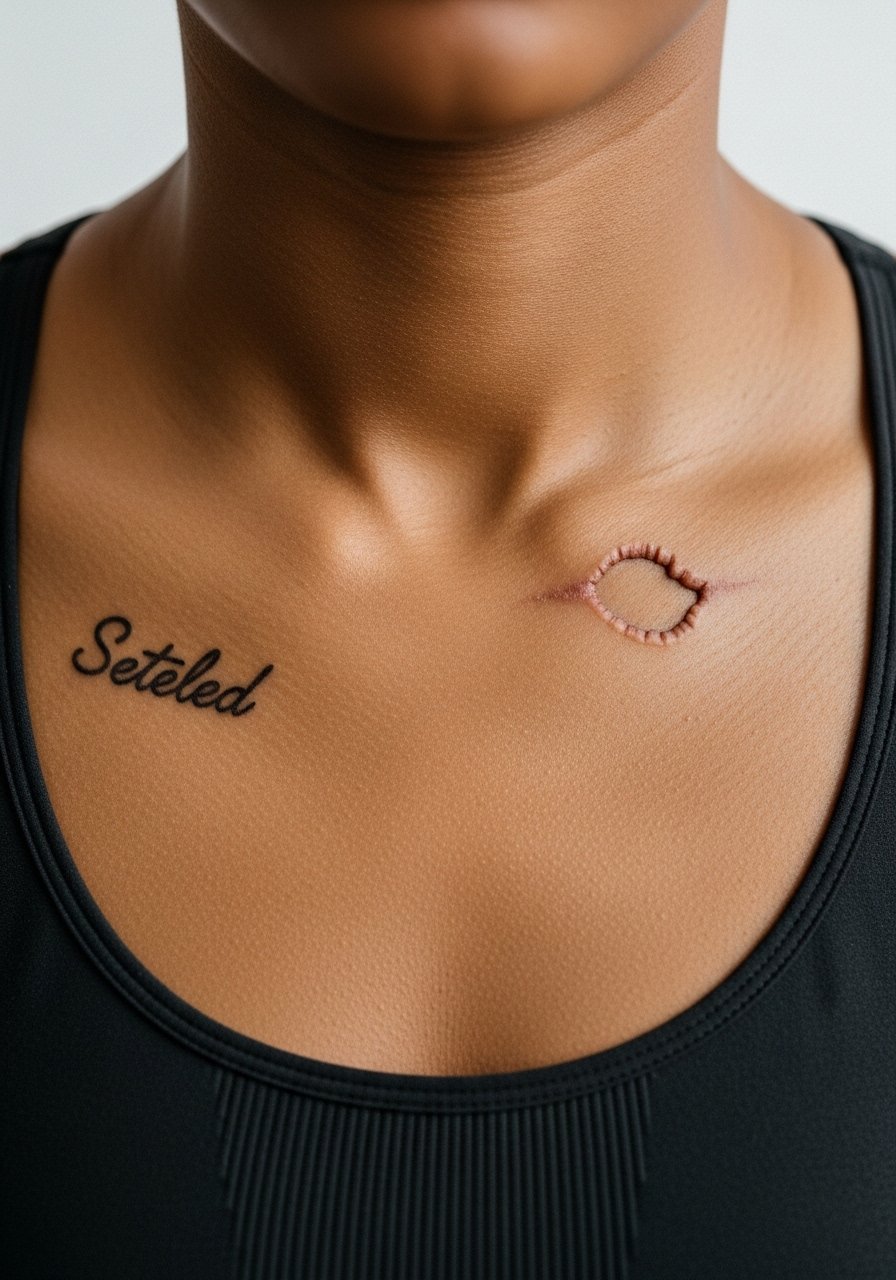
2. Micro-Realism Collarbone Impression
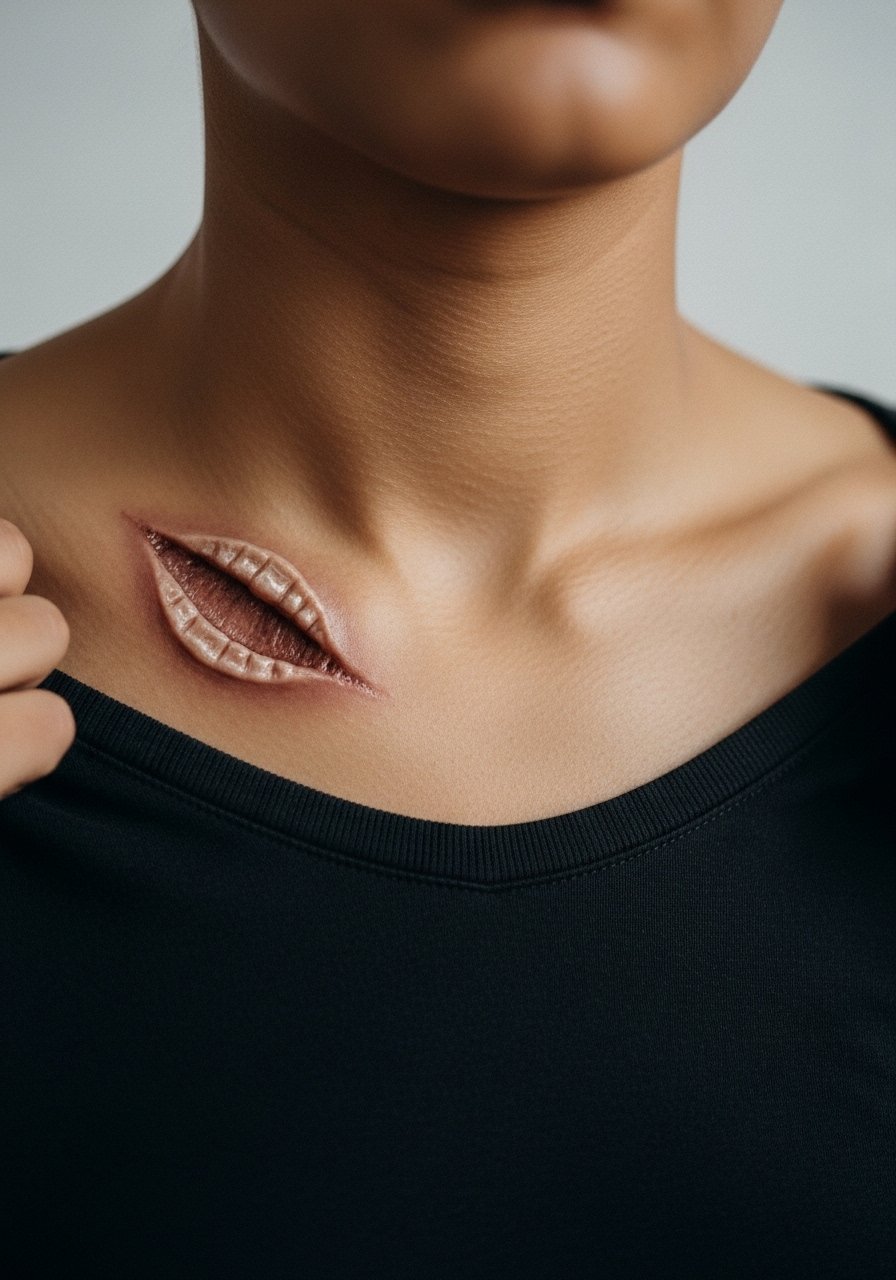
Micro-realism captures tooth grooves and skin texture for a documentary feel. Say you want black and gray micro shading, anatomical depth, and minimal contrast edges so the piece ages like a healed mark. A frequent error is scaling the piece too small; the detail needs room to read at six months. Collarbone work can feel sensitive during the session. When dressing to reveal this placement, an open-neck blouse or wide-neck shirt makes aftercare and photos easier.
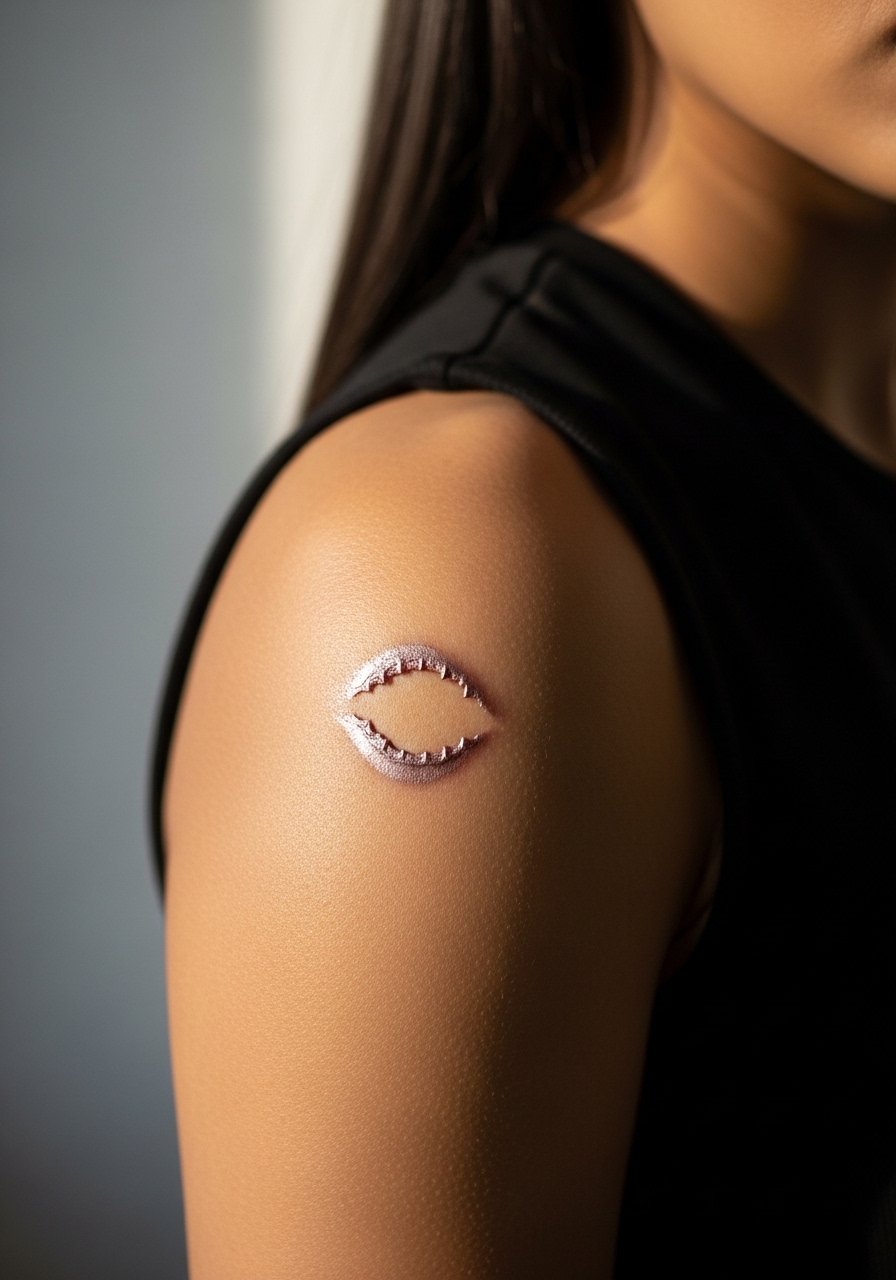
3. Neo-Traditional Lip-Edge Bite on Shoulder
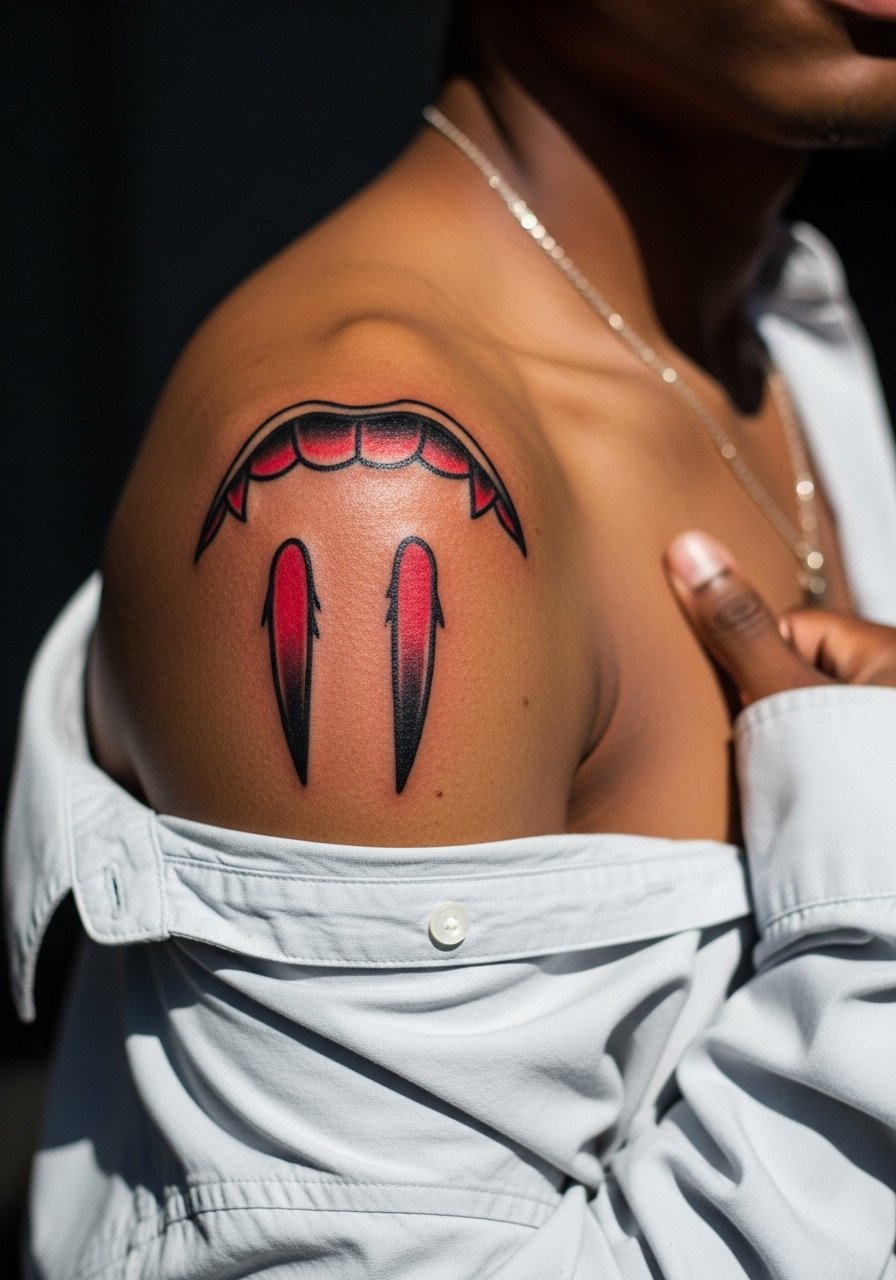
Neo-traditional lets you stylize a bite impression into a punchy graphic with bold outlines and color fills. Ask for saturated reds with a thin black surround to keep contrast as color softens. The common aging mistake is overloading gradients that lose punch over time. Shoulder sessions are moderate in pain and sit well with one sitting. For daytime outfits a loose button-down shirt that can be pulled aside during healing is practical and keeps the piece visible when you want it to be.
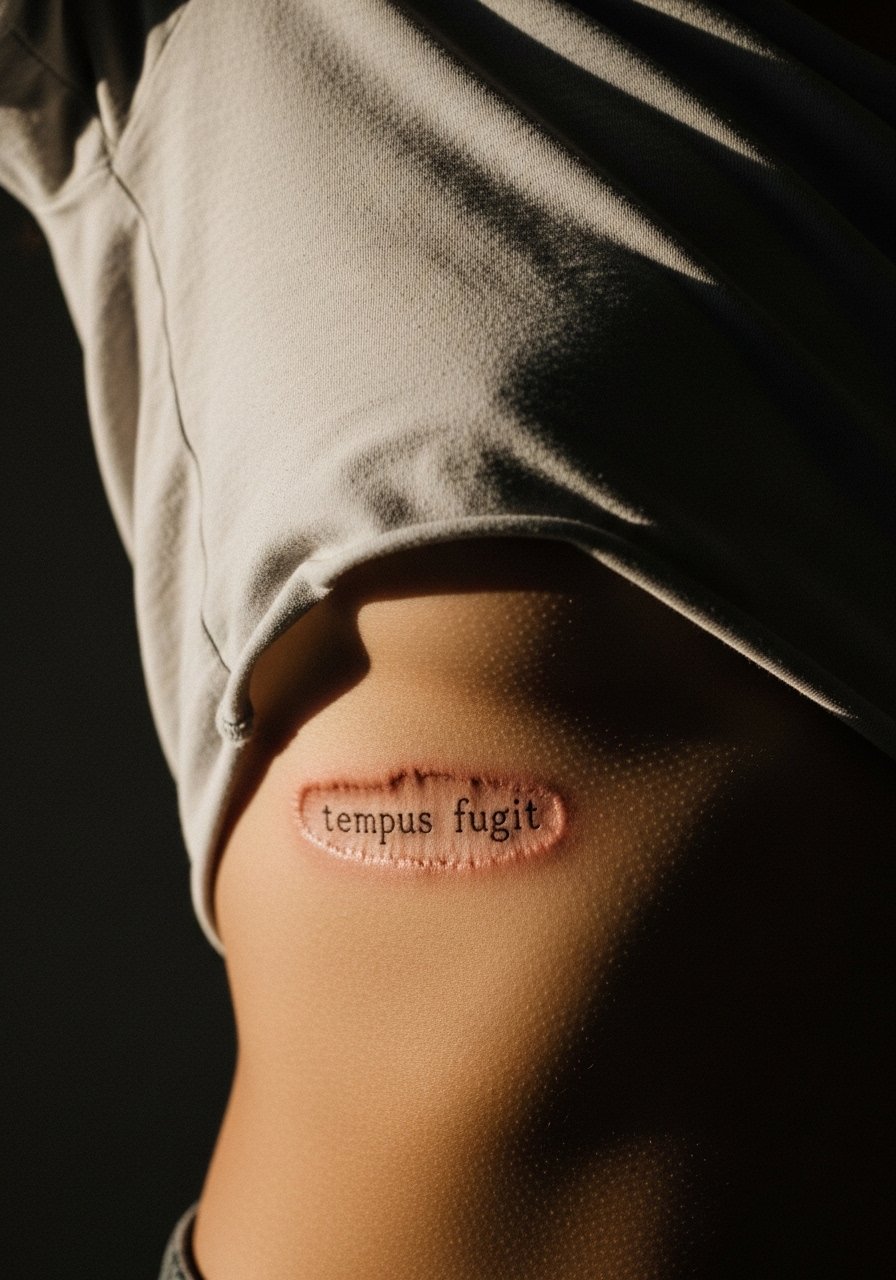
4. Fine Line Ribcage Trace, With the Debate
Fine line on the ribs splits artists into two camps. One camp argues the skin stretch and movement blur tiny lines within two years. The other camp says with correct needle depth and spacing fine line can hold on ribs. If you lean toward this look, ask the artist how they space lines and what they charge for touch-ups. The biggest mistake is asking for too-small, dense detailing that the rib skin cannot reliably hold. Rib sessions are painful for most people, so plan short breaks and a comfortable top you can easily adjust for the artist.
5. Blackwork Bite With Abstract Negative Space on Thigh
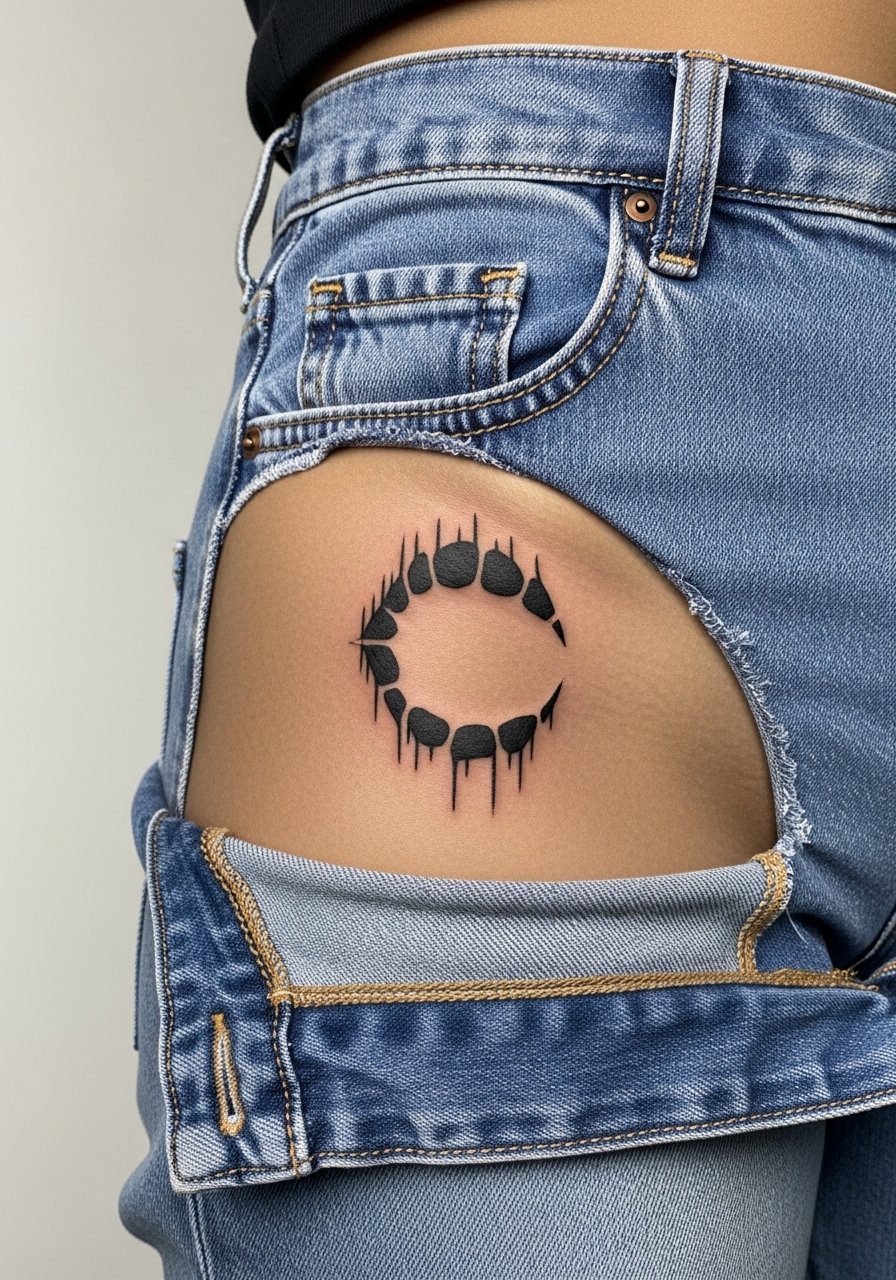
Blackwork lets you turn a bite impression into a graphic statement that reads from a distance. Tell your artist you want heavy saturation and intentional blank space to mimic bruising patterns. A common error is extending solid black into zones with lots of movement, which can age into patchy areas. Thigh pieces tolerate saturation well and sessions are comfortable for most. For session wear pick high-waisted shorts so the artist can access the area without you being uncomfortable.
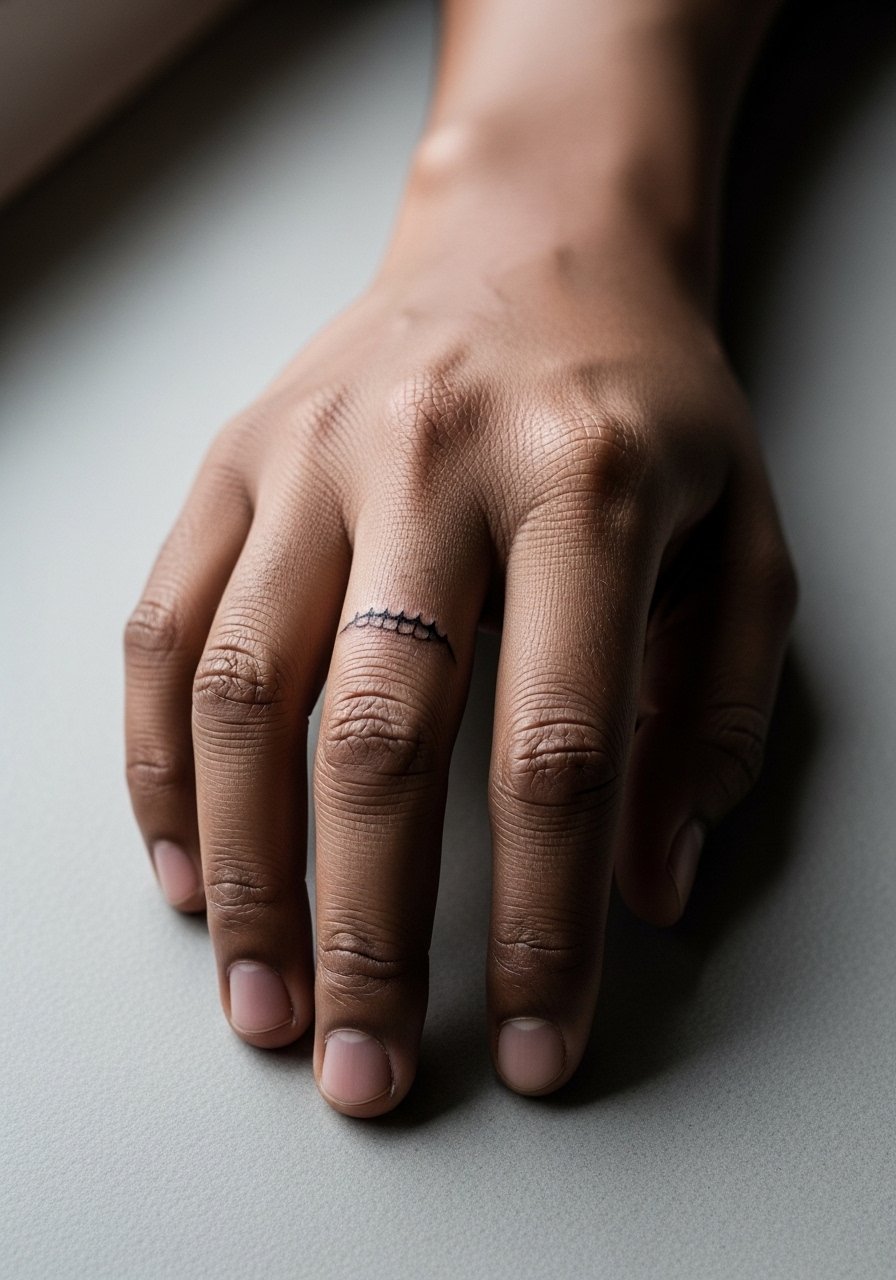
6. Minimalist Dot-Work Wrist Accent
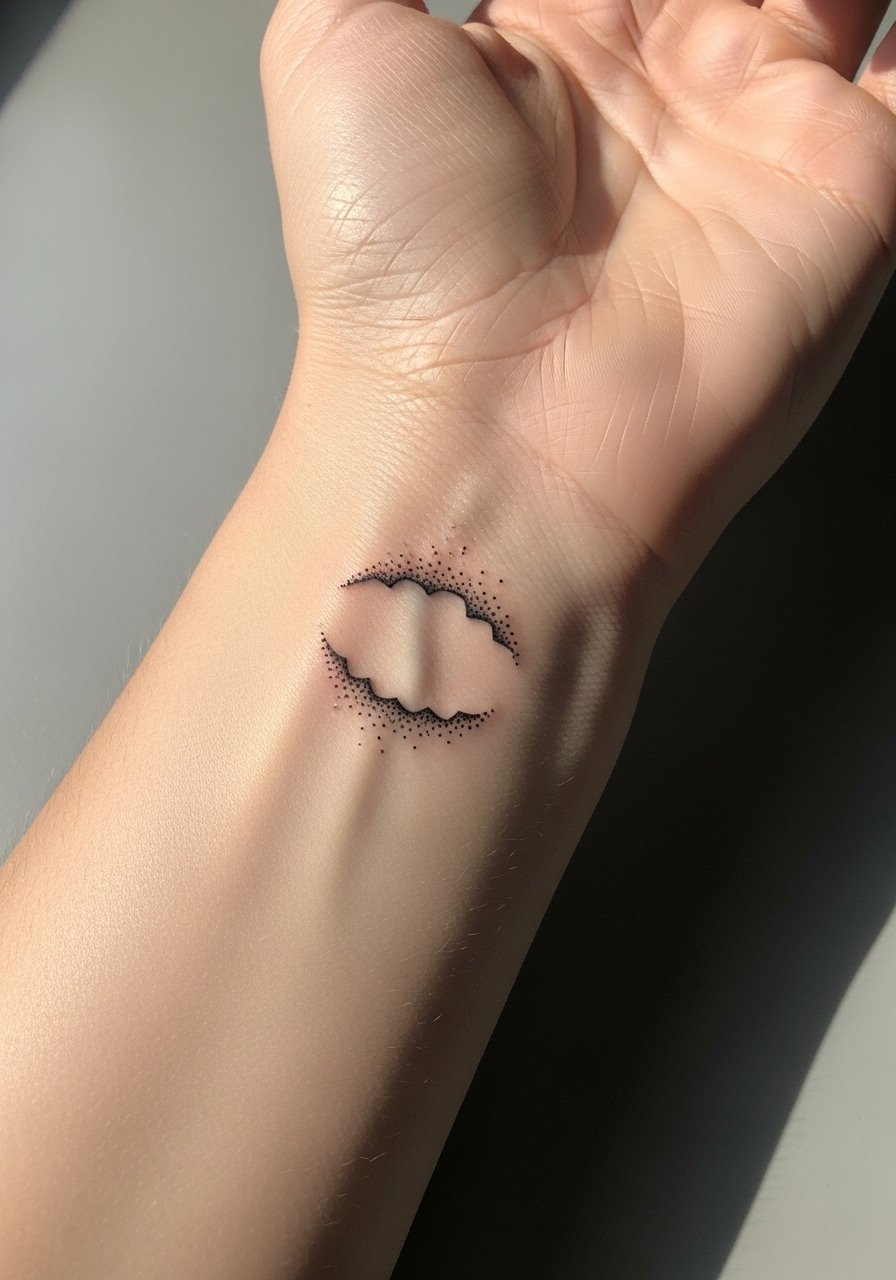
Minimalist dot-work reduces a bite impression to a pattern of dots and tiny marks that read like a coded scar. Say you want stippling rather than solid shading and keep the composition small. Mistakes include placing too many dots too close, which merges over time. Wrist pieces are high-friction so expect some softening; touch-ups are not uncommon around year two. For showing the piece with jewelry, try a thin chain bracelet that frames the tattoo without covering it.
Studio Day Picks
The wrist and thigh pieces above have different prep and friction risks, so a few targeted items smooth the session day and early healing.
- Stencil transfer paper kit. Lets you preview exact placement on skin, which is crucial for small wrist and dot-work pieces from above.
- Topical numbing cream. Applied per instructions it helps with sensitive rib and sternum sessions without altering linework.
- Thin protective film roll. Useful for finger and wrist tattoos that face constant washing and friction.
- Fragrance-free gentle body wash. Cleans healing skin without irritation for areas like the shoulder and thigh.
- Aquaphor healing ointment. A thin layer in the first days helps keep fine line and micro-realism work moisturized while it seals.
7. Stippled Inner Bicep Impression

Inner bicep placements let micro shading sit in a protected spot that ages well if kept out of sunlight. Ask for stipple shading and reduced high-contrast outlines to mimic soft tissue impressions. A common mistake is heavy outlines that read too graphic when the intent was naturalism. The session feels odd because of arm mobility, but the area is forgiving for healing. For the appointment wear a loose tank top so the artist can raise your arm comfortably without constraining circulation.
8. Collarbone Script With a Small Bite Accent
Pairing a tiny bite impression with a single-word script near the collarbone gives the mark context without overwhelming the space. Tell your artist you want the script at a readable size and the bite impression offset so neither competes. Newcomers often request tiny script that becomes illegible after healing, so scale up slightly. Collarbone talk again: this spot can be sensitive during the tattoo. For showing it off choose an open-back midi dress when you want the area visible for evenings out.
9. Watercolor Suggestion Over a Bite Scar on Upper Arm

A subtle watercolor wash can suggest bruising tones without literal realism. Ask for diluted color pools with feathered edges and minimal black lines. The risk is overdoing color saturation that flakes unevenly during healing. Upper arm sits well for watercolor because it gets less daily abrasion. For casual looks roll the sleeve of a soft linen shirt and pair with a rolled-sleeve linen shirt to show the blend without competing patterns.
10. Trash Polka Bite with Graphic Splatter on Calf
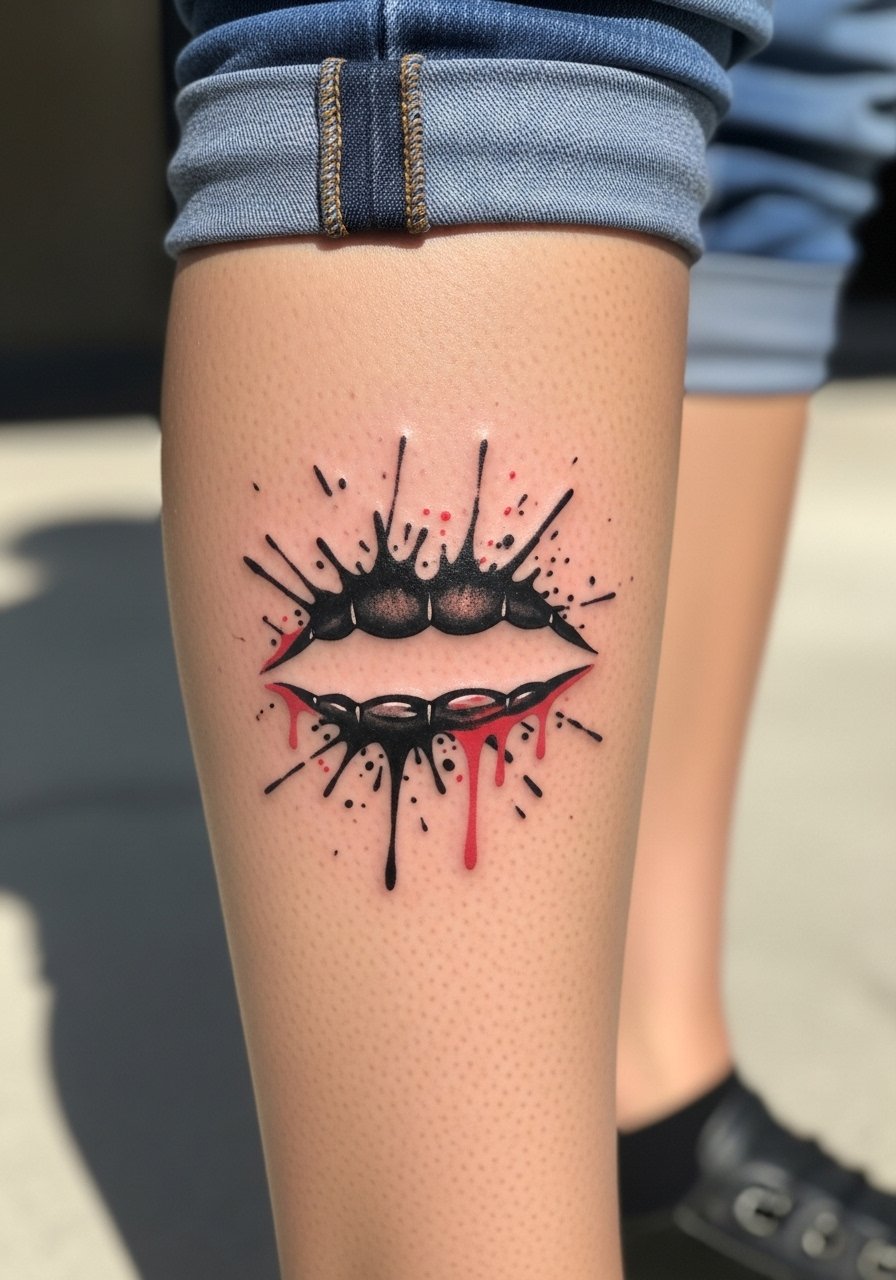
Trash polka merges photographic elements with bold graphic splashes for a confrontational look. Tell your artist you want asymmetric splatter to suggest impact and a solid bite impression anchor. The mistake is crowding the negative space, which reduces the composition's punch. Calf work tolerates dense black well and photographs clearly. Session comfort is high for calf pieces. For showing the design off, wear jeans slightly rolled up or canvas slip-on sneakers and cropped pants that keep focus on the tattoo.
11. Tiny Finger Bite Mark Accent
Finger tattoos are quick but high maintenance. Ask for bolder linework than you think you need and for the artist to warn you about yearly touch-ups. A common mistake is requesting ultra-fine detail that disappears within months. Fingers face constant washing and friction, which causes pigment loss. Plan for small, frequent touch-ups. For session convenience keep nails short and hands clean. A thin minimalist ring can frame the finger mark without covering it.
12. Chest Bite Mark With the Romantic Versus Ridiculous Debate
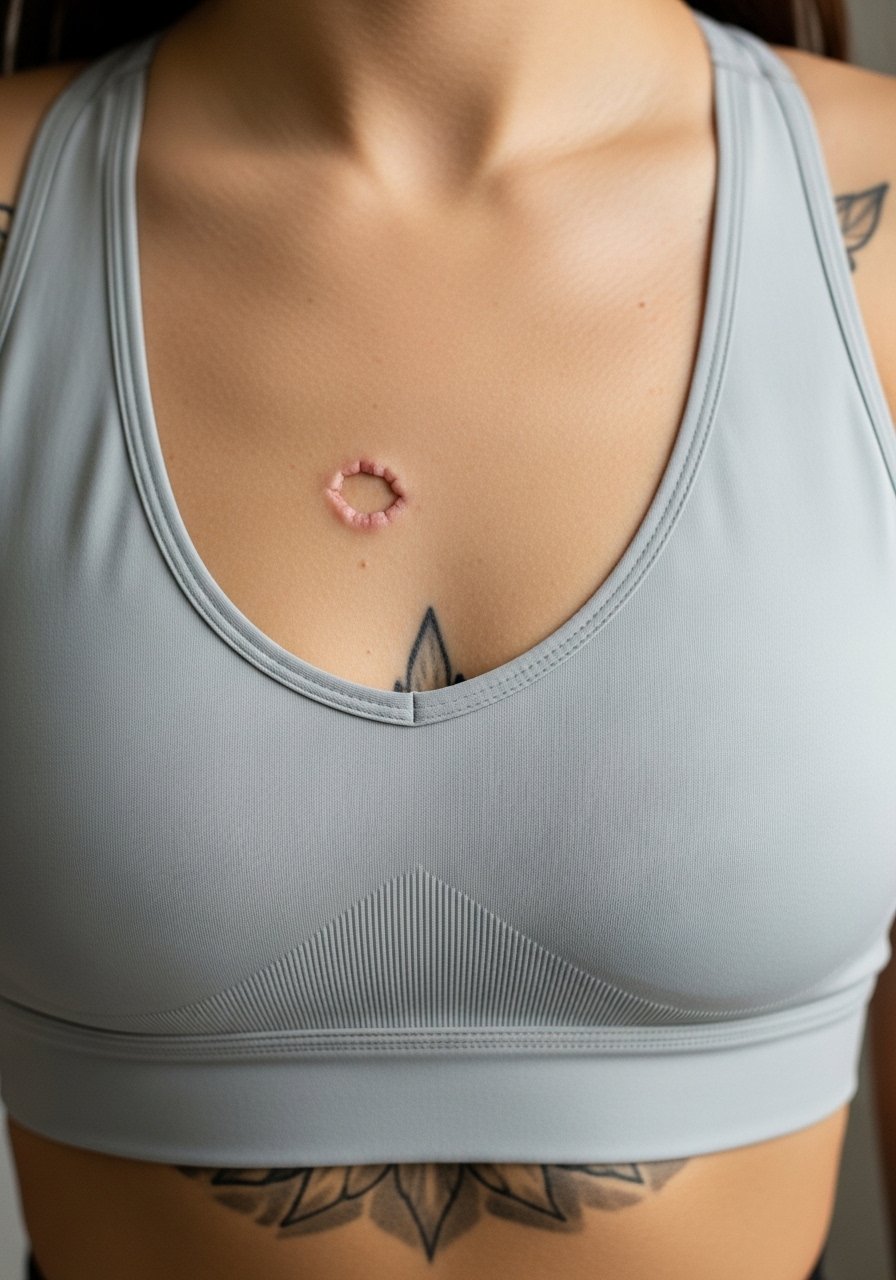
Bite mark tattoos spark a cultural split. One camp treats them as a bold romantic marker that commemorates intimacy. The other camp calls them novelty gestures prone to regret and questions the hygiene of tattooing over bite-related tissue changes. If you want this placement, prioritize healed skin and a consult that addresses infection risk. Sternum and chest areas can be sensitive in sessions. For day-of comfort wear a fitted sports bra that provides support and can be adjusted to expose only the work area.
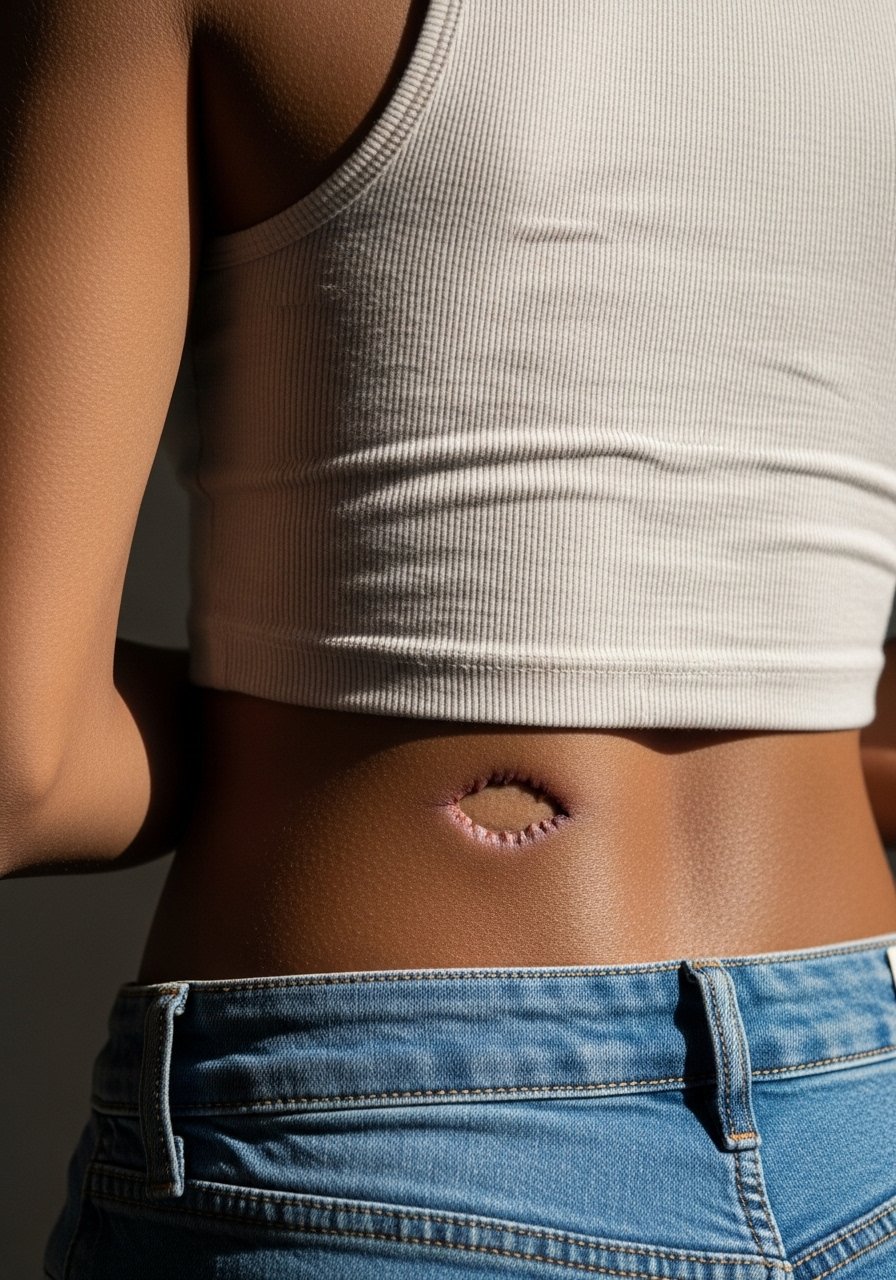
13. Tattooed Bite Over a Healed Scar on Lower Abdomen

Tattooing over a healed scar requires experience and a realistic conversation. Tell your artist about the original injury and let them examine the texture. A mistake is assuming scar tissue takes ink like normal skin. Some artists recommend stretch tests and smaller needle groupings. The stomach moves with weight changes and pregnancy, so plan placement where stretching is minimal. For appointments wear high-waisted pants you can lower slightly so the artist accesses the site without discomfort.
14. Bite Impression Embedded Into Floral Surround on Shoulder Blade
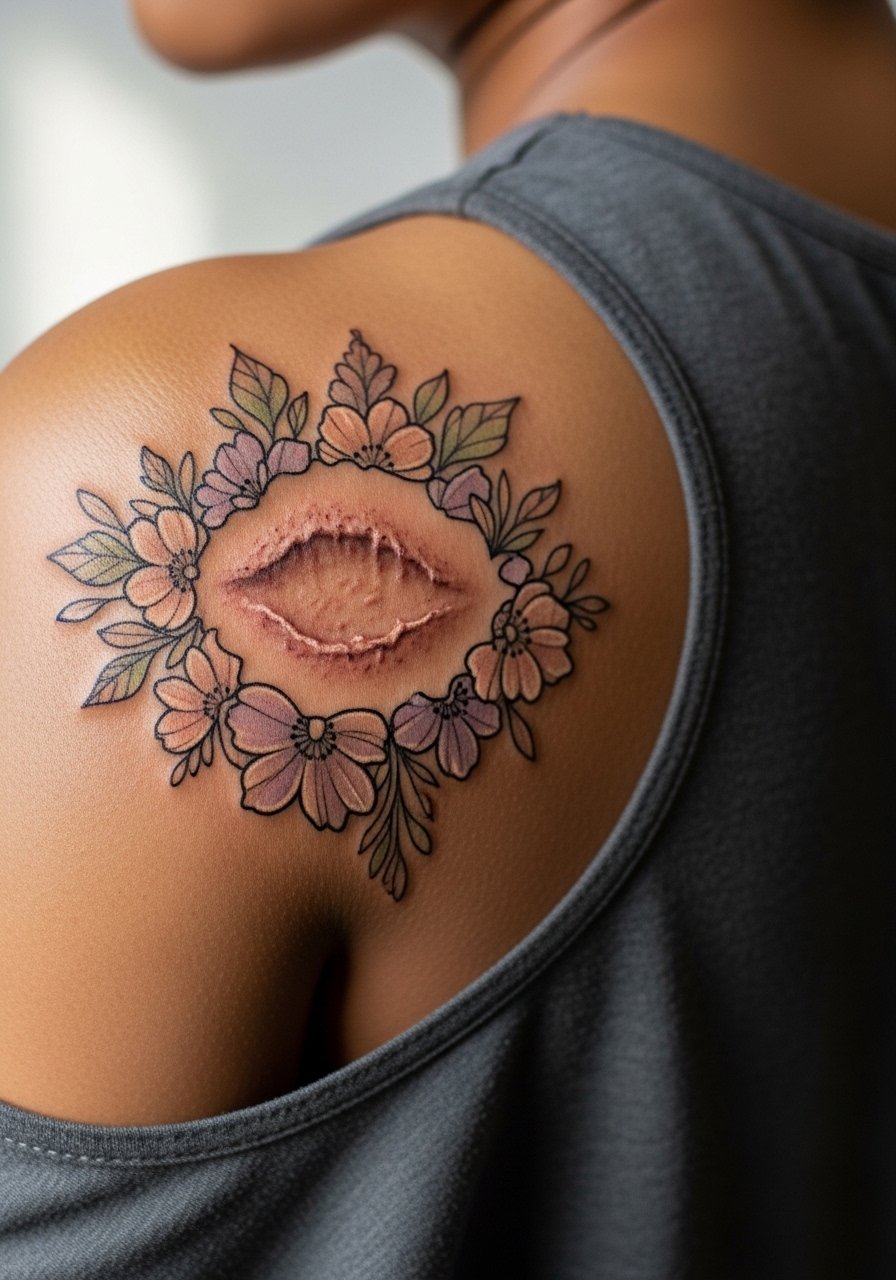
Combining a bite impression with floral elements softens the narrative and disguises edges as a design choice. Ask for the bite to be the focal point with petals flowing away to avoid busy backgrounds that date quickly. A common error is too many tiny petals that blur over time. Shoulder blade work sits comfortably for longer sessions. For after and show-off looks consider a tank top with open back that keeps the silhouette clean and reveals the work when you want it visible.
15. Geometric Bite Cluster on Outer Forearm
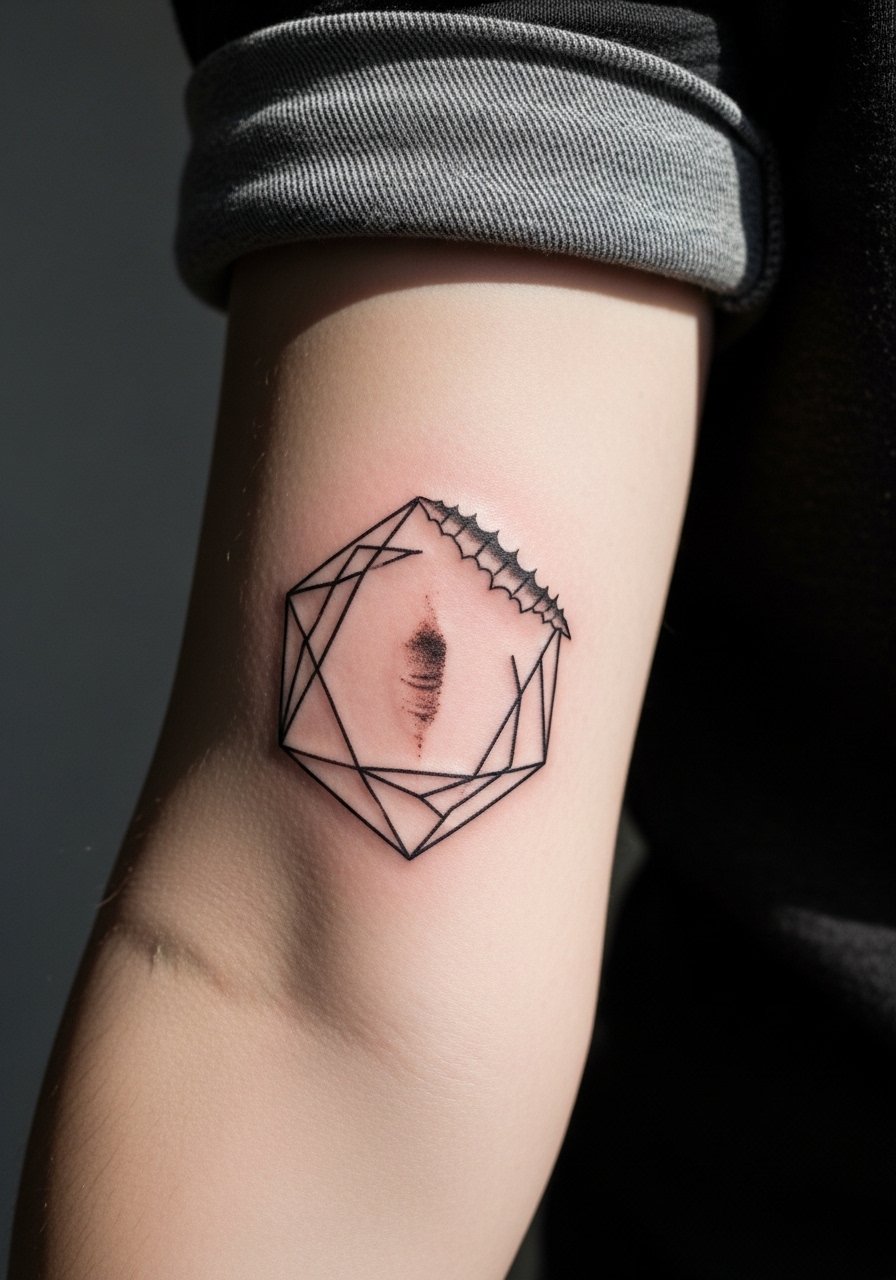
Geometric frameworks can give a bite impression structure and longevity. Request spacing that keeps lines at least 2.5 mm apart to avoid merging as the skin ages. A frequent mistake is cramming intricate geometry into a small forearm patch. Outer forearm tends to hold linework well and shows clearly at a distance. For showing the design frame it with a minimalist watch that complements rather than competes.
16. Single-Color Red Bite on Ankle
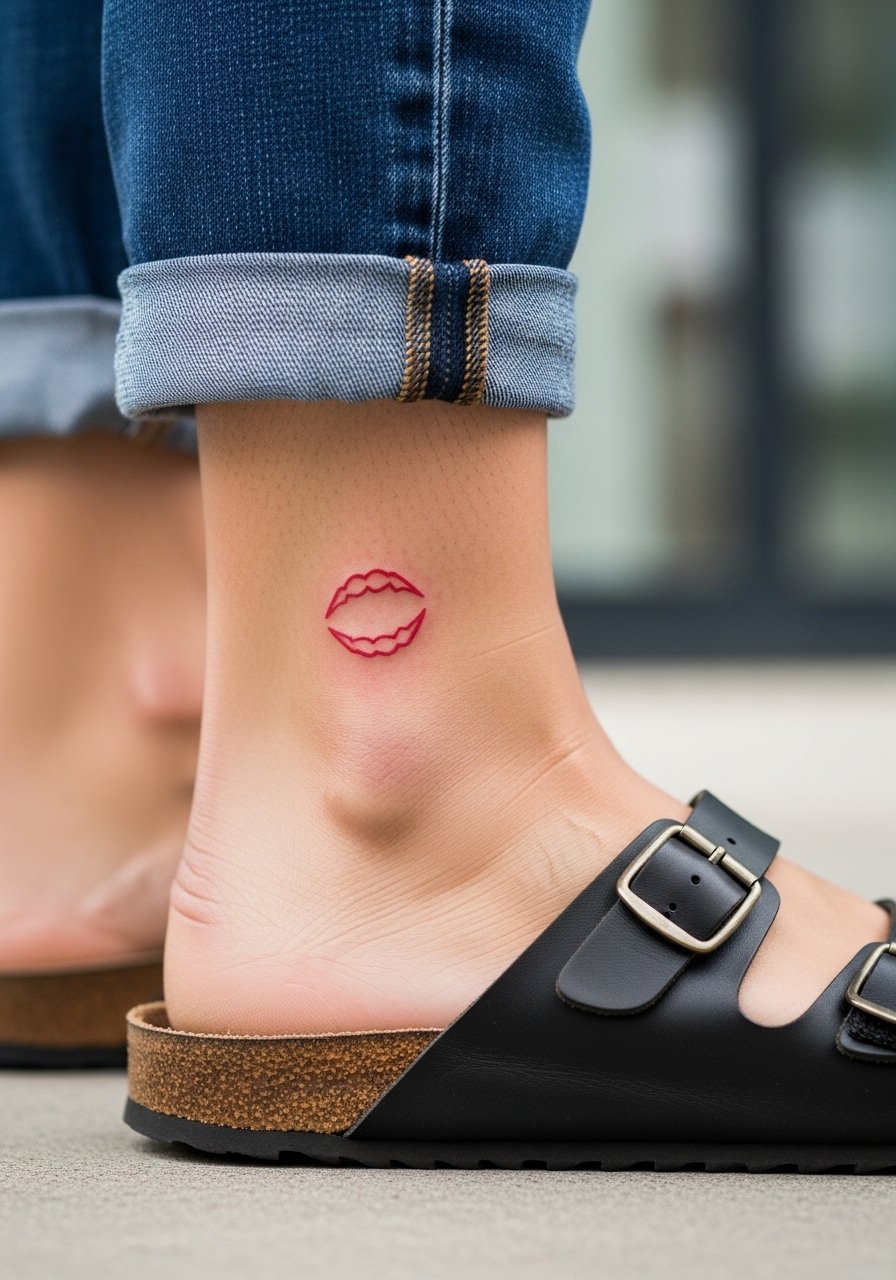
Using a single color, like red, emphasizes the bruise-like aspect while remaining graphic. Ask your artist about color fastness on ankles since pigment can fade faster due to sun and shoe friction. The error is not discussing long-term color retention and touch-up plans. Ankle sessions are quick but can sting from thin skin and bone proximity. For the appointment wear shoes and pants that are easy to remove or roll up, like jeans you can roll.
17. Layered Script and Bite on the Inner Wrist
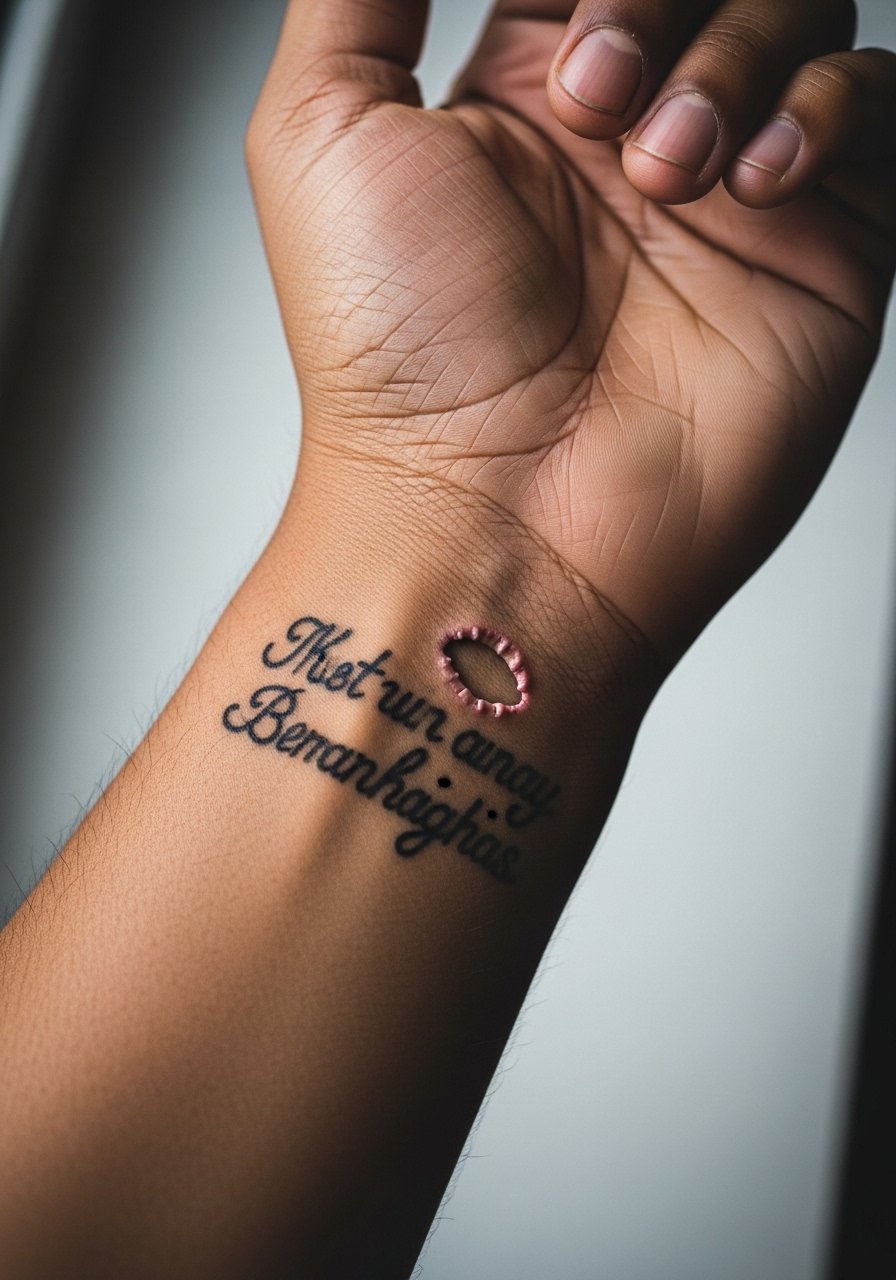
Combining a small bite with short script lets the mark carry narrative without dominating. Tell your artist you want the script separated slightly above the mark so each element breathes. Tiny, dense scripts are a common mistake because legibility suffers after healing. Inner wrist tattoos take frequent sun exposure which accelerates fading. For session prep wear a loose long-sleeve button-down you can roll so the area is accessible and stays clean.
18. Bite Impression With Stippled Shadow Behind the Ear Area
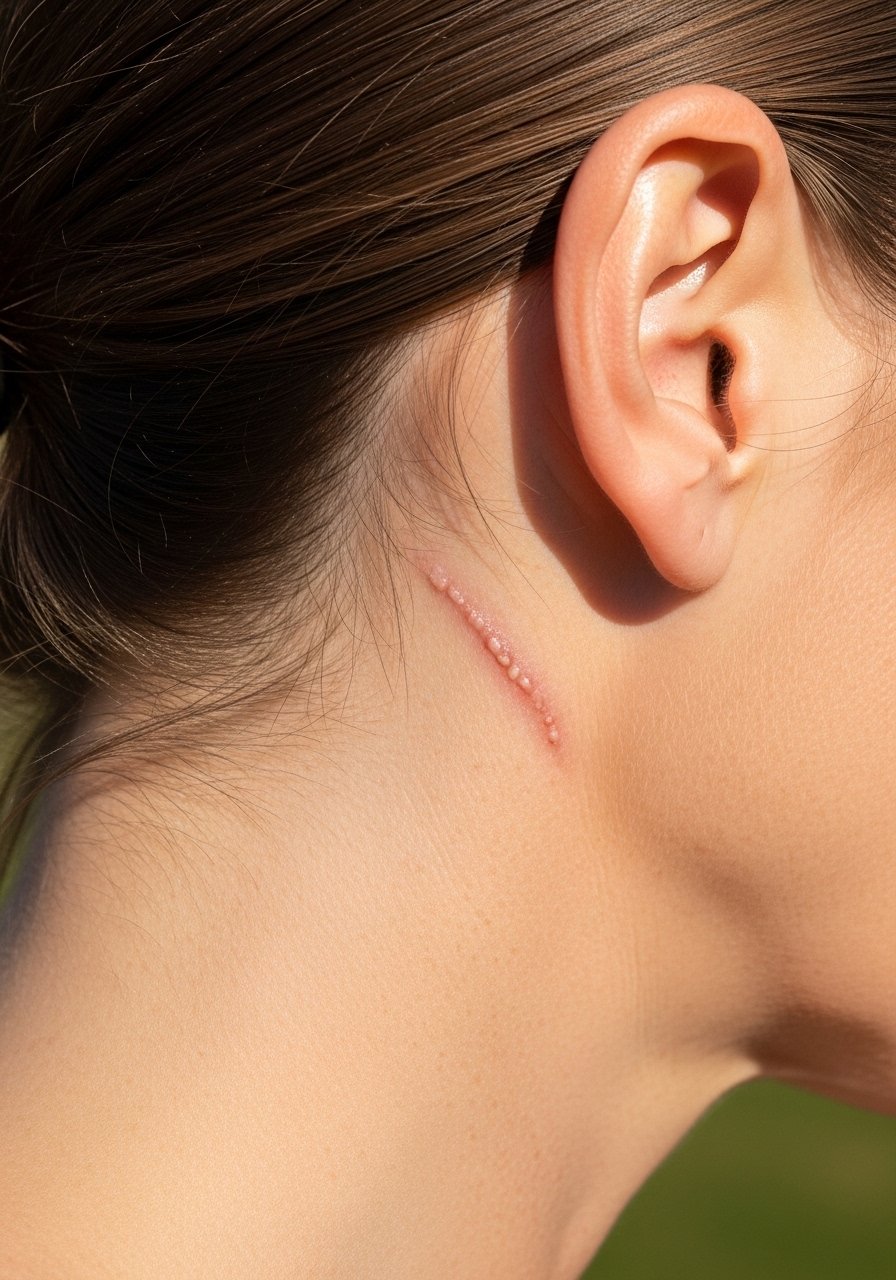
Behind-ear placements are intimate and small. Ask for minimal contrast and low saturation to keep the impression subtle. Never request large, dense shading behind the ear because touch-ups there are painful and the area sees friction from hair. This placement is discreet but requires skilled needle depth. Plan to tuck your hair back for the session and follow the artist's advice on shampooing during healing. No clothing link here because visibility is limited and session wear is hair management.
19. Realistic Bite With Subtle Scab Texture on Upper Thigh
Realistic pieces aim to mimic healed skin texture without replicating fresh wounds. Ask for reference photos of healed marks and request muted contrast rather than fresh-wound brightness. A mistake is overemphasizing scab tones which age badly. Thigh pieces do well because they face less daily abrasion. For session comfort choose loose drawstring linen pants you can drop slightly for access while staying comfortable.
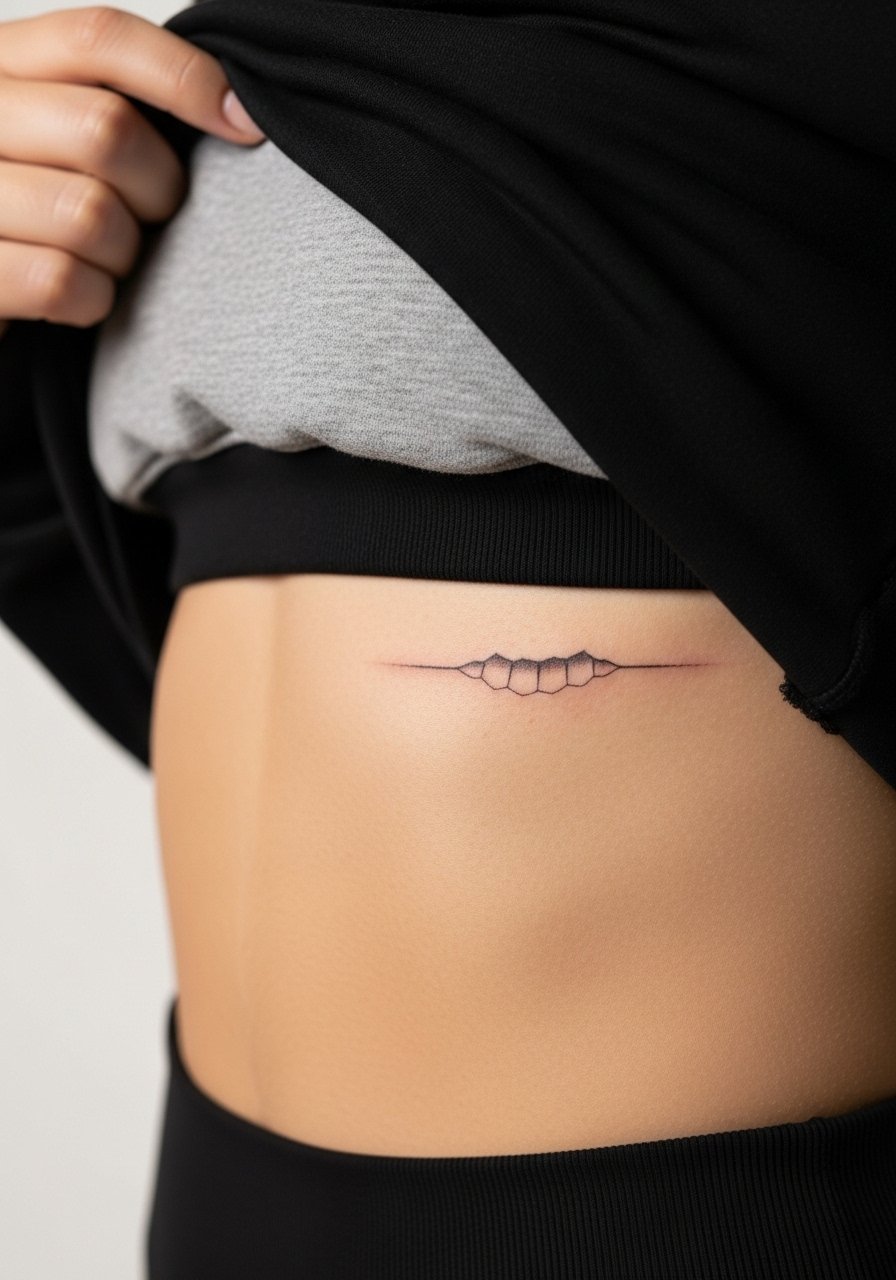
20. Small Script Inside a Bite Impression on the Rib Line
Embedding a word inside the impression adds meaning while keeping the design compact. Communicate exact text and font size because small lettering can blur on ribs. The common error is choosing ornate script that becomes unreadable; pick a simple, slightly larger hand-lettered style. Prepare for the session with short breath-control tips from the artist. For appointment ease wear a cropped tank or zip-up hoodie that you can adjust so only the area is exposed.
21. Bite Mark Accent With Geometric Halo on Back of Neck
Back-of-neck placements read well with small geometric frames that add longevity to linework. Ask for spacing that keeps the halo airy, which prevents lines from merging into a solid block later. A common mistake is choosing tiny concentric lines that soften into a blur. Neck skin moves and can thin with age, so consider slightly bolder lines than you think you need. For the session wear a wide-neck shirt that can be adjusted without full removal.
22. Bite Mark With Minimalist Arrow Accent on Calf
An arrow accent can point to the bite impression and give a directional story. Tell the artist you want the arrow thin but not fragile, and have it parallel to muscle lines for longevity. Tiny thin arrows are a common mistake when placed across curved surfaces, which can bend the visual line. Calf is a forgiving spot for thin work. For casual display pair with comfortable canvas sneakers and cropped trousers that keep the area visible.
23. Stylized Bite Mark in American Traditional Palette on Upper Arm
American traditional treatment gives the impression a classic, bold feel that ages predictably. Ask for strong outlines and flat fills with minimal gradients. A mistake is soft shading added to a traditional piece, which compromises its graphic nature over time. Upper arm is a stable spot for traditional saturation. For show-off outfits consider a short-sleeve henley that frames the bicep without banding the artwork.
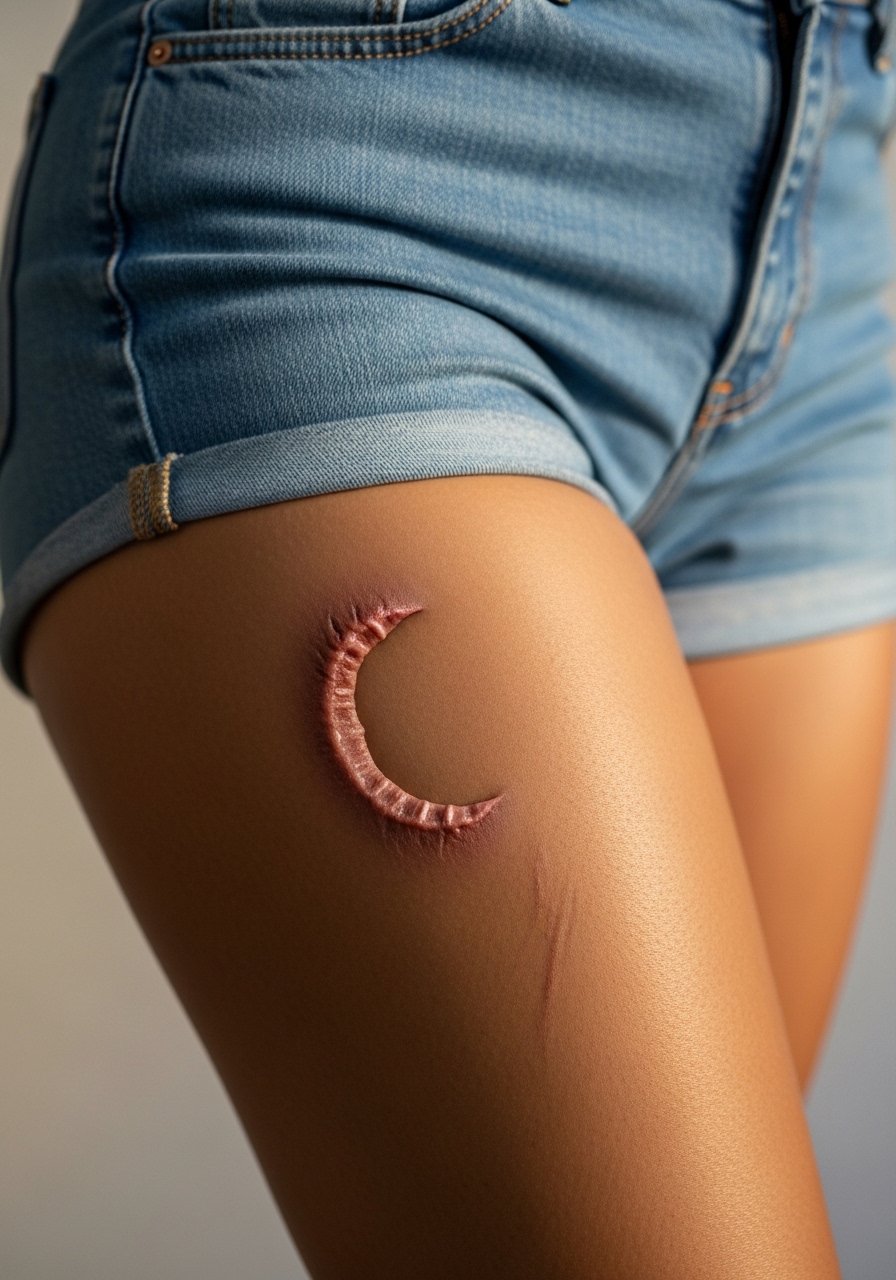
24. Bite Mark in a Tiny Crescent Cluster on the Ankle
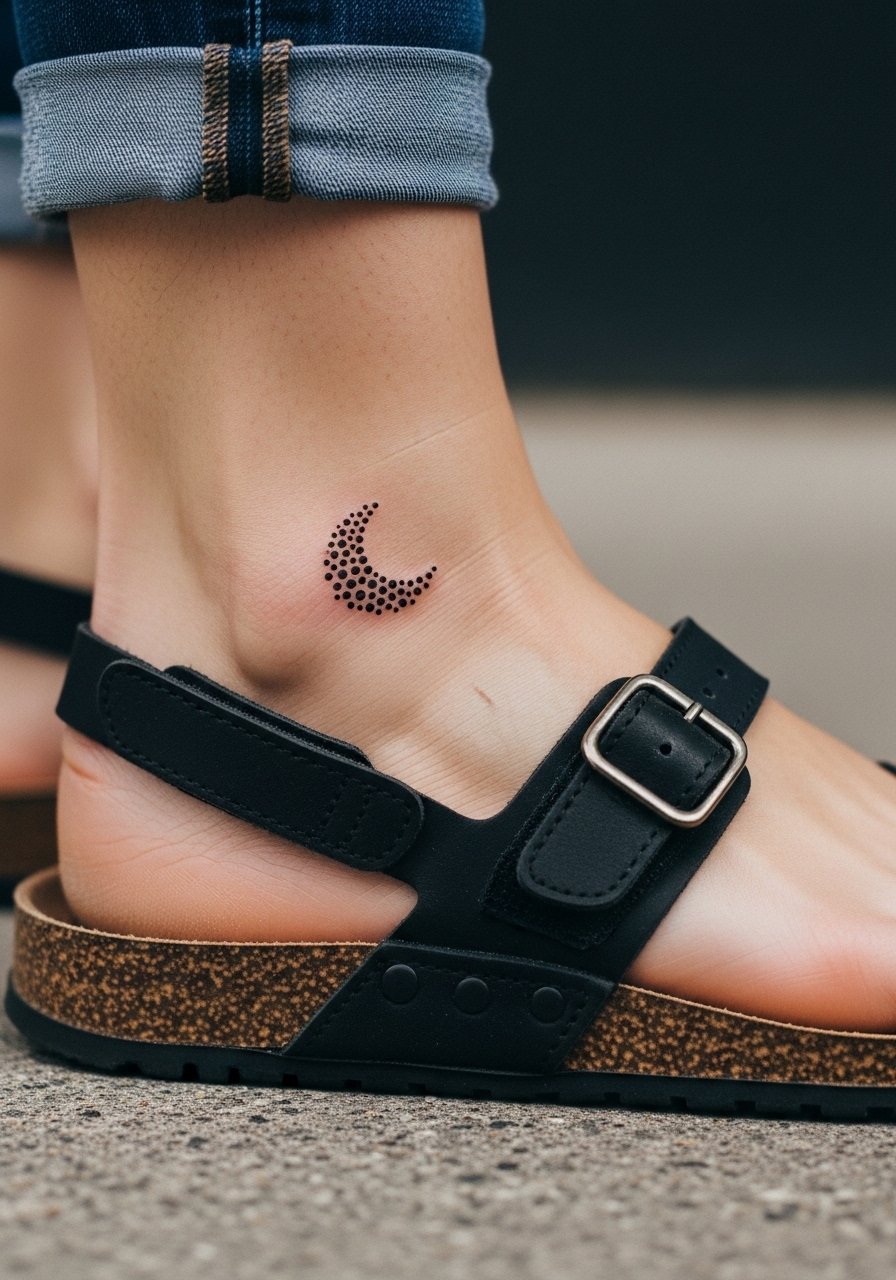
Crescent clusters reduce a bite to symbolic marks that age less obviously than literal impressions. Ask for dots spaced to hold as the skin shifts and avoid dense packing. The common mistake is expecting a one-session perfect result; ankle pieces often need a touch-up once the skin settles. For the appointment pick footwear that slips off easily like flat sandals so you avoid unnecessary rubbing after.
25. Abstract Negative Space Bite on Lower Back
Negative space treatments rely on uninked skin to shape the bite impression, which preserves long-term clarity. Tell your artist to plan the composition around where fabric will sit so the tattoo does not get constant friction. A mistake is placing the work where waistbands press directly over it. Lower back pieces are private but photograph well when desired. For session access wear a tank top with high-waisted jeans that lets the artist work without full disrobing.
26. Bite Mark Accent With Metallic Ink Highlight on Shoulder Cap
A metallic ink highlight can catch light and suggest healed scar sheen, but be careful because metallics fade uniquely. Ask how the ink ages and whether they recommend touch-ups. The mistake is overusing metallics where tanning or friction will dull the effect. Shoulder cap placement tolerates highlights and is visible in summer. For show-off days choose a sleeveless top that keeps the shoulder exposed and lets the highlight read.
27. Tiny Constellation of Bite Marks Behind the Knee
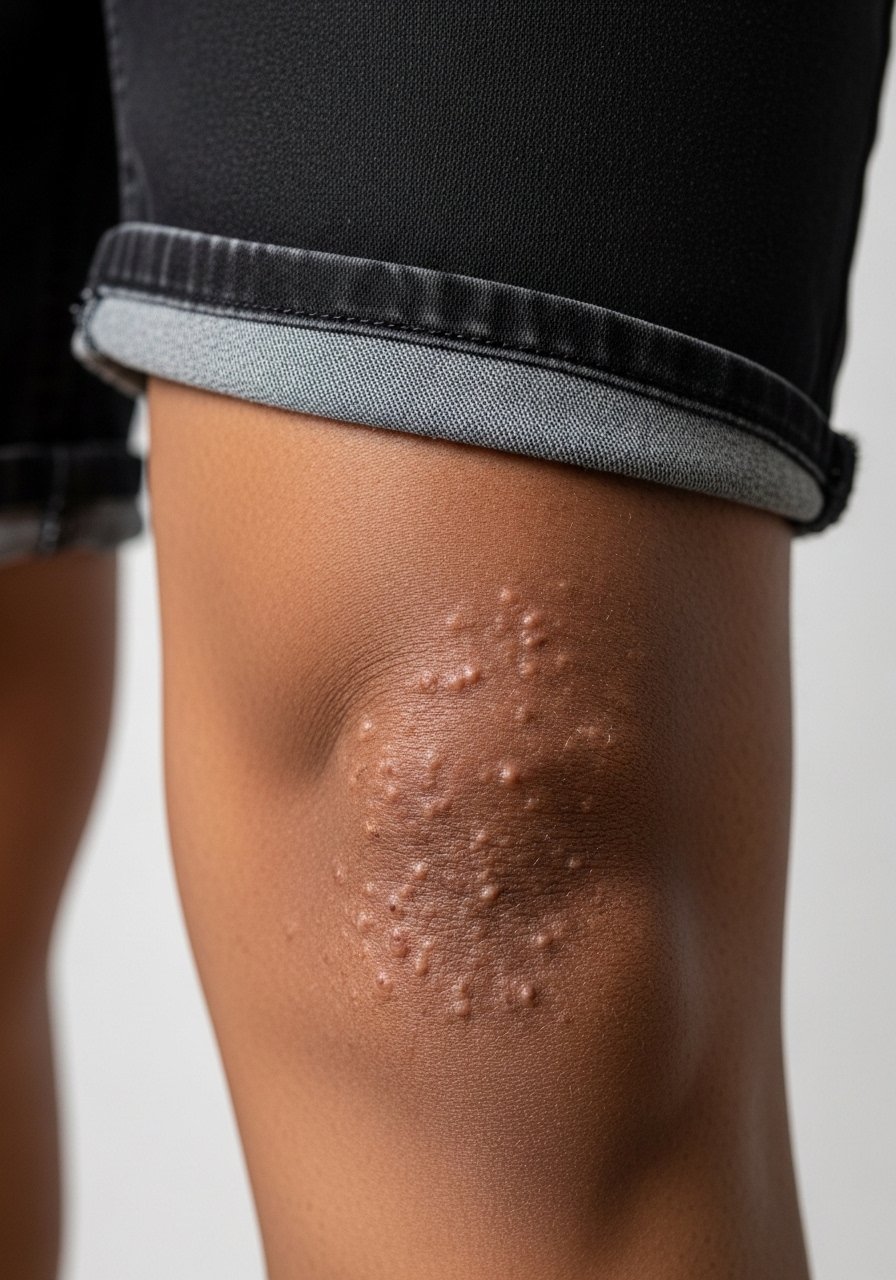
Behind-the-knee placements require careful aftercare because of bending and sweat. Request placement that avoids the crease where possible and ask the artist about motion-aware shading. Common mistakes include placing heavy shading in the crease which leads to faster breakdown. Sessions here are awkward because of positioning, so bring a comfortable support cushion. For the session wear shorts you can adjust and that keep the area clean without rubbing, like athletic shorts.
Frequently Asked Questions
Q: How long should I wait to tattoo a bite mark so the canvas is safe and reads correctly?
A: Wait until bruising and swelling are fully resolved and any open skin is healed, which usually means several weeks to a few months depending on severity. Bring photos of the healed mark to your consult and ask the artist to confirm the skin quality before booking.
Q: Will a fine line bite mark blur faster than a bold blackwork version?
A: Fine line generally needs more maintenance because thin lines can merge over time, especially on high-friction spots. Bold blackwork trades subtlety for longevity, but it changes the aesthetic. Choose based on how much upkeep you want and the placement you pick.
Q: Are bite mark tattoos more likely to get infected because they reference a mouth injury?
A: The risk is from tattooing over skin that is not fully healed or was recently compromised. Artists will refuse fresh or infected tissue. Make sure the site is fully healed and mention any prior bite-related issues during your consultation.
Q: How do I find an artist experienced with micro-realism or the specific style I want without naming names?
A: Use style-specific hashtag searches and tattoo booking platforms to filter artists by portfolio. Look for healed photos in the exact style you want and read community forum threads where people share follow-up images. A good consult will show healed examples, not only fresh work.
Q: Do certain placements require different session clothing or prep?
A: Yes. Bring loose, adjustable clothing that exposes only the area the artist needs. For collarbone wear a wide-neck top you can pull aside. For thigh bring shorts. For back pieces consider a loose button-down you can shift. Comfortable, adjustable clothing makes the session easier on you and the artist.
Q: If I get a bite mark as a couples token, how can I avoid regret later?
A: Frame the design so it can carry a meaning beyond the relationship, like a survival mark or a moment of transformation. Discuss neutral styling options with the artist and plan a subtle placement if you want privacy. Many people choose symbolic elements that age into personal narratives rather than explicit couple-only markers.
Q: Will this kind of tattoo show clearly on darker skin tones?
A: Some styles hold better on darker skin. Bold blackwork and clear geometry often translate well, while ultra-fine detail and very light colors can be harder to read. Ask to see healed photos on similar skin tones during your consult and discuss contrast and saturation choices that work on your skin.
