
Fine line tattoos dominate Pinterest right now, but the pieces you see getting saved most often are not always the ones that age best. Fine detail can look gorgeous fresh and then soften on high-movement spots, watercolor can bleed on tan skin, and small wrist ideas can cost more than you expect when deposits and touch-ups pile up. Read on for 21 sibling-friendly designs that balance the trend and the long game.
1. Minimalist Arrow Pairing on Inner Forearm
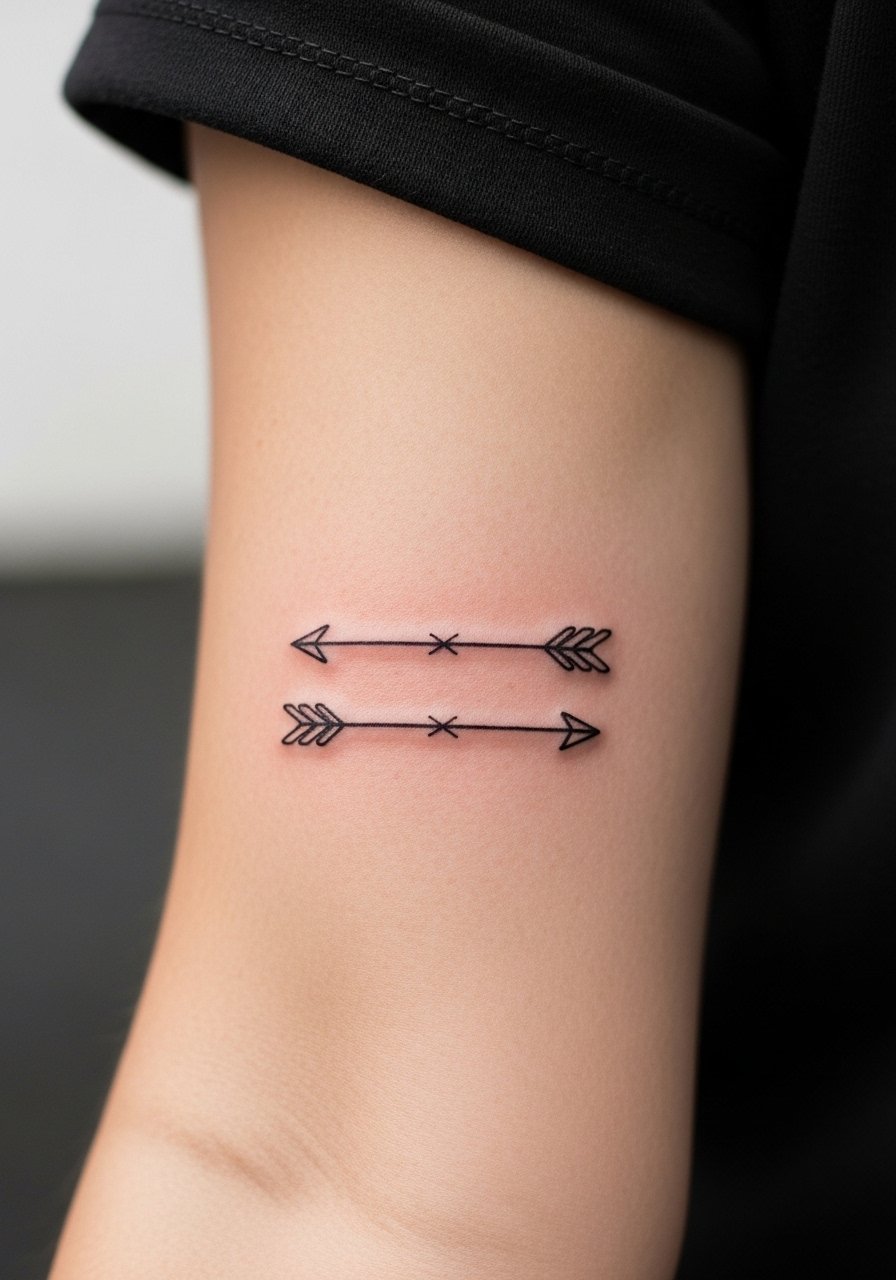
I recommend this for siblings who want a micro design that still reads from a few feet away. Tell your artist you want clean single-needle linework with a slightly bolder spine so it holds on movement points. Common mistake is asking for ultra-thin arrows that vanish after sun exposure and a summer of sleeves. Expect a 30-45 minute session and mild forearm rubbing afterward. For showing it off, roll up a rolled cuff chambray shirt and wear a thin leather wrap bracelet on the opposite arm so the arrow remains the focal point.
2. Half Tree of Life on Collarbone
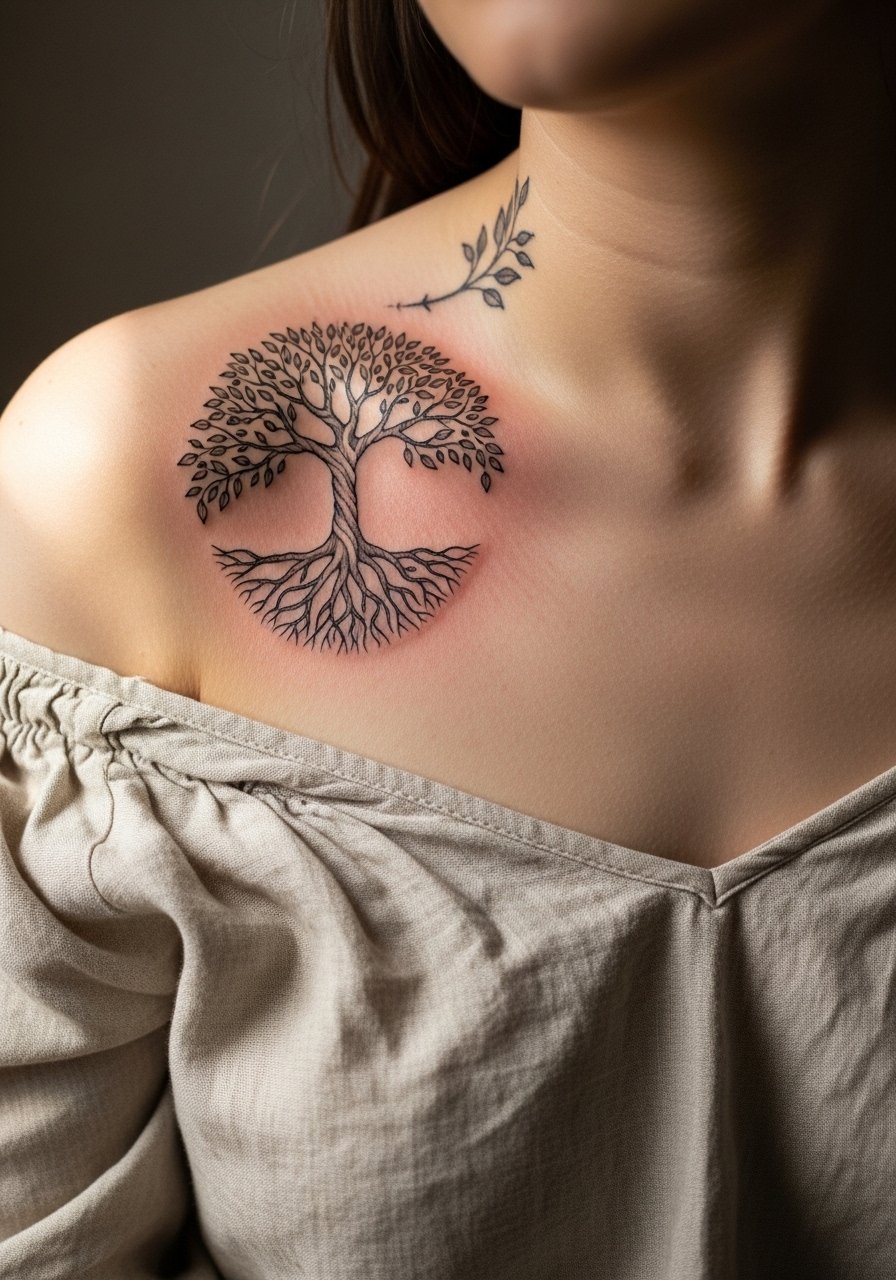
Collarbone pieces age surprisingly well if you avoid packing too many tiny branches. The ribbed skin around the collarbone needs slightly heavier linework than you might ask for in a flash piece. Tell your artist you want a single-session small to medium piece with delicate negative space in the canopy. Pain is moderate. This placement favors layered jewelry and an off shoulder linen blouse for show-off photos. A common error is compressing the design to fit a narrow space, which causes lines to merge as it heals.
3. Blackwork Sun and Moon Pair on Upper Arm
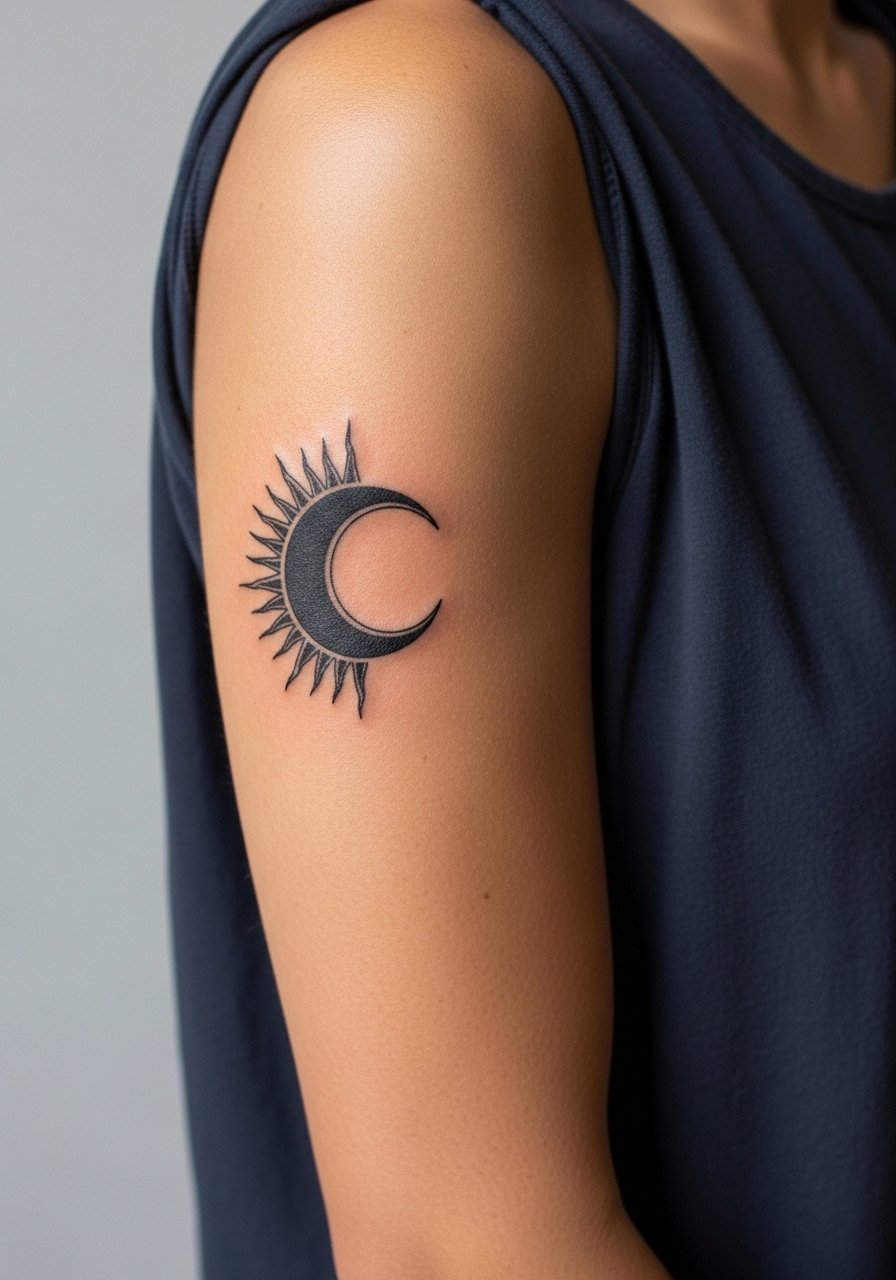
If one sibling likes bold and the other prefers contrast, sun and moon in blackwork make a clear pairing without matching exactly. This is a medium session and feels like steady vibration rather than sharp buzzing. Ask for solid fills with clean edges so touch-ups are less frequent. The main mistake is trying a watercolor gradient in the same spot, which fades faster. These hold up longer than fine line symbols on wrists. Pair with strappy tanks or a strappy racerback tank to show the silhouette.
4. Micro-Realism Fingerprint Locks Behind the Ear
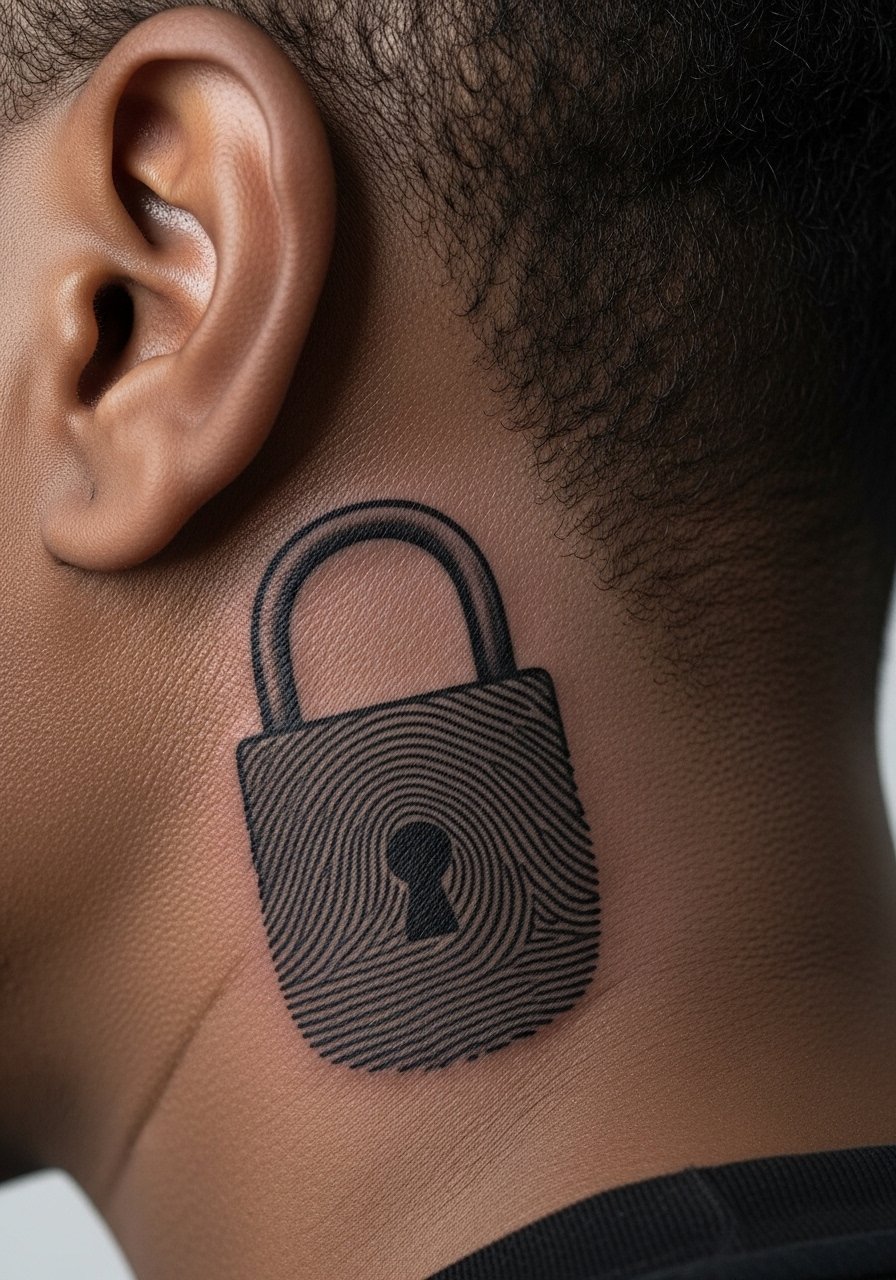
This intimate placement reads like a quiet handshake. The behind-the-ear skin demands precision and a micro session that often lasts under an hour. Bring a clear print so the artist can match the whorls. A frequent problem is expecting the same crispness across different skin textures. Discuss touch-up expectations up front. Note that behind-the-ear tattoos need careful aftercare because hair and sweat can irritate the area. Keep designs small and avoid text there.
5. Fine Line Morse Code Along the Ribcage
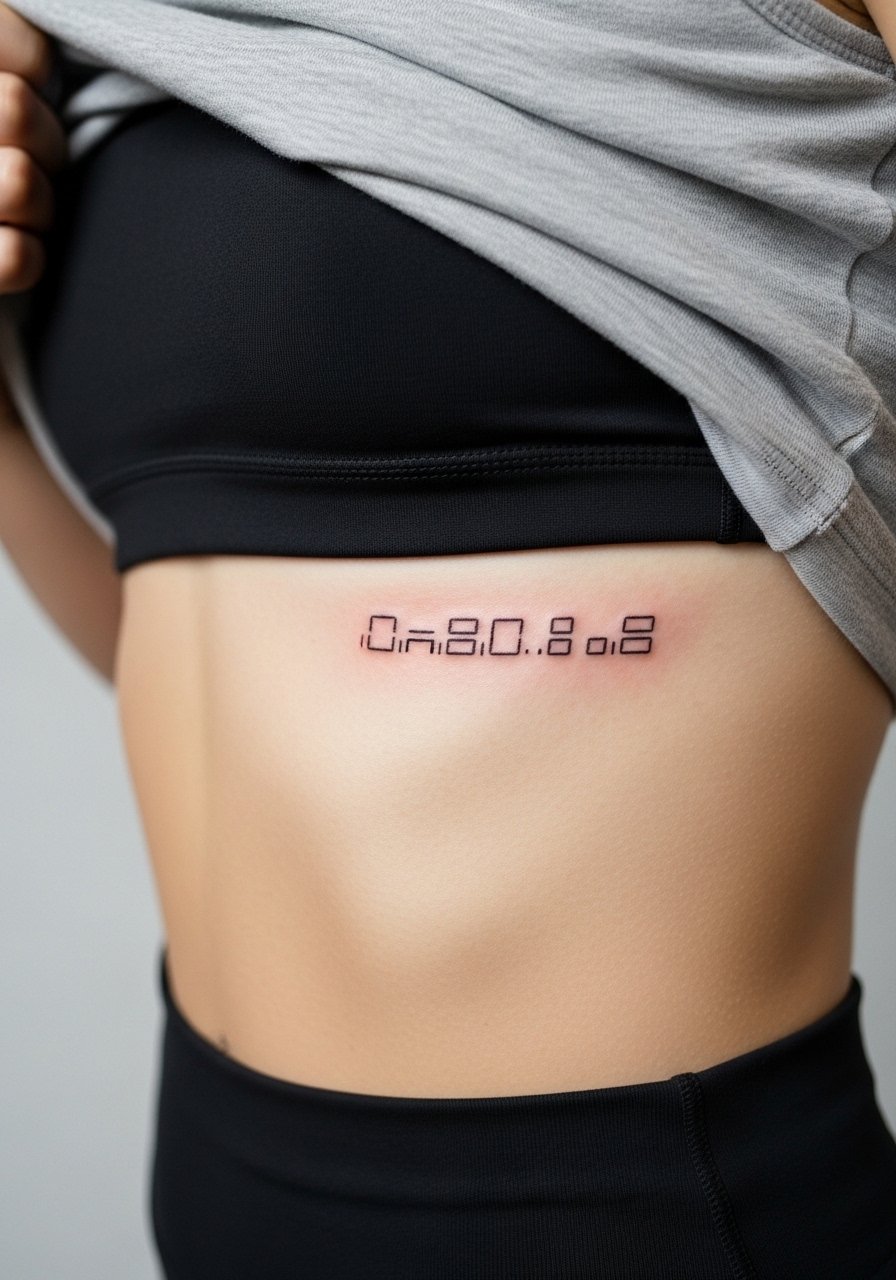
Fair warning: ribs rank high on many pain scales, but they also suit slender linear work that can stay private. This is one you book when you want discretion. The biggest mistake I see is asking for dots and dashes too close together. Ask for slightly wider spacing and a touch more ink depth so the code reads at 6 months and beyond. Plan your session wear: a cropped top you can lift or an open button shirt works best. Expect the artist to suggest touch-up at year two for fine line on ribs.
6. Ornamental Puzzle Piece Chain on Forearm
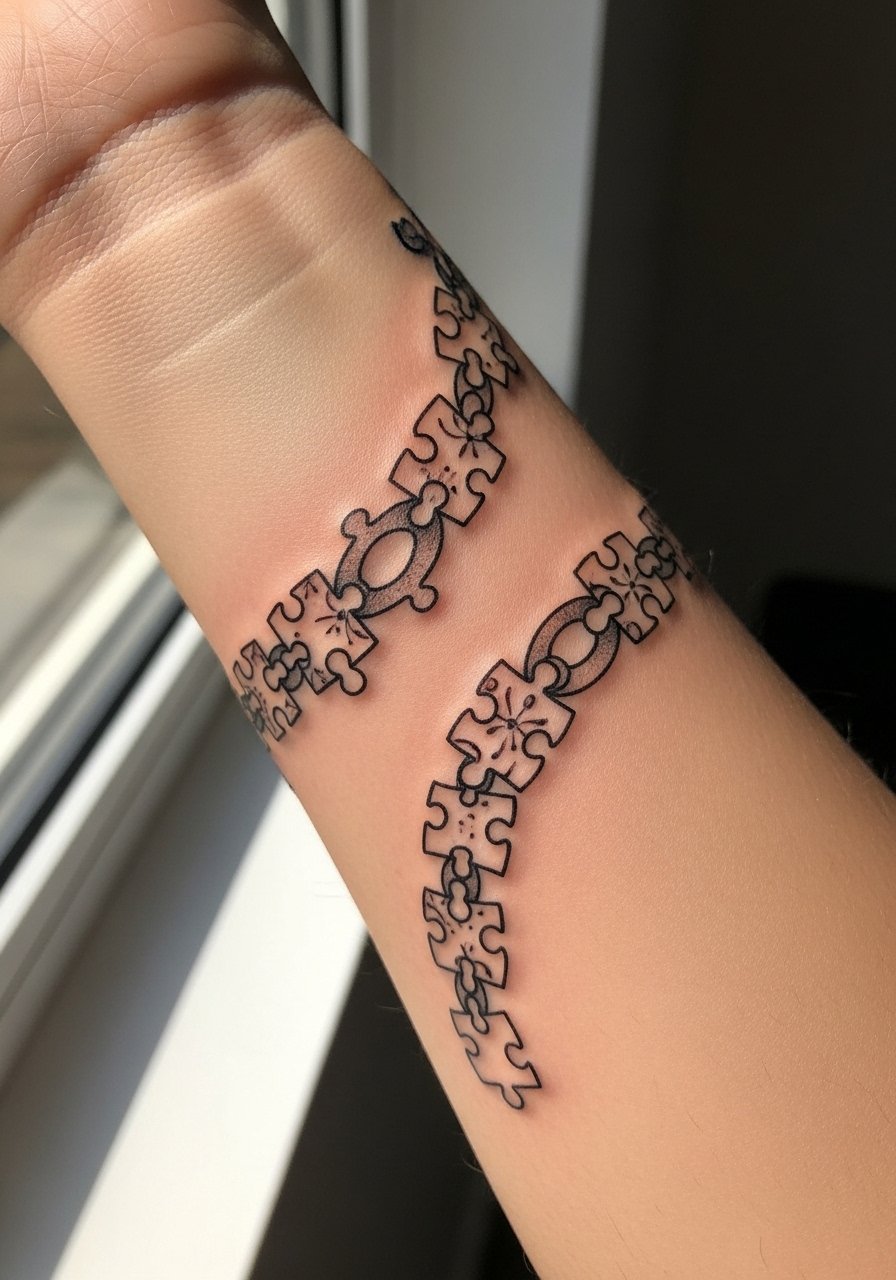
This forearm wrap is a good option for siblings who want a linked visual that varies slightly between them. Tell your artist how many links you want so they can space them for a clean wrap. A common error is choosing too-small connectors that blur. Forearm movement means slightly bolder anchors are better. For session wear, a loose short-sleeve tee or button-up gives full access. Pair with a loose fit button shirt rolled at the cuff to frame the chain without hiding it.
Studio Day Picks
The wrist and ribcage ideas above ask for different session prep. These five items smooth the appointment and the first healing window.
-
Hustle Butter Deluxe. A non-greasy balm many people prefer for fine line wrist work because it keeps the skin supple without a heavy film.
-
InkGuard tattoo balm. Lighter than thick ointments, useful for calm healing on forearm wraps and ornamental chains where excess product can obscure crisp detail.
-
Tea tree salve for tattoos. Helpful in small amounts for blackwork areas prone to scabbing, especially on lower-sweat zones like the calf.
-
Fragrance free gentle body wash. Use this during showers in the first two weeks to avoid irritating delicate fine line ribs or collarbone pieces.
-
Aquaphor healing ointment. A thin layer in the first 48 hours helps lock in moisture on micro-realism and dot work before switching to lighter balms.
7. Minimalist Star Constellations on Ankle
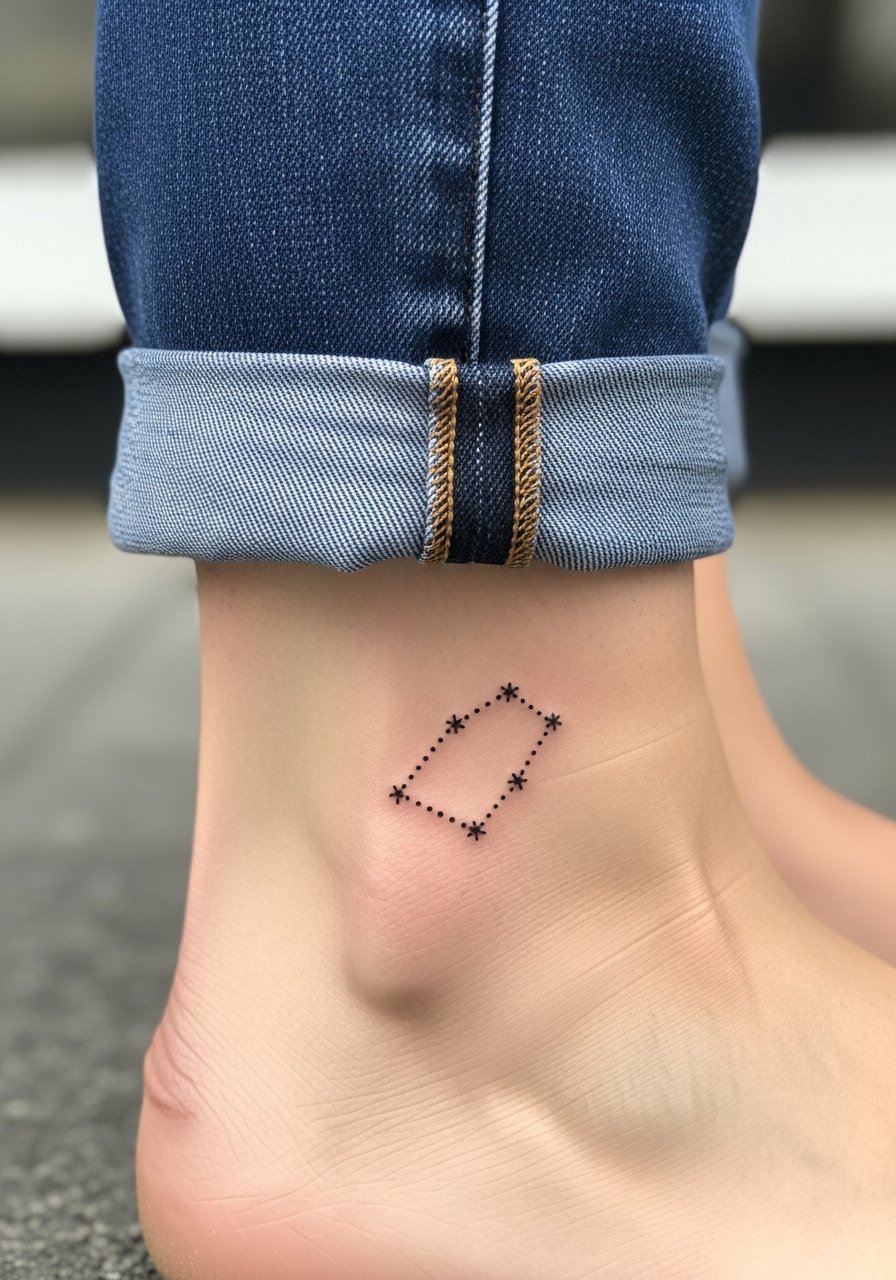
Ankle constellations read seasonal and playful without taking much session time. Pain is low to moderate. A common mistake is compressing too many stars into a tiny space. Tell your artist you want clean dot spacing and slightly bolder anchor stars for longevity. For showing it off, cropped straight-leg jeans or a cropped straight leg jeans look great and keep the area visible in summer. Expect a single session and a possible minor touch-up after the first year.
8. Watercolor Coordinates on Inner Bicep
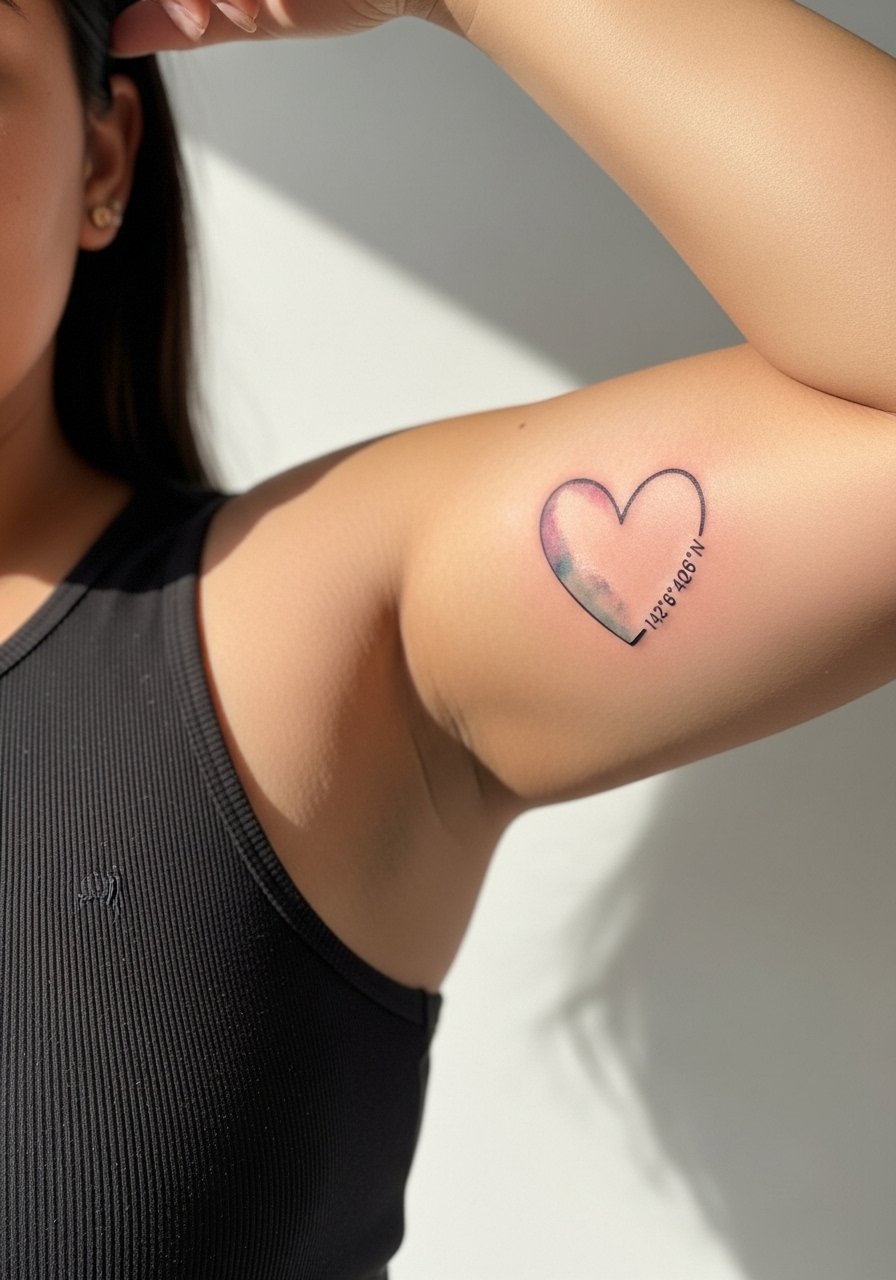
Watercolor pieces can feel personal and nostalgic, especially when paired with hometown coordinates. On medium and darker skin tones color saturation can shift, so ask the artist about contrast and whether a black outline will preserve the coordinates legibility. Session time is moderate. The usual mistake is relying on pastel washes without enough contrast, which fades into a bruise-like look on some skin types. For the actual appointment wear a loose tank so the artist has clean access. Count on touch-ups for color at year two.
9. Neo-Traditional Lion and Lamb on Shoulder Blade
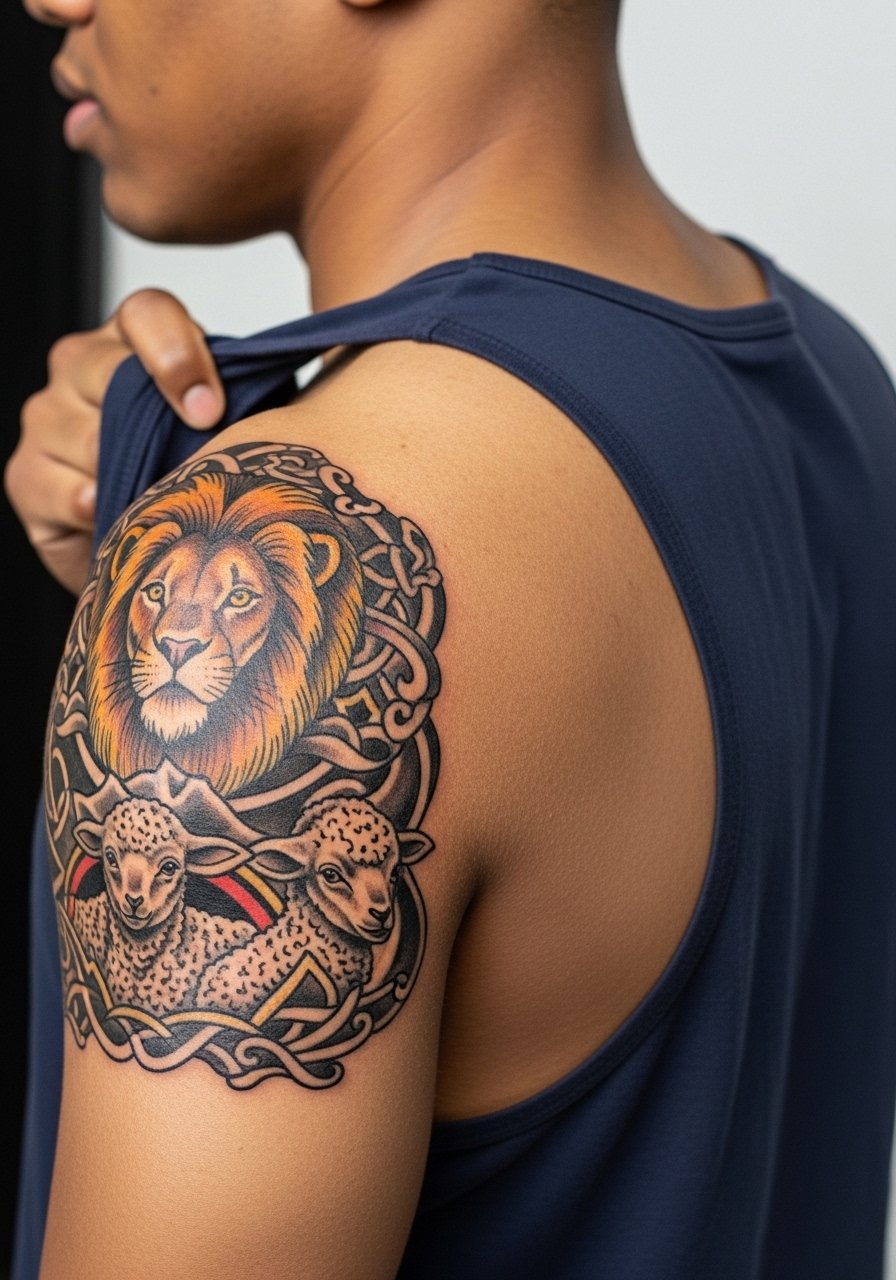
This pairing works for siblings who want narrative contrast without mirror images. Shoulder blade spots tolerate saturation well and age into a bold statement. Ask for a medium session with illustrative shading and clear edges around color fields. A common mistake is packing too much tiny detail into shaded areas, which turns muddy as it settles. Session wear should be a loose tank or button-down you can open. These often need two sessions for color saturation and one small touch-up later.
10. Fine Line Bird Silhouettes in Flight on Calf
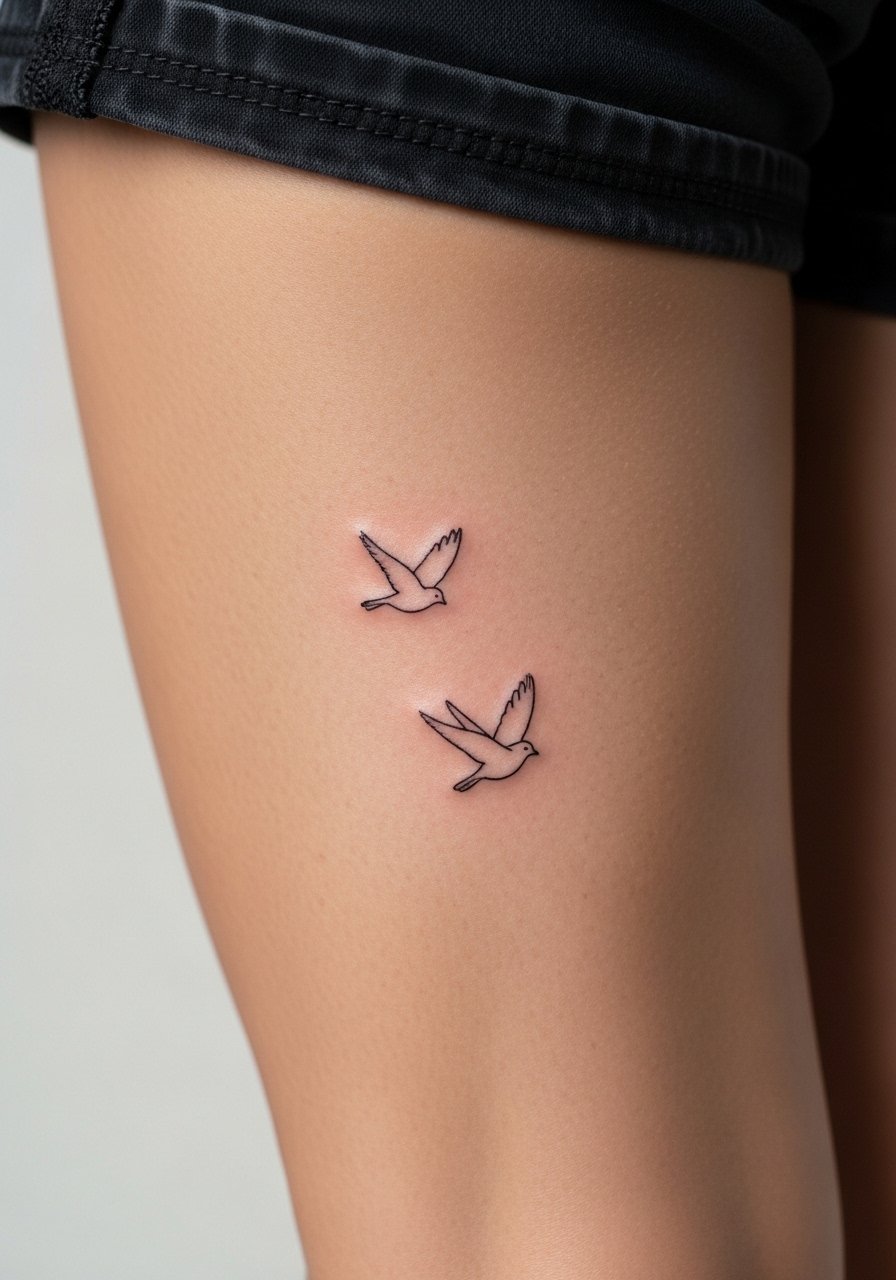
Calf placements handle thin work better than wrists since there is less constant friction. Birds in flight are simple to coordinate without matching exactly. Tell your artist you want slightly increased line weight on leading edges so the motif keeps silhouette definition after a few years. Expect 20-40 minutes per leg and low to moderate pain. Show-off pairing is rolled joggers or shorts and a neutral palette, for which an athletic shorts men style works for casual shoots.
11. Blackwork Half Hearts on Inner Wrist
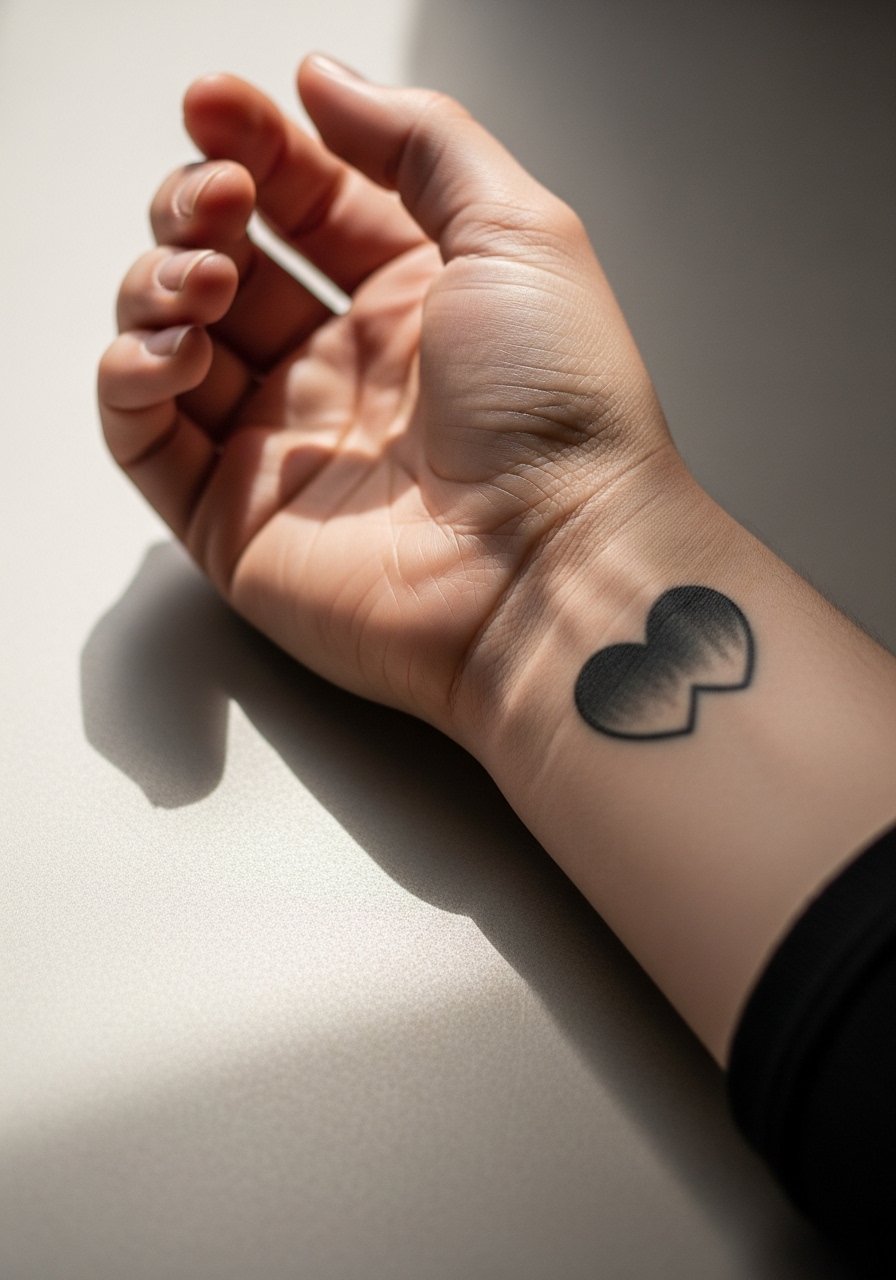
Inner wrist blackwork halves complete visually when siblings put hands together. The wrist is high-movement and sun-exposed, so ask for solid fills and clean edgework to reduce early feathering. Pain is sharp but brief. A frequent error is choosing too small a half that loses its clean shape after a year. These often need a touch-up at year one, especially if you wash hands a lot. For visuals, pair with a slim leather cuff bracelet on the opposite wrist rather than stacking on the tattooed side.
12. Micro-Realism Fingerprint Key on Finger
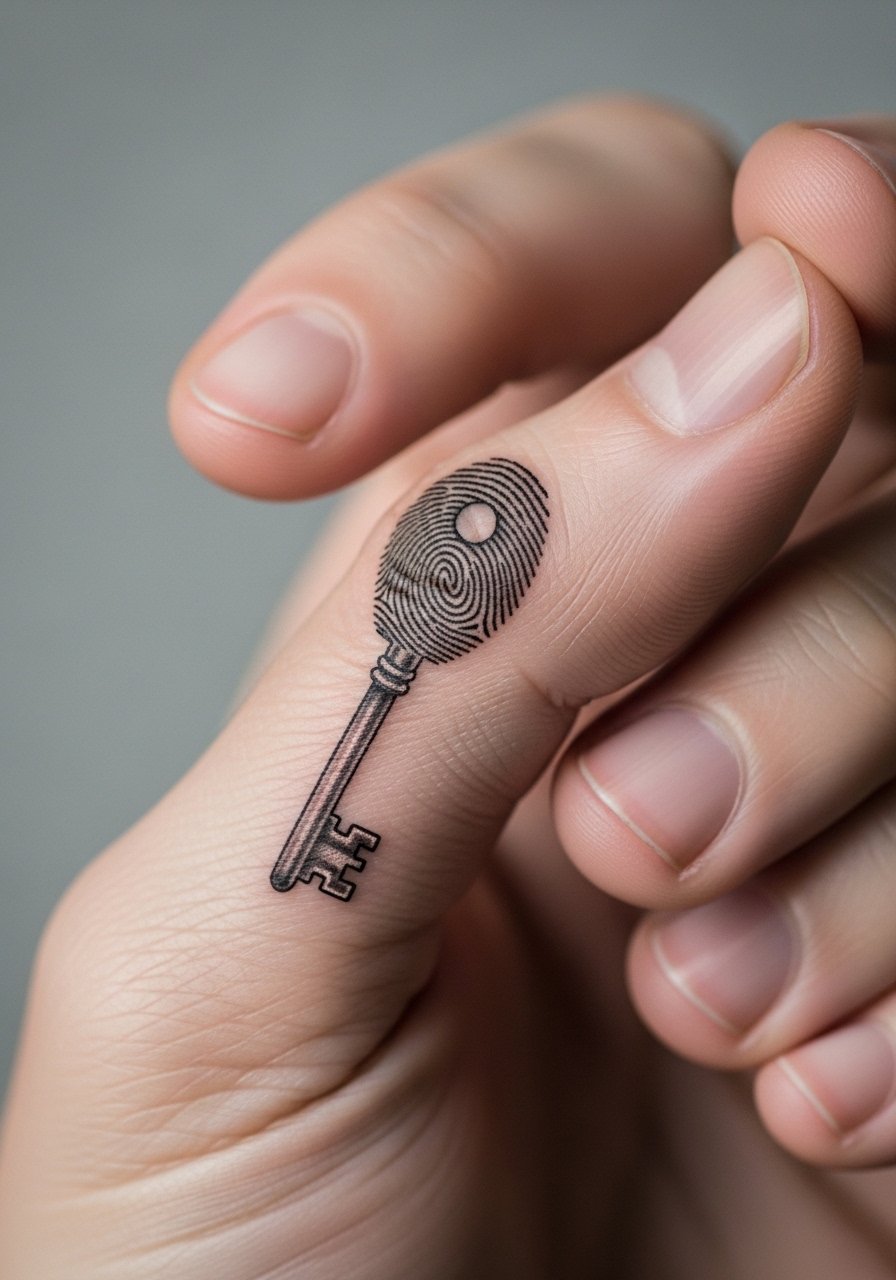
Finger work is intimate and high-wear. Expect faster fading than forearm or calf pieces. Ask for a slightly bolder ridge pattern and accept that touch-ups are common for finger micro-realism. The typical mistake is assuming the same depth and spacing as a larger micro piece will hold. Session time is short but expect annual refreshers. Protect this one during the first two weeks with minimal washing and avoid heavy hand work when possible.
13. Sacred Geometry Mandala on Outer Forearm
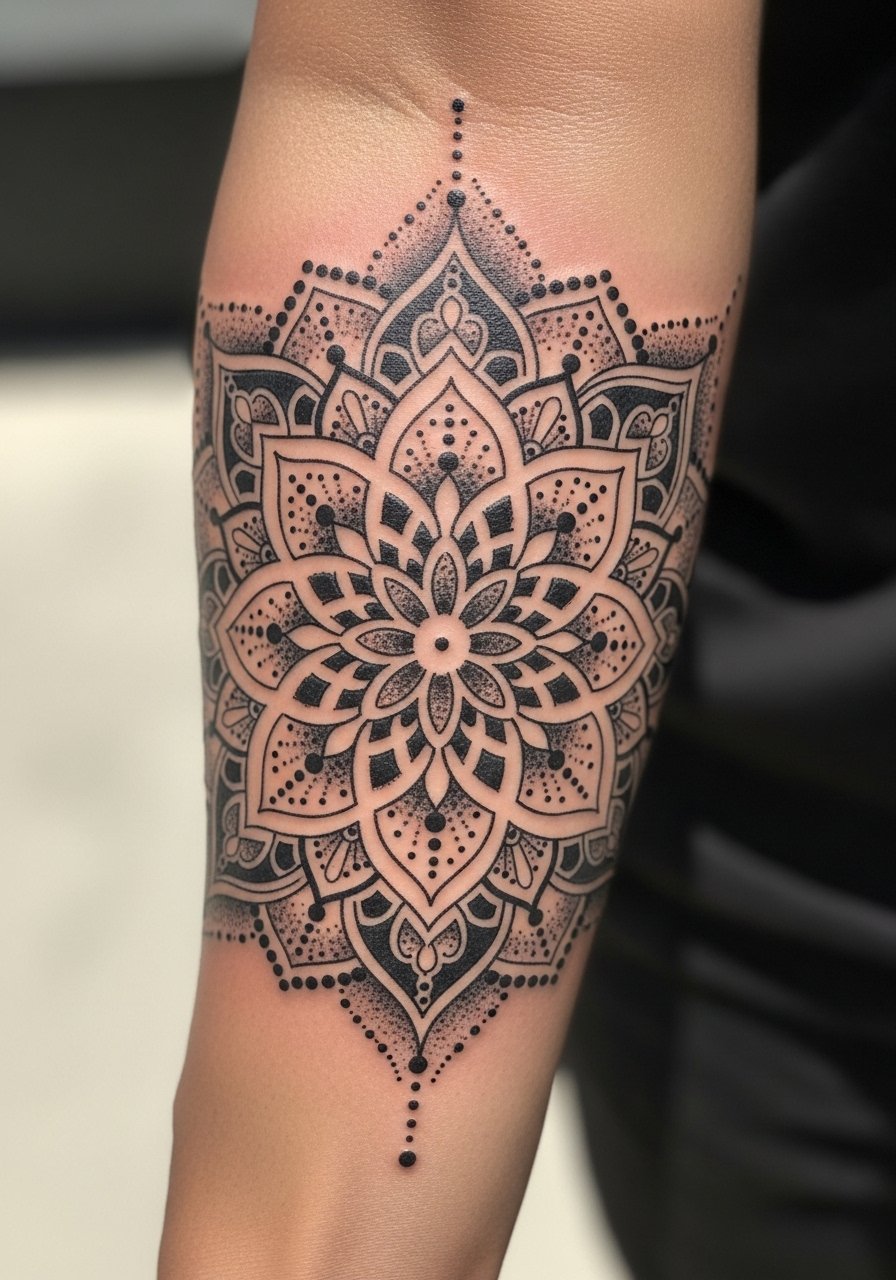
Sacred geometry reads coordinated without literal matching. For longevity, avoid compressing intricate details into a small 2-inch area. Tell your artist you want moderate spacing between concentric elements and stipple shading rather than dense fill. Forearm placement tolerates complexity better than wrist. A common issue is asking for too many concentric rings which merge as the ink settles. Pair with rolled sleeves and a loose fit button shirt to show the full mandala in photos.
14. Minimalist Script of a Childhood Nickname on Collar Tattoo
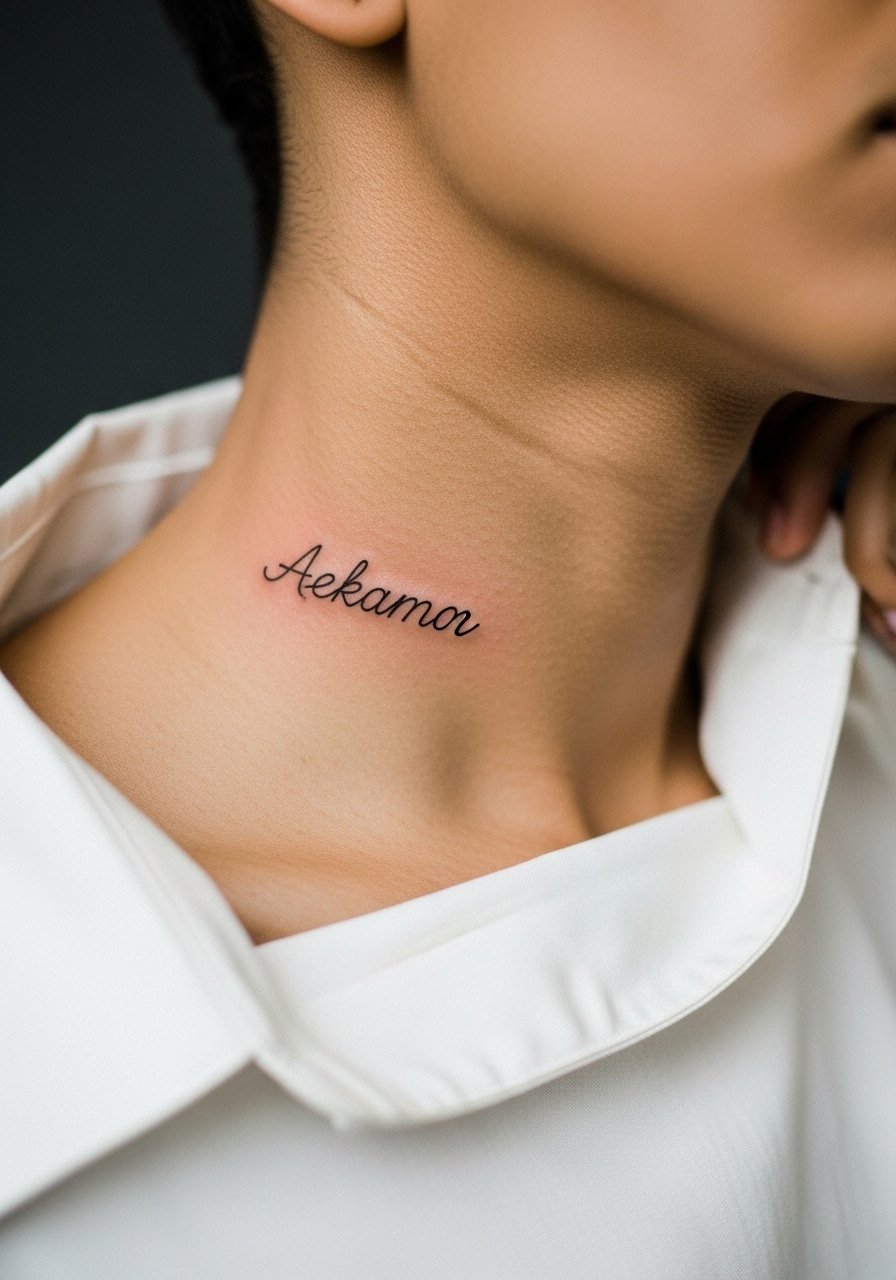
Neck scripts are visible and personal. Pain is moderate. The real mistake is tiny, ornate cursive that becomes illegible on darker or textured skin. Request a readable, slightly wider stroke and exact letter spacing during consultation. If you have career concerns, consider placement slightly lower or hidden behind the collar. For session comfort, a wide-neck shirt you can pull aside is best. Expect a one-session job with a possible small touch-up.
15. Split Animal Motif That Completes When Together

Half-designs that only complete when siblings pose together are underused and emotionally clever. One sibling can have the forearm half and the other an ankle counterpart for lifestyle fit. Tell your artist you want the halves to visually align at a shared scale reference so photos line up. Mistakes happen when artists scale halves differently. Discuss dimensions in millimeters and test a stencil on both body sites before inking. Plan session wear accordingly for each placement.
16. Neo-Traditional Protective Motifs on Shoulder
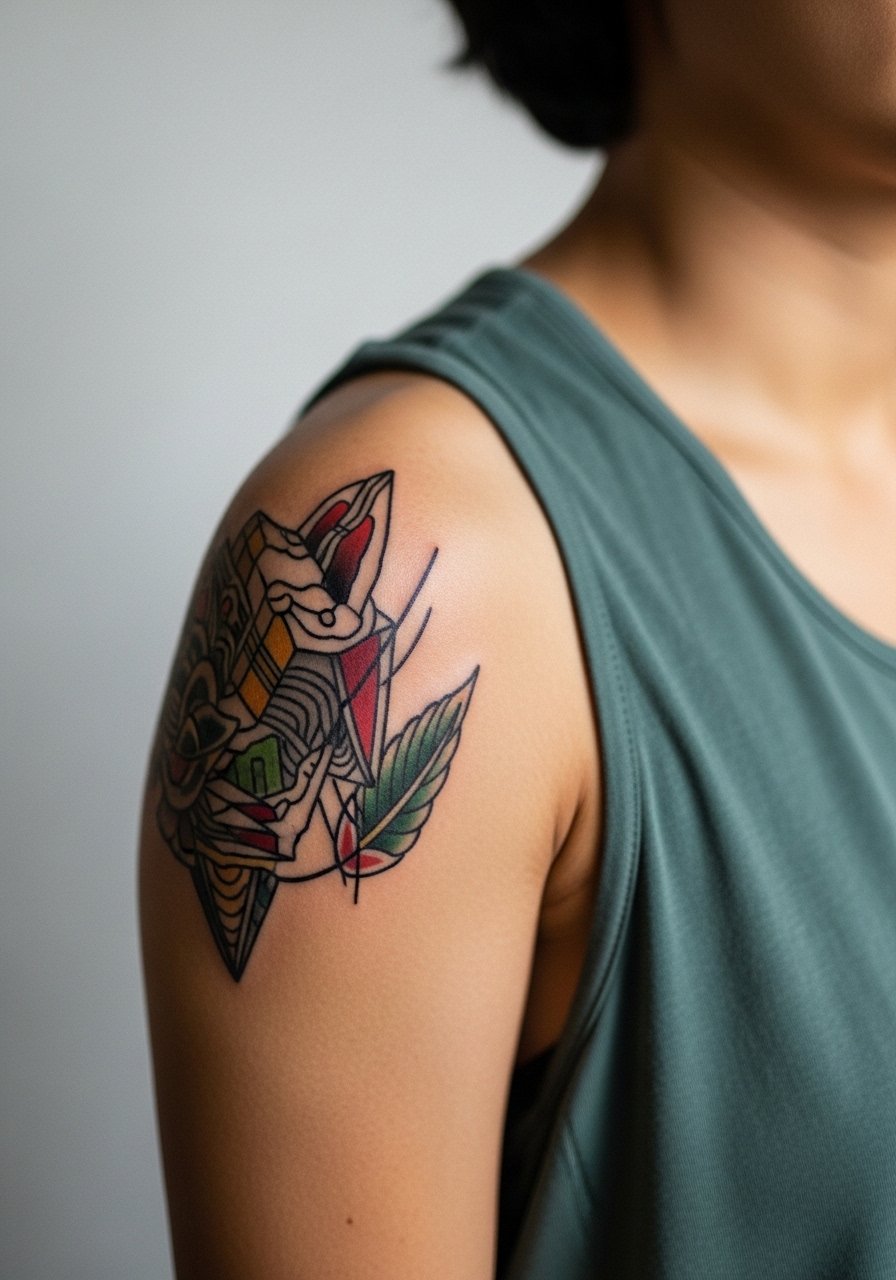
Shoulder pieces sit flat and tolerate saturation, which suits neo-traditional portraits or guardian motifs. The session feels like long steady shading blocks. One mistake is compressing facial features too tiny for the shoulder blade area. Ask your artist for larger elements and bold edges to age well. For the session wear a loose tank that gives full access. Expect two sessions if color is rich.
17. Morse Code Inside Thigh for Privacy
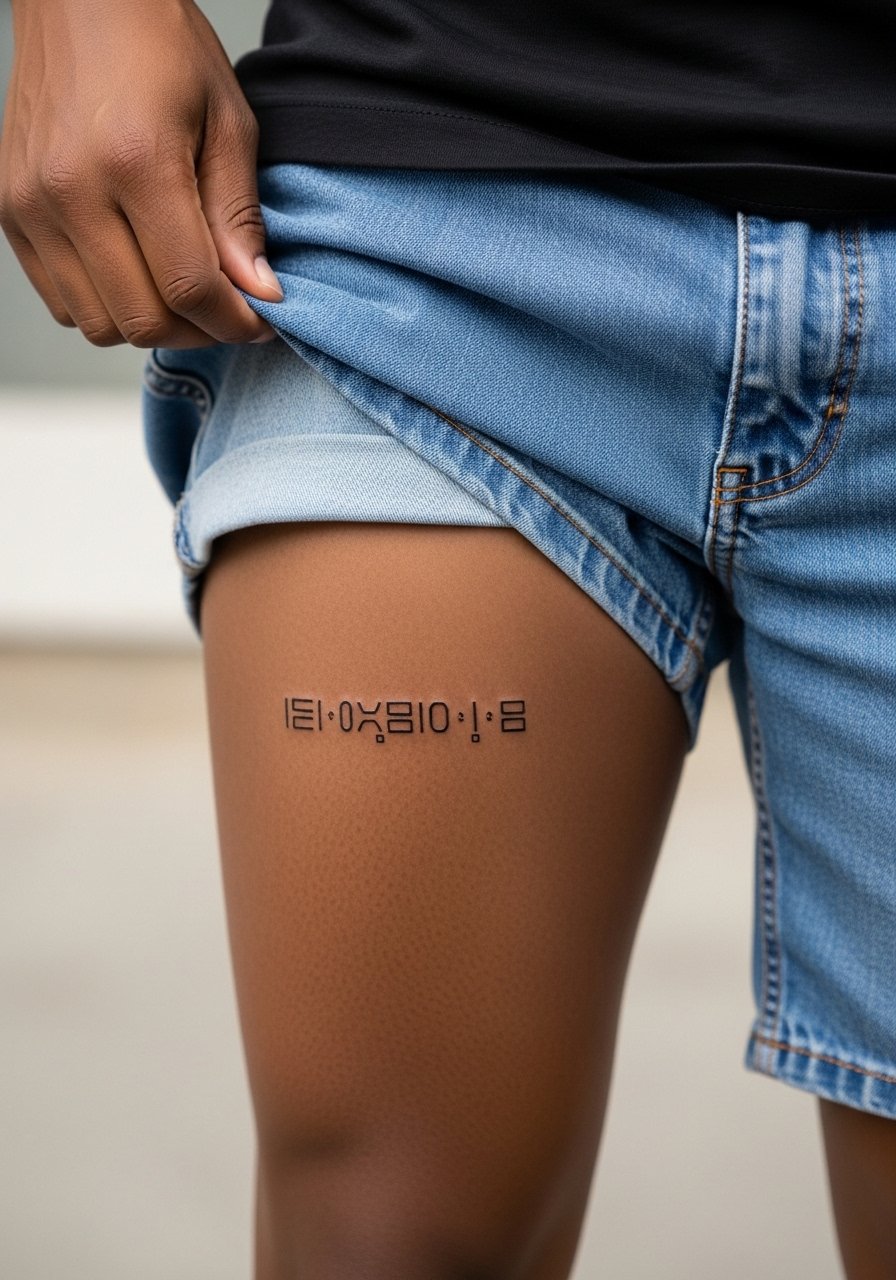
Inner thigh designs stay private and are great for encoded phrases that only you and your sibling get. Pain is moderate to high. The key mistake is compressing dots and dashes too tightly which can blur as skin moves. Request stretched spacing and slightly deeper ink deposition for durability. Session wear should be loose shorts you can shift for access. This placement often needs less sun exposure, which helps preserve fine line clarity.
18. Blackwork Compass Pair on Calf and Ankle
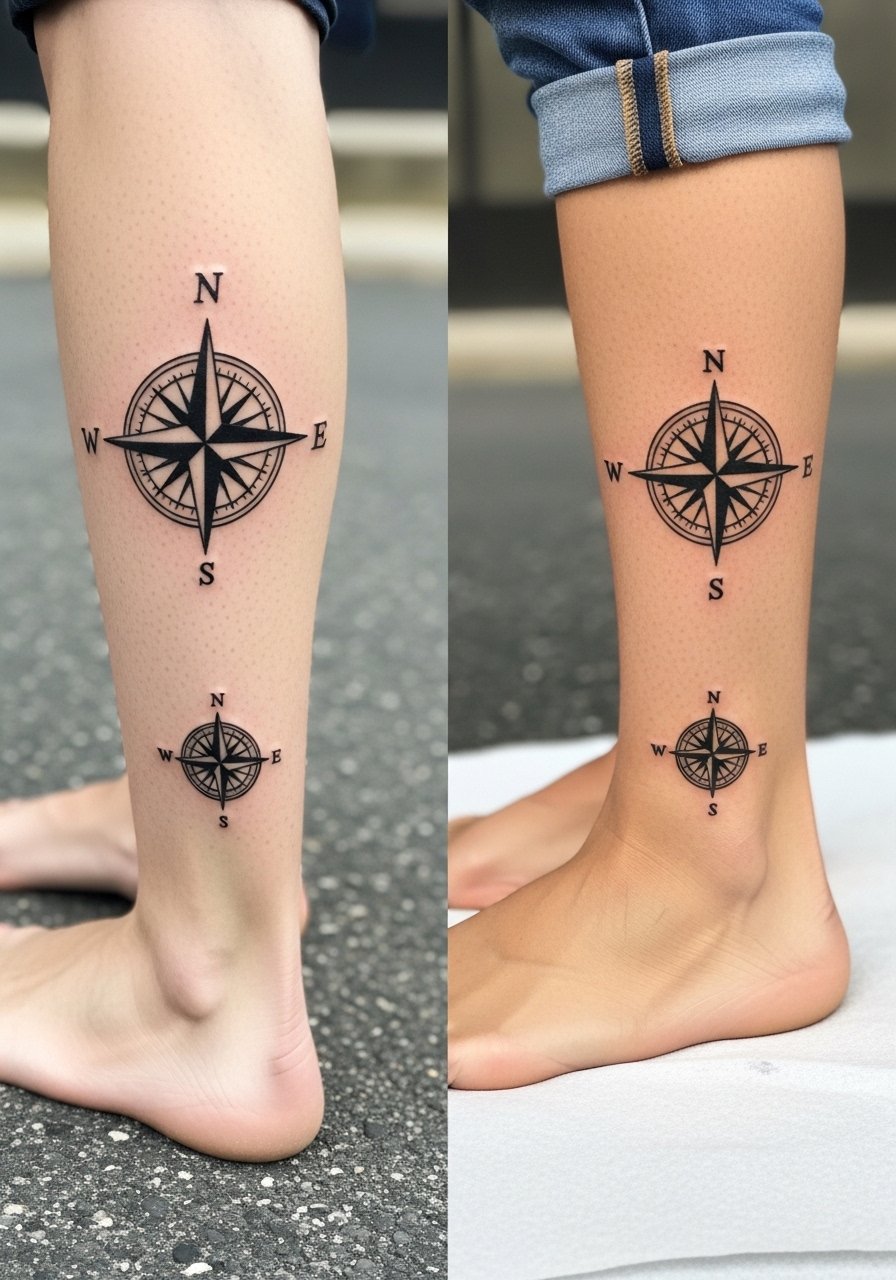
A compass motif is practical for siblings who like travel themes but do not want obvious mirrors. The calf compass holds saturation well and the ankle version can be a micro companion. Ask for slightly thicker cardinal points on the ankle for legibility over time. Expect low to moderate pain on the calf and sharper sensation on the ankle. For show-off looks, cropped jeans and sandals work well and highlight the ankle piece.
19. Micro-Realism Birthmark Outline Behind the Ear
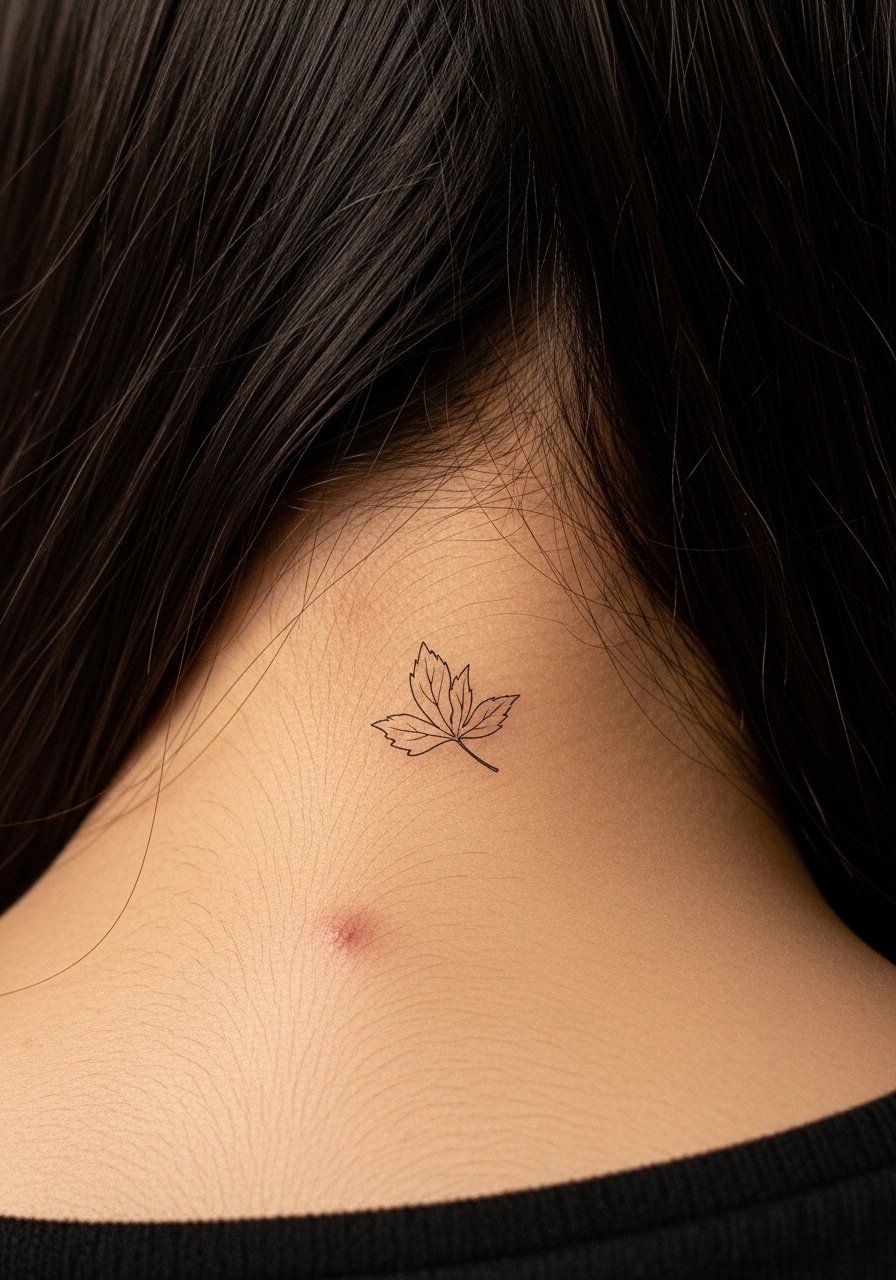
Tracing a birthmark or a small natural feature can be a quiet shared statement. Behind-the-ear work requires an experienced hand because of thin skin and hair proximity. Ask to preview a stencil and discuss how hair growth might conceal or reveal the piece. Common mistake is over-detailing in a tiny area, which can look messy after healing. Keep it simple and plan for a short touch-up window if lines soften.
20. Ornamental Puzzle Cuff on Wrist
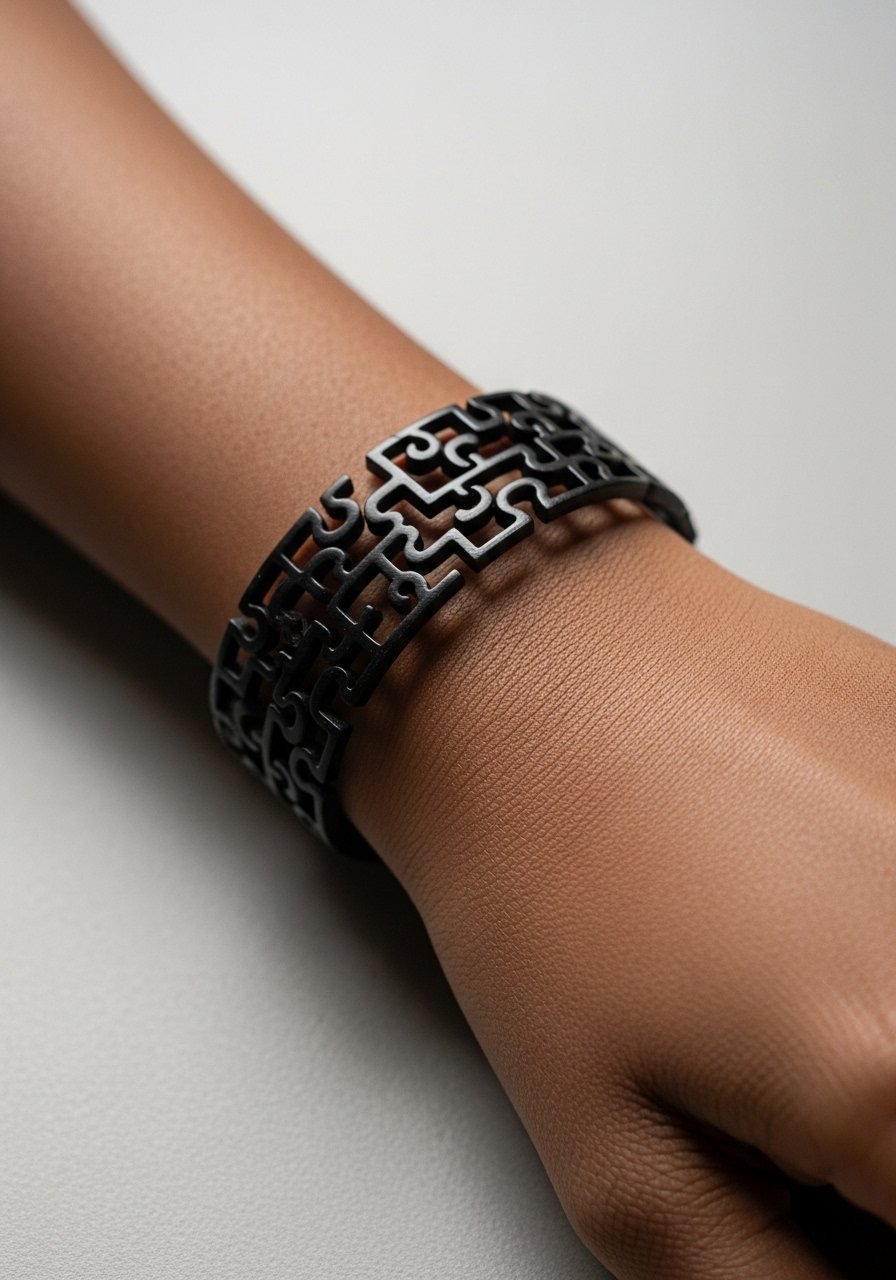
A cuff lets siblings vary link count while keeping a shared theme. The wrist will see friction from watches and bracelets, so request bolder anchor links and leave slightly more space between elements. Expect quick pain and a one-session job. Typical error is tight filigree that becomes indistinct. For display, use a minimalist watch on the opposite wrist rather than piling accessories on the tattoo side. A minimalist leather watch works as a complementary piece.
21. Split Coordinates with Watercolor Accent on Inner Bicep
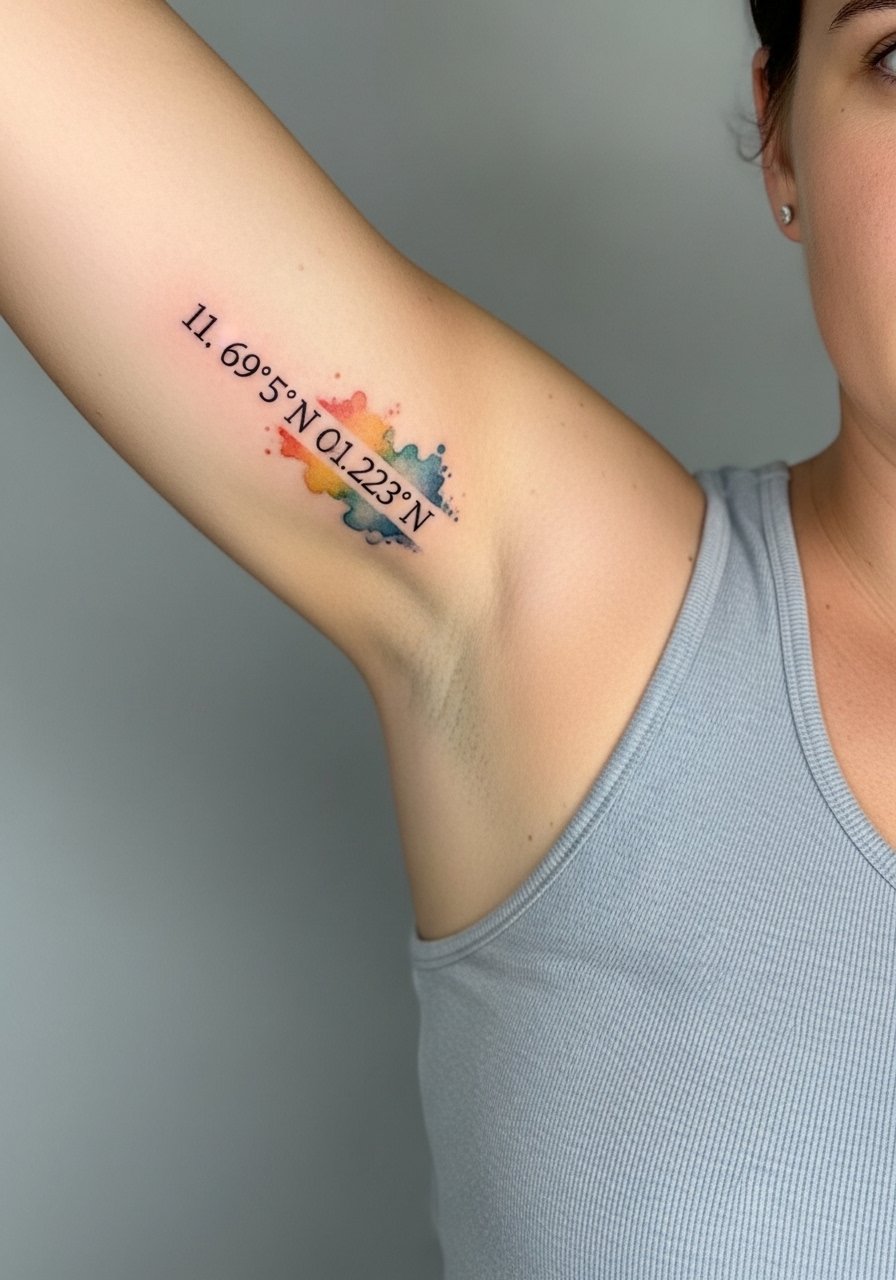
Coordinates are quietly specific and translate well into split designs where one sibling carries the latitude and the other the longitude. Inner bicep placement lets you hide or show as needed though the area can be sensitive. Tell the artist you want the numerals in a clear monospace and a restrained watercolor patch so the text remains legible. The common mistake is using too much translucent color which can drown thin numerals on darker tones. Expect a short session and a possible touch-up to ensure number clarity.
Frequently Asked Questions
Q: Do fine line pieces blur faster on darker skin tones?
A: From what I have seen, ultra-thin single-needle fine line can soften more quickly on higher-melanin skin because of how ink sits in denser dermal tissue. A practical solution is asking for slightly increased line weight or a subtle black anchor so the motif keeps definition while still reading delicate.
Q: If an artist cancels our matching session, what should siblings do about deposits and scheduling?
A: Book through platforms that offer transparent cancellation policies and confirm guest spot dates in writing. If a deposit is non-refundable, try to reschedule with the same artist or ask for a credit toward a different appointment. Booking two options with a firm first and a backup limits disruption without losing momentum.
Q: How much does wrist pain affect placement choice for siblings who want the same design?
A: Wrists are sharper in sensation because of thinner skin and proximity to bone. If one sibling tolerates the wrist and the other prefers less pain, consider mirrored placements like wrist and inner forearm, or pick a bolder wrist execution to shorten session time. Numbing creams are an option but discuss them with your artist ahead of time.
Q: Should siblings pick identical designs or complementary halves for better longevity?
A: Complementary halves or related motifs often age better because each can be scaled and placed for the body area. Identical tiny designs on different skin types or movement zones tend to age unevenly. Talk to the artist about scaling and line weight for each placement before committing.
Q: What should we wear to a ribcage or collarbone session to make the appointment smoother?
A: For collarbone or rib work wear a strapless crop top or a wide-neck shirt you can pull aside. That keeps access clean and avoids wrangling clothing mid-session. Loose layers are best for session comfort and modesty.
