
Sitting in the chair with the stencil on is the moment most people realize how chest tattoos read under studio lights. The placement can look delicate on a screen and heavy on skin, so line weight, spacing, and where the design sits matter more than trend. These 17 black and grey chest ideas come with notes on pain, aging, consultation cues, and what to wear to the session so the finished piece reads the way you expect.
1. Script Line Across the Sternum
A narrow script that sits along the sternum reads intimate and quiet. Tell your artist to keep linework single-needle and a little looser than you want fresh so the letters do not fill in as they heal. Expect the sternum to be a 6 to 8 on most pain scales and plan for a single 60 to 90 minute session for short phrases. The common mistake is asking for ultra-thin lettering without room between letters, which leads to merging after a year. For evenings, a thin chain pendant necklace sits just above the line and frames the script without crowding it. Hand professional considerations in mind if you need conservative dressing at work.

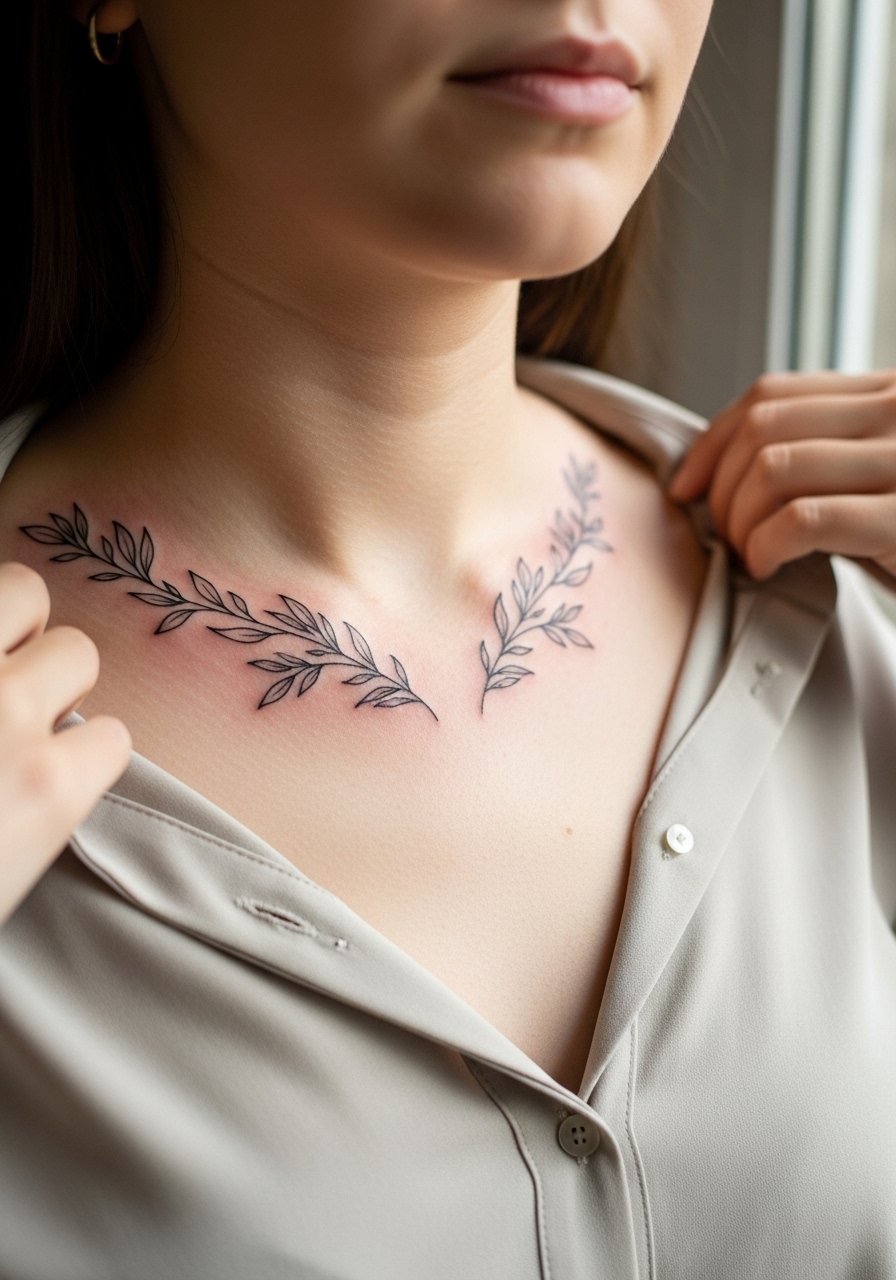
2. Fine Line Botanical Across the Upper Chest
A horizontal botanical sweep that follows the collarbone softens heavy silhouettes. Ask for staggered branch spacing and a mix of single-needle stems with tiny stipple shading for depth. This placement sits at a 3 to 5 on pain scales depending on how close it is to bone. Over the first two years the thin stems retain their delicacy if the artist spaces leaves slightly apart. The mistake is packing too many tiny leaves into a small band, which looks crowded once healed. For casual wear, an open-neck blouse pulled slightly aside shows the work without overexposing it.
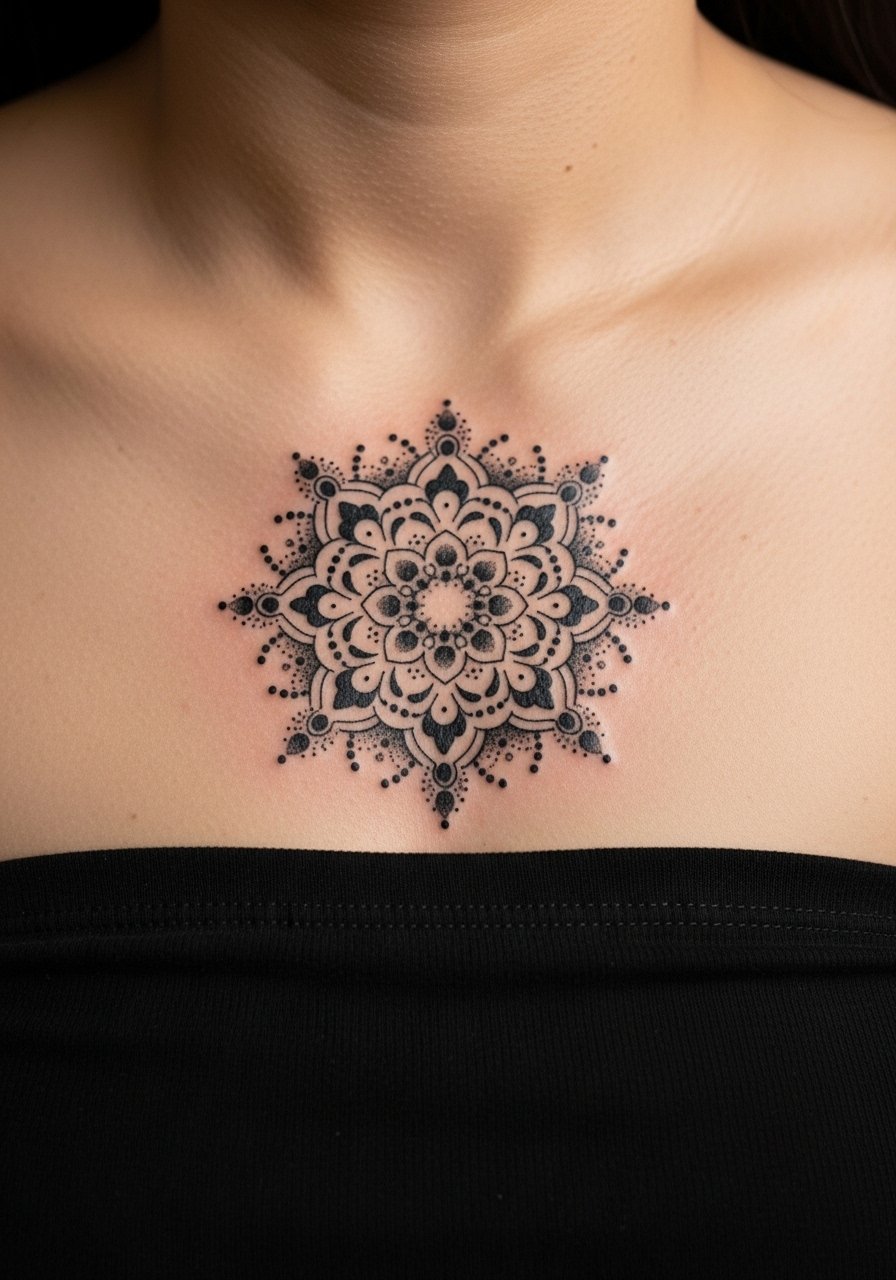
3. Symmetrical Mandala Over the Upper Sternum
A small mandala centered above the sternum reads architectural and feminine. Tell the artist you want breathing room between dense dot work and the outer ring so the stipple shading does not fill in. This design can take a 90 to 150 minute session depending on detail and uses dot work and whip shading to avoid solid black blocks. There is active debate about dense geometric detail on the sternum. One camp says tiny geometry blurs quickly because skin there shifts with breathing. The other camp argues that with correct spacing and dot shading it holds. Ask your artist where they stand before booking. Pair with a strapless top for nights out to let the symmetry speak.
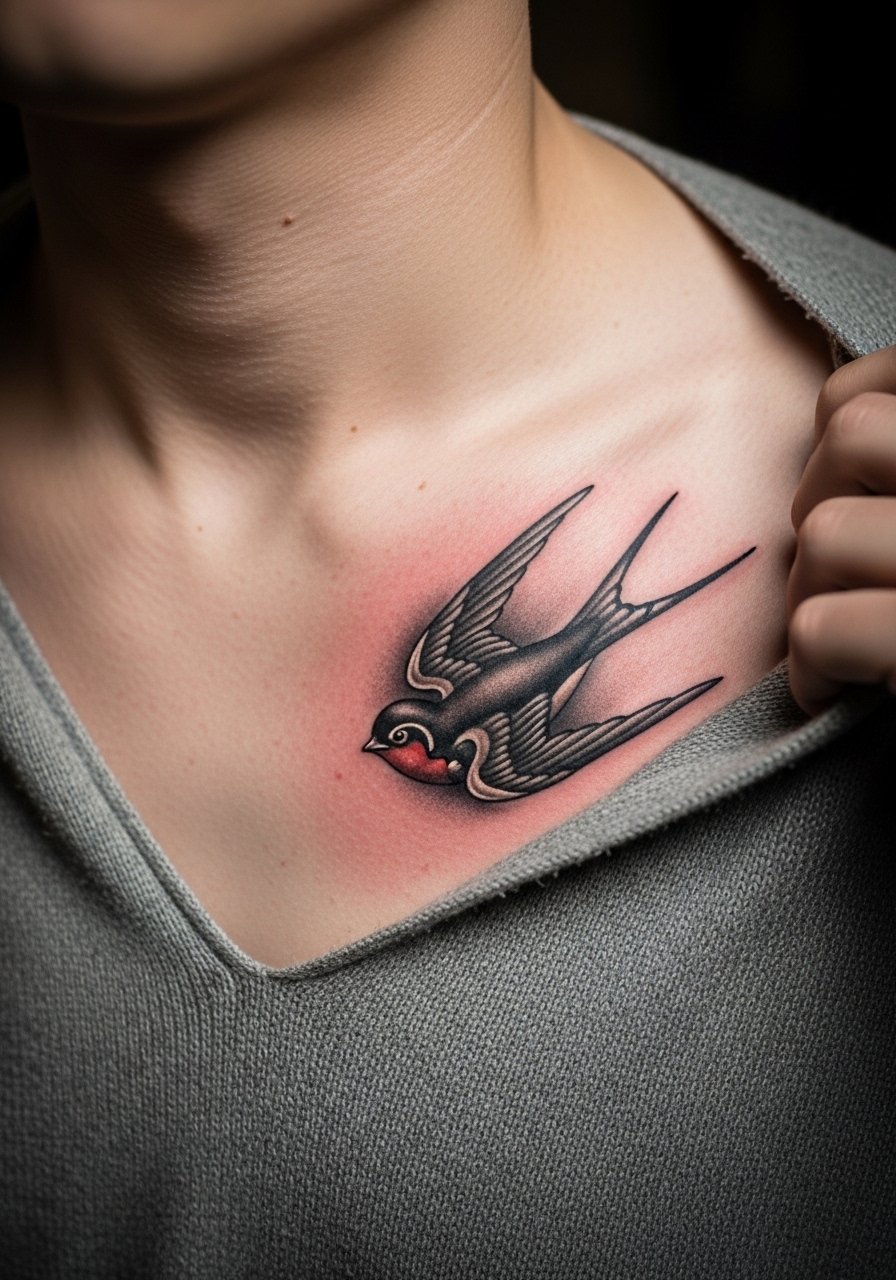
4. Micro-Realism Bird Near the Heart
A tiny micro-realistic swallow or sparrow perched just over the left chest can be striking when done in greyscale. Ask for reference photos that show the bird at a similar scale so the artist can translate feather texture using tiny needles and subtle saturation. The left chest near the heart has moderate pain and often needs one longer session for careful placement. Micro-realism ages differently than bold work because subtle shading can lose contrast by year three unless the artist compensates with higher saturation up front. Avoid asking for extreme micro detail in a very small size. For everyday styling, a v-neck sweater frames the bird without hiding it.
5. Bold Blackwork Chest Plate
A bold blackwork plate or scalloped panel across the upper chest uses heavy saturation and negative-space patterns. This is a session that often runs multi-hour or is split into two sittings because saturation takes time. Expect a higher chance of visible scarring and a longer touch-up timeline compared with single-needle work. The common mistake is asking for full coverage in one short session which leads to patchy saturation. If you want it visible under evening wear, a wide-neck dress that exposes the upper chest makes the panel the focal point.

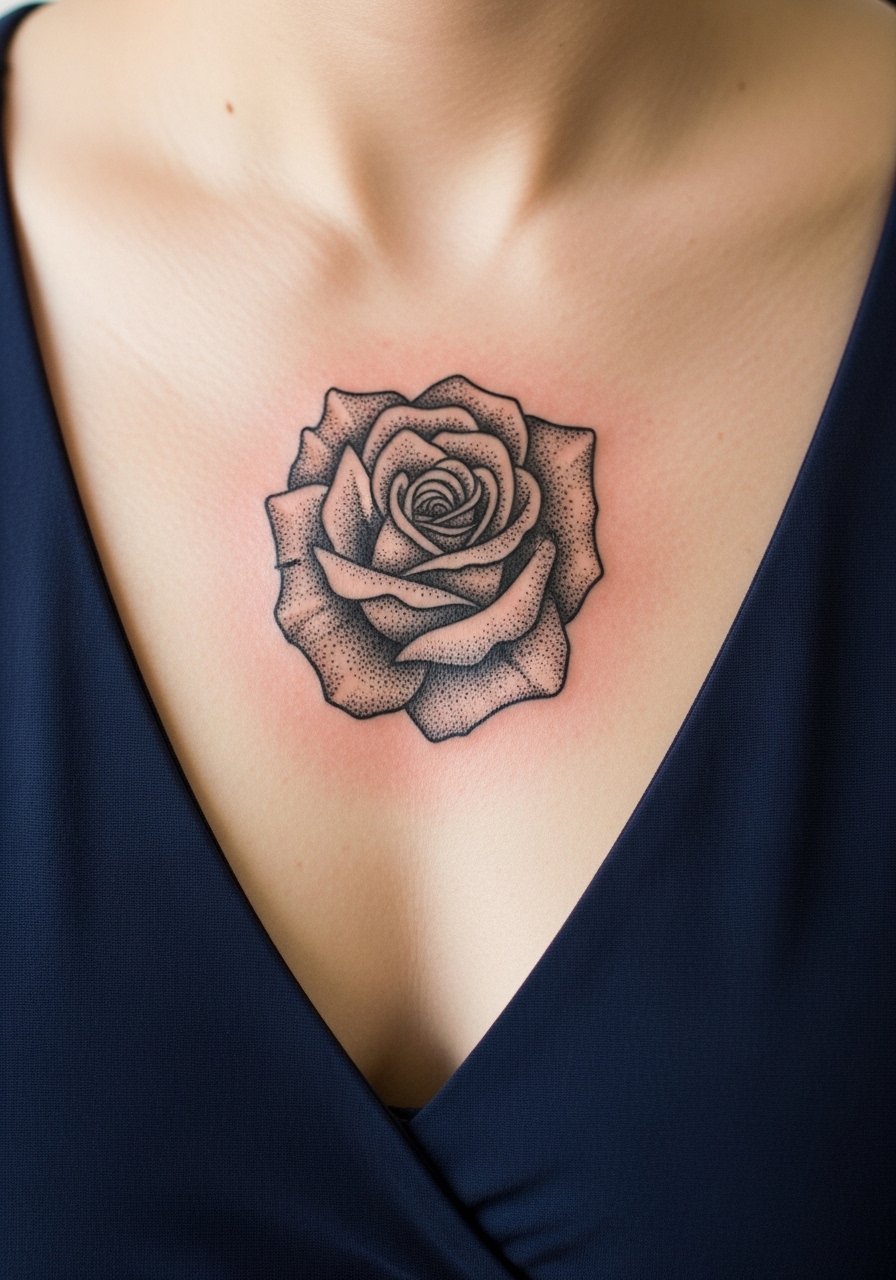
6. Stipple Rose Nestled in the Cleavage
A stipple-shaded rose centered low on the chest uses dots to build soft gradients that sit well in cleavage areas. Tell your artist you prefer gradated stippling rather than solid grey fills to keep texture as the piece heals. The lower chest can be a sensitive spot with friction from clothing, so expect a one- to two-hour session and a touch-up at year two for reshaping. A classic mistake is placing the bloom too low where it disappears under tops. For evenings, a plunging neckline dress showcases the floral without competing with jewelry.
Studio Day Picks
The upper chest and sternum pieces above need different prep than collarbone work, and the right items smooth out the session and the first week.
-
Stencil transfer paper kit. Lets you preview placement on the actual skin so a centered mandala or script sits where you want it.
-
Topical numbing cream. Applied per package instructions before a sensitive sternum session can reduce discomfort for people with low tolerance.
-
Thin protective film roll. Keeps chest tattoos protected from friction with straps and necklaces during the first 48 hours.
-
Fragrance-free gentle body wash. Cleanses the area without stripping fresh ink when showering.
-
Aquaphor healing ointment. A thin application in the first days helps retain moisture for fine line work without clogging.
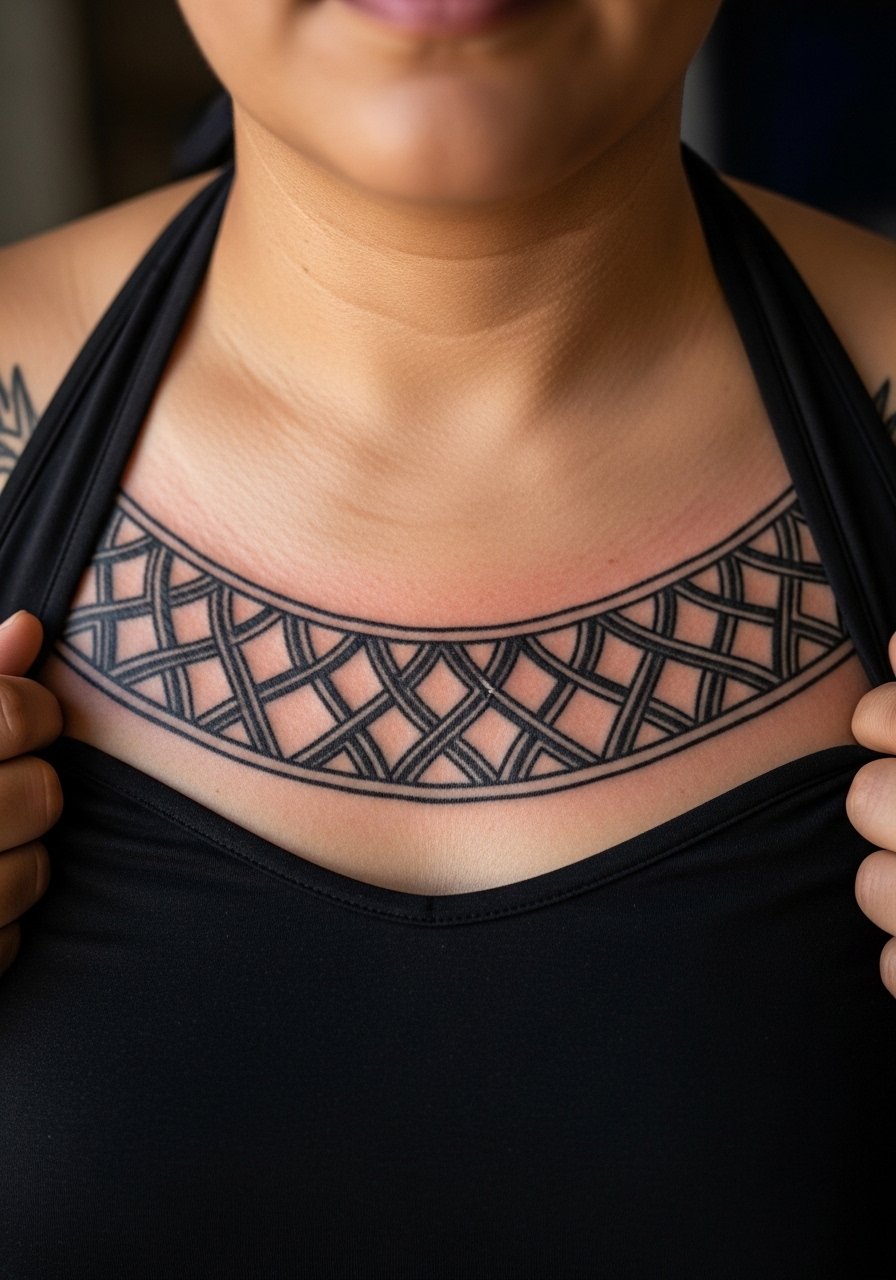
7. Ornamental Lattice Across the Upper Chest
An ornamental lattice or filigree band that sits across the upper chest reads like jewelry. Ask for negative space to form the highlights rather than heavy grey fills so the pattern keeps crisp edges. This placement can be covered by most shirts, so plan the exact vertical position during consultation. Sessions vary from 90 minutes to three hours based on detail. A mistake is compressing ornate elements into too short a span which makes the pattern look muddled after healing. A halter tank top lets you show the lattice when you want it without rewiring your whole wardrobe.
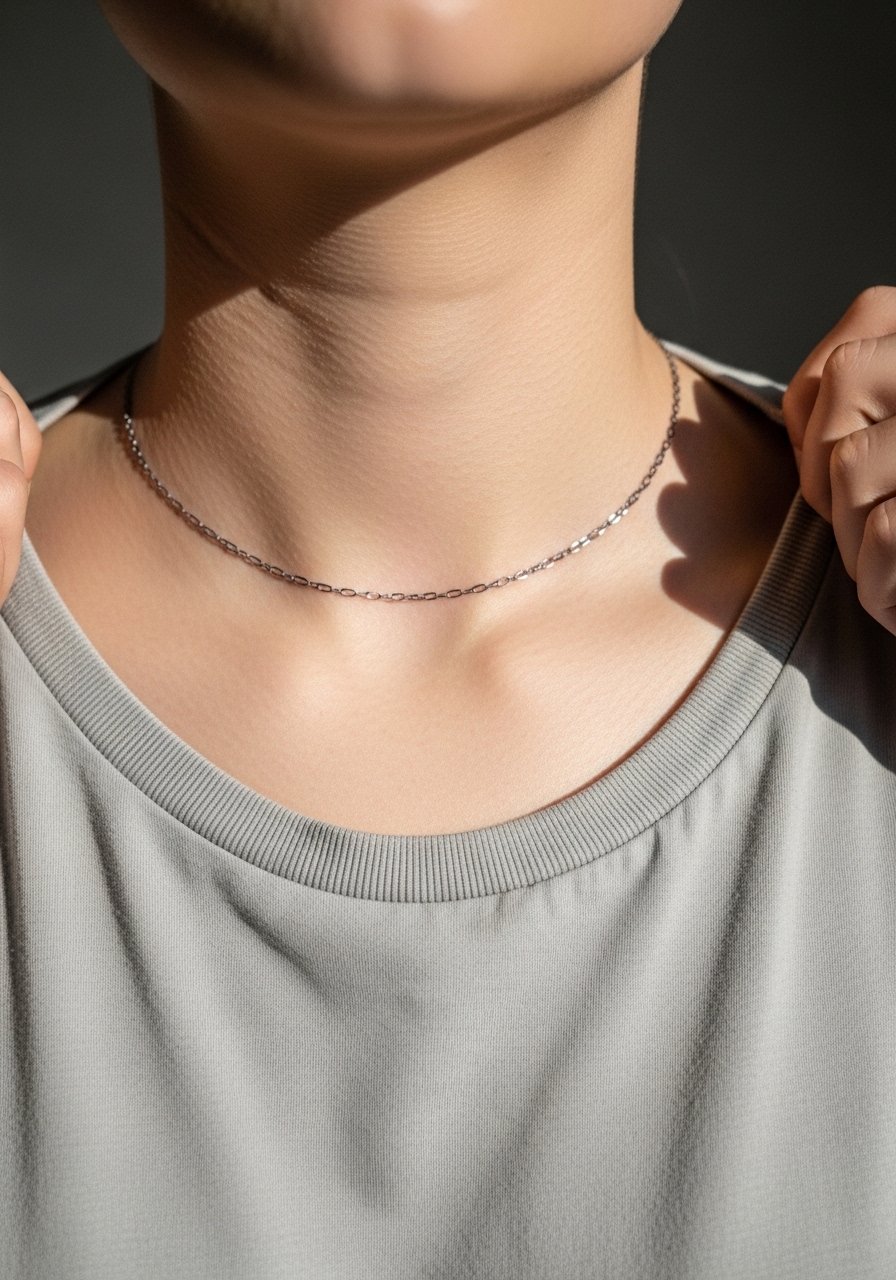
8. Chain Necklace Illusion Under the Collarbone
A thin chain illusion that follows the collarbone mimics jewelry and avoids the permanence of a real piece. Ask for slightly heavier linework than you think you need so the chain reads after a year. This is a lower-pain placement and usually done in a 30 to 60 minute session. The typical mistake is asking for an ultra-fine chain without enough contrast, which fades into the skin. For a simple daytime look, pair it with a crew neck tee with a scooped collar that reveals the chain when you roll the neckline.
9. Botanical Panel Sweeping From Sternum to Shoulder
A dramatic botanical panel that climbs from the sternum toward the shoulder uses varying leaf sizes and stipple shading to create motion. Tell the artist you want heavier leaves near the sternum with lighter, more open work over the shoulder bone to avoid blowout. This is a longer session and may be split for comfort. The mistake is asking for identical density across the panel which looks flat after healing. For showing off your shoulder line, a one-shoulder top exposes the ascent naturally.

10. Minimalist Dotwork Star Cluster Near the Collarbone
A cluster of tiny dot stars placed near the collarbone reads delicate and airy. Specify dot size ranges to your artist and request dot spacing to preserve shape as the skin ages. This placement is low pain with short sessions of 20 to 40 minutes. A typical mistake is trying to cram too many stars into a tiny space. For low-effort styling, a v-neck camisole shows the cluster without competing details.
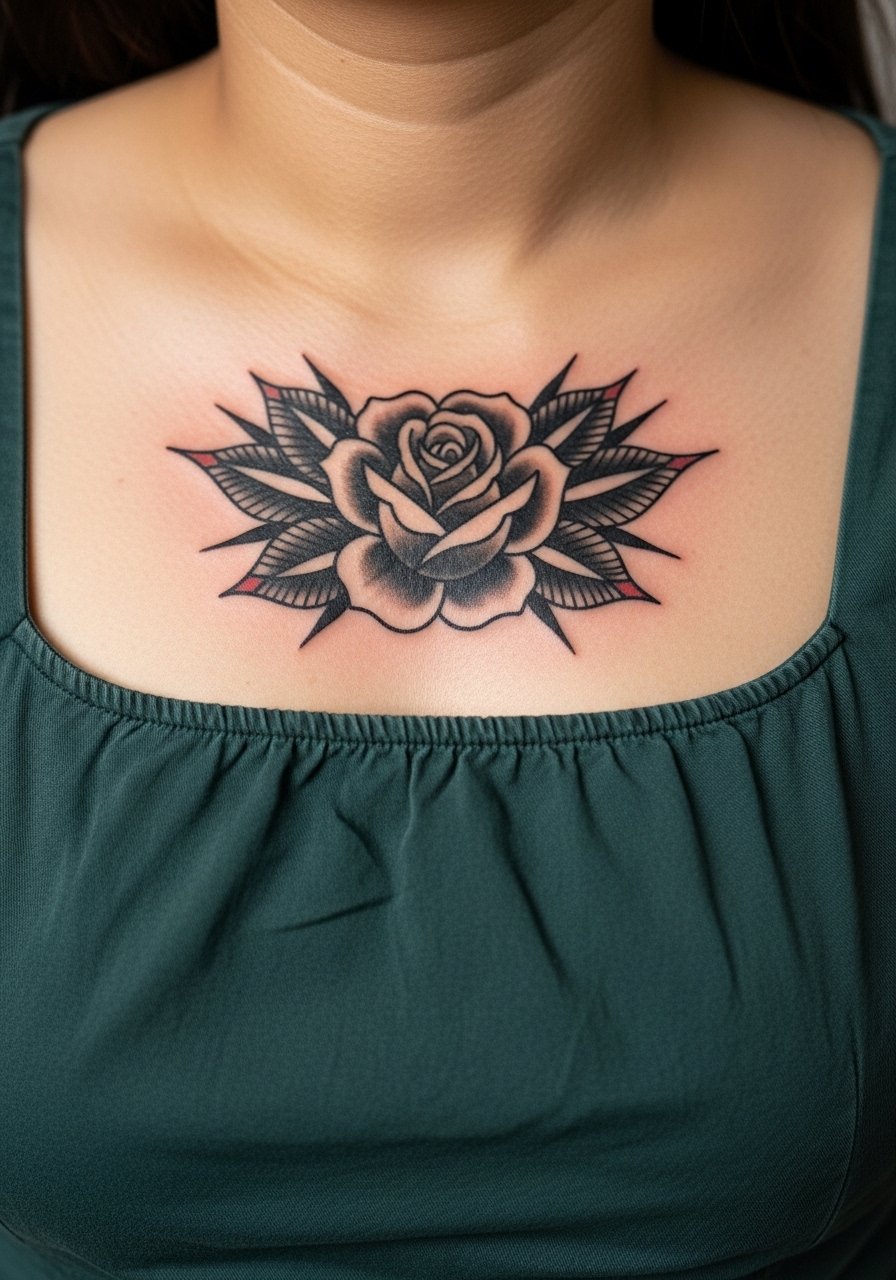
11. Traditional Rose Centered on the Sternum
A scaled-down traditional rose in black and grey uses bold outlines and saturated blacks to hold shape over time. Ask the artist for clean linework and confident saturation in the petals, not soft grey washes that flatten later. Traditional technique means it will need less frequent touch-ups than thin script. The sternum placement is more sensitive, so expect one longer session and a possible touch-up at year three for edge maintenance. For evenings, a square-neck dress frames the bloom centrally without distracting straps.
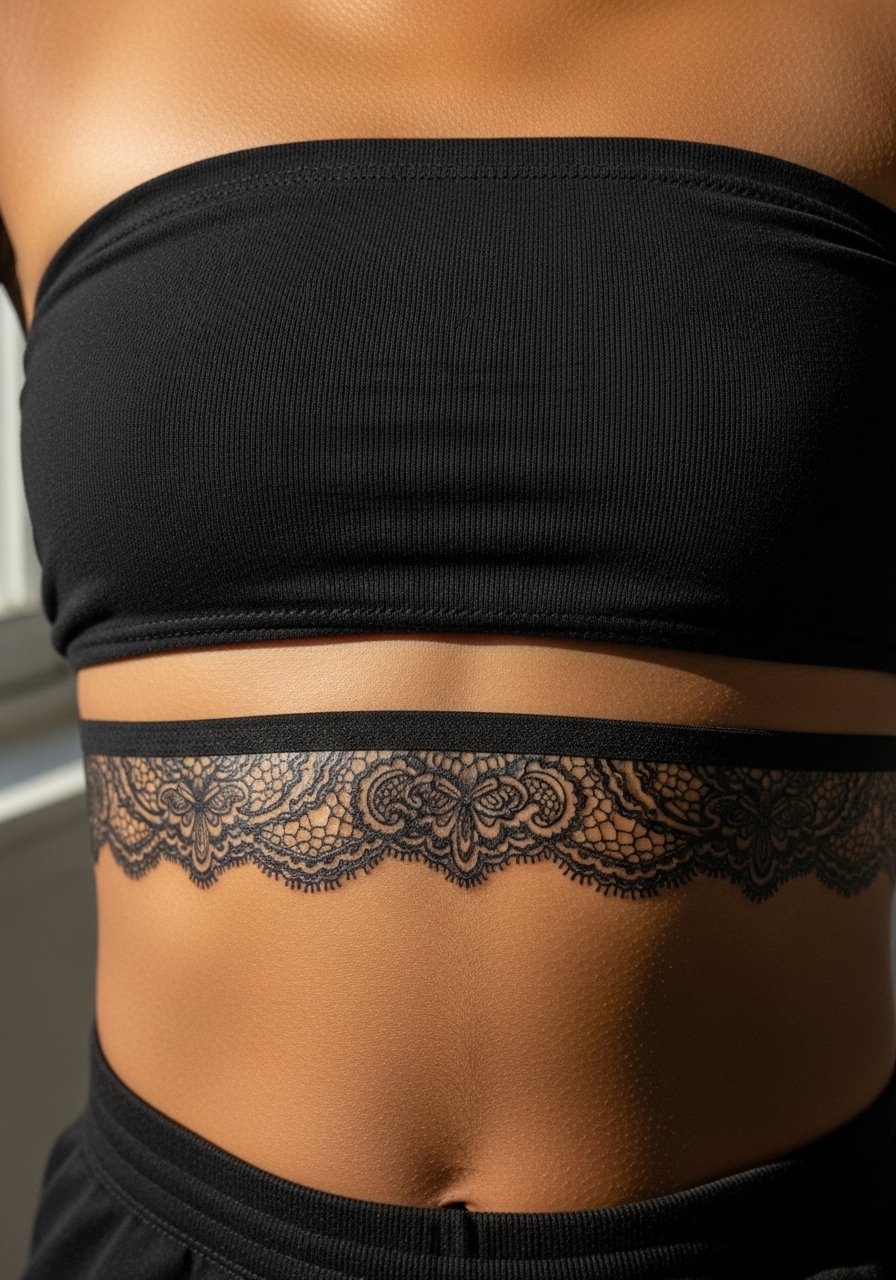
12. Lace-Inspired Underbust Band
A lace band under the bust mimics lingerie and works with bras and swimwear. Request varied negative spaces so the lace reads as texture rather than a flat grey band. This area moves with posture and breathing, so plan for a test stencil and expect a two-hour session for a detailed band. The common error is a continuous heavy fill which can look like a shadow after healing. For pool days and dresses, a bandeau top pairs with the lace without covering the design.
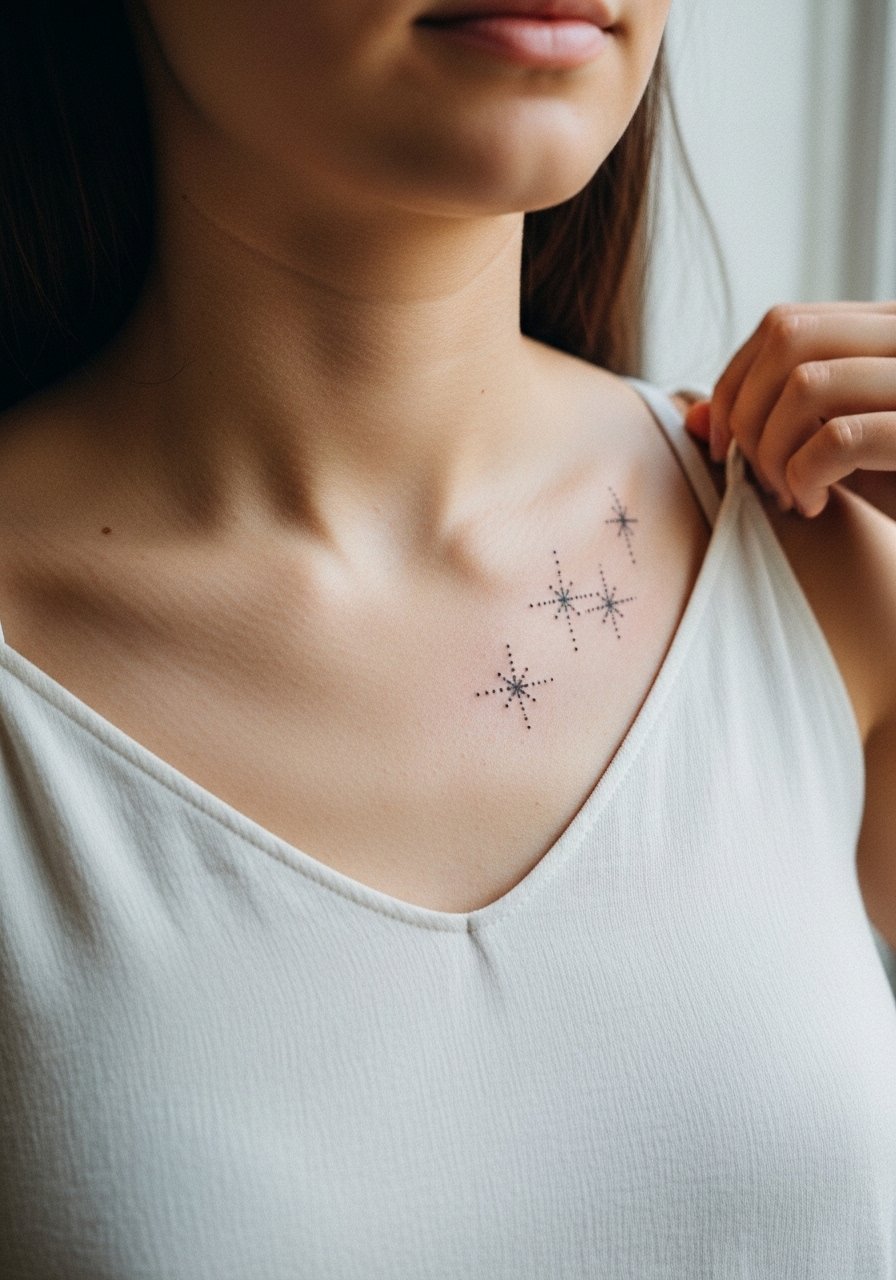
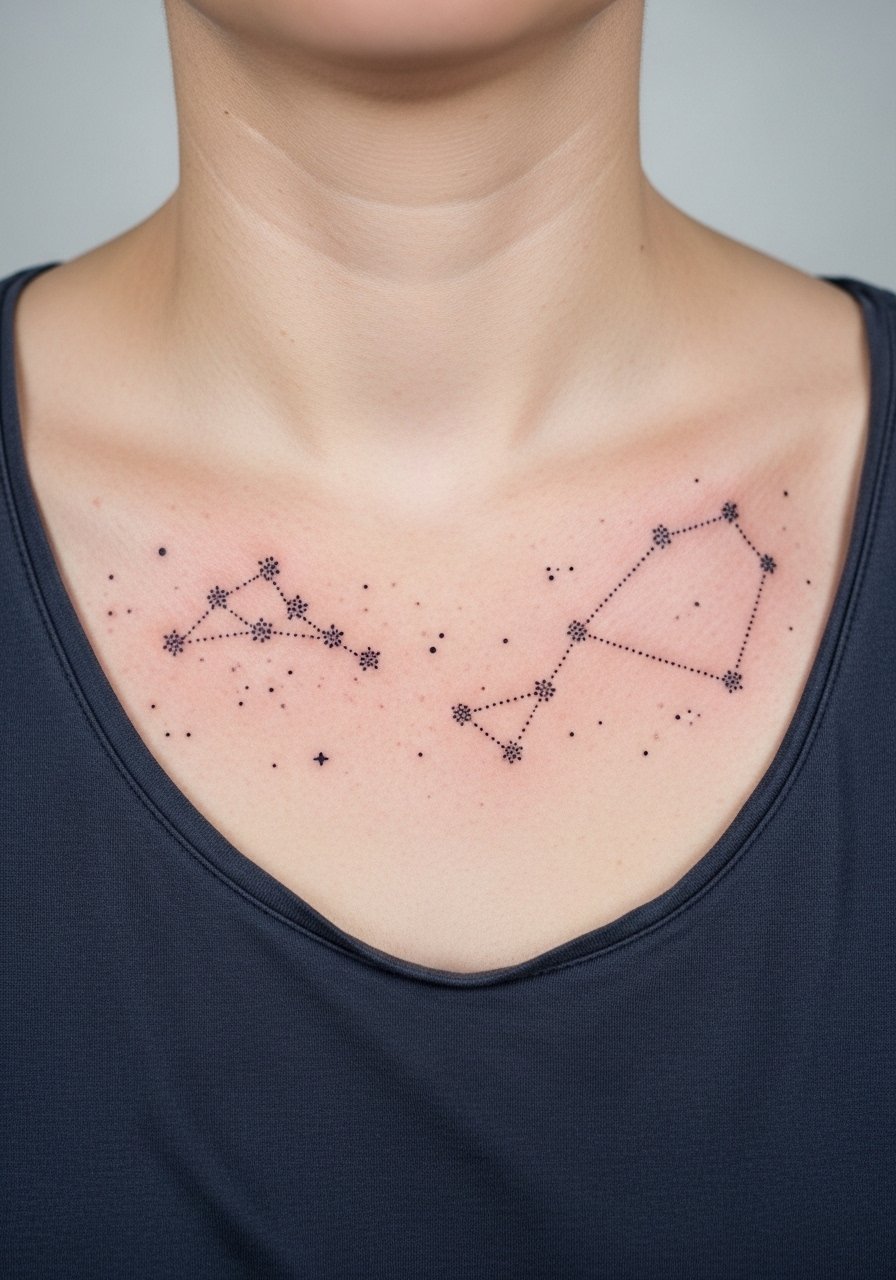
13. Constellation Spread Across the Upper Chest
A constellation map that arcs across the upper chest uses tiny dots and micro lines to connect stars. Tell your artist you want certain stars slightly bolder to read after sun exposure. This piece is low pain and usually done in one short session, but long-term contrast depends on initial dot saturation. A mistake is placing overly complex constellations without dedicating space around them. For everyday wear, a scoop-neck tee reveals the arc while keeping the look casual.
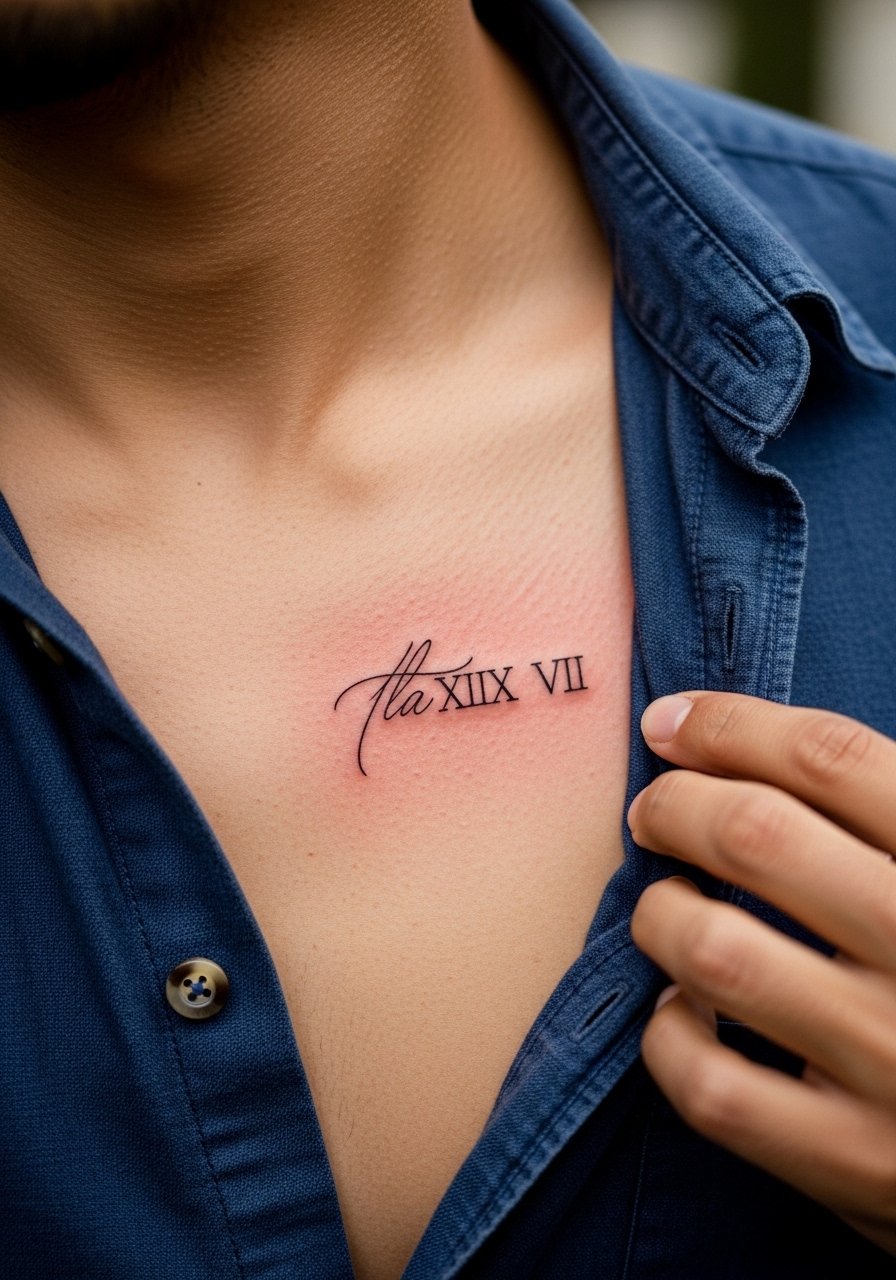
14. Script with Roman Numerals Over the Left Heart
A combined script and small roman numerals over the heart makes for a personal, readable chest piece. Ask for letter spacing and numeral sizing in the stencil stage so the artist can scale lines to the skin contours. Expect a moderate pain level and a 45 to 90 minute session. The common mistake is stacking elements too close to the breast fold which distorts with movement. For subtle daytime styling, a button-down shirt left slightly open frames the work.
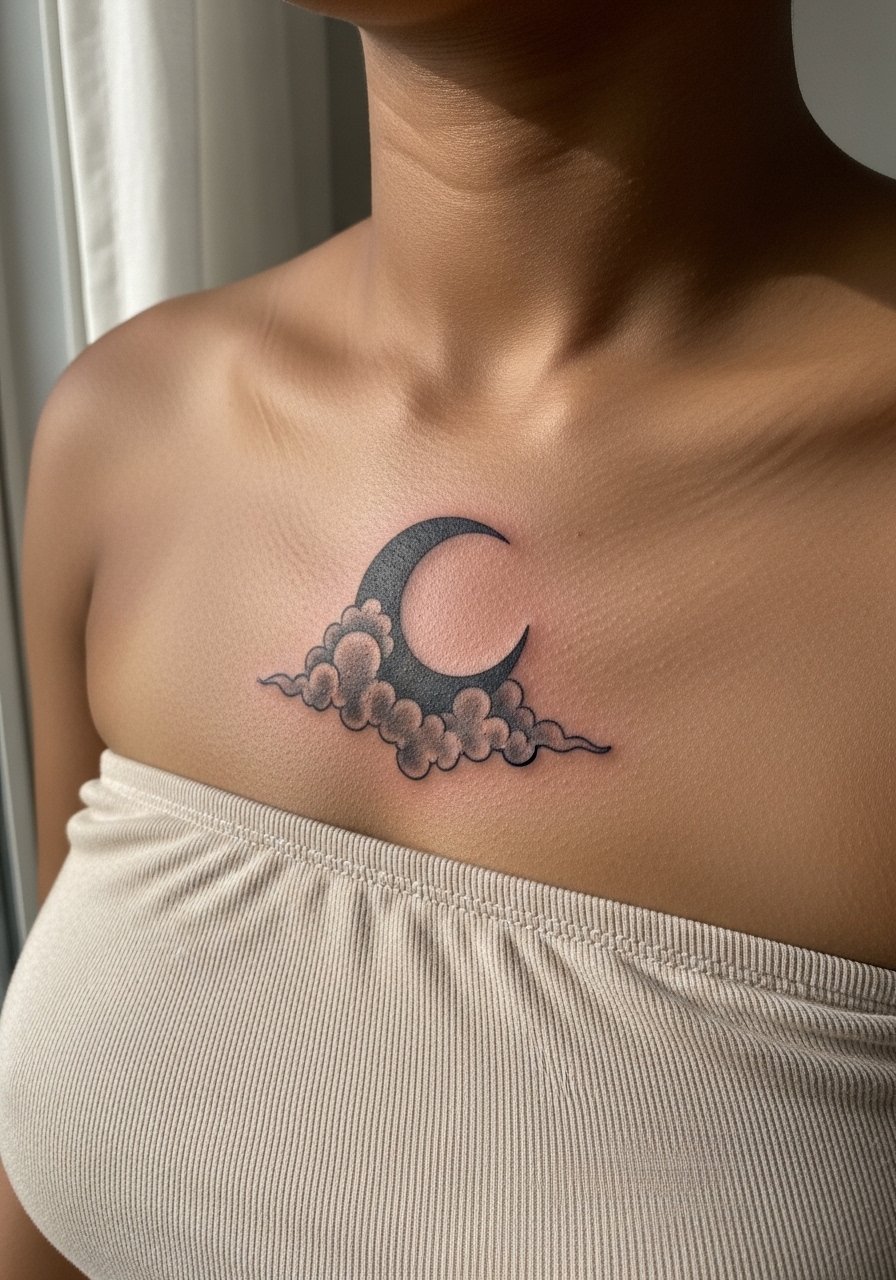
15. Crescent Moon and Cloud Cluster Low on the Sternum
A crescent moon and soft cloud shading placed low on the sternum uses gradated grey to keep a dreamy feel. Ask an artist to use dot gradients for the clouds to avoid heavy grey pooling. This area is prone to rubbing from waistbands and straps so expect slightly longer healing precautions. A typical error is too much mid-tone grey which flattens over time. For evenings, a strapless midi dress shows the piece without competing necklines.
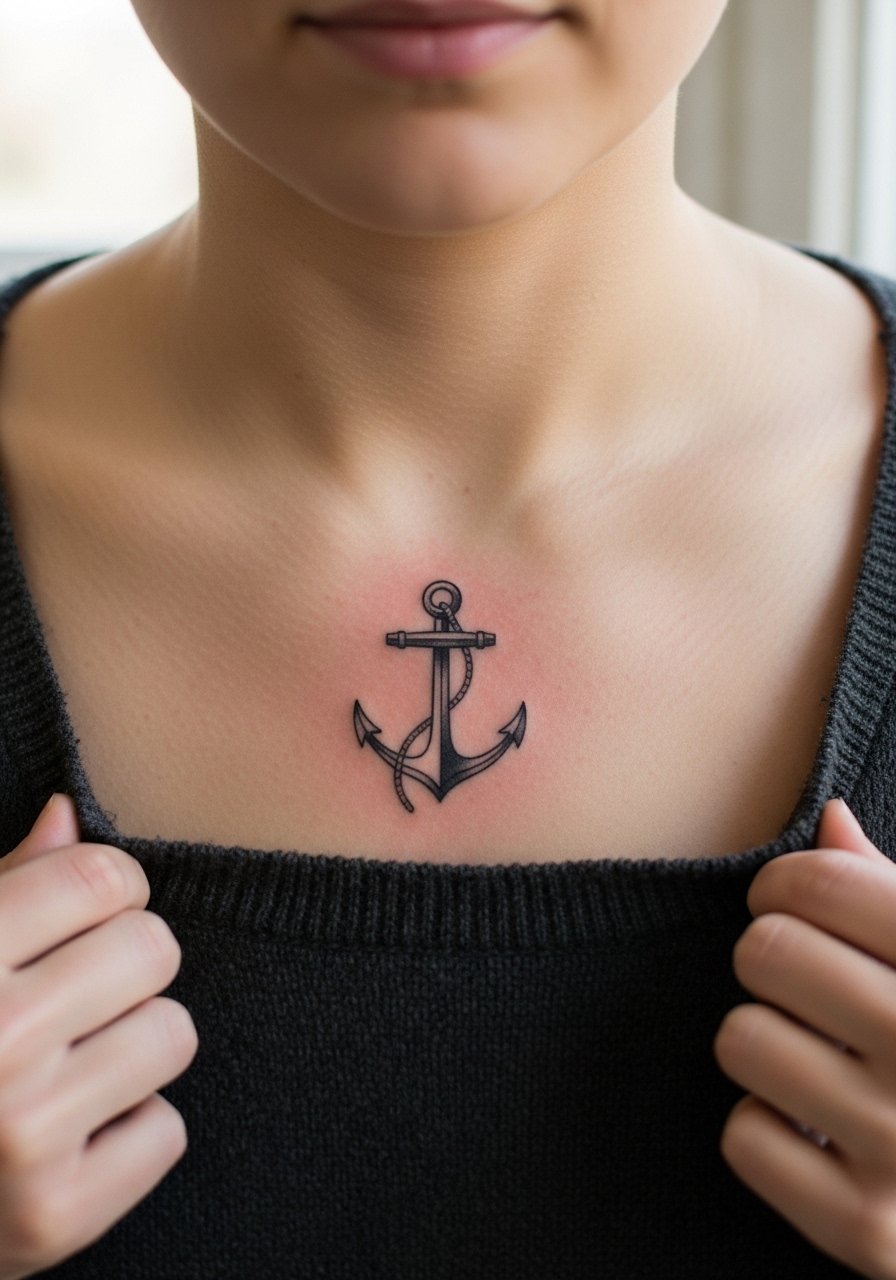
16. Anchor or Nautical Symbol Centered Below the Collarbone
A small anchor or nautical glyph centered below the collarbone reads bold in black and grey if the linework is confident. Ask for thicker anchor stems with subtle inner grey to preserve shape when the skin softens. This location is lower pain and usually a quick 30 to 60 minute sit. A mistake is over-detailing tiny rope textures which can blur. For casual looks, a boatneck sweater frames the symbol neatly.
17. Lace Collarband Framing the Collarbone
A lace collarband that sits along and slightly below the collarbone uses negative space to create a framing effect. Request that the artist test the stencil with jewelry in place so the lace complements, not competes, with necklaces. This is a delicate session that often runs 60 to 120 minutes for detail and may need a touch-up in the first two years. The most common mistake is mirroring a machine-made lace pattern exactly which can look flat on skin. When you want to show it off, a wide-neck sweater exposes the collarband without overcomplicating the neckline.

Frequently Asked Questions
Q: Will fine line work on the sternum blur faster than bolder pieces?
A: Fine line on the sternum can blur faster because the skin there moves with breathing and has thinner tissue. One camp says fine detail always softens there within a few years. The other camp says spacing and needle depth preserve it. In practice, plan for touch-ups at year two to three and ask your artist about spacing, line weight, and expected touch-up timing.
Q: How should I dress for a long chest session that crosses the sternum and collarbone?
A: Wear a fitted sports bra or a wide-neck button shirt you can easily pull aside so the artist has clean access while you stay modest. Choose loose bottoms and a zip-up sweater to slip on after the session so nothing rubs the fresh work.
Q: Do stipple and dotwork age differently on dark skin tones?
A: On darker tones stipple can read very nicely but needs slightly denser dots up front to keep contrast as it heals. Discuss how contrast will look in healed photos with your artist and ask for sample healed images on similar skin tones.
Q: If I want a chest piece that reads like jewelry, which designs hold best?
A: Chain illusions and ornamental lattices hold up well because they rely on bold linework and negative space rather than sheer micro detail. Ask for confident line weight and space between elements so the design stays legible as the skin changes.
Q: Can I combine script and a small image on the chest in one session?
A: Yes, small script plus a micro image is often done in the same sitting if both fit within a one to two hour window. Bring clear reference photos and ask your artist to produce a single stencil so placement and scale are finalized before needles touch skin.
Q: How soon should I plan a touch-up for chest tattoo styles in this roundup?
A: Expect a touch-up window between year one and year three depending on style. Fine line and micro-realism often need earlier touch-ups. Bold blackwork usually holds longer but may still need an adjustment for saturation and edge clarity.
