
Fine line trends look gorgeous right after a fresh session, but the darker ornamental pieces that still read crisp at year five are usually the ones planned around placement, spacing, and saturation. Longevity, touch-up frequency, and how the design sits under different clothing matter more than the initial wow. Read on for practical ornamental ideas that consider aging, pain, and what to ask your artist so the piece still reads like you in three years.
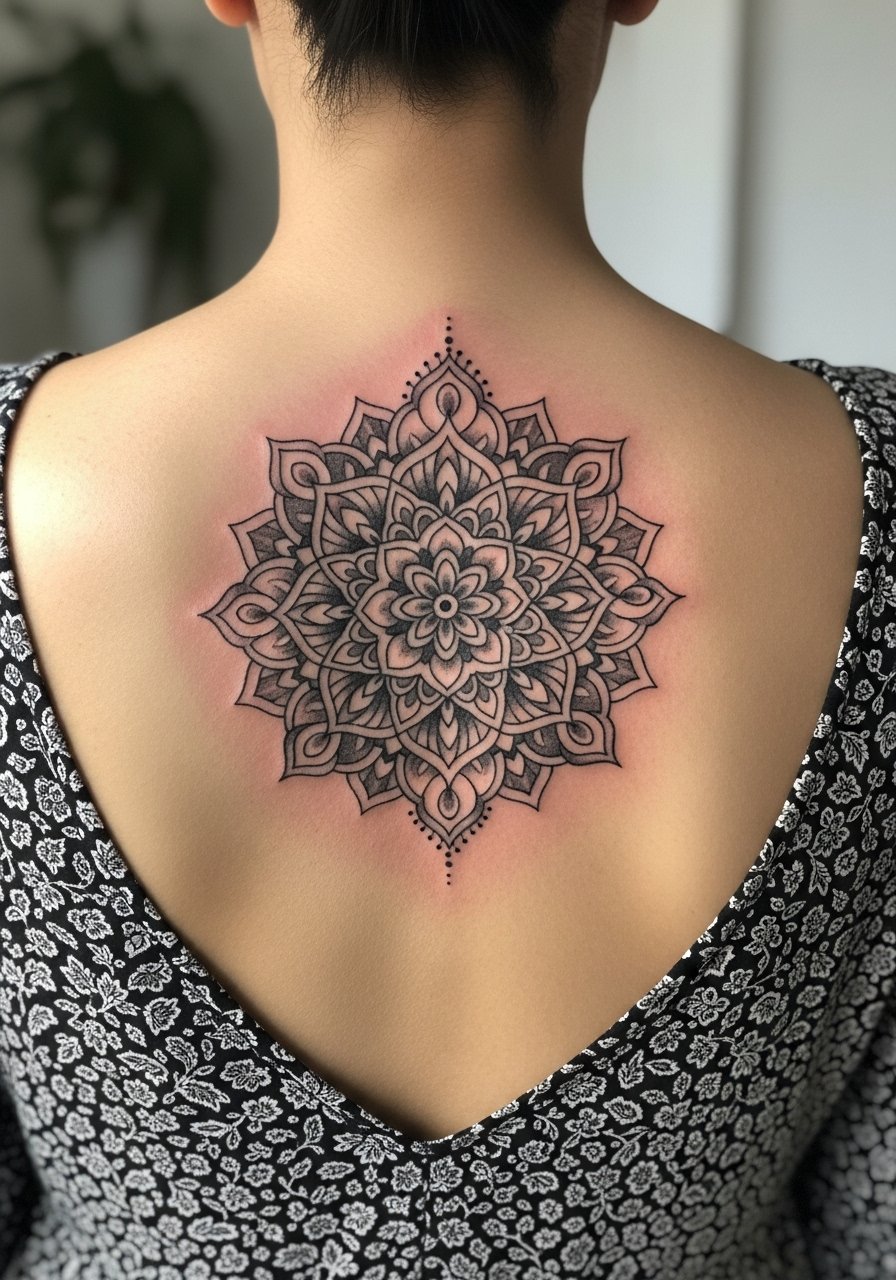
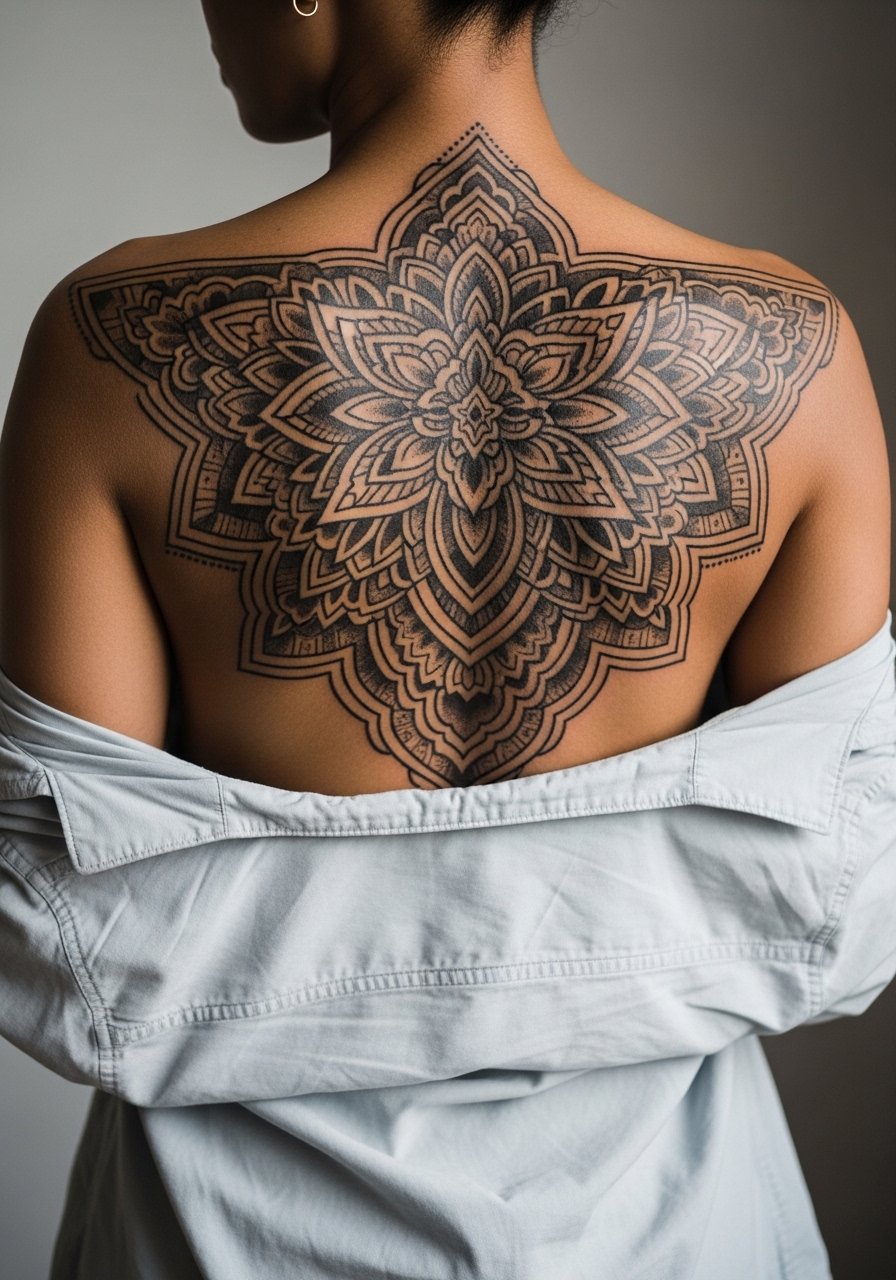
1. Upper Back Mandala Medallion
This symmetrical mandala works as a central ornamental anchor that carries dark shading without becoming a muddy patch. I recommend this over tiny mandalas because the negative space keeps stipple shading readable as the years pass. Tell your artist you want stronger saturation in the core and more breathing room between petals so the dense areas do not merge. Expect a medium pain level on the upper back and a multi-hour session for a mid-sized piece. Common mistakes include packing tiny petals too close together, which ages into a blur and triggers early touch-ups. For showing it off, pair the piece with open-back dresses or tops that reveal the upper spine so the central medallion sits in the visual frame.
2. Forearm Ornamental Sleeve Panel
A dark ornamental panel along the outer forearm gives the illusion of a sleeve without committing to full coverage. I steer people to this when they want a high-impact look but prefer shorter sessions. Ask your artist for varied lineweight and whip shading to hold across healing. The forearm tolerates saturation well, but watch for blowout near the wrist where skin is thinner. Session time is often split across two visits to manage swelling. One common mistake is asking for too many tiny details in a narrow band, which blurs into smudge after two to three years. For everyday wear, roll up sleeves or choose a linen shirt that frames the forearm without covering the art.

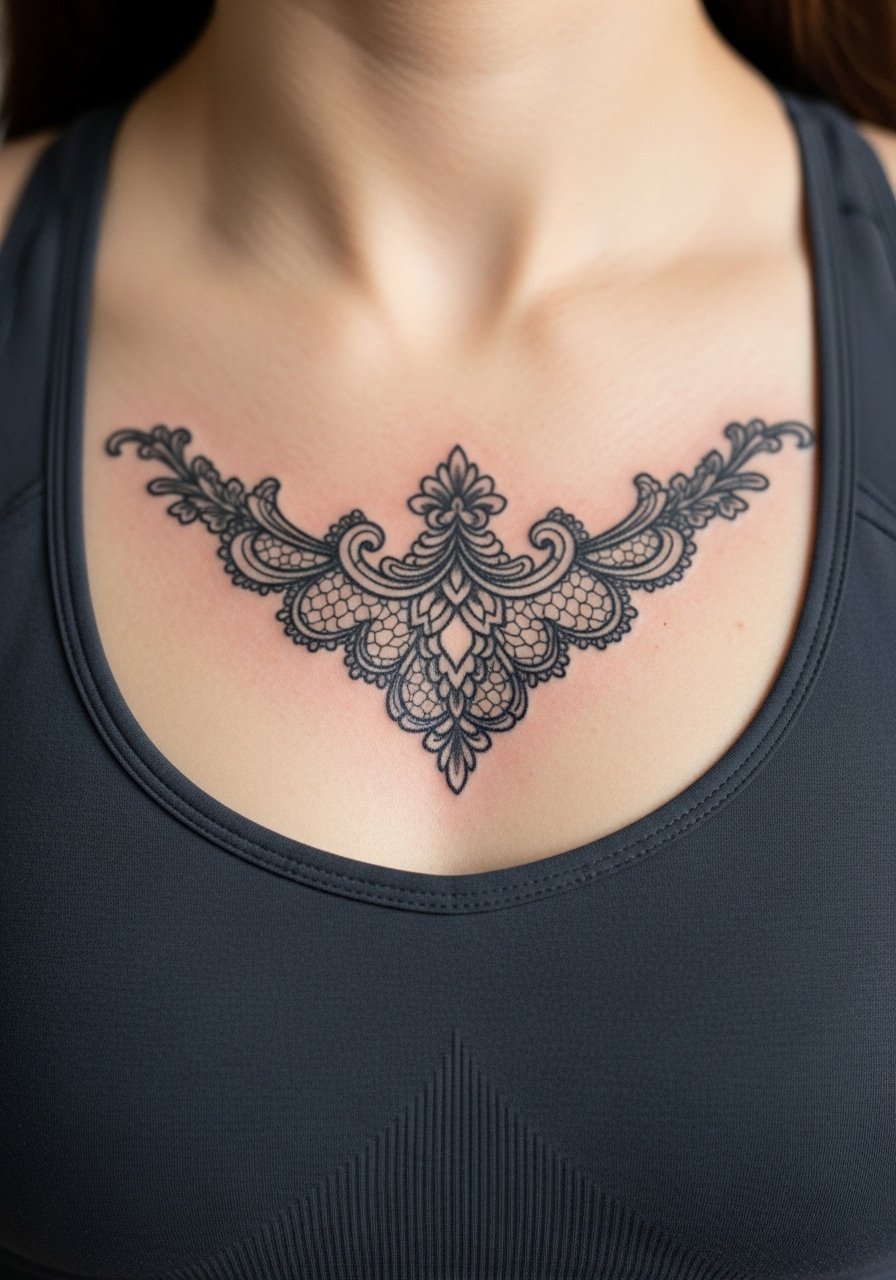
3. Collarbone Filigree Accent
A filigree design that sits along the collarbone reads like jewelry and pairs well with darker saturation to keep contrast as it ages. For this placement, tell your artist to keep the heaviest saturation slightly away from the thinest skin closest to the bone so the edges stay crisp. Pain is usually moderate near the collarbone and a single session can cover a compact area. The common mistake is putting ultra fine detail right on the bony edge, which can blur or feel patchy after healing. For outfits, a wide-neck shirt pulled slightly aside flatters the curve and keeps attention on the filigree without exposing too much skin.

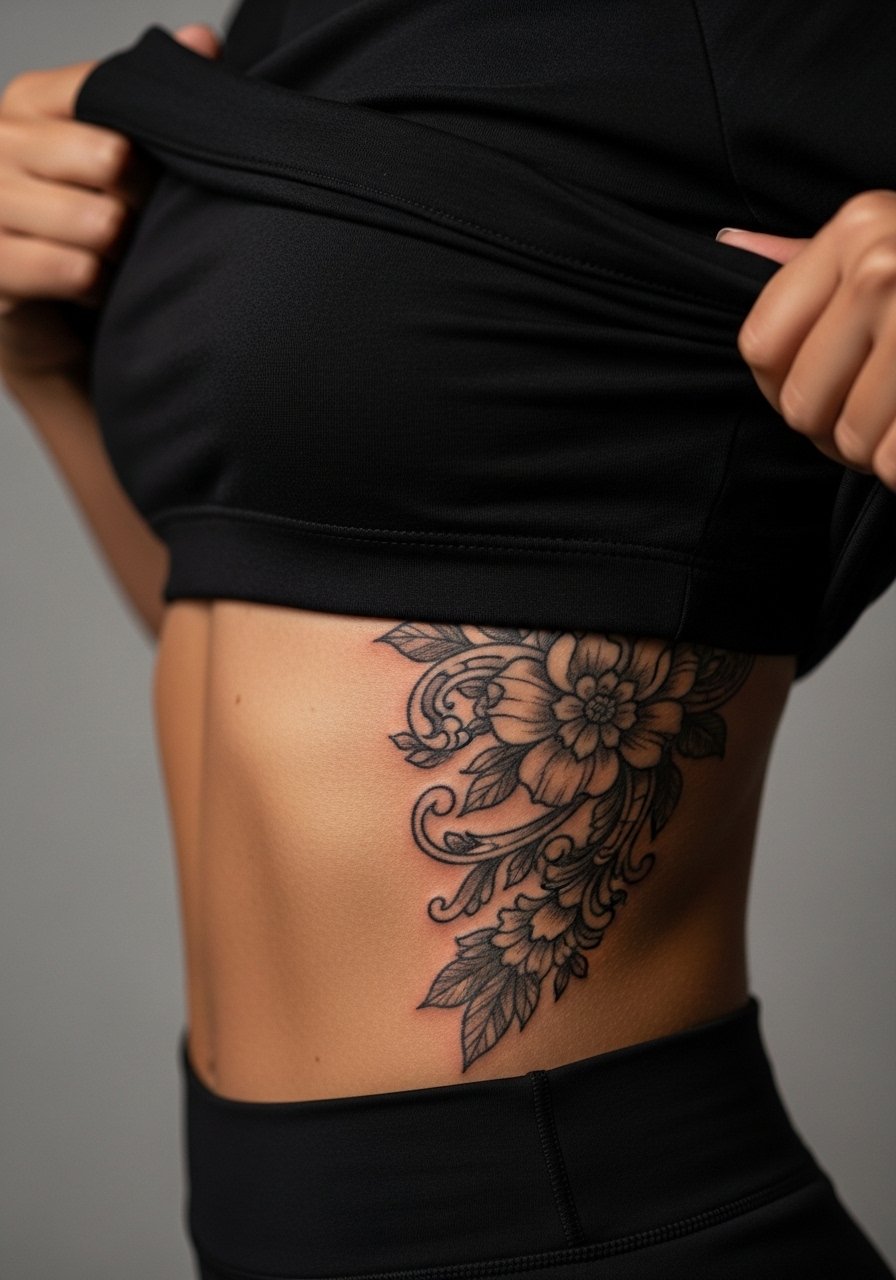
4. Ribcage Dark Floral Panel
Ribcage ornamentals carry a lot of movement and drama, and they age differently than arm work. Artists are split on fine line here. One camp says the skin stretch blurs lines within two years. The other camp argues that with proper depth and spacing, fine line settles fine on ribs. Ask your artist how they handle needle depth for ribs and consider slightly increased spacing in dense areas. Expect higher pain and longer sessions because of the placement. The typical mistake is scaling a piece too small on the ribs. At six months fine lines may still read sharp, but by year three dense clusters often need a touch-up. Because this sits under clothing often, plan session-day wear like a cropped top so the artist can access the side torso easily.
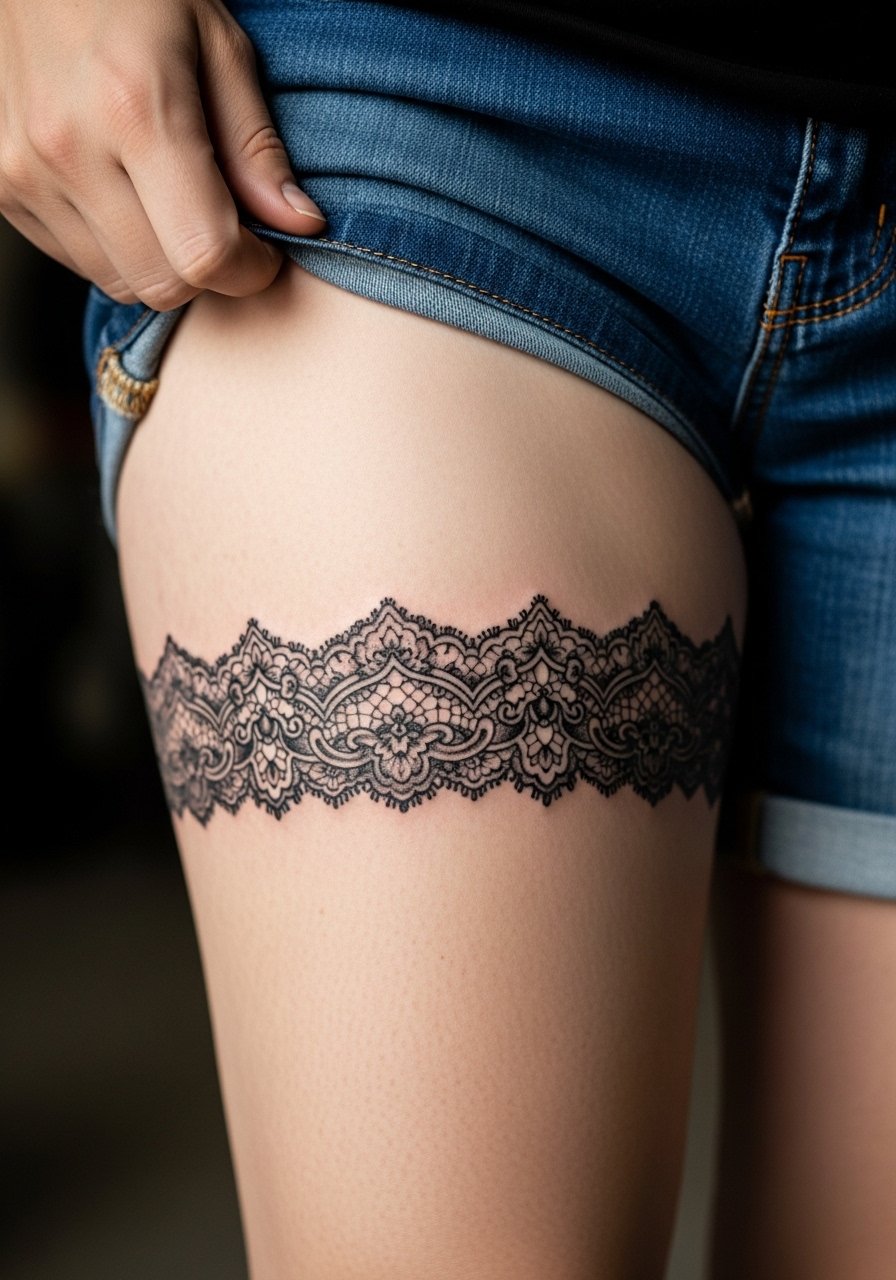
5. Inner Thigh Lace Band
An ornamental lace band on the inner thigh reads intimate and ornamental, and it heals differently than outer-leg work. Pain varies but many find the inner thigh more sensitive. Tell your artist to avoid ultra-fine interior filigree and instead use stipple shading to suggest texture without tiny lines that can blur. The design is forgiving if you give the pattern room to breathe. Wear loose shorts or high waisted swim bottoms to the appointment so the artist can access the area without pressure from tight seams. Common mistakes include asking for lace so detailed it becomes a gray patch after a year. Expect a touch-up window around year two for crispness.
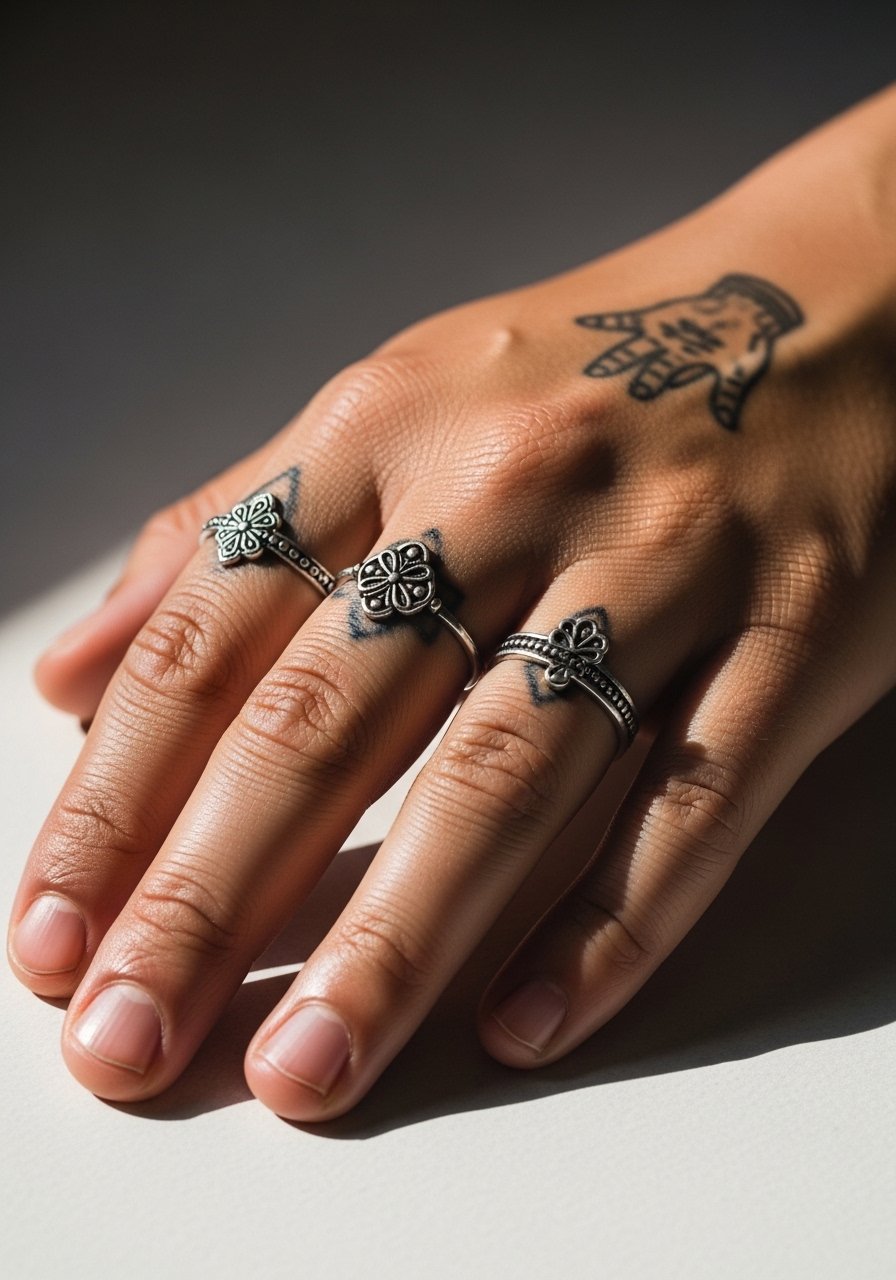
6. Finger and Hand Ornamental Rings
Tiny ornamental rings and hand motifs read like permanent jewelry, but they require planning for friction and fast fading. Fair warning: hands are high-friction zones and the pigment sits closer to the surface, which can cause early loss of saturation. Ask for slightly bolder linework than you think you need and plan for touch-ups at year one or two. A common mistake is requesting ultra-fine single-needle detail on fingers, which often softens within months. Session time is short for small pieces, but healing involves regular washing and motion. Style the look with actual jewelry, such as stackable rings, which frame the tattoos and make the handshake moment intentional.
Studio Day Picks
The hand, finger, and inner thigh pieces above demand specific prep and gentle first-week care, so a few items smooth the chair day and the first wash.
-
Transfer stencil paper kit. Lets you preview the linework on skin before commitment, especially useful for the mandala and filigree pieces.
-
Topical numbing cream. Applied as directed eases the sharp moments on the ribs and inner thigh without altering the artist's work.
-
Thin protective film roll. Useful for wrist, finger, and hand pieces that face constant washing and friction during the first week.
-
Fragrance-free gentle body wash. Cleanses healing linework without stripping the subtle stipple shading that keeps ornamental bands readable.
-
Aquaphor healing ointment. A thin layer in the first days helps retain moisture without clogging tiny channels in delicate linework.
7. Sternum Lace Motif
A sternum ornamental sits between structure and vulnerability, and the right composition echoes the rib flow without crowding the center. For this area, ask for wider spacing in dense lace to reduce the chance of merging as swelling subsides. Pain is higher and sessions can be interrupted for breaks. One mistake is pushing tiny micro details into the sternum base where motion and sweat accelerate fading. Because of sensitivity, come in wearing a fitted sports bra that reveals only the center so the artist can work without you adjusting clothing constantly. Some people reserve this placement for pieces that matter most because touch-ups are often needed after a year of regular movement and friction.
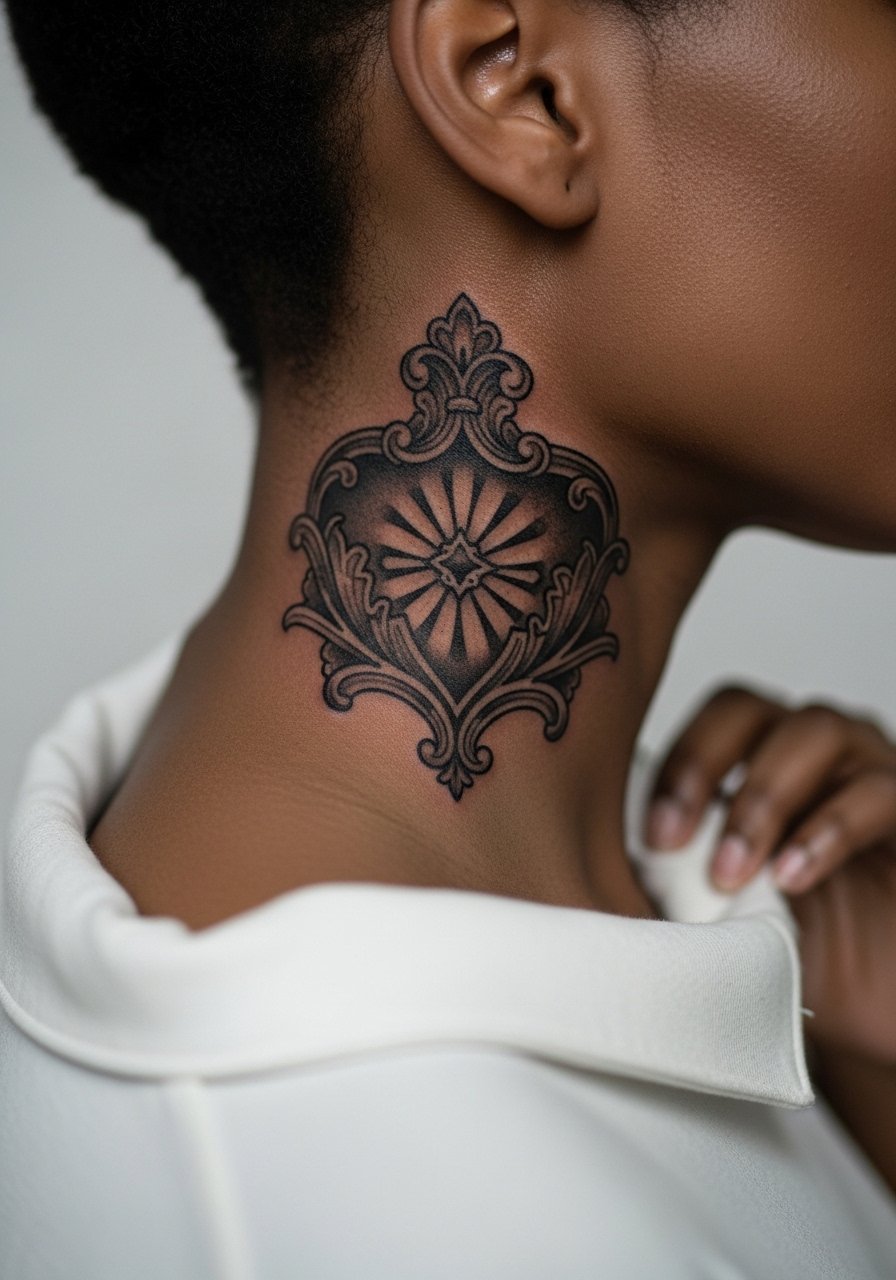
8. Nape Ornamental Crest
A small vertical crest at the nape reads elegant and can be hidden or revealed easily. The nape tolerates medium saturation but the thin skin and constant motion from collars mean planning matters. Tell your artist to anchor the design slightly lower on the neck fold so it settles into a steady plane rather than riding the hairline. Pain is usually moderate and sessions are short. For showing it off, a thin chain pendant necklace sits above the crest without competing for attention. If you work in conservative settings, know a subtle neck piece can still affect first impressions, so factor career into the decision.
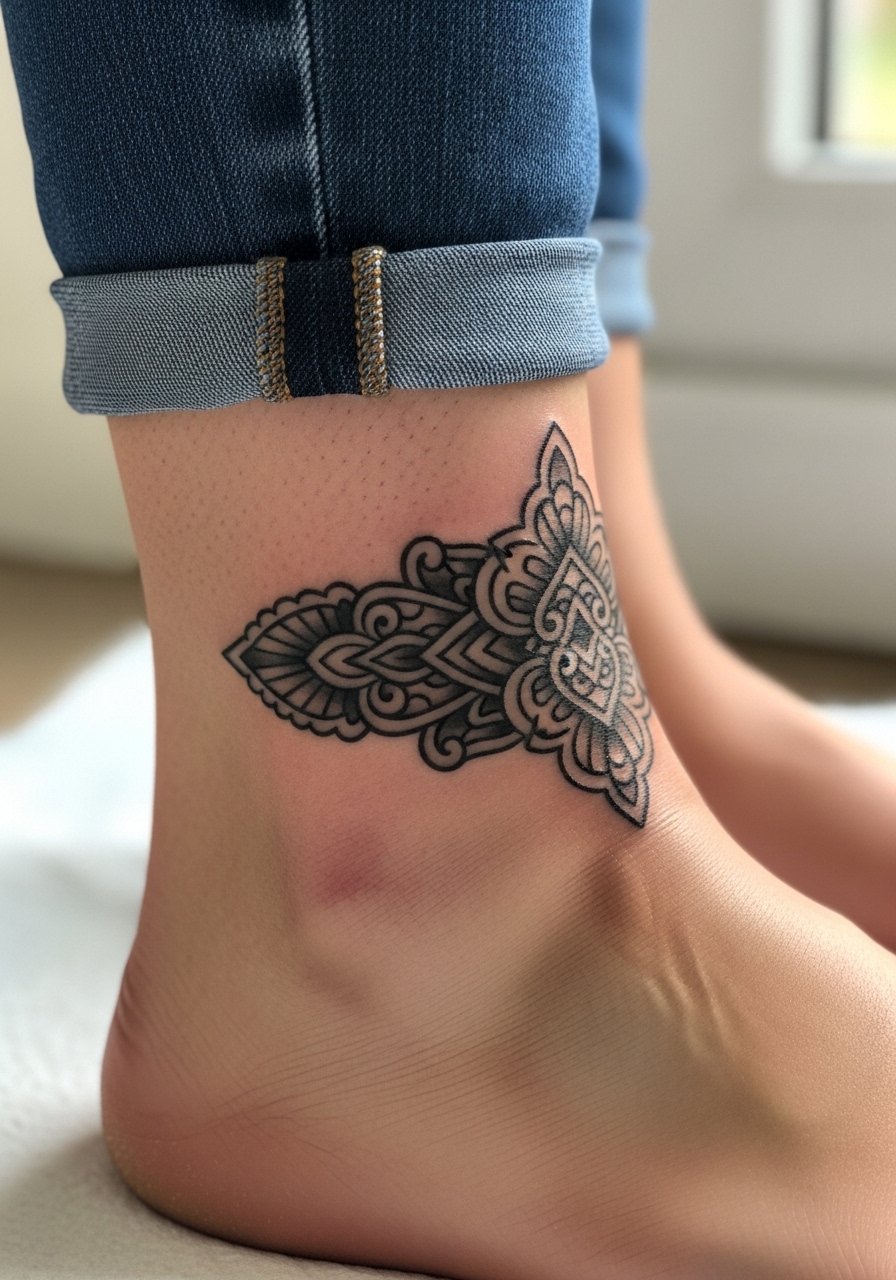
9. Ankle Ornamental Cuff
An ornamental cuff around the ankle is a small canvas with surprising visual weight. The ankle sees lots of rubbing from shoes and socks, so ask your artist to plan for a slightly bolder outline and heavier saturation at the outer edges. Session time is short, but healing involves frequent friction. A mistake is packing tight dot work that disappears under daily wear. For footwear that frames the cuff, try ankle strap sandals or rolled pants to keep the design visible without constant abrasion. Expect a touch-up at around one year for crispness if you wear closed shoes daily.
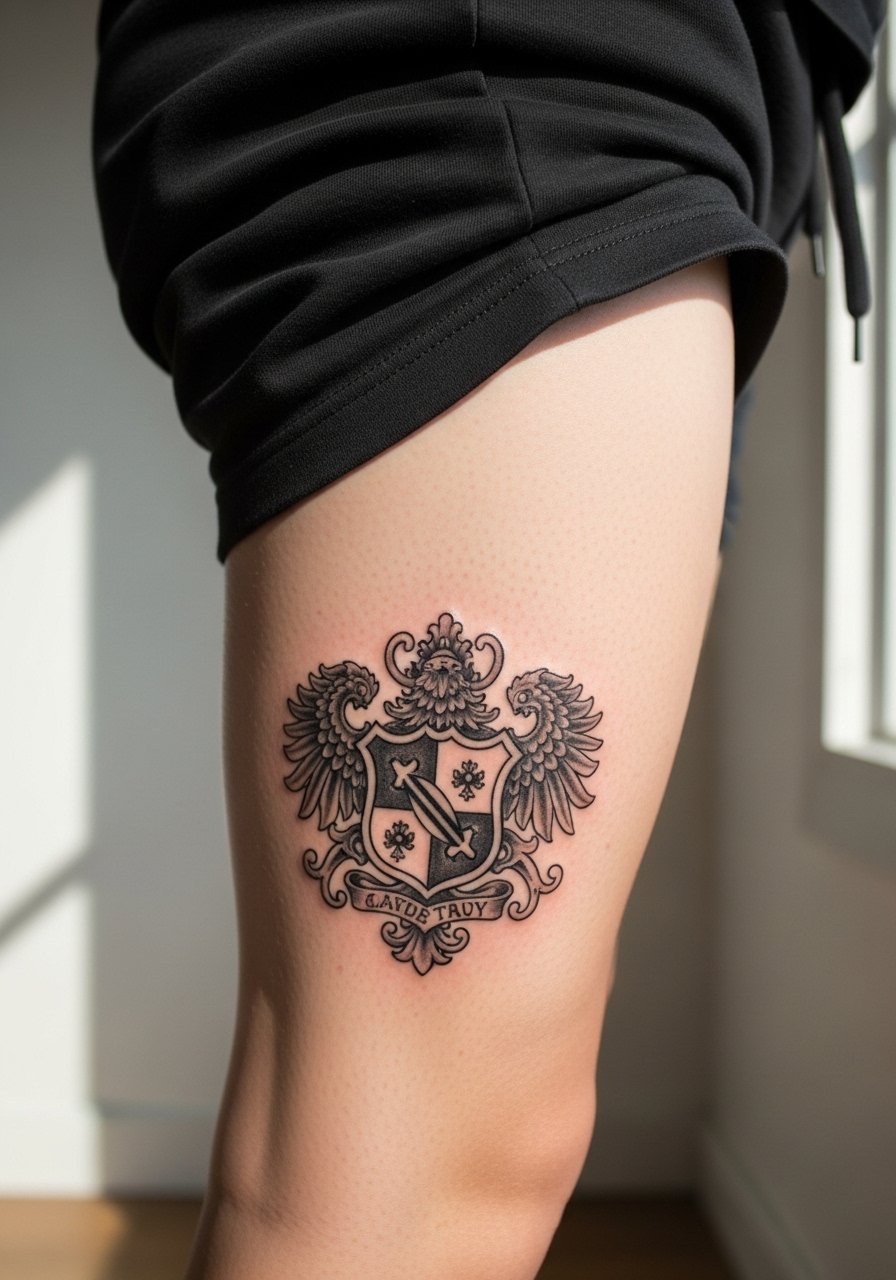
10. Calf Heraldic Crest
A vertical heraldic crest or ornamental shield on the calf gives room for dark contrast and layered shading. Calf skin holds saturation well and the area tolerates longer sessions. Ask for heavy core saturation with softer stipple at the edges so the piece reads from across a room without forming a dense gray block up close. Common mistakes include making the crest too narrow, which shortens the visual impact and increases blowout risk along the shin. For the session, wear loose athletic shorts so the artist can access the area without fabric pressure. A touch-up may be helpful at year two depending on sun exposure.
11. Inner Forearm Ornamental Band
The inner forearm is ideal for ornamental bands that follow the arm's subtleties and age predictably. I prefer stipple and whip shading here because it keeps heavy contrast without making the band feel flat. Tell your artist to space ornamental motifs so breathers appear between dense motifs, which reduces the chance of merging after two to three years. Pain is usually lower than ribs, and a single session can handle a full band. Common mistakes are tiny, tightly packed motifs that need early touch-ups. For daily style, rolled-up sleeves or a button-down shirt lets the inner forearm be visible without competing with bracelets.

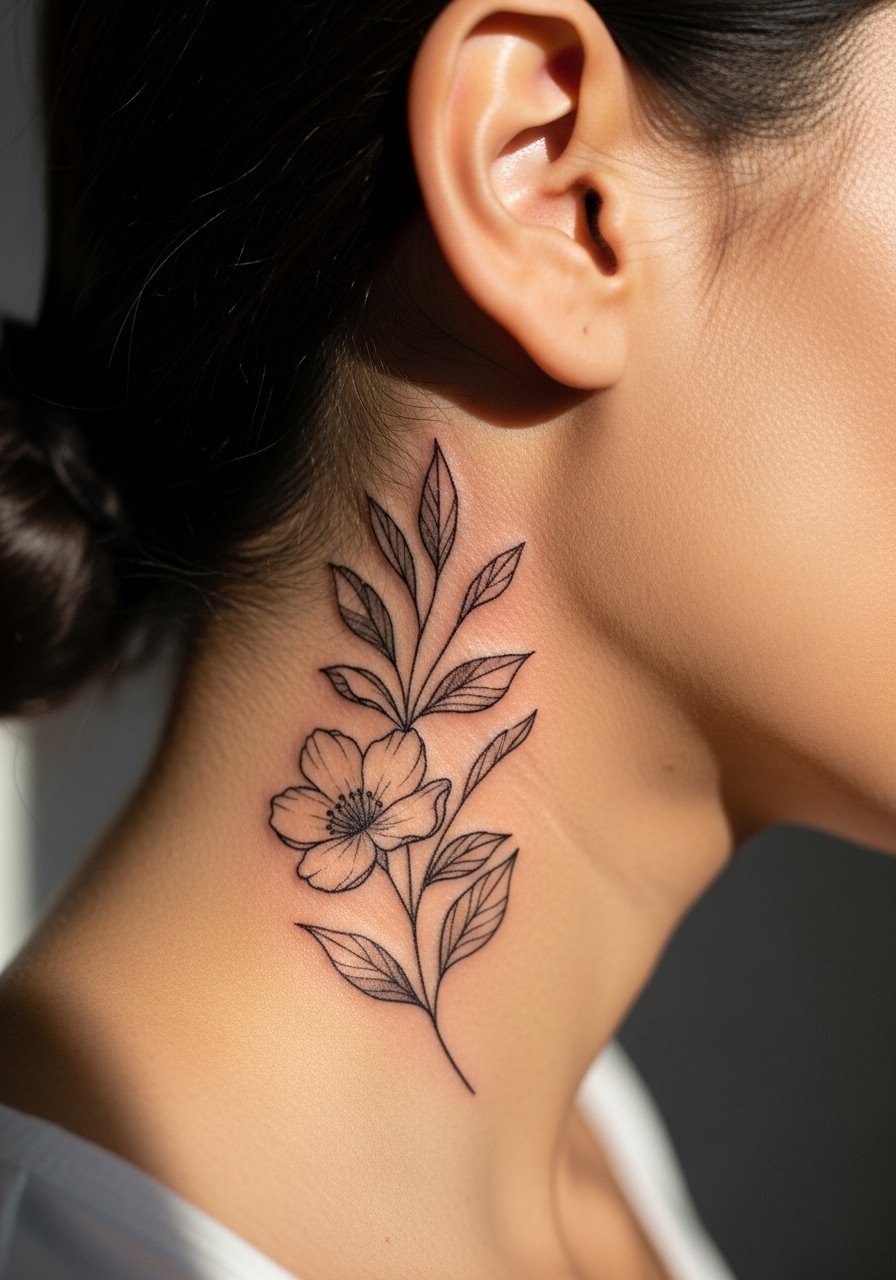
12. Behind-the-Ear Mini Ornament
A tiny ornamental motif just behind the ear reads discreet and playful, and it requires special framing in the stencil stage. For image prompts and photos describe this as on the skin behind the ear below the hairline on the neck. Expect low session time but note the area heals with frequent hair contact. Tell the artist to keep the motif bold enough to survive pillow and hair friction. A common mistake is requesting ultra-fine detail that does not hold up when hair rubs the area. For professional settings, even a small neck-adjacent tattoo can alter perceptions, so weigh visibility against intent.
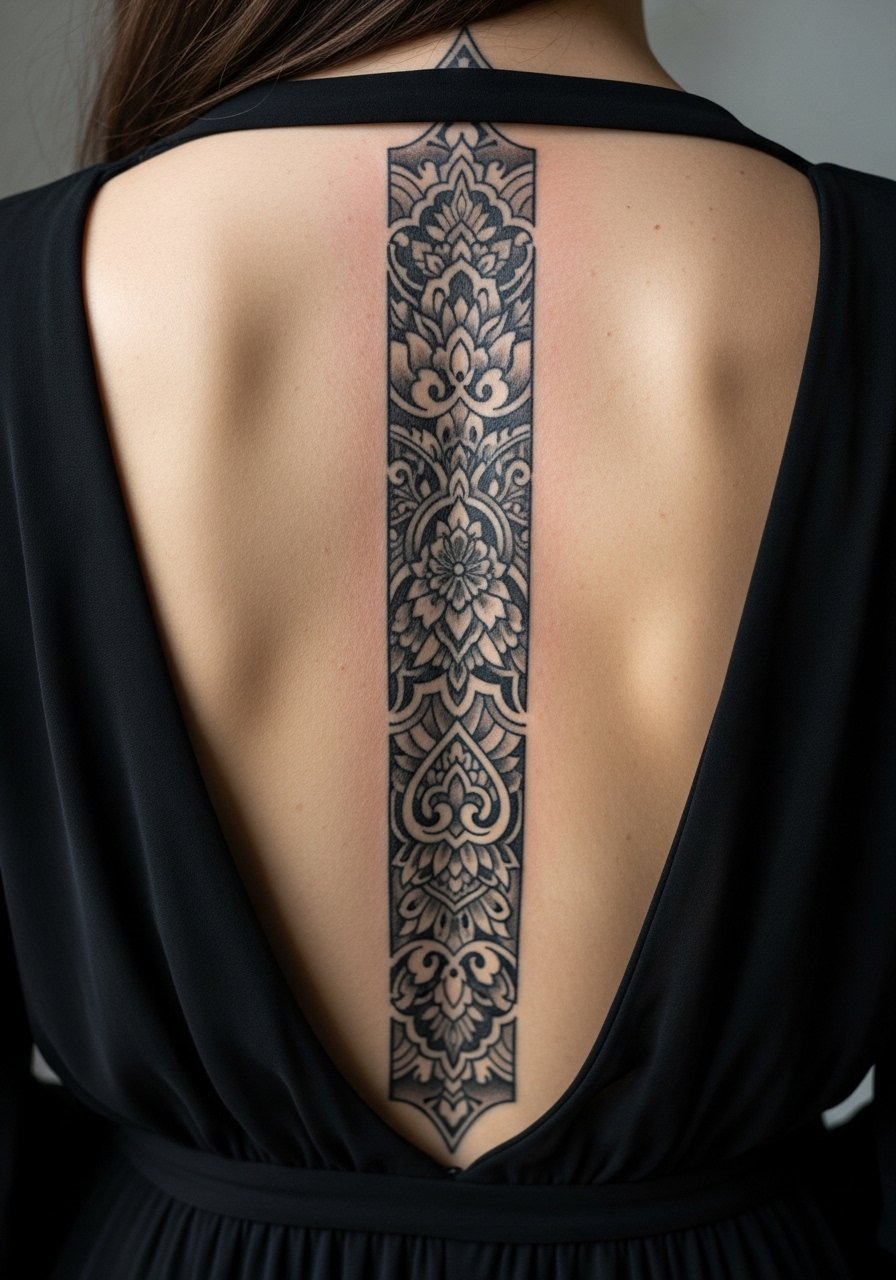
13. Spine Ornamental Vertical Panel
A vertical ornamental panel down the spine lets you use the body's natural line to emphasize symmetry and movement. This placement tolerates dense blackwork as long as negative space is used to prevent a single dark block. Tell your artist to stagger dense motifs so the strip keeps texture across time. Pain is variable along the spinal line and sessions are often broken into multiple passes. A common mistake is compressing the design too tightly, which causes lines to merge after healing. For evening wear, an open-back dress frames the vertical panel beautifully and keeps the work visible without full exposure.
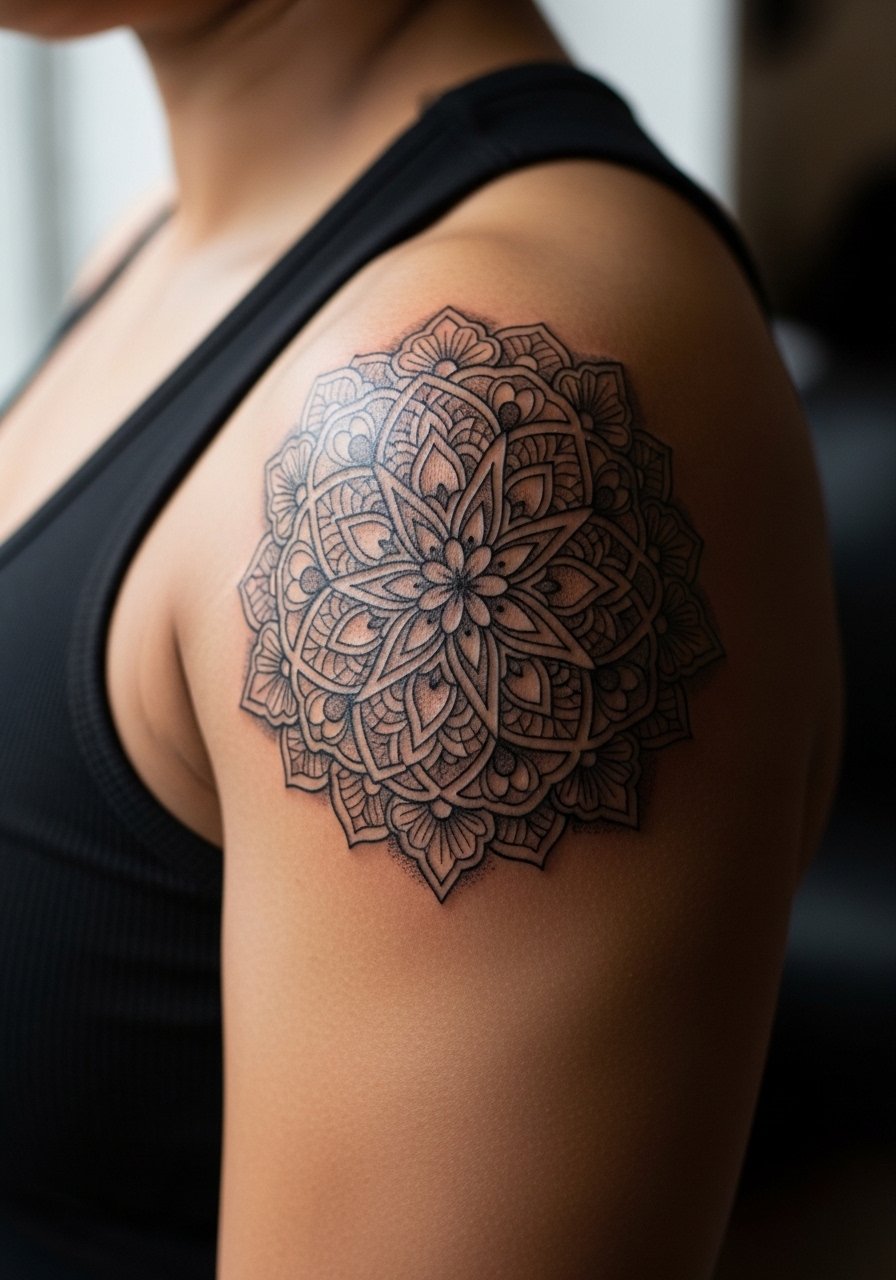
14. Shoulder Cap Ornamental Medallion
A shoulder medallion sits well for people who want a standout focal point that can expand into a sleeve later. The shoulder holds saturation and tolerates bold black fills with layered stipple. Ask for a defined outer border and graduated shading inward so the medallion does not read as a flat blob as it ages. Session time is moderate and pain is generally manageable. Mistakes include putting too many micro details at the edge where movement can soften them. For casual looks, a tank top displays the cap while keeping the piece framed.
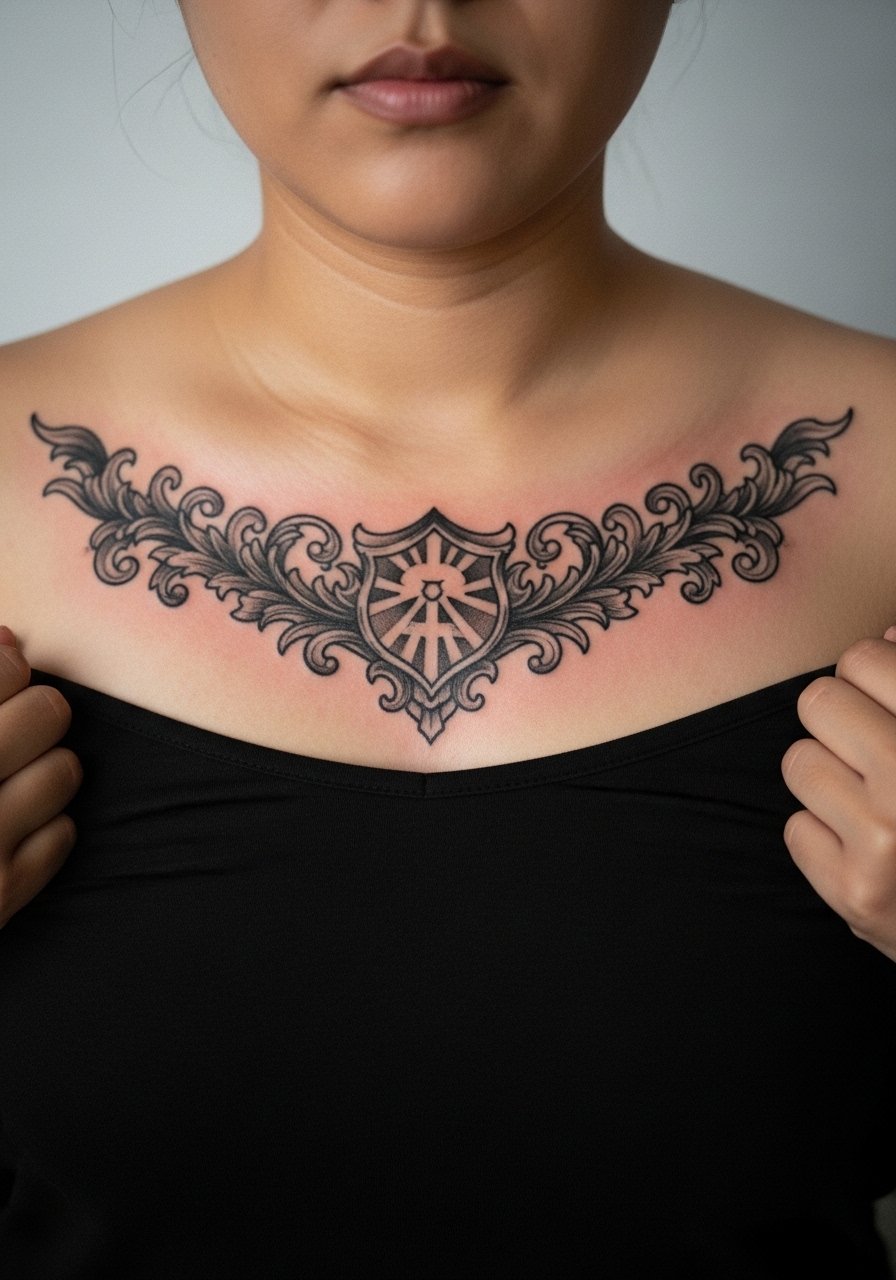
15. Upper Chest Symmetrical Crest
A symmetrical ornamental crest across the upper chest balances with the collarbone and sternum when planned with spacing. For this area, ask the artist to anchor heavy black blocks away from the collarbone edges so the linework stays sharp. The pain is moderate and sessions can be divided for comfort. A common error is shrinking the piece too small for the chest plane, which loses the intended symmetry. Wear a wide-neck top to the appointment so the artist can work without tugging fabric across the area. Expect touch-ups as needed based on movement and sun exposure.
16. Hip Paisley Ornament
A hip ornament sits at the edge of visibility and works well as a single-sided ornamental accent. The hip tolerates dark shading but the curvature means the design needs to account for stretch. Tell your artist to test the stencil in motion so the paisley reads when you sit and when you stand. Session time is typically short, and common mistakes include placing too much tiny detail where the fabric waistband will rub. For the session, wear high waisted jeans or bottoms you can shift slightly so the artist accesses only the tattoo zone without exposing the rest of the torso.

17. Full Back Ornamental Panel
A full back ornamental panel is a commitment and a canvas for layered black and grey contrast that can age gracefully if planned with negative space. This is best if you want a long-term project that can be shaded and built over multiple sessions. Tell your artist you want progressive saturation with regular breaks so swelling does not force overworking. Bigger mistakes happen when people try to cram too many styles into one panel and the result reads confused years later. Sessions are long and recovery is involved. For casual coverage while healing, loose button-downs and layered tops help when moving in public without exposing the full panel.
Frequently Asked Questions
Q: How often will ornamental black and grey work need touch-ups?
A: It depends on placement and daily wear. High-friction zones like hands and ankles often need touch-ups around year one, while forearms and calves can go longer, sometimes three to five years. Expect a touch-up sooner if you spend lots of time in the sun or if the design has very tight detail.
Q: Are fine ornamental details a bad idea on ribs and sternum?
A: Artists are split into two camps. One camp says thin, dense linework blurs quickly on the ribs and sternum because of skin stretch and movement. The other camp says with careful depth and spacing those areas can hold fine detail. Ask your artist which approach they use and consider slightly increased spacing if you want longer-term clarity.
Q: What should I wear to the studio for a shoulder or upper chest session?
A: Wear something loose you can shift without fully undressing. A button-down shirt or a wide-neck top works well because the artist needs clear access while you stay covered and comfortable.
Q: How does black and grey ornamental shading age compared with bold blackwork?
A: Heavier saturation tends to hold visual weight longer. Ornamental pieces that balance heavier cores with airy negative space usually age better than uniformly dense shading. Expect stipple and whip shading to soften over time but remain textural if planned properly.
Q: Do hand and finger ornamentals affect job prospects?
A: Small hand or finger pieces still carry real-world consequences in some industries. If your job or career path involves strict visibility policies, consider placement that can be covered or discuss removable jewelry options to minimize exposure.
