
The tattoos that still read clean at year five are rarely the tiny, hyper-detailed pieces that get the most likes on day one. Bold line work, smart placement, and a clear conversation with your artist beat a pretty photo when longevity matters. If you worry about fading on darker skin, booking drama, or how a leg piece will stretch with muscle gain, this list gives practical options and what to ask at the consultation.
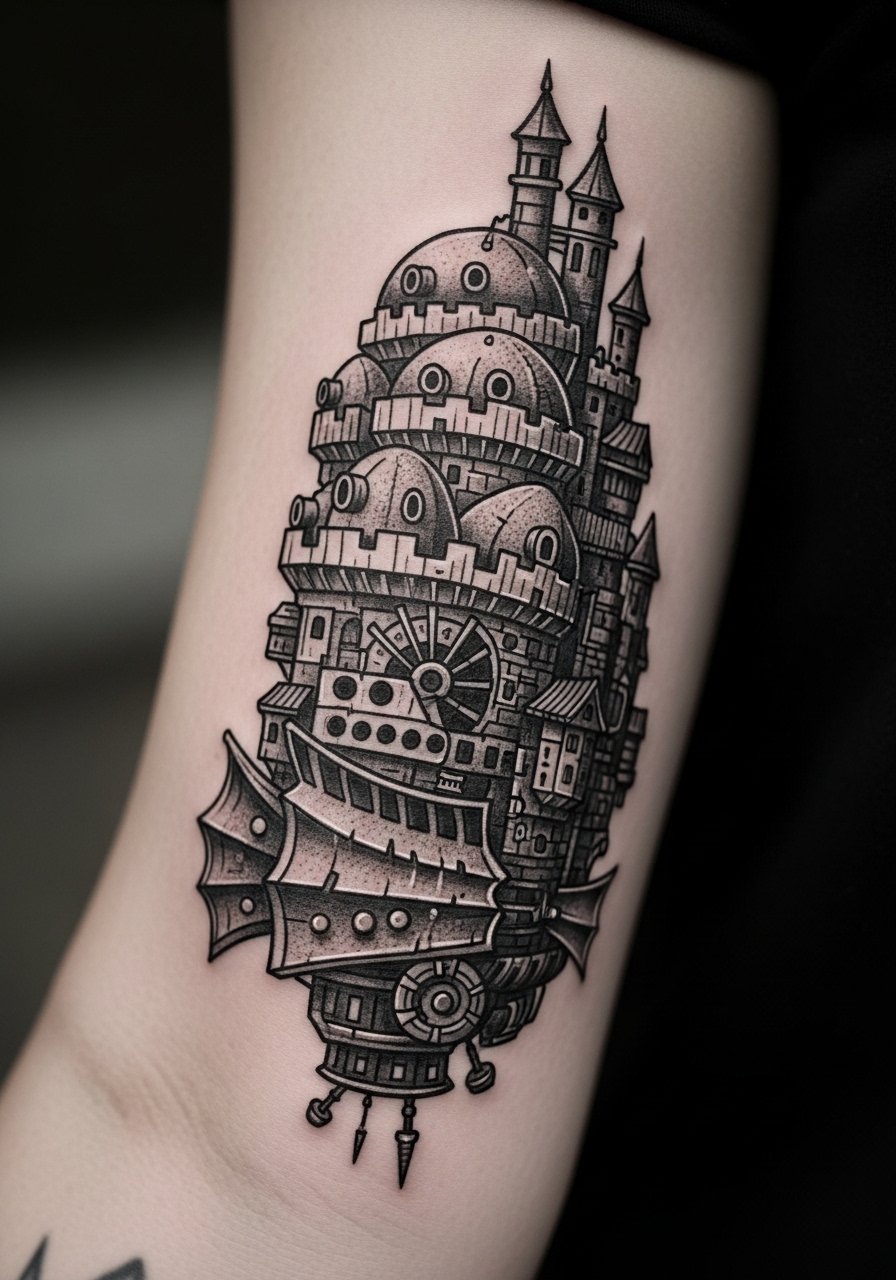
1. Bold Neo-Traditional Howl Silhouette with Fiery Accents on Upper Arm

This is the go-to when you want a design that still reads in photos after two summers. I've seen neo-traditional saturation hold better than watercolor on the upper arm because the bold outlines and packed color resist blowout and sun fade. Tell your artist you want heavy outlines and dense saturation around the chimney and flames, and ask for a 6-8 inch sketch so the legs and gears have room. Pain ranks medium on most charts and expect two sessions for color depth. Common mistake is shrinking the castle too small, which makes the gear details bleed at year three. For showing it off, pair with a black fitted tank top and a leather arm cuff so the silhouette sits against a neutral backdrop.
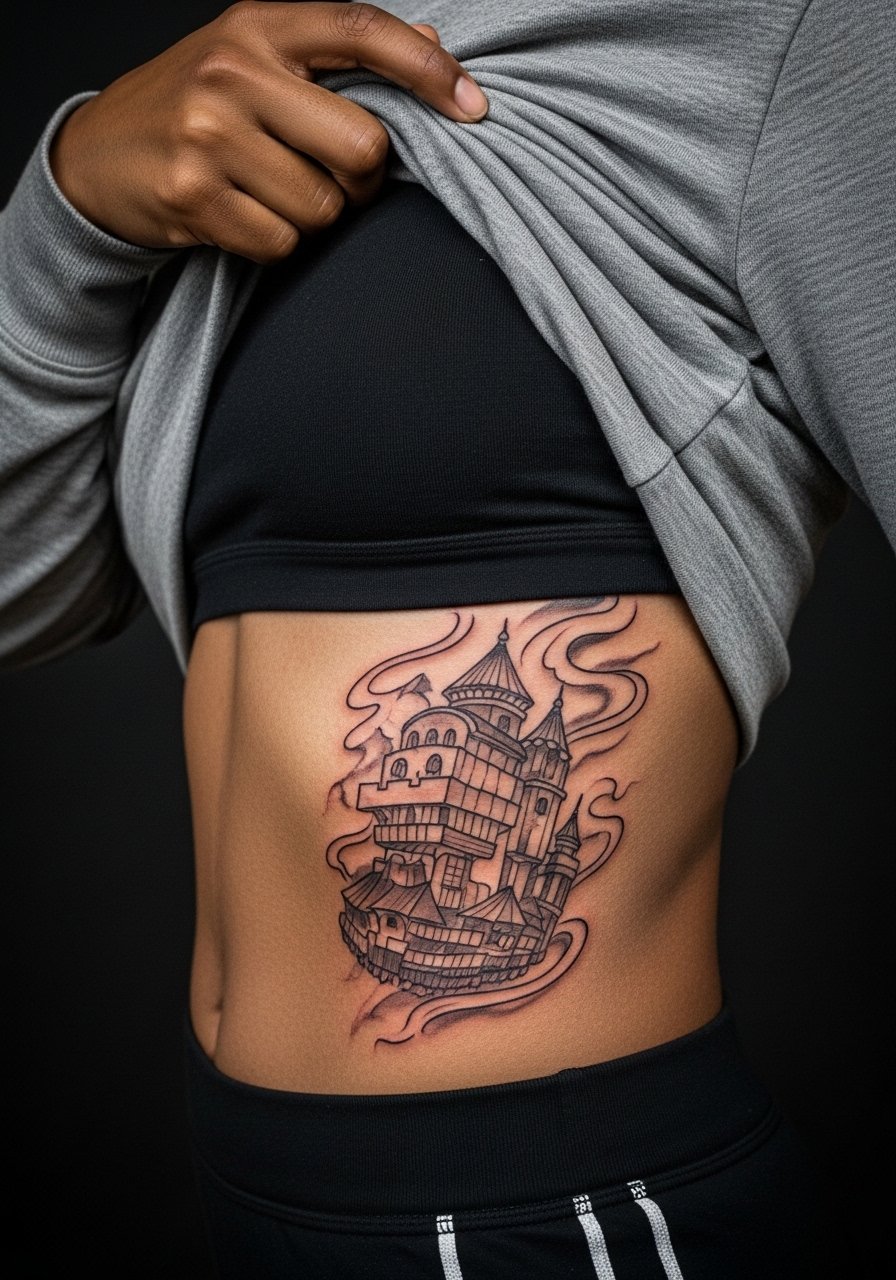
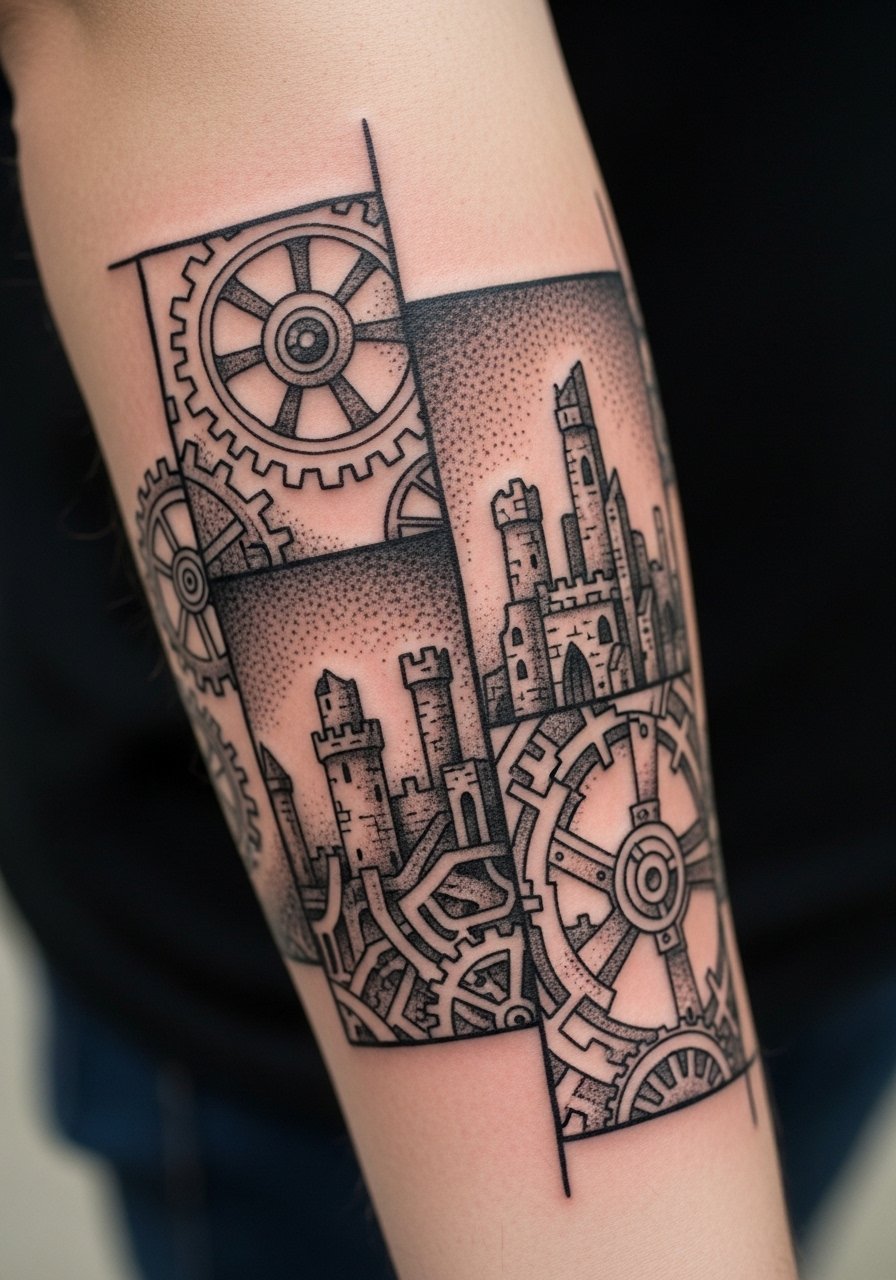
2. Gear-Heavy Blackwork Castle on Outer Forearm
This one suits fans who prefer stark engineering over color. On the forearm the linework shows clearly from across a room and lets you build a modular sleeve later. In consultation, specify negative space for gear teeth and tell the artist you want stipple shading rather than soft gradients to preserve contrast. Expect three shorter sessions rather than one marathon. Forearm blowout risk is low with proper line spacing, but avoid cramming tiny cogs. For day-of comfort and a smart reveal, roll up a charcoal button down shirt so the artist can access the outer forearm without tugging.
3. Roof-Color Illustrative Castle on Shoulder Cap
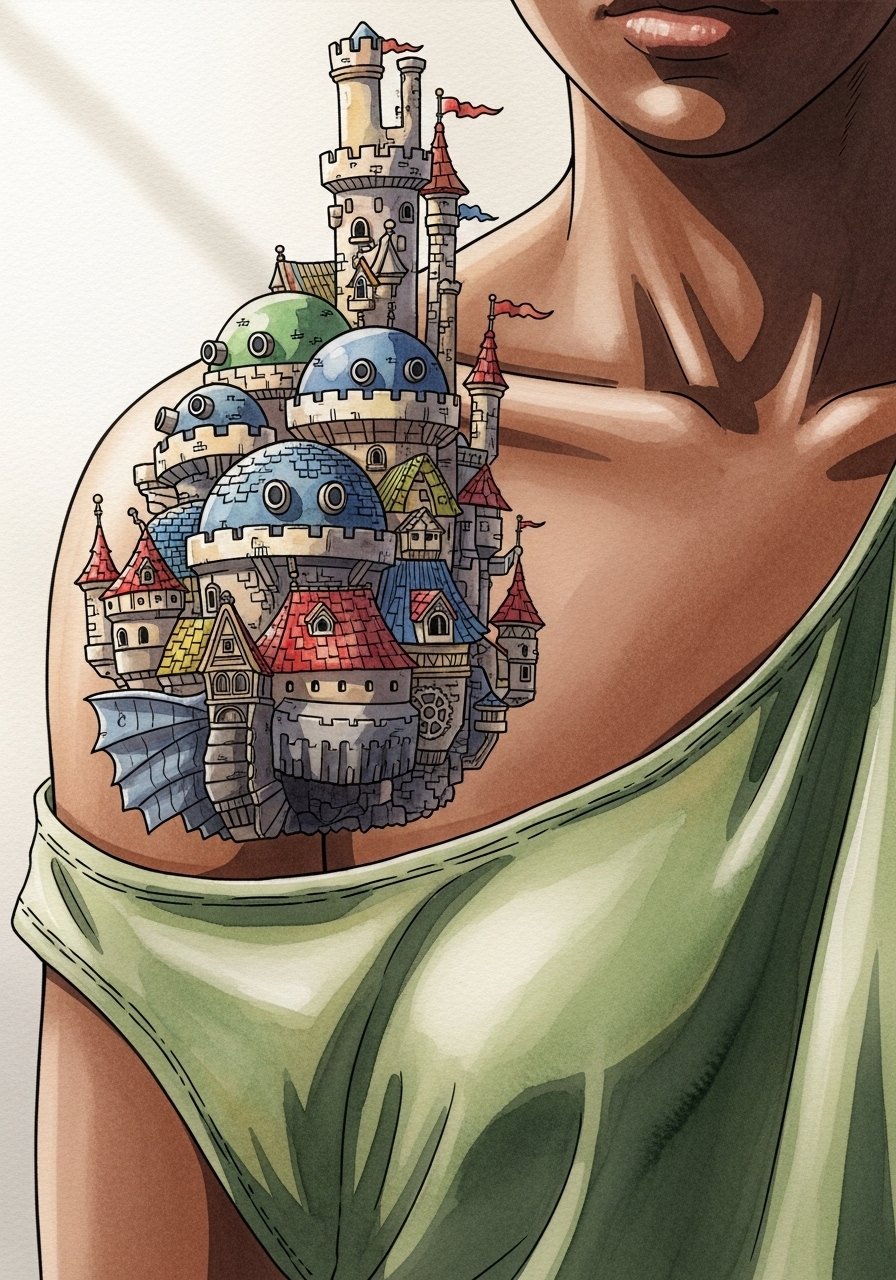
If you want a painterly palette without committing to a full back piece, place a vibrant illustrative castle on the shoulder. The shoulder handles color well during healing because it moves less than the chest or ribs. Ask the artist for slightly thicker outlines around the roof tiles to protect color from softening over time. Sessions are short and usually done in one or two visits. A common error is a washed-out palette with no anchor lines, which looks muddy after one year. When you want to show it off, wear an off shoulder blouse that frames the roofline.
4. Fiery Howl Silhouette Integrated with Castle on Bicep
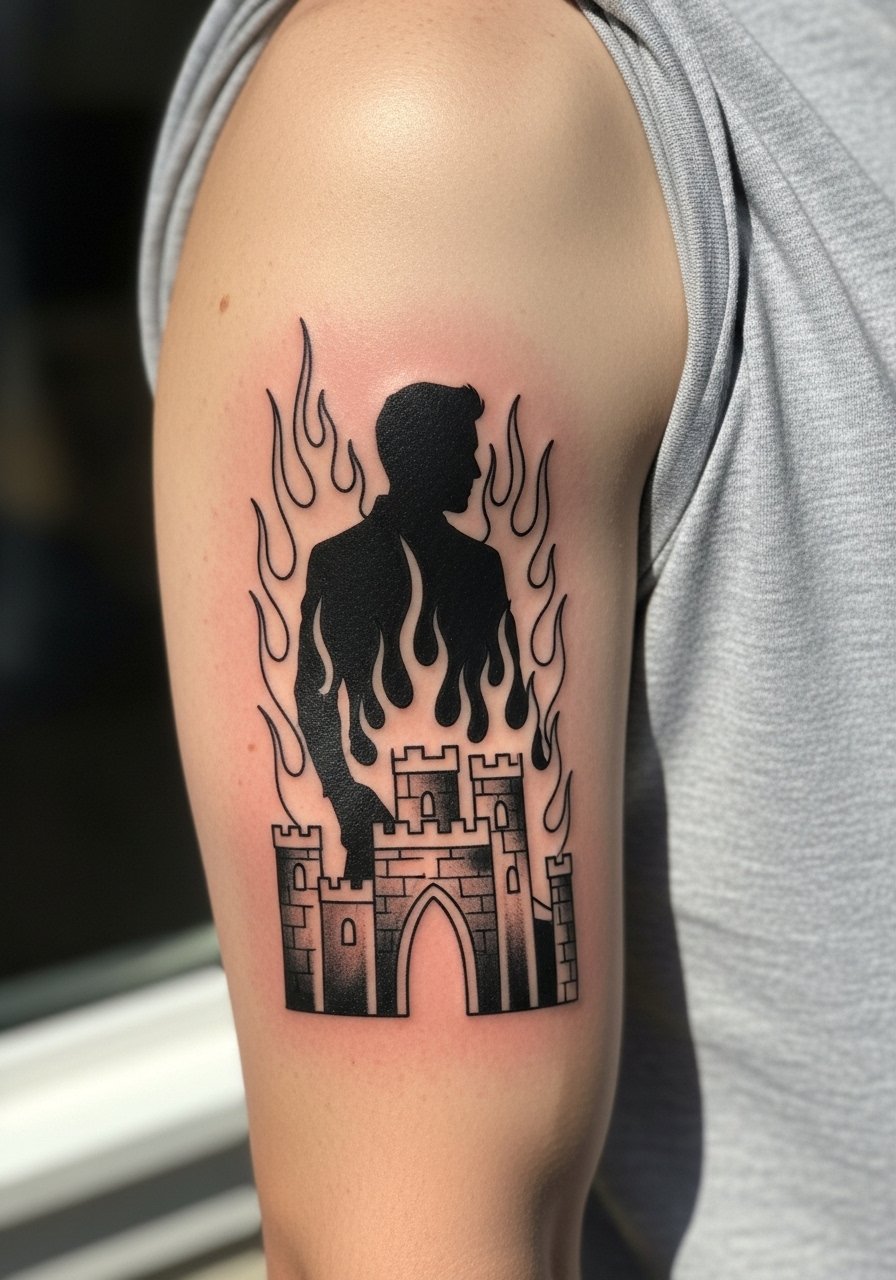
This compact combo reads as a bold character tribute without needing large real estate. The bicep is forgiving for saturation, but the big mistake is asking for too much facial detail at small size. In consultation say you want silhouette focus, not portrait realism. Expect medium pain and two sessions for crisp color and outlines. There is an ongoing split among artists about fine detail in small neo-traditional pieces. One camp says fine line will blur quickly and recommends thicker anchors. The other camp argues that precise needle control and correct depth allow finer detail to last. Ask the artist where they stand and request photos of healed work on similar placements.
5. Minimalist Outline Castle with Motion Lines on the Wrist

Wrist minis are great first-timers but they demand design breathing room. Fine line on the wrist will likely need a six- to twelve-month touch-up if the lines sit very close together. Tell your artist you want slightly reinforced outer lines to prevent early fading. Expect the wrist session to sting more than an upper arm piece, and keep session time under an hour for a three inch design. Avoid cramped gears or text here. For wearing after healing, a thin accent bracelet pairs nicely and does not compete with linework; try a thin leather bracelet during casual days.
6. Ornate Star-Tarot Castle on Thigh
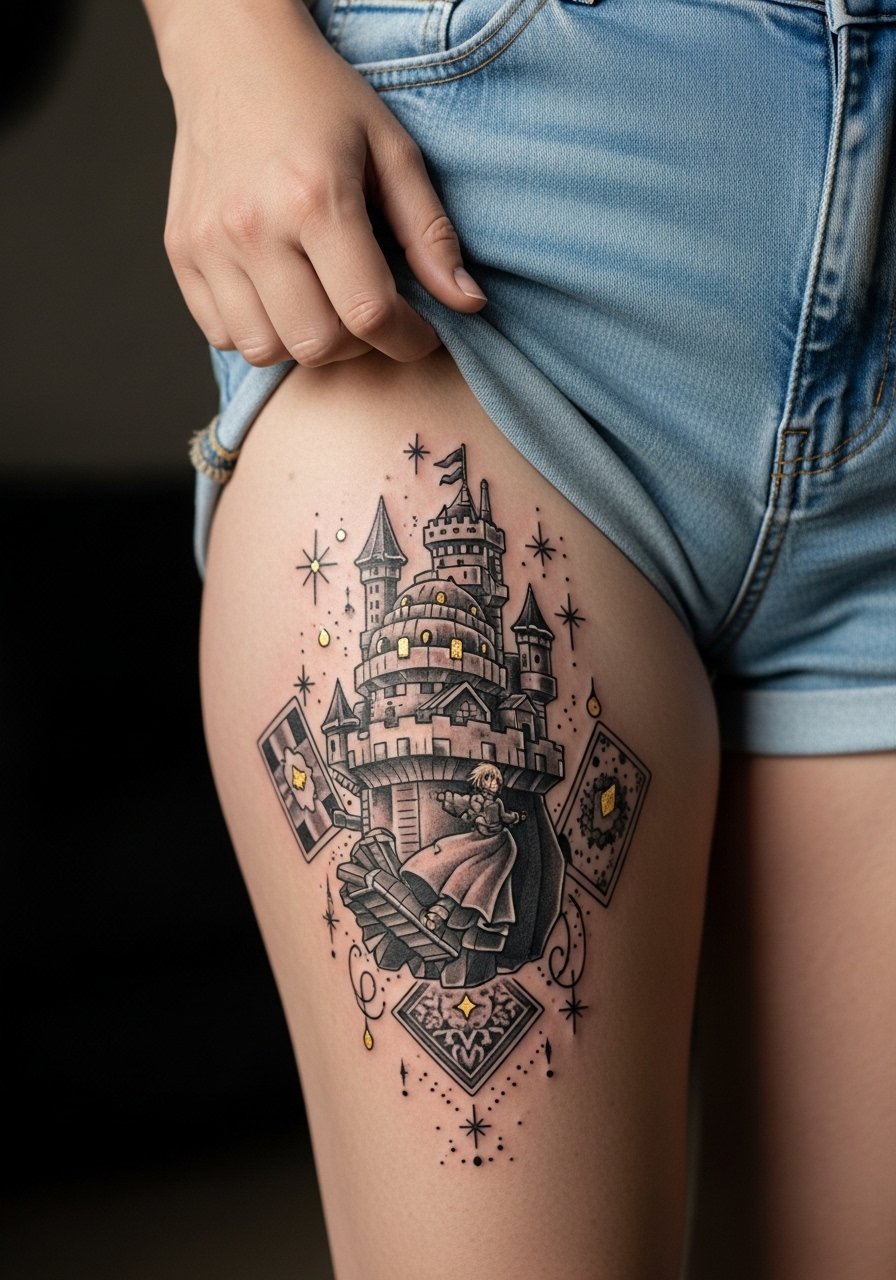
This is for collectors who want layered symbolism. Thigh tattoos give scale and hold ornamentation well because the skin is stable and large. When you book, bring tarot imagery that shows the motif placement and ask for subtle negative space so the stars do not crowd the castle. Sessions are longer and can be split into four appointments. A mistake is over-detailing the stars so they merge after healing. For summer reveals, high-waisted shorts frame the piece; consider wearing high waist athletic shorts the day you show it off.
Studio Day Picks
The wrist, forearm, and thigh designs above all have different session needs, so a few targeted prep items smooth the appointment and the first week.
-
Hustle Butter alternative balm. A less greasy option that fans report helps color-rich neo-traditional areas stay supple during early healing without heavy residue.
-
Tea Tree Tattoo Balm. Lightweight and good for dryer climates, which suits the fine line wrist piece and the detailed thigh work.
-
Australian no-peel aftercare spray. Spray formats reduce rubbing on delicate outer forearm linework and stop occlusive cling on ornate pieces.
-
Rice bran oil tattoo balm. Absorbs quickly for people wary of greasy finishes, useful for keeping shoulder and thigh color vibrant during warm months.
-
Aquaphor healing ointment. Thin application right after the shop helps protect small wrist lines from excessive crusting during the first two days.
7. Bold Line Castle Legs in Motion on the Calf
Calf pieces let you tell motion stories. The thicker legs and landscape wash read well from a distance and age predictably. Consult on flow so the legs do not align with muscle creases where stretch could warp the silhouette. Expect two sessions with time spent on saturation in shadowed areas. A frequent error is placing the legs too low on the calf where boots and socks rub constantly. For summer wear, roll up a pair of slim jogger pants so the motion reads in shorts season.
8. Micro-Realism Castle with Smoke Effects on the Ribcage
Ribcage micro-realism is striking but painful and higher risk for fine-line fading. Fair warning, the ribs are a top pain zone and micro-detail can blur if placed too small. Artists split on fine line there. One camp says the skin stretch causes merging within two years. The other camp says careful needle depth and spacing will keep detail longer. If you go for this, plan for three to five sessions and budget for a touch-up at six months. For the session, wear a cropped tank top that you can lift comfortably so access is clean.
9. Watercolor Castle Wash Across Upper Back
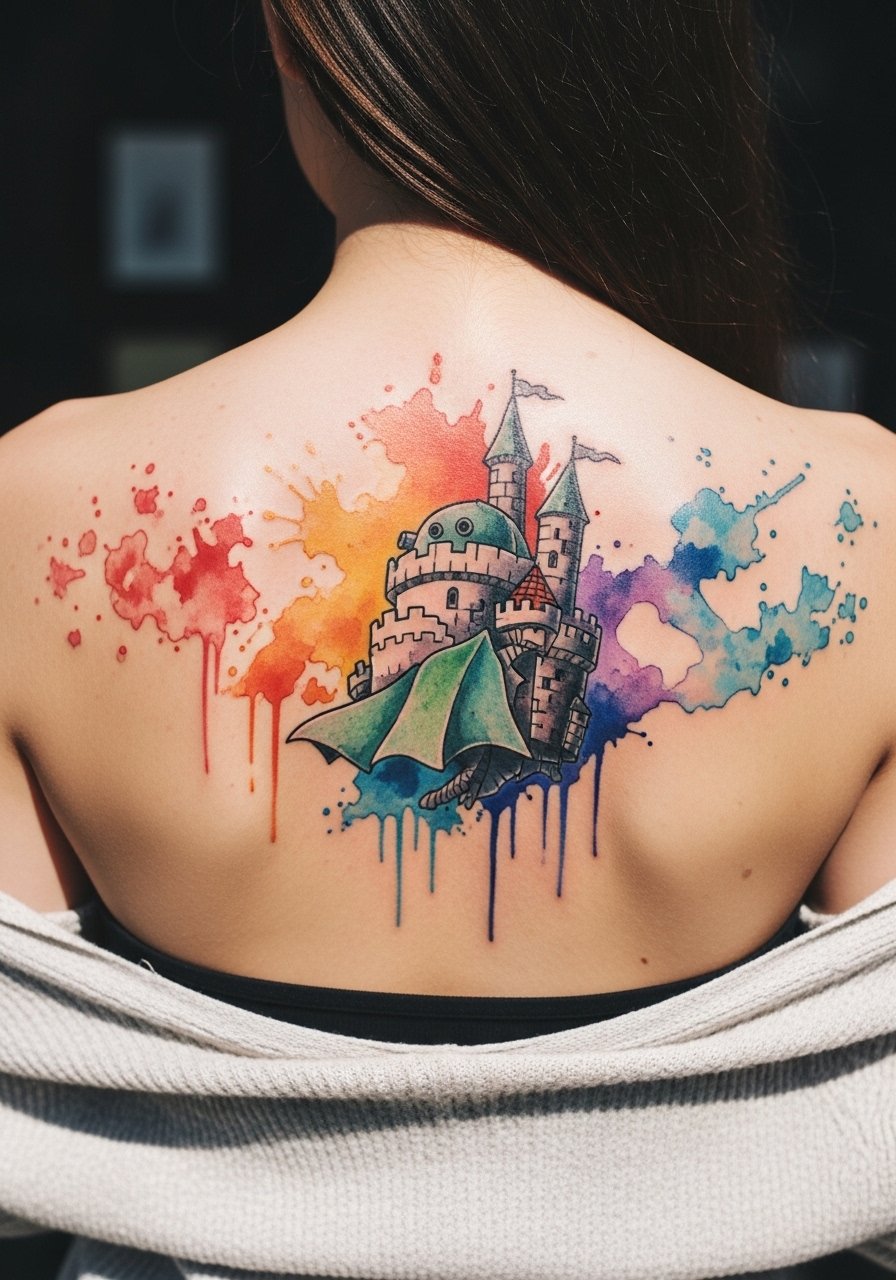
Watercolor captures fluid transformations but needs honest expectations. From what I have seen, watercolor fades faster than bold blackwork unless the artist uses stronger anchors and saturation. Ask the artist to include subtle outlines where you want longevity and to plan a two-session color pack. Expect the back to be moderate on pain but forgiving for large washes. A common regret is tiny watercolor patches with no anchors, which look like bruises after sun exposure. Protect this placement from daily sun to keep the washes lively.
10. Ignorant-Style Blocky Castle on Ankle
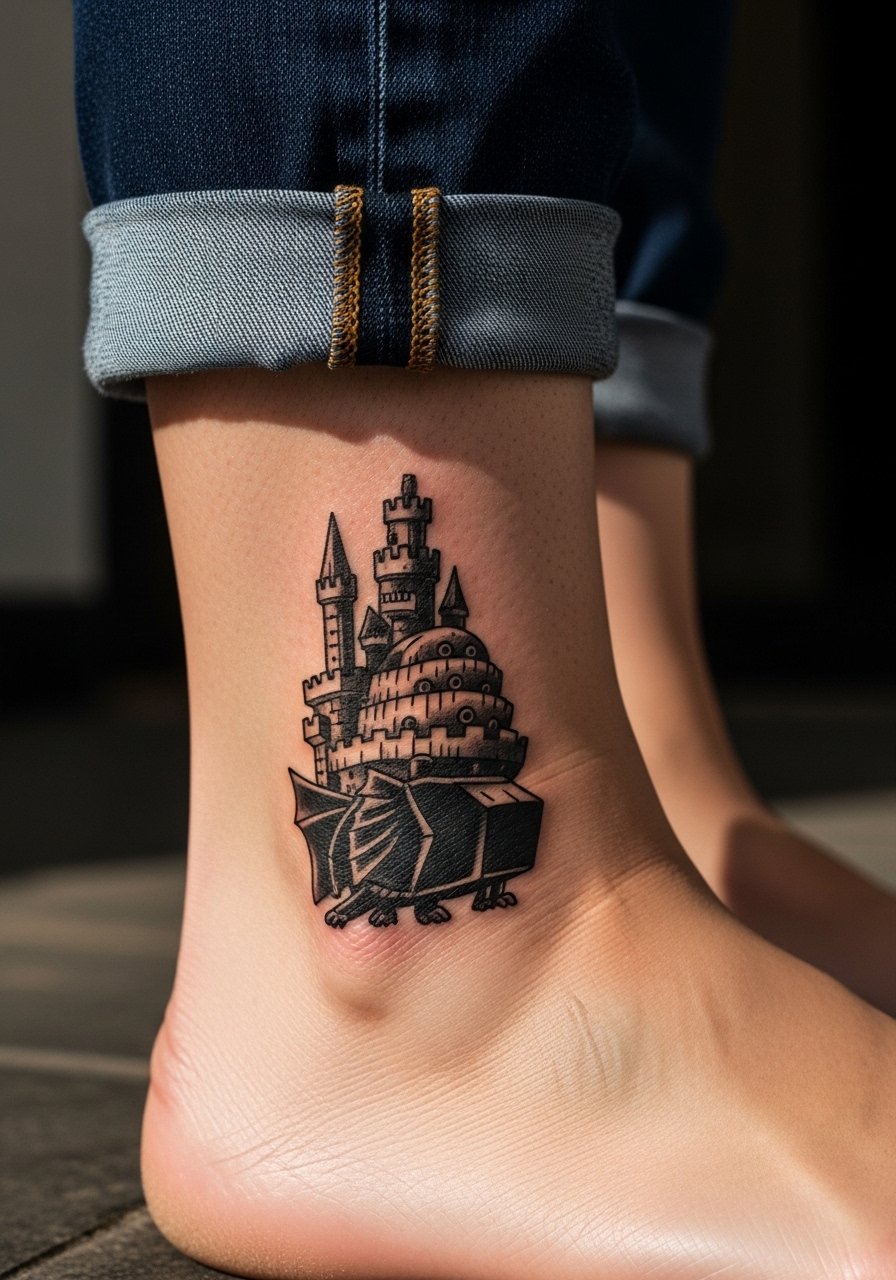
Ankle tattoos are great for seasonal visibility and low-commitment statements. The ignorant style's chunky blocks work well here because they do not ask for fine detail in a friction-prone spot. Pain is moderate and expect one short session for a four inch blocky piece. The mistake is adding fine gears to an ankle design; those details do not hold. For casual shows, pair with cropped pants or try cropped joggers men so the ankle silhouette pops.
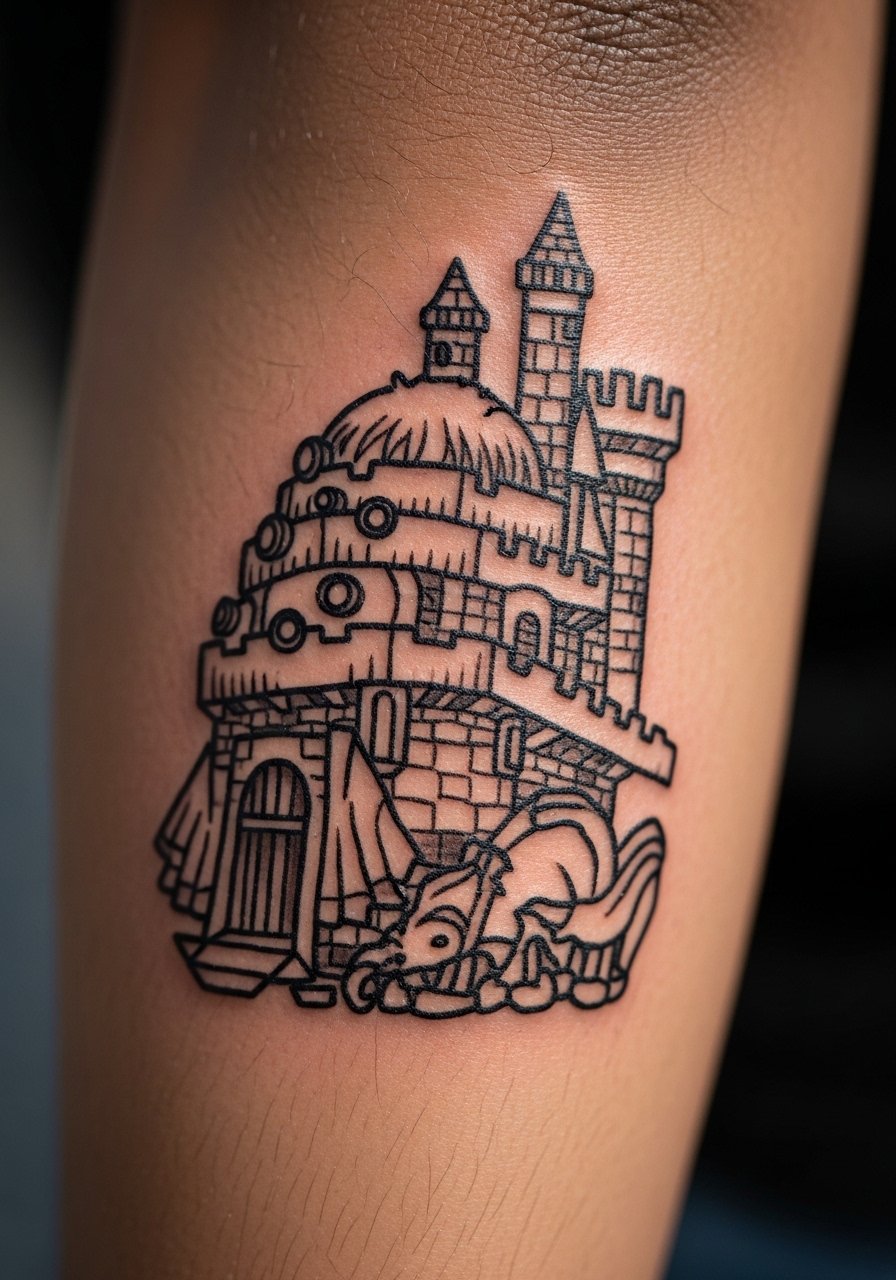
11. Howl and Calcifer Neo-Traditional Forearm Narrative

Combining characters creates narrative depth without sacrificing clarity if you resist tiny facial realism. The outer forearm keeps the story readable and lets you add later sleeve elements. In consultation, ask for strong black anchors around Calcifer so the flames do not flatten into the castle over time. Sessions usually span two to three sittings for color layering. A common error is overcrowding the forearm with background elements, which steals attention from the characters. Roll sleeves or wear a loose short sleeve tee the day of the session for easy access.
12. Fine Line Castle Silhouette with Gears on the Collarbone

The collarbone spot is visible and ages gracefully when the line spacing is generous. Fine line here can look elegant, but dense gear work will blur faster. If you want subtlety, ask for slightly thicker primary anchors around the silhouette to protect the delicate gear accents. Sessions are short and pain varies with anatomy. Avoid asking for text too close to the bone. For show-off outfits, a v neck cotton tee and dainty necklace frame the piece without crowding.
13. Tarot-Star Castle Overlay on Upper Thigh

This hybrid leans into symbolism, layering celestial motifs over the castle silhouette. The thigh gives scale to place tarot elements without crowding. Tell the artist which tarot symbols matter to you and have them map negative space so stars do not fill every panel. Sessions are longer and privacy considerations matter for healing. One mistake is prescribing too many tiny stars which can lose contrast. High-waisted shorts help with reveal timing during summer shows.
14. Modular Mechanical Patch for a Sleeve Starter on Outer Forearm
If you want to grow a sleeve over time, start with a single modular patch that reads complete on its own. The outer forearm patch should include clear margins so you can add adjoining pieces later. Tell the artist you plan future sessions so they match flow and negative space. Expect three sessions for deep saturation if you plan to build into color. A real mistake is treating the starter patch as filler; it should be a strong composition that tolerates expansion. For style balance, a simple chain bracelet men on the opposite arm keeps the industrial vibe coherent.
15. Ankle Walking-Castle Illusion with Motion Lines
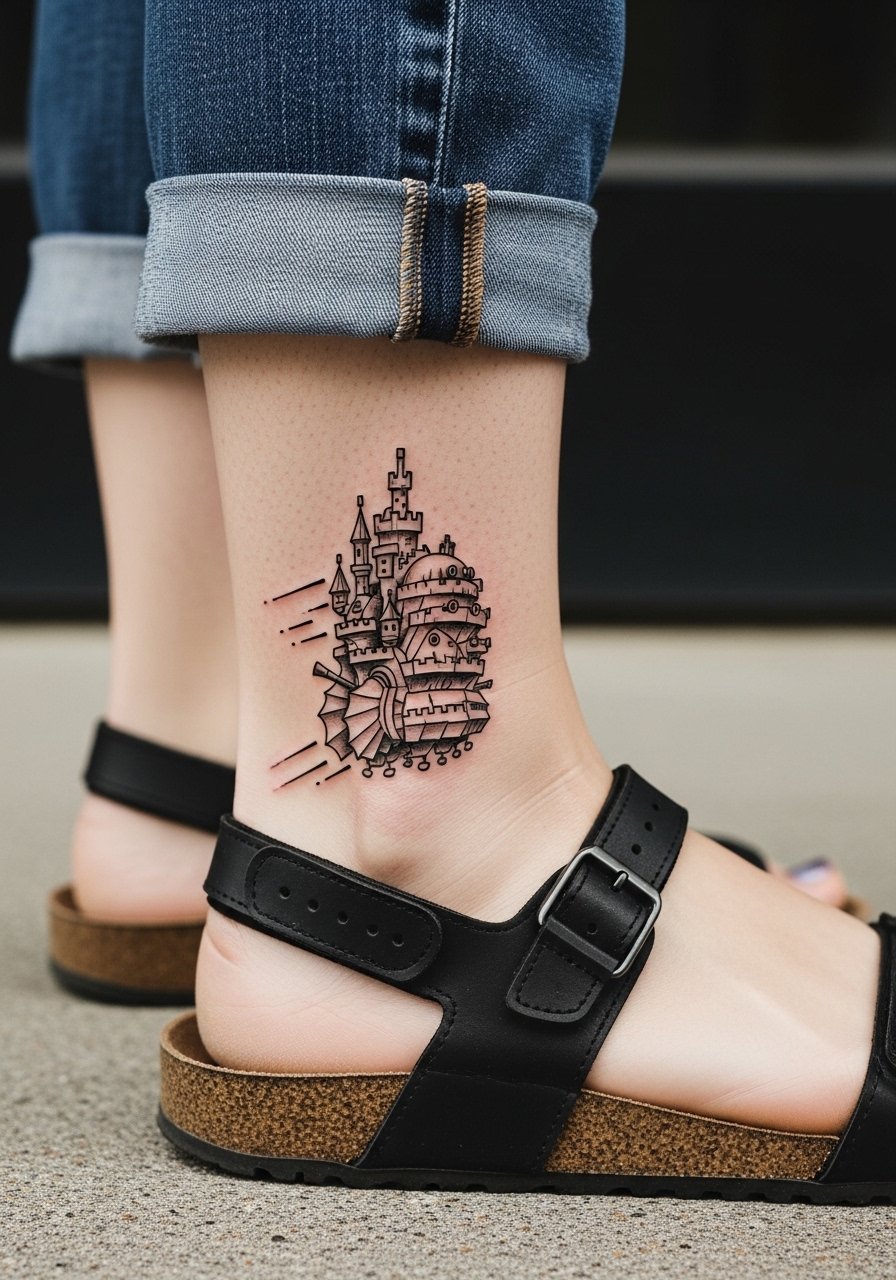
The walking castle illusion works well at ankle scale when motion lines are bold and minimal. The ankle sees frequent rubbing from footwear, so anchor the legs with heavier outer lines. Sessions are short but you might need touch-ups after heavy summer wear. Avoid adding fine shading beneath the feet, which wears out quickly. For seasonal styling, try mid calf socks or cropped pants to control how much of the illusion shows.
16. Dark Skin Adaptation with Thickened Outlines for Longevity
People with darker skin tones often report faster perceived wash-out with fine line work. For better longevity, request intentionally thicker outer lines and slightly higher saturation in color fills. I have seen bold blackwork hold much better across tones when artists adapt line weight. Ask for a small patch test if you are unsure how color reads on your skin. This approach trades some delicacy for durability, but it keeps the narrative clear. For low-profile show-off looks, a minimalist cord wristband keeps attention on the piece without overpowering it.
17. Micro Castle on Ankle for Summer Visibility
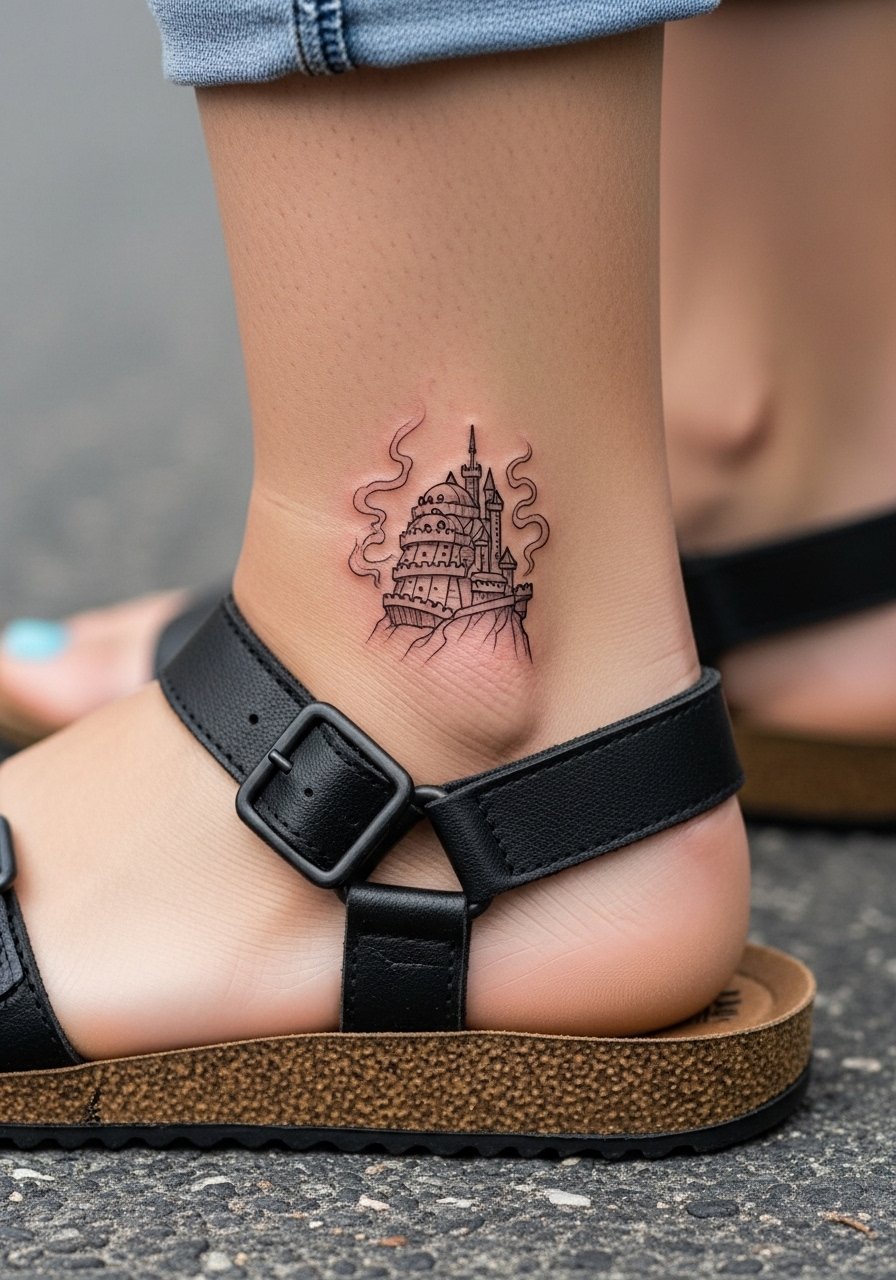
A micro castle on the ankle is a compact summer statement that photographs well when healed. Keep expectations modest: micro-realism tiny pieces require expert placement and often need a touch-up at year one. The ankle is a high-friction area, so ask for reinforced outer lines and minimal internal detail. Sessions are short but precise and may use single-needle work. Common regret is requesting micro shading that disappears under clothing friction. For booking, plan footwear that avoids rubbing during the first two weeks.
Frequently Asked Questions
Q: Will a bold neo-traditional Howl's Moving Castle tattoo hold up better on darker skin than a fine line version?
A: From what I've seen, bold neo-traditional with heavier outlines and dense saturation tends to hold contrast longer on darker tones than very fine line pieces. Ask for test photos of healed work on similar skin tones and request slightly thicker anchor lines rather than paper-thin detail.
Q: How should I plan sessions if my design mixes micro-realism smoke and bold color blocks?
A: Split the work into defined sessions, doing linework and micro-realism in separate sittings from the color pack. Micro details often need precise shading at lower needle speeds, while color blocks benefit from saturation sessions. Expect at least two bookings and budget time for a six-month touch-up.
Q: Artists debate Saniderm versus dry healing. Which camp should I follow for a color-rich Howl piece?
A: Both camps make valid points. One side likes Saniderm for locking in moisture and speeding color-settling. The other worries about trapped bacteria in humid climates and prefers breathable dry healing. Your best move is to ask the studio what they usually recommend for color work and follow their protocol for the first week, then adapt if your skin reacts.
Q: What should I wear the day of an upper arm neo-traditional session?
A: Pick a sleeveless athletic shirt or tank so the artist can access the entire bicep without fabric bunching. A tank with some stretch helps you move comfortably during longer sessions.
Q: If my forearm Howl piece stretches because of muscle gains, can touch-ups fix the distorted legs?
A: Touch-ups can restore contrast and fix some softening, but significant skin stretching can change the original proportions. Talk to your artist about placement away from high-tension zones and consider scheduling touch-ups after body changes settle.
