
Bold black, precise linework, and placement that flatters muscle make the upper arm one of the most forgiving canvases a man can choose. The pieces that still look clean after five years are usually the ones that respected anatomy and spacing from the start. Below are 27 upper-arm ideas, what to ask for in consultation, how they age, and how to dress for them so they read loud without shouting.
1. Bold Tribal Cap That Follows the Deltoid
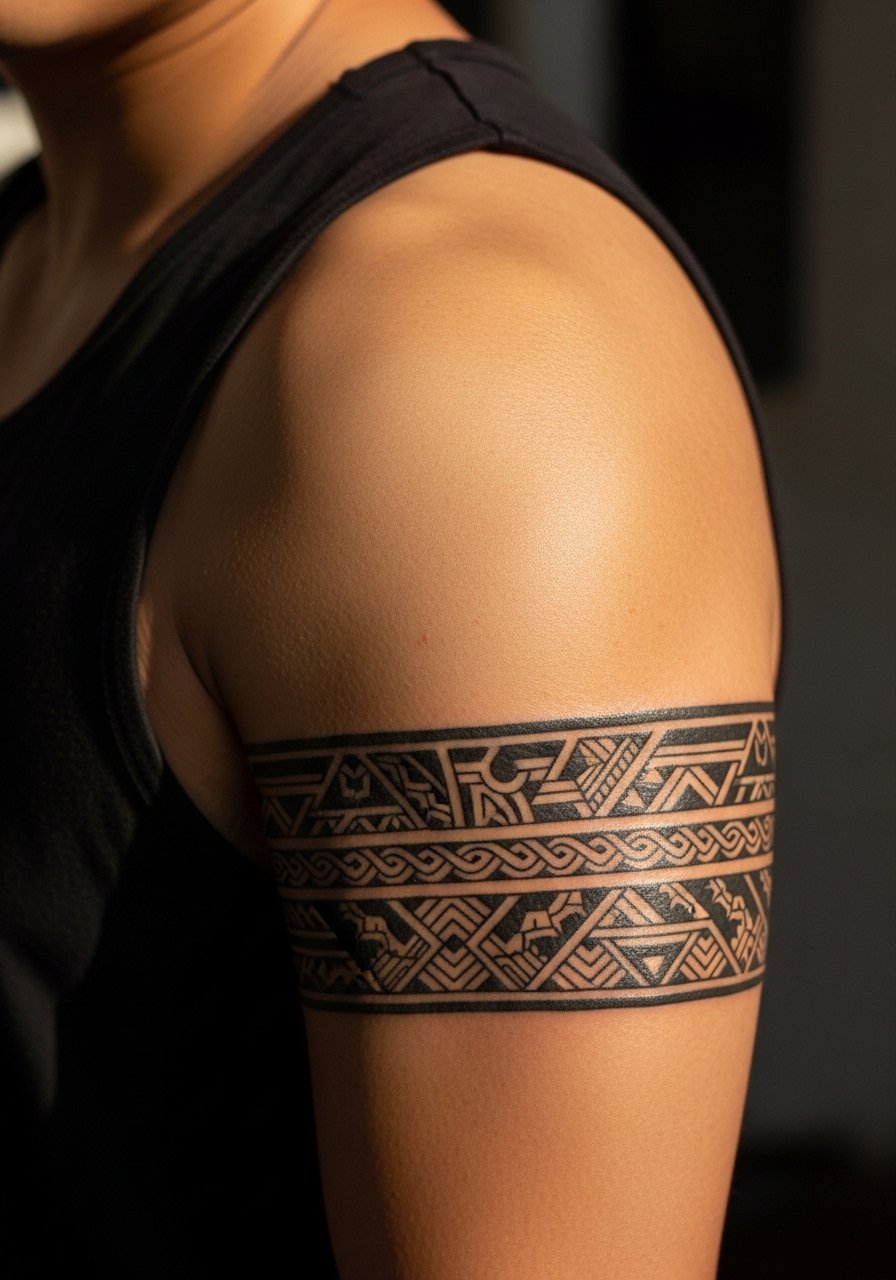
I recommend this when you want a high-contrast piece that reads from across a room. Tell your artist you want the lines to curve with the deltoid peak so the pattern moves with the arm and does not cut into the muscle. The common mistake is shrinking the motif too much, which loses the intended bold impact and increases blowout risk along thin lines. Expect a 1.5 to 3 hour session and low to medium pain. For the appointment wear a men's sleeveless tank top so the artist can access the shoulder without sleeve pressure. Over time the heavy black saturates nicely and usually needs only a touch-up at year three if exposed to sunlight.
2. Realistic Animal Portrait on the Outer Bicep
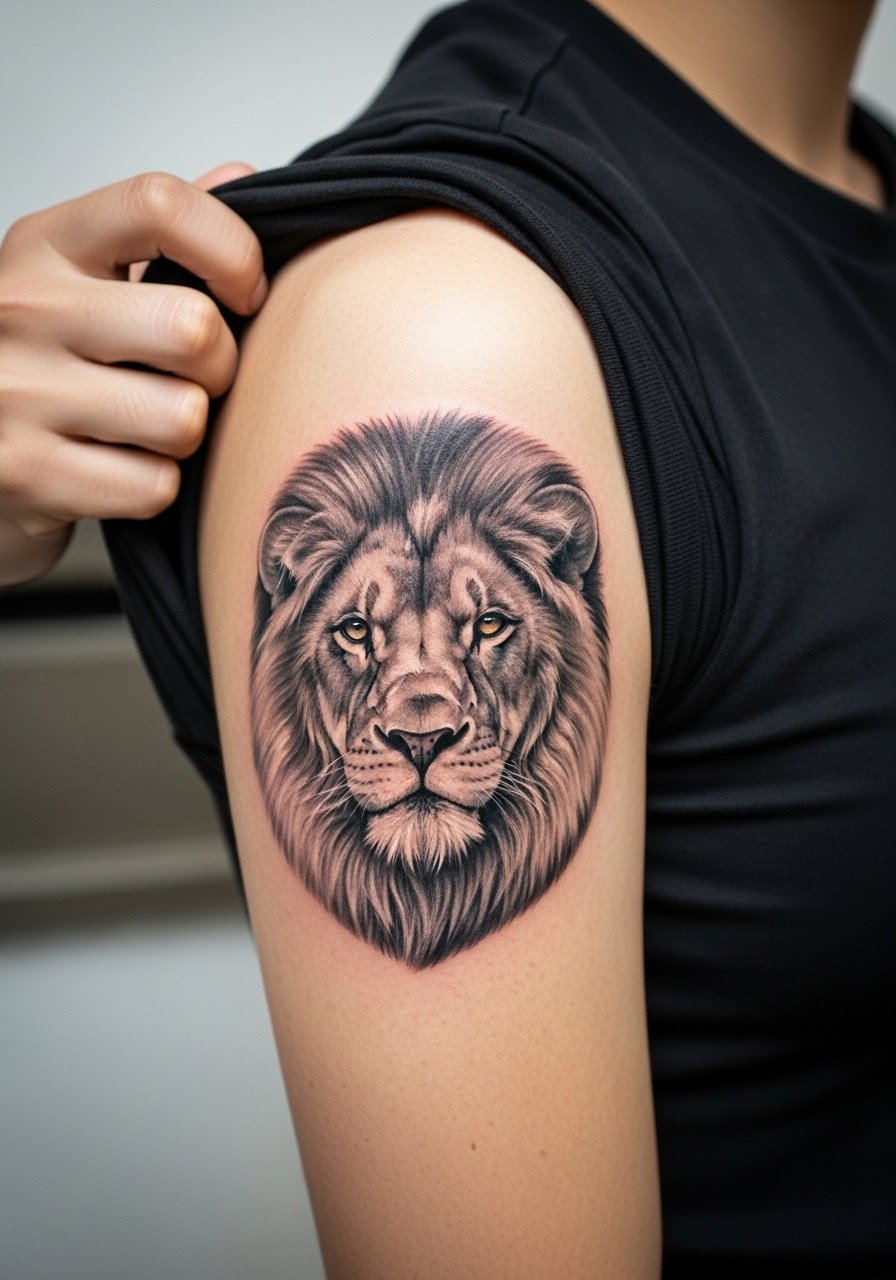
Go for realism when you have a strong reference photo and you want depth that uses the deltoid as a sculptural surface. Tell the artist to map the eye line to the natural muscle arc so the gaze reads straight when your arm is relaxed. A common mistake is asking for too-small detail on the upper arm. Detail holds better here than on the forearm but it still needs scale. Sessions typically run 2 to 4 hours and this is a premium piece that may require two sessions. Expect richer contrast to hold for three to five years before softening. For showing it off wear a fitted short sleeve t-shirt that frames the bicep without competing with the portrait.
3. Neo-Traditional Flowing Sleeve Starter
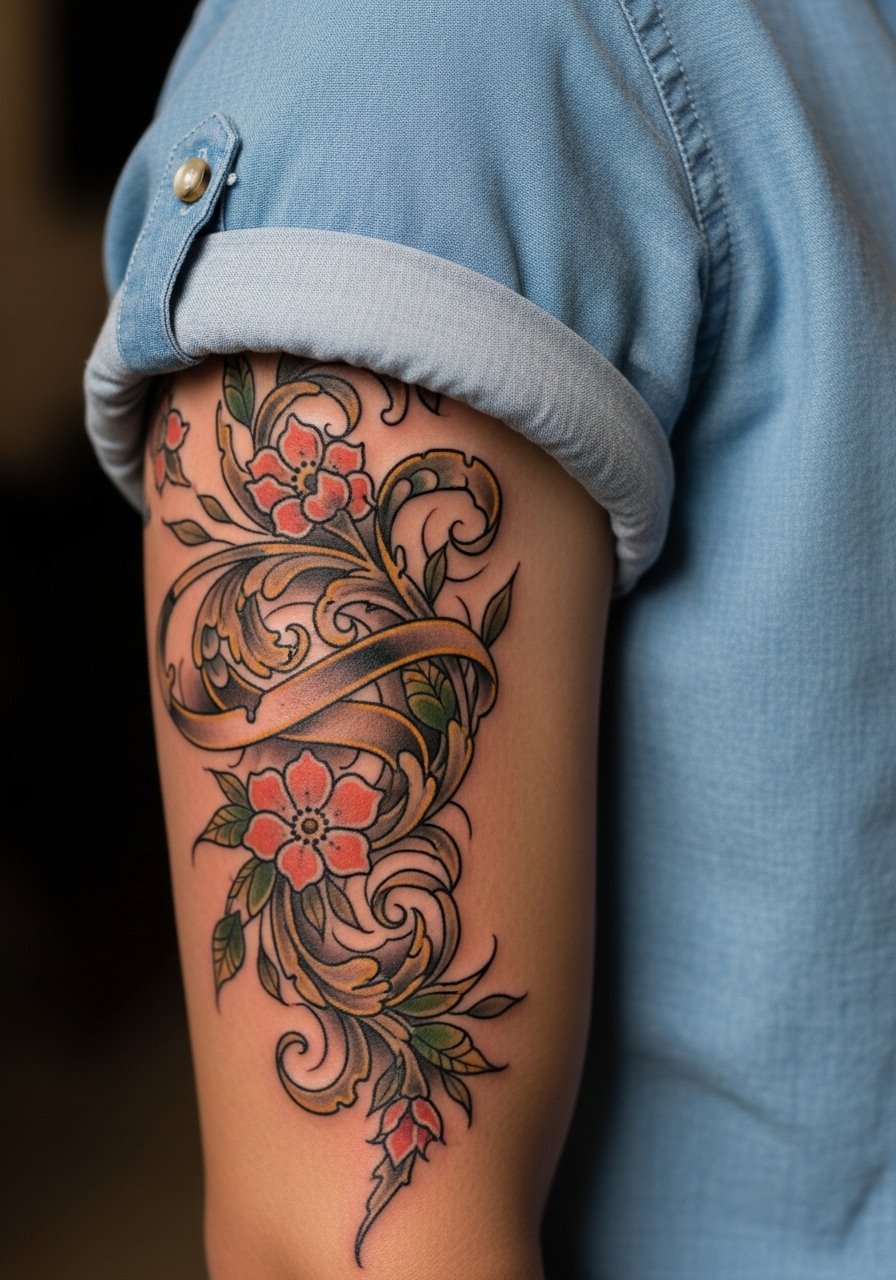
This works when you want a sleeve that accentuates muscle shape while leaving room to connect later. During consultation say you want flowing elements that hug the bicep peak and negative space to avoid crowding. The mistake is packing too many motifs into the shoulder cap, which creates a top-heavy sleeve that looks unbalanced at the wrist. Sessions are modular, usually 1.5 to 3 hours per visit. Color saturation looks punchy for the first year and then softens into a warmer palette. Pair it with a men's linen button up shirt when you roll the sleeves to show transitions between chest and arm.
4. Japanese Traditional Panel on the Upper Arm

Choose this if you want narrative and bold color on a scale that can integrate into a larger back or chest project. Ask the artist how the panel will read from the side and whether you should extend onto the shoulder cap for flow. A common oversight is stopping short of the shoulder which creates awkward edges against the chest. Expect multiple sessions over months and strong saturation that will slowly mellow with proper sun protection. For the session wear a loose button-down shirt you can slide aside so the artist has clean access to the upper arm.
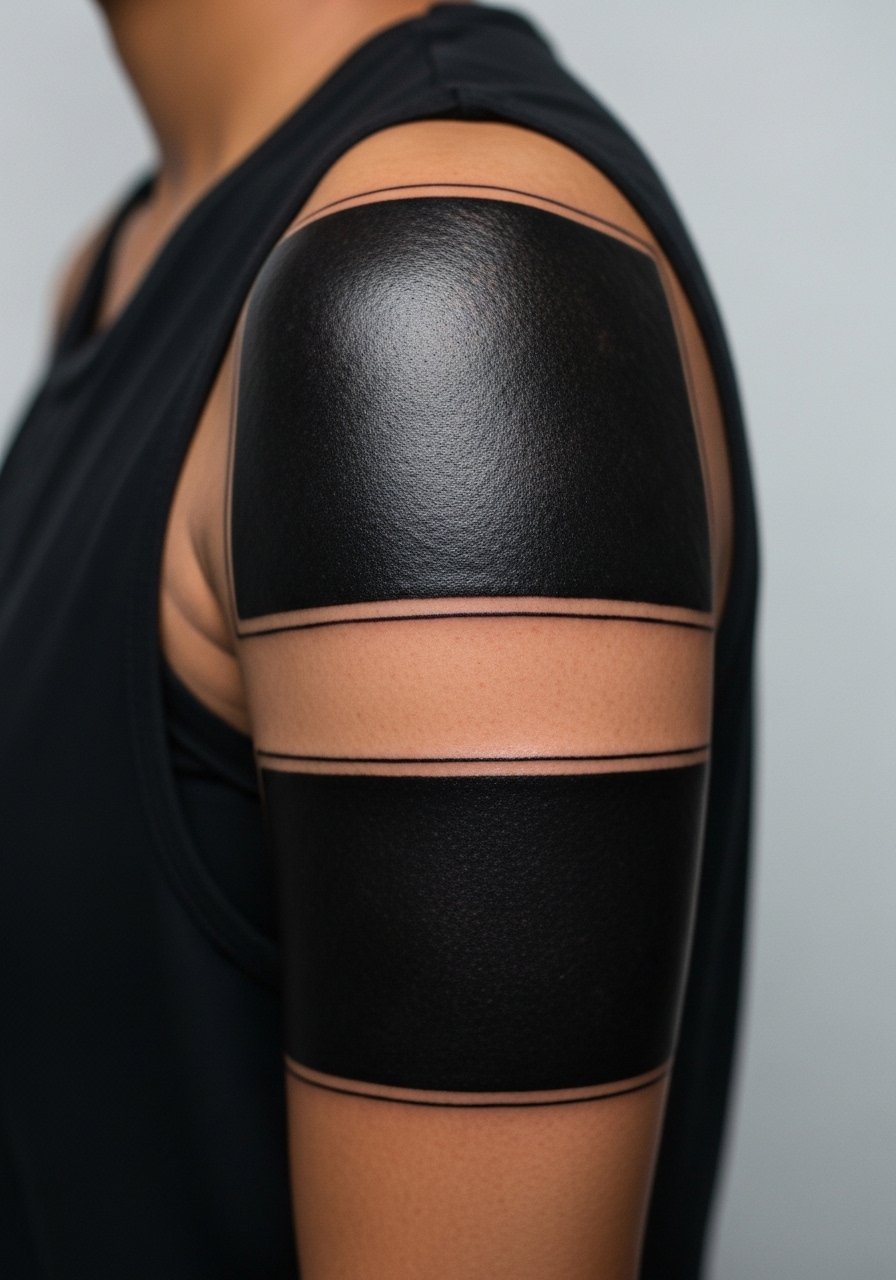
5. Solid Blackwork Band Across the Bicep
Black bands age well when the line edges are thick enough to resist blowout. Tell your artist you want a clean edge and consistent saturation rather than a faded, textured fill. The rookie mistake is picking a band too thin which looks fine fresh and then softens into a fuzzy ring. Session time is short to moderate. Pain is low to medium depending on circumference. For showing it off try a fitted short sleeve t-shirt with sleeves rolled slightly. Expect the fill to remain dramatic for years, with touch-ups rarely more than cosmetic.
6. Inner Bicep Script Curving With the Muscle
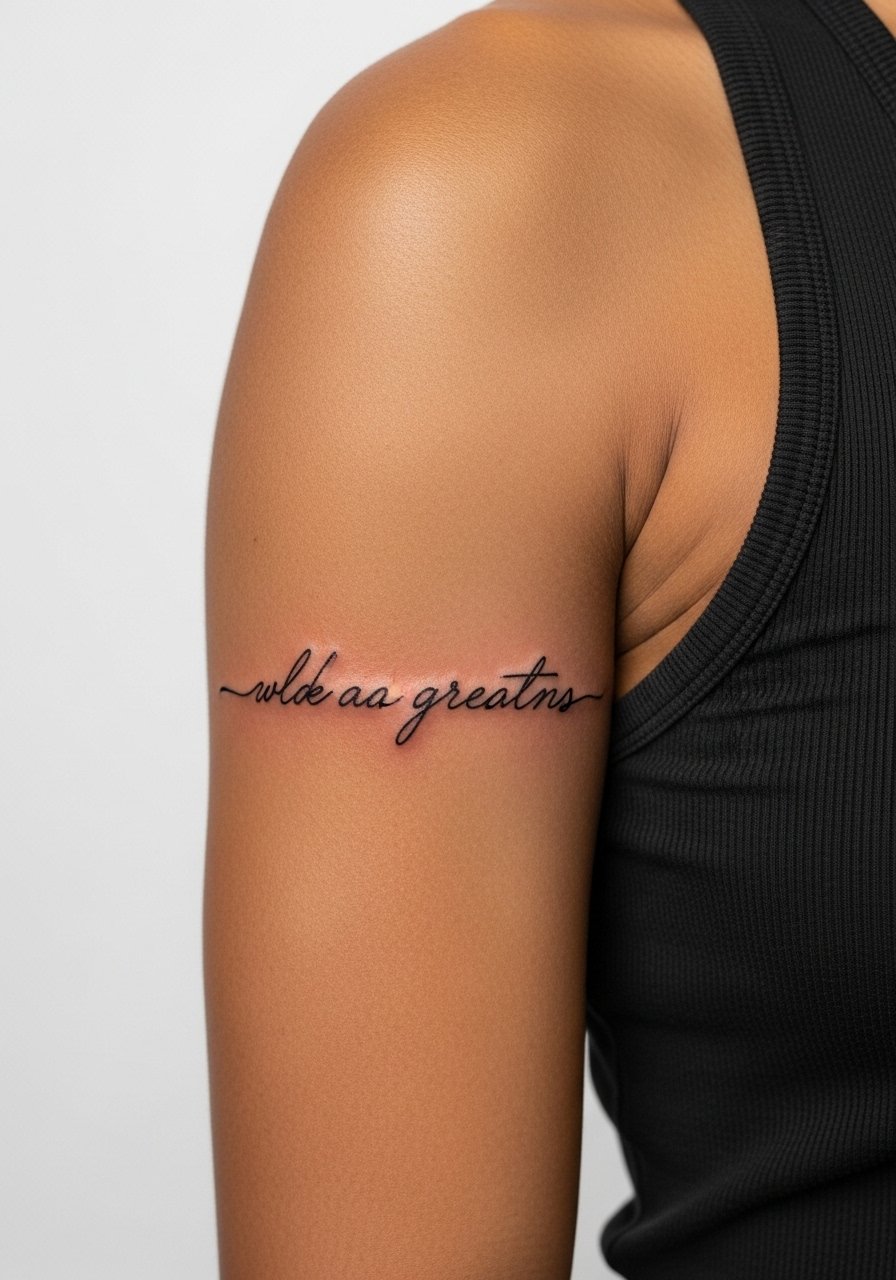
Inner bicep script reads intimate and personal while staying concealable. Ask for curved baseline guides so the lettering wraps naturally with muscle movement rather than sitting on a flat plane. The controversy here is fine line longevity on soft skin. One camp says thin script blurs faster in the inner arm. The other camp argues that with correct depth and spacing it holds. Ask your artist which side they fall on and consider slightly bolder weights if you want fewer touch-ups. This area can be tender but sessions are usually short. For the appointment wear a men's sleeveless tank top so the artist can raise the arm without pressure.
Pre-Session Essentials
Those first six placements include both exposed shoulder work and sensitive inner-arm pieces, and a small kit makes the session and the first week smoother.
-
Natural healing balm search. A gentle balm helps initial moisture control for dense blackwork and inner bicep script without heavily perfumed ingredients that irritate fresh skin.
-
Thin protective film roll. Useful for small areas that face friction from clothing, especially wrist or inner arm placements covered above.
-
Fragrance free gentle body wash. Cleanses healing tattoos without stripping saturation on colorful neo-traditional or Japanese panels.
-
Sterile stencil transfer paper kit. Lets you preview placement and line weight on skin before the needle meets ink, helpful for the realistic portrait and script pieces above.
-
Aquaphor healing ointment. Thin layers in the first 48 to 72 hours help prevent excessive scabbing on heavy black fills and delicate scripts without clogging pores.
7. Ornamental Mandala Over the Shoulder Cap
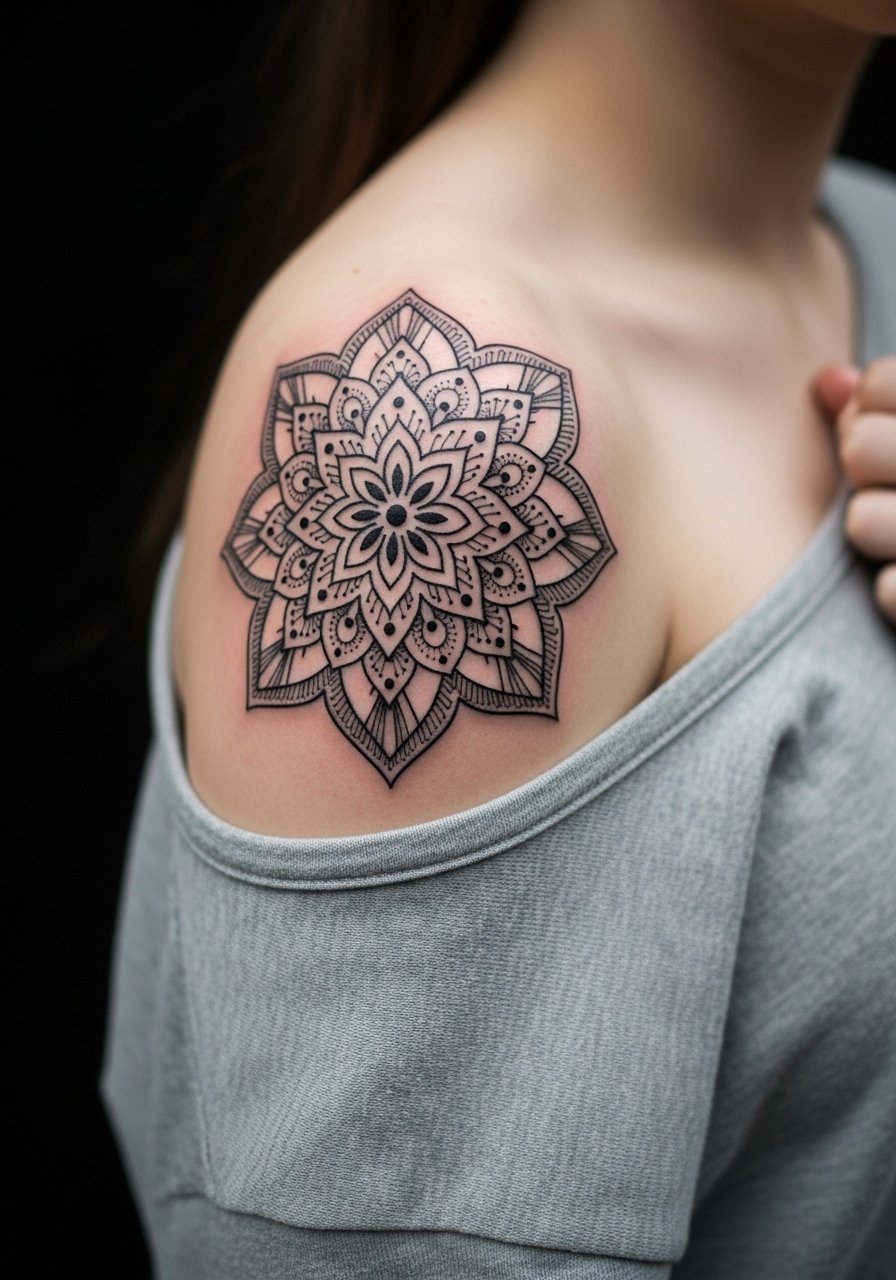
Mandala work on the shoulder cap benefits from scale and negative space. Tell your artist you want the densest points away from the joint so the pattern does not compress when you raise or lower the arm. The mistake is cramming too much detail into a small circle which causes early softening. Dot work needs careful needle depth to avoid blowouts. Session time varies with intricacy. For showing it off use a loose button-down shirt with the sleeve rolled. Because mandalas echo spiritual traditions, consider slight design variation rather than copying religious iconography directly.
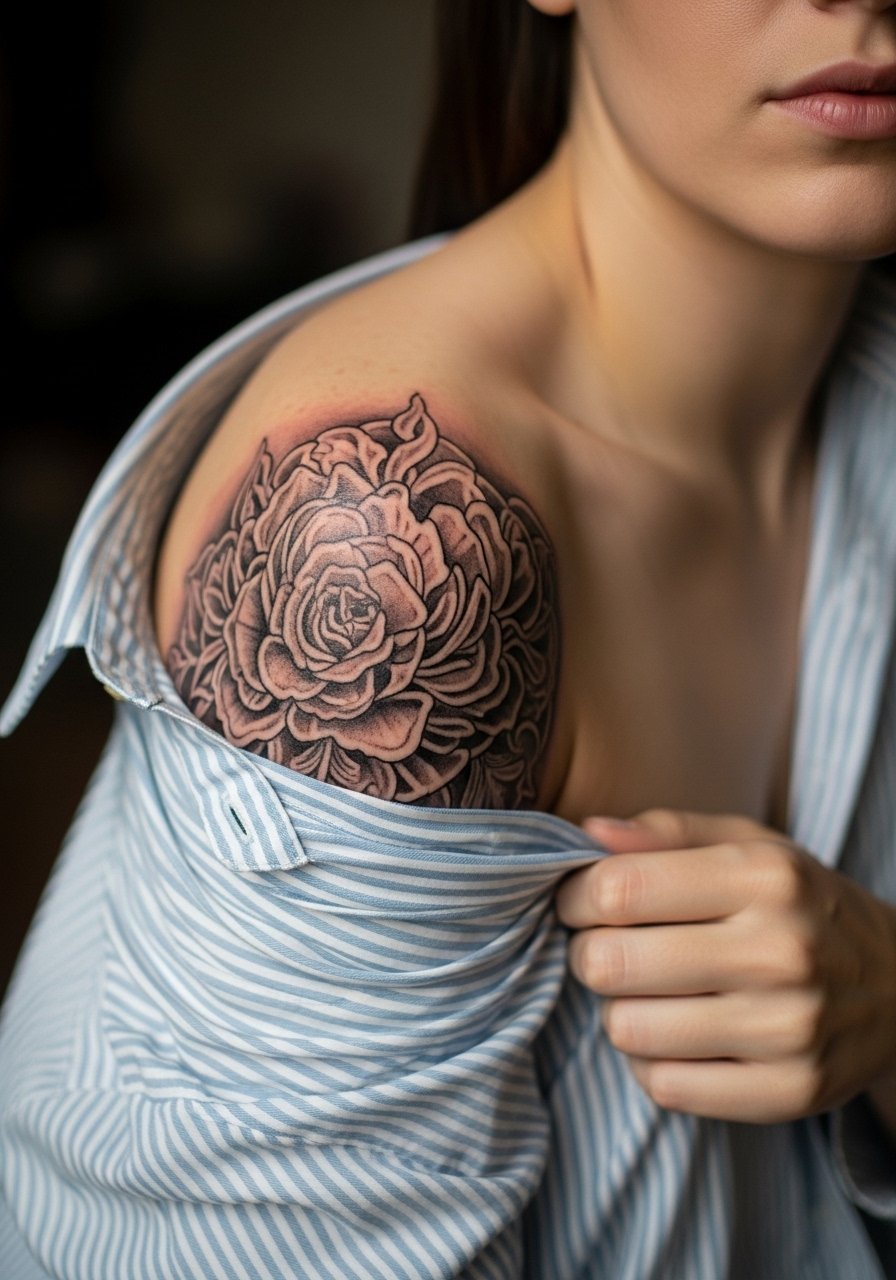
8. Floral Botanical Cluster on the Outer Bicep
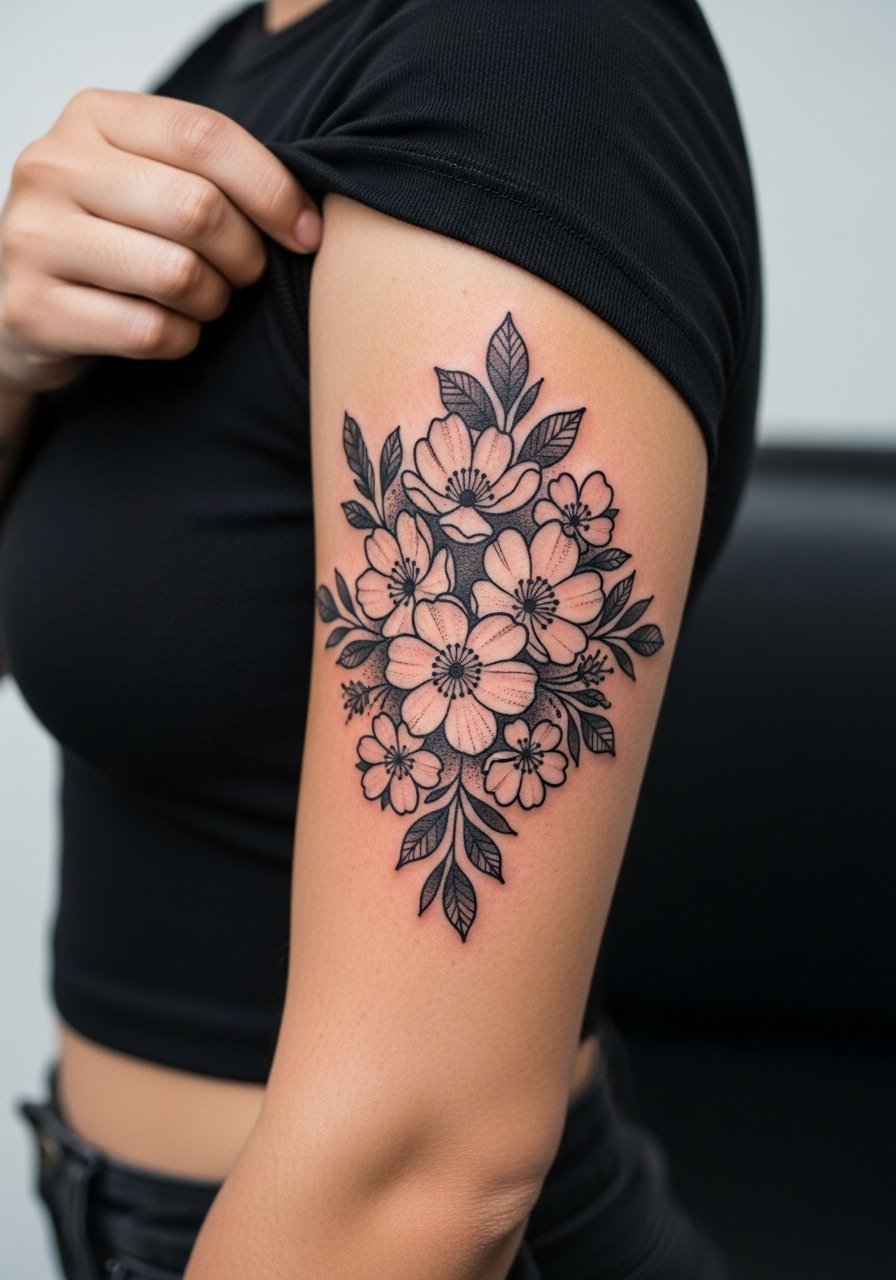
Botanical clusters are versatile and age gracefully when given breathing room. When you consult, point out which flower should sit on the peak of the bicep and which should drift toward the tricep. The common error is making all blooms the same scale, which flattens depth. Pain is low to medium and sessions are typically one or two sittings. For casual reveals pick a fitted short sleeve t-shirt in neutrals so the ink reads clearly. Fine stipple shading holds well at year two and softens into a softer texture by year five.
9. Geometric Banding That Accentuates Muscle Lines
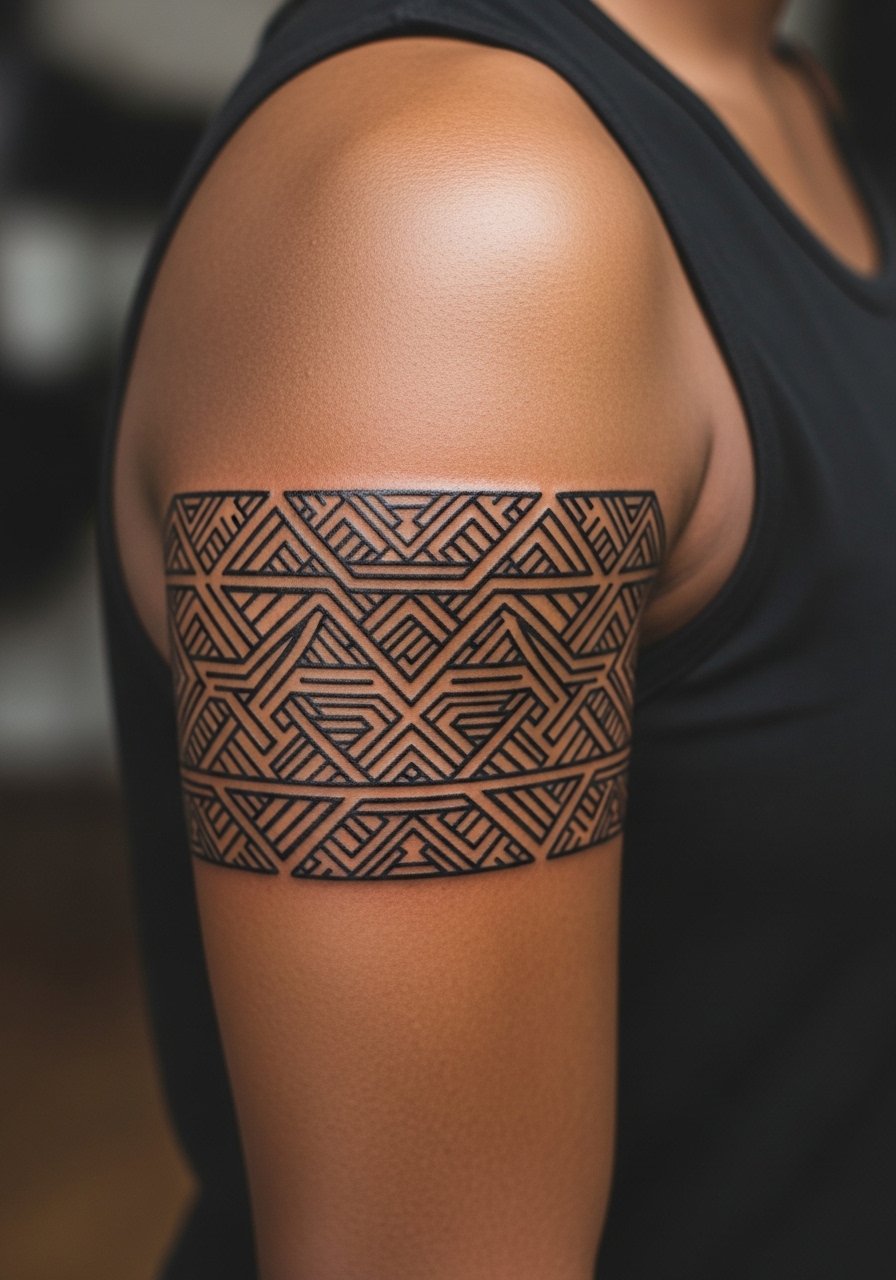
This style plays with symmetry and rhythm across muscle peaks. Ask the artist to map the pattern over your arm in standing and flexed positions so lines do not bend awkwardly under movement. A frequent mistake is ignoring natural skin folds which can break crisp geometry. Sessions are short to moderate and pain is usually tolerable. For showing it off try a men's rolled sleeve shirt to keep the arm framed while exposing the bands.
10. Watercolor Splash Accent on the Upper Arm
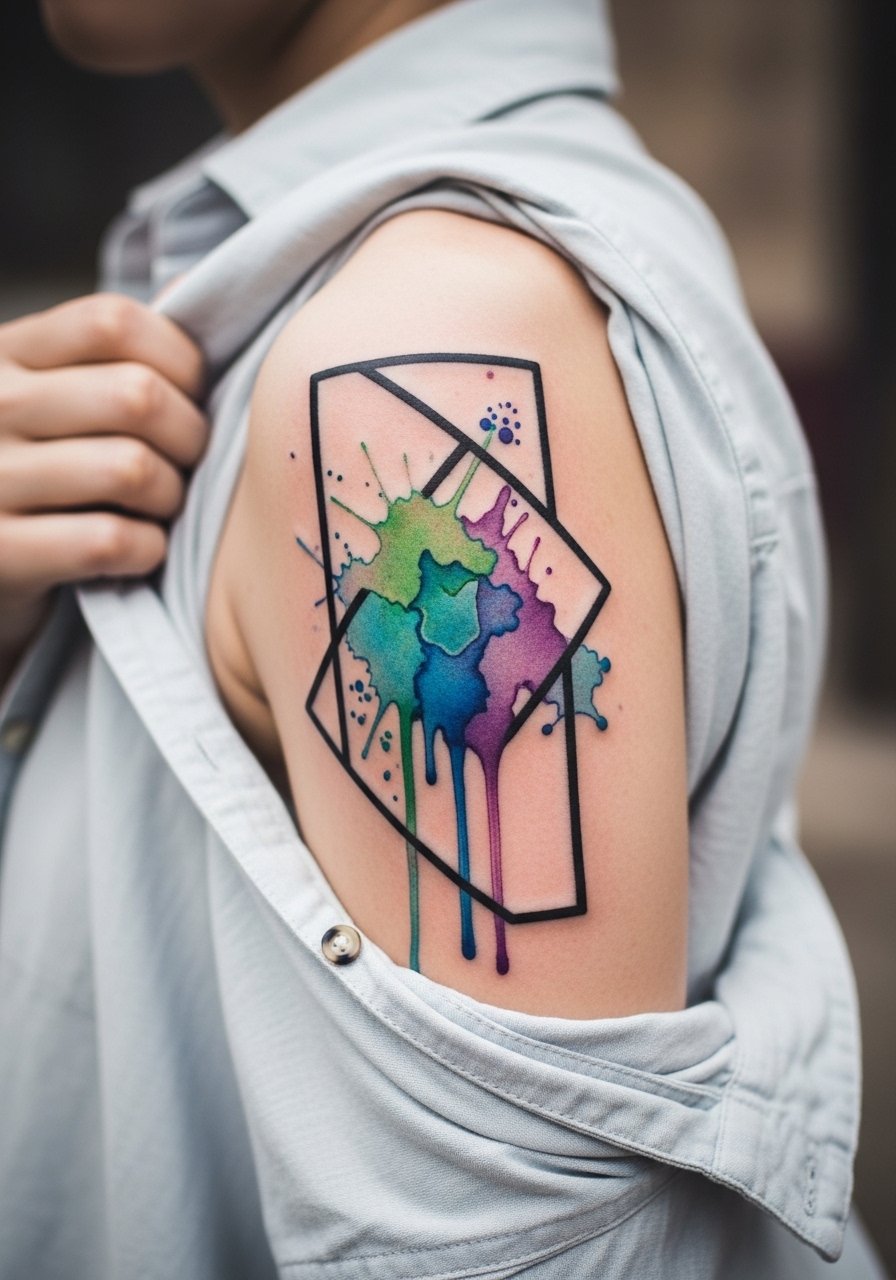
Watercolor accents give color without heavy outlines but they fade faster than saturated traditional fills. Tell the artist you prefer color placed as background wash behind stronger black elements to retain clarity over time. The mistake is asking for full watercolor coverage without a black anchor which often translates to a blurry patch after healing. Sessions are moderate and color touch-ups are common around year two. Pair the look with a men's linen button up shirt rolled at the sleeves so the color peeks through without clashing.
11. American Traditional Eagle on the Outer Arm
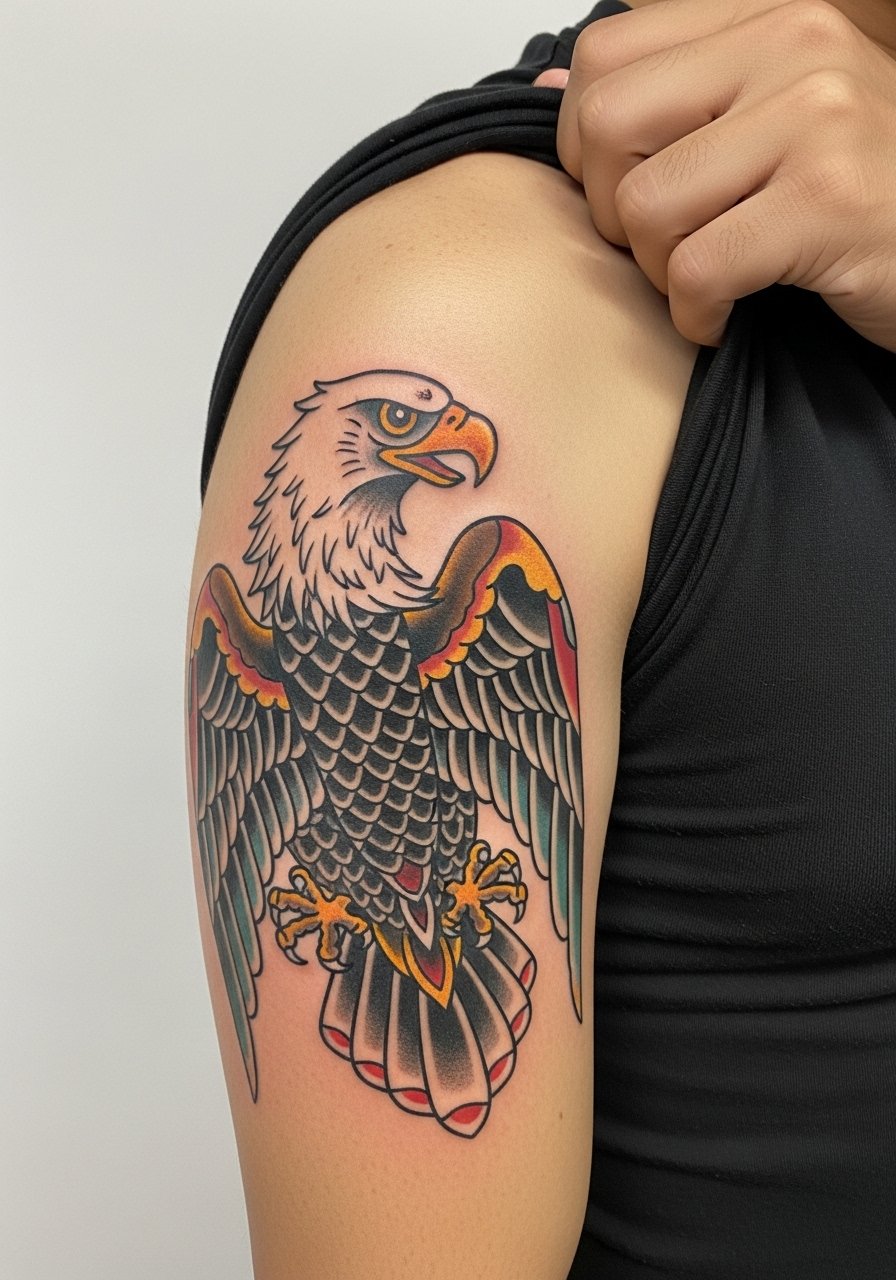
Classic old-school work holds well because its line weight and saturation are forgiving. Ask for strong outlines and saturated fills rather than micro detail. The common mistake is shrinking traditionally sized motifs into tiny stickers which negates the style's longevity. Sessions are usually single visits under three hours. For displays, a fitted short sleeve t-shirt keeps the motif readable. Expect clean lines to keep their shape for many years with minimal touch-up.
12. Photorealistic Portrait on the Upper Arm
Portraits demand reference clarity and a specialist hand. Tell your artist which facial angle you prefer and where the light source in the reference should sit relative to your arm curve. A mistake is using low-resolution photos which translate poorly to skin. Sessions are long and may be split across days. The realism looks great for 2 to 4 years and then may need a touch-up to restore midtone contrast. For the session wear a loose button-down shirt so you can expose the shoulder and upper arm comfortably.
13. Ornamental Sleeve Connector With Smoke and Waves
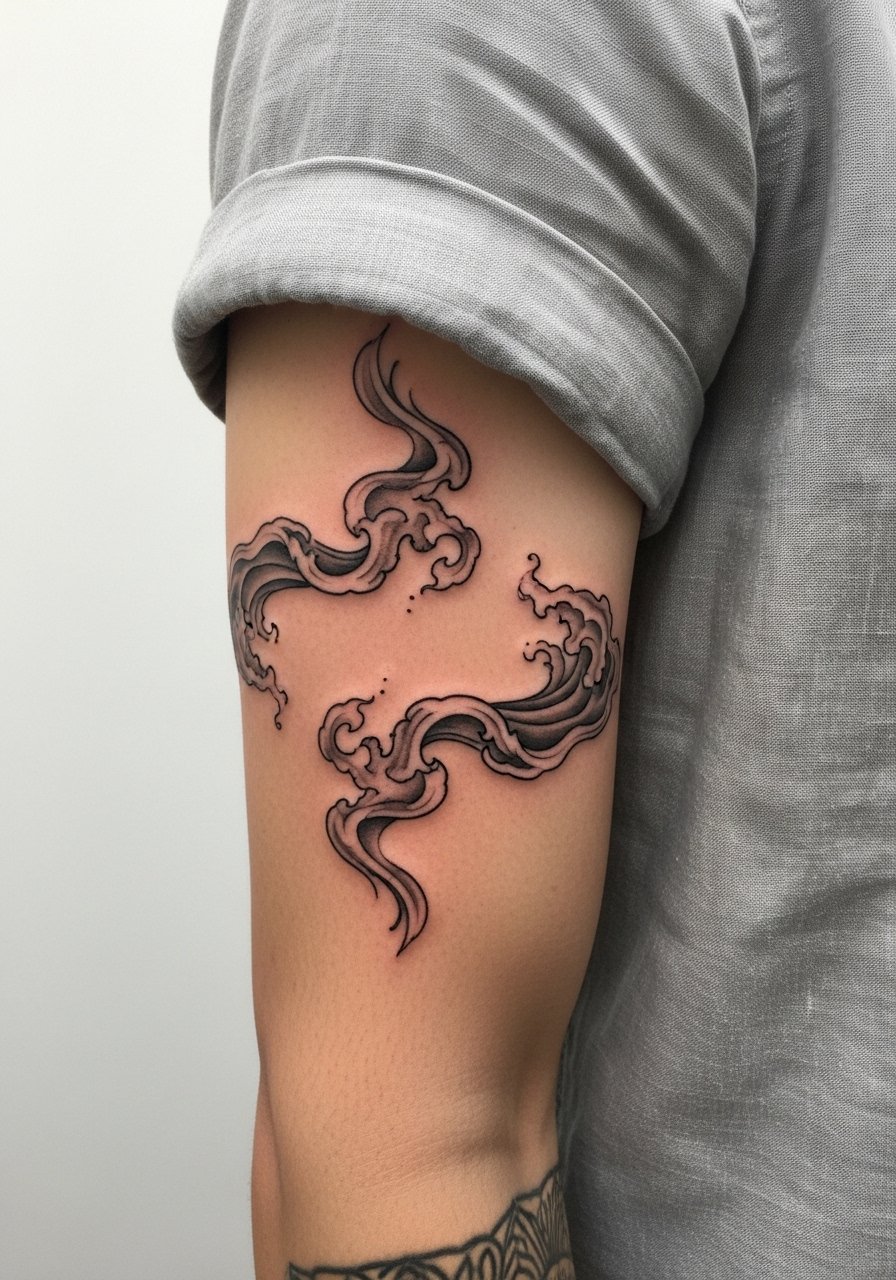
Connectors are the backbone of sleeves that bridge two canvases. Ask for flowing negative space that lets the forearm pieces breathe while linking motifs. A frequent mistake is forcing identical motifs across both arm sections which reads repetitive. Sessions vary and planning across multiple appointments is standard. For wearing, a men's linen casual shirt with rolled sleeves shows off the transition. Proper spacing ensures the connector will age gracefully as each piece settles.
14. Minimalist Single-Line Symbol on the Inner Arm

Minimalist symbols look clean when sized appropriately. Ask the artist for single-needle work with a slightly bolder baseline if you want it to last without frequent touch-ups. Small and faint is the top mistake because the lines fuse over time. Sessions are short and pain is moderate. For the session wear a men's sleeveless tank top so the inner arm is easy to reach. Expect this treatment to need touch-up by year two or three if you want it to remain sharp.
15. Ornate Compass and Nautical Elements on the Upper Arm
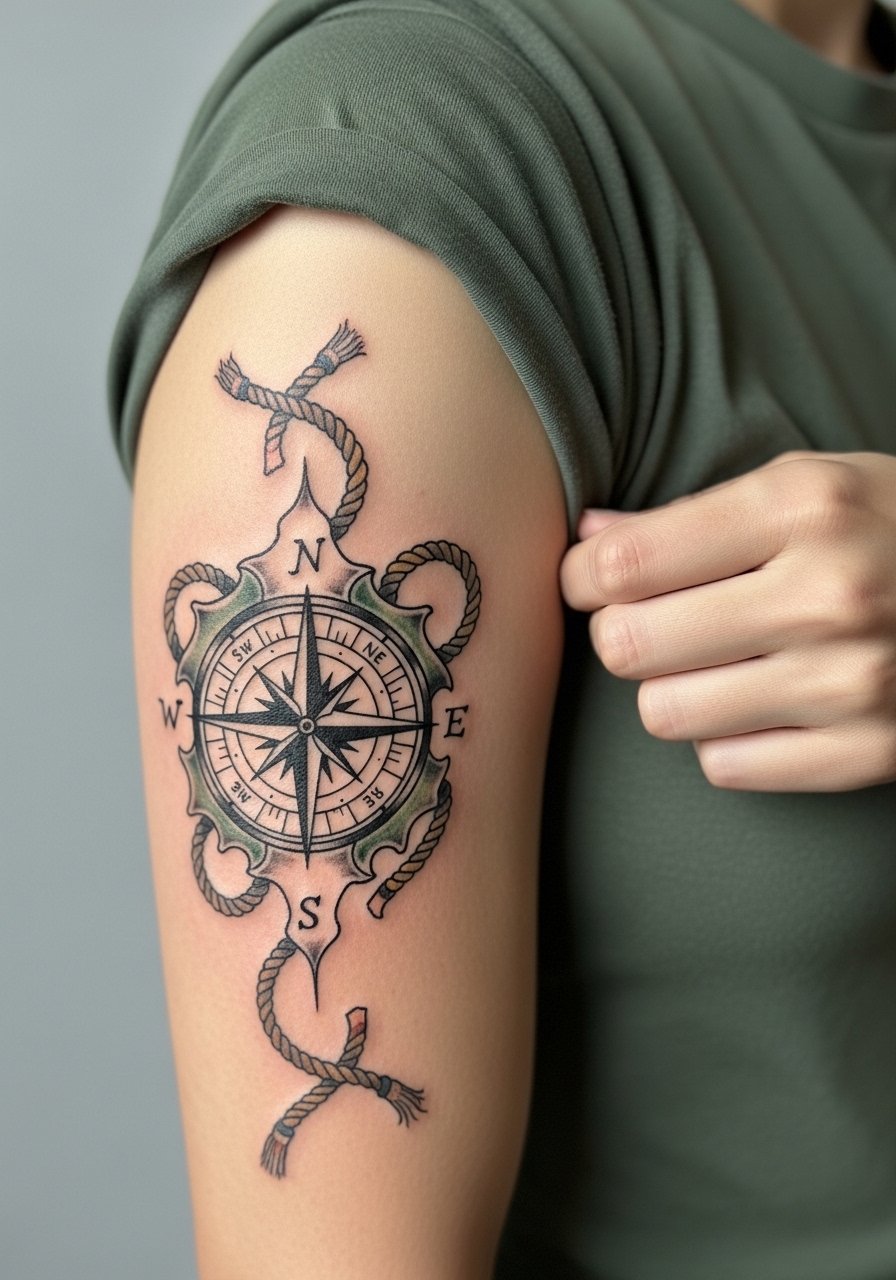
Nautical pieces sit well on the outer arm where circular compasses can center on the bicep. Tell the artist where you want true north to align relative to your body so the compass does not read sideways when you walk. The mistake is small, densely shaded compasses which blur in the center over time. Sessions are moderate. For styling pair it with a fitted short sleeve t-shirt or an open overshirt to reveal the motif. Proper line weight keeps the dial legible well past the first few years.
16. Blackwork Sleeve Panel With Negative Space
Large black patches can be dramatic while avoiding blowout when designed with muscle flow in mind. Tell your artist you want crisp edges and planned breaks of skin tone for contrast. The error is filling awkward curves without considering how clothing will rub the area during healing. Session time is long and may require multiple sittings for saturation. For revealing this look, a sleeveless tank top works best. Dense blackwork tends to remain visually strong for years though touch-ups may be required to maintain uniform saturation.
17. Runic or Norse Band With Subtle Stippling
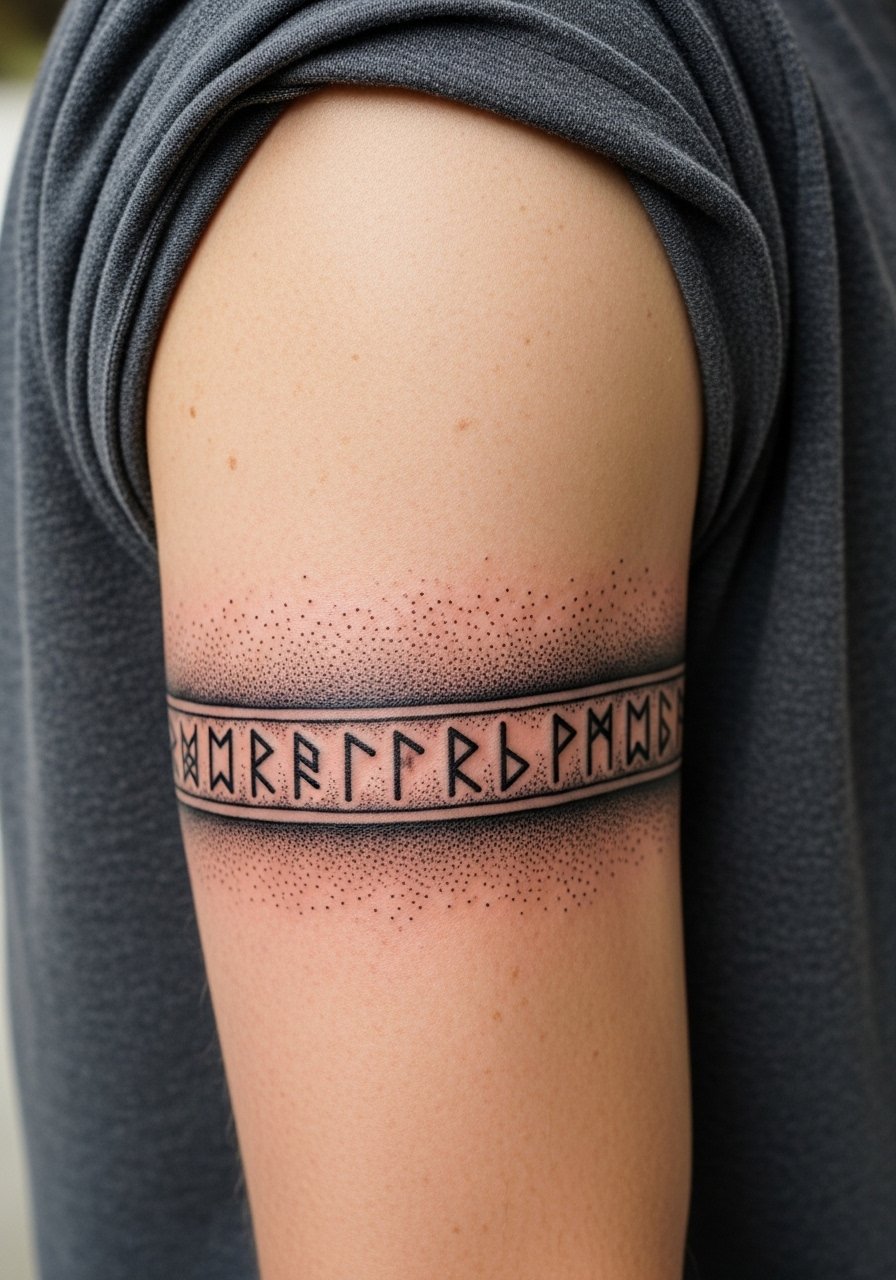
Symbolic lettering in band form reads best when the size fits the arm circumference. During consultation clarify the exact runes and their spacing because small errors become obvious. The common error is choosing tiny runes that blur into an unreadable line. Sessions are brief. For showing the work, try a men's rolled cuff linen shirt. Expect crispness for several years if the runes are sized conservatively.
18. Shield or Armor Plate Design Over the Shoulder
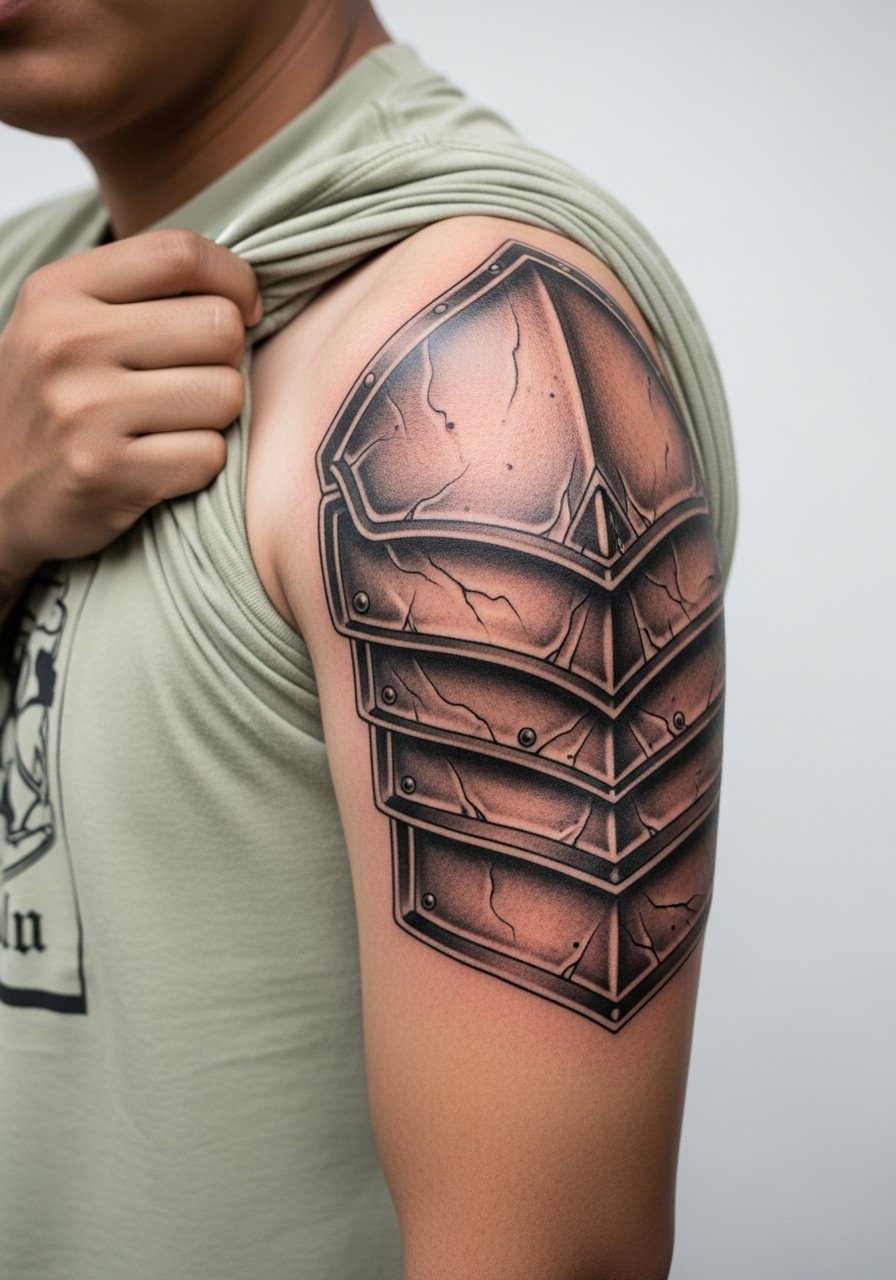
Armor motifs work with the shoulder geometry to create a protective visual effect. Ask for plates that follow muscle separations rather than crossing them awkwardly. The mistake is forcing rigid shapes over flexible tissue which creases during movement. Sessions are moderate to long. For the session wear a loose button-down shirt you can adjust to reveal the area. Because these use bold washes, they usually hold shape well but may need edge touch-ups later.
19. Hourglass Geometric on the Upper Arm
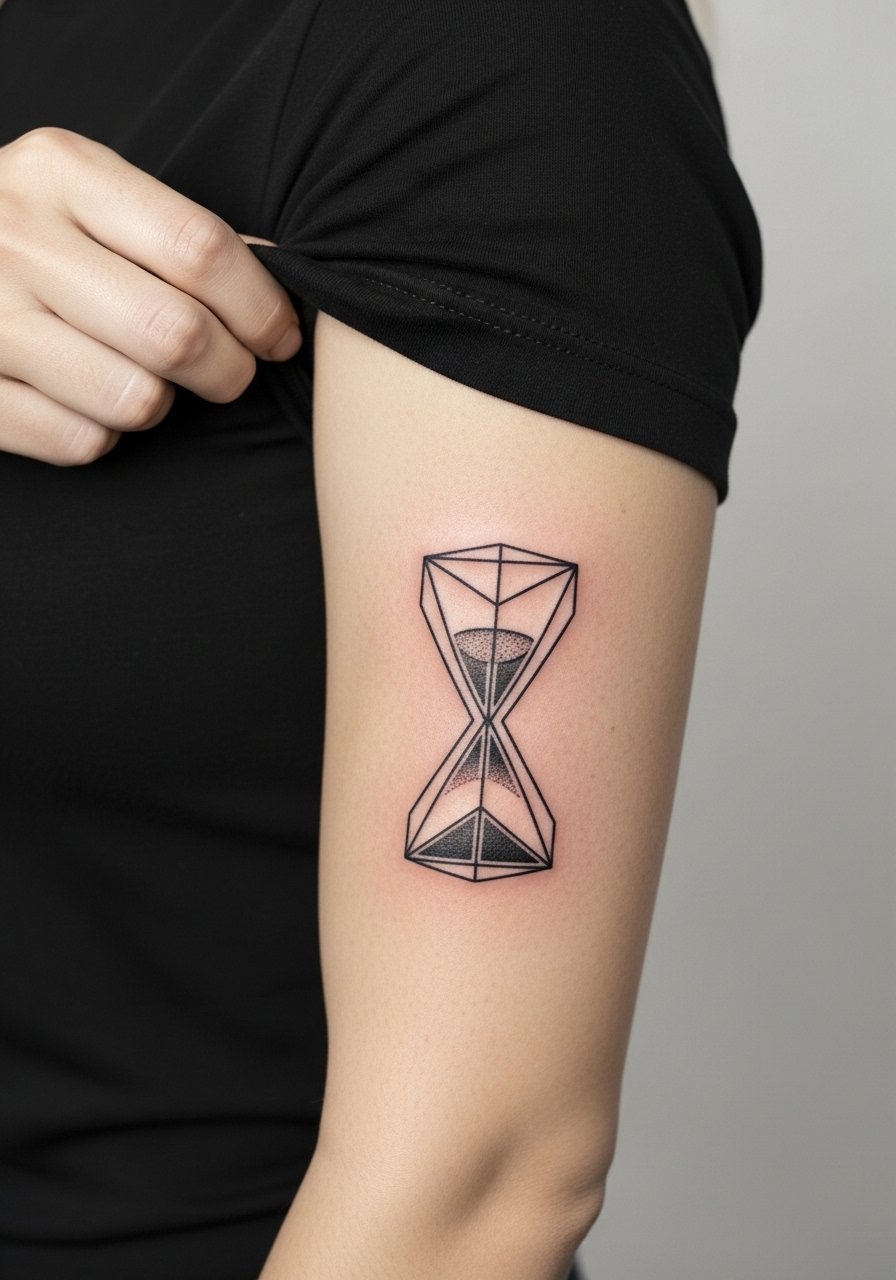
Geometric motifs demand exacting placement. Bring photos of your arm from multiple angles to the consultation and ask the artist to print a stencil and test placement. The frequent mistake is misaligned stencils that make shapes look skewed when viewed straight on. Sessions are short to moderate. For the reveal, a fitted short sleeve t-shirt keeps the silhouette clean. Over time check for slight softening along intersections and plan a touch-up if needed.
20. Nautical Sleeve Starter With Waves and Rope
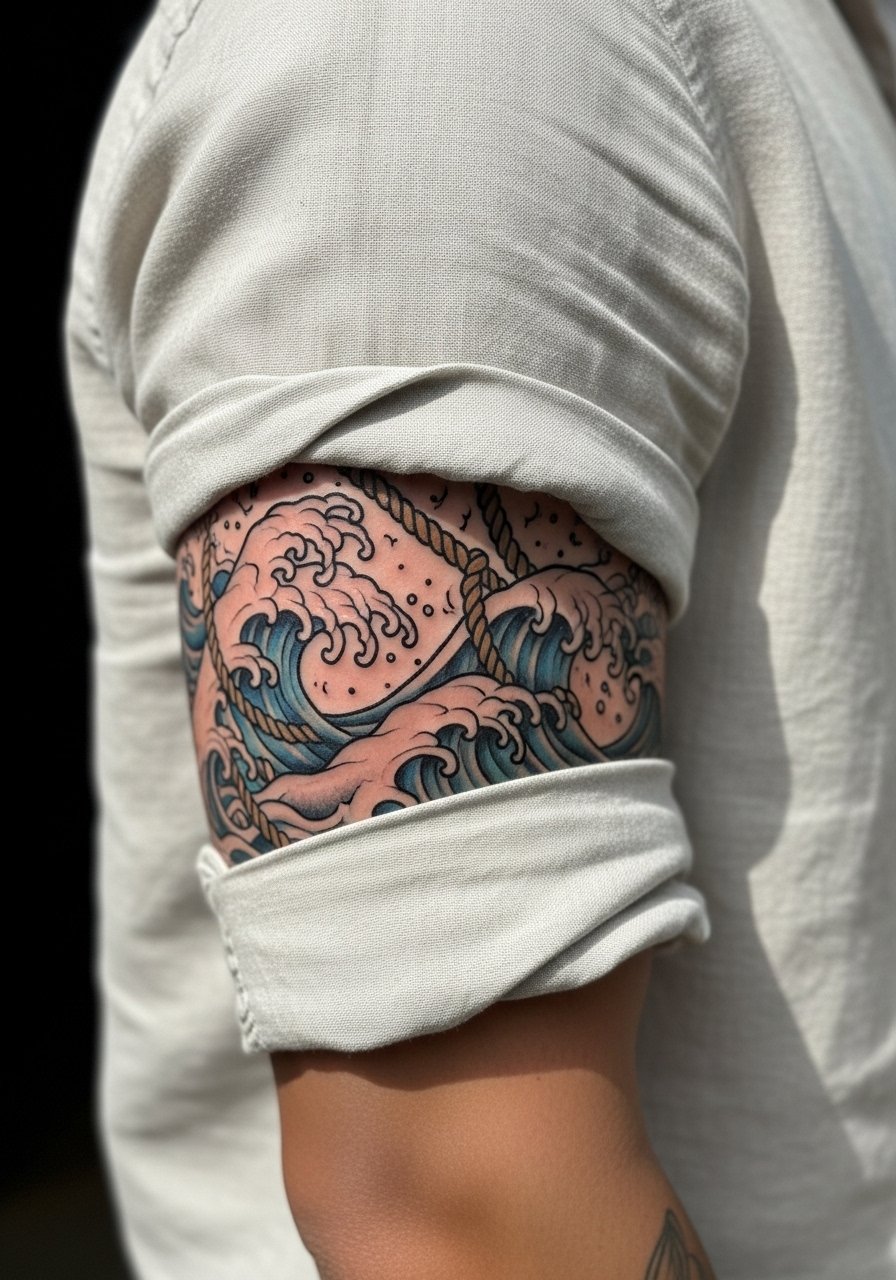
A sleeve starter that leans nautical makes future forearm additions simple to match. Ask for negative space pathways for future pieces and avoid locking the palette into one narrow tone. The common error is overcommitting color in the starter piece which limits later cohesion. Sessions are staged. For day-to-day looks a men's linen casual shirt rolled at the sleeves complements the ocean tones. With proper spacing this approach blends well with future work.
21. Minimalist Arrow Curving Over the Bicep
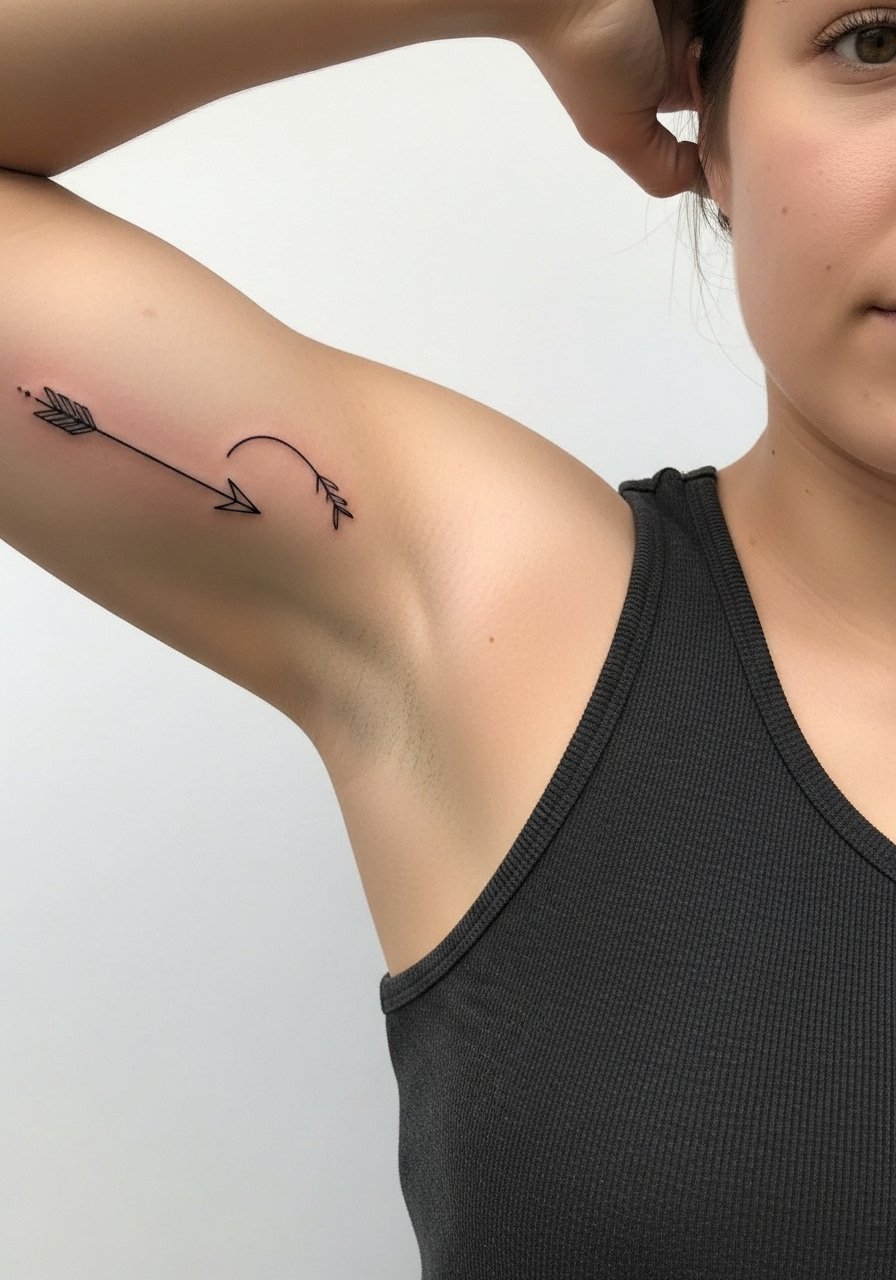
A single arrow looks intentional when placed to follow the muscle arc. Ask for a slightly increased line weight compared to a purely decorative needle so it holds. The mistake is requesting fragile single-needle lines that merge over time. Session length is short and pain is low. For casual wear pair it with a men's sleeveless tank top. Expect touch-ups in two to three years if you want the line to stay razor sharp.
22. Scripted Phrase Along the Upper Arm Ridge
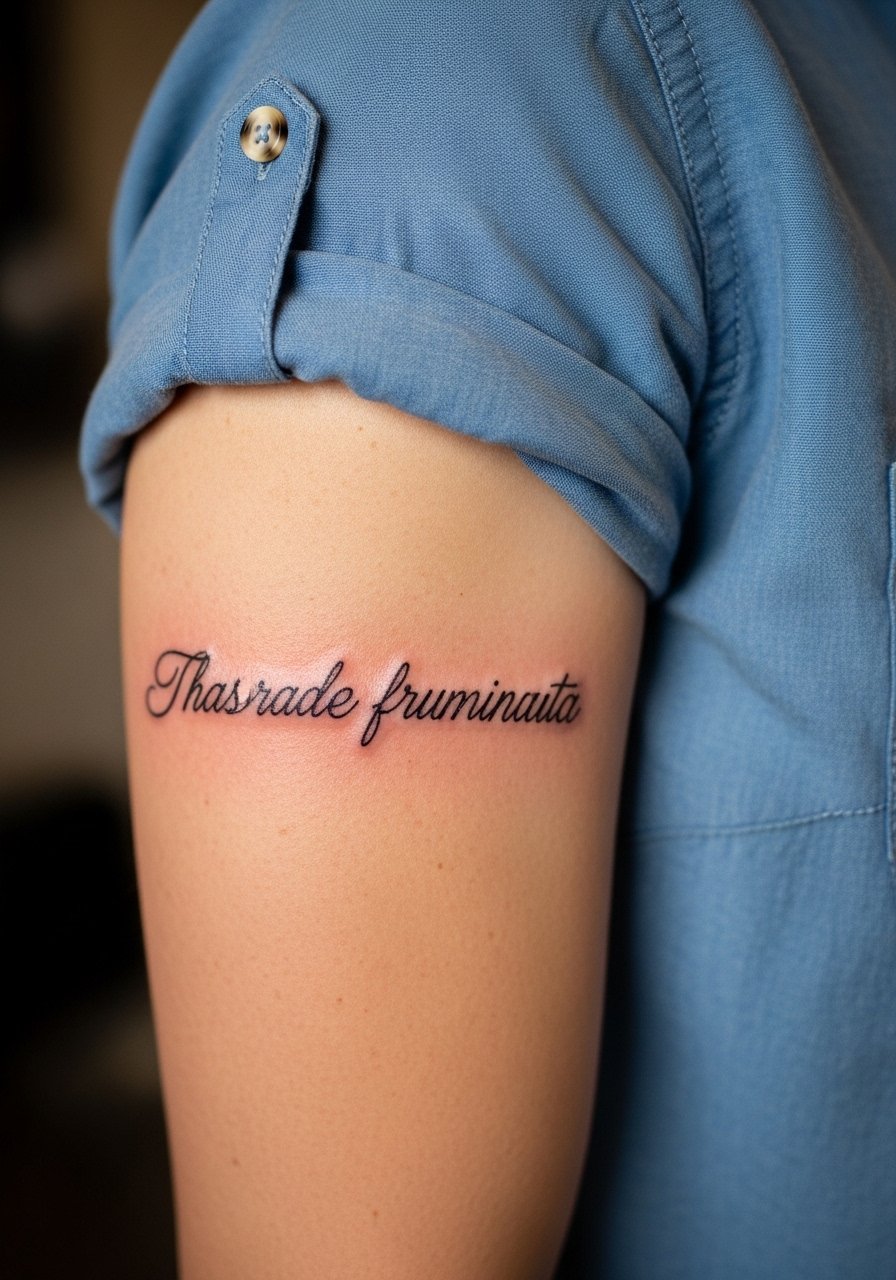
Script along the ridge reads best if the baseline follows the muscle curve. During consultation select a font that maintains thick and thin contrasts at the right scale. The error is choosing an ornate font that becomes illegible on skin. Sessions are short. For showing it off wear a men's rolled sleeve shirt so the text peeks out naturally. Expect moderate fade over time and plan on a touch-up for the midtones if you want preserved contrast.
23. Heraldic Crest Placed on the Outer Upper Arm
Crest work benefits from clear negative space around the design so each element remains distinct. Ask the artist to simplify ornate elements to retain legibility on muscle curves. The common mistake is over-detailing small heraldry which becomes muddy. Sessions are moderate. For shows try a fitted short sleeve t-shirt. A simplified approach preserves heraldic clarity through years of wear.
24. Bold Skull With Floral Accents on the Upper Arm
Skull imagery pairs well with softer florals to create contrast. Tell the artist which elements should sit on the peak of the bicep and which should recede. Mistakes happen when artists place heavy black directly on tight curvature which risks uneven saturation. Sessions are moderate to long. For the reveal wear a fitted short sleeve t-shirt. Expect the black to remain the anchor while florals may need color retouches after a few years.
25. Compass Rose With Map Fragment on the Upper Arm

Combining a compass with map fragments creates context and movement. Ask the artist to place the focal compass at the bicep peak and let the map fragment fade toward the tricep so the composition breathes. The error is crowding the arm with tiny map details that blur. Sessions are staged. For showing it off use a men's linen button up shirt with sleeves rolled. Proper spacing keeps the compass readable for years.
26. Abstract Brushstroke Blackwork on the Upper Arm
Abstract strokes lean into composition and muscle direction more than representational elements. Ask for proofing with temporary stencils to confirm visual rhythm while moving the arm. A common mistake is creating brush marks that fight the anatomy instead of following it. Sessions are moderate and may be split. For style pair with a sleeveless tank top. The bold black will remain dominant for a long time but expect minor softening at edges that can be refreshed.
27. Shielded Sleeve Cap With Negative Space Flowers

This is a final look that both anchors a sleeve and leaves room for forearm expansion. Tell the artist you want hard stops of negative space to prevent the top from dominating future lower arm work. The mistake is creating a dense top cap without planned exits which makes later sleeve balance difficult. Sessions are multi-step. For showing it off try a loose button-down shirt with rolled sleeves. The arrangement helps the piece age evenly while leaving planning flexibility.
Frequently Asked Questions
Q: How does a bold blackwork upper arm compare to fine-line work in terms of longevity?
A: From what I have seen, bold blackwork generally ages more predictably because the thicker line weight resists early bleeding and loss of contrast. Fine-line work looks incredible fresh but often needs touch-ups earlier, especially on softer areas like the inner bicep. If longevity matters more than initial delicacy, ask your artist to slightly increase line weight and leave breathing room around dense detail.
Q: If I want a sleeve later, which upper arm styles make the best anchor pieces?
A: Sleeve-friendly anchors are panels that respect negative space and include transitional elements such as smoke, waves, or ribbon motifs. Neo-traditional panels, illustrative connectors, and shielded caps often make the easiest anchors because they leave clear pathways for forearm additions. During consultation ask the artist to sketch possible connection routes so future sessions feel cohesive.
Q: Do I need special clothes for upper arm sessions and the first week of healing?
A: Yes. For shoulder and outer-arm work bring shirts that pull aside or sleeveless options so the artist can work without tugging fabric across fresh ink. For inner bicep or armpit pieces choose a loose tank so the artist can raise the arm comfortably. A clean, soft top helps the first week because friction from tight sleeves can irritate healing skin.
Q: Are second-skin coverings better than traditional balm for upper arm tattoos?
A: Artists and clients split into two camps on this. One camp prefers second-skin or protective films for the first few days because they limit friction and keep bacteria out. The other camp favors thin layers of balm and air exposure after initial cleaning. Both approaches work when applied correctly. Ask your artist which method they see hold up best for the style and placement you chose.
Q: How often should I expect touch-ups on upper arm pieces?
A: It depends on style and sun exposure. Bold, saturated blackwork and traditional pieces may go many years before needing work. Fine-line and watercolor elements commonly benefit from touch-ups around year two to year three. Keep in mind lifestyle, sun habits, and whether the area sees frequent friction when estimating timelines.
Q: Will my upper arm tattoo distort if I build muscle or lose weight?
A: Upper-arm placements move with muscle and fat changes but are generally forgiving compared to stomach or thigh areas. Designs that follow muscle lines and include negative space age more gracefully through body changes. If you plan major bodybuilding or weight loss, tell your artist so they can design with future contours in mind.
Q: How should I find an artist who specializes in the exact upper arm style I want without naming specific studios?
A: Search Instagram and booking platforms using style plus city tags such as #upperarmtattoo and #blackworktattoo combined with your city. Use booking platforms that filter by style and read verified client photos. When you find candidates, compare multiple portfolios for consistency in the specific technique you want before committing.
