
Fine line finger tattoos are trending, but they behave differently than the same designs on larger canvases. Tiny sigils and circuit motifs that look crisp in the chair can blur under constant hand washing and friction. These 21 cybersigilism templates translate cryptic tech motifs into finger-ready tattoos that consider spacing, needle depth, and wardrobe so the symbols stay legible for years.
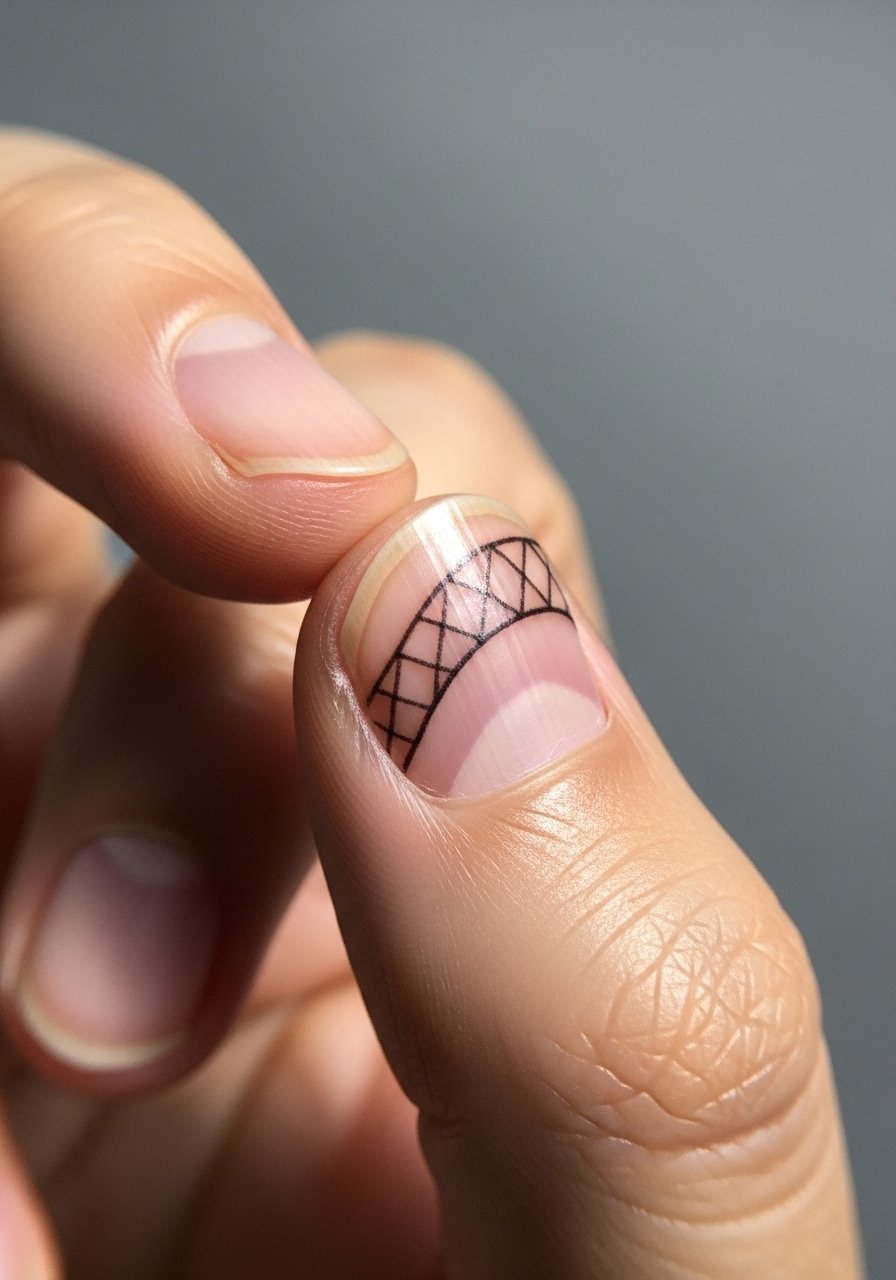
1. Minimal Circuit Sigil on the Side of the Index Finger

Most people pick the index finger for visibility, so I recommend spacing the nodes slightly wider than a screen mockup. In consultation tell your artist you want negative space between nodes and brief stipple shading around junctions, not heavy saturation, so the tiny dots do not merge later. Expect the session to be quick and sharp, pain level moderate given bone proximity, and touch-up likely by year two for most skin types. A common mistake is asking for denser cross-hatching to mimic digital noise. That ages poorly on fingers because the lines compress. For showing this off, pair with a thin chain ring that sits above the jewelry line and does not rub the tattoo.
2. Micro-Barcode Sigil Across Two Adjacent Fingers

The barcode aesthetic reads horizontally, so plan which finger alignment will sit flat when your hand is relaxed. Tell the artist to keep bars at least 1.5 millimeters thick and to avoid ultra-fine hairline widths. That choice reduces blowout risk and extends legibility to year three and beyond. Pain is sharp near the knuckle, session time under an hour. A mistake I see often is compressing the barcode to fit a ring gap, which makes it illegible after healing. For nights out, a simple matte signet ring lets the design peek through without crowding the visual field.
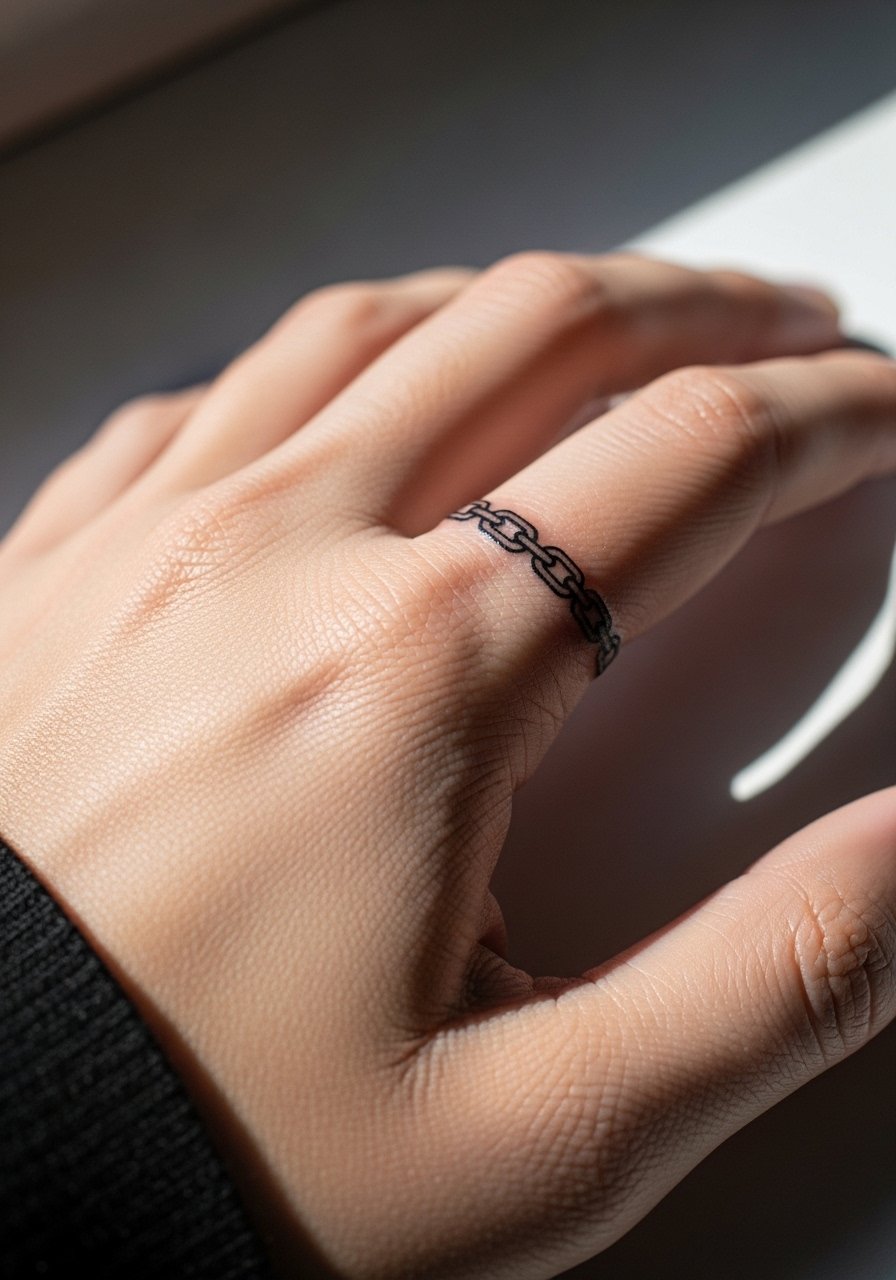
3. Micro-Runic Nodes Around the Finger Base

I like runic nodes as a ring alternative because the negative space breaks up saturation. Ask your artist to space each glyph evenly and avoid filling between them. That spacing protects against the common fate of ring-style work where full bands merge into a solid band after a few years. The ring area is prone to rubbing from jewelry and daily tasks, so expect touch-ups near year two. During the session wear loose gloves to keep the hand warm and steady. Pair this with a thin silicone wedding band if you need daily jewelry that will not abrade the fresh ink.
4. Dot-Matrix Glyph on the Finger Pad

Dot work on the finger pad is controversial because the skin there regenerates quickly. One camp says dot work can hold if the artist places dots shallow and spaced. The other camp argues any concentrated dot field will fade within a year. Name both camps in your consult and ask how the artist adapts spacing for grip areas. The session feels prickly and short. Expect faster fading than on the side of the finger and plan for a touch-up at year one or two. A frequent mistake is requesting dense stipple to mimic texture. For wearing during healing try a thin cotton fingertip cover when doing wet tasks.
5. Tiny Circuit Sigil at the Finger Joint, Vertical Orientation

Finger joints are mobile so the artist needs to advise about placement that sits on the flatter plane of the finger when relaxed. Tell them you want the sigil aligned with the natural crease and avoid crossing two creases. The session includes brief stretches and repositioning to check how the design looks in motion. Expect faster softening where the skin flexes, and budget for a touch-up in year two. The usual error is centering a design over multiple creases; that speeds degradation. For after-session wardrobe, a slim button-up glove helps keep scabbing clean while still letting the finger breathe.
6. Negative-Space Circuit Ring That Wraps a Finger

Negative-space rings age better than fully filled bands because the skin is not saturated continuously. In the consult ask for fine outlines with spaced connectors and limited solid fills. The pain level is moderate, session about 30 to 45 minutes. A common mistake is requesting a fully shaded band to emulate metal, which nearly always blurs into a dark smudge on fingers. This design pairs well with a delicate open band ring that frames the negative-space breaks without rubbing the tattoo.
Studio Day Picks
The small, high-contact finger placements above need different prep and protection than forearm work. These five items smooth the session and reduce early wear for the micro sigils and bands in ideas 1 through 6.
-
Transfer stencil film pack. Lets you preview how the tiny sigil sits on the finger so you can adjust spacing before needles touch skin.
-
Low-odour topical numbing cream. Use 30 to 45 minutes before the session for relief on joint work without masking outline feedback.
-
Thin protective film roll. Useful for the first day on finger tattoos that face constant washing and rubbing.
-
Gentle fragrance-free soap. Cleans hands without additives that irritate tiny linework during the first week.
-
Aquaphor healing ointment. Thin layers protect the very fine needle channels in finger work without heavy occlusion that can smother delicate lines.
7. Micro-Lattice Grid Across the Finger Nail Bed Edge
A lattice that hugs the nail edge reads like jewelry when done with slight spacing. The nail bed is tricky because constant hand washing and nail care accelerate fade. Tell your artist you want the grid slightly raised off the cuticle line to avoid manicure rubbing. The session is fiddly and may require working around the nail plate. Expect touch-up before year three, especially if you change nail polish often. A common mistake is pushing the grid directly on the cuticle margin which the salon will rub away. For showing off, a matte band ring keeps the focus on the micro-lattice without interfering.
8. Binary-Code Tiny Script on the Side of the Little Finger

Binary sequences look effective when the digits are spaced for clarity. Ask for digits spaced with small gaps between each pair so they read even after slight spreading. Expect short session time and a moderate sting during needle passes near the tip. The typical error is compressing digits to mimic a continuous band; that makes them unreadable in a few years. If you want to conceal the work for interviews, a thin woven ring placed above the design can hide it without covering the ink directly.
9. Micro-Mandala Cyber Sigil on the Finger Pad Edge

Mandala-derived sigils compress many details into a tiny field and that invites trouble. The aging truth is mandala detail needs spacing and selective simplification to survive on a fingertip edge. Tell the artist to reduce petal count, emphasize outer contours, and use dot work sparingly. The session is delicate and quick. A mistake is asking for full mandala density at micro scale. For session comfort, wear a breathable cotton glove with the tip cut off to protect the area during transit.
10. Tiny Glyph Stack on the Top Joint of the Middle Finger

Stacked glyphs that sit above the top joint must follow the finger movement plan. Artists differ here. One camp insists shallow placement avoids blowout, while the other says slightly deeper insertion locks lines in place. Name both camps when you book and ask the artist how they balance depth versus spread. Expect a sharper session and touch-up by year two. The common mistake is stacking too many glyphs vertically which forces compression. For wear during recovery, a slim finger sleeve protects scabs while keeping the tattoo visible for inspection.
11. Single-Pixel Sigil at the Fingertip Crease

Pixel-like dots on the crease are high risk because creases move and skin renews rapidly. I usually recommend placing the dot just off the crease so it keeps shape. Tell your artist you prefer a slightly offset placement to account for motion. The session is tiny and quick but expect the fastest fade of any finger placement. The typical error is centering on the fold. For short-term protection while scabbing forms, a thin breathable fingertip bandage helps reduce friction.
12. Micro-Armor Plate Motif Spanning Two Fingers
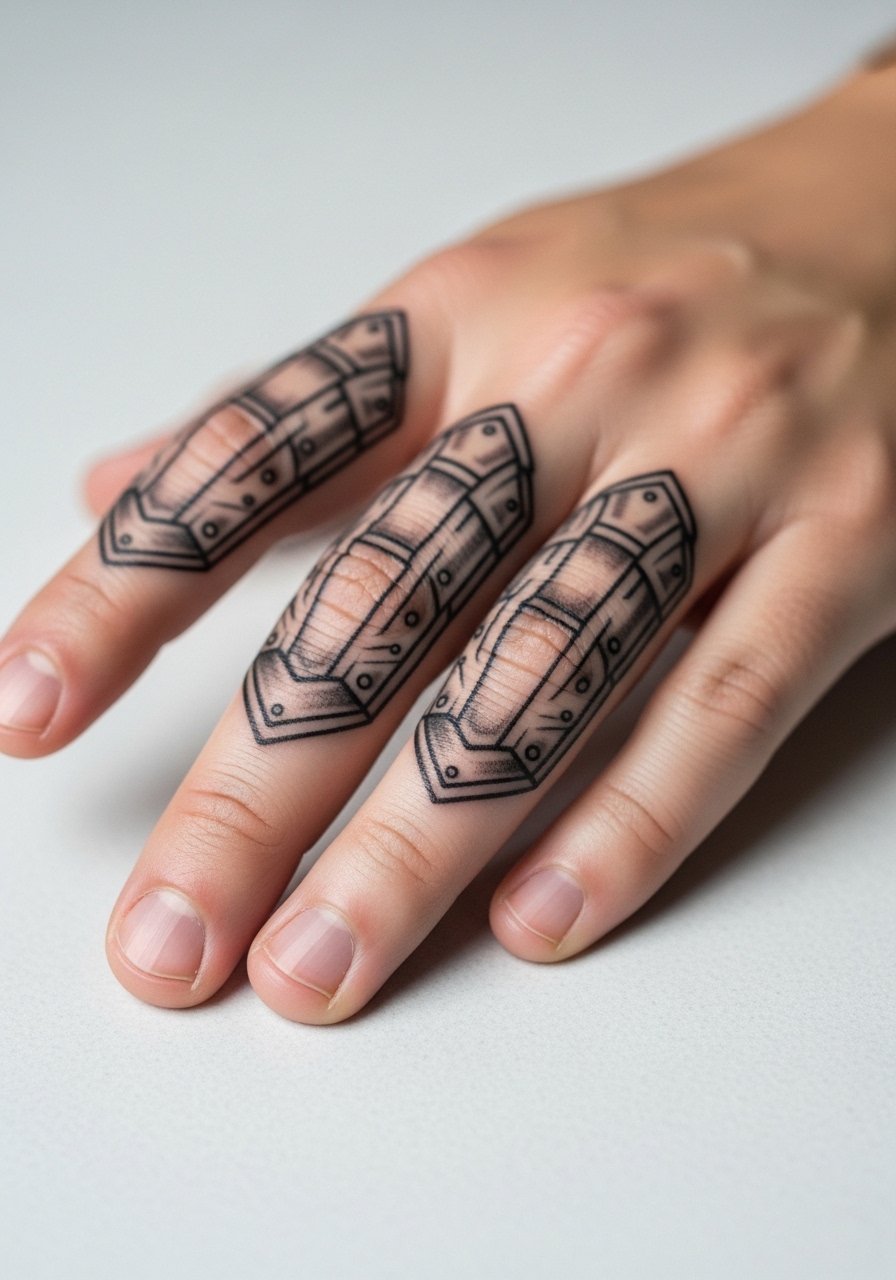
Interlocking plate motifs read like small tattoos and make a graphic statement when the fingers come together. For longevity ask for clean negative-space gaps between plates and avoid heavy black fills. The session takes longer than a single finger piece because of alignment needs. A common mistake is over-saturating the plates to look metallic which speeds up blurring. For showing off at concerts or nights out, a simple cuff bracelet frames the hands without rubbing the design.
13. Tiny QR-Like Sigil That Resolves Only Up Close

QR-style aesthetics imply machine-readability but most micro QR designs will not scan. The appeal is visual. Request that the artist simplify corner blocks and avoid trying to compress too many squares. The session is precision work. The reality is mini QR details will soften faster than larger black blocks, so expect touch-ups. A common mistake is treating it like functional code instead of ornament. For wardrobe pairings try a minimal gold band that complements the grid.
14. Micro-Glitch Line That Runs Perpendicular to the Finger

Glitch lines look kinetic when placed across the finger, but movement causes micro-tracking. I recommend a slightly thicker main stroke with thinner ancillary strokes to retain the glitch feel without relying on ultra-fine lines. Expect a quick sting during the session and a likely touch-up window at year two. The mistake is asking for hairline fragments that will not hold under friction. For showing this piece wear a rolled-sleeve linen shirt so the arm frames the hand without distracting from the glitch.
15. Minimal Node-and-Line Sigil Running Along the Finger Side

Side-of-finger placements tend to be less abrasive than the pad or top. I advise nodes no smaller than 1.5 millimeters and lines slightly spaced so they do not bleed together. The session time is short and discomfort moderate. A common error is shrinking node sizes to match an on-screen mockup which accelerates blur. For daily life a thin leather wrap ring keeps the visual interest without touching the ink.
16. Tiny Neon-Style Outline Simulating LED Traces

Neon-effect outlines ask for a crisp outer line with a lighter inner wash if color is used. For fingers I generally advise sticking to black or deep indigo for longevity and avoiding saturated fills that fade unevenly. The session feels quick and the aftercare is normal, but colored micro work can need touch-ups sooner. A common mistake is requesting bright neon inks at micro scale. For shows or photos pair with a matte black ring to contrast the thin outline.
17. Constellation Sigil That Maps to a Coordinate
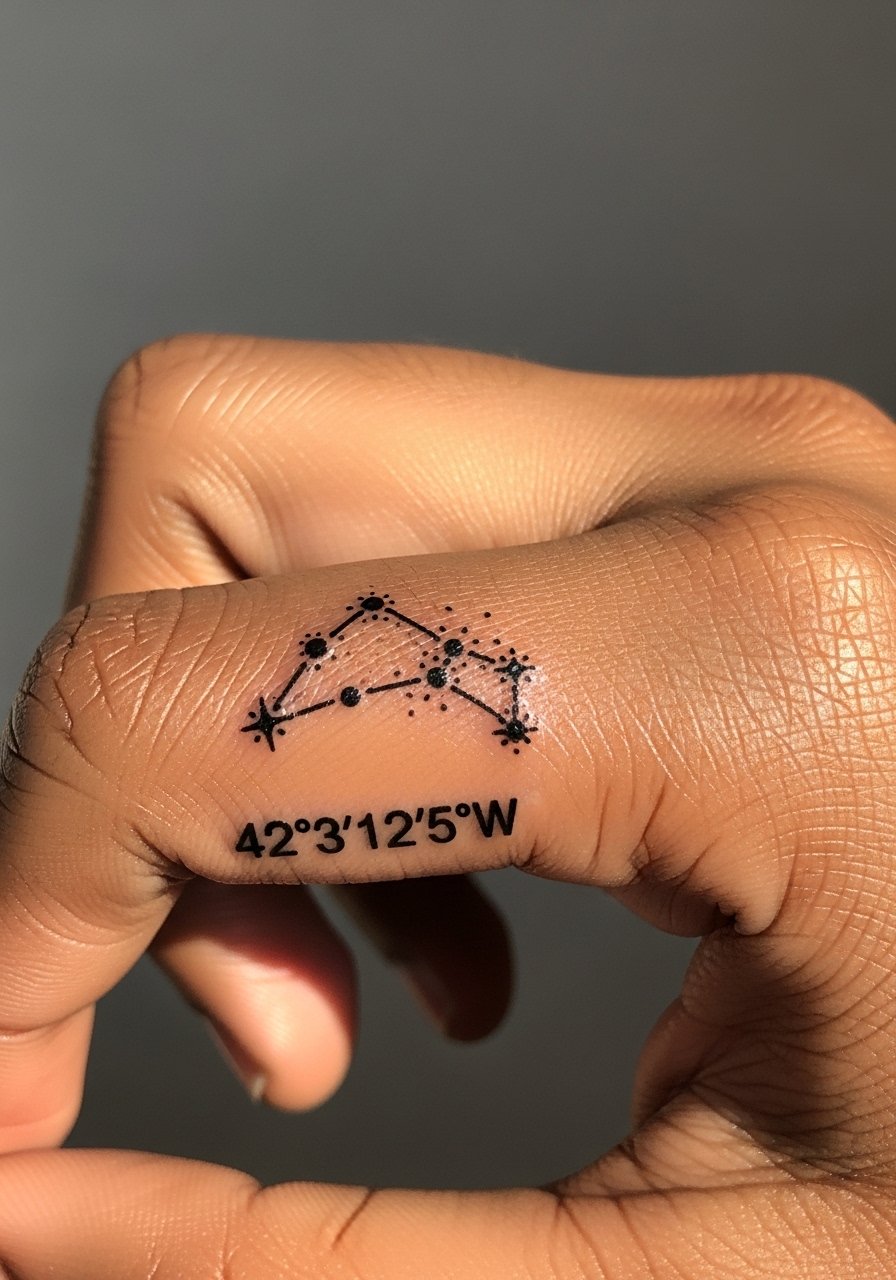
Constellation motifs are forgiving because negative space supports the stars. If you include coordinates, specify the exact text to avoid gibberish generation in images and stencil prep. I recommend keeping star dots slightly larger with thin connecting lines. The session is delicate and might require multiple small passes. The common mistake is chaining many tiny stars without spacing which accelerates merging. For showing off alongside this design, a thin coordinate bracelet sits on the wrist and creates a narrative without covering the fingers.
18. Micro-Encryption Glyph That Reads Differently Per Angle
These ambigram-like sigils reward motion by changing their perceived shape. Tell your artist you want asymmetrical anchors and avoid symmetry that collapses when the skin stretches. The session requires test rotations to check readability. One camp says small ambigrams fail due to skin movement, and the other camp builds designs that rely on negative space to resolve. Name both camps and ask for their sample work. Expect touch-ups and plan for a retouch at year two. For discreet wear a thin wrap ring sits above the piece without rubbing.
19. Micro-Grid with Tiny Legend Symbols on Each Finger

A legend across multiple fingers reads like an interface when the hand is open. During consultation ask for a simple key and keep legends minimal so each symbol has room. The session spans a bit longer since multiple fingers require alignment pauses. A mistake is overloading each symbol which forces compression and rapid blurring. For showing this ensemble try stacking a thin midi ring set that accents the hand without rubbing the tattoos.
20. Micro-Anchor Point Sigils at the Base of the Thumb

The thumb base moves a lot when gripping, so I suggest slightly larger anchors and open space around them. The session is sharp and placement needs testing during motions. Expect faster softening if you do manual labor or heavy texting. A common error is shrinking anchors to match a screen mockup which reduces longevity. For everyday wear, a thin leather thumb ring avoids contact with the tattoo while complementing the design.
21. Micro-Chain-Link Sigil That Mirrors a Bracelet
Mirrored chain-link motifs echo a bracelet without requiring wrist ink. To hold up, connectors should be spaced and not fully shaded. During the consult ask for slight gaps at the connectors to prevent the chain from merging into a band. The session is moderate in duration and the usual mistake is solid fills to mimic metal which will blur on fingers. For pairing, a delicate wrist chain frames the hand without touching the finger art.
Frequently Asked Questions
Q: How long do micro cybersigilism finger tattoos usually stay readable?
A: It depends on placement and daily friction. Side-of-finger and ring-area negative-space designs often read clearly longer than pad or crease placements. From what I have seen, plan on touch-ups as early as year one for high-contact spots and year two for calmer zones.
Q: Are colored inks a bad idea for tiny finger sigils?
A: Color at micro scale tends to fade unevenly faster than deep black or indigo. If you want color, ask for minimal accents with strong contrast and accept that touch-ups will be more frequent. Many artists recommend deep indigo over bright neon for small work.
Q: How should I prepare for a finger session that crosses multiple fingers?
A: Wear clothing that gives clear access to your hands and wrists. A button-down with sleeves you can roll or a short-sleeve top works well. Bring a small hand sanitizer and avoid heavy lotions before you arrive. If you want to protect the work after the session, consider a thin breathable fingertip bandage for the first day.
Q: Do finger tattoos affect professional appearance?
A: Some industries still judge visible hand and finger tattoos. The debate is active. One camp argues visibility impacts hiring in conservative fields. The other camp points to growing acceptance in creative and tech sectors. Think about your career path and whether you need concealment options before booking.
Q: How do I find an artist who does durable micro finger work?
A: Search portfolios via directory listings, local convention rosters, and hashtag exploration. Look for recent healed photos of finger work in portfolios and ask about their touch-up policy in the consult. Ask which techniques they use on fingers and request healed photos at least a year old if available.
