
Fine line chest work looks amazing in photos, but the real test is how it lives on skin. Trends push smaller linework and whisper-thin scripts, and those pieces can look delicate for a year then soften faster than people expect. These ideas pick placements, spacing, and wardrobe cues that keep detail readable over time while still feeling like jewelry on the chest.
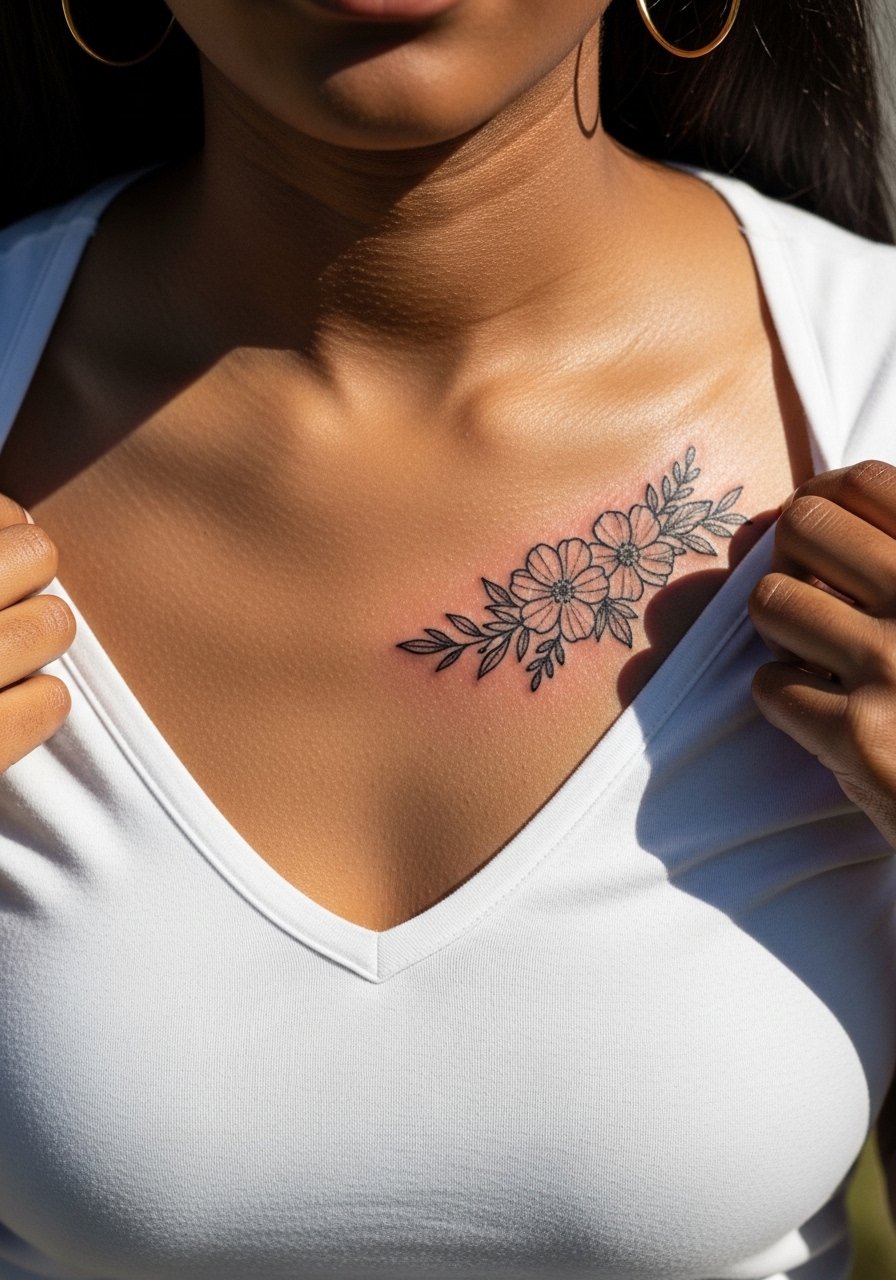
1. Fine Line Sternum Sprig
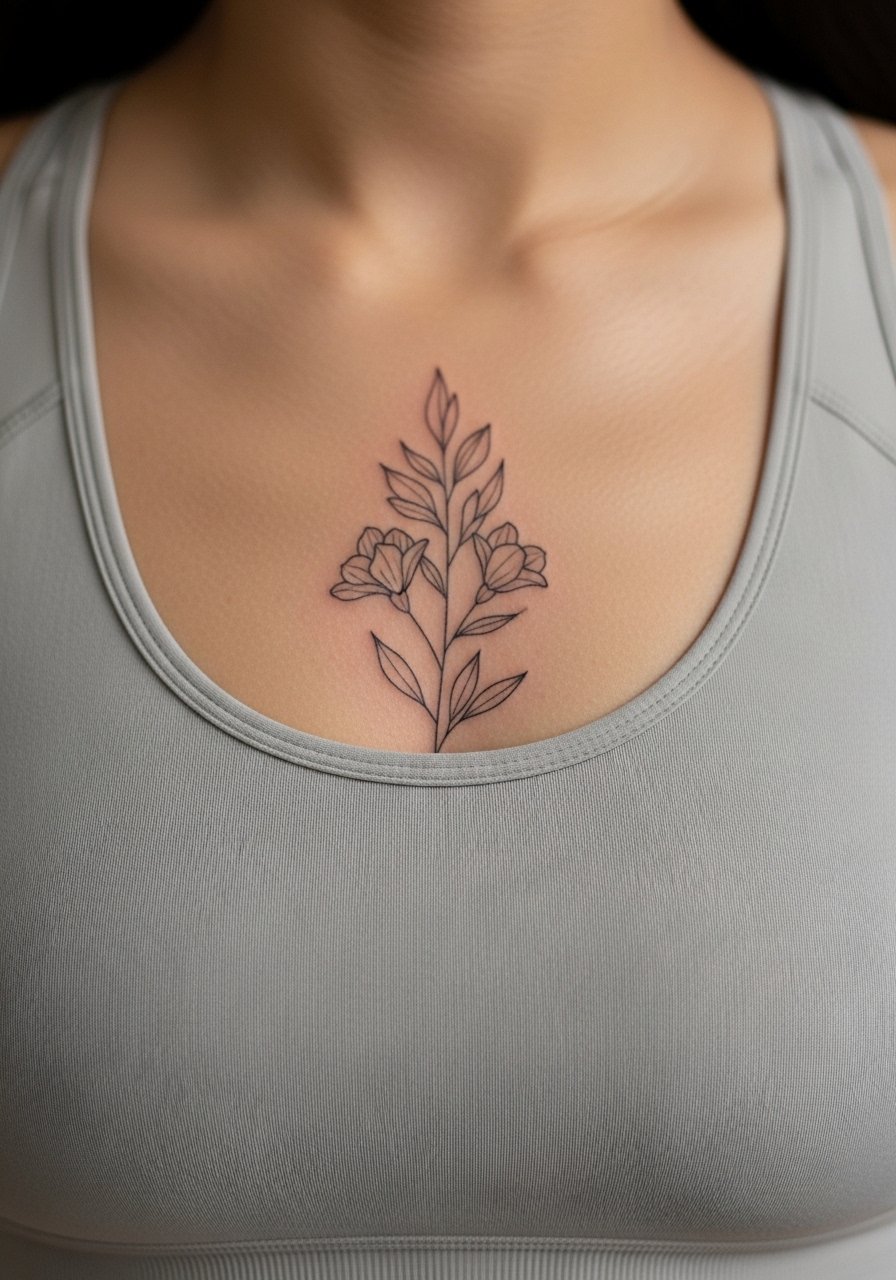
Most people want a sternum piece that sits like a pendant. For delicate work, ask for single-needle linework with small negative space between branches so the design breathes over time. Fair warning, the sternum can be a 6 to 8 on pain scales for many, and the skin there moves during breathing which affects healing. The common mistake is asking for overly dense dot shading which fills in after healing. For session wear, bring a strapless bandeau or sports bra you can remove and put back without tugging the chest, and expect a 60 to 90 minute appointment with a likely touch-up at year two.
2. Tiny Heart Over Left Chest

I've seen the micro heart become a default first-chest piece. It reads intimate and soft when placed just above the breast, but it can blur if done too small. Ask your artist to size it so linework has at least a few millimeters of breathing room. Pain is usually lower than the sternum, around a 4 to 5, and sessions are brief, often under thirty minutes. A common aging issue is lines merging when artists use ultra-fine needles at shallow depth. If you want to show it off, a low V-neck frames it without covering the mark.
3. Crescent Moon Nestled by the Collarbone
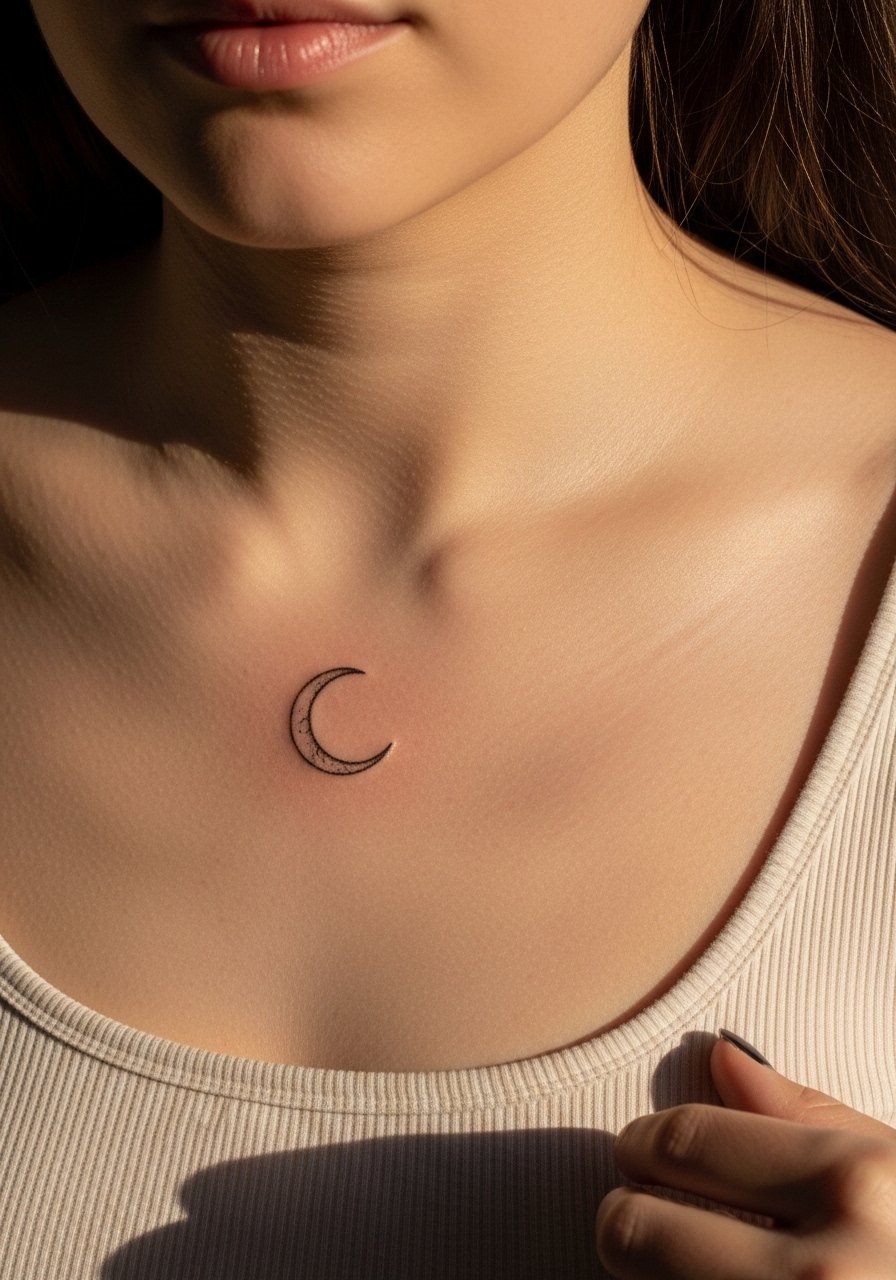
Visual impact matters on the collarbone because clothing frames the area. For a crescent moon, request slightly bolder single-line contours with light interior stippling instead of dense wash shading. The collarbone sits at a moderate pain level, about a 5, and sessions tend to be 30 to 45 minutes. The most common mistake is putting too many tiny details into such a shallow plane, which creates blur after a few years. If you want to show it often, pair it with a thin chain necklace that sits just above the ink so the two read as a set.
4. Micro Script Along the Upper Chest
Consultation tip, bring a few font options and mark the exact placement on your skin. The upper chest stretches differently than the forearm, so ask the artist to space letters slightly wider than your screen mockup. Expect the session to be 20 to 40 minutes and mild to moderate pain. One camp argues small script will blur on chest skin within two years. The other camp insists careful spacing and proper depth keeps script legible for much longer. Ask which side your chosen artist is on before booking. For styling on cooler days, a wide-neck sweater shows the lettering without rubbing it.
5. Single Rose Over the Heart

A single rose on the left chest reads like a personal emblem, and heavier outer lines with lighter inner detail hold better over time than all-fine line petals. Pain at this placement is usually a 5 to 7 depending on proximity to the sternum. Sessions can run 45 to 90 minutes for clean shading. The frequent error is filling petals with tight dot work that smudges into a blotch after a few years. For the session, wear a scoop-neck tee you can lift up without stretching the flower.
6. Paired Stars Across the Décolletage
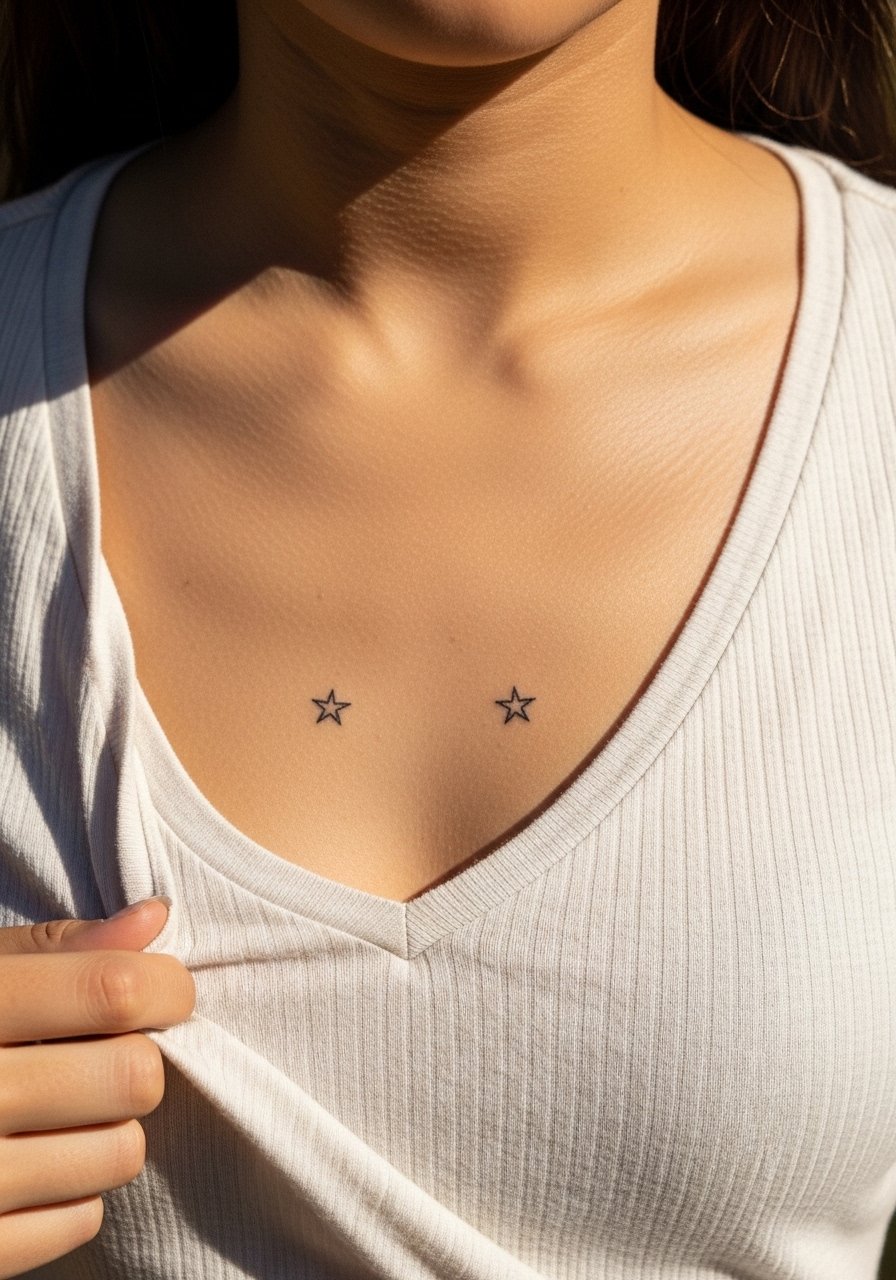
Styling lead, this placement plays with symmetry and wardrobe. Keep stars spaced and resist tiny clusters that age into indistinct specks. Pain is usually mild to moderate and sessions are quick. People often want a tight constellation that reads well up close but disappears from a distance. For longevity, ask for slightly stronger outline contrast and keep inner dots minimal. Pair the stars with an open V-neck blouse for evenings out or a racerback tank if you plan to show it during workouts.
Studio Day Picks
Those upper chest, sternum, and collarbone sessions above benefit from targeted prep and a small kit to smooth the first week of healing.
-
Stencil transfer paper kit. Lets you preview placement on skin before the needle touches down, which is helpful for collarbone and sternum layouts.
-
Topical numbing cream. Applied before the session eases the sharpest minutes on the sternum or over-the-heart pieces without muting artist feedback.
-
Thin protective film roll. Handy for small chest pieces that might rub against clothing during the first few days.
-
Fragrance-free gentle body wash. Cleans the healing area without stripping oils or irritating sensitive linework on the chest.
-
Aquaphor healing ointment. A thin smear helps lock in moisture early on for delicate linework, which reduces scabbing that pulls at fine lines.
7. Minimalist Lock and Key at the Center
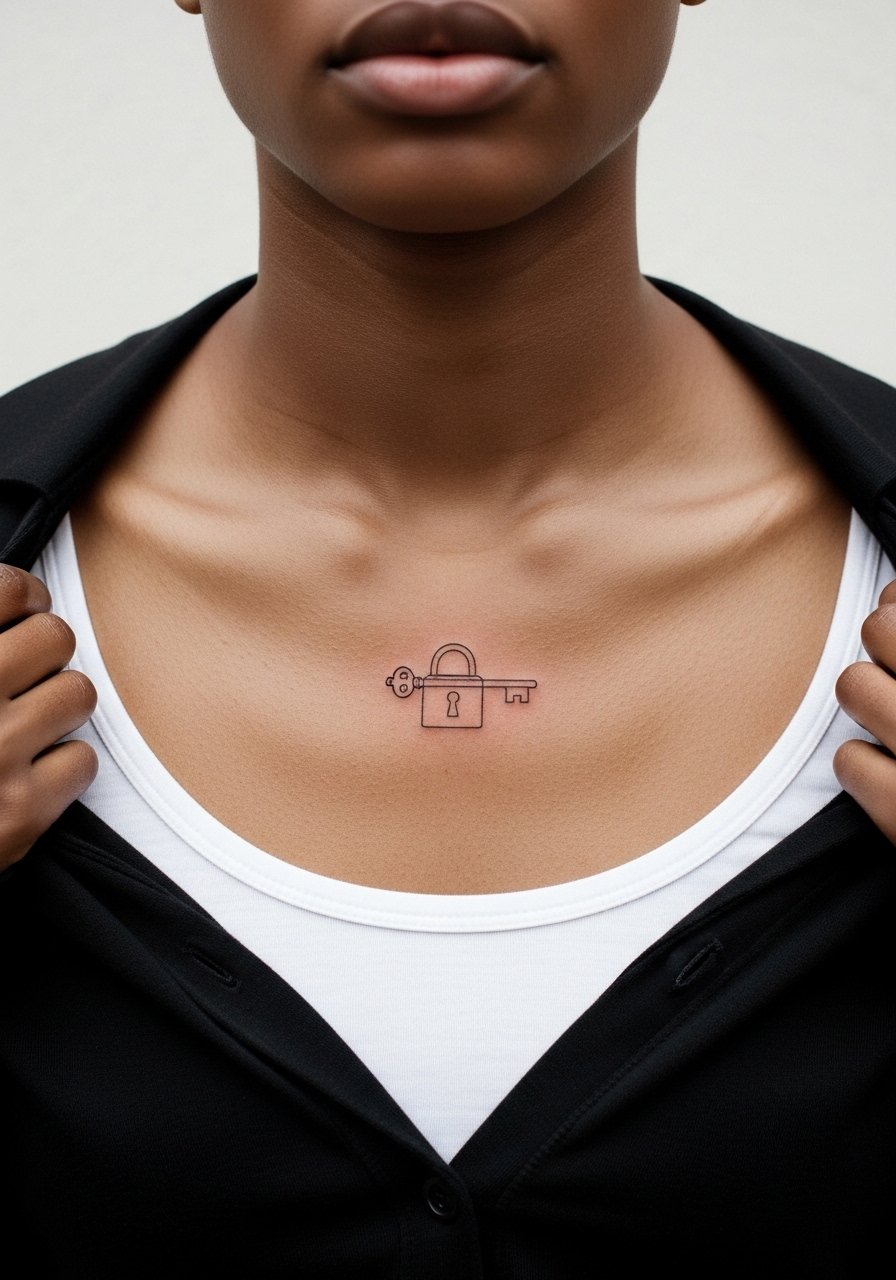
Consultation lead, discuss relative scale for the two pieces so the lock does not overpower the key. Centered pieces move with breathing which affects shading, so favor clean linework over dense fill. Pain tends to be moderate and sessions can take 45 minutes if both icons are detailed. A common mistake is asking for microengraving inside the lock that becomes unreadable. For showing this off, a button-down shirt worn open frames the motifs like jewelry without rubbing them.
8. Delicate Sun Rays Above the Collar
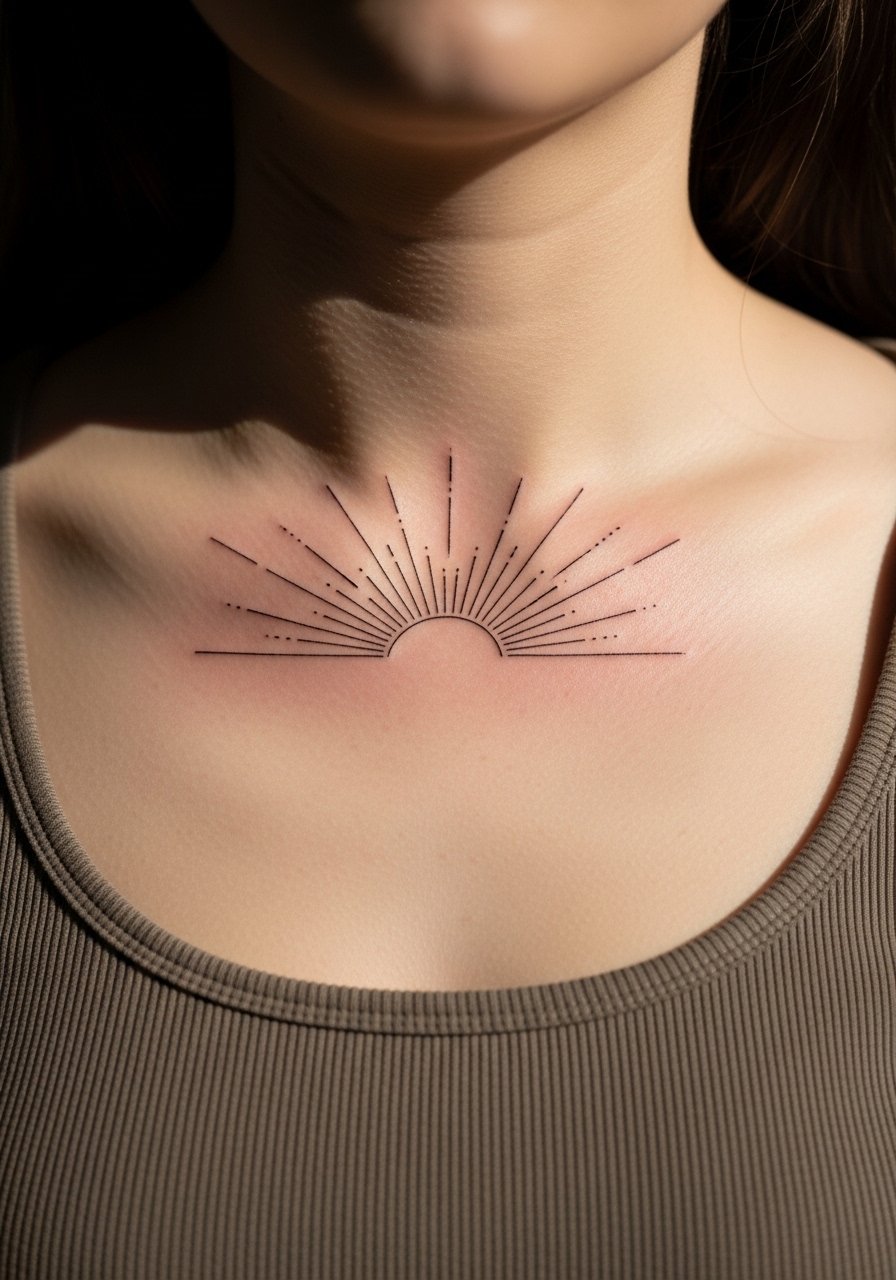
Aging/healing lead, sun rays can diffuse if too many thin rays are packed tightly. Space rays and keep transitions simple. The collarbone area is forgiving for moderate pain but the skin can sit tight so the artist may suggest a narrower band than on an arm. Sessions are usually under an hour. The typical mistake is over-embellishing rays with tiny dots which merge later. Pair with a thin chain choker to echo the radial lines.
9. Lace-Inspired Filigree Along the Upper Chest
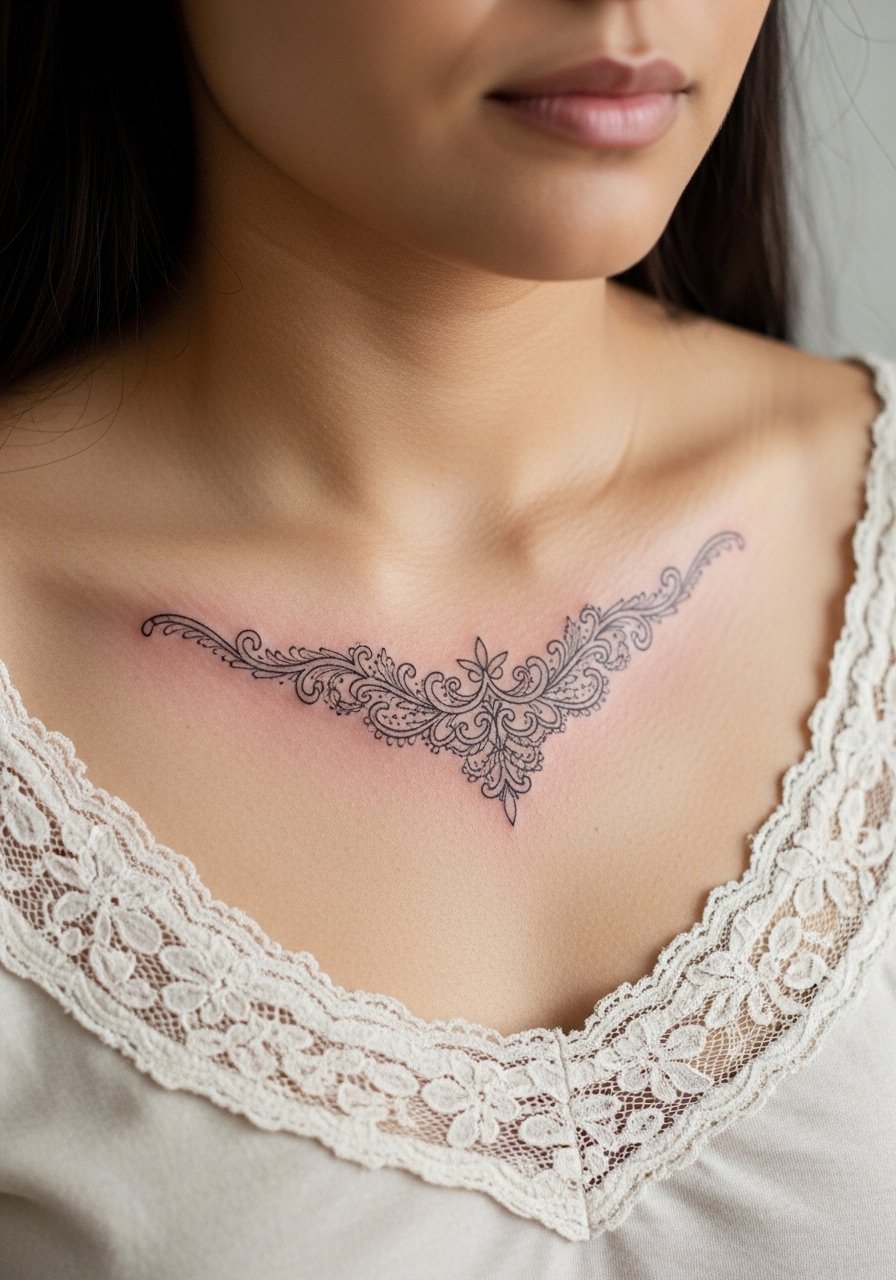
Mistake lead, the biggest error with lacework is over-detailing at a tiny scale. For the upper chest, ask for negative space to read like fabric, not engravings that fill in. Expect moderate pain and a session of 60 to 90 minutes for a chest band. Blowout risk is low if the artist keeps needle depth consistent. For show-off styling, a lace-trim camisole sits perfectly with the filigree and keeps clothing edges from rubbing the fresh ink.
10. Micro-Realism Single Eye on the Sternum Ridge
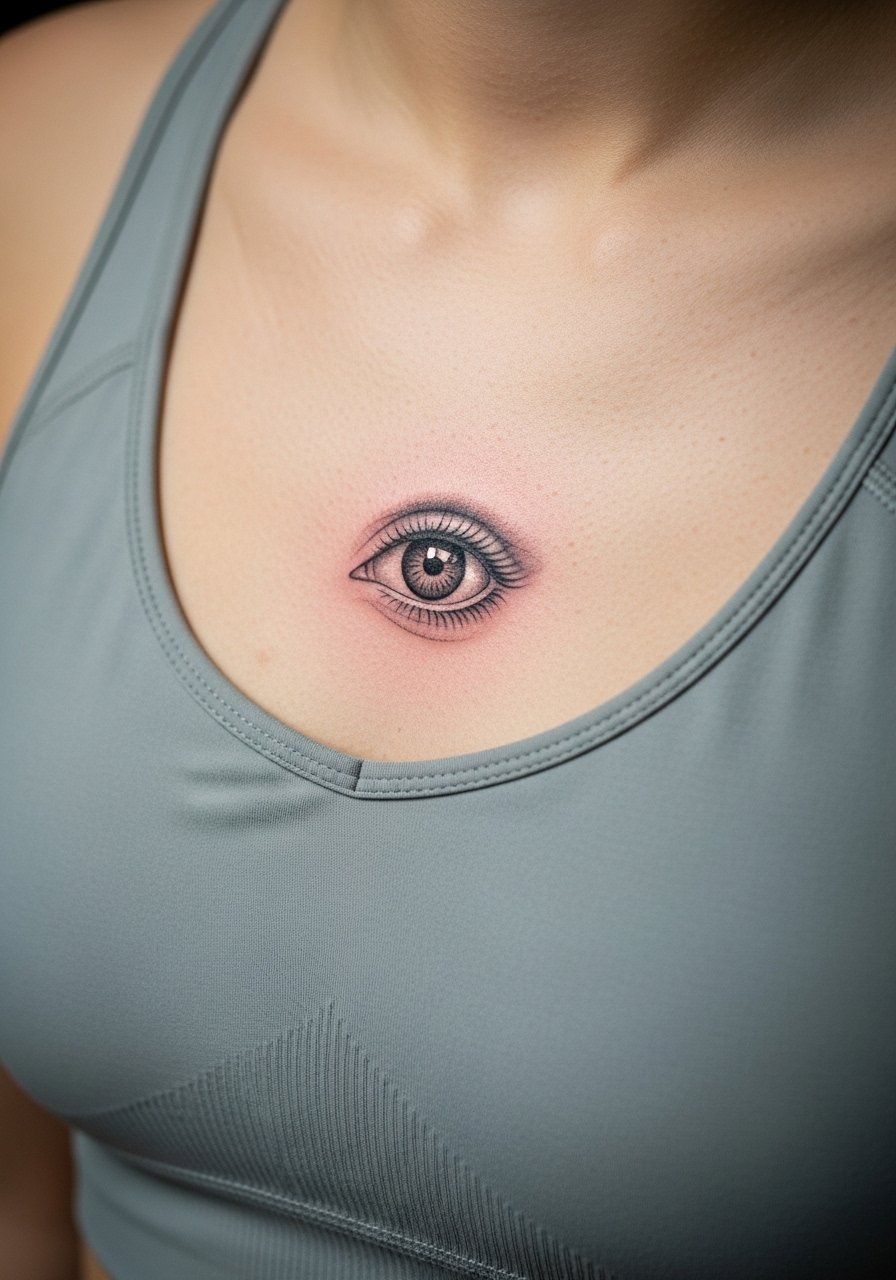
Personal observation lead, micro-realism on sternum reads like a talisman but demands a steady hand and realistic scale. The sternum area increases sensitivity, which can extend session time. Most artists caution against hyper-detail at tiny sizes because lashes and iris ticks merge during healing. If you choose this, expect a touch-up window within the first two years. Special note, some artists will not attempt tiny micro-realism on sternum due to skin movement, so ask about previous healed photos.
11. Mirrored Minimal Wings Over Each Collarbone

Styling lead, mirrored wings read like statement jewelry when worn with open necklines. The balance is essential so stencil placement is key, and a short session to preview symmetry saves touch-ups later. Pain is mild to moderate and sessions are typically 30 to 60 minutes. A common mistake is asymmetry from rushed stenciling. For evening wear, an open-back dress with strap detail shows the shoulders and keeps focus on the wings.
12. Tiny Anchor Near the Lower Chest Edge
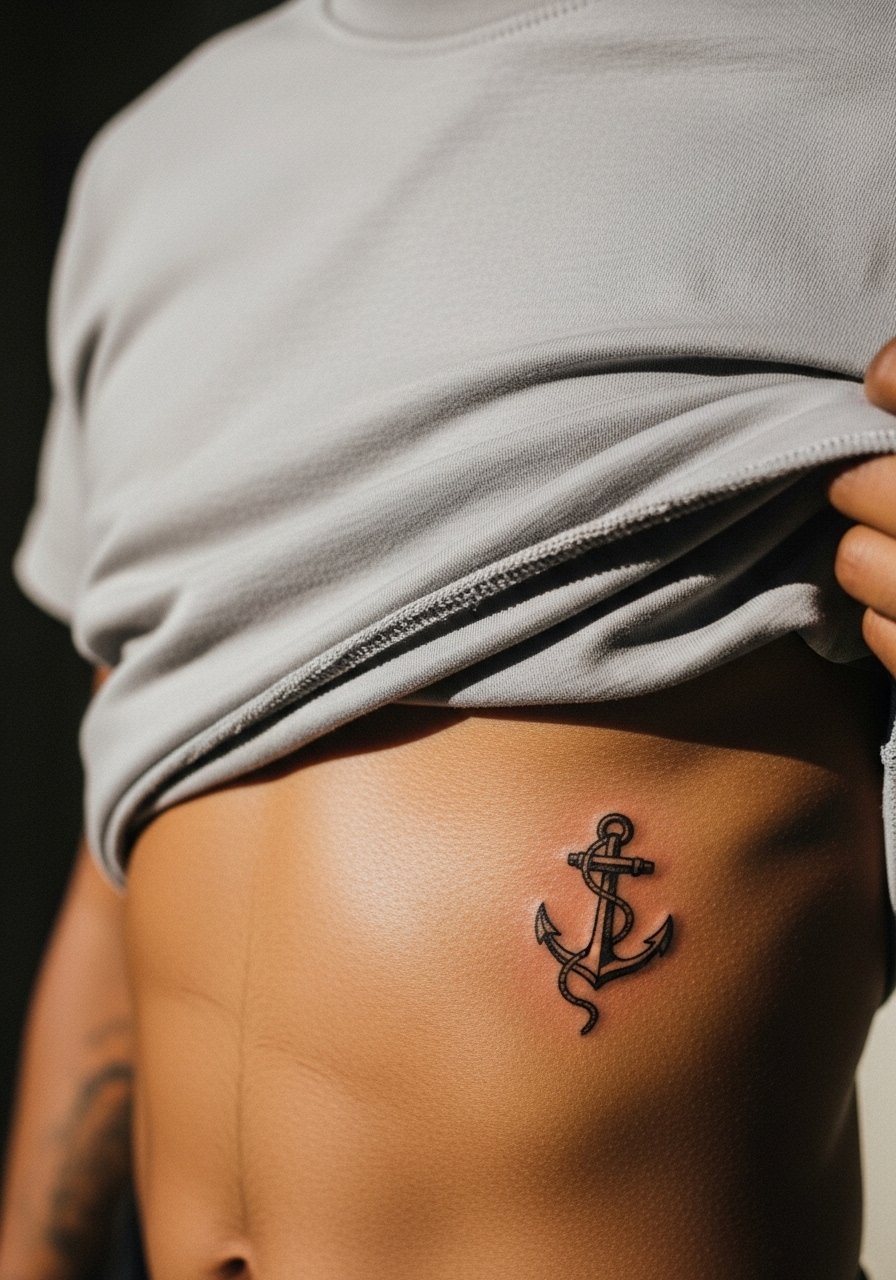
Pain warning lead, the lower chest can be tender near the ribcage border. Anchors read crisp if the outlines are slightly stronger and inner detail is minimal. Sessions for tiny chest anchors are short, often under 30 minutes. The prevalent mistake is asking for shaded rope that fills in over time. If your day job requires modesty, consider this placement carefully since it sits lower than collarbone pieces.
13. Geometric Triangle Cluster Centered Low on the Chest
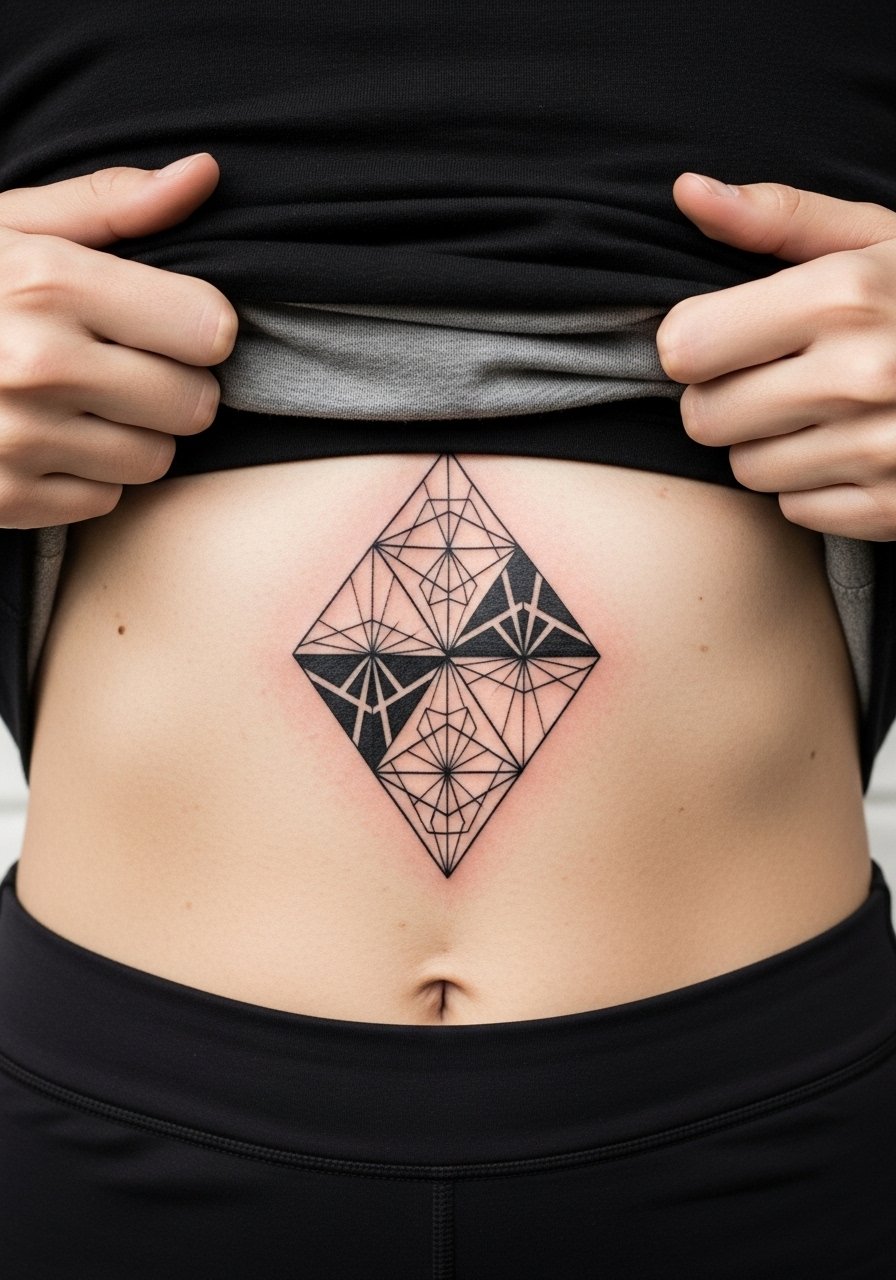
Consultation lead, discuss scale and negative space so triangles do not become a block after healing. The lower chest near the sternum flexes, so spacing saves crisp angles. Sessions are moderate in length depending on the number of shapes. The mistake is stacking too many thin triangles in a tight area. Pair with high-waisted skirts or a cropped athletic top when you want to show the geometric pattern without tugging at the ink.
14. Minimal Anchor Script Under the Collarbone
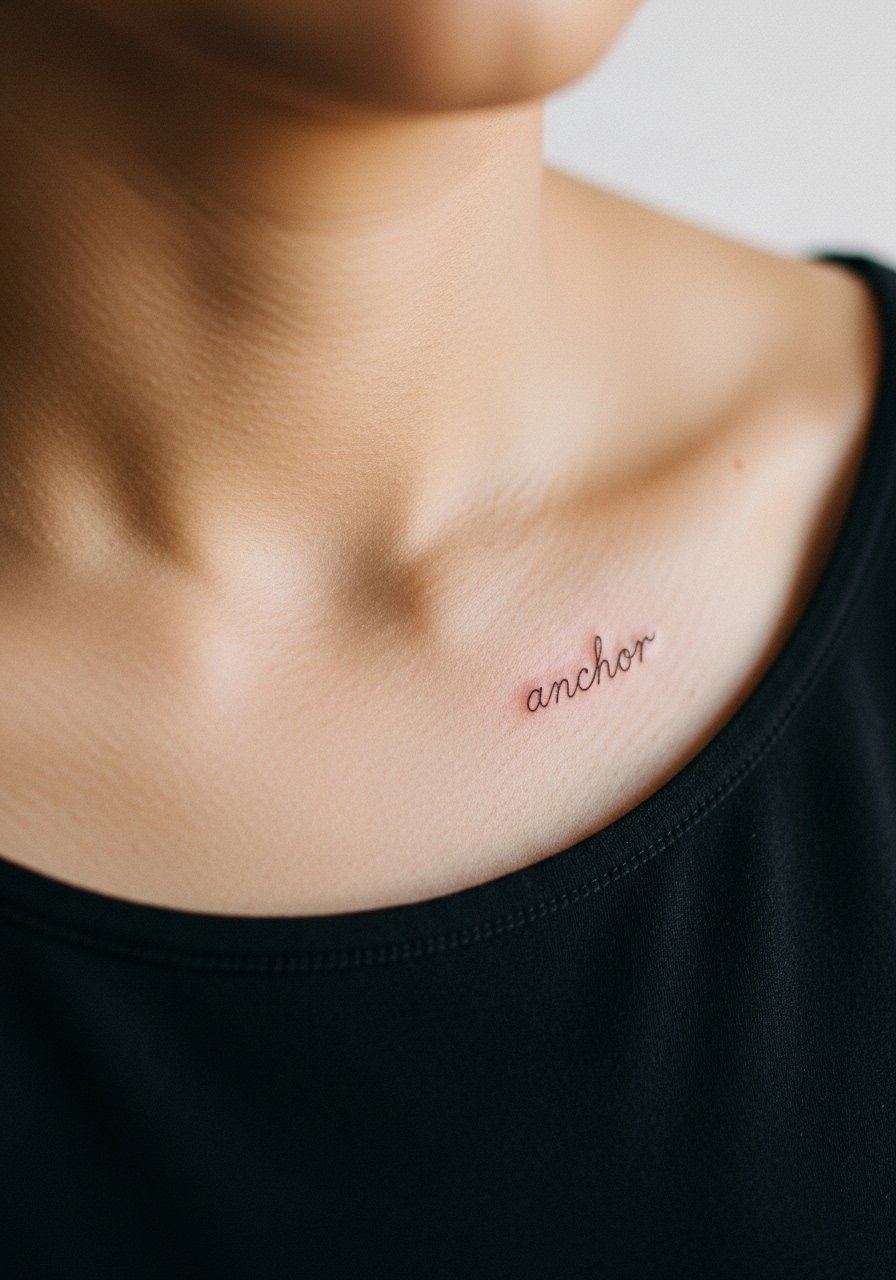
Aging/healing lead, scripts under the collarbone must breathe. Narrow script with tight kerning is tempting but often blurs. Ask for open letter spacing and a slightly heavier downstroke so letters stay legible. Pain is low to moderate and sessions are brief. One group argues tiny chest script rarely holds long. The other says proper spacing and depth do the job. Expect a touch-up discussion during your consult.
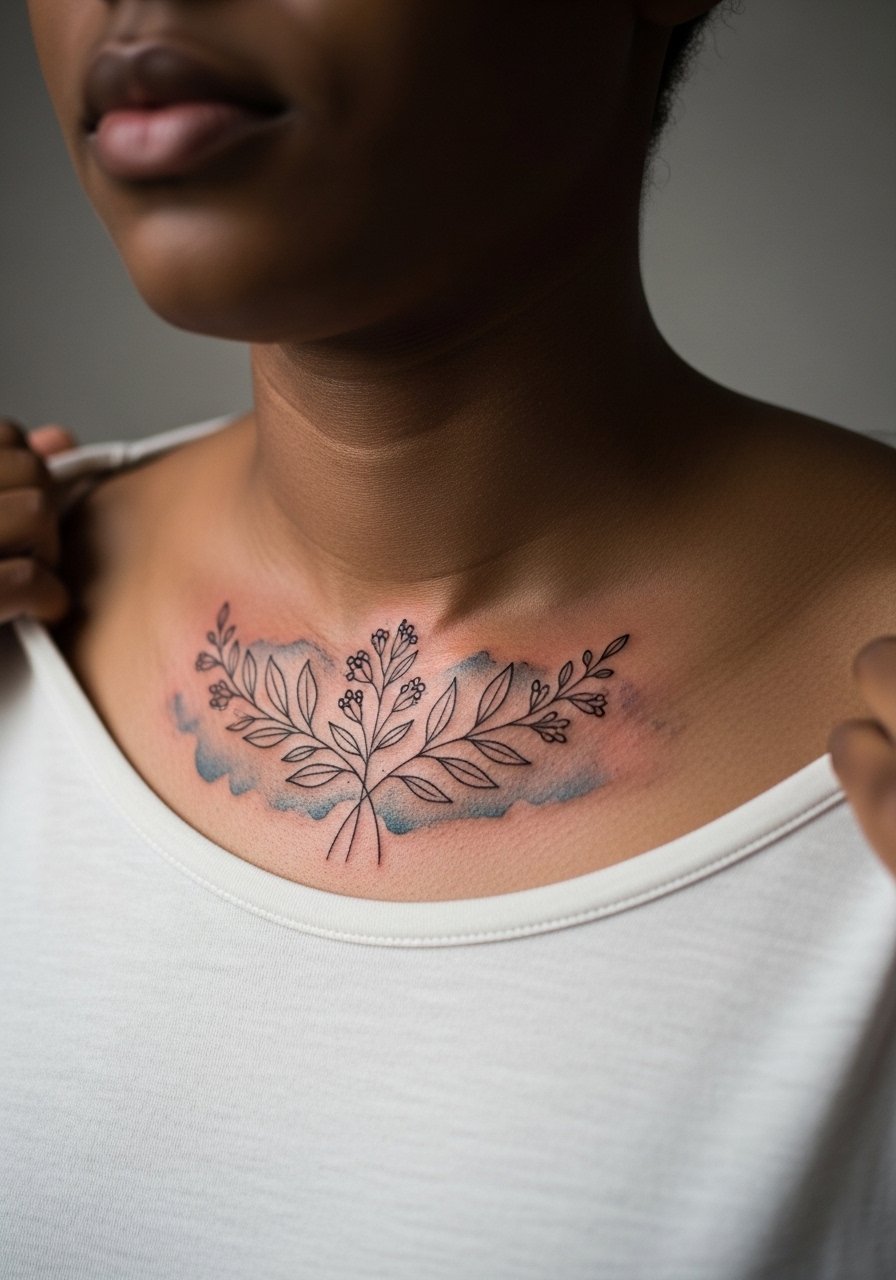
15. Botanical Vine That Follows the Chest Curve
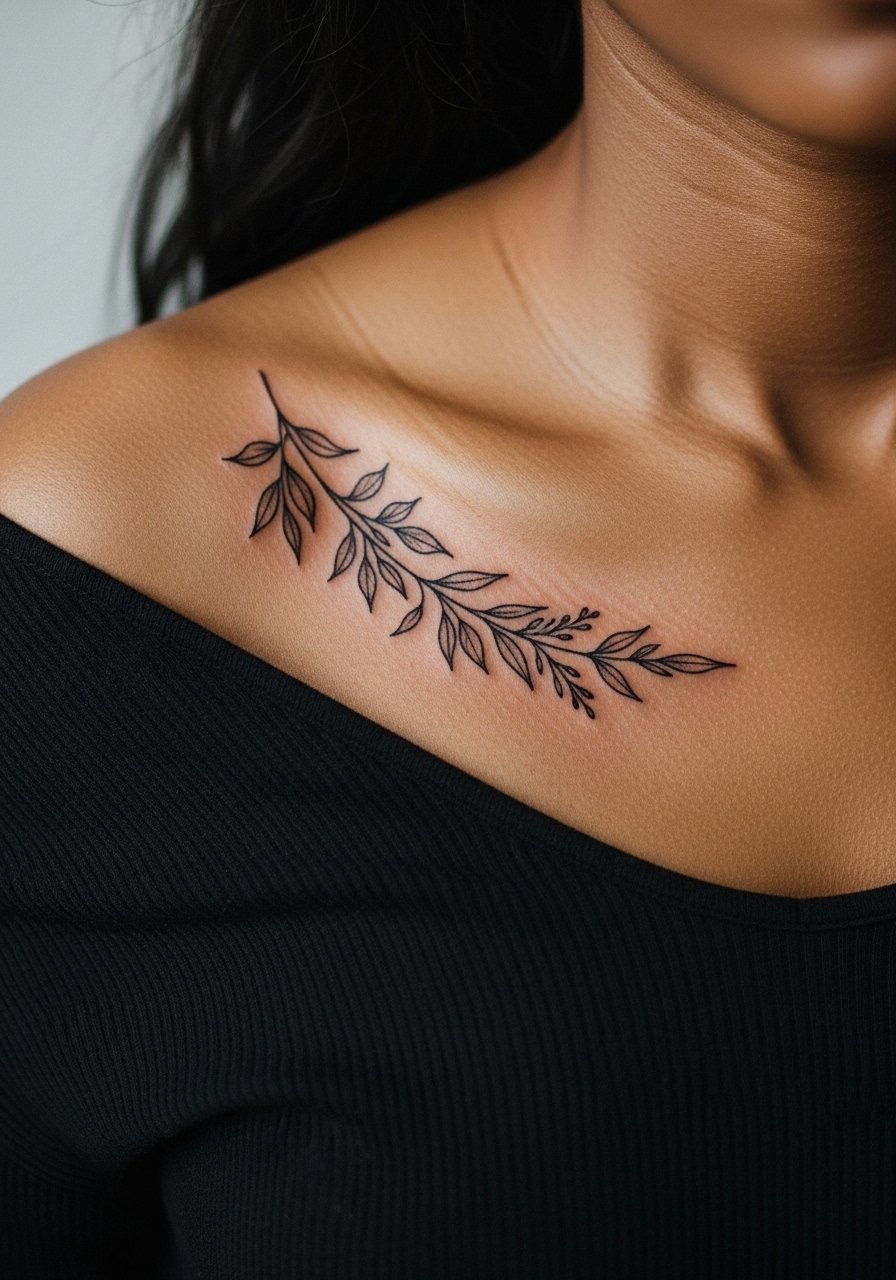
Personal observation lead, vines that follow natural curves read like jewelry and age well when left with breathing space. The chest flex means small leaves should be spaced. Pain varies along the curve but is usually manageable, and sessions can be split if the vine is long. A common mistake is requesting dense stippling along the entire vine which can blur. For showing off on warm days, a wide-neck linen shirt keeps the vine visible while avoiding friction.
16. Small Compass Between the Clavicles
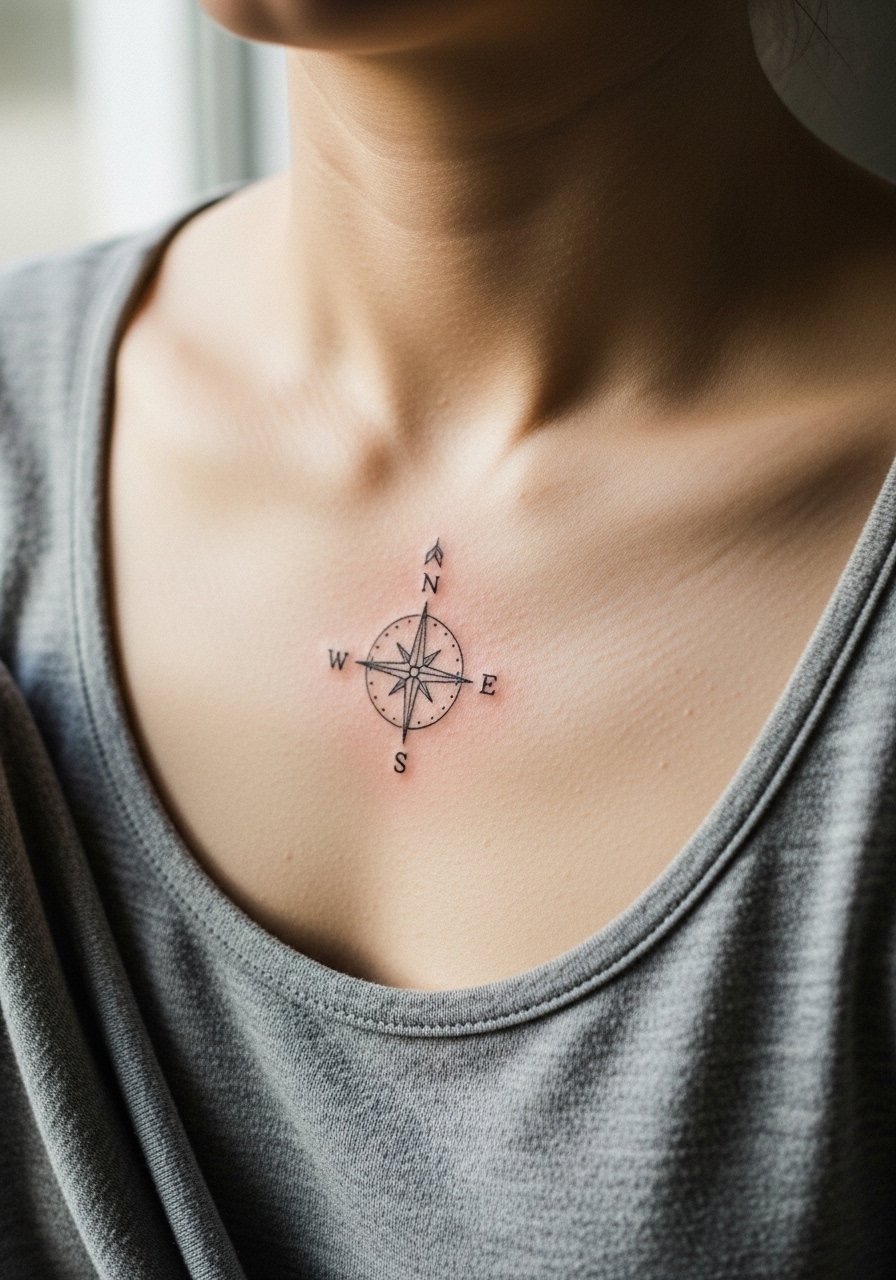
Visual impact lead, the compass sits in a high-visibility spot so lines must be crisp. The central placement has low to moderate pain and sessions are usually short. Fixing off-center compasses is a frequent studio call, so take time with stencil marking and movement tests. For longevity, skip intricate inner shading that can soften. If you travel often, think about how the design sits with necklaces.
17. Tiny Zodiac Glyph Just Above the Heart
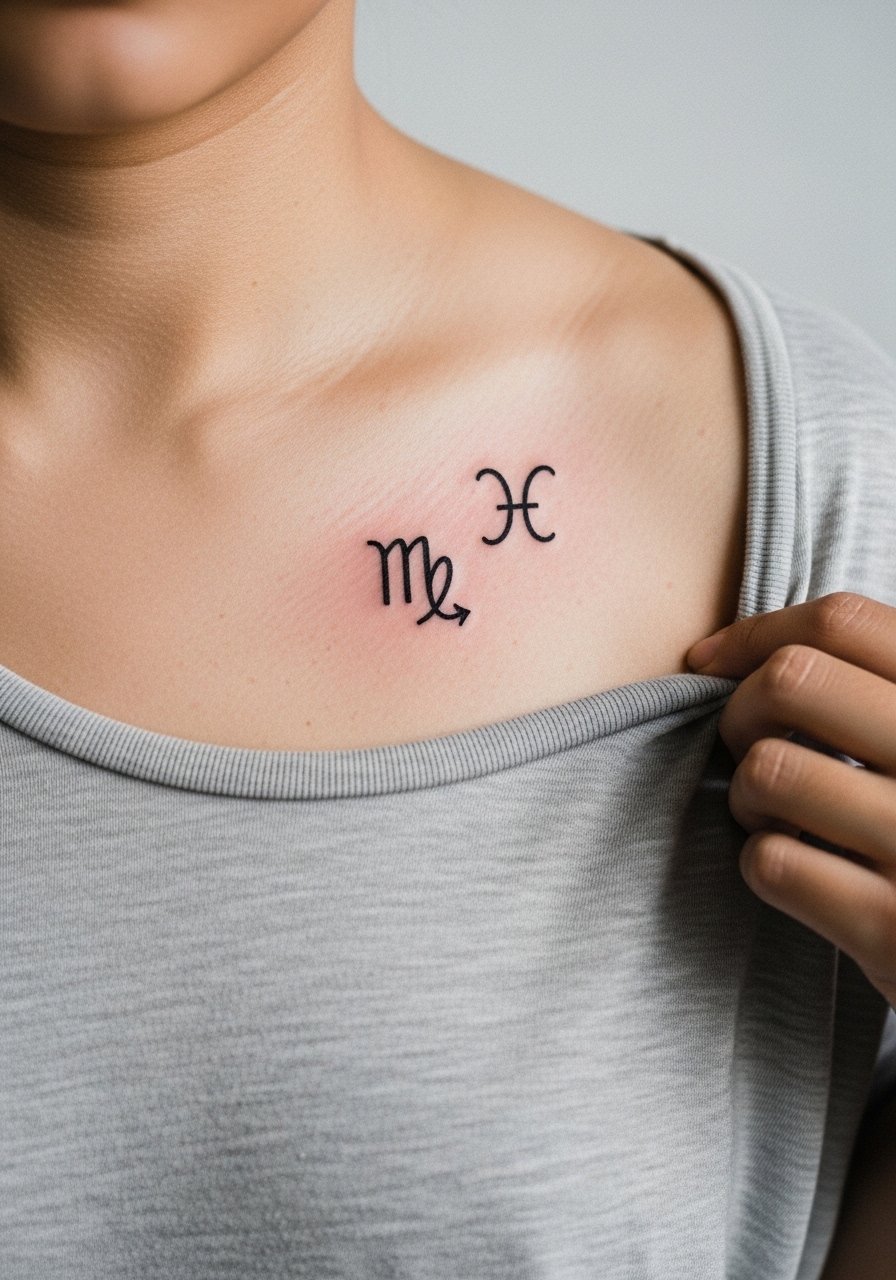
Mistake lead, zodiac glyphs are tempting to shrink to match charm size but too-small glyphs blur. Favor a modest scale and slightly bolder linework for chest skin. Pain is moderate near the heart area, and sessions are brief. Some people want blackfill backgrounds which age unpredictably on moving chest skin. For a casual show-off, a thin pendant necklace can sit above the glyph without covering it.
18. Watercolor Wash Behind a Fine Line Outline
Controversy lead, watercolor effects split artists. One camp says soft color washes on chest can fade inconsistently and patch. The other camp uses muted, UV-stable pigments and says it can age acceptably with planned maintenance. If you choose watercolor, expect touch-ups and realistic color retention talk during consults. The chest gets sun exposure at the necklines so sunscreen after healing matters.
19. Delicate Chain-Link Motif Along the Collarbone
Pain warning lead, collarbone edges can be bony and sensitive, which affects how the chain sits. Keep links slightly larger than you think so they do not merge. Sessions are moderate in length and require precise stenciling for symmetry. A common mistake is choosing a tiny repeat pattern that ages into a gray band. Style it with a thin chain bracelet or choker to keep the motif cohesive.
20. Tiny Bow Knot Centered Under the Sternum
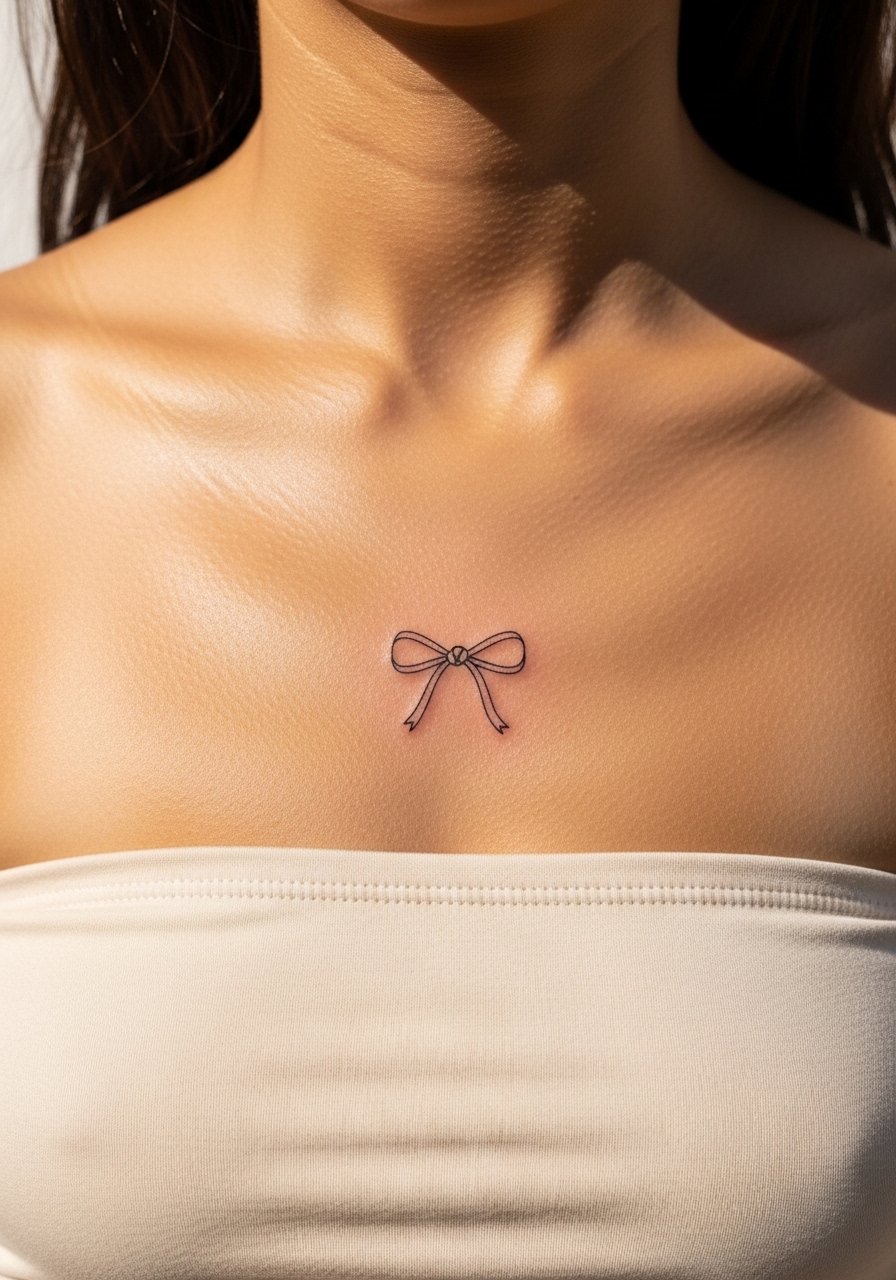
Visual impact lead, bows can look like adornments if scaled for the chest. The sternum is sensitive, so plan for a short but intense session. The frequent error is overworking the loops with micro hatching which fills in. For placement, check how the bow interacts with jewelry like short pendants.
21. Dot Work Crescent and Tiny Constellation
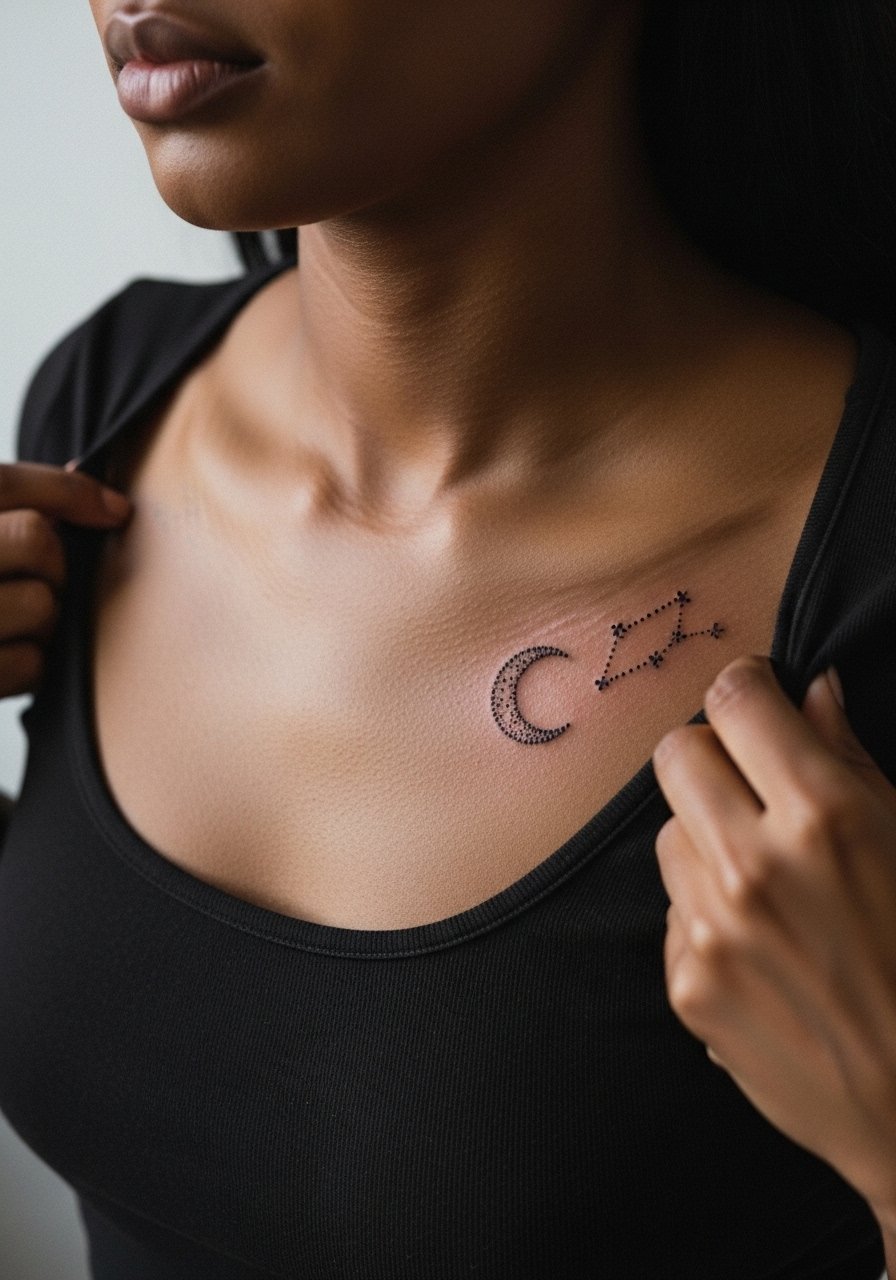
Consultation lead, dot work depends on consistent needle depth. Tiny clusters near the cleavage can merge if dots are too close. Sessions vary but plan for 45 minutes to an hour for small constellations. One mistake is matching the dot density from large pieces onto tiny layouts. For night looks, a low neckline silk top highlights the constellation like jewelry.
22. Minimal Anchor Chain Dripping Toward the Center
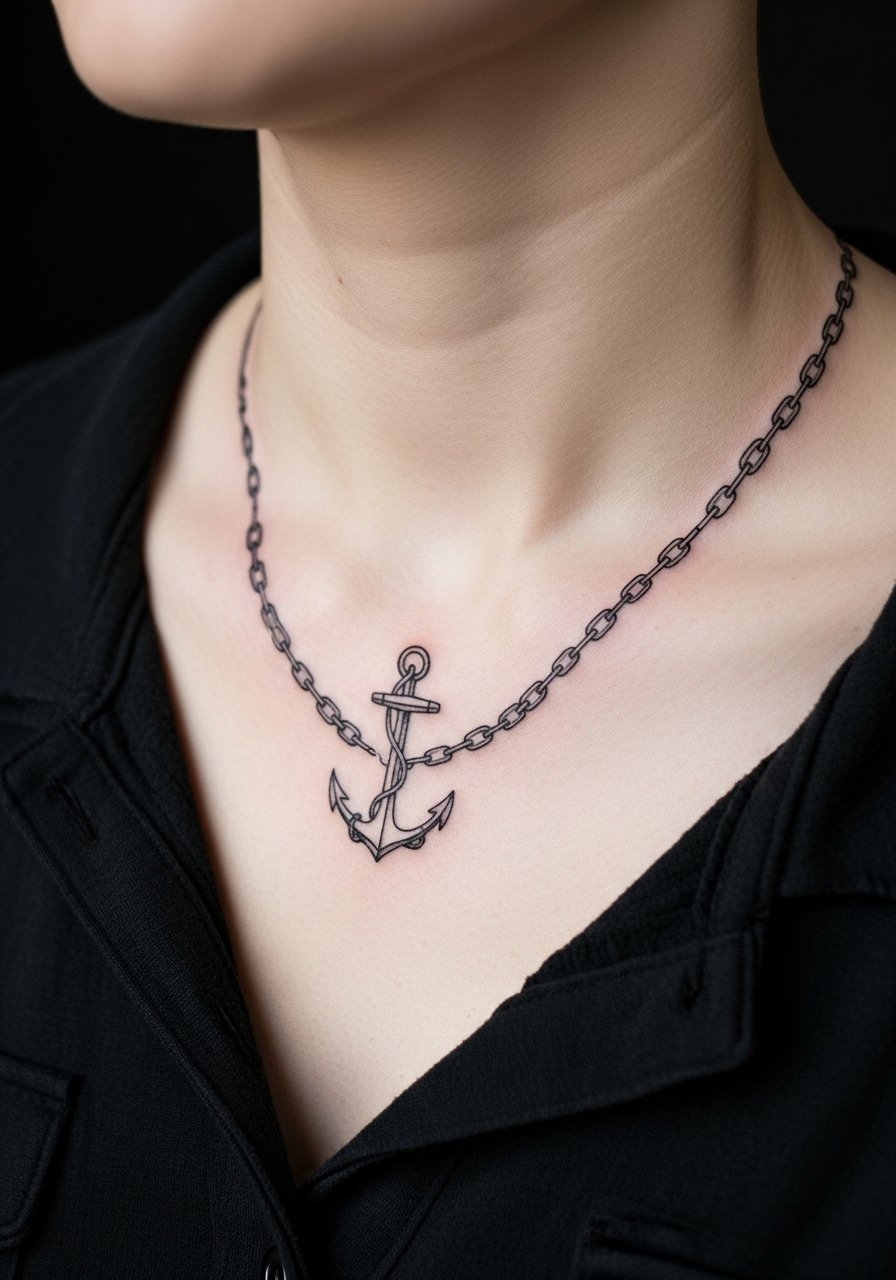
Mistake lead, flowing chain elements look elegant but the chest moves with breathing so keep links open enough to avoid collapse. Pain varies and sessions are short. People often ask for tiny chain links that are too similar and then merge. If the chain crosses the sternum, expect a slightly longer appointment.
23. Scripted Coordinates Along the Upper Chest
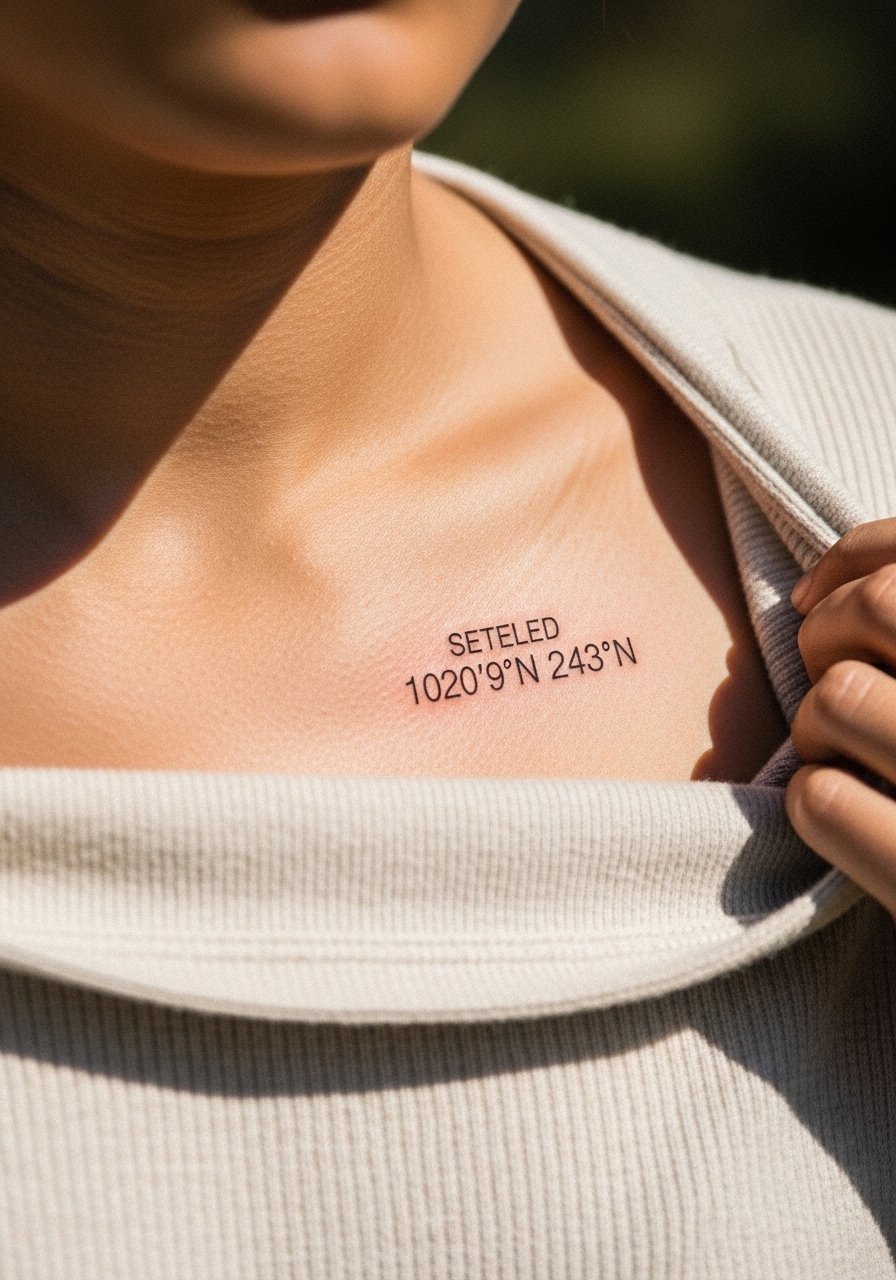
Styling lead, coordinates read like a private map and sit well under necklaces. Use slightly increased letter spacing for numbers on chest skin. Sessions are brief and pain is mild to moderate. A typical mistake is choosing a tiny font which blurs into a line. Show it off with a thin pendant necklace that sits above the text.
24. Tiny Floral Cluster Tucked Near the Cleavage
Aging/healing lead, cleavage-adjacent skin experiences friction from clothing edges which can affect scab formation. Keep clusters airy and avoid heavy shading. Pain is moderate in this zone and sessions can be short. The common misstep is packing dense shading into a small cluster that later looks smudged.
25. Minimalist Arrow Parallel to the Collarbone
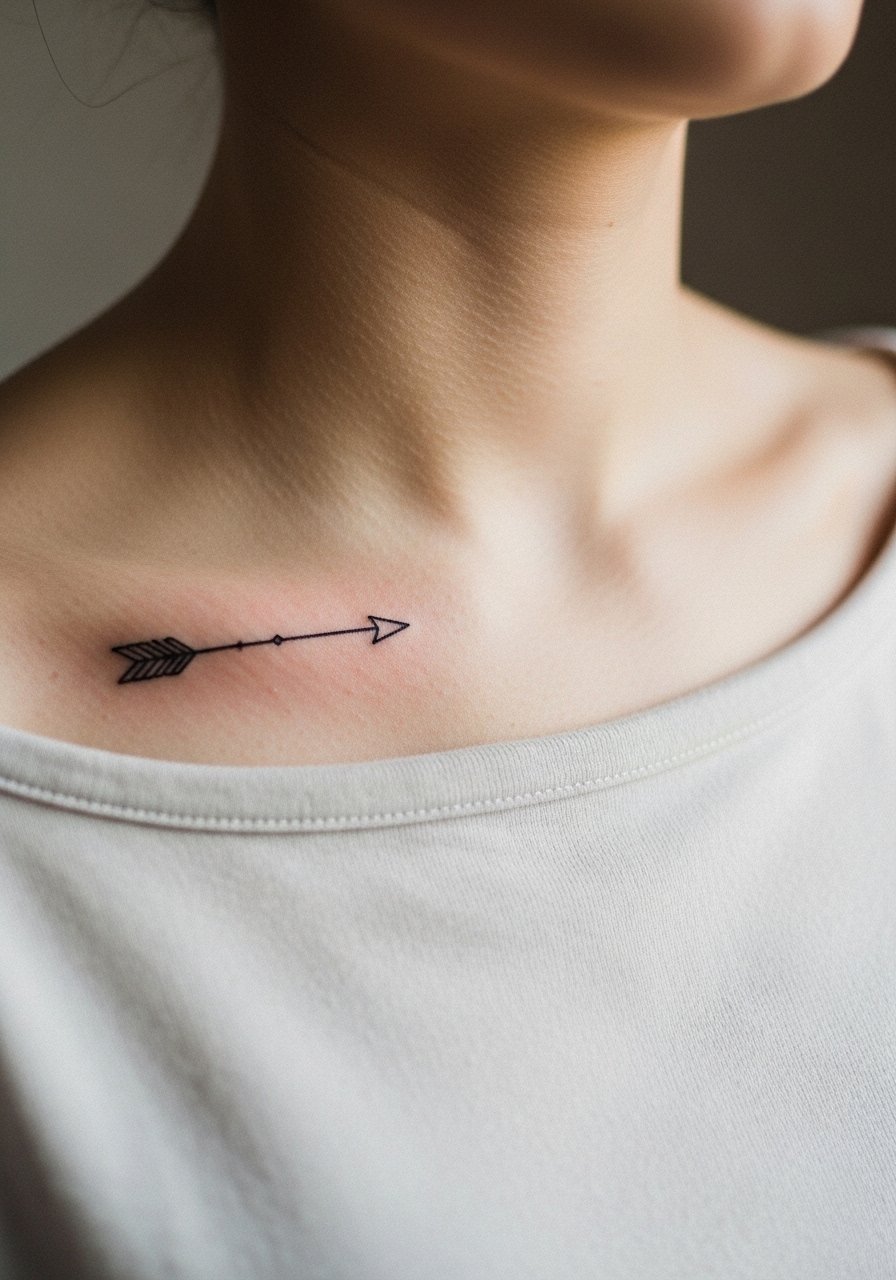
Personal observation lead, arrows parallel to the collarbone read like a subtle accent. Ask for a slightly thicker main shaft with tapered ends so the line holds. Pain is usually low to moderate and sessions are quick. People often request ultra-fine arrows that lose definition. For casual styling, a loose button-down shirt worn open frames the collarbone without pressing on the ink.
26. Single Dot Cluster Centered Above the Heart

Mistake lead, dense dot clusters can coalesce on chest skin. Opt for spaced dots and include a few negative gaps. Pain is moderate and sessions are brief. Artists will usually advise on dot density during the stencil stage. This design is low-visibility when you wear crew necks, so plan wardrobe if you want it visible.
27. Tiny Laurel Wreath Framing the Upper Chest
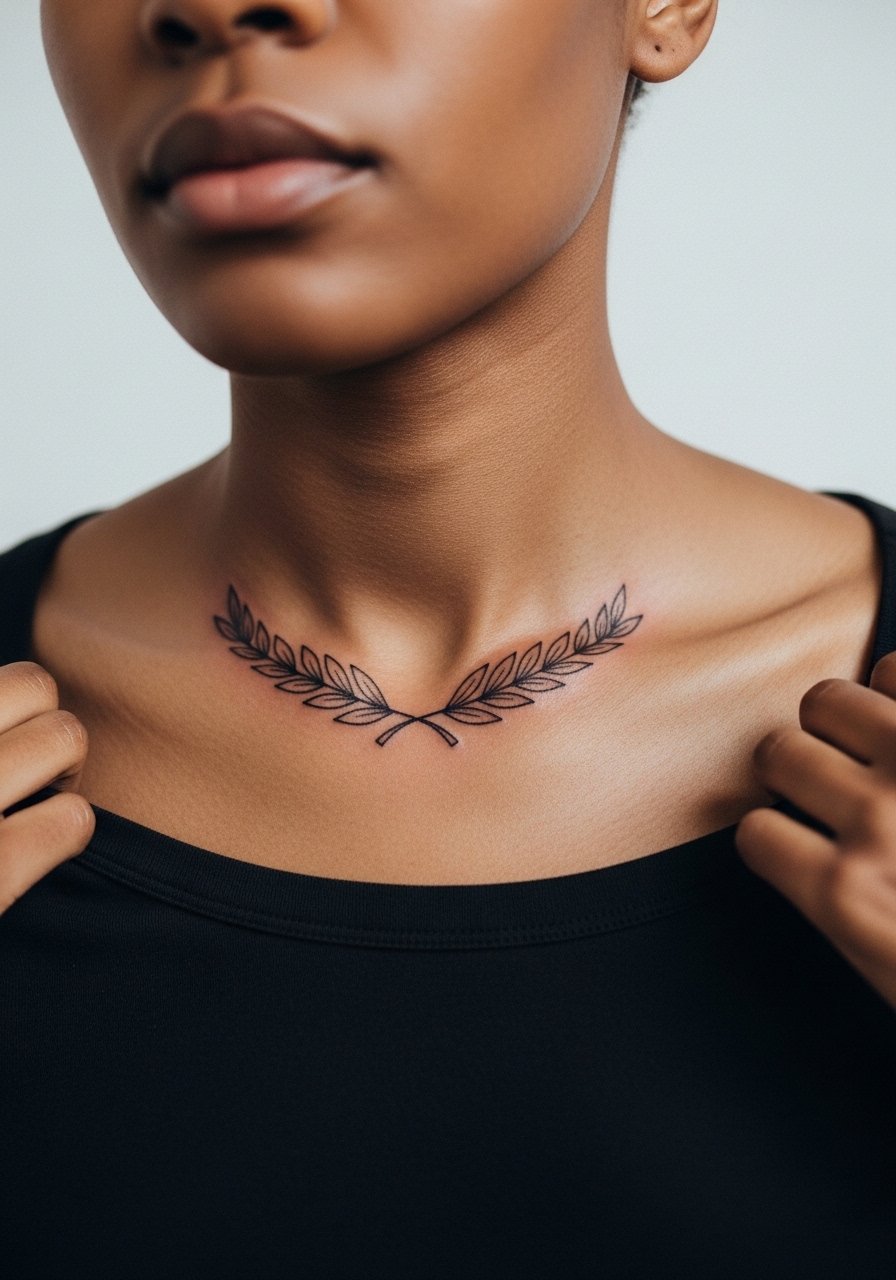
Styling lead, a laurel wreath reads like a banded necklace when placed low on the chest. Ask for leaves with clear spacing and avoid micro hatching inside each leaf. Pain is mild to moderate and sessions can be 45 minutes. A standard error is hollowing leaves too much which makes them disappear from a short distance. Pair it with a thin chain choker or short pendant that sits above the wreath to create layered visual interest.
Frequently Asked Questions
Q: Will fine line chest tattoos blur faster than bolder chest pieces?
A: Fine line can blur sooner because the chest skin moves and stretches more than flat areas. From what I have seen, spacing and slightly stronger outlines help, and plan for a touch-up sooner than you would with heavy blackwork.
Q: How should I dress for a sternum or upper chest session to make the artist's work easiest?
A: Wear a removable top like a fitted sports bra or a wide-neck shirt you can pull aside without stretching the tattooed skin. Button-downs worn open also work well.
Q: Do I need to avoid certain chest designs for darker skin tones?
A: Darker skin tones handle bold contrast best, so ask your artist how they adapt line weight and pigment for your skin. Many artists adjust spacing and saturation to preserve definition over time.
Q: Are there placements on the chest I should skip if I need a professional look at work?
A: Hands-off chest work near the collarbone or high on the sternum is easier to conceal with shirts and scarves. Designs that sit low on the cleavage may be harder to hide in professional settings, so consider placement relative to your wardrobe.
Q: How soon can I wear necklaces that sit over a new collarbone tattoo?
A: Wait until the tattoo has formed a stable surface, usually after scabbing has cleared which is around two weeks for many people. If you must wear jewelry earlier, put it on gently and avoid dragging it across fresh ink.
