
The stencil sat low on the spine, the client tugging at the waistband to peek while the artist adjusted the spacing one last time. Low back dotwork asks for patience, careful stencil placement, and awareness of wardrobe that can rub a fresh piece raw. Expect a tender first week, higher friction from belts and waistbands, and a few choices that make a design age better. Start with the right reference and the right clothes in the chair.
1. Symmetrical Mandala Centerpiece in Dotwork

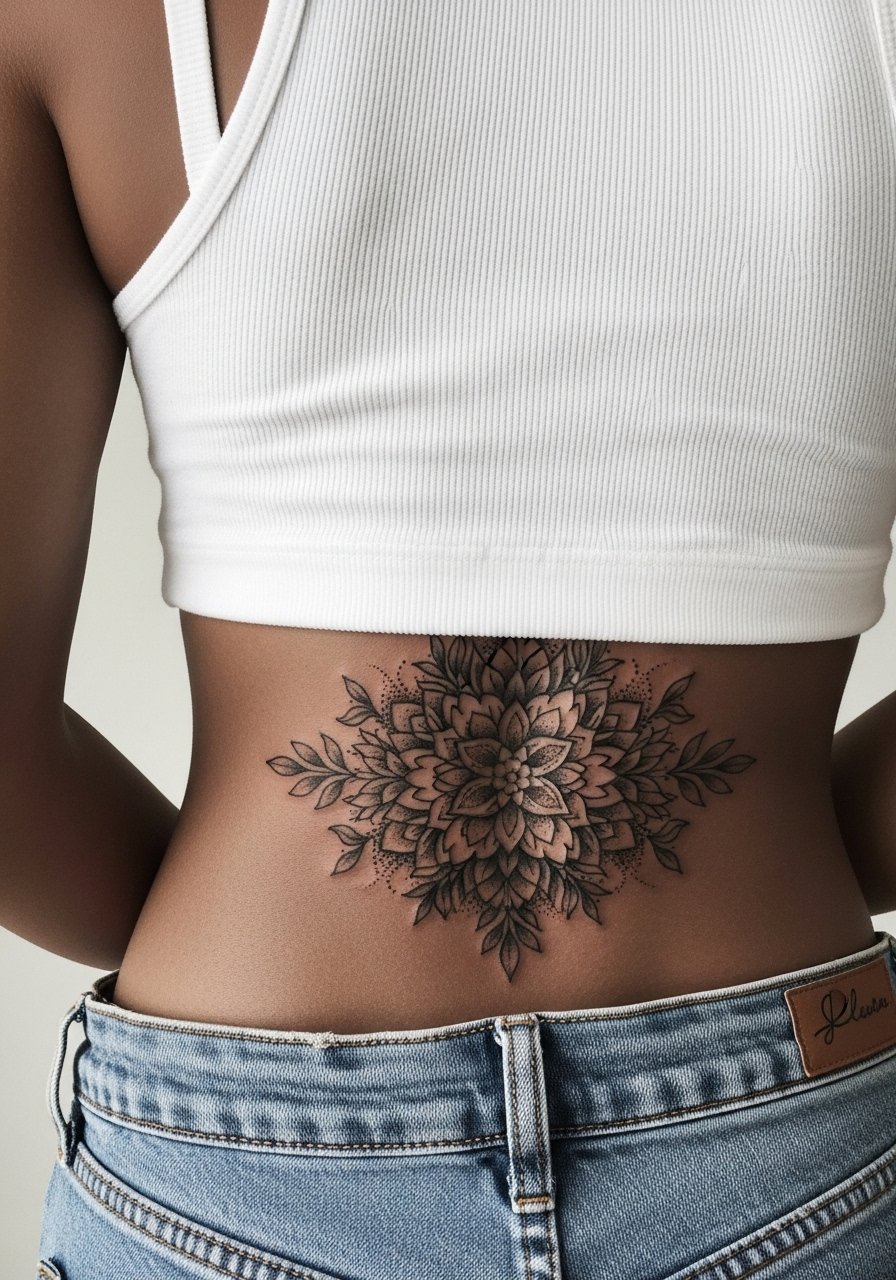
A centrally placed mandala reads like a focal point for low back work. I recommend it when you want a balanced look that pairs with open-back dresses and plunge tops. Tell your artist to increase spacing between dense stippling and the outer linework so the tiny dots do not merge over time. Expect a moderate pain level and a single two to four hour session for a medium-size piece. Common mistakes are asking for too many tiny motifs packed into a small diamond shape, which leads to blurring after two to three years. For showing it off, try an open-back midi dress that frames the center without pulling at the seam.
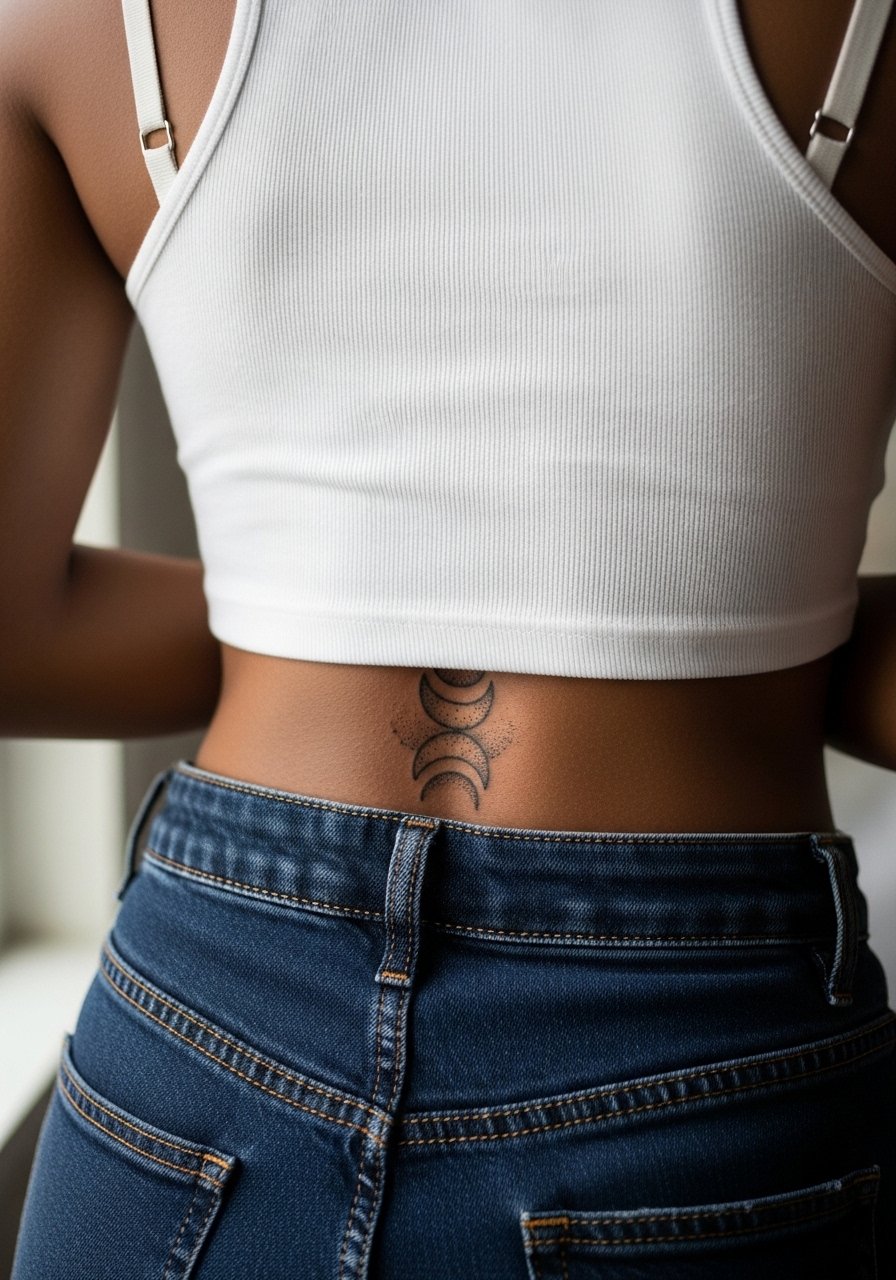
2. Crescent Moon Cluster in Stipple Shading

A crescent cluster gives a celestial, low-profile read when placed along the natural curve of the low back. Ask for stipple shading that fades outward instead of heavy black fills, that helps the piece keep its texture after a year or two. Most people report the session feels like repetitive vibration rather than sharp stabs in this area, but expect tender days with sitting and bending. The main aging issue is friction from waistbands. For the appointment wear a high-waisted skirt with an elastic waist you can slide down slightly without getting cold.
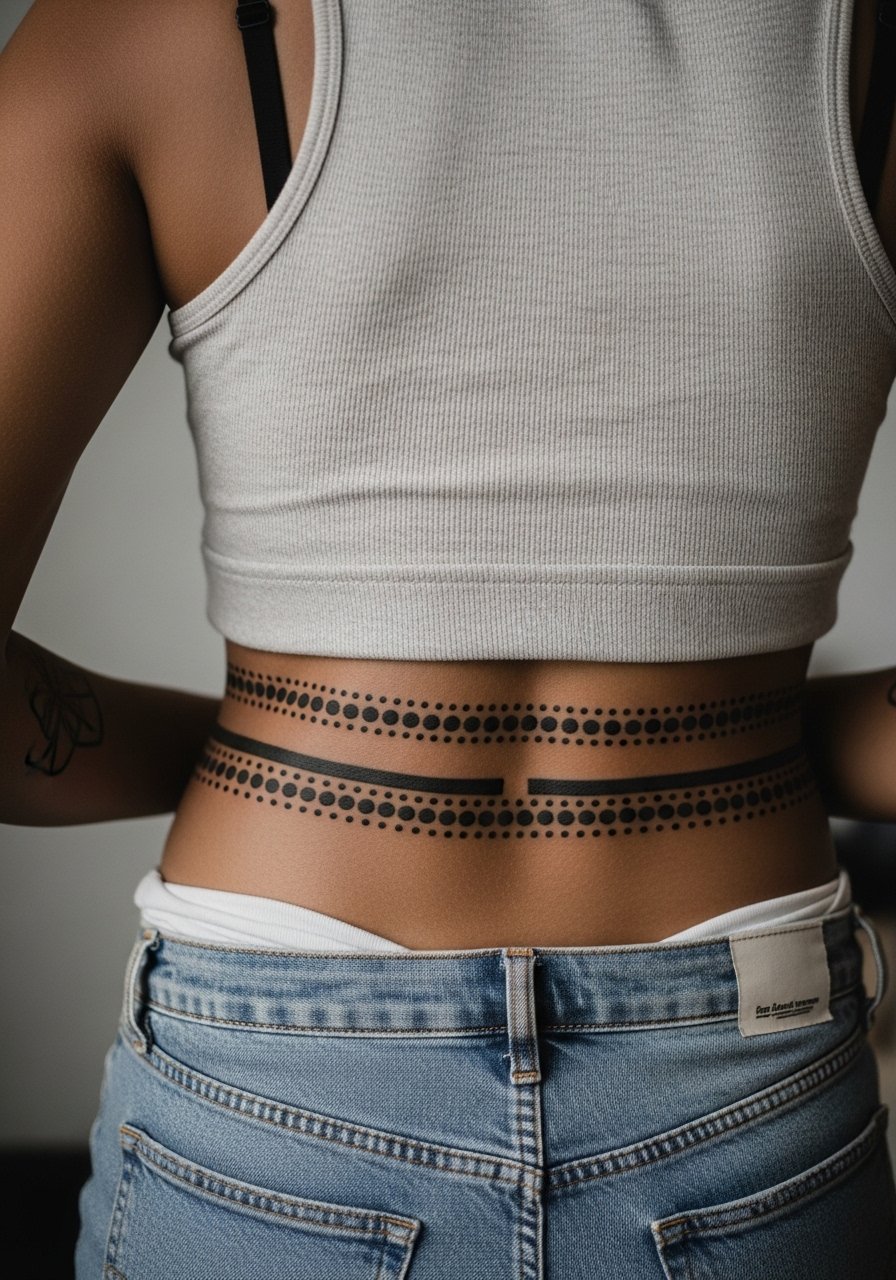
3. Geometric Spine Band with Dotwork Fill

A horizontal geometric band follows the body line and can act like wearable jewelry. In consultation say you want negative space between each segment so the pattern does not become a solid block as it heals. Pain is manageable but the constant motion of the torso means you will feel tenderness for several days. The mistake I see is asking for a very thin band with tiny dots; give the artist room and expect a touch-up window at year two if you like it dense. Pair this with low-rise or mid-rise jeans that sit below the design, or show it off with a halter crop top.
4. Minimalist Constellation Trail in Fine Dotwork
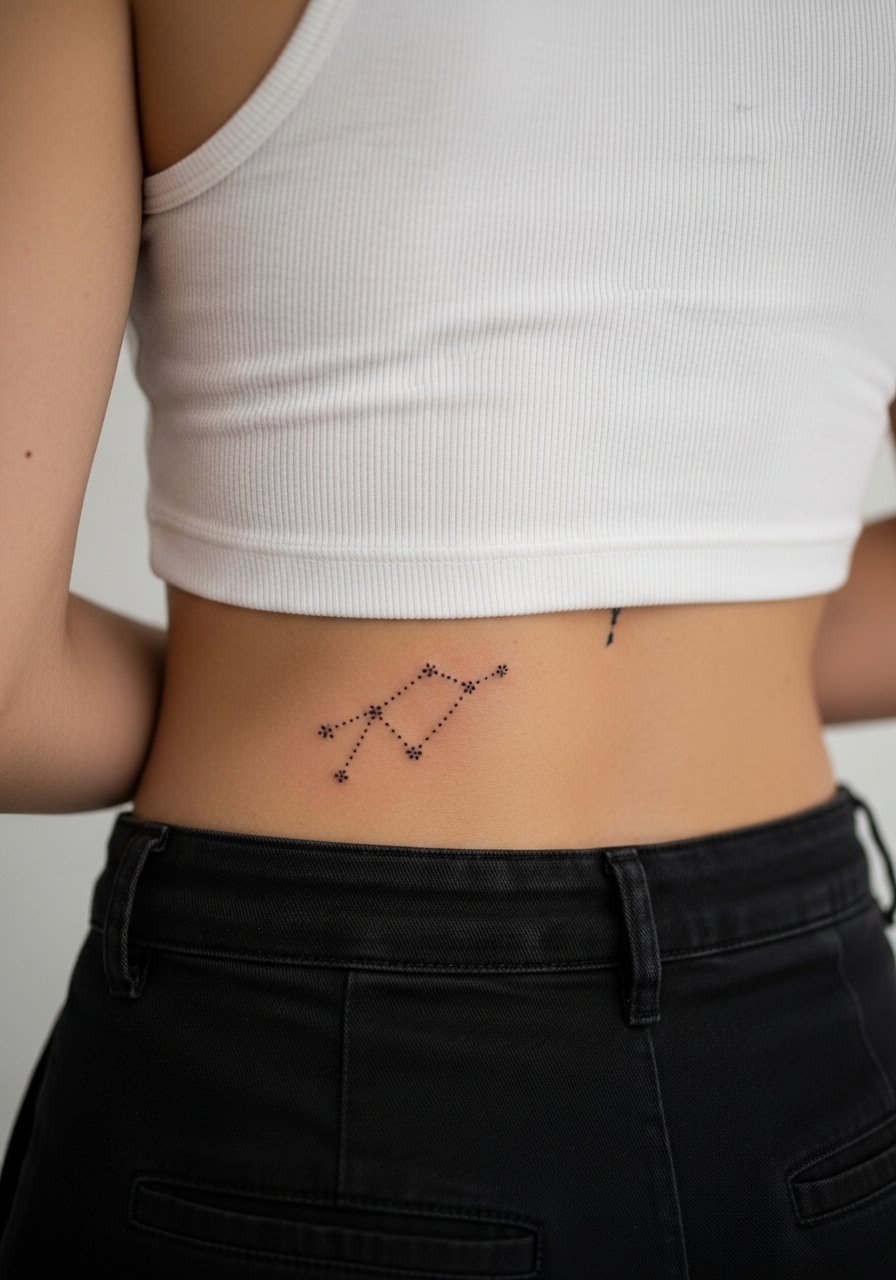
This low back constellation is delicate and works best when spaced across the small of the back. Tell your artist to prioritize single-needle dot placement and to avoid compact clusters that risk turning into smudges. Expect lighter pain but more sensitivity when lying down. A common error is compressing multiple tiny stars into a tiny space, which makes touch-ups more likely by year three. For session comfort wear a loose ribbed tank so you can move freely and the artist can access the area cleanly.
5. Floral Crescent That Tucks Above the Beltline

A crescent of florals that sits just above the waistband reads intimate and intentional. In consultation ask for petals with a mix of stipple and fine line so heavy black does not dominate. The area catches heat from seams and belts which can irritate fresh ink, so expect extra attention the first week. The mistake is demanding hyper-dense black petals that age into a blob. For showing this off, open-back tops help, or a cropped tee you can lift during the session without cold spots.
6. Lace-Inspired Horizontal Panel in Dotwork
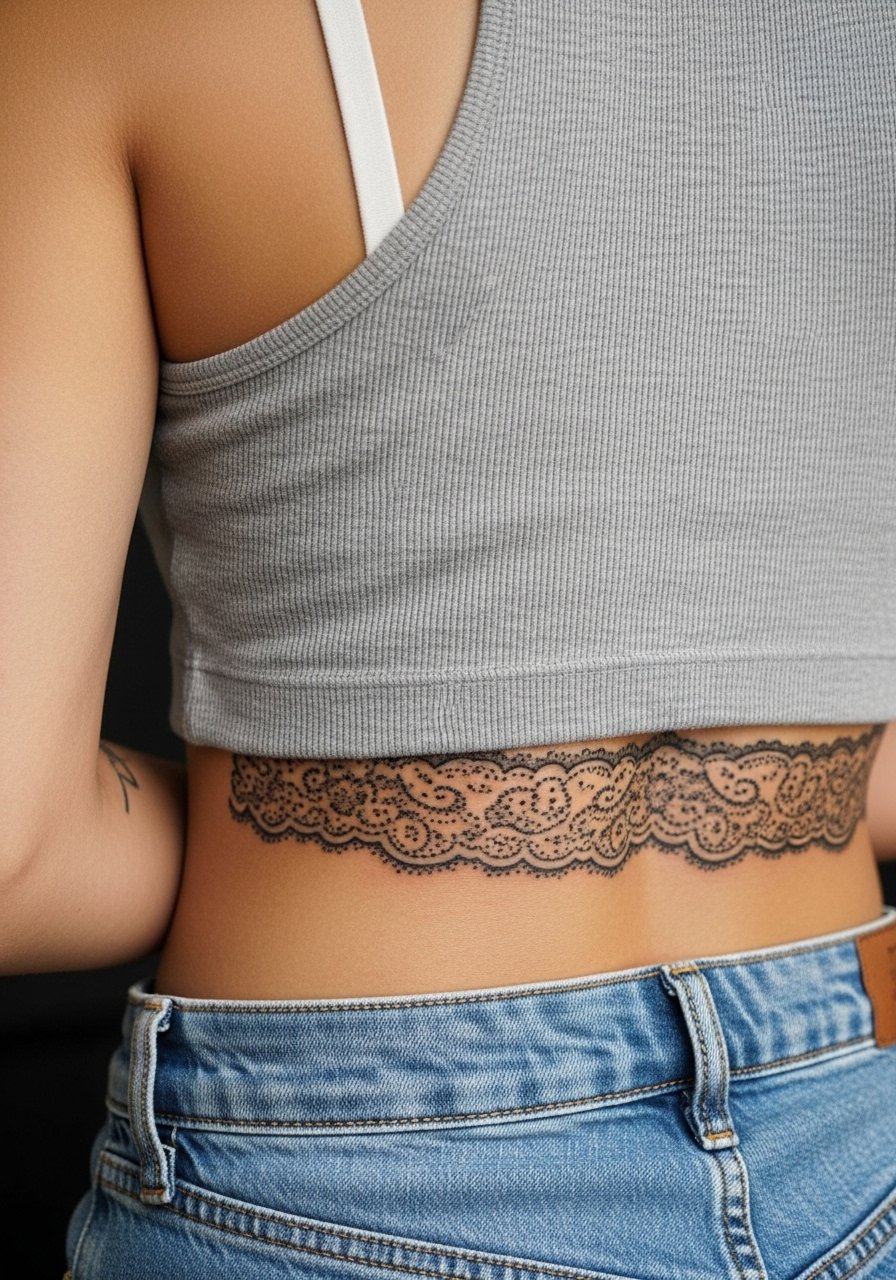
This lace panel looks like a built-in accessory and holds well if the negative space is bold enough. During your consultation say you want the motifs spaced to avoid dense black in small areas. Sessions commonly take two to four hours depending on coverage. The low back can be sensitive if you have little subcutaneous fat there, so expect soreness when leaning back. Avoid tight belts the first two weeks so nothing rubs the lace pattern raw. For nights out pair the panel with an open-back bodysuit.
Studio Day Picks
The first six designs above sit where waistbands, belts, and tight dresses can rub a fresh tattoo, so a few specific items make the session and the first week easier.
-
Disposable stencil transfer paper. Useful if you like trying different placements on skin before committing, which matters for centered mandalas and horizontal bands.
-
Topical numbing cream 5% lidocaine. Apply per instructions before long sessions to reduce sensitivity for the lace and floral panels.
-
Thin breathable protective film roll. Helps protect lower back pieces from friction against waistbands during the initial healing window.
-
Fragrance-free gentle body wash. Cleans without stripping the tiny dots that define dotwork pieces.
-
Aquaphor healing ointment. Thin layers in the first few days help keep dotwork moisturized without clogging the channels.
7. Asymmetrical Vine Along the Oblique

An asymmetrical vine looks organic when it follows the oblique curve. Ask the artist to map how clothing sits on your body so the vine does not land exactly under tight seams. Pain is moderate with sharp pinches when the needle crosses thinner tissue. The common mistake is centering the vine where bras or jeans sit, which increases the chance of irritation. If you want to show it off pair with a wrap crop top that complements the diagonal flow.
8. Tiny Script Anchored in Dotwork Frame

Text in the lower back reads best when framed by dotwork so the letters can sit in negative space. Be explicit about font size during consultation, and provide the exact text so line spacing is accurate. The pain is usually low to moderate but the area reacts to bending and sleep positions. A frequent error is choosing ultra-thin script that blurs in two years; increase weight slightly for longevity. For sessions wear a soft cotton tank top you can lift without removing completely.
9. Ornamental Crescent with Fine Dot Texture

An ornamental crescent reads as jewelry and works when the motif sits above the waistband curve. Tell your artist to maintain micro-gaps between dot clusters to prevent merging. Expect soreness when sitting against hard surfaces. A common mistake is over-detailing the inner crescent edge which can fill in over time. For showing it off try a low-back slip dress that keeps the design visible without pressure on the skin.
10. Botanical Anchor with Negative Space Leaves
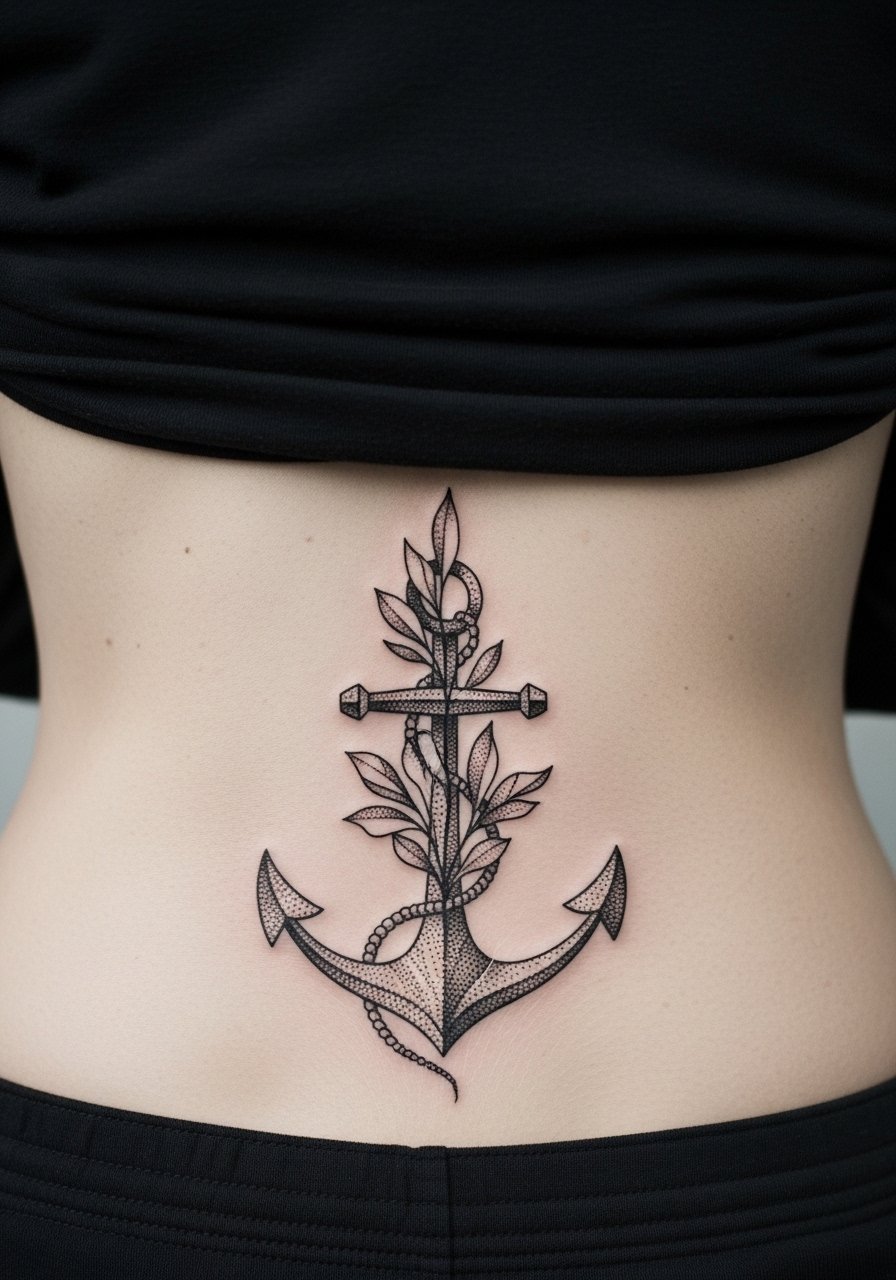
Leaves done with negative space age more cleanly than fully filled black leaves. During the consult ask for light stipple inside leaves rather than solid fill. Sessions are steady and can take up to three hours if the anchor is wide. The typical mistake is overfilling the leaf interiors which turns them into flat shapes after a few years. This placement also benefits from a wide-neck linen shirt you can slide aside during the session.
11. Compass Rose with Dotwork Shading

A compass rose anchors well on the low back because it reads balanced under clothing. Ask for crisp cardinal points and airy stippling instead of heavy fills, that helps preserve directional detail. The low back can swell slightly, making crisp points look softer after a few months. A mistake is too tight a compass size which makes touch-up necessary sooner. For a night out select an open-back blouse that frames the rose.
12. Mirrored Dotwork Wings Framing the Spine

Wings give a strong visual but need symmetry and breathing room. Tell the artist you want space between feathers and to avoid dense black at the base. This placement can feel sensitive directly over the spine, so expect sharper sensations near bone. The debate among artists here is explicit. One camp says highly detailed feathers blur quickly because the skin shifts. The other camp argues that with proper spacing and needle control the detail can hold. Ask the artist which approach they prefer and why before booking. For display pair with a low-back tank.
13. Dotwork Keyhole that Peeks Above Clothing
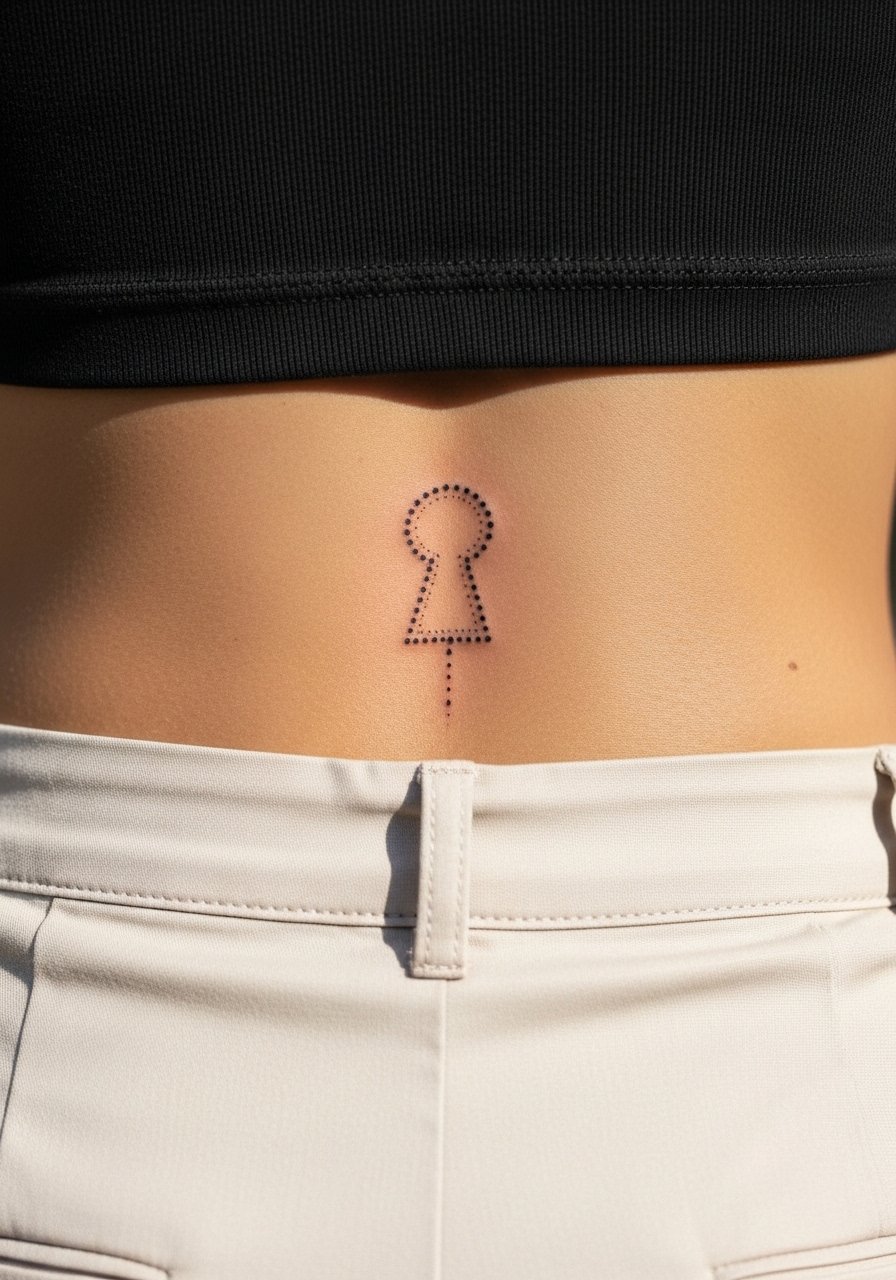
A tiny keyhole reads as a secret detail and is subtle under clothing. Specify exact size and negative space around the hole so it does not fill in. Pain is light but movement while sleeping can irritate the spot. The usual mistake is making it too small to remain legible in two to three years. For easy access during the session wear elastic-waist linen pants that you can lower without undressing.
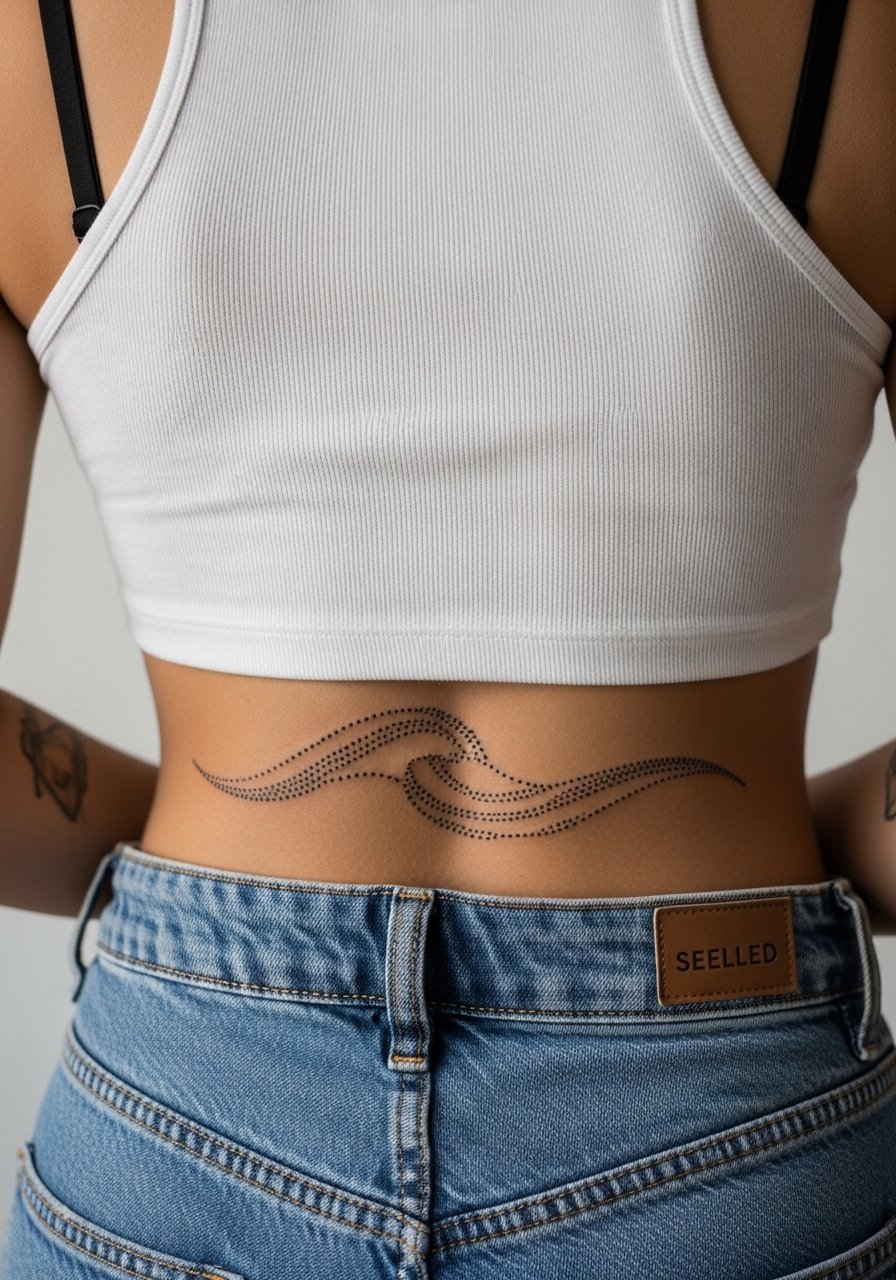
14. Wave Motif with Graduated Dot Gradient
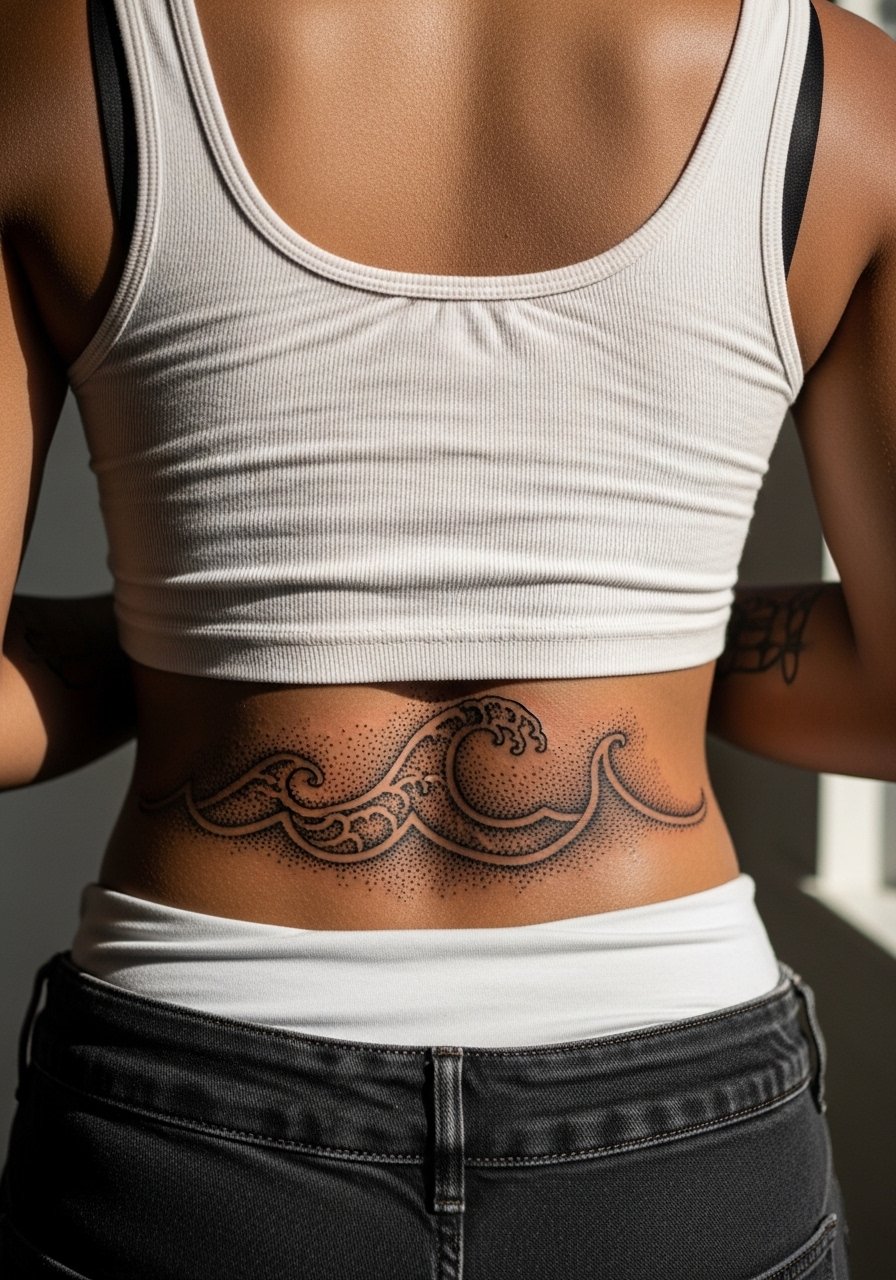
A wave with a dot gradient creates motion without heavy blacks. Request a soft gradient from dense to airy dots so the transition holds better over time. Sessions can be longer if you want a wide gradient. The error I often see is asking for a perfectly smooth gradient in a tiny space which ends up patchy. Wear a loose drawstring short for the appointment so seams do not press during healing.
15. Interlocking Circles in Micro Dotwork
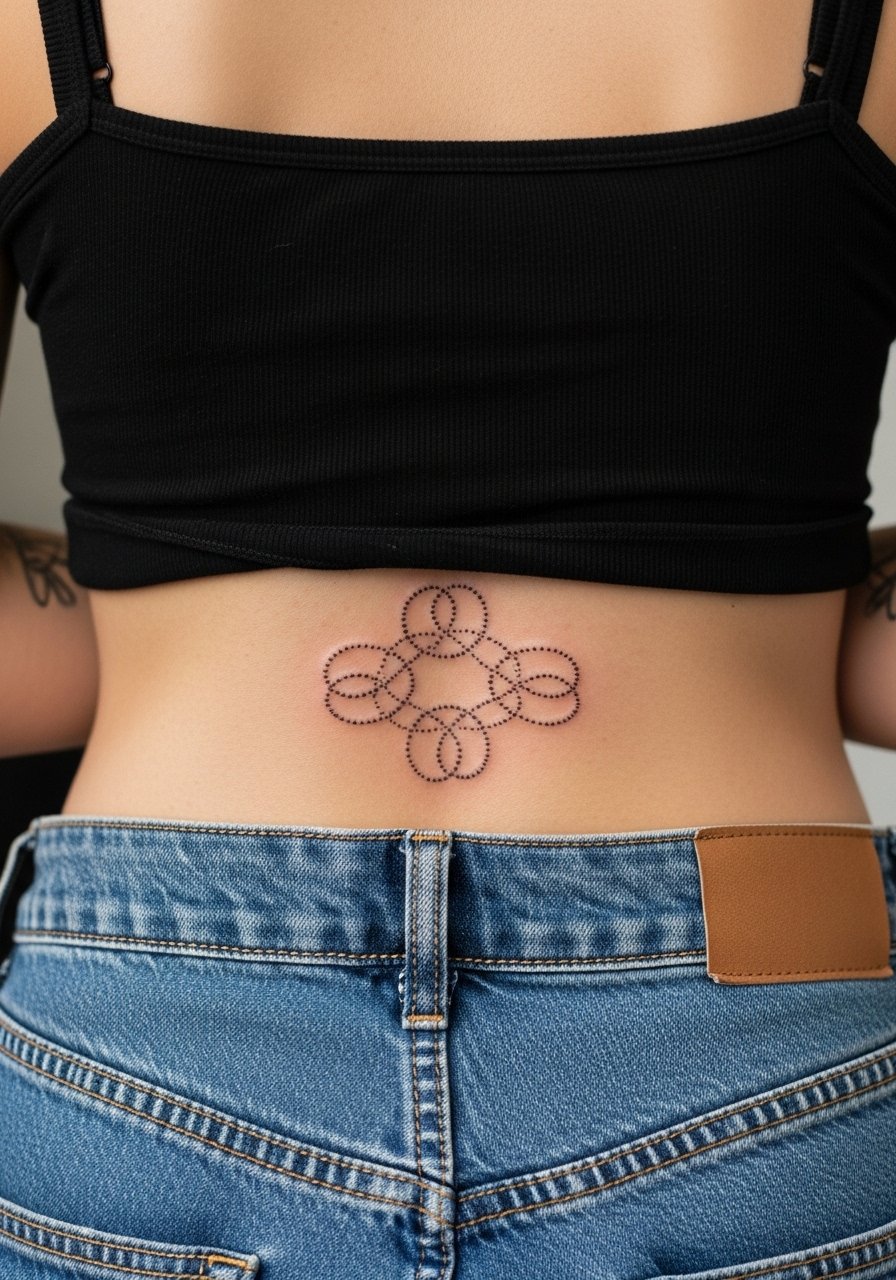
Interlocking circles create texture and a geometric rhythm. Be explicit about minimum diameter for each circle, as too-small circles merge into one shape over time. This design may take several short passes depending on how dense you want it. A common mistake is packing circles tightly with minimal negative space, which accelerates loss of definition. For a casual reveal try an open-back crop top.
16. Sunburst Medallion With Stipple Halo

A sunburst medallion makes a strong low back anchor and the halo helps the piece read at a distance. Ask for a wider halo so the inner rays do not crowd. Expect a steady session and some tenderness when bending. The common error is requesting razor-thin rays without room for the dots between them. Show it off with an open-back maxi.
17. Botanical Mandala Hybrid Along the Lower Curve
Combining botanical elements with mandala geometry can soften a center-heavy piece. Tell your artist you want organic leaf shapes interrupting strict geometric lines to avoid a rigid look. The low back moves with posture so expect slight softening of nodes at six months. A frequent mistake is keeping the mandala too small; scale it so the botanical parts can breathe. For evenings out wear a low-back wrap dress that complements the curve.
18. Dot-Shaded Crescent Moon Paired with Tiny Stars

A crescent and star cluster yields a quiet composition that ages well if the dots are not overly compact. Ask for the stars to be spaced so they remain distinct from the crescent halo. Pain is modest but lying on your back on hard surfaces can be uncomfortable right after. The mistake is clustering too many tiny stars which leads to a blotchy look later. Pair with a high-waisted skirt that sits below the piece.
19. Filigree Panel with Negative Space Links

Filigree benefits from clear negative spaces between the loops so the pattern does not collapse. Tell your artist to mark those gaps on the stencil and to avoid tiny connected dots in those areas. Expect a two to three hour session depending on width. A typical error is asking for a filigree panel that reaches under your bra line where friction increases healing problems. For the session try a button-down shirt you can pull aside without rubbing.
20. Tiny Geometric Arrow Row in Fine Dots

A row of tiny arrows reads minimal and graphic if each arrow has room to breathe. Ask for slightly thicker anchor points and airy dot fill so the arrows do not soften into a line. Pain is light for most clients but the low back can be sensitive if you have little fat. The misstep is compressing too many arrows into a narrow band; spread them out for longevity. For show try a halter bikini top with a low back if seasonal styling is on your mind.
21. Ornamental Anchor with Mirrored Dot Fans
Mirrored dot fans create a decorative frame that flatters the low back curve. During consult ask the artist to leave micro-gaps between fans to avoid merging. Sessions can run longer with symmetry checks required. A mistake I see is starting the ornaments too close to the spine which puts pressure on healing. For a polished look try an open-back blazer layered over a slip.
22. Single-Line Wave in Dotted Contour
A single dotted contour reads minimal and modern. Ask for a consistent dot rhythm so the wave keeps its movement at six months and beyond. Pain is low to moderate and the session can be quick. The usual error is varying dot sizes in the same wave, which looks uneven as it heals. For session comfort wear an oversized tee you can shift without cold spots.
23. Tribal-Inspired Dot Bands with Contemporary Spacing
When borrowing motifs from cultural sources show respect and ask for contemporary variations rather than direct replicas. One sentence on origin is appropriate in consult. Keep spacing wide to prevent the bands from merging. Sessions can be punchy near the bone. A common mistake is copying dense tribal flash that relies on solid blacks instead of dotwork adaptation. Try pairing the bands with a wrap crop top that shows the negative space.
24. Crescent Lotus with Fine Dot Halo

A lotus crescent blends floral and spiritual motifs. Be mindful of cultural context and opt for stylized elements rather than sacred replicas. Ask for a halo that dissipates gradually to avoid a heavy ring. Pain is moderate and the area often feels tight for a few days. A common mistake is choosing an overly literal religious icon which some communities consider sensitive. Wear a flowy cropped top when exposing the area.
25. Minimal Dot Grid as a Subtle Texture
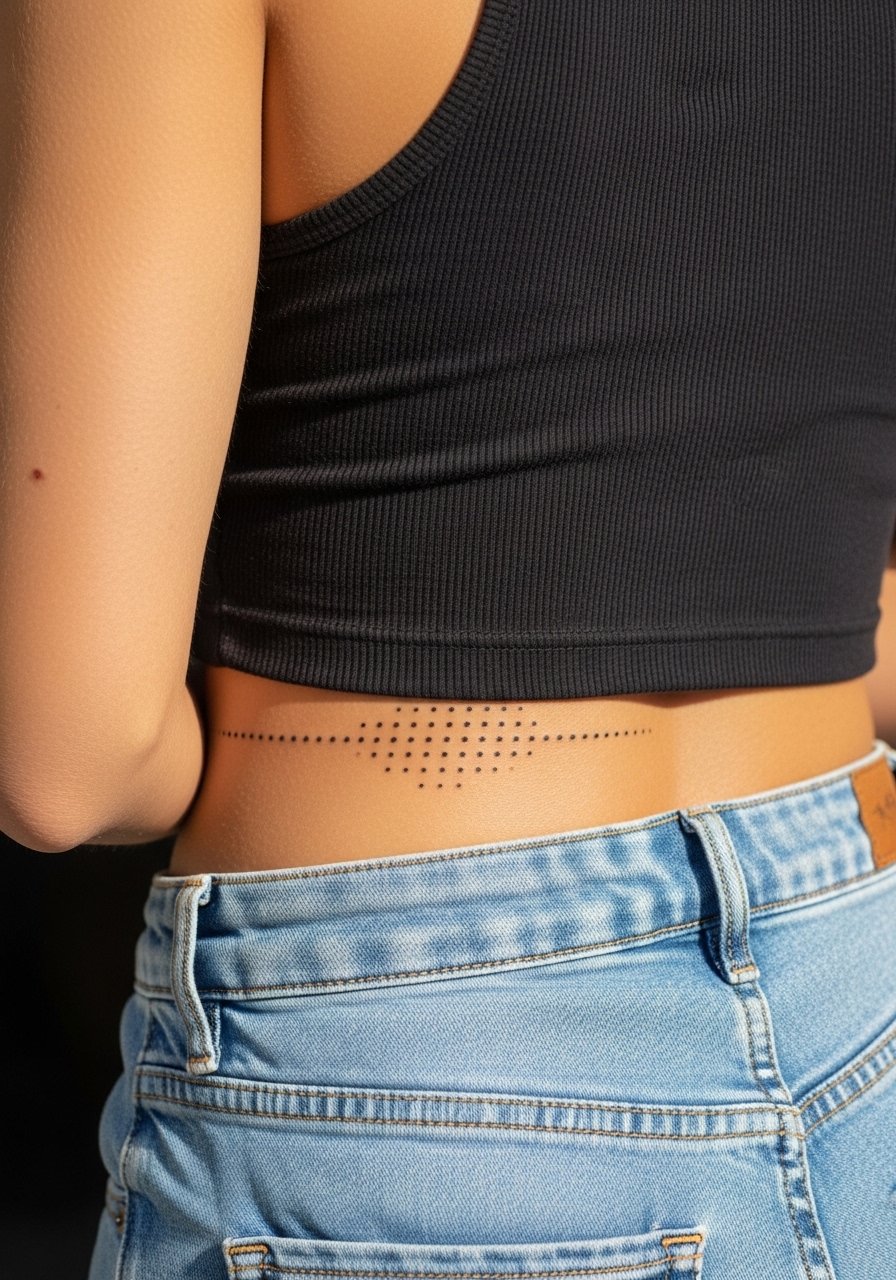
A minimal grid is graphic and quiet, and it benefits from even spacing so the pattern does not blur into a gray band. Tell your artist you want a minimum dot separation to keep the grid readable after a few years. Sessions are straightforward but repetitive. The mistake is starting the grid too close to clothing lines. For session wear elastic-waist joggers you can lower without pressure.
26. Stacked Half-Moons with Delicate Stippling
Stacked half-moons create a layered feel that moves with the body. Ask for a gradual stipple density from the top moon to the bottom. Pain is usually low but expect tenderness when leaning back. A common mistake is tight stacking with no negative space, which increases the chance of the moons merging. For easy display try a low-back slip top.
27. Custom Crest with Dotwork Border

A custom crest can be personal and symbolic. During consultation provide clear references and ask the artist to simplify tiny details so the crest reads even after years of movement. Sessions vary by complexity and may require multiple sittings. The typical mistake is packing text and tiny icons into a small crest, which blurs. Think about where clothing seams sit and how jewelry might rest on the area. A simple open-back top keeps the crest visible without pressure.
Frequently Asked Questions
Q: How long does dotwork on the lower back typically last before needing a touch-up?
A: It depends on your skin type, sun exposure, and how much friction the area sees from clothing. In my experience many dotwork pieces show softening by year two to three if they are dense, and lighter stipple holds a bit longer. Plan on a possible touch-up around year two for denser details.
Q: Will waistbands and belts ruin a fresh low back tattoo during healing?
A: Friction from waistbands is one of the most common problems for low back placements. Keep waistbands loose for the first two weeks, sleep on breathable sheets, and avoid tight belts. A protective film in the first 48 hours can help if your clothes must contact the area.
Q: Are there specific wardrobe items I should bring to the session for comfort and access?
A: Yes. Bring loose, high-waisted bottoms or a button-down top you can lift rather than remove. A recommended option is a high-waisted skirt with elastic waist that you can lower slightly without getting cold.
Q: Does dotwork blur faster than solid black on the lower back?
A: Dotwork can blur if dots are packed too tightly, but when spaced intentionally it can age more gracefully than small-linework because the negative space is part of the design. Ask your artist about dot spacing and expect touch-ups sooner for very dense stippling.
Q: Should I worry about career implications from a low back tattoo?
A: Lower back pieces are generally easy to conceal so they are less likely to affect professional situations. If your work involves formal uniforms or tight clothing, think about long-term visibility and choose placement slightly lower or higher based on how you dress.
