
Fine line and solid black meet at opposite ends of the same conversation. Some people call blackout tattoos extreme and reckless, while others treat the black canvas as a way to carve out negative space and tell a subtle story. That debate matters because technique and placement change everything. Below are elegant blackout ideas that favor longevity and clarity, with notes you can bring to your first consultation to help the design age well.
1. Lace Cuff Negative-Space Forearm
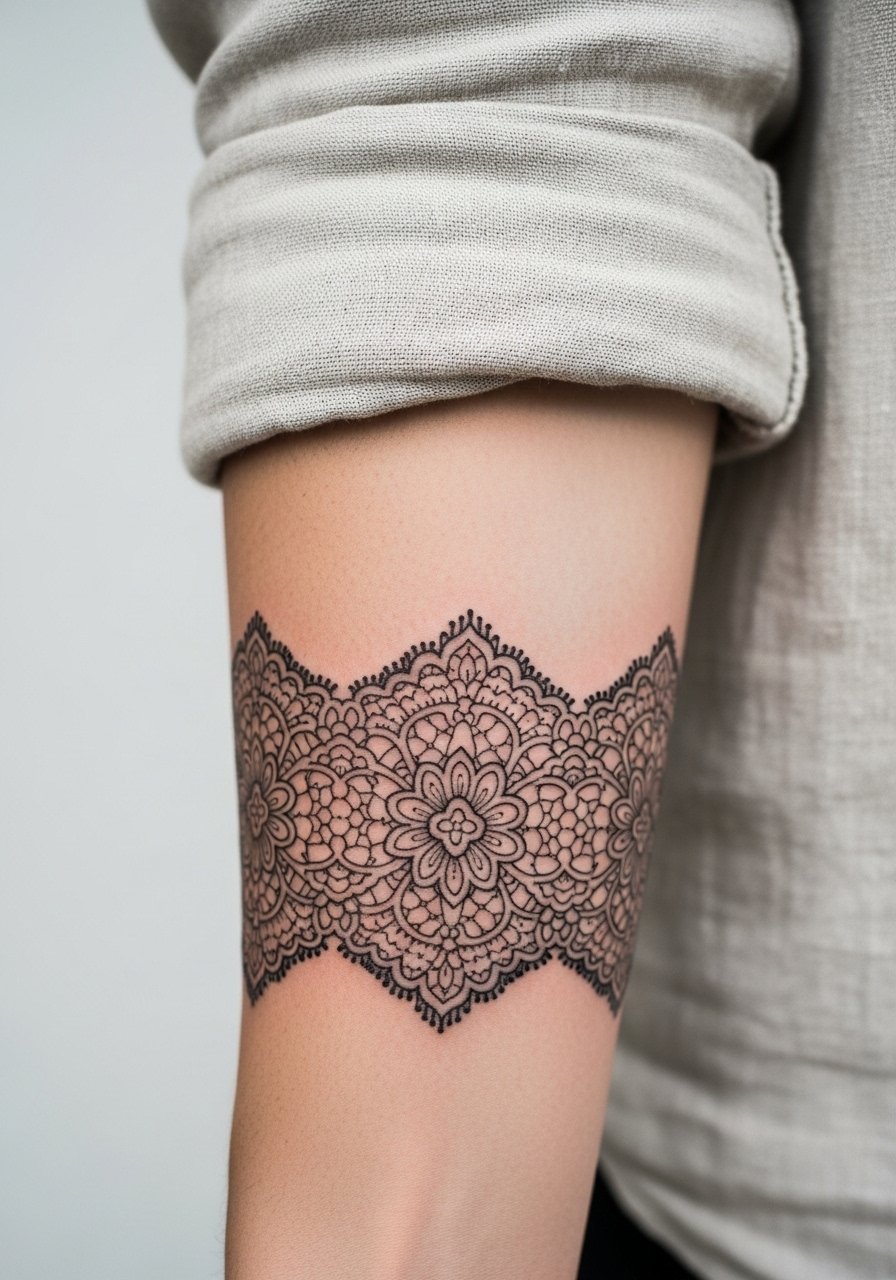
This is a classic way to use blackout without losing delicacy. I recommend the lace sit on the inner forearm where the skin is relatively stable and the negative motifs have room to read. Tell your artist you want areas of untouched skin that act like "windows" inside the black, and ask for slightly larger gaps than your reference to prevent merging over time. Fair warning about blowout on soft forearm flesh if the black is packed too deep. For the session wear, bring a loose button-down shirt so the artist can access the inner arm without stretching the skin.
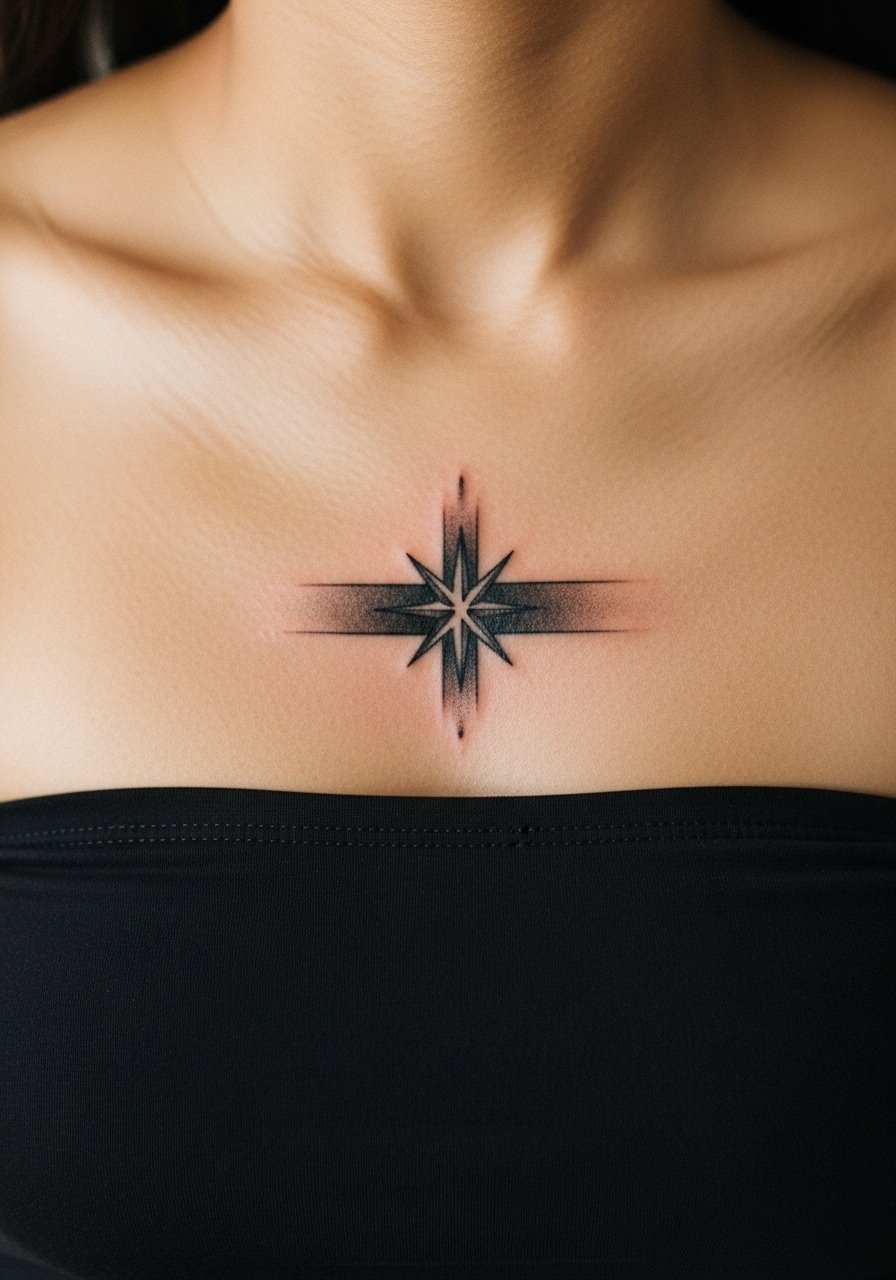
2. Geometric Mandala at the Collarbone
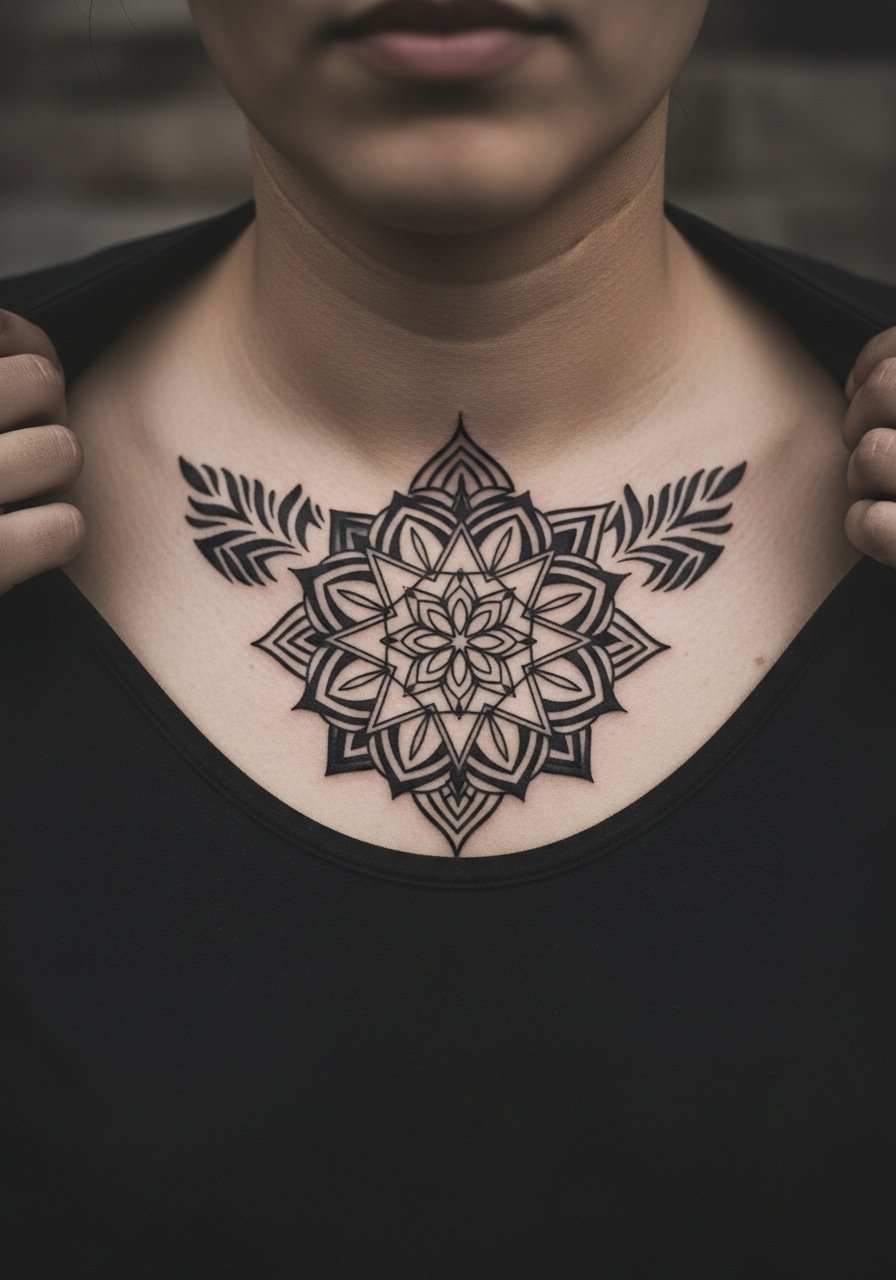
A small mandala carved by negative arcs reads like jewelry along the collarbone. The collarbone sees movement and sun exposure, so request bold, slightly wider linework in the negative shapes and deeper saturation in the surrounding black to reduce patchiness later. Expect a two-hour session for a compact piece. If you plan to show it, pair it with an open-back midi dress or a thin chain necklace that sits above the design to frame it without competing.
3. Ribcage Botanical with Cutouts
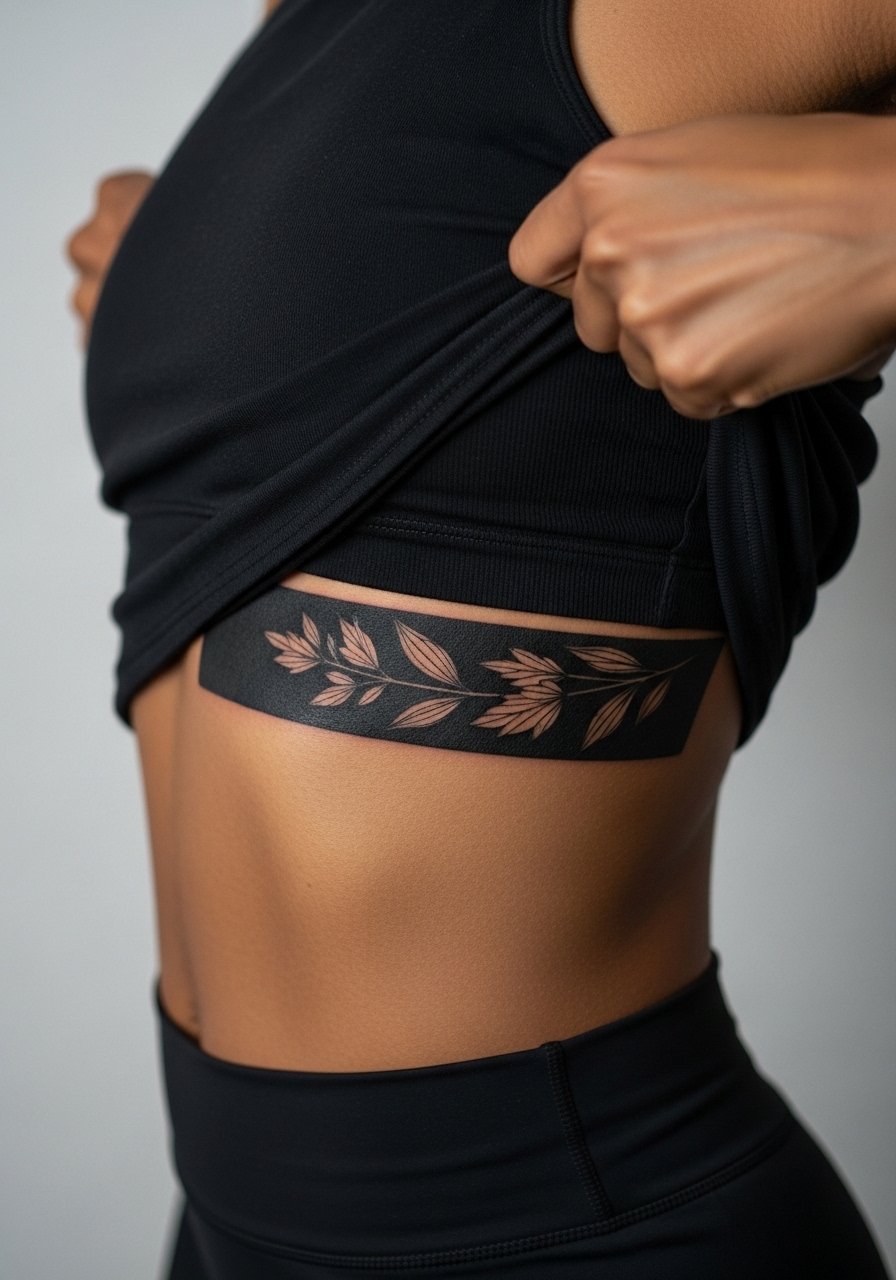
Ribcage work divides artists into two camps. One camp warns that the skin here shifts and dense fine details blur within a couple of years. The other camp says proper needle depth and spacing prevents that. My take is practical: avoid tiny stippling inside the negative shapes and insist on broader cutouts that read at a distance. The session can be uncomfortable, expect multiple shorter sittings. For the appointment, wear a cropped athletic top you can lift easily without risking fabric rubbing on the fresh ink.
4. Sleeve Accent with Constellation Negatives
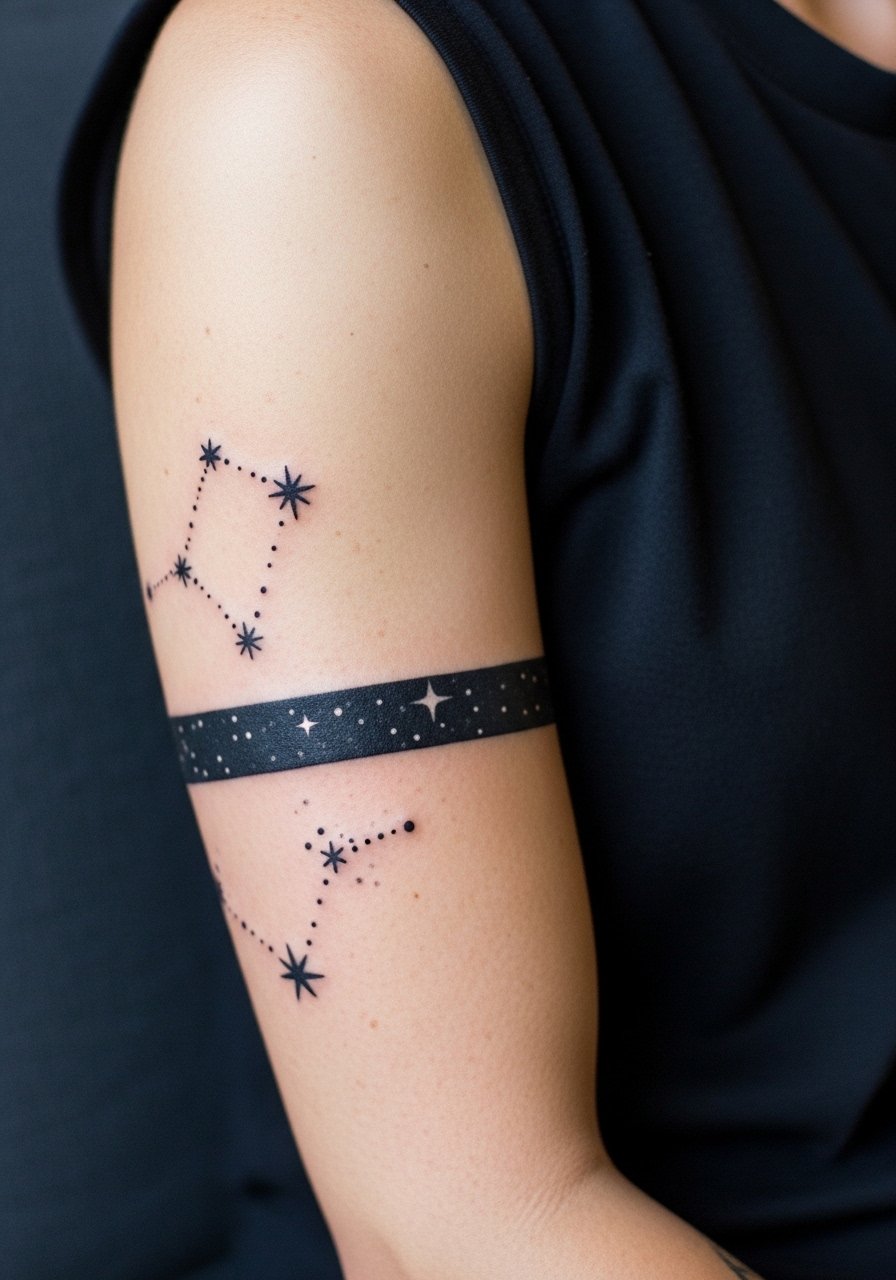
Use black to turn a sleeve into night sky and let stars show through as untouched skin. The visual impact reads from a distance and still holds detail where the negative stars are spaced widely. Tell your artist you want dot work kept sparse inside the black so the dots do not coalesce as the piece heals. Expect several sessions for a large band. For style, a rolled-up linen shirt shows the arm without hiding the sleeve and complements the stark contrast.
5. Thigh Panel Floral Silhouette
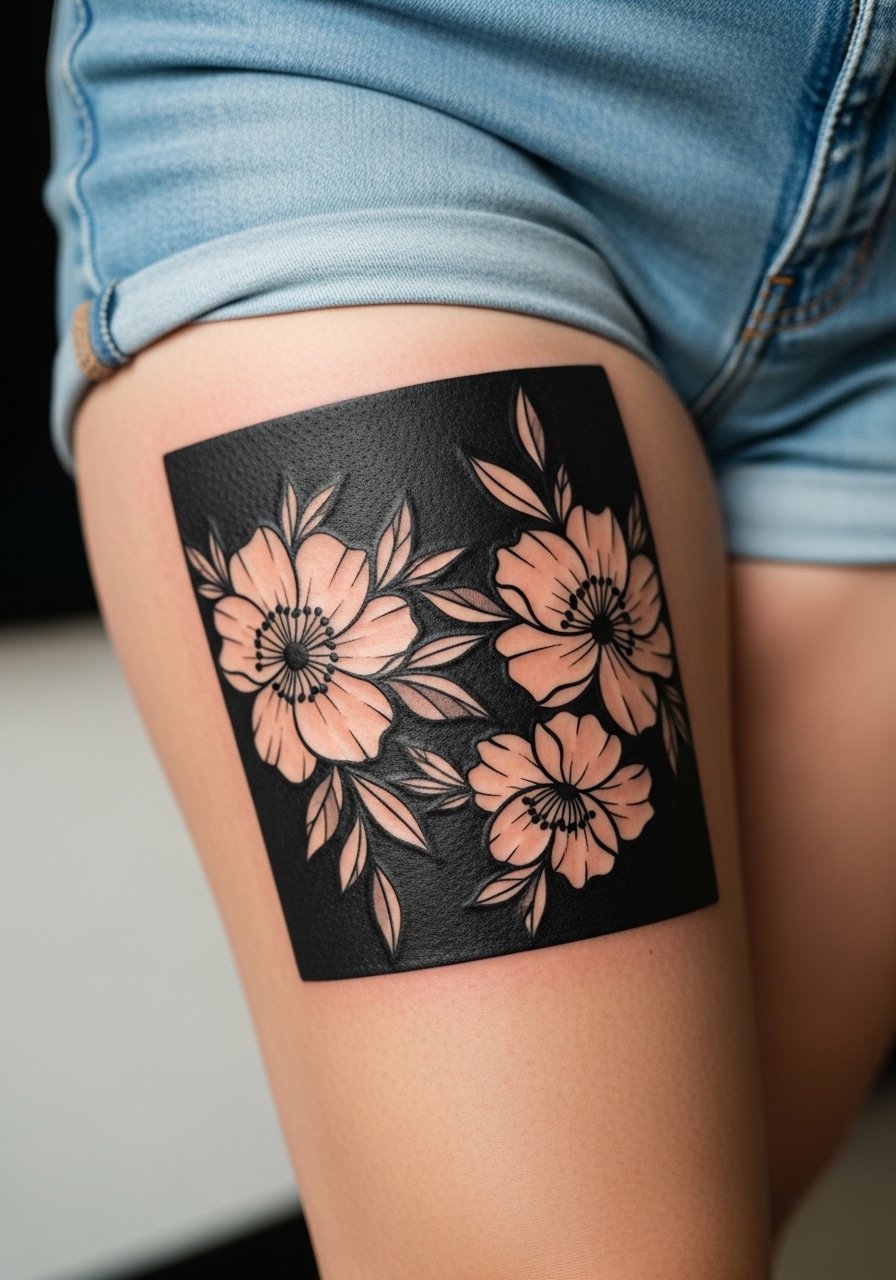
Thigh skin tolerates saturation well, so blackout panels here age gracefully. I suggest placing the floral silhouettes where muscle movement is minimal so the negative shapes maintain their edges. During consultation, ask for the darkest possible saturation around the cutouts while keeping the petals as clean uninked areas. Sessions are usually lengthy but manageable in a chair. To show it off, an open-back midi dress or high-waisted shorts frames the piece for summer wear.
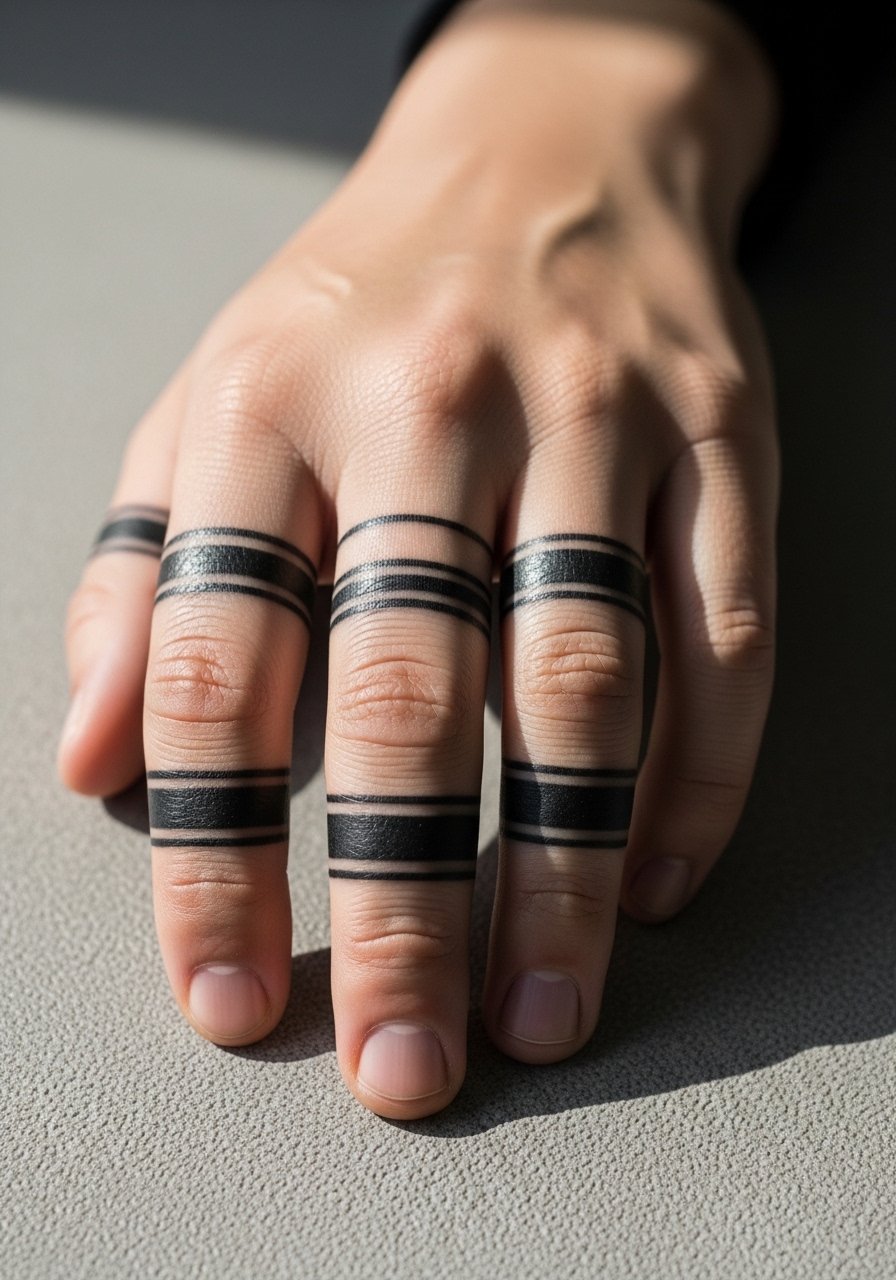
6. Minimalist Wrist Band Blackout
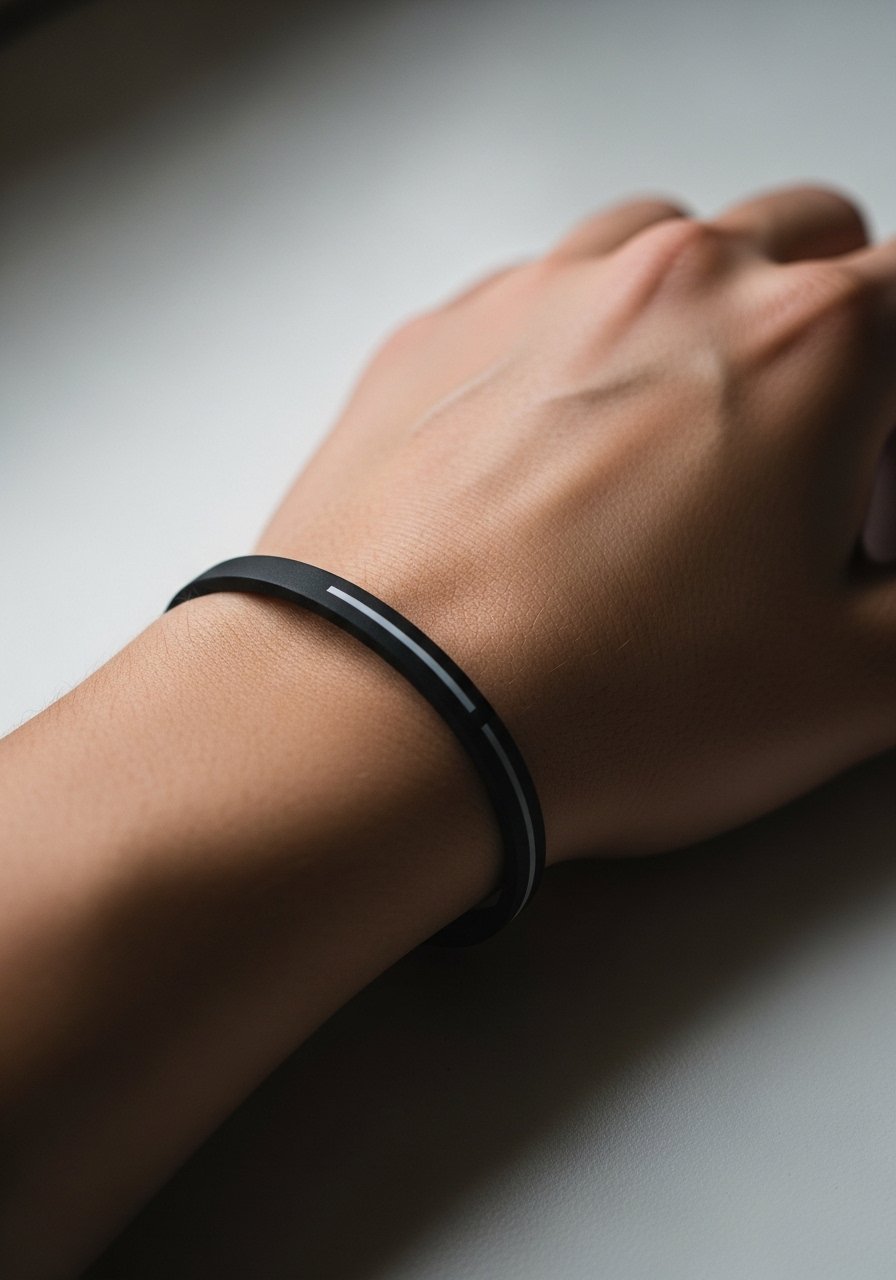
Small wrist bands can be elegant if done with attention to spacing. The biggest mistake is making the band too thin. Narrow bands tend to fade unevenly and need touch-ups. Ask your artist to leave a thin negative stripe inside the band for a modern feel and to place the band slightly higher on the wrist where the skin is less exposed to constant washing. Session time is short but the wrist heals under frequent friction. Pair the finished band with a minimalist watch or thin bracelets that do not press directly on the fresh ink.
Before You Book
Those first six pieces include exposed areas and friction zones, so a little prep smooths the session and first week of healing.
- Stencil transfer paper kit. Lets you preview how the lace cuff and wrist band align with your forearm shape before the needle hits skin.
- Topical numbing cream. Useful for ribcage or inner thigh sessions if you are sensitive and want a calmer first hour.
- Thin protective film roll. Keeps small wrist and hand pieces safe from friction during the initial days of healing.
- Fragrance-free body wash. Cleans delicate collarbone and thigh areas without stripping pigment or irritating fresh work.
- Aquaphor healing ointment. A thin layer for the first few days helps fine line negative spaces stay supple without clogging.
7. Shoulder Accent with Negative Phoenix
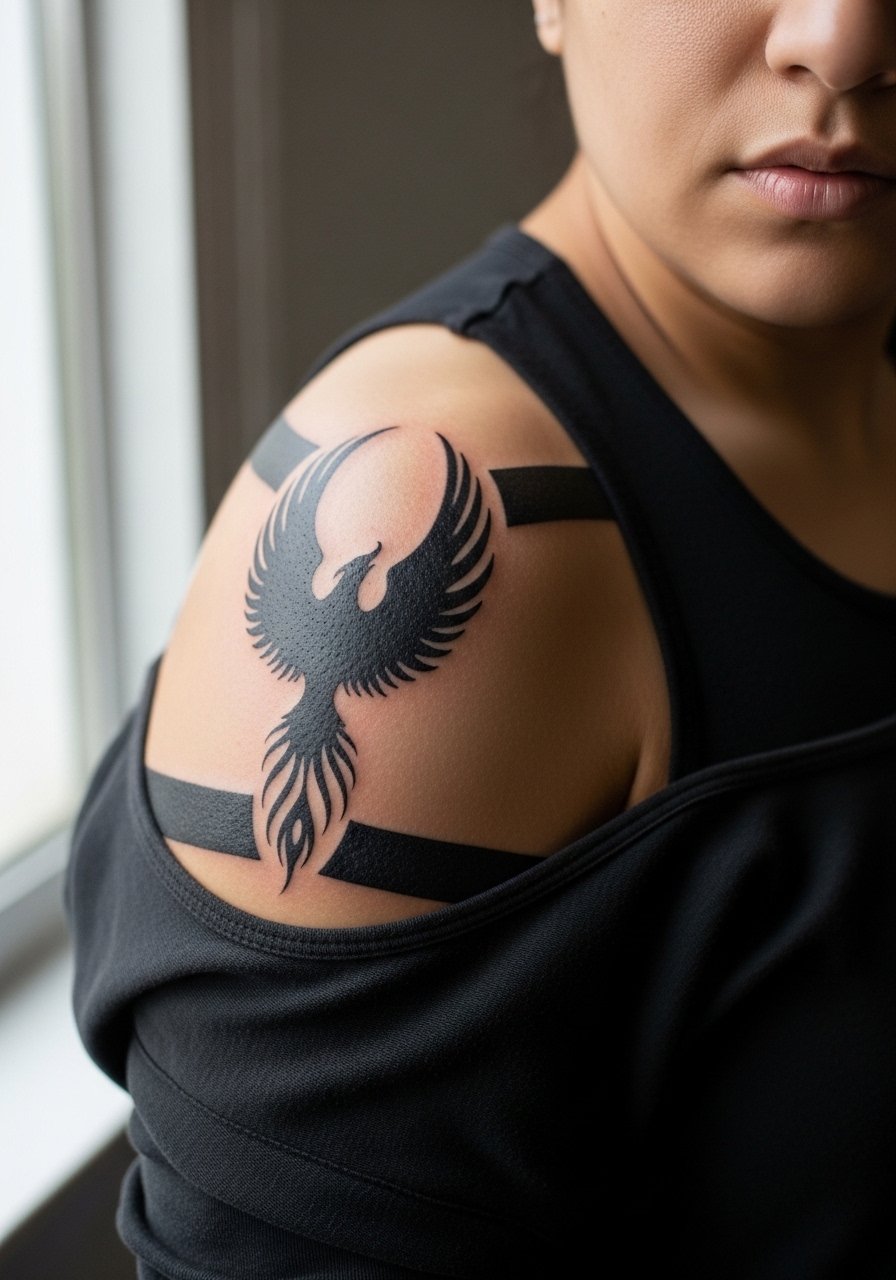
A shoulder blackout offers bold visual weight while letting a phoenix come through as negative form. The shoulder is forgiving for saturation but moves when you lift the arm. Ask your artist to map the design while your arm is relaxed so the negative phoenix reads correctly in everyday posture. Sessions are moderate in length and comfortable for most people. For outfit pairing, a loose tank top shows the shoulder without rubbing the healing area.
8. Sternum Floral Underbust Panel
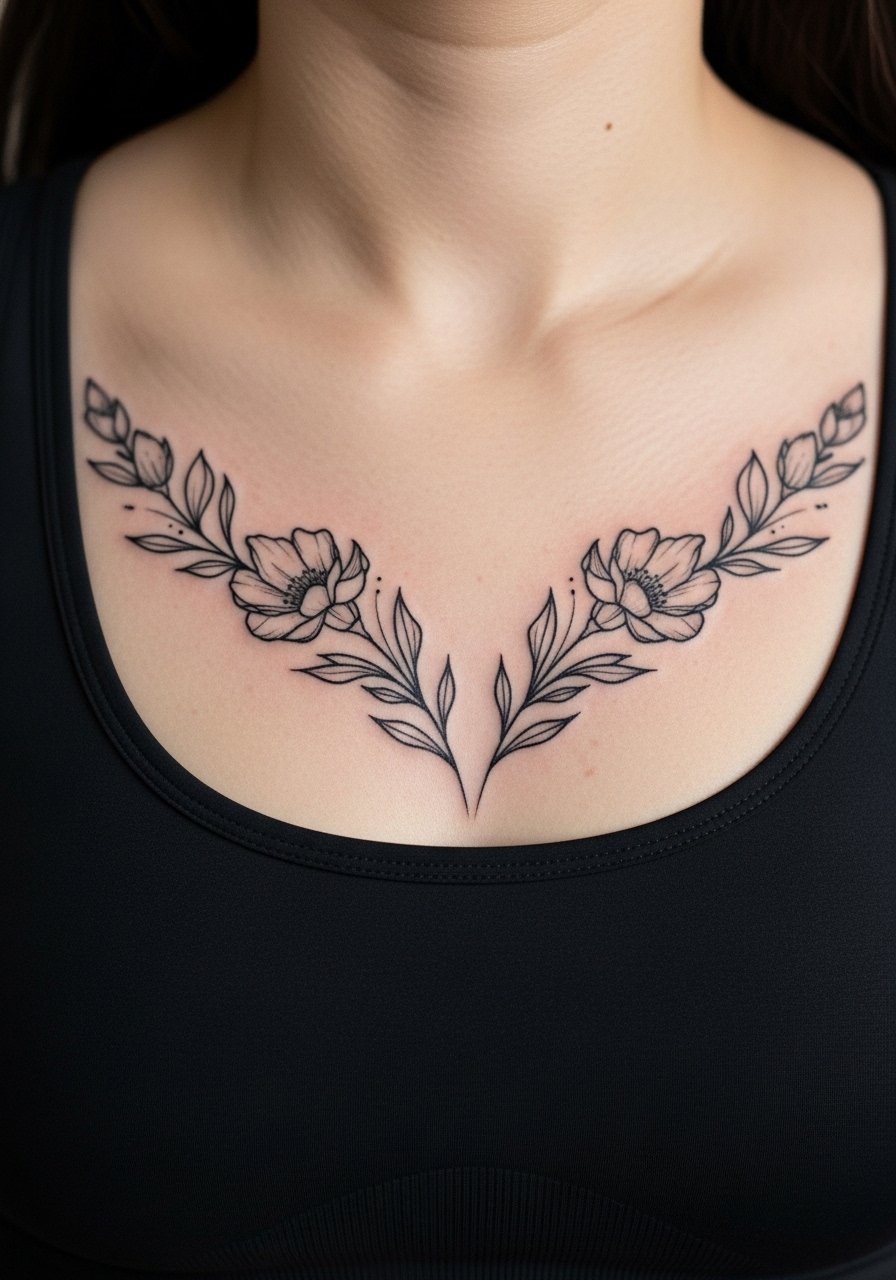
Sternum pieces look refined when negative petals breathe inside a dark panel. The sternum sees stretching with deep breaths and shifting from movement, so request the negative areas be slightly larger than you want on paper. Expect higher sensitivity during the session. Mention to your artist that you prefer the black stopped short of the most bony points so the piece sits with natural contours. For the appointment, wear a fitted sports bra to give access without full exposure.
9. Ankle Crescent with Negative Stars
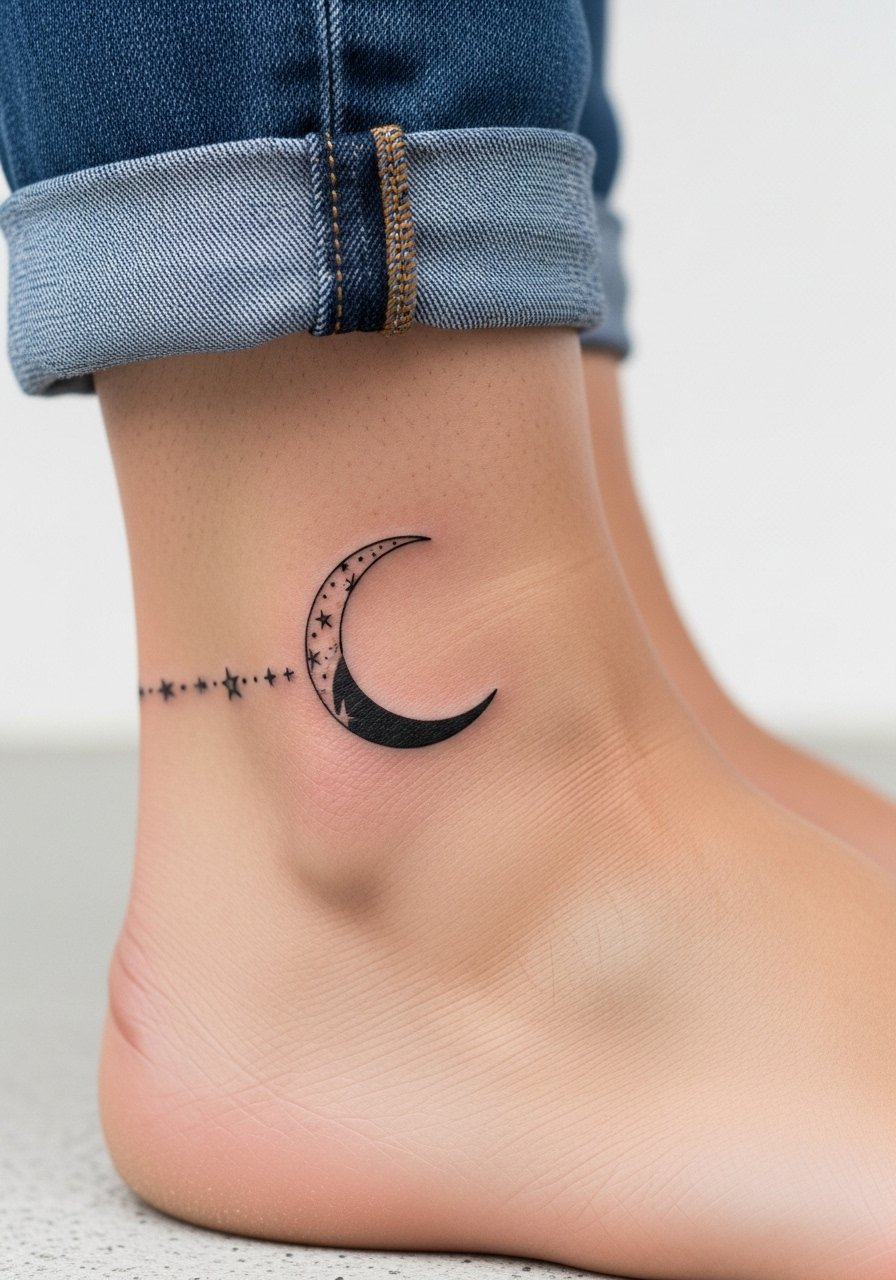
Ankle tattoos face constant friction from shoes and socks, and that accelerates fading. For small blackout shapes choose larger negative stars rather than tiny dots so they do not vanish under rubbing. The session is quick but healing needs mindful aftercare. Style-wise, slip on sandals or roll jeans for reveal. Pair with a delicate anklet when the piece is fully healed to highlight the curve without covering the ink.
10. Inner Bicep Micro Blackout Panel
The inner bicep is a softer surface that can experience blowout if ink is placed too deep. I advise asking for a denser saturation around negative shapes rather than needle-heavy dot shading. The pain can be surprising because the skin is thin and sensitive. Expect a short session and a touch-up at year two depending on movement and exposure. For the session, wearing a loose drawstring linen pant is irrelevant for the arm but brings a relaxed vibe to longer sittings. Keep the arm relaxed during healing to avoid stretching newly inked edges.
11. Half-Hand Blackout with Ring Negative
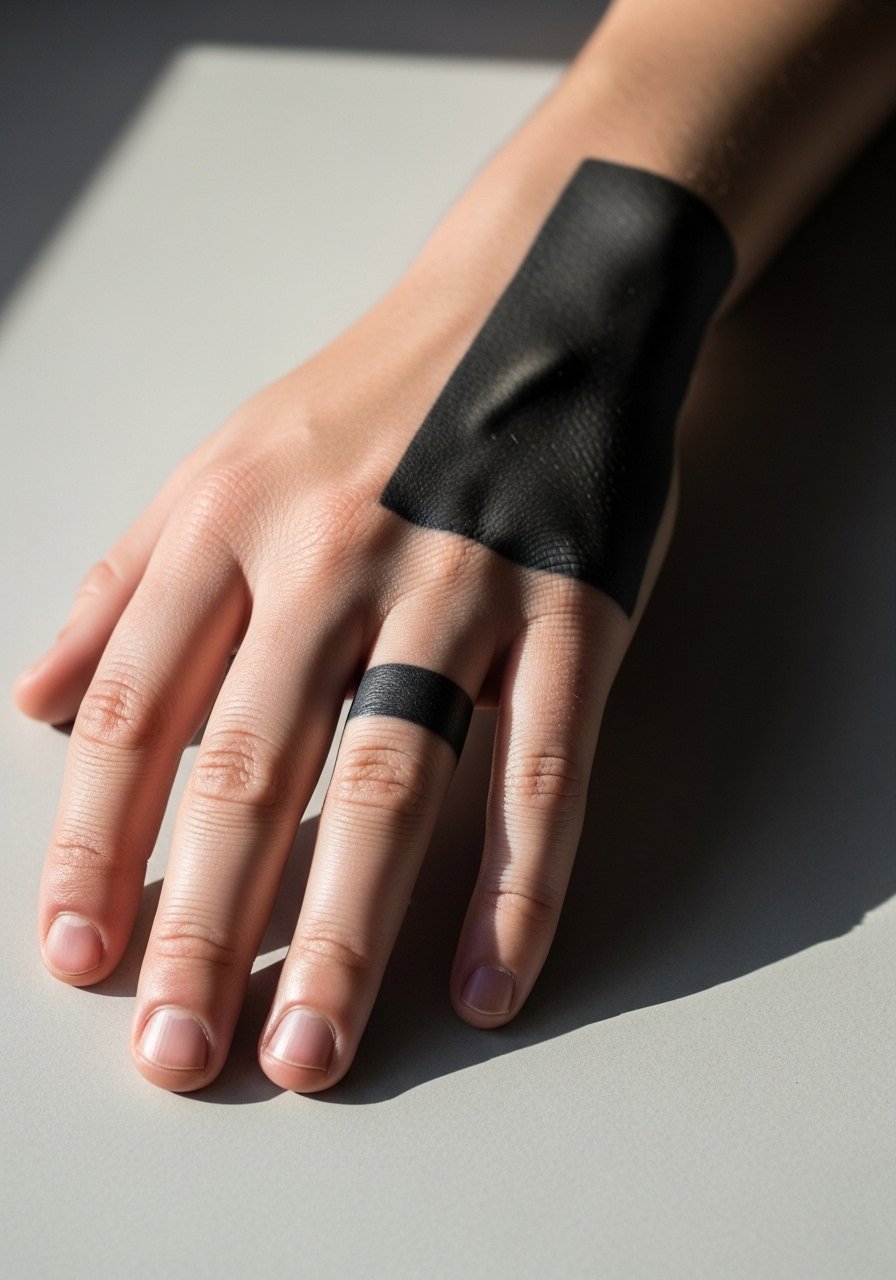
Hand tattoos are visible and controversial in professional contexts. One camp says hands are expressive places to keep, the other notes workplace restrictions and rapid fading. Be explicit with your artist about long-term plans and ask for a plan that allows for touch-ups. Hands also see a lot of washing which wears pigment. A common mistake is asking for too much tiny detail. Larger negative shapes and bold fields hold up better. Expect multiple short sessions and realistic touch-up timelines. Styling tip after healing is to wear subtle rings that sit above the negative band.
12. Calf Geometric Ladder Panel
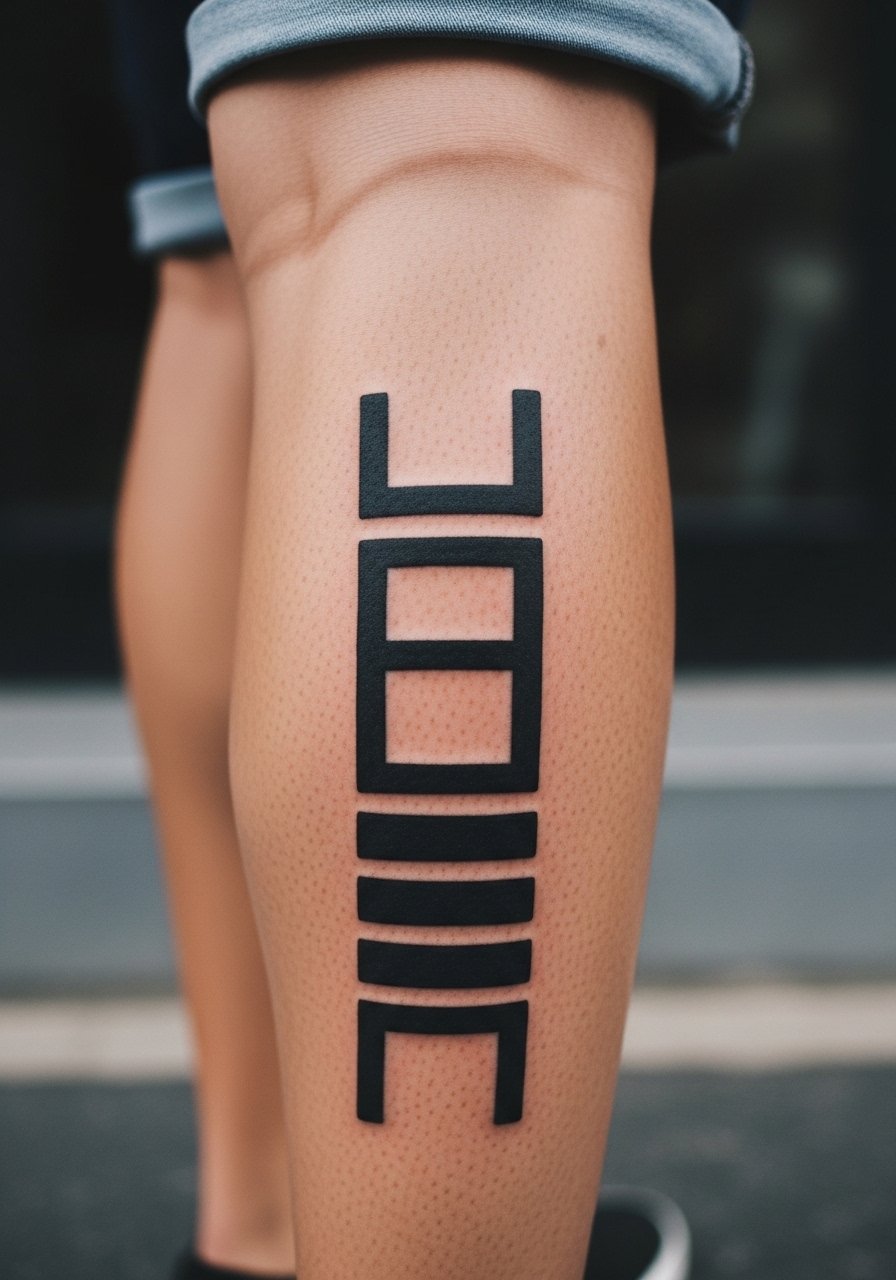
Calf skin takes saturation well and usually keeps edges clean for years. A ladder of negative rungs inside a black column creates a modern architectural look that reads from a distance. Tell your artist you want even spacing and thicker negative gaps to avoid merging with muscle movement. Expect a longer single session for taller panels. Show-off pairing includes mid-calf boots or rolled shorts that expose the geometric line.
13. Nape Crest with Negative Foliage
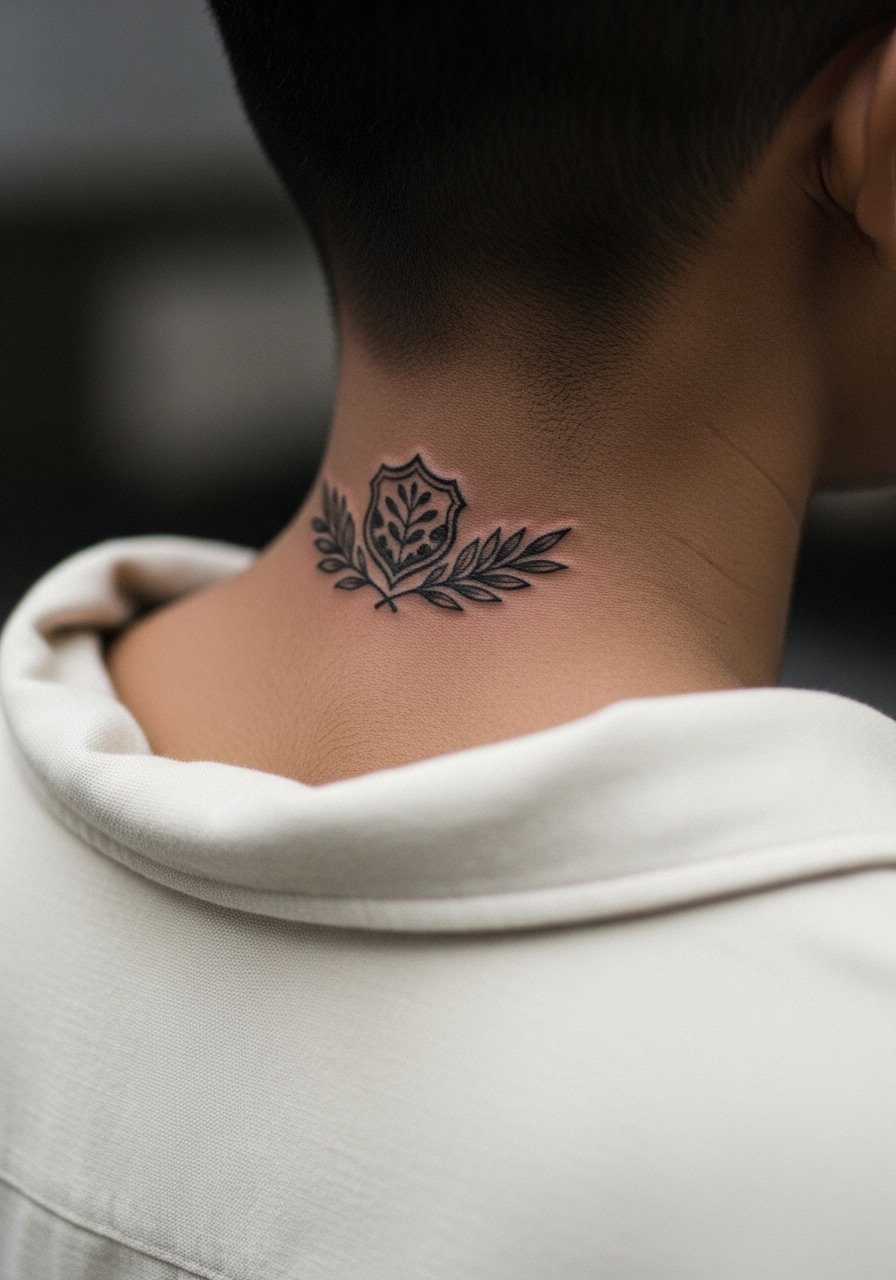
The nape is discreet when covered and flirtatious when exposed. Blackout here can be a compact crest that peeks beneath hairlines. Mention to your artist how you plan to wear your hair most days since constant friction from collars or hairstyles affects healing. Sessions are brief but precise. For styling, a thin chain pendant necklace sits above the crest and frames the negative foliage without crowding it.
14. Lower Back Lace Panel
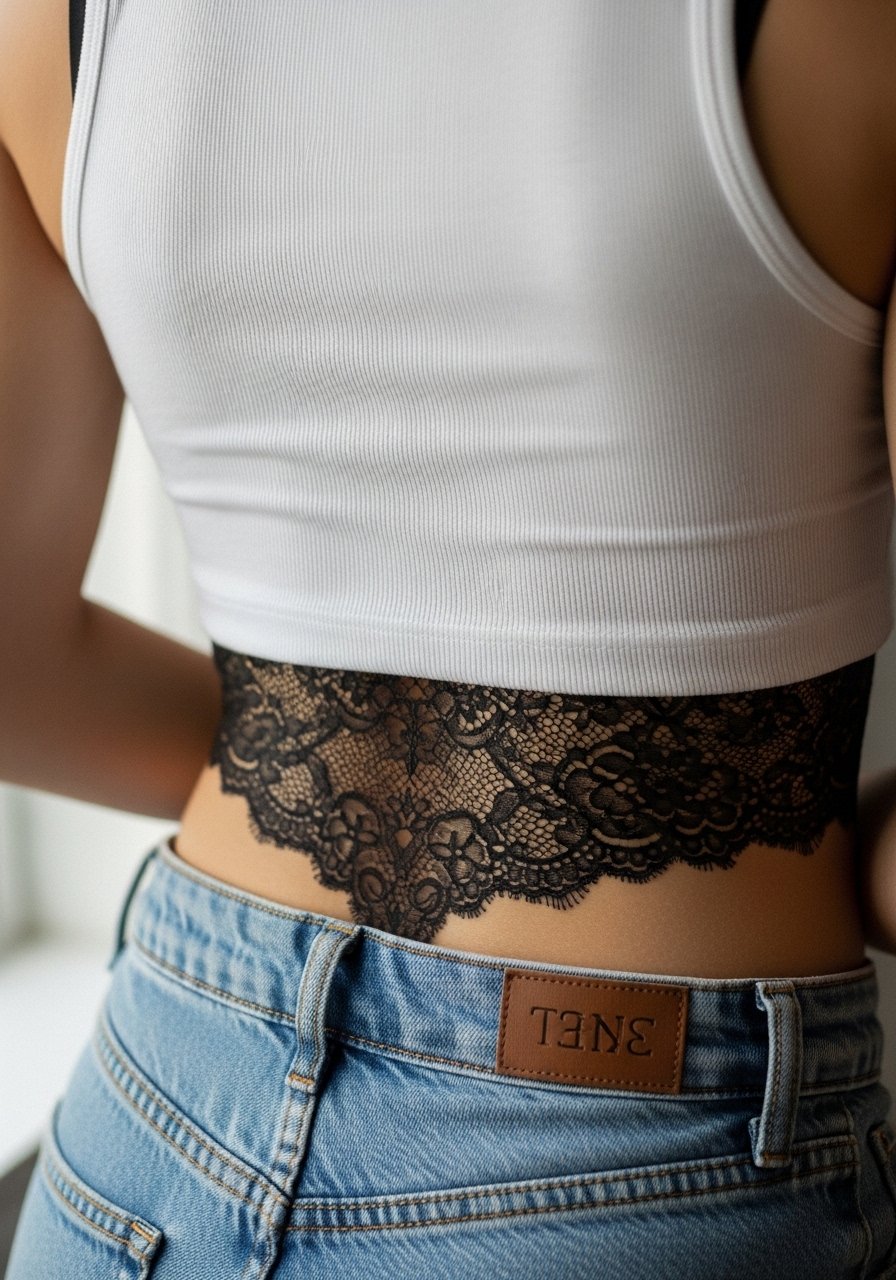
Lower back blackout offers a large canvas that ages consistently because it sees less sun than limbs. Lace cutouts here can be broader, which helps prevent detail loss as the skin moves with bending. A common mistake is attempting ultra-fine lace in a small panel. Sessions are comfortable and may be split if the area is extensive. Pair with low-rise jeans or high-waisted skirts to show off the panel tastefully after healing.
15. Collarbone Script Bar in Negative Space
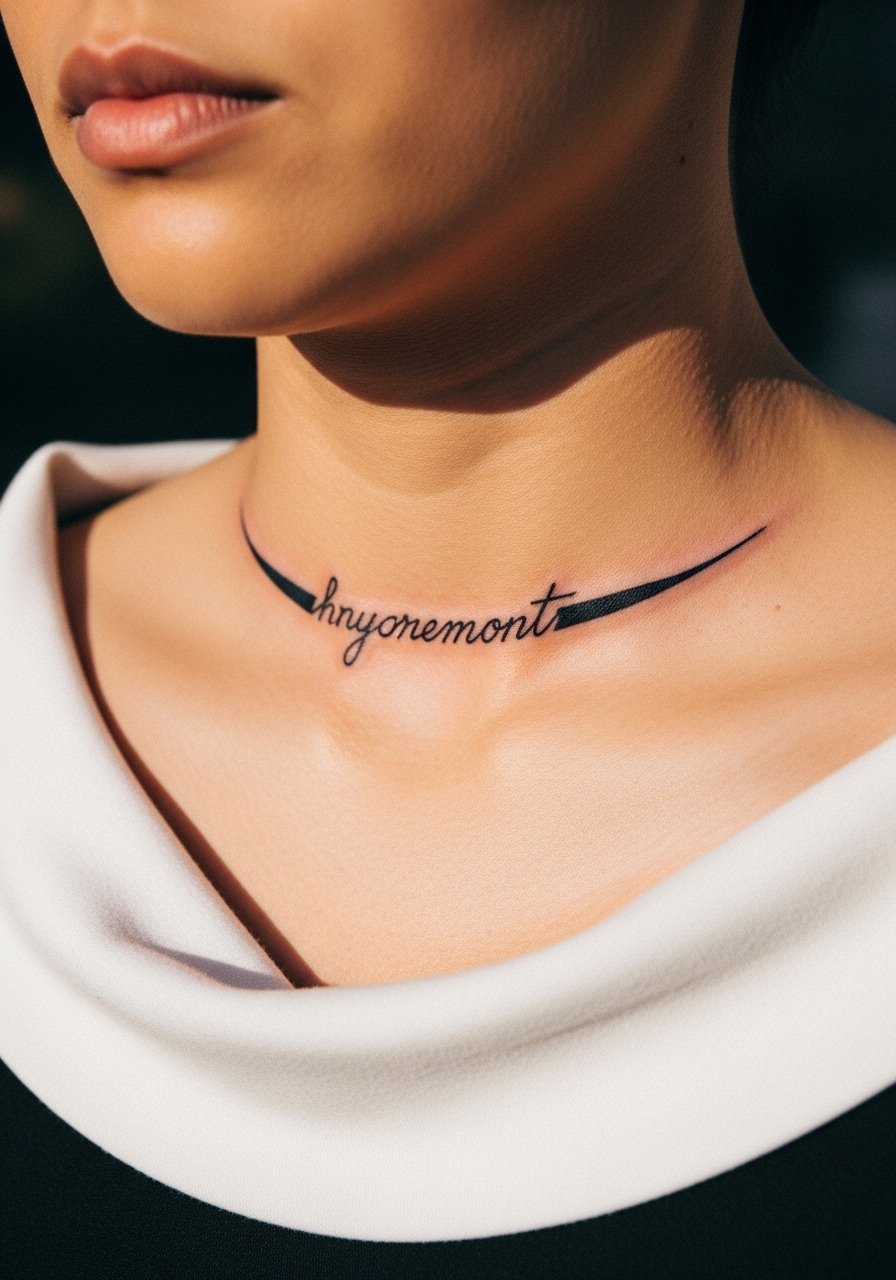
Lettering inside a blackout strip reads like a secret band. When text is involved, insist on the exact phrase and font during the transfer so the negative letters are legible. Small script can dissolve as the black settles so opt for slightly larger letter spacing. The collarbone is exposed to sun, so plan touch-ups later if you expect heavy outdoor time. For showing off, a thin chain pendant sits without distracting from the bar.
16. Upper Arm Panel with Slash Reveal
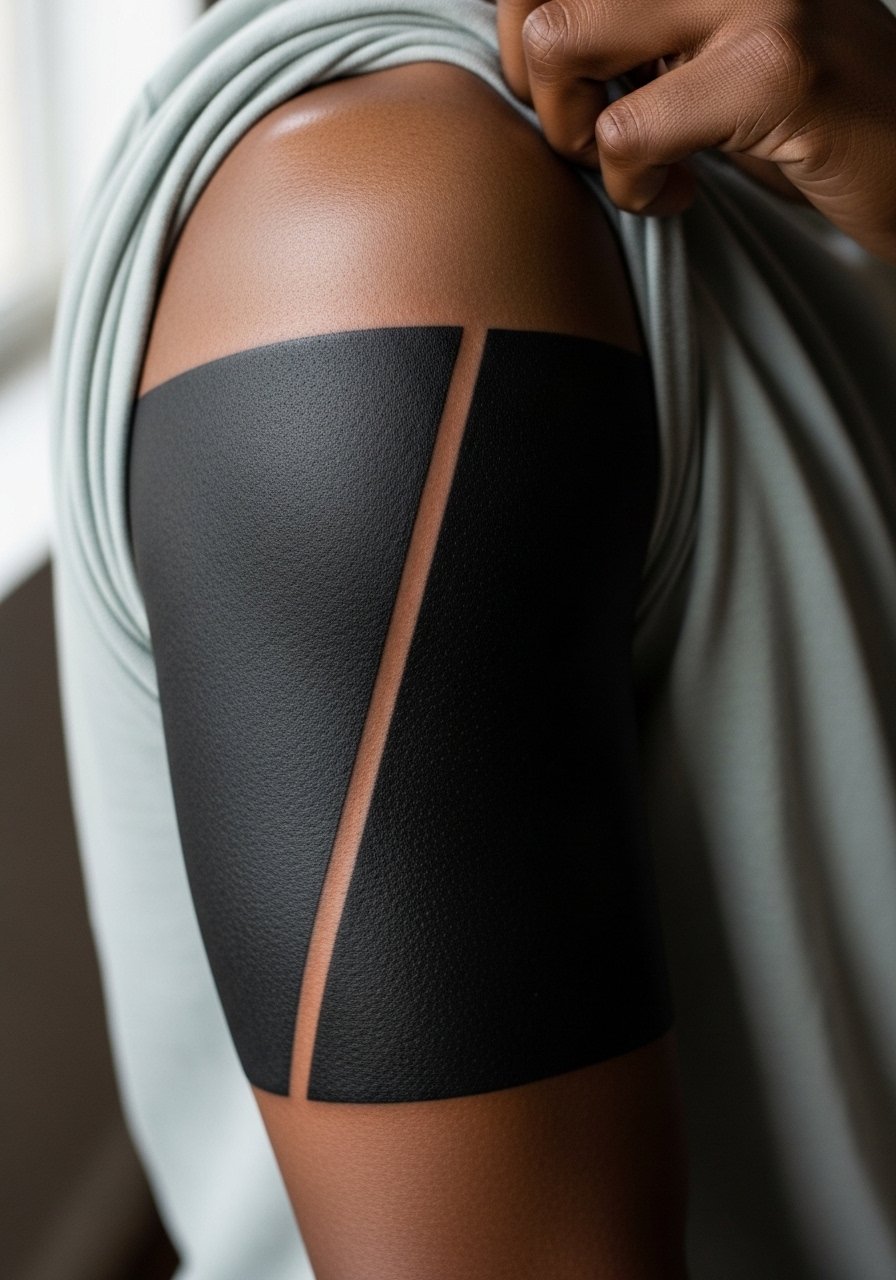
A single slash of negative skin inside a large black field gives a sculptural effect. The upper arm avoids much friction and keeps saturation stable. Ask for a clean, slightly tapered slash shape that follows natural muscle lines so movement does not distort it. Sessions are mid-length and healing is straightforward. For the appointment, a loose button-down shirt provides easy access and comfort.
17. Vertical Spine Blackout with Motifs
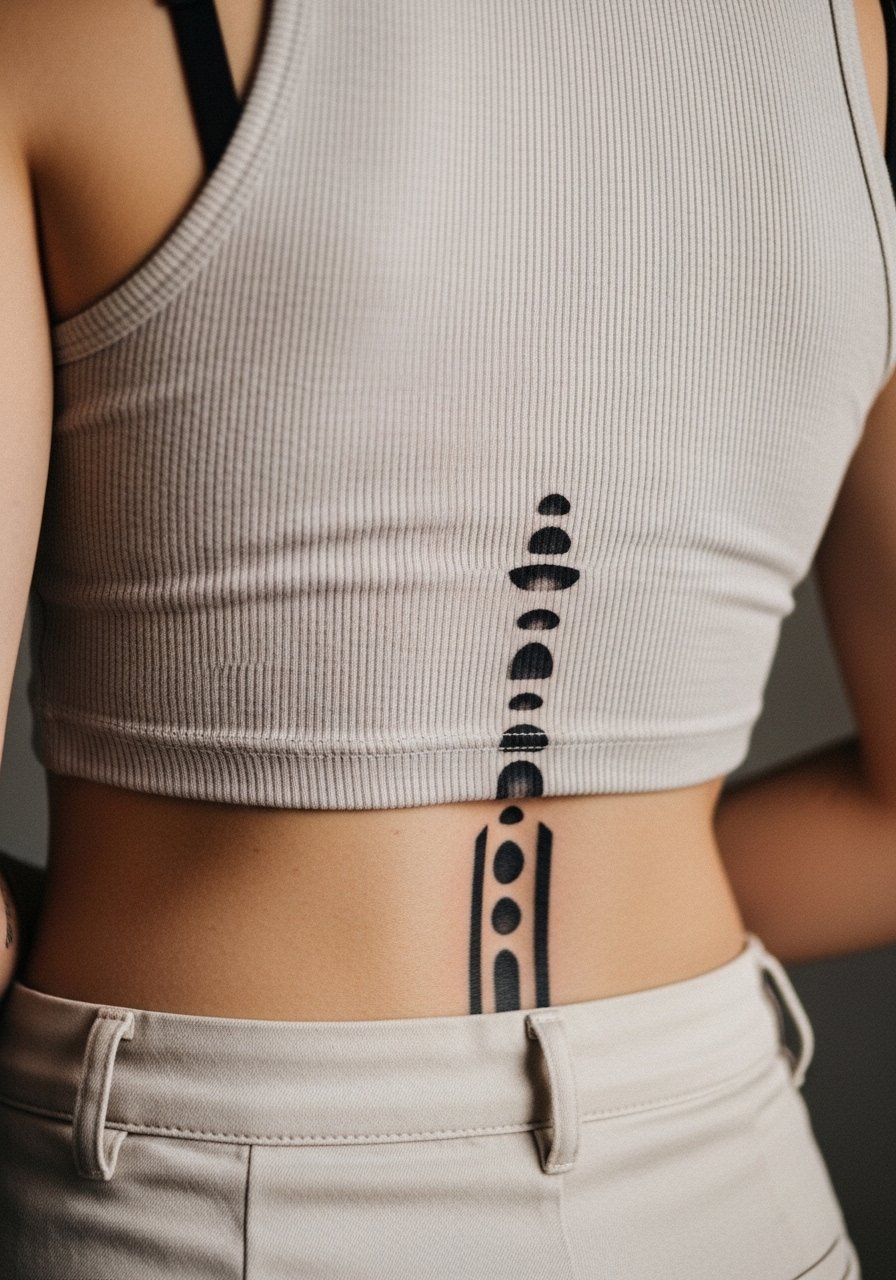
A spine strip reads elegantly when negative icons are spaced around bony landmarks. The spine can be tender during inking, so expect higher sensitivity. Ask your artist to place motifs where movement is minimal so edges stay crisp. Touch-ups are common for high-contrast pieces aligned over bones. For showing off, open-back tops work well once healed. Mention career considerations if the spine will be exposed often.
18. Full Chest Mask with Negative Facial Silhouette
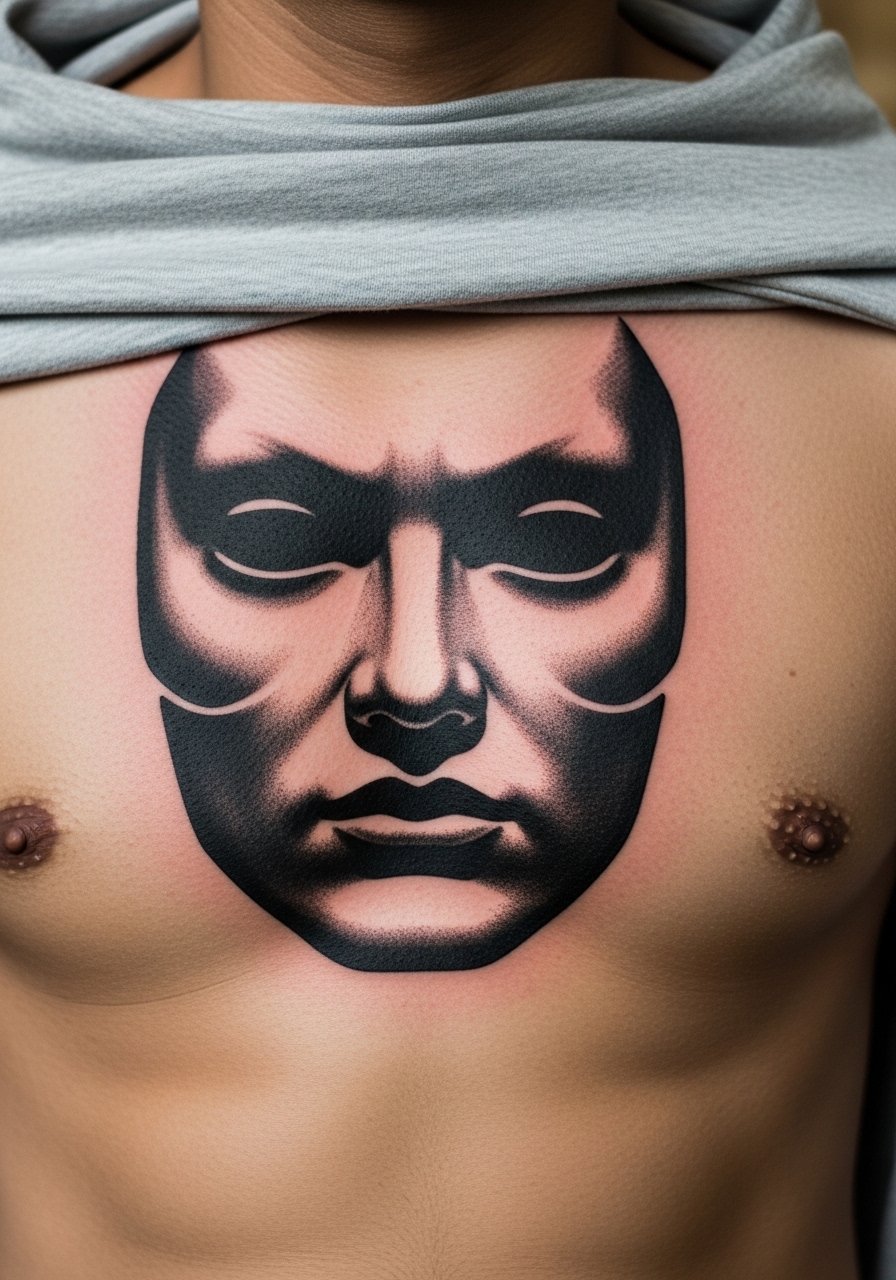
Chest blackout can read like armor when designed as a mask with a single negative silhouette at center. The chest moves with breathing and sun exposure affects it, so request denser saturation around edges and slightly larger negative openings. Sessions may be lengthy and split into two visits. For the appointment, a wide-neck shirt that you can pull aside is easiest for artist access.
19. Hip Crescent Panel
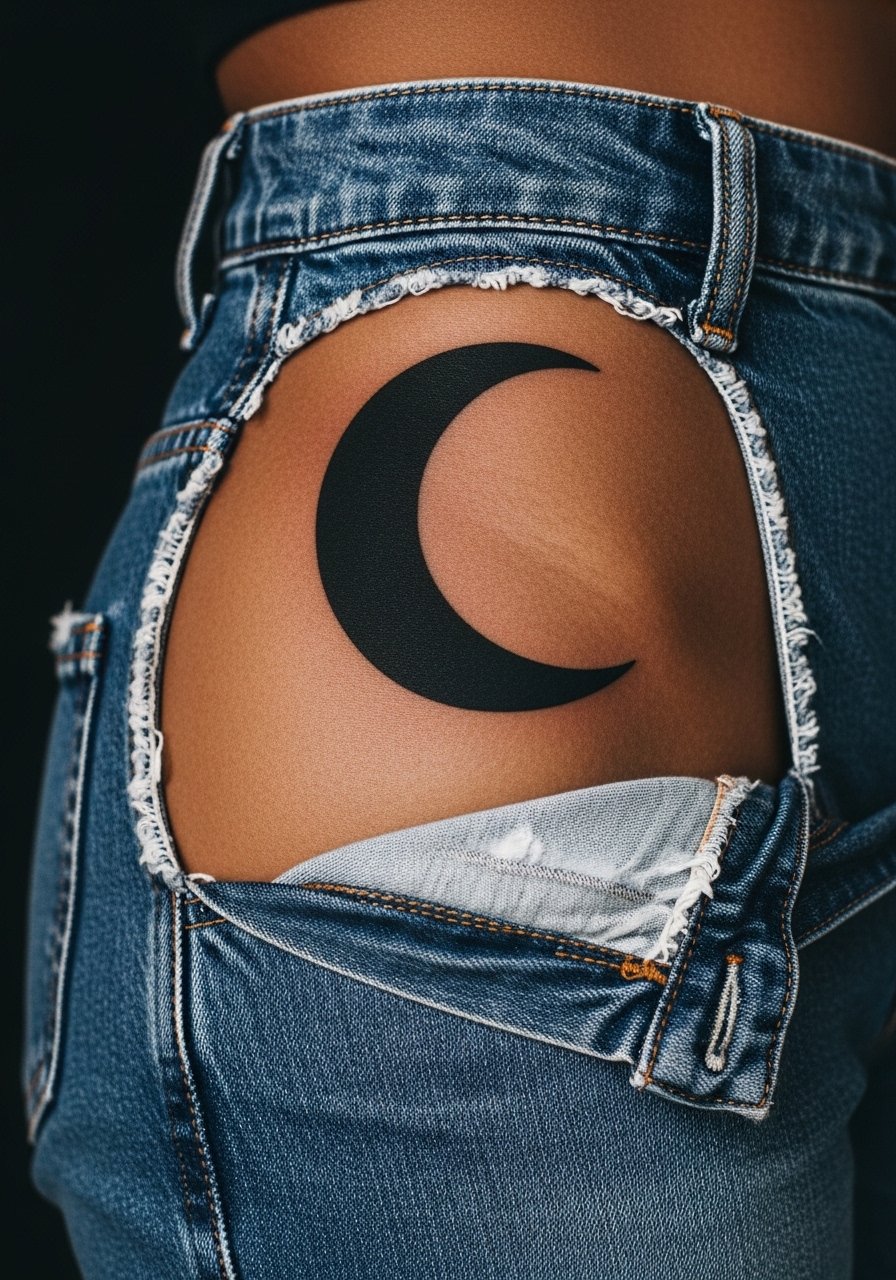
A hip crescent can be sensual without being overt. Hip skin tolerates saturation, but shifting from sitting and clothing can affect early healing. Ask for a crescent that follows your pelvic line and for broader negative edges to prevent blurring. The session is comfortable and short. Once healed, pair with swimwear or high-cut shorts to showcase the curve. For the session, choose bottoms you can shift easily to expose the area without constricting.
20. Inner Thigh Botanical Panel
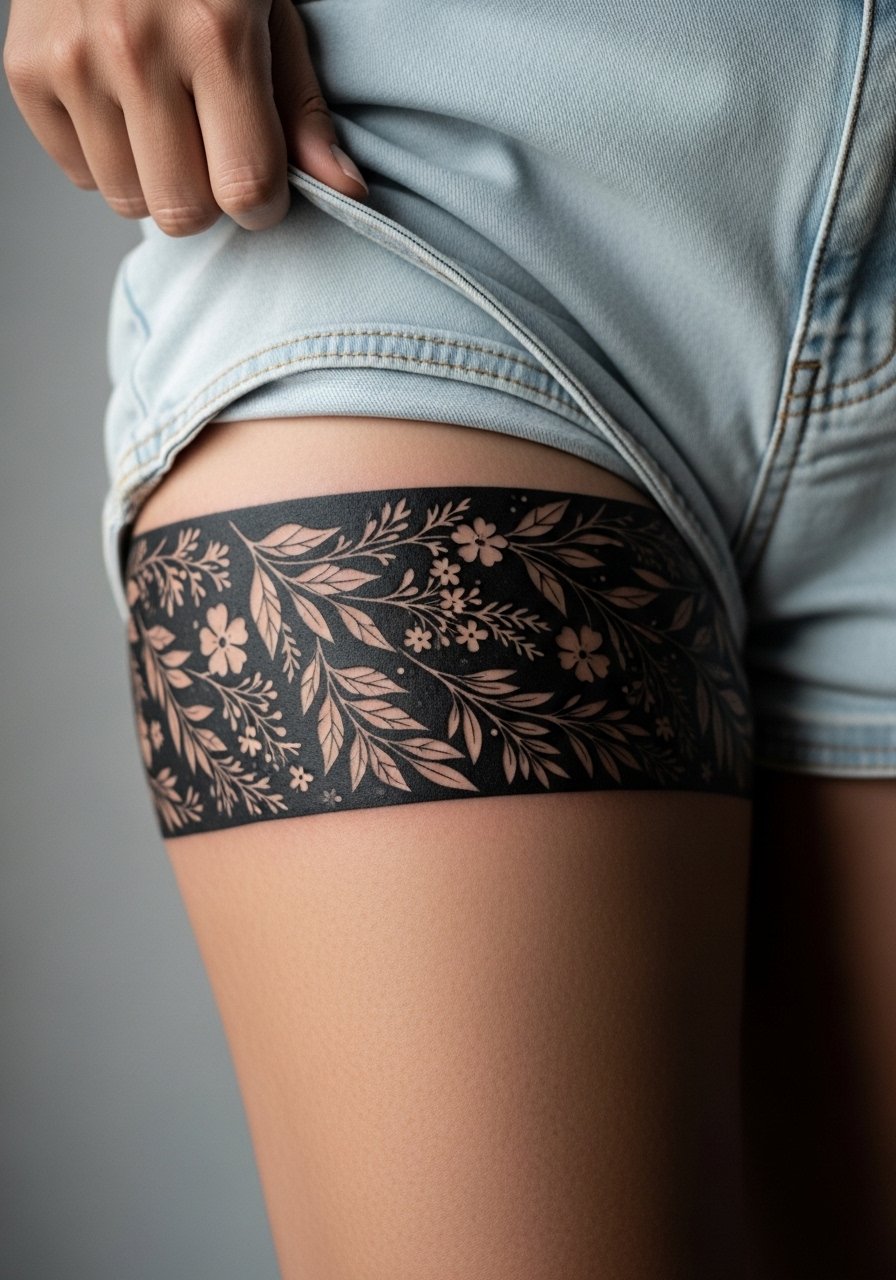
Inner thigh work is intimate and sensitive. The biggest mistake is demanding super-fine detail in a high-friction zone that rubs against clothing. Request bolder negative shapes and discuss touch-up expectations. Sessions can be tender and sometimes require reclining positions that feel awkward. Wear loose shorts for the session and recovery. After healing, the piece pairs discreetly with summer skirts and swimwear.
21. Finger Band Blackout Stack
Finger ink sees the fastest wear because of constant use and washing. For blackout bands choose thicker bands with simple negative grooves rather than tiny patterns. Artists are split on the long-term reliability of finger saturation, so ask about realistic fading and touch-up frequency up front. Sessions are brief but expect annual touch-ups. Style-wise, slim rings that sit above the bands complement the blackout without rubbing the healing area.
22. Sternum Starburst Accent
A small negative starburst in a sternum panel can feel understated and intentional. The sternum has thin skin and sensitivity, so request larger negative rays to keep detail readable as the area heals. Sessions are sensitive but short. If you plan to wear necklaces, choose ones that sit above the motif to avoid contact. For the appointment, a bandeau or sports bra works best to give clean access and minimize fabric interference.
23. Shoulder Blade Map Silhouette
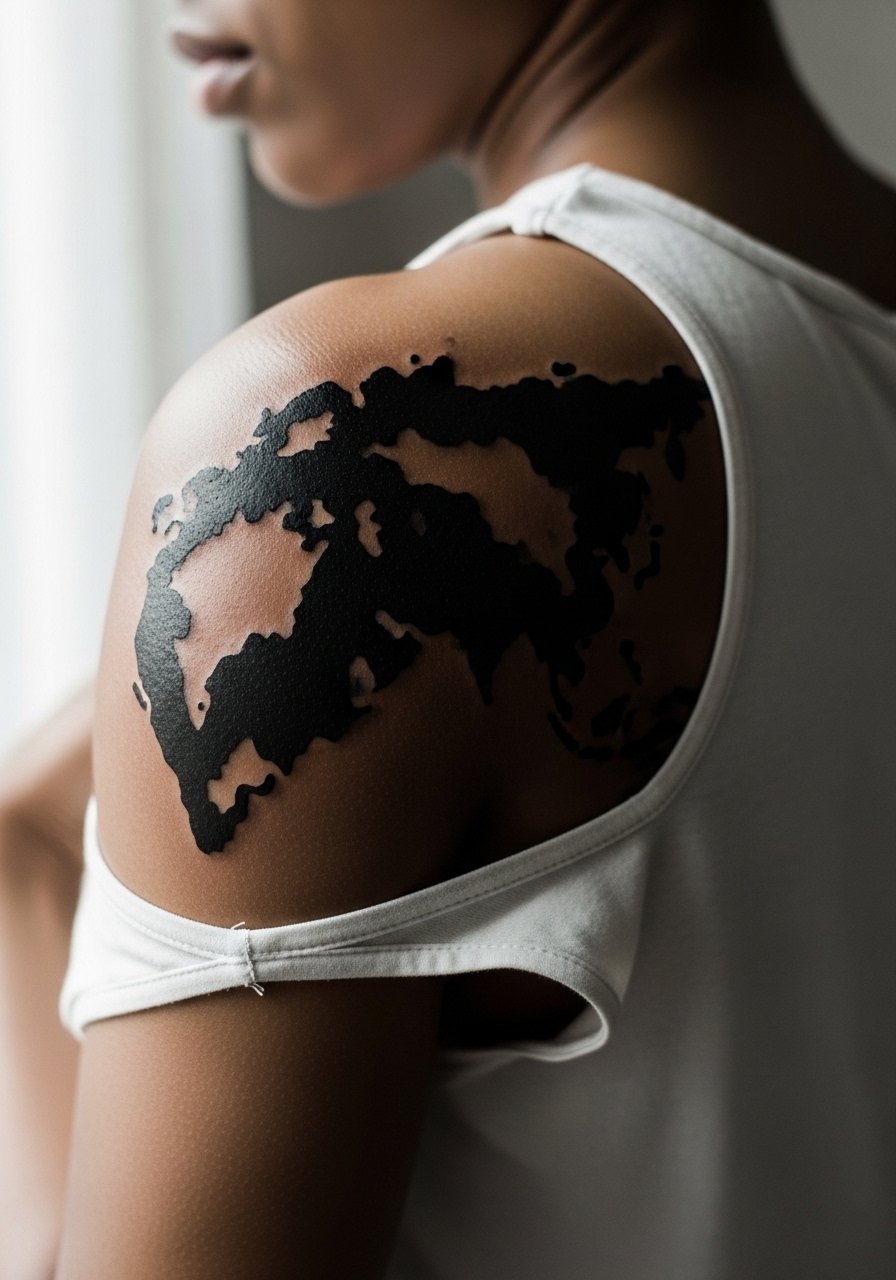
A shoulder blade gives a broad flat area where negative islands in a blackout silhouette can keep crisp edges. Movement is less disruptive here than on joints, which helps longevity. Ask for slightly raised negative shapes so they remain distinct against the black field. Sessions are comfortable with you lying on your side. Showing it off pairs well with open-back dresses or halter tops after healing.
24. Kneecap Semi-Circle Accent
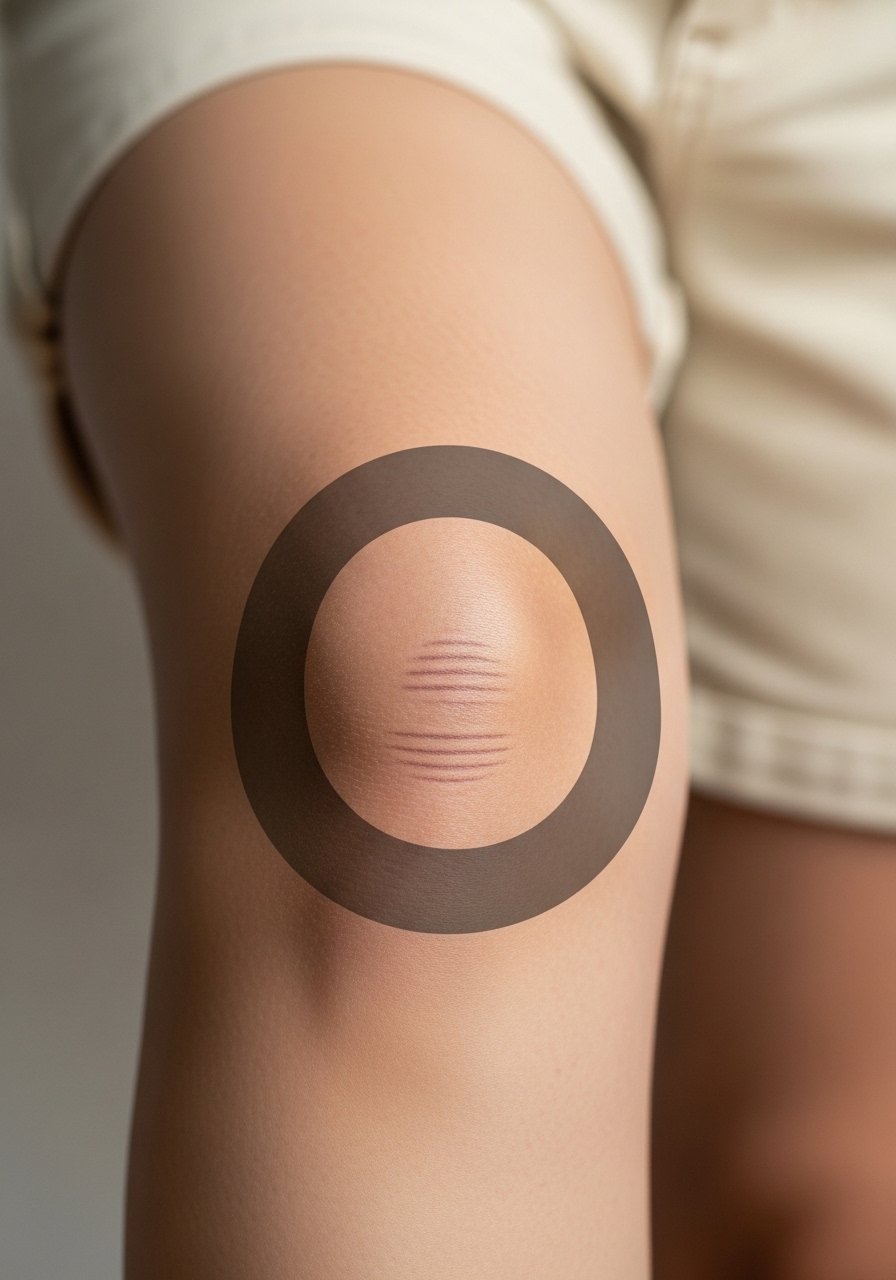
Knee work sits over a mobile joint and is prone to pigment loss over time. The smart move is a bold semi-circle that leaves the kneecap itself untouched as a negative crescent. Expect more frequent touch-ups compared to elsewhere. Sessions include careful positioning and shorter passes to limit irritation. For mobility during healing, wear loose shorts and avoid deep squatting for the first two weeks.
25. Behind-the-Ear Micro Patch
Behind-the-ear pieces need precise placement and a mindful approach to visibility. The area can be hidden by hair or revealed depending on your style. Ask your artist for a small, solid patch that reads as a spot rather than a complex motif. Sessions are quick but can be ticklish. Consider hairstyle preferences and professional settings before booking. A note about discovery: search shop portfolios and local conventions to find artists who specialize in small placement work.
26. Side Torso Geometric Wave
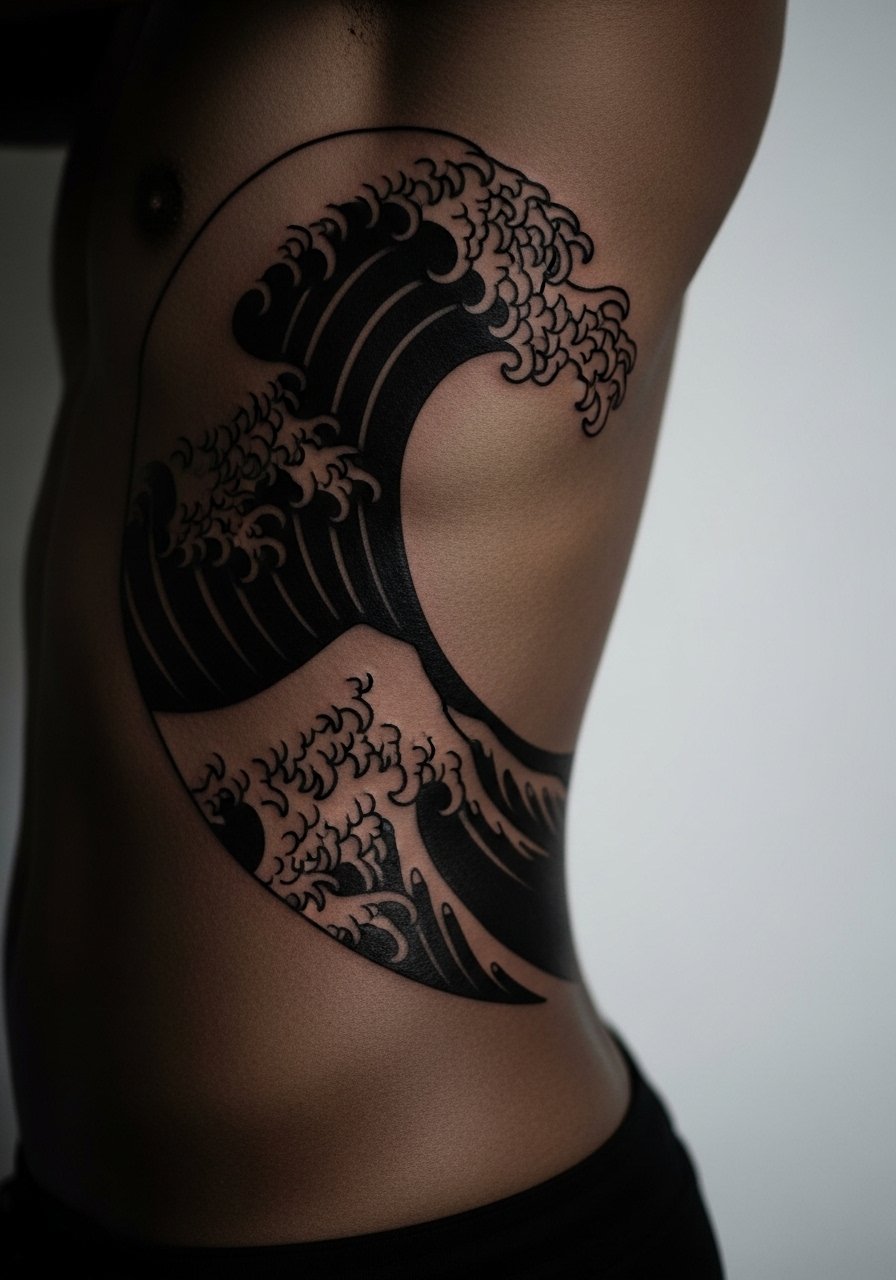
Side torso pieces follow the body's curves so negative geometry should respect muscle lines. The skin here stretches with movement and breathing, so request generous spacing and bold negative stripes to avoid premature blurring. Sessions can be lengthy and some people split the work into two visits. For the session, wear a cropped top that you can lift easily without irritating the area. After healing, the wave pairs well with swimwear or low-rise trousers.
27. Inner Forearm Script Band
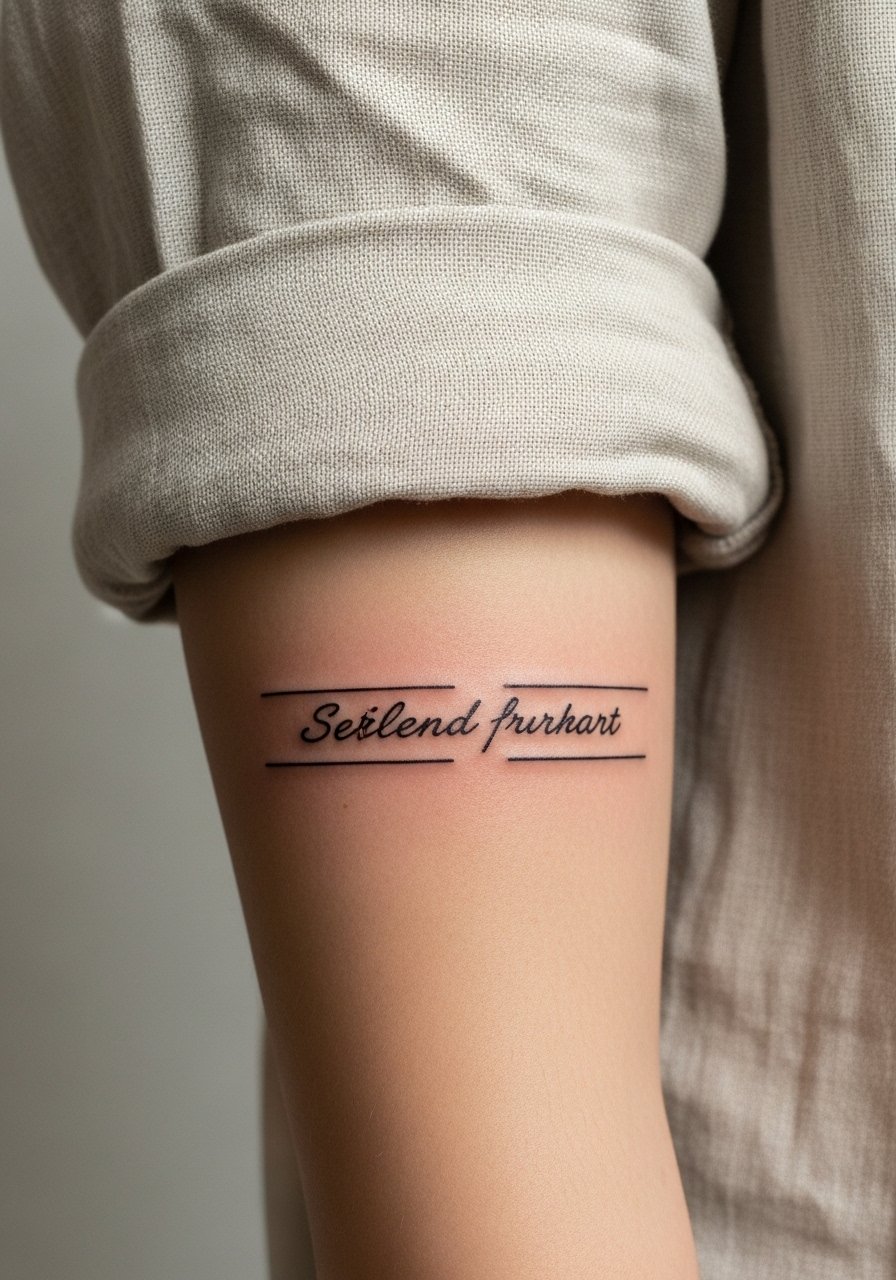
A script band inside a blackout is a quiet statement when the lettering is spaced deliberately. The inner forearm is stable for longevity but avoid tiny serif fonts that can lose shape. Request the exact phrase on the transfer so the negative letters are clean. Sessions are straightforward and healing is reliable. For a simple show-off look, roll sleeves or wear short-sleeve linen shirts and consider a racerback tank for casual reveal.
Frequently Asked Questions
Q: Will a blackout tattoo with negative space age better than dense color pieces on high-friction areas like the wrist or hand?
A: It depends on placement and how the negative space is handled. On wrists and hands, larger negative shapes and bolder surrounding black tend to hold up better than tiny details. Expect more frequent touch-ups on hands. Preparing for realistic maintenance upfront helps set expectations.
Q: How should I approach artist consultations for a ribcage or sternum blackout where artists disagree about longevity?
A: Ask directly where they fall in the debate and request healed photos of similar placements on varied bodies. Ask about spacing, needle depth, and expected touch-up timing. If you hear uncertainty, consider a smaller test piece first.
Q: Are blackout tattoos safer on darker skin tones, and do they require different techniques?
A: Blackout can look striking on all skin tones but technique matters. Artists will focus on even saturation and avoid micro-stippling inside negative shapes for darker tones. Bring healed examples and ask how they adjust spacing and contrast for your skin.
Q: What should I wear to sessions for sensitive placements like the ribcage, hip, or inner thigh?
A: Choose clothing you can shift to expose only the tattoo zone. Examples include a fitted sports bra for sternum work or loose shorts for inner thigh sessions. Comfortable clothing makes longer sittings far more manageable.
Q: How visible should negative elements be when planning for future sun exposure?
A: Bigger negative shapes withstand sun exposure better. If you expect heavy sun, plan for broader uninked areas and discuss sunscreen habits with your artist to protect the edges after healing.
