
Fine line mandala styles dominate feeds right now, but the pieces that still read crisp after three years are not always the ones with the most likes. Line weight, spacing, and placement matter more than novelty. As you scroll these seventeen ideas, I point out what tends to blur, what holds up, what to ask your artist in the consult, and how to show each piece off so it looks considered from day one.
1. Dotwork Mandala Wrist Cuff
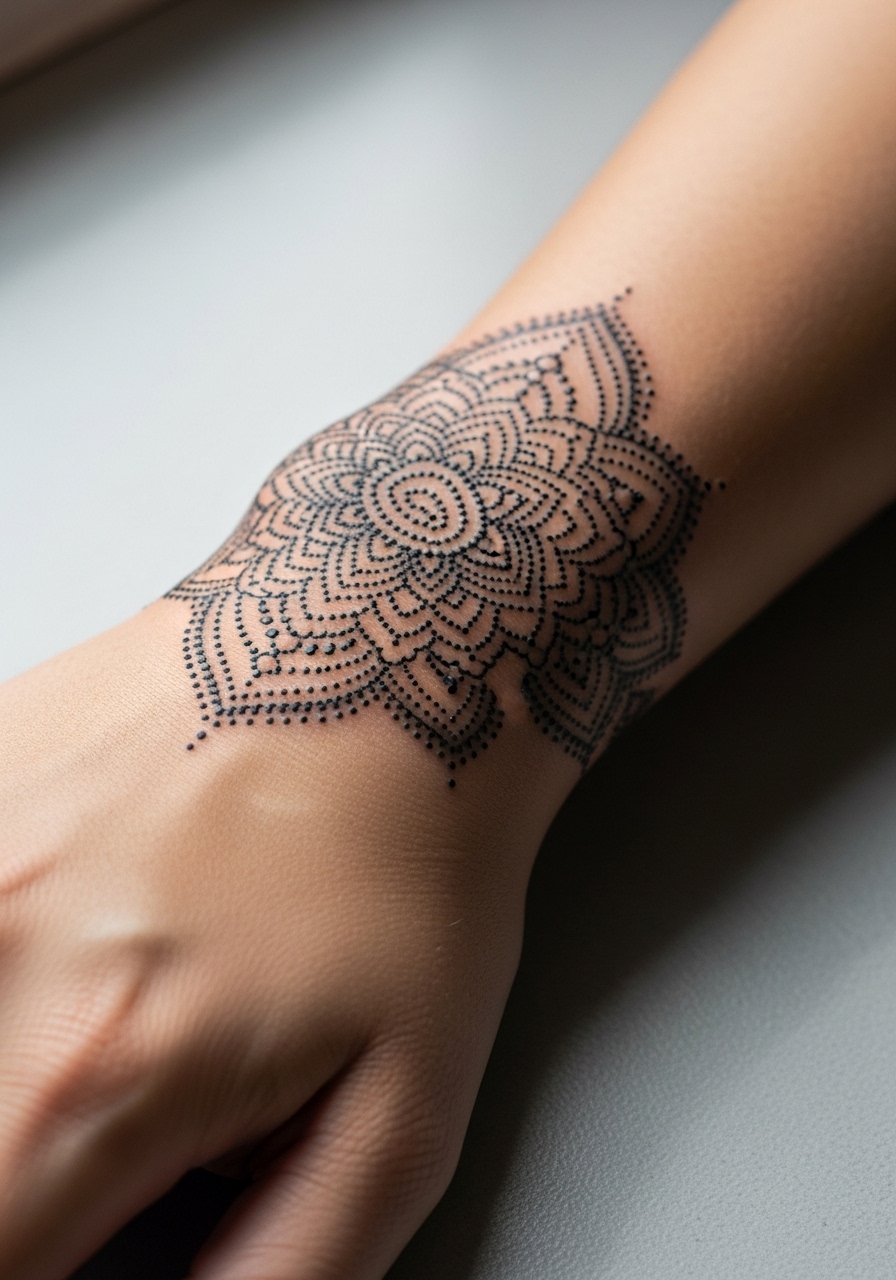
I recommend the dotwork cuff for people who want a meditative micro piece they see every day. Fair warning, the wrist is a high-movement zone and fine dot density can merge over time. Tell your artist you want slightly wider spacing between concentric rings and stronger outer linework so the design breathes as it ages. Session time usually runs under an hour and pain sits around a four out of ten. Common mistakes include asking for ultra-small dots in the tight bands. For showing it off, roll up a linen sleeve and layer a thin silver bangle set on the opposite wrist so the cuff reads intentional, not crowded.
2. Fine Line Mandala Inner Forearm
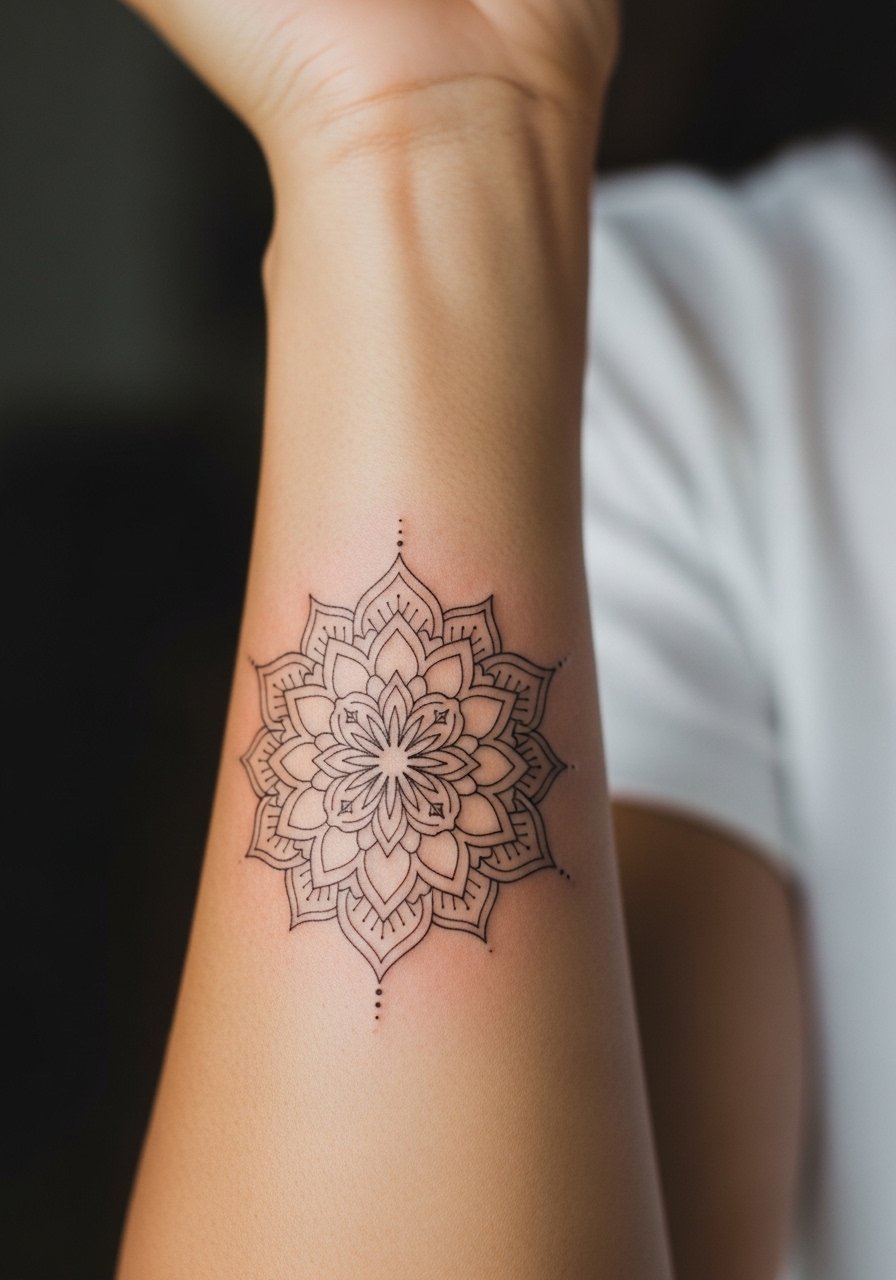
I've seen inner forearm mandalas hold their shape when designers respect negative space. Ask for a 4-6 inch vertical layout with varied lineweight and some stipple shading, not uniform single-needle density. Pain is mild and sessions typically span one to two hours. The aging trade-off is clear: ultra-fine single-needle fills look gorgeous at three weeks but often need touch-ups by year two on high-sun exposure arms. During consult, bring reference photos showing the exact lineweight you want and ask about touch-up policy. For a wearable reveal, pair the piece with a loose kimono sleeve blouse when you want the mandala to peek without distraction.
3. Watercolor Mandala Shoulder Cap
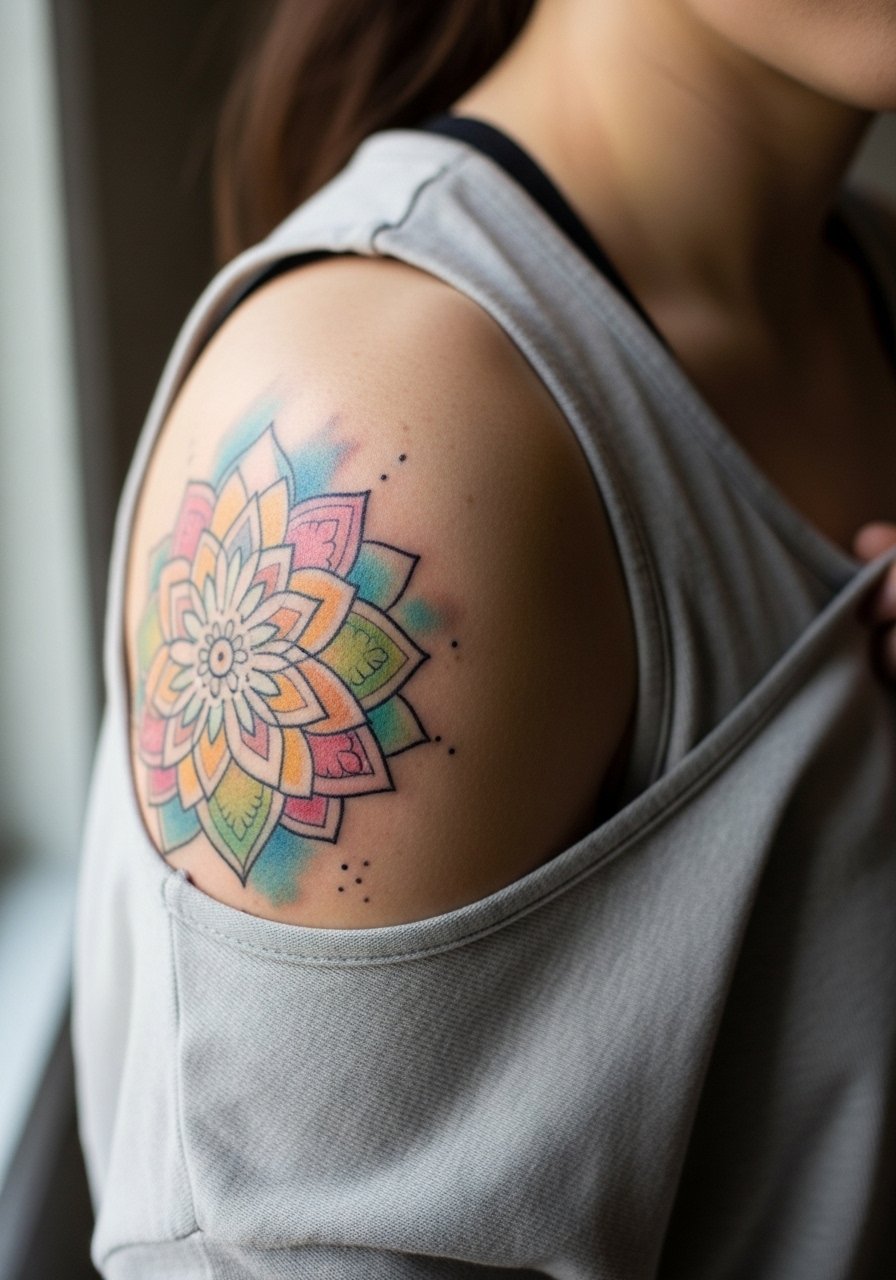
Watercolor mandalas look like soft paintings but they need more care to keep soft pigments lively. For the shoulder cap, ask your artist to anchor the color with a fine black outline so the shape stays readable as pigments soften. Pain is low and sessions usually finish in a single sitting. A common mistake is asking for neon gradients that lack a supporting line structure; those blur faster. For session comfort wear a sleeveless linen top so the artist has clear access and you stay cool during longer shading. If longevity matters, discuss saturation and a conservative palette.
4. Blackwork Mandala Ribcage Piece

Fair warning, the ribcage rates high on pain scales but gives one of the most private, dramatic canvases. Artists split on fine line here. One camp says the skin stretch blurs delicate lines within two years. The other camp argues that carefully placed spacing and correct depth let fine line settle well. Tell your artist if you prefer bolder black fills rather than ultra-fine spokes, and expect two sessions for 5-7 inch pieces. A real mistake is squeezing a dense mandala into a narrow vertical column. For nights out, contrast the hidden piece with a side-slit crop top or a dress with a subtle cut so the rib art reads like deliberate styling.
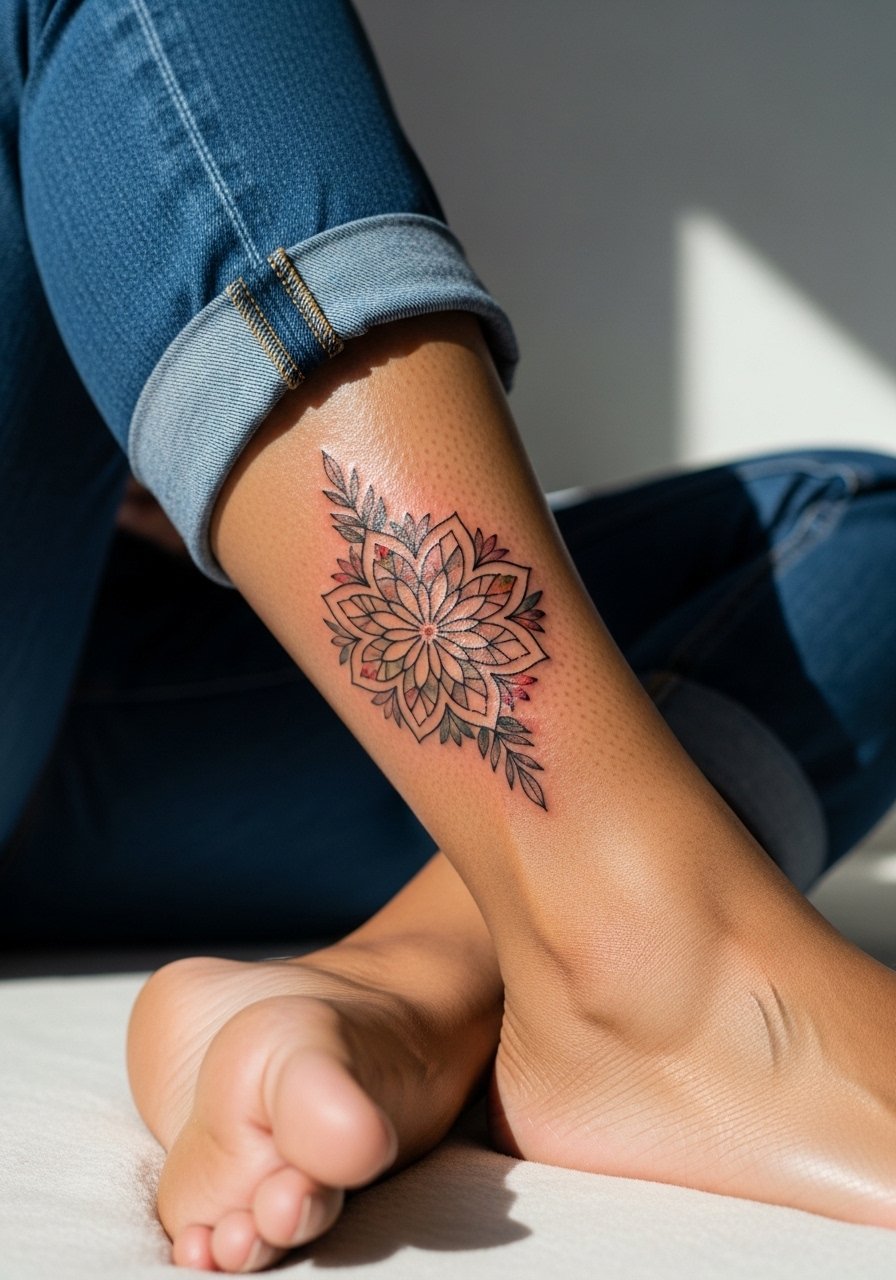
5. Minimalist Mandala Ankle
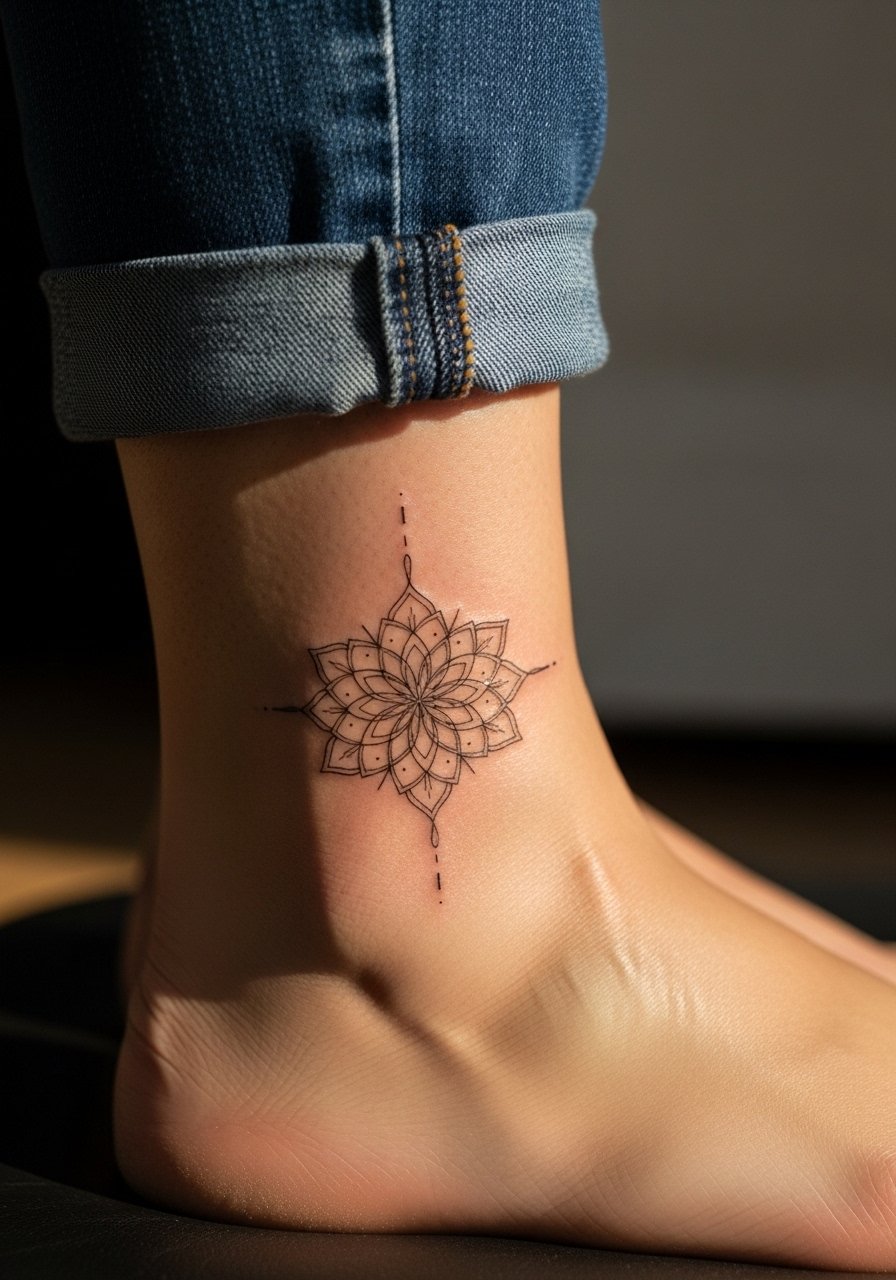
Ankle mandalas are beginner-friendly but life on the ankle is rough for fine lines. I advise slightly bolder outer edges and a compact internal pattern so the design resists early blur. Expect one short session and a pain level around five out of ten when the needle crosses bone. A common regret is choosing an ultra-dainty mandala that looks great fresh and softens into an indistinct shape within a year. For summer showing wear strappy heeled sandals and cropped pants to keep attention on the ankle without competing textures. During the appointment wear loose joggers that you can roll up easily.
6. Neo-Traditional Mandala Thigh Panel

Thigh placements let artists scale up, which helps mandalas breathe and age well. Neo-traditional color pops sit well against strong blackwork for visual contrast. Expect longer sessions across multiple visits for 6-8 inch designs with color saturation and layering. Pain is moderate and breaks make long sittings manageable. Common mistakes include cramming heavy coloration into too-small designs. For summer styling, pair the mandala with high slit midi skirts or denim shorts to let the piece read as art rather than a random flash. During the session wear loose shorts so the leg can be propped comfortably.
Studio Day Picks
The first six pieces above include wrists, ankles, forearms, shoulders, ribs, and thighs, which each have different prep and healing needs. A small kit tailored to those placements smooths the session and the first week.
-
Indie dotwork ink set. If you want darker, longer-lasting contrast on medium and dark skin tones, asking whether an artist uses these pigments can make a visible difference in healed photos.
-
Tattoo Goo thin balm. A lighter balm recommended after the first 48 hours for those worried about clogging, especially useful for fine line forearm and wrist pieces.
-
HealFast protective patch strips. Useful for rib and sternum sessions where clothing rubs the area during the first few days.
-
Fragrance free gentle body wash. Keeps healing zones like the calf and thigh clean without irritating tight linework.
-
Aquaphor healing ointment. A thin layer in the immediate 48-hour window helps protect fine line work on wrists and ankles during the scabbing phase.
7. Geometric Mandala Collarbone Accent

Collarbone mandalas frame the face and need careful scale so they do not fight necklaces. Ask for a 3-4 inch horizontal layout with dot gradients that fade outward, and request the outer row be slightly bolder to prevent early softening. The collarbone can hurt when the needle crosses bone, a sharp three to five out of ten depending on your tolerance. A common mistake is over-detailing the central axis which then blurs into a dark line. For showing it off, an off-shoulder top in soft peach or cream keeps attention on the pattern without overpowering it.
8. Ornamental Mandala Spine Runner
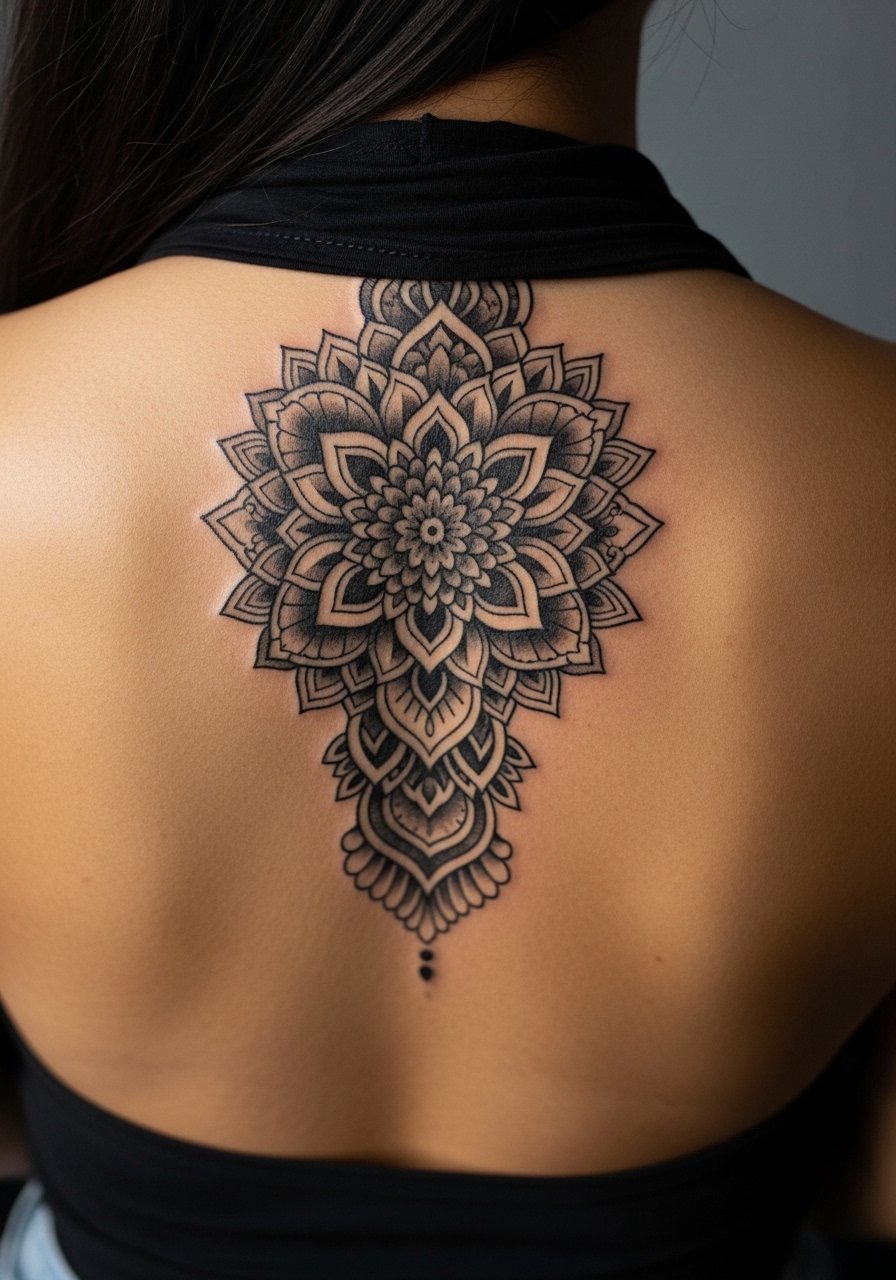
Spine mandalas make a vertical statement and pair well with gradient shading to suggest alignment. Expect longer sessions and three to four visits for an 8-10 inch runner. Pain ranges from moderate to high depending on proximity to the bone line. A frequent mistake is packing too many small concentric rows; the middle needs breathing room to avoid blowout where lines merge. Artists debate numbing creams for long spine sessions. One camp favours them for client comfort, the other worries they mask feedback that helps pacing. Ask your artist where they stand and whether they recommend breaks. For nights out, a backless halter top frames the piece and keeps the silhouette intentional.
9. Floral-Infused Mandala Calf
Calf placements wear well because they avoid the friction of ankles and hands. Combine mandala geometry with botanical elements to create movement that complements muscle shape. Typical sessions are two in length for a 5-inch piece with black lines and small color accents. A common mistake is running floral shading too heavily into the mandala center, which can read muddy after a few years. For casual styling, a cropped pant and strappy sandals show the calf without distracting patterns. During the session wear loose athletic shorts so the artist can roll the leg up without pressure.
10. Micro Mandala Side Finger
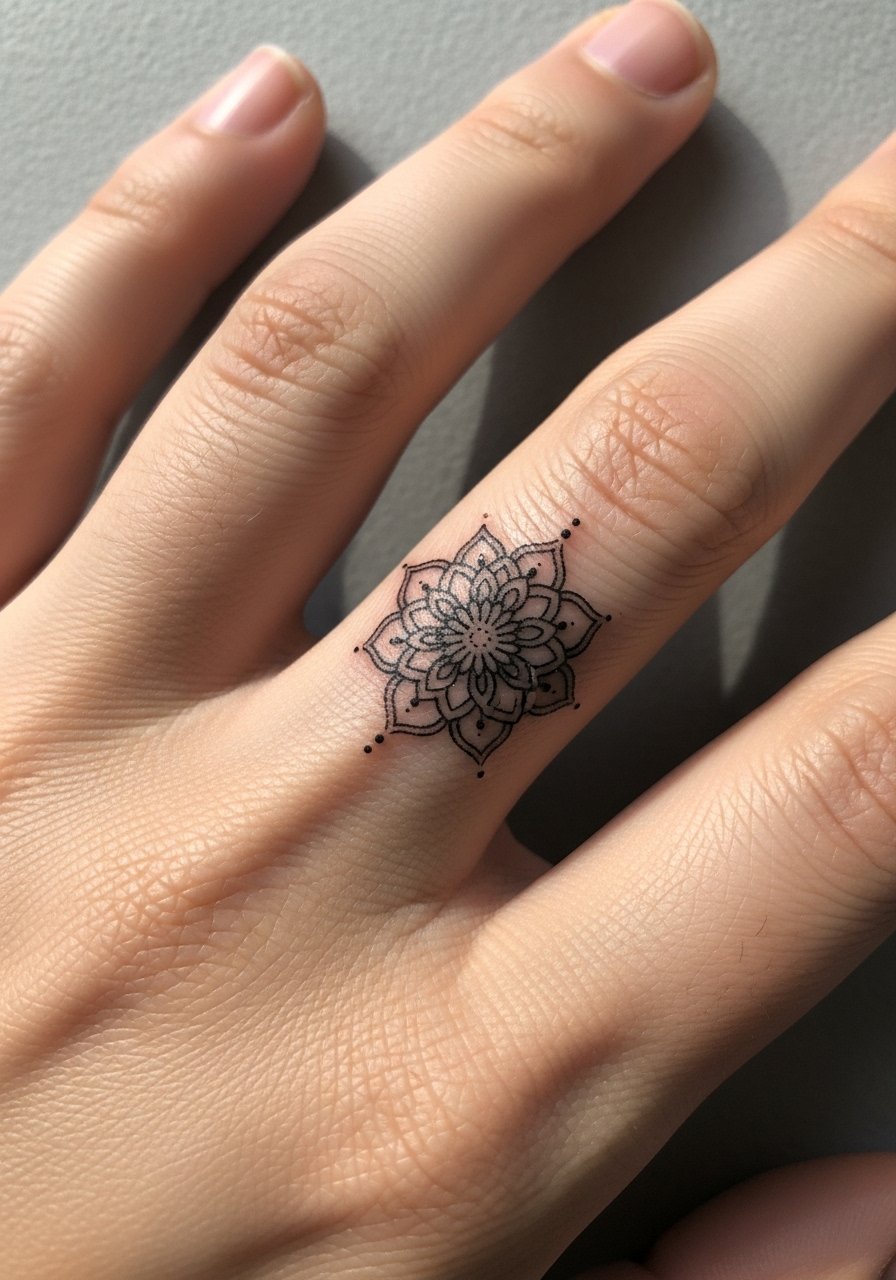
Finger placements are instantly visible but they live in high-friction zones, so longevity is the main trade-off. I recommend a micro mandala kept to 0.5-1 inch with slightly bolder outer dots so the silhouette remains after abrasion. Expect a short session and touch-ups are common within a year. People often underestimate daily washing and rings rubbing the ink. A tip during consult is to align the mandala with the finger bone so the main motif sits on skin that moves less. For career concerns, remember that hand visibility still affects some workplaces, so think placement and timing carefully.
11. Sacred Geometry Sternum Accent

Sternum mandalas are private and feel empowering because they are mostly covered. The area is sensitive and can be painful, so break sessions into shorter blocks. Choose dot work with radiating negative space to avoid creating dense dark patches that age into a heavy shape. Artists disagree about surface protection during healing. Some prefer protective film that breathes, others favor open dry healing. Name both camps to your artist and decide based on the studio's recommended routine. During consult bring a fitted bra that the artist can accommodate for access and comfort.
12. Layered Mandala Back Panel

Large back panels let artists build narratives over multiple sessions, which suits collectors who plan expansions. A 10-inch square layered mandala benefits from alternating stipple and whip shading to create depth without saturating the skin. Expect four to six sessions and plan for longer sittings with breaks. A common mistake is trying to include every reference idea at once. Bring a focused brief with the primary elements prioritized so the design evolves rather than becomes cluttered. For reveal moments choose low-back dresses or an open front robe so the piece reads cohesive with your wardrobe.
13. Henna-Style Mandala Back of Hand

Hand tattoos are bold choices because they face constant exposure and friction. The back of the hand can keep crisp linework if the design uses slightly bolder outer contours and limited interior micro shading. Pain is moderate and touch-ups are the norm. A common regret is treating hand pieces like temporary ornamentation; they require ongoing maintenance and, in some industries, carry stigma. If you want the henna look without full commitment, test with temporary designs and bring a stencil to your consult to match the placement. For session day wear a sleeve you can pull back easily so the artist has clear access.
14. Micro Mandala Behind the Ear

Behind-the-ear mandalas are discreet and require exact stencil placement. The site is sensitive to motion and hair oils, so a slightly bolder outline helps the motif remain visible. Sessions are brief and pain is low to moderate. A mistake I see is asking for too many tiny internal petals; the anatomy there needs breathing room. Because of the location, note that your artist will frame the shot as a close crop that includes hairline context. Ask whether they recommend short-term hair styling changes during the first week to keep the spot clean.
15. Geometric Mandala Throat Panel
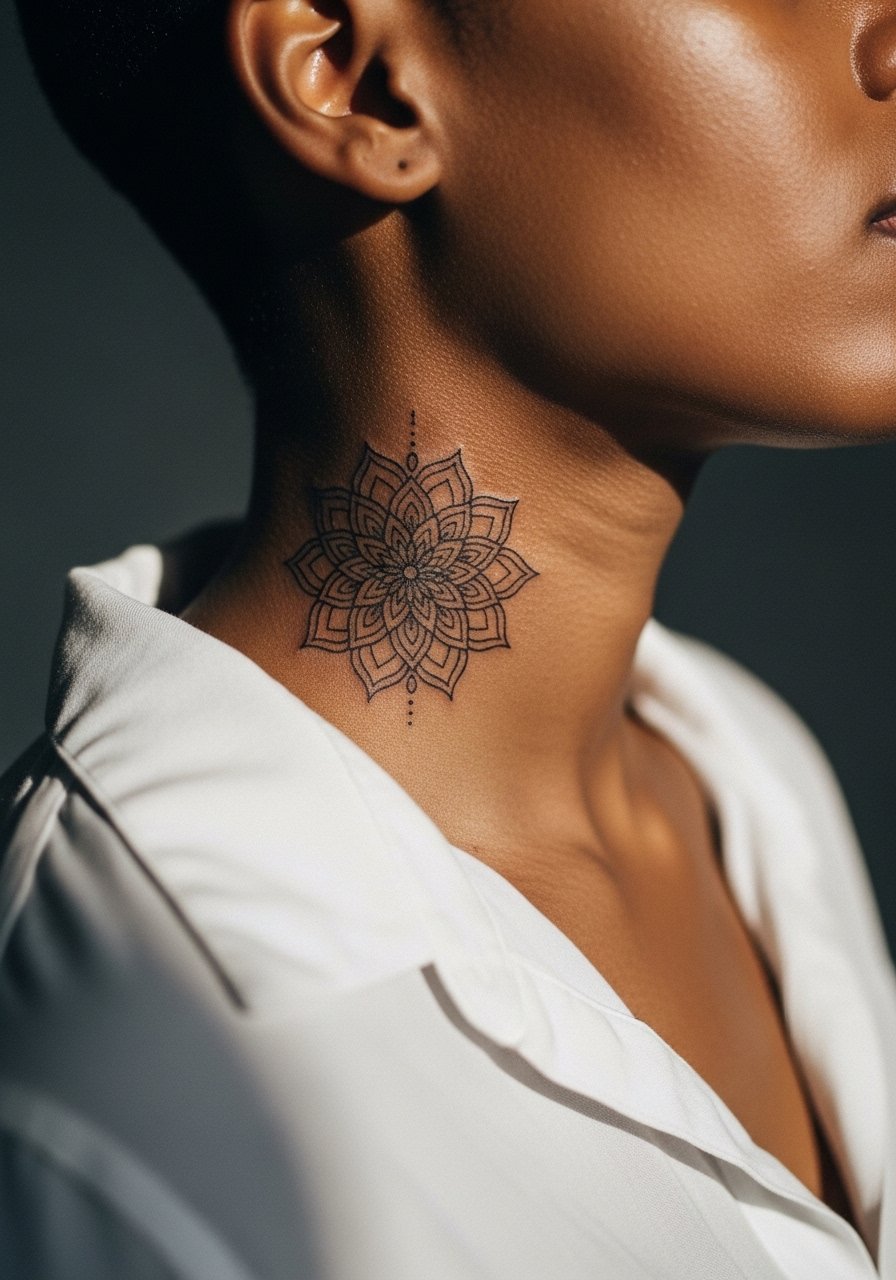
Neck mandalas are visible and therefore a deliberate choice. The side neck needs clean, confident linework and some artists decline intricate single-needle fills in this area because of movement and contour. Expect a short session and moderate pain. The main mistake is underestimating workplace visibility and social implications. During consult discuss line thickness and ask whether a small increase in outer linework will extend the piece's readability over time. For a polished look wear tops with a wide-neckline that show the piece without crowding it.
16. Mandala Navel Surround
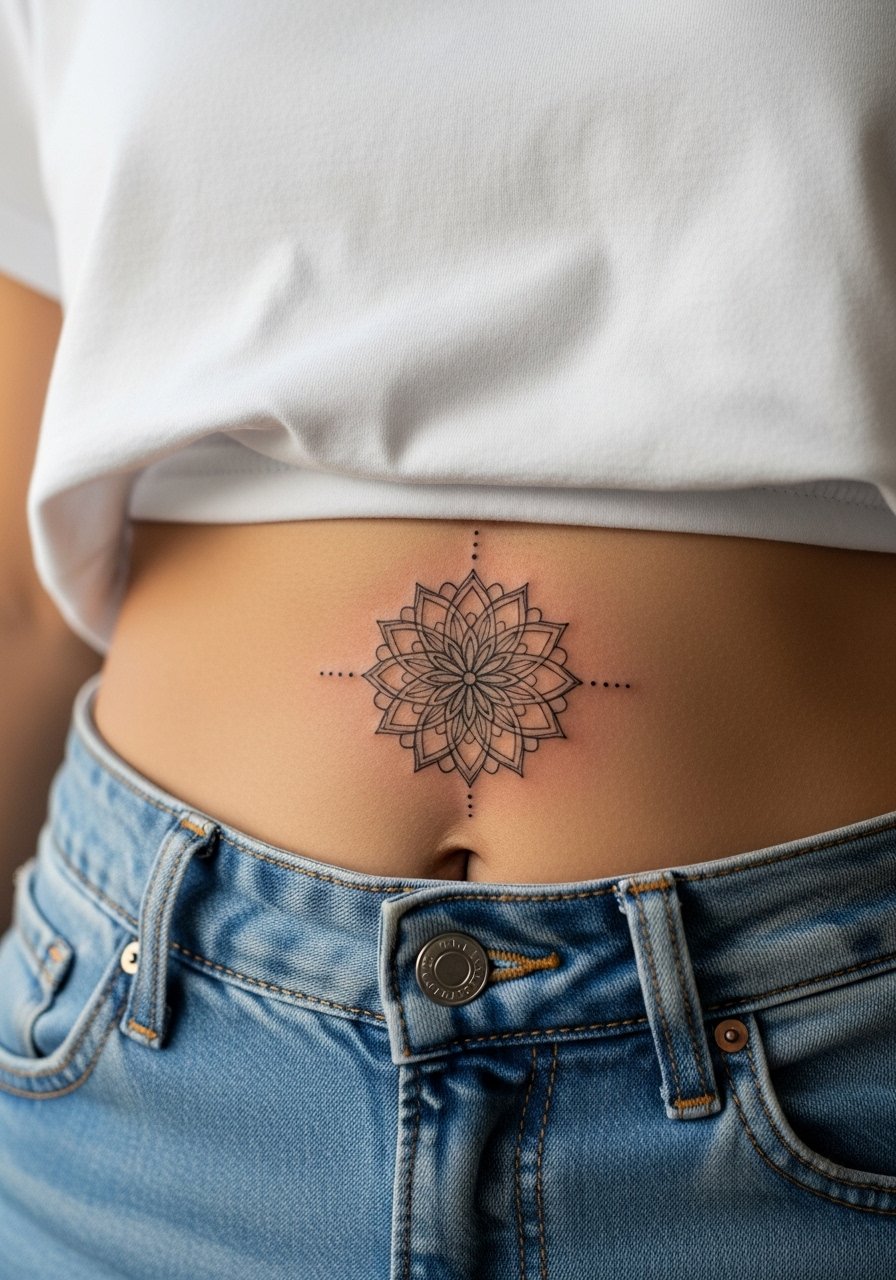
Navel placements let you hide or reveal the mandala depending on your outfit. The belly stretches with weight and movement, so I advise designs with radial symmetry and larger internal spacing to avoid warping. Sessions are moderate in length depending on scale and the area can be tender. A common error is choosing extremely dense dotwork that later looks blotchy after natural skin changes. For the appointment wear high-waisted bottoms and a cropped tee so the artist can expose only the necessary narrow strip without discomfort.
17. Mandala Hip Accent

Hip mandalas sit between playful and private, which makes them popular for seasonal reveals. The area tolerates scale well, but avoid packing the design into too-small a radius. Expect a single session for a 3-inch cut-out and moderate pain when the needle crosses bony hip points. A frequent mistake is letting jeans waistbands sit directly on fresh lines during the first week. For showing the piece, choose high-waisted cuts or a swimsuit bottom that frames the design without constant rubbing. During the session wear something you can slip to the side easily so the artist has clear access.
Frequently Asked Questions
Q: Will fine line mandalas blur faster on wrists and ankles than on forearms or thighs?
A: Yes, in my experience wrists and ankles experience more friction and movement so fine line density needs spacing or bolder outer strokes to last. Forearms and thighs have more stable skin and sun protection options, so the same linework usually holds better without early touch-ups.
Q: For a ribcage mandala, should I use protective film or dry healing?
A: Artists are split on this. One camp prefers protective film for reduced mess and containment, the other favors dry healing to let scabs form naturally. Ask your artist which method they use and why, then follow their protocol so you do not mix techniques mid-heal.
Q: How soon should I book a touch-up for a micro finger or ankle mandala?
A: Plan to check in around six to twelve months. Fingers and ankles often need earlier touch-ups because of daily wear. If the studio offers a complimentary short touch-up window, confirm that in your consult and note any price for later sessions.
Q: Is there a way to make a watercolor mandala age better without losing its vibe?
A: Anchor the watercolor with fine black outlines or subtle dotwork borders so the color has a structured frame as it softens. Pick muted pigments and ask the artist about saturation levels that heal well on your skin tone.
Q: How do I find an artist skilled in dotwork mandalas without naming or following specific accounts?
A: Search hashtags like #DotworkMandala and #FineLineMandala on social platforms, browse Etsy for custom stencil makers, and filter local listings with ornamentals or dotwork styles on booking apps. Send clear photos of healed references and ask for healed work images during consultations.
