
Fine line neck pieces are hot on socials right now, but what looks sharp on an iPhone screen can age into a smudge under everyday wear. The throat and side neck are high-motion zones, they hurt more than the forearm, and they show up in job screenings in ways other placements do not. Below are 17 geometric throat designs that balance visibility, longevity, and the reality of living with ink.
1. Central Throat Mandala with Radiating Lines
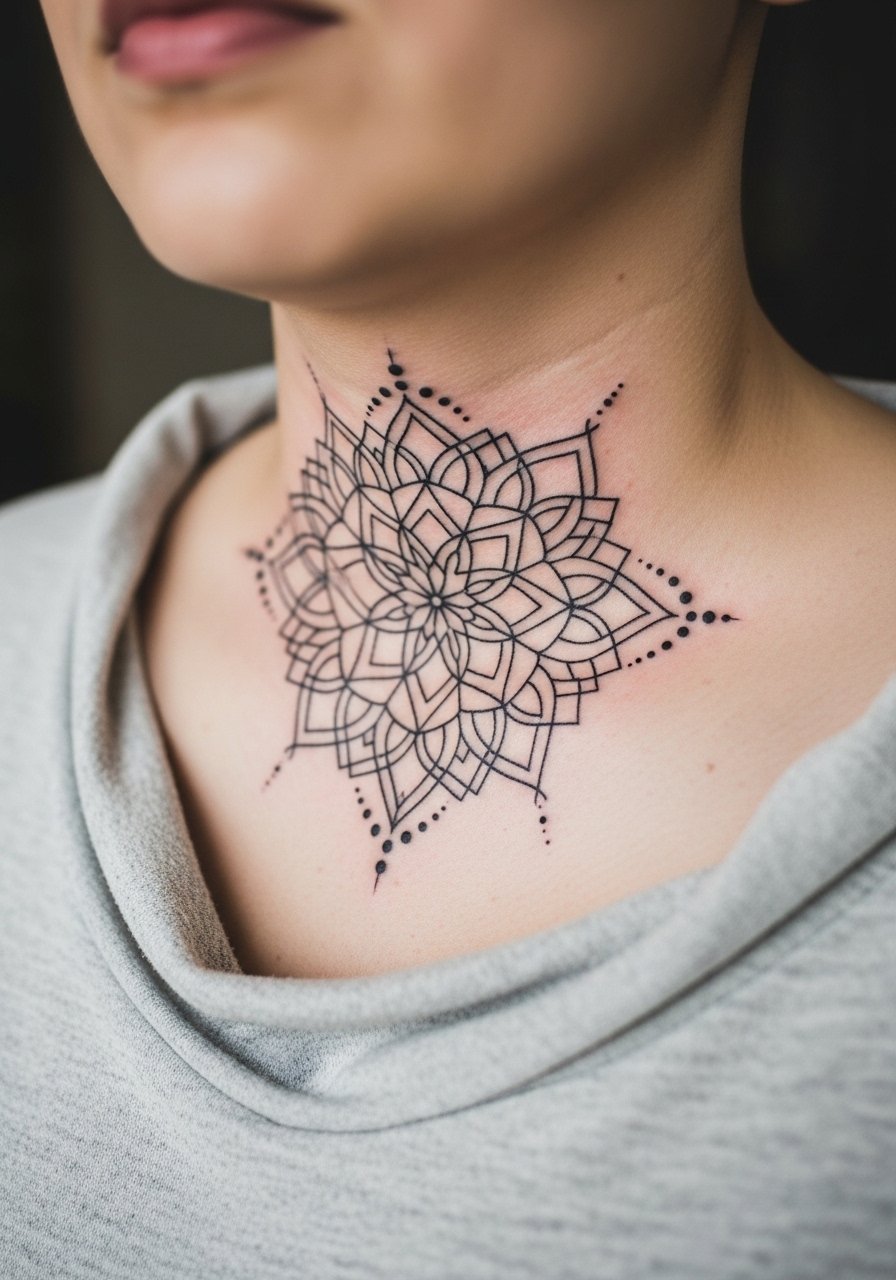
I recommend a bold mandala when you want a central focal piece that still reads at a distance. Fair warning, this placement is sensitive and ranks higher on most pain scales, but the session time is moderate because the lines are mostly repetitive. Tell your artist you want slightly thicker outer linework and more space between dense inner rows so the pattern does not merge as skin settles. A common mistake is packing too many concentric rings. Ask for a touch-up plan at year two, and expect the center to keep its contrast longer than the outer rings. For show-off styling, a wide-neck shirt that pulls aside frames the piece without exposing too much skin. Remember that neck tattoos can affect professional impressions, so factor that into placement and scale.
2. Vertical Geometric Column Under the Adam’s Apple

This elongated column reads clean because the motion of swallowing aligns with the vertical flow. Pain-wise it hits the cartilage-adjacent zone, so plan for short breaks. In consultation, ask for moderate lineweight and avoid ultra-fine filler lines. A frequent error is making the column too thin, which causes blowout and premature blurring. Expect sharpness at six months, softening around two years, and a likely touch-up window at three to five years depending on sun exposure. For the appointment, wear a loose crew neck tee you can pull down without stretching the skin.
3. Symmetric Honeycomb Panels Across the Side Neck
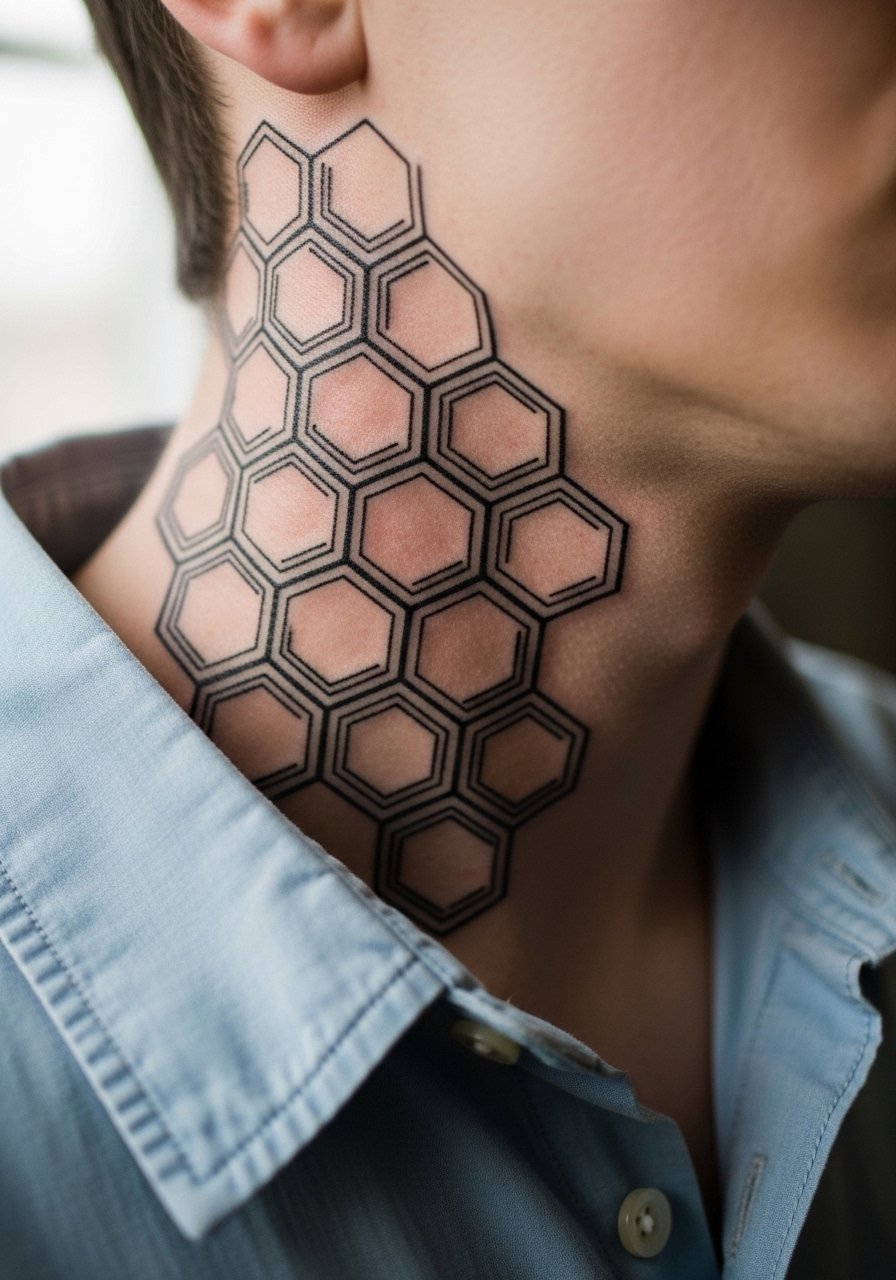
There is a debate among artists about fine tessellation on the side neck. One camp says dense repeat patterns on thin neck skin blur within two years. The other camp argues that with correct needle depth and a slightly bolder module, honeycomb can hold. Name both camps when you consult and ask your artist which approach they follow. Practically, wider panels with small negative spaces age better. This placement feels prickly and often requires shorter sessions with more breaks. Pair this with a loose button-down shirt that shows the side neck when you want to display the pattern, and wear it open for the session so the artist can work without stretching the skin.
4. Interlocking Triangle Collar Motif

There is something about clean equilateral triangles that reads architectural on the collar. This area takes less time than a full chest piece but more care because sleeves and scarves rub the edges. A common mistake is aligning the triangles asymmetrically to the clavicle. Ask your artist to stencil and stand back to check symmetry before any needle touches skin. Expect crisp edges at six months, slightly softer joins at two years, and a touch-up window if you work outdoors a lot. For showing off the motif, a fitted crew or wide-neck tee in neutral tones keeps the geometry in focus. Note that visible throat work still factors into some hiring decisions.
5. Minimalist Geometric Bar Beneath the Jawline

This compact bar is ideal when you want a subtle statement without heavy session time. Pain is moderate because the needle crosses thinner skin closer to the jaw. The biggest mistake is going too thin. A slightly thicker single bar will keep its silhouette longer. During consultation, ask for a mapping test so you can see how it sits when you move and speak. At two years expect slight softening unless you protect it from sun and friction. For the appointment, a wide-neck shirt makes access easy and keeps the area calm afterwards. Remember that small throat marks are still highly visible in close interactions.
6. Concentric Geometric Rings with Negative Space
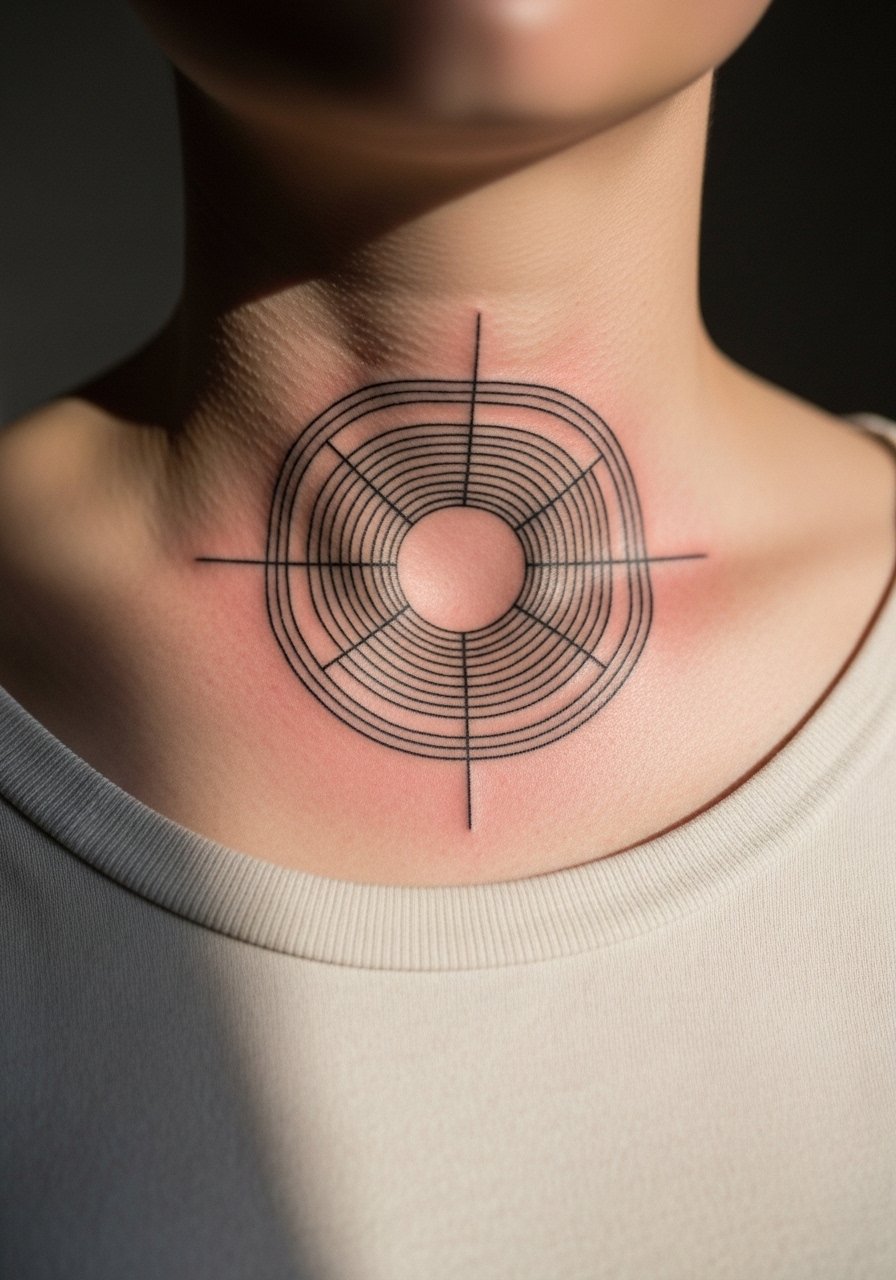
The strength of concentric rings is in spacing and contrast. If the inner rings are too tight, they merge over time. Tell your artist to prioritize negative space and slightly heavier outer rings so the design reads even as inner lines soften. Session time is moderate and the area is tender, so expect short breaks. A real-world test is smiling, swallowing, and turning your head with the stencil on; if the rings distort, adjust the spacing. For casual display, a wide-neck tee or an open button-down frames the rings without exposing much skin.
Pre-Session Essentials
The throat and side neck pieces above demand clear access and careful first-week care, and the right prep items smooth the session and the first days of healing.
-
Stencil transfer paper kit. Lets you preview the exact placement on your neck before the needle touches skin, which matters for asymmetric collar pieces.
-
Topical numbing cream. Apply as directed before the appointment to reduce sharpness around the throat without altering the artist's linework.
-
Thin protective film roll. Protects fresh neck lines from clothing friction and keeps contaminants off during the first week.
-
Fragrance-free body wash. Cleans the area gently in the shower so the tiny geometric lines are not irritated while healing.
-
Aquaphor healing ointment. A thin layer helps lock in moisture in the first days without clogging delicate line channels.
7. Asymmetric Polygon Patch on the Side Throat

This asymmetric patch reads modern and can be sized to tuck under a collar or show when you want. For best longevity, pick bolder outer edges and allow larger internal negative spaces. Pain can spike near muscle attachments, so the session feels sharper in bursts. Tell your artist you want a dotted stipple transition rather than dense filler if you want a softer fade over time. A common error is requesting dense micro-lines inside the polygon; they blur faster on neck skin. Style it with an open-collar linen shirt for nights out. Also know that neck tattoos are typically visible in formal portraits.
8. Geometric Chain Link That Wraps the Neck
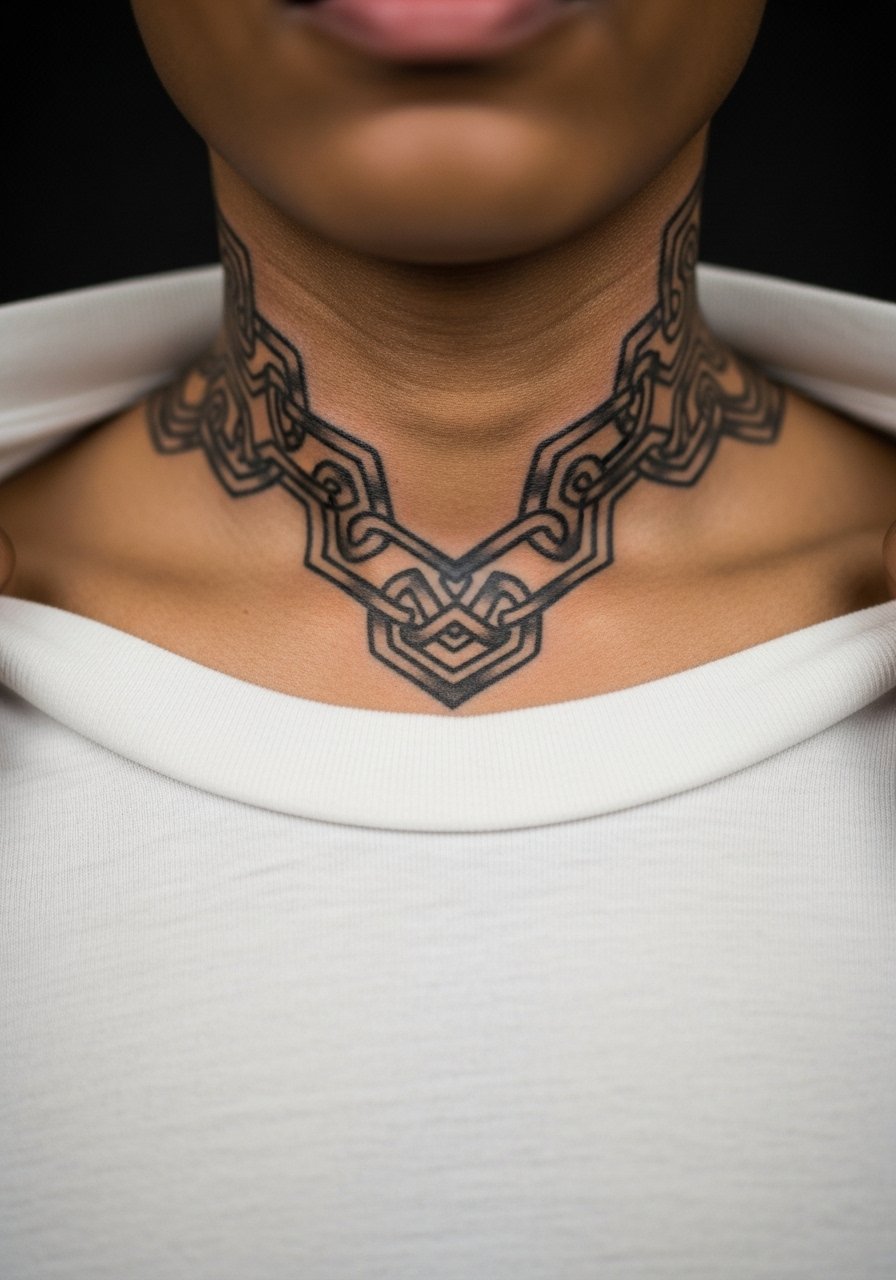
A chain-link wrap can mimic jewelry without actual metal. It is visually bold and demands careful spacing so interlocking points do not merge. This placement has higher blowout risk where the skin curves, so ask for slightly thicker junctions. Sessions run longer because of the wrap and the need for symmetry checks. A real mistake is trying to match a bracelet-level thinness at this scale. Expect the piece to soften in joints first and plan a touch-up at two to four years depending on exposure. For subtle presentation, pair with a thin chain or collar that sits above the tattoo rather than over it.
9. Pixelated Geometry Block on the Lower Throat

Pixelated geometry reads contemporary and ages well when each block is large enough to hold saturation. The mistake is requesting tiny pixels that look crisp in photos but blur into a patch in real life. Bring reference photos that show scale on real bodies rather than on screens. Pain is moderate and concentrated near the suprasternal notch. Plan for short sessions and a touch-up if you want the blocks to keep crisp edges at year three. For session comfort, wear a wide-neck tee so the artist can work without stretching the neck.
10. Chevron Ladder Leading from Collarbone to Throat
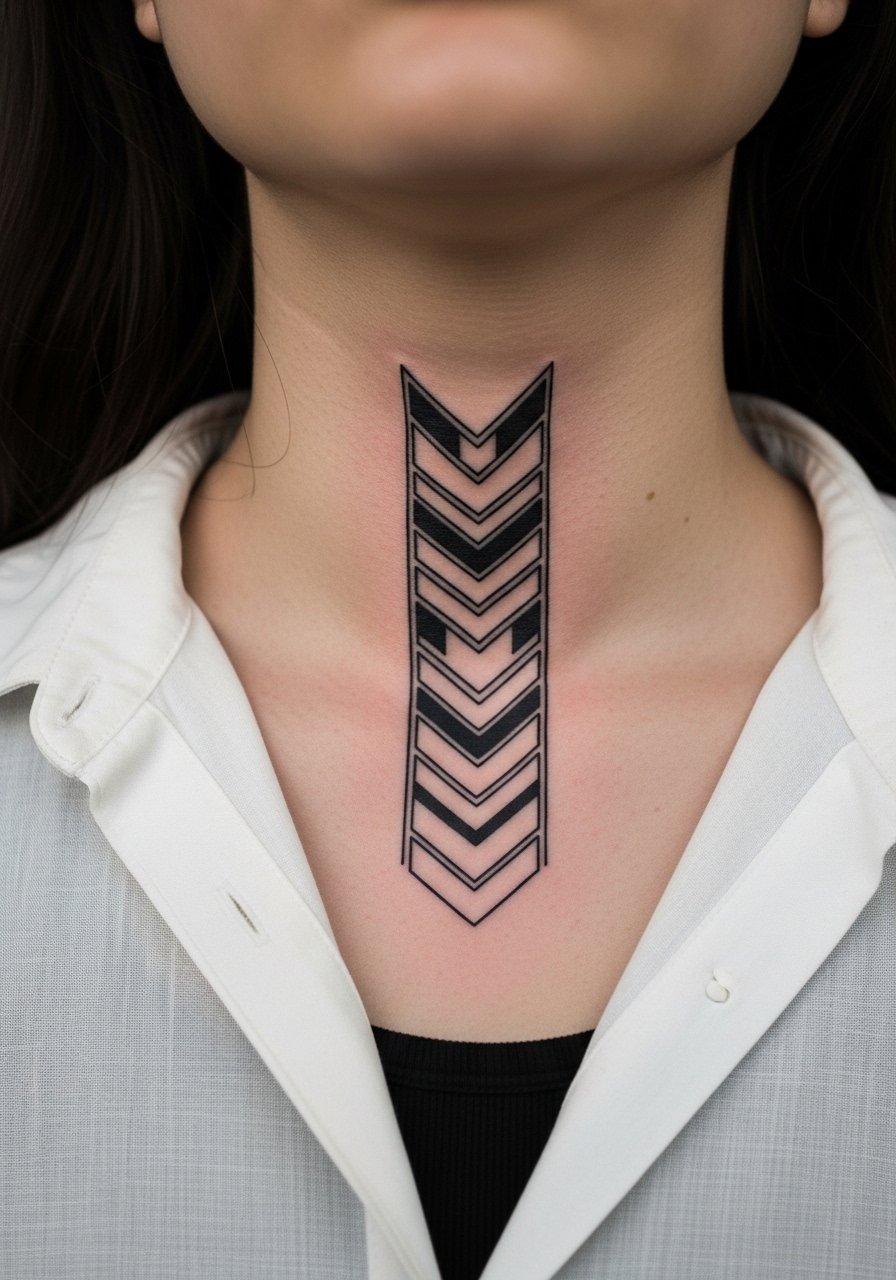
Visually, chevrons draw the eye upward and elongate the neck. They feel punchy and take less time because the pattern repeats. The biggest practical slip is misaligning chevrons to the clavicle axis, which makes the whole run look off. Ask your artist to check alignment on both sides of your body before inking. Expect clean lines at six months and slight softening at joins by two years. If you want the pattern shown selectively in colder months, pair with unbuttoned shirts that reveal the throat area.
11. Radial Sunburst Under the Chin
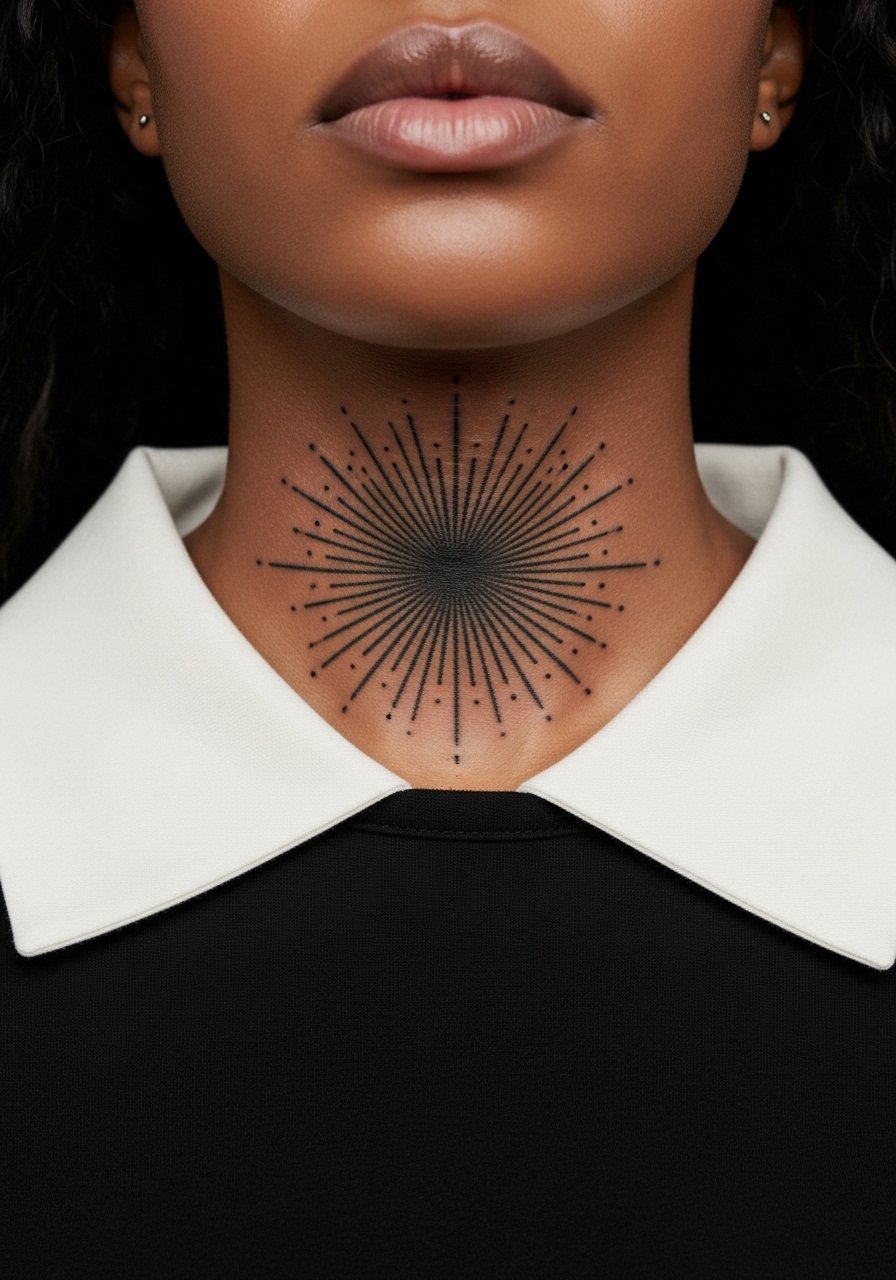
A sunburst under the chin gives a vintage-meets-modern vibe, but it demands spacing discipline. Dense rays too close to the submental fold blur when you smile or tilt the head. Ask your artist to simulate movement with the stencil and to widen ray gaps near flex points. This placement is tender and can sting more near the chin. Expect the central hub to hold contrast longer than the outer rays, and plan for a touch-up on outer rays first. For showing off, a slightly open collar shirt or low collar works best without feeling exposed.
12. Geometric Script-Frame Pairing at the Throat

Combining geometric borders with short script can anchor words without ornate flourishes. When text is included, specify exact wording and font so the stencil generator avoids gibberish. The common error is squeezing long phrases into a tight frame. Keep text to a single word or a short date to maintain legibility. Expect letters to lose crisp edges faster than the surrounding geometry, so plan for a touch-up on the script first. This placement is visible and personal, so consider how it reads in professional contexts.
13. Stacked Diamond Tiles Along the Side Throat

Diamonds create a rhythm that follows the neck contour. To avoid blowout, ask for slightly thicker tile outlines toward the edges where skin curves the most. A common mistake is keeping all tile outlines uniformly ultra-fine. Sessions require careful stencil checks to maintain tile alignment with the jawline. For casual display, an open collar or a loose button-down shirt frames the tiles while keeping them from being overstated. This placement is straightforward to hide under collars when needed.
14. Negative Space Arrowhead Centerpiece

Negative space pieces work well on the throat because they rely on skin tone as part of the design. The advantage is lower pigment load, which can mean less scarring and a cleaner long-term look. The mistake is over-framing the negative area with thin lines that blur. Ask the artist to define one or two slightly heavier anchor lines so the arrowhead keeps its shape. This one is quick to ink and ages predictably if you avoid bulky collars rubbing the edges. For sessions, a wide-neck tee keeps the area accessible.
15. Micro-Geometric Cluster at the Suprasternal Notch

Micro clusters can be striking but they demand scale discipline. Too small and the separate modules bleed together in months. Tell your artist you want the modules at a minimum visual size so each cell keeps definition. This placement is one of the more painful spots because it sits over bone. Expect crispness at six months and the need for a touch-up on the outer micro modules first. For the appointment, wear a loose crew neck tee that you can pull down without creating tension.
16. Spiral Geometry Flowing from Throat to Lower Chin

A spiral that moves toward the chin creates implied motion and looks dynamic when seen in profile. The risk is making the inner spiral too tight, which loses clarity as skin moves. Ask for gradual spacing increases as the spiral radiates outward so it ages with readable intervals. This placement feels sharp near the chin and softer lower down, so plan for short sessions. If you want to show it selectively, pair with a shirt that has a slightly open neckline so the spiral peeks out without being fully exposed.
17. Geometric Compass Plate Centered on the Throat

A compass plate gives a structured, symbolic feel while staying geometric. The trick is balancing detail and scale. Too many micro-compass ticks will blur; too few makes it feel basic. Ask your artist for a clear primary axis and simplified secondary ticks that sit as negative space. The piece takes moderate session time and reacts to sun and collar friction like other throat work. Plan a follow-up touch-up on the outer ticks if you spend time outdoors. Since this is highly visible, think about how it will appear in close-up photos and formal settings.
Frequently Asked Questions
Q: How much does a geometric throat tattoo hurt compared with other placements?
A: The throat tends to be more sensitive than fleshy areas like the forearm because of thinner skin and proximity to cartilage. Pain comes in sharp bursts near bone and more of a deep vibration over softer zones. Expect shorter sessions or breaks to manage discomfort.
Q: Will fine line geometric work on the throat blur faster than bold blackwork?
A: In my experience, ultra-fine linework on the throat softens sooner than bolder blackwork. The skin there stretches with movement and expression, so slightly heavier lines and generous negative space improve longevity. If you prefer ultra-fine work, plan for touch-ups earlier.
Q: Are throat tattoos professional-friendly and easy to hide?
A: Throat tattoos are visible in most interactions and can impact hiring depending on the field. They are easier to conceal with collared shirts, scarves, or higher necklines, but casual workplaces may still notice. Consider placement scale and your career trajectory when choosing how bold to go.
Q: How long between session and first touch-up for geometric neck pieces?
A: Expect a realistic touch-up window between two and four years, depending on sun exposure, friction from collars, and how much negative space was used. High-contrast, slightly bolder lines often push that window outward compared with ultra-fine fills.
Q: What should I wear to the appointment for a throat tattoo?
A: Wear clothing that gives the artist clean access without stretching the area, such as a wide-neck shirt you can pull aside. Avoid tight collars and layers that you must force on afterward.
Q: Can geometric throat tattoos be adjusted for different skin tones and aging?
A: Yes. Skilled artists alter contrast, lineweight, and negative space to make patterns read well across tones and as skin changes. Ask to see healed examples on a range of skin tones and request a custom stencil test before inking.
