
Sitting in the chair with the stencil over the upper back is the moment most people realize scale and symmetry matter more than a cool photo. The upper back reads wide across the shoulders and narrows toward the spine, so small spacing decisions in the chair decide whether a geometric layout breathes or blurs over time. Below are thoughtful layouts and practical notes that keep symmetry, longevity, and wardrobe in mind.
1. Central Mandala Aligned with the Spine
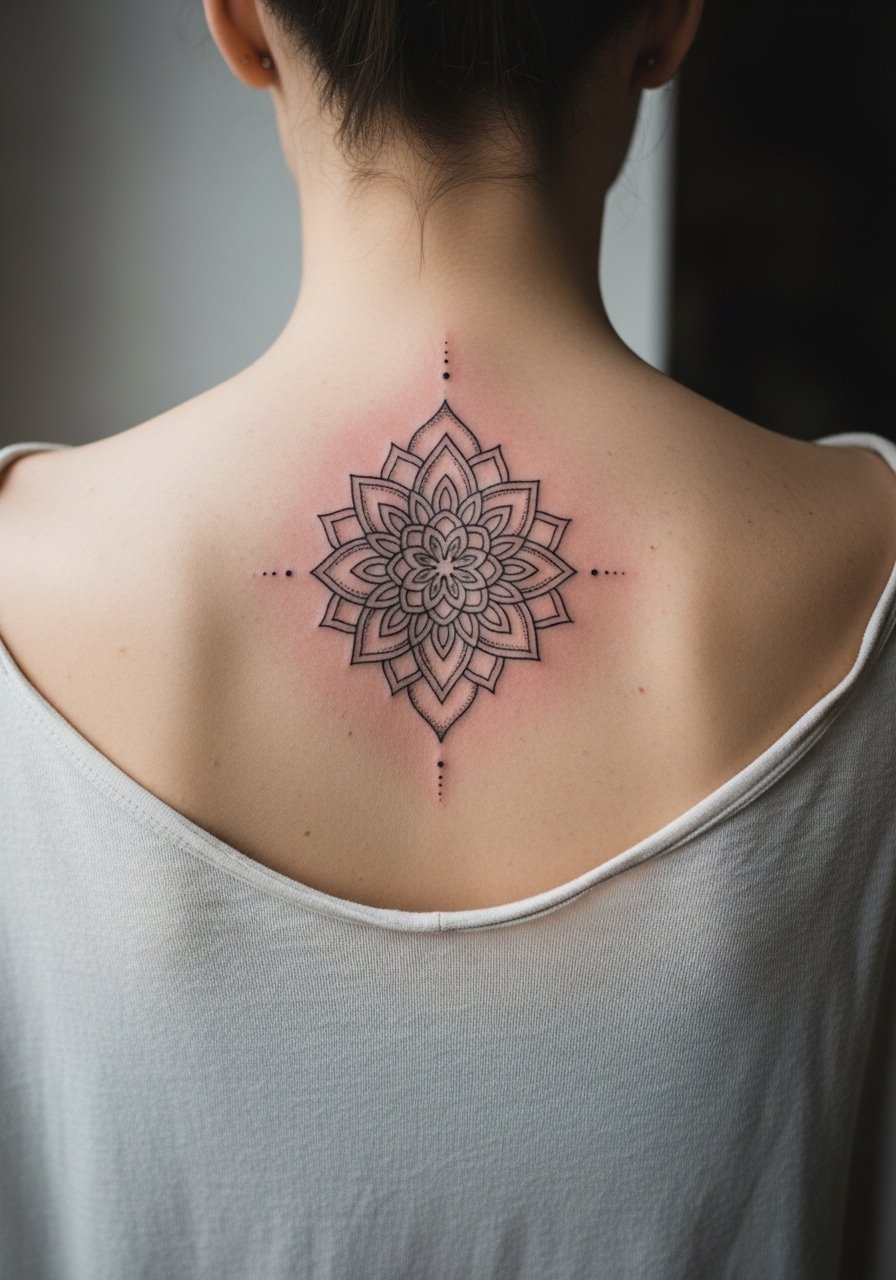
A symmetrical mandala placed on the upper back reads strong because the spine gives a natural axis to register against. I've seen the best results when the artist measures from the vertebrae and marks small alignment points rather than eyeballing center. Fair warning, tiny dot work packed too close tends to merge after a few years, so ask for slightly wider spacing and heavier outer ring linework to hold the shape. The session feels like long stretches of focused linework across a broad canvas. For show-off wear, an open-back shirt frames the mandala neatly without forcing a full reveal.
2. Geometric Phoenix Across the Shoulder Blades
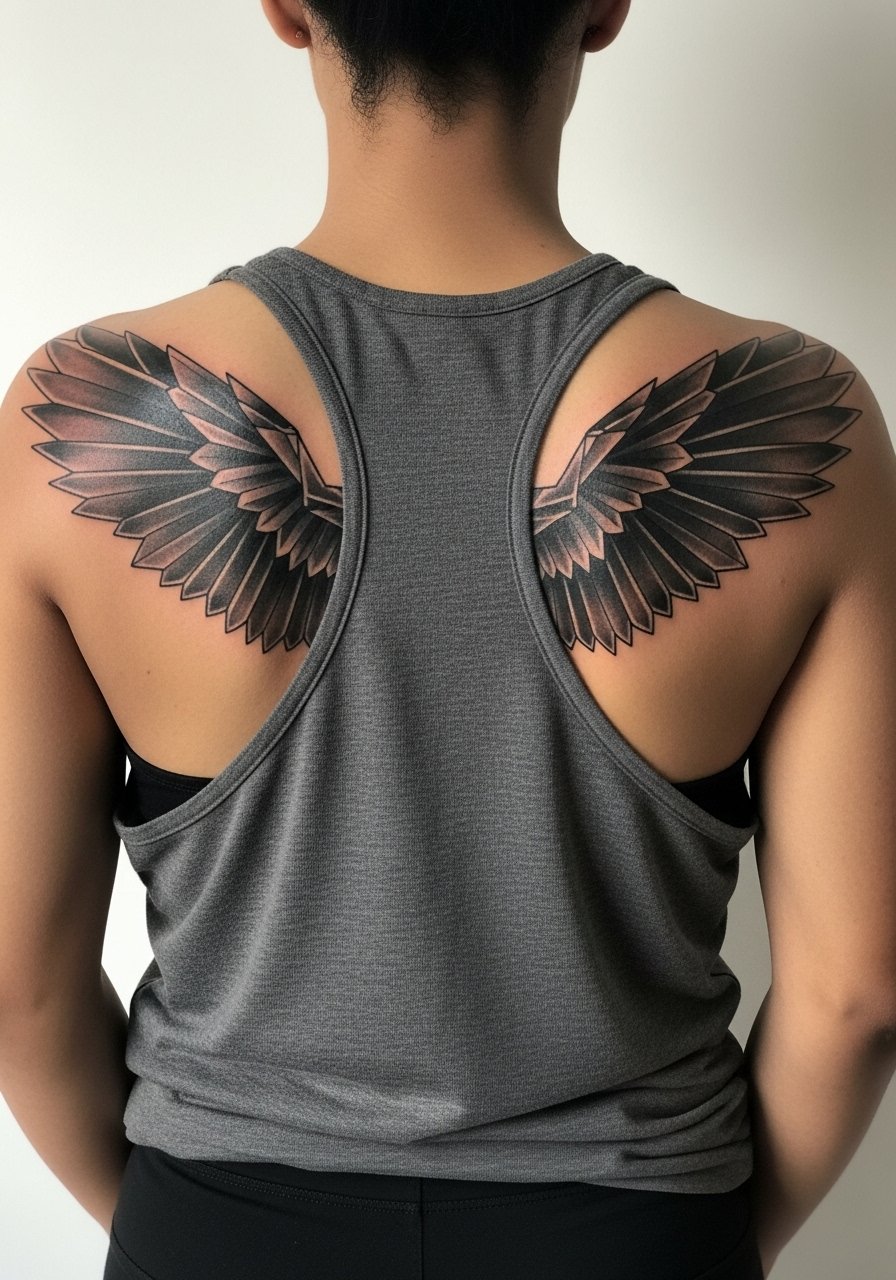
When you want motion across the upper back, a stylized phoenix built from triangles and chevrons creates flow without relying on fine detail that will blur. In consultation, say you want "negative-space feathering" so the artist keeps some skin gaps to prevent dense patches that age into mud. The session is physically comfortable since the area is broad, but plan for two passes if you want both crisp linework and deep saturation. Pairing tip for nights out is a backless bomber or open-back tee that lets the wing shape read while keeping shoulders covered.
3. Minimalist Spine Chevron Stack
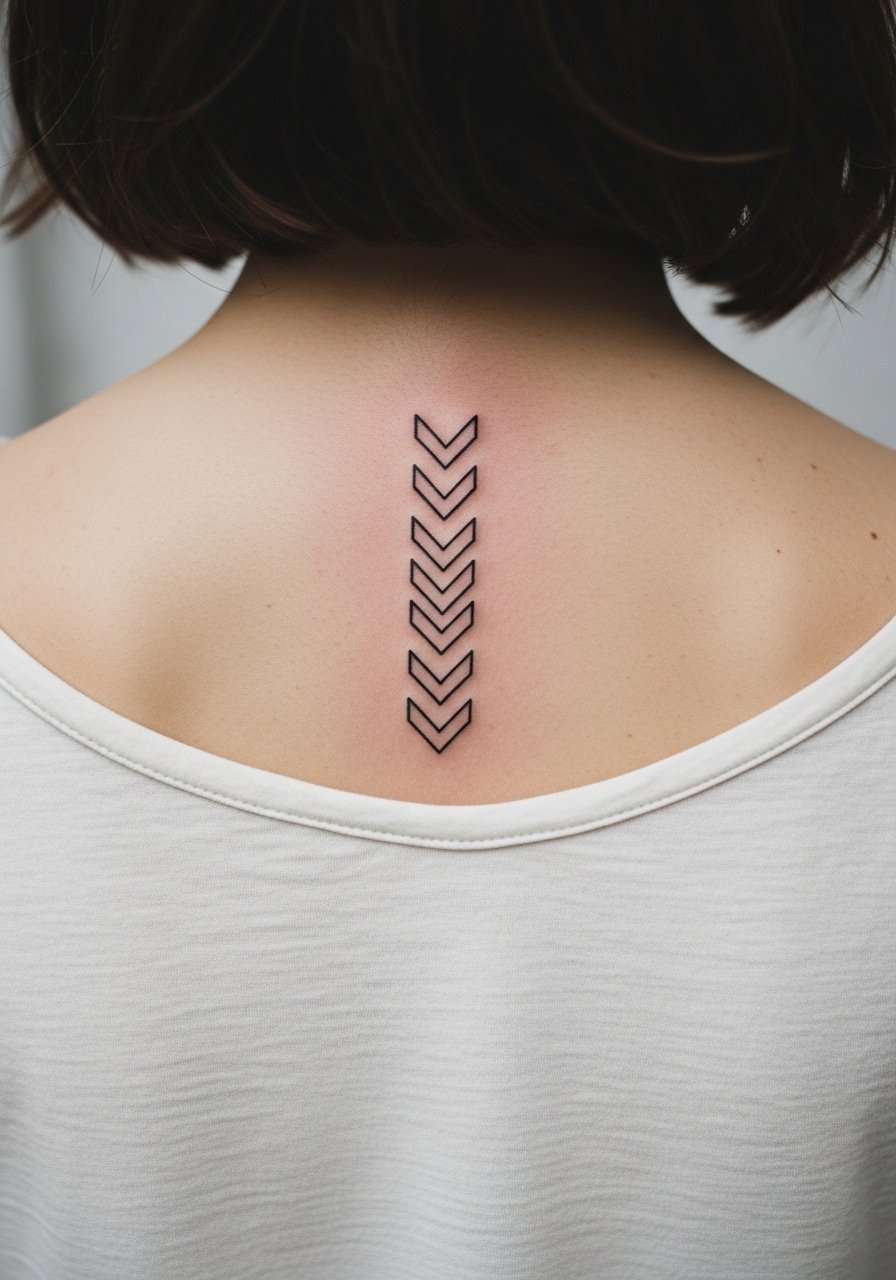
Most clients choose chevrons for clean geometry and subtle symmetry. The biggest mistake is asking for lines that are too thin and too close together. That combination risks early merging, especially over the spine where skin texture varies. Tell your artist you want two needle groupings for the outer chevrons and single-pin spacing for the inner lines so touch-ups are predictable. Pain on the spine is sharper than the fleshy parts of the upper back, but it is short lived. For the appointment, wear a wide-neck shirt you can pull aside for clean access.
4. Sacred Geometry Grid with Negative Space
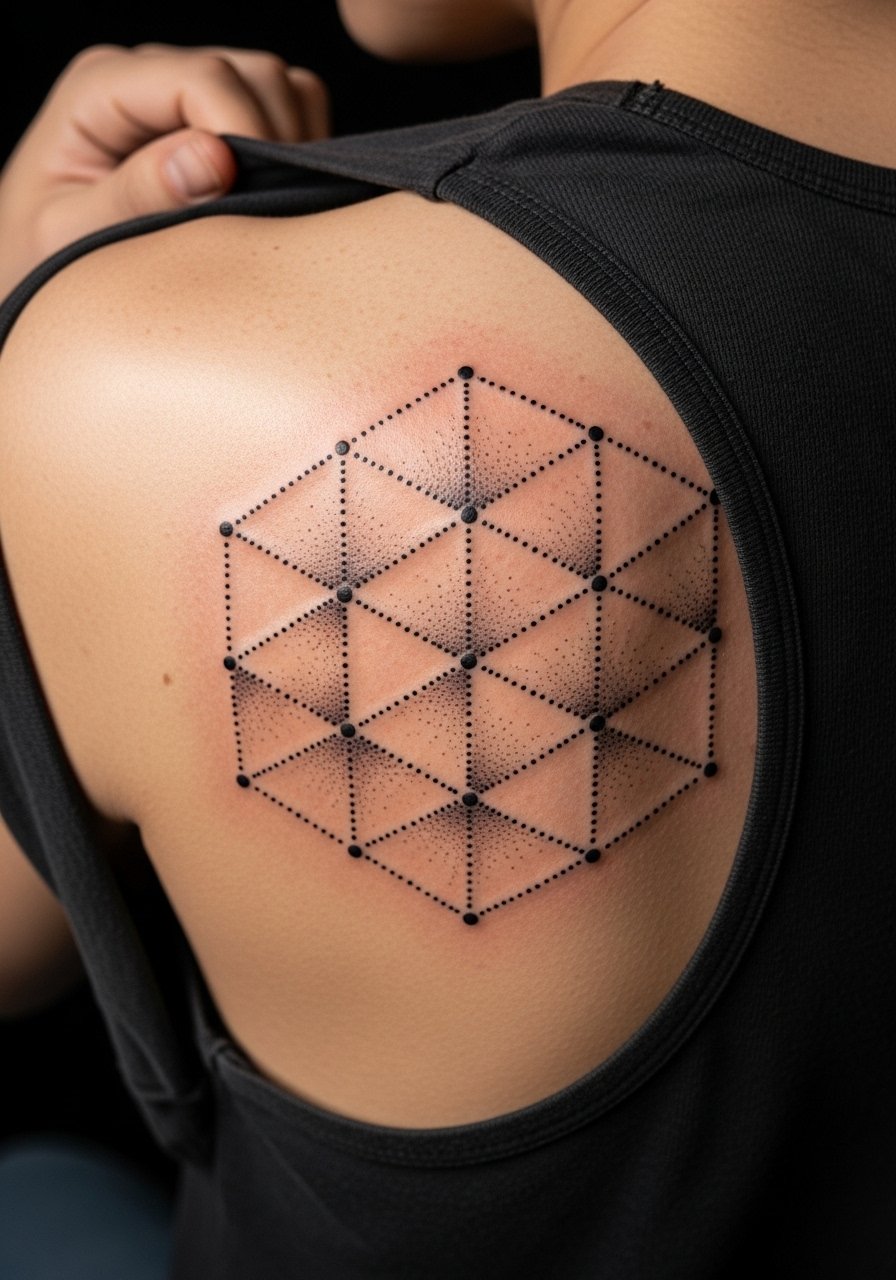
This grid reads technical but still human when negative space is planned. Artists split into two camps on whether dense dot work holds on the upper back. One camp says dot work needs wider spacing to avoid merging. The other argues experienced dot artists can pack density and still preserve separation. I advise naming both camps in your consultation and asking for a small test patch or larger spacing. Plan on a touch-up at year two for denser grids. For evening looks, a scoop-back tee frames the pattern without crowding it.
5. Low-Poly Animal Centerpiece
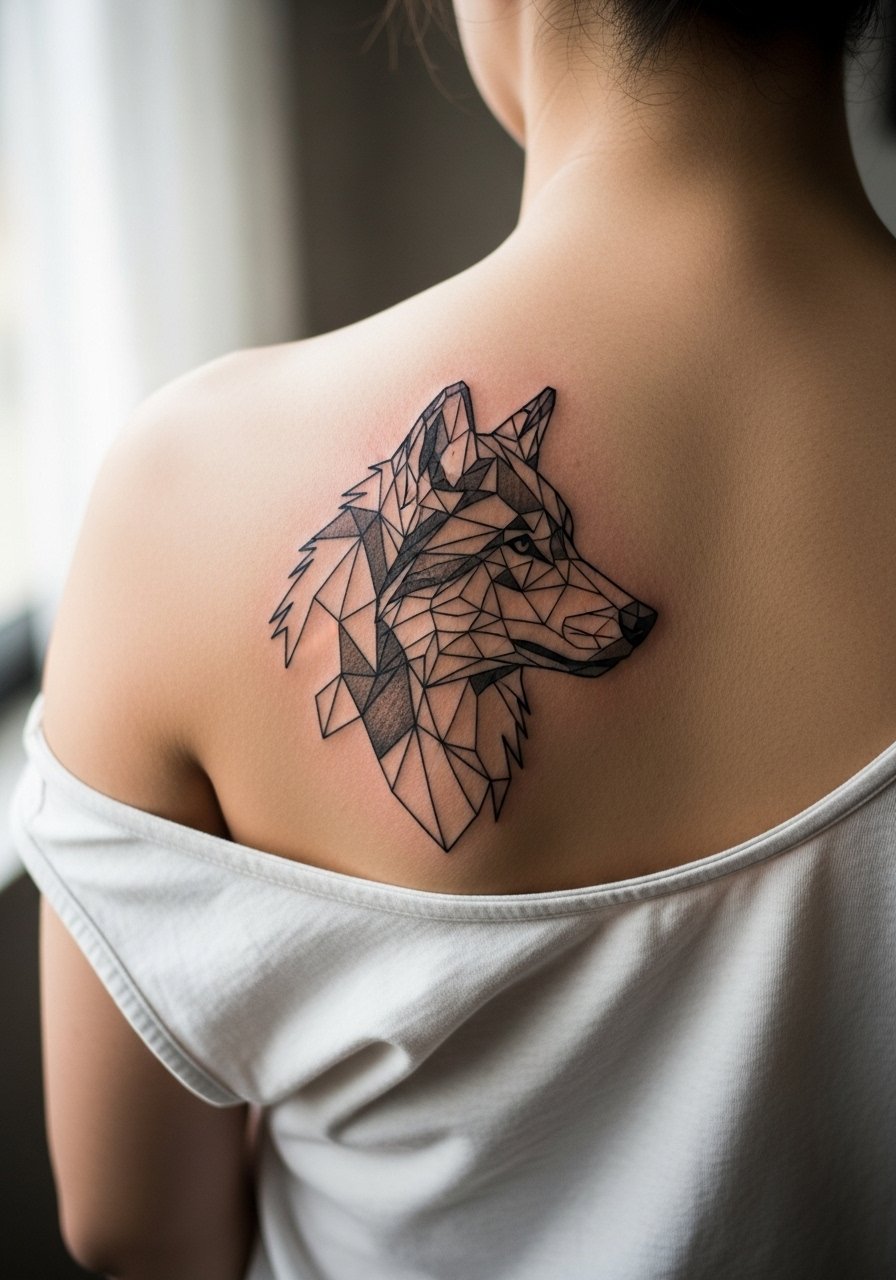
A low-poly animal gives a masculine silhouette while keeping the piece modern. A common error is over-detailing the face area with micro shading that later melts into a gray patch. Request defined polygons with bold outer lines and subtle internal strokes. For a realistic aging path, expect the polygons' inner weights to soften at the 3 to 5 year mark and budget for a light touch-up if you want crisp edges later. During the session, the sensation is steady because of the wide placement. For casual show-off, a muscle tank pairs well without taking focus from the design.
6. Interlocking Triangles Framing the Trapezius
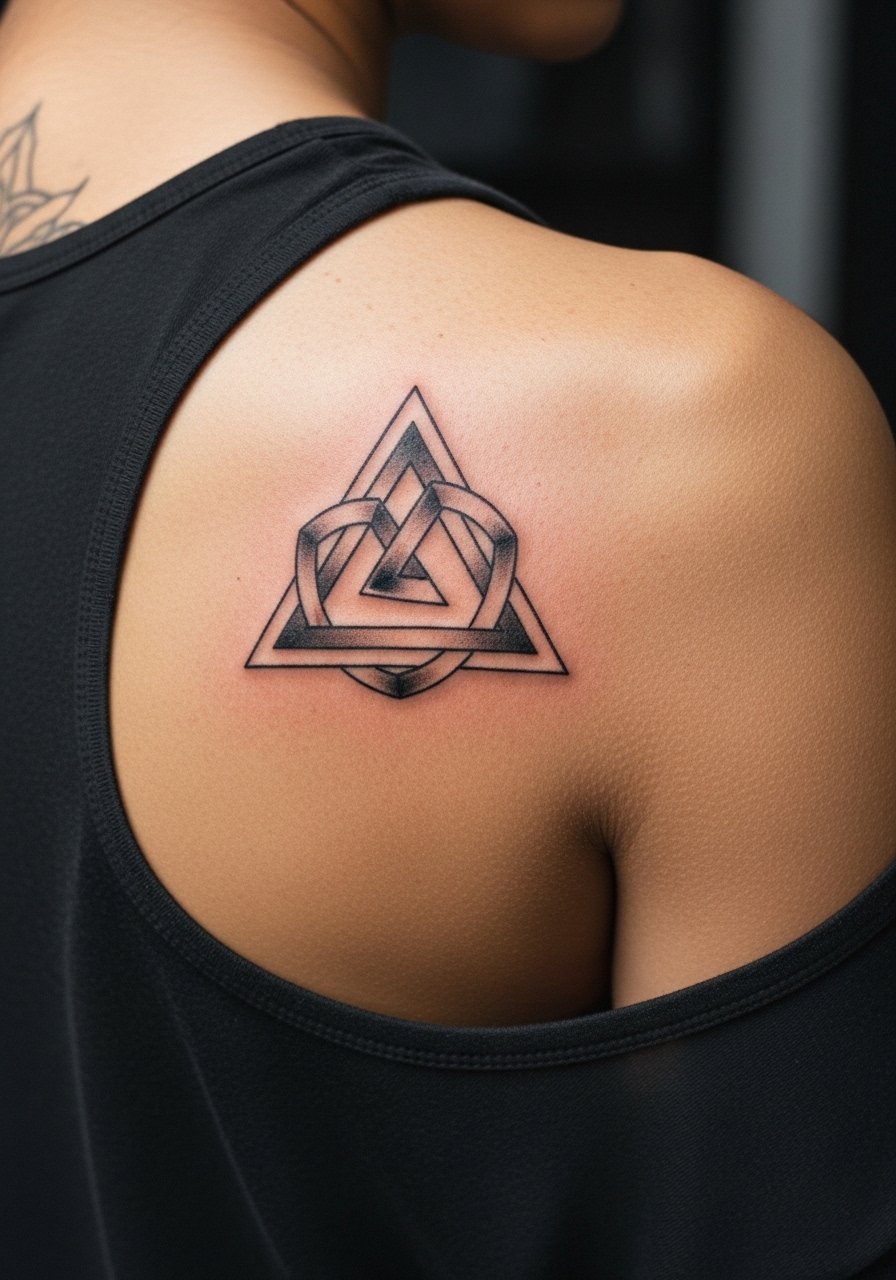
Triangles arranged to follow the trapezius create a dynamic shoulder cap that reads well from three quarters. The usual mistake is trying to force mirror-perfect symmetry across a muscle curve without accounting for posture. Ask for a mockup photographed with arms relaxed and then flexed to check how the geometry moves. Blowout risk is low on this fleshy area but shallow needles can cause patchy lines. A single-session piece like this runs moderate in time and often needs a short follow-up for crisp edges. For the day itself, wear a button-down shirt you can pull aside so your artist has clean access.
Studio Day Picks
The upper back pieces above ask for different prep than wrist work, and a few specific items smooth the session and the first week.
-
Disposable stencil transfer paper kit. Helps the artist print and reposition stencils on broad back canvases so the centerline and shoulder alignment match the reference.
-
Cooling gel pack wrap. Applied between breaks it reduces swelling after long upper back sessions without freezing the skin.
-
Low-profile travel pillow. Makes the chair and leaning forward more comfortable during longer geometric fills across the trapezius.
-
Breathable adhesive film roll. Useful for protecting large upper back areas from rubbing against seat belts and straps during the first 48 hours.
-
Aquaphor healing ointment. A thin application in the first days keeps larger geometric panels supple while the scabs form and peel.
7. Radiating Linework Fanned from a Central Point
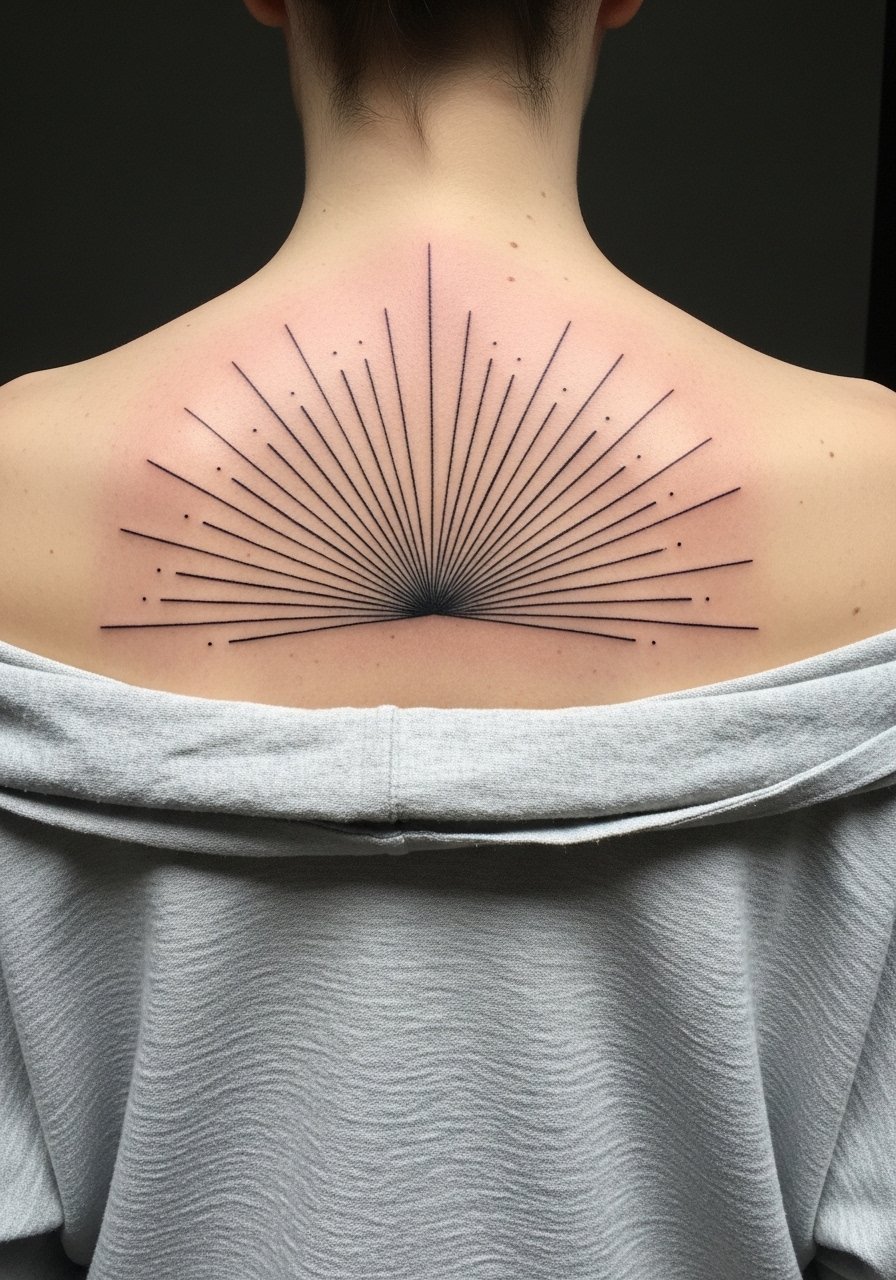
There is something graphic about lines radiating from a single anchor on the upper back that keeps the eye moving. The biggest mistake is drawing too many lines too close to each other. Ask for a rhythm where line spacing increases as the rays extend outward. Over time the inner lines soften sooner than the outer ones, so the design should be composed to look intentional both fresh and healed. The session is steady with intermittent breaks. For late spring and summer outfits, pair it with an open-back tank that reveals the radiating composition without overexposing the shoulders.
8. Constellation Map with Geometric Connectors
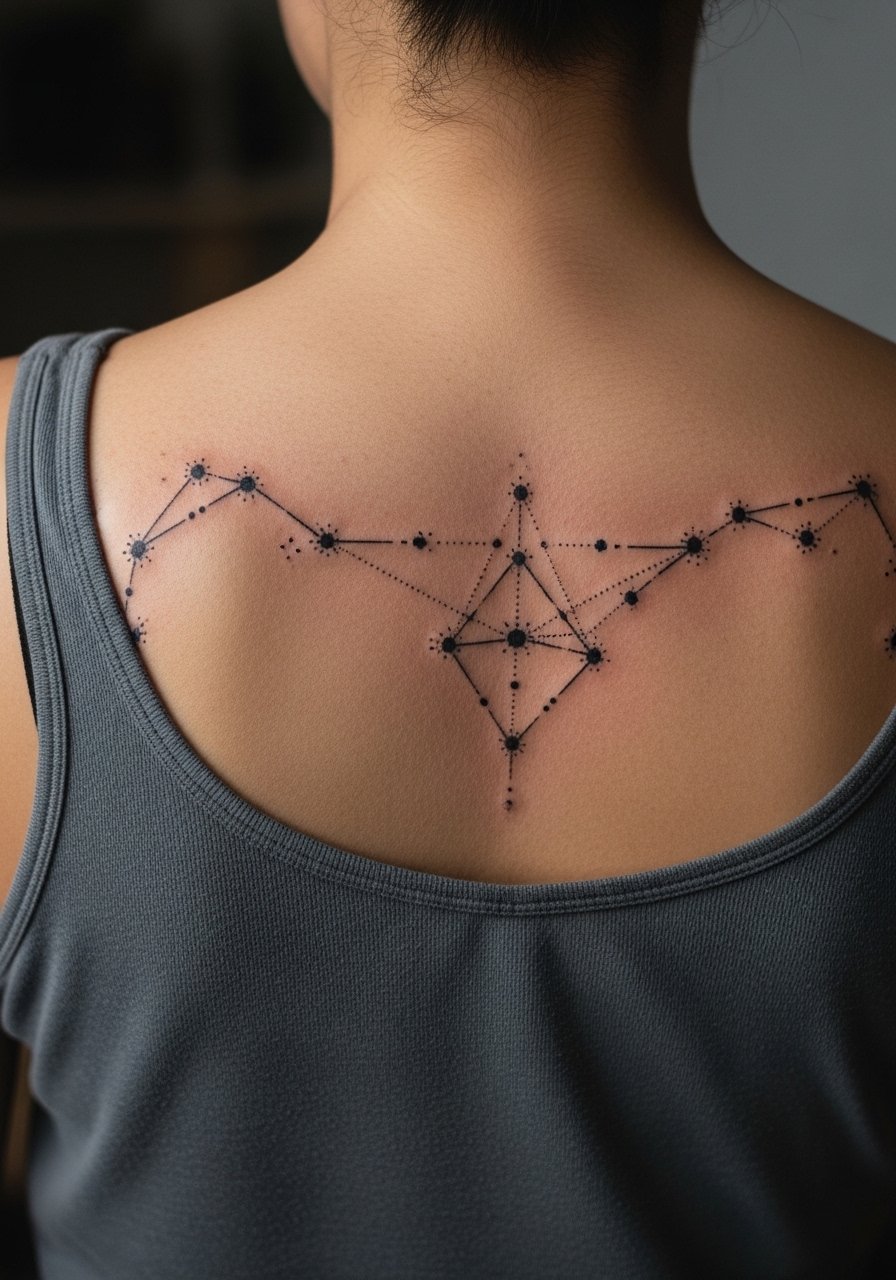
A constellation treatment keeps things minimal while leaning on geometry for structure. A common aging issue is dot work that clumps when dots are placed too close. Tell your artist you want the dots spaced like a star chart and prefer slightly thicker connectors that can weather sun exposure. This piece often reads best with a light touch-up at year three if you want the connectors crisp. It is a lower-pain option given the upper back surface. For a night look, a crew-back tee with a low scoop shows the map without pulling focus from the shoulders.
9. Aztec-Inspired Geometric Panel
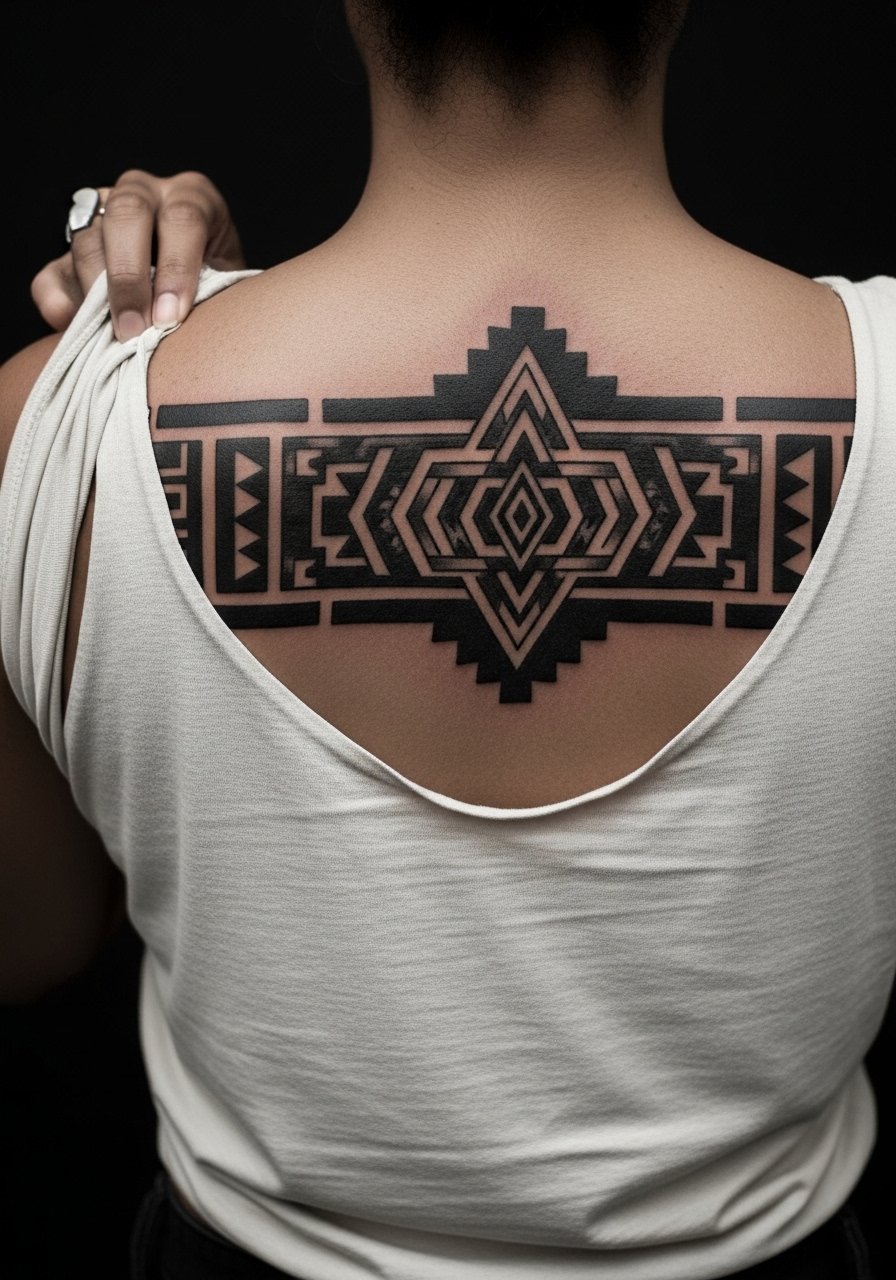
This pattern borrows from indigenous motifs, so a short note on respect is worth a minute. The design references traditional geometry rather than copying ceremonial symbols exactly. One common mistake is over-saturating small motifs which later merge. I recommend a scale increase of about 25 percent from the original reference so the pattern breathes and holds. Sessions for panels like this can take longer because of dense blackwork. For daytime styling, a sleeveless hoodie keeps the panel visible while staying casual.
10. Layered Rings and Bands Across the Upper Back
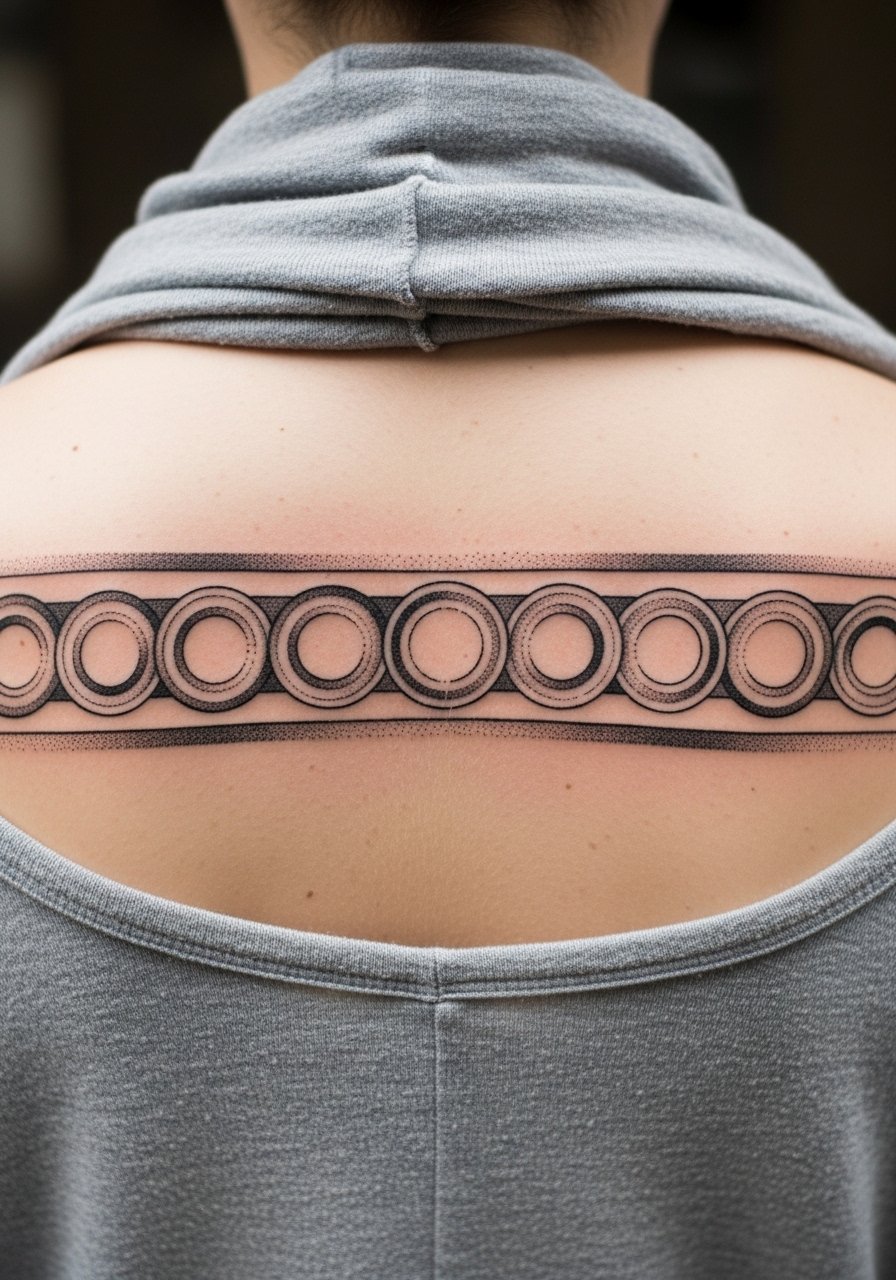
Layered bands and rings read like architecture on the upper back and age predictably when line weight is consistent. The mistake I see is mixing ultra-fine inner rings with bold outer bands without transitional weights. Ask for graduated line weights so outer bands hold while inner rings can be refreshed later. The session is rhythmic and often faster than detailed dot work. If you want to show this at a party, a low-back knit top frames the bands without making the shoulder area look busy.
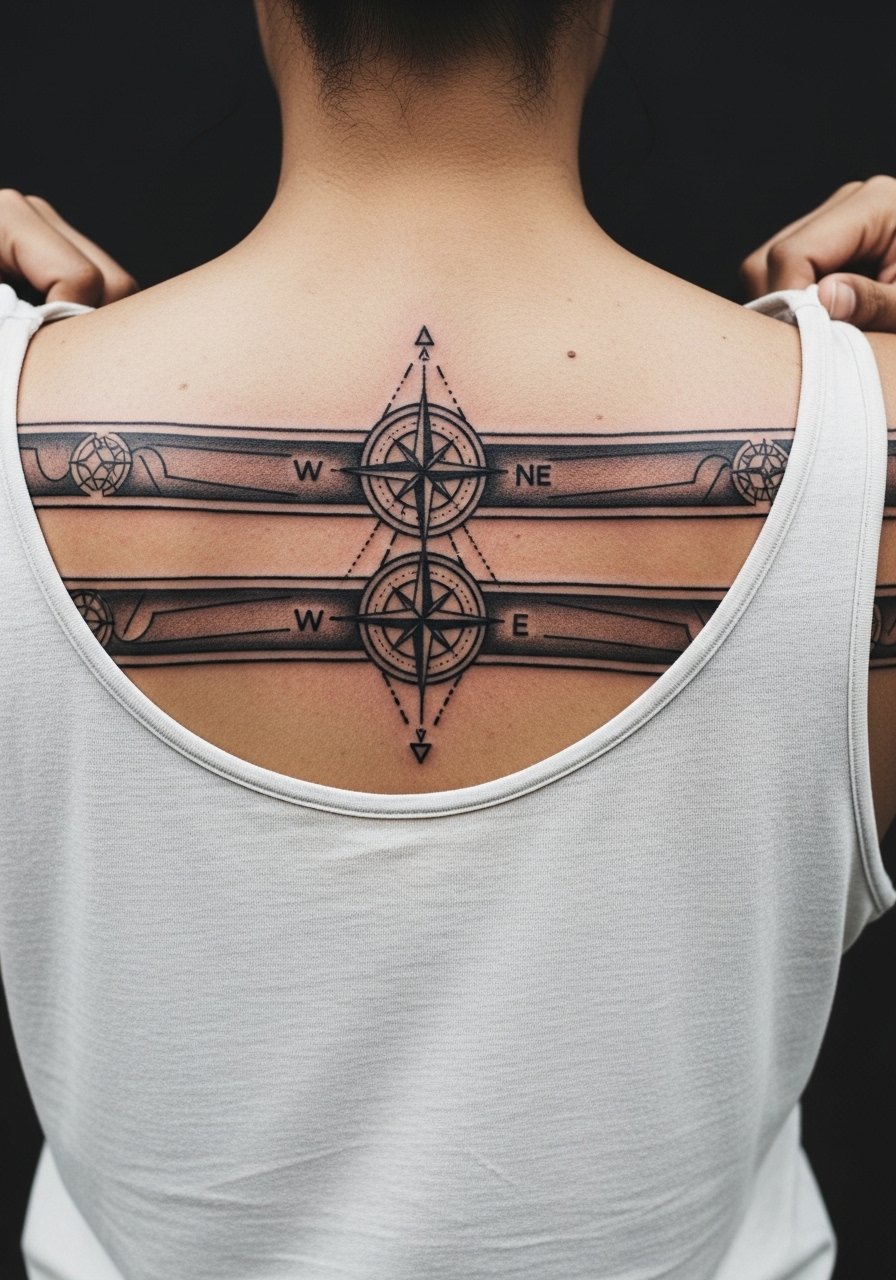
11. Compass Rose with Geometric Fill

A compass rose plays well with the upper back axis when you want directional symmetry. The common error is putting tiny text or coordinates inside the points that later blur. If you want lettering, ask for a slightly larger font and bold lines for the numerals. Touch-ups are common at year three for the fine interior details. The session is moderate in discomfort because of the spine adjacency. For travel-friendly outfits after healing, a backless travel shirt keeps the compass visible without constant exposure.
12. Asymmetric Geometric Panel Over One Shoulder Blade

Going asymmetric can feel more modern, but posture and shoulder height differences can make imbalance obvious. Before booking, photograph your shoulders relaxed and shrugged so the artist can map the panel to both positions. A mistake is mirroring a design from a stock image without adjusting for your natural stance. The session is shorter than full-back work and often leaves the other side ready for a complementary piece later. For showing it off, a one-shoulder top that exposes the blade works well.
13. Linear Maze That Follows Muscle Flow
Designs that respect muscle flow age better because they move with the body rather than against it. The common misstep is forcing a strict grid over curved anatomy. Ask your artist to sketch the maze over your relaxed posture and then test it with a few simple movements. Expect the inner junctions to blur earlier, so request slightly wider channels at those points. Sessions can be meditative with patient, continuous linework. A muscle tank shows off the flow without distraction.
14. Sacred Cube Tessellation Across the Upper Back

Isometric cubes give a three-dimensional feel without color. The error to avoid is overly thin perspective lines that fade unevenly. Tell your artist you want slightly bolder perspective anchors so the illusion holds after a few years. This style can show age evenly, which is an advantage. It usually needs a precise stencil and short touch-up. For an evening reveal, a low-back dress shirt or open collar keeps the tessellation visible without full exposure.
15. Fractal-Inspired Repeating Pattern
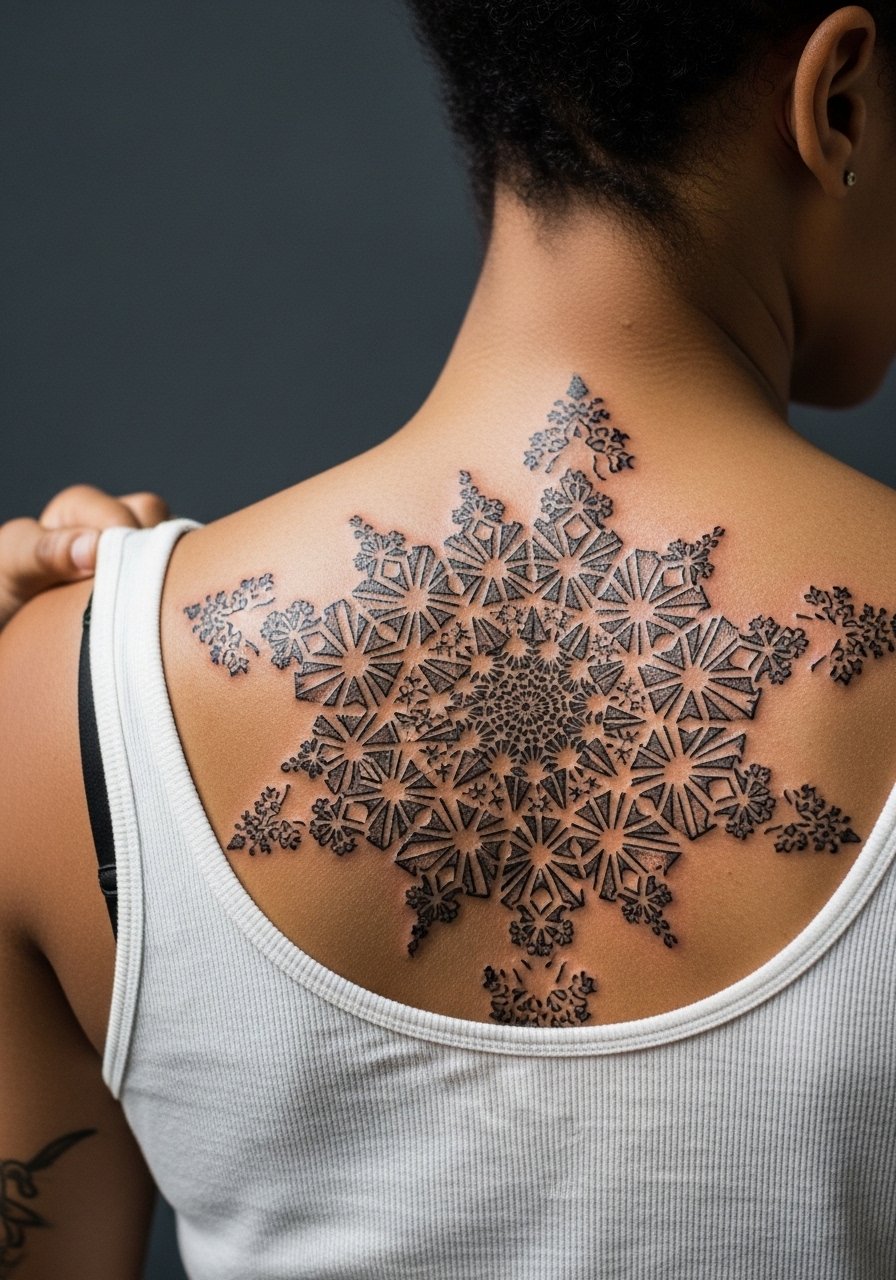
Fractal patterns look technical and organic when executed with proper spacing. The controversy here is density. One camp says fractals need large open areas to read well after healing. The other says skilled stipple artists can maintain density. Ask your artist which approach they prefer and to show examples of healed work. Expect a longer session for consistent stipple shading and a recommended light touch-up at year two. For casual pairing, a backless sweatshirt keeps the pattern visible while staying relaxed.
16. Angular Arrow Cluster Near the Nape
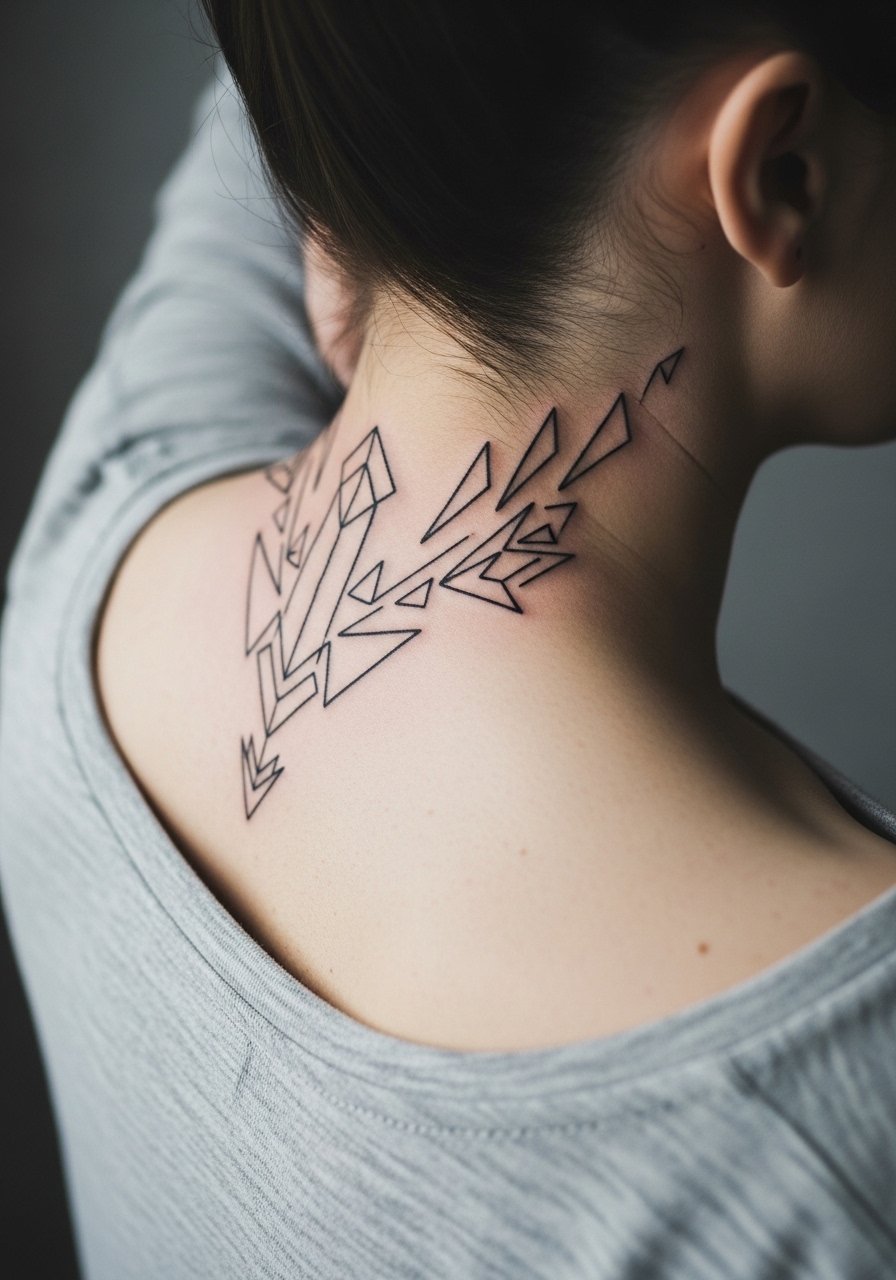
Placing elements close to the nape requires finer planning because hairlines and collars affect visibility. The common mistake is not accounting for hair length. If you wear your hair down, ask the artist to position the cluster slightly lower so it remains visible when needed. Pain near the nape can be sharper but brief. For showing it off, a wide-neck sweater or a short hair cut will keep the arrows visible.
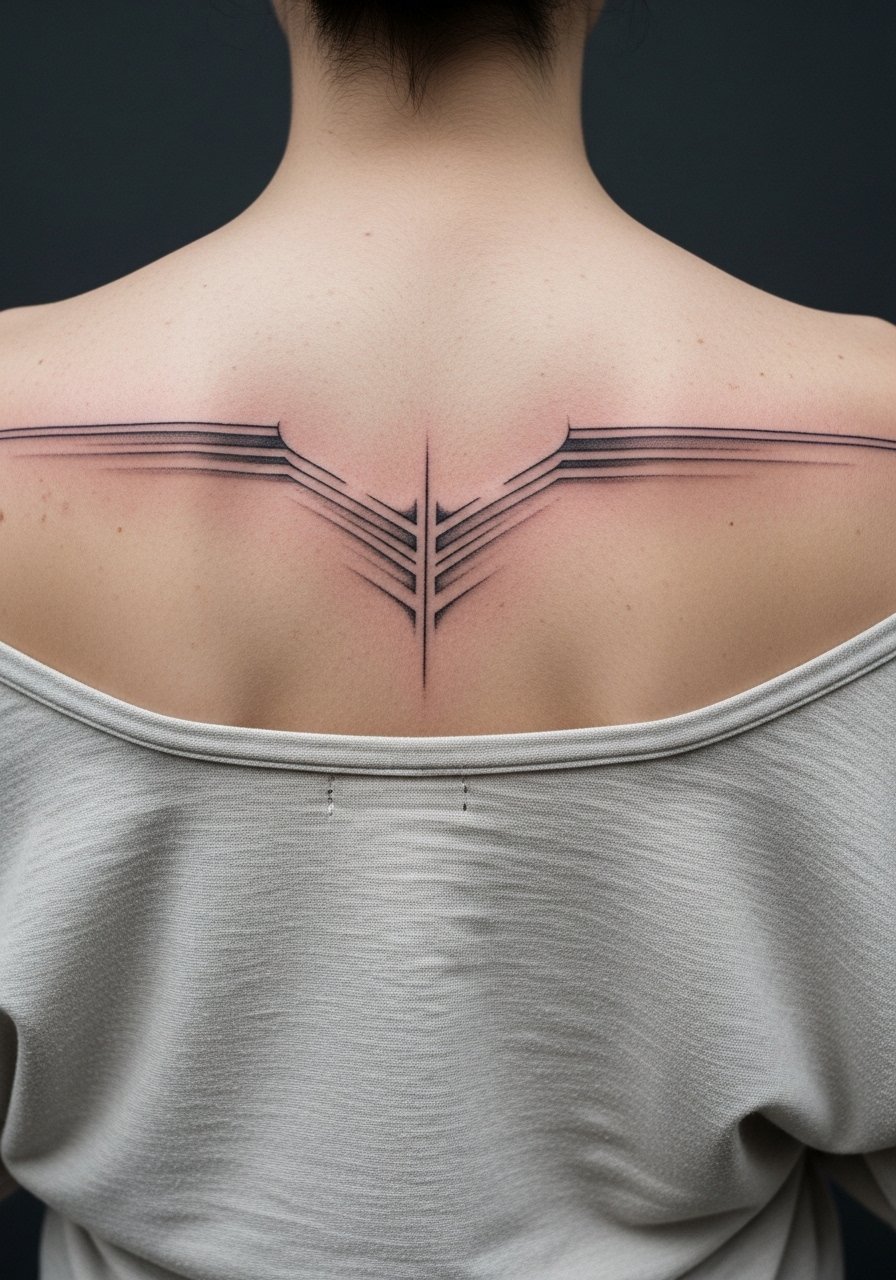
17. Geometric Compass Bands Bridging the Shoulders
Bands that bridge both shoulders emphasize width, so spacing matters. A common error is making bands too narrow so they feel like straps. Ask for bands that are wide enough to retain proportionality as skin ages. The session is longer because both sides demand consistency. For wardrobe, a boat-neck tee highlights the bridge without competing details.
18. Nested Polygons Over the Upper Back Center

Nested polygons can feel tactile and precise. The typical mistake is alternating fills that are too dense, which lose contrast over time. Ask for a mix of solid outer shapes and airy inner negatives so the center reads on its own as it softens. Sessions are methodical and sometimes split into two sittings to ensure crisp edges. For a refined outfit pairing, a low-back linen shirt complements the centered geometry.
19. Latticework Panel with Open Nodes
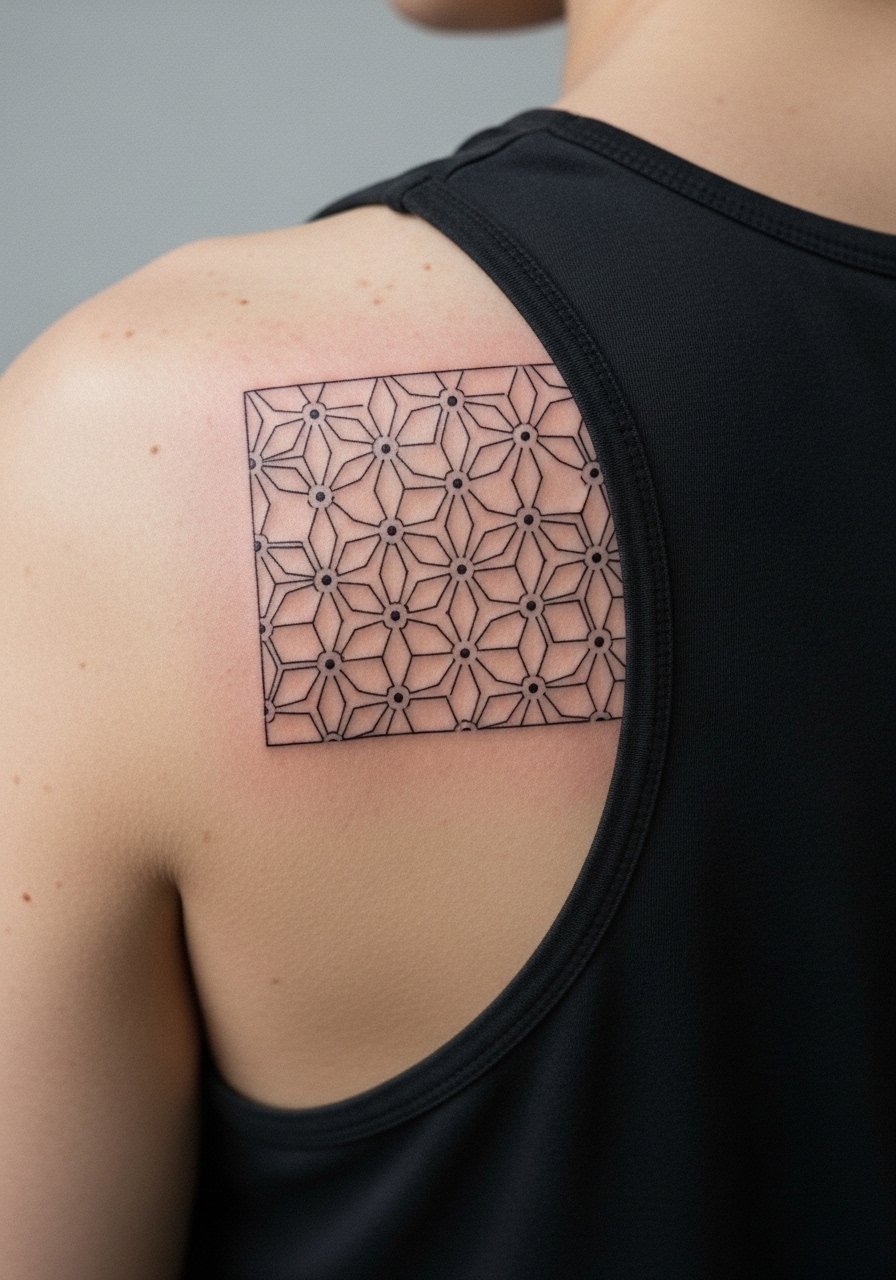
Latticework benefits from intentional breathing room. The mistake I see is filling nodes too densely. Ask your artist to design open nodes that create rhythm and plan for a small test patch if the artist uses very fine needles. Healed lattice often keeps its structure better when negative space is part of the plan. The session is repetitive but steady. For casual show-off, a scoop-back hoodie keeps the lattice visible without full exposure.
20. Stylized Geometric Skull Centerpiece
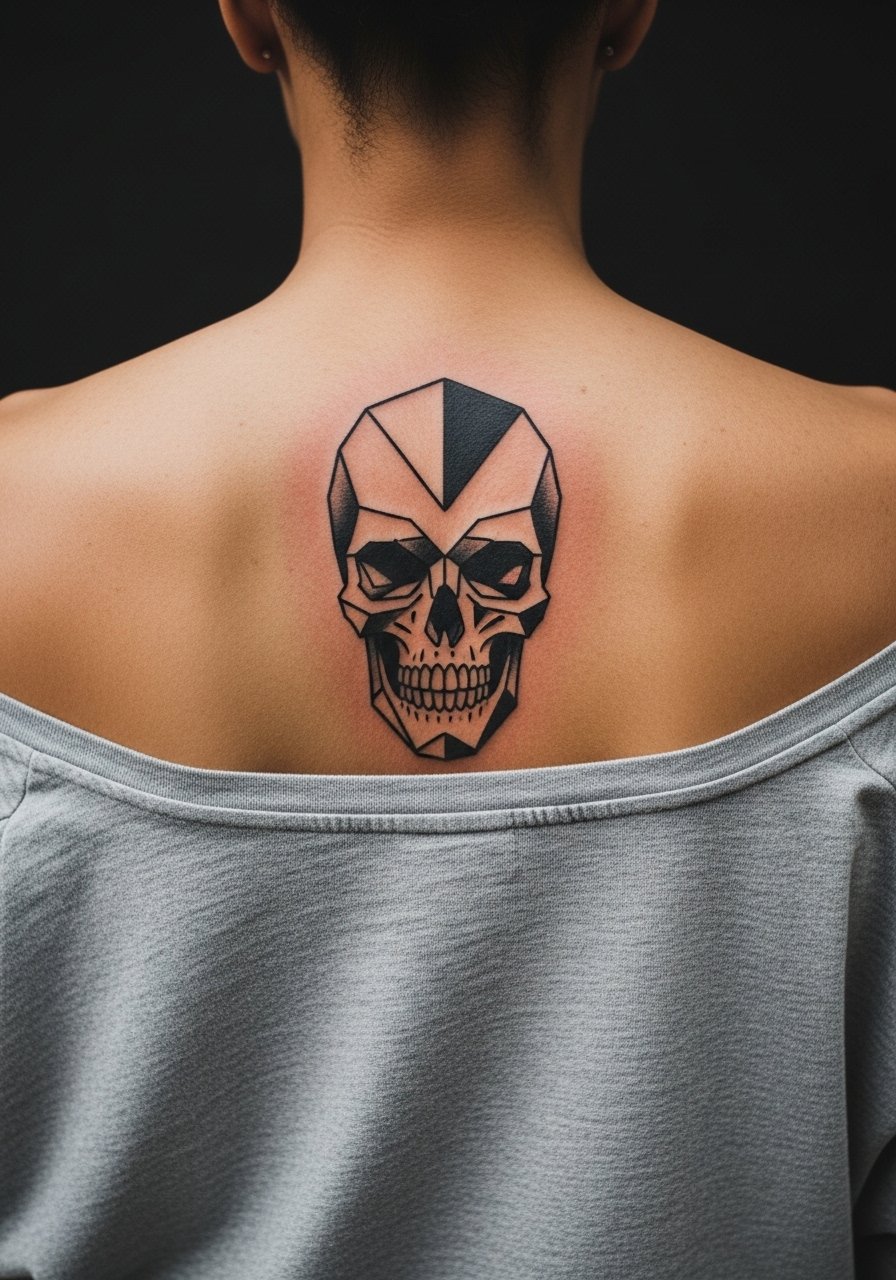
A skull rendered in geometric facets reads bold and modern when spacing is kept intentional. The common mistake is over-detailing teeth and small features that blur with time. Request larger planes and stronger outer lines to keep the shape legible as the fill softens. Sessions can be heavier if you want deep black fills. For an edgy evening look, a low-back leather jacket shows the centerpiece without revealing too much.
21. Hexagonal Cluster That Fans toward the Shoulders
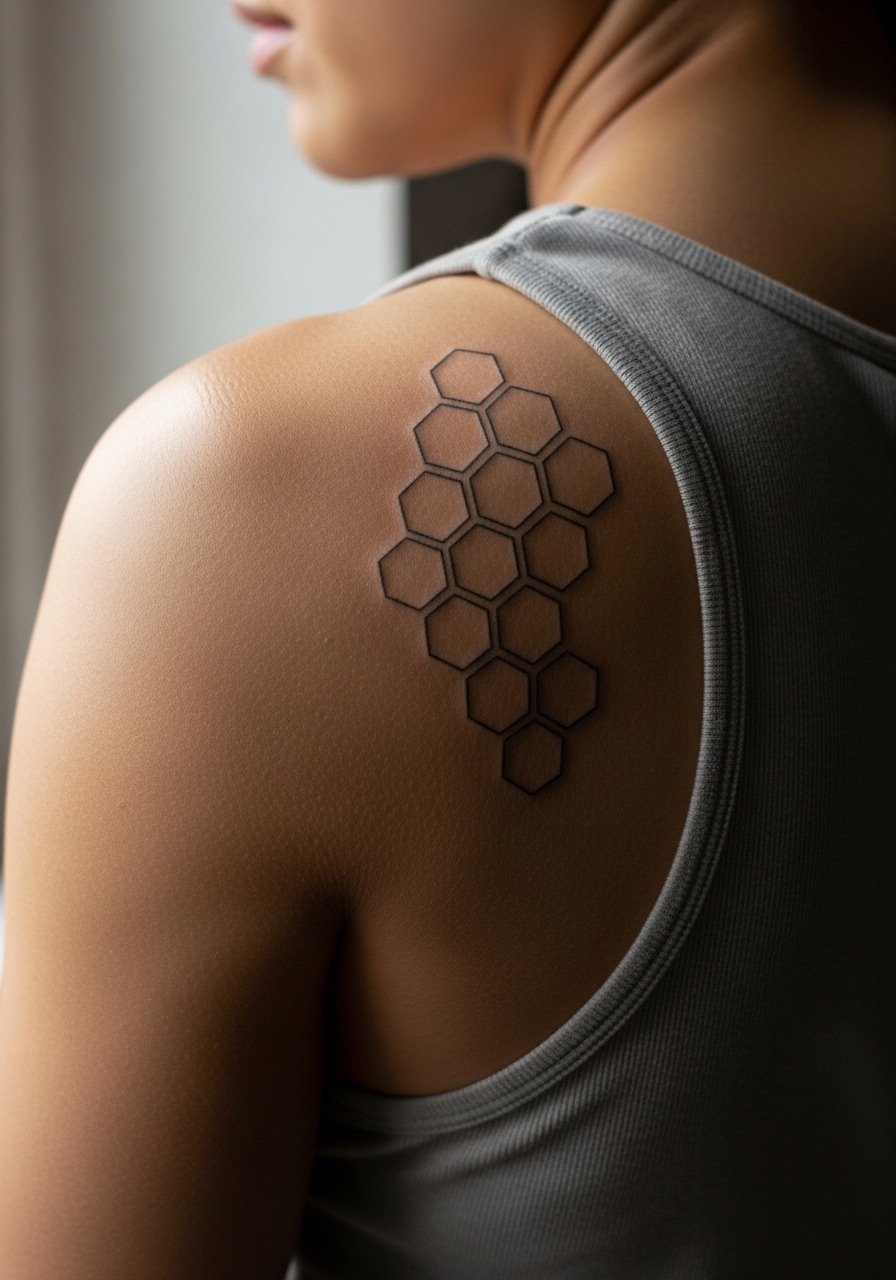
Hex clusters play well with shoulder contours when the edges are softened. The mistake is making the outer hexes too small which causes loss of definition with age. Ask for a gradual scale change from center to edge so the composition stays interesting as it heals. Expect a touch-up at year two for inner join lines if you want them crisp. For daytime wear, a cutaway tee frames the hex fan neatly.
22. Geometric Wave That Mirrors Muscle Lines

When geometry follows muscle contours the result looks integrated instead of pasted on. The typical error is forcing a straight pattern across curved anatomy. Ask for a mockup that sits with your relaxed posture. This approach ages predictably and usually needs minimal touch-up. Sessions are comfortable with long flowing lines. For a subtle reveal, a loose polo with an open collar keeps the wave visible without full exposure.
23. Optical Illusion Grid Centered on the Upper Back
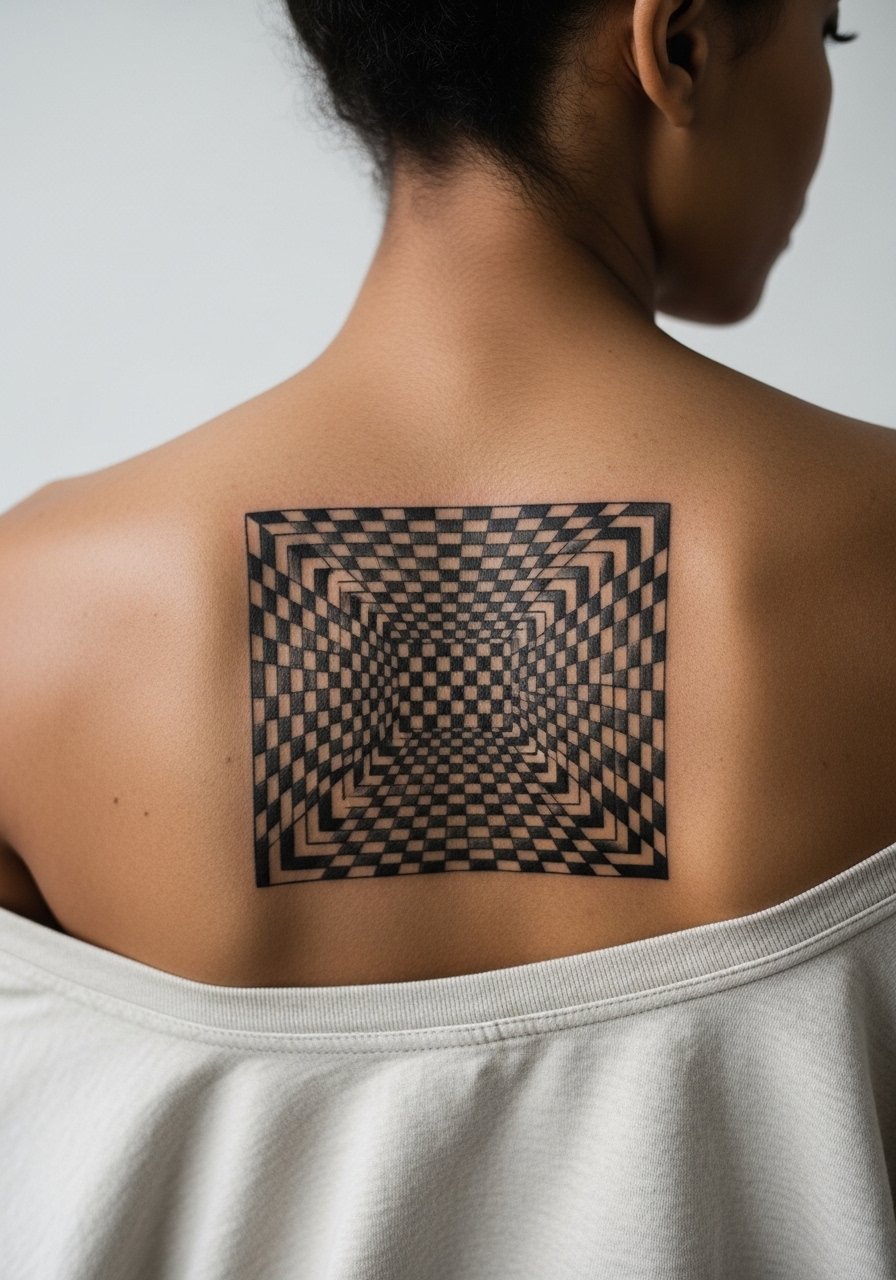
Optical illusion pieces demand planning because small inconsistencies ruin the effect. A common mistake is relying on micro-lines that fade faster than bolder anchors. Request a mix of anchor lines that remain legible as the inner finer lines soften. Expect a longer session focused on symmetry and perhaps a small follow-up for tweaks. For a night out, a low-back blazer frames the effect in a more dressed way.
24. Fragmented Geometry That Breaks Toward the Spine

Fragmented shards create movement by intentionally breaking symmetry. The mistake is letting fragments become too small near the spine where they will disappear. Ask for a tapering plan that keeps shard edges clear and intentionally fades rather than vanishes. The session often feels punchy near the spine and smoother across the fleshy areas. For layered outfits, a backless undershirt can let you reveal fragments selectively.
25. Geometric Solar Motif Framed by Lines
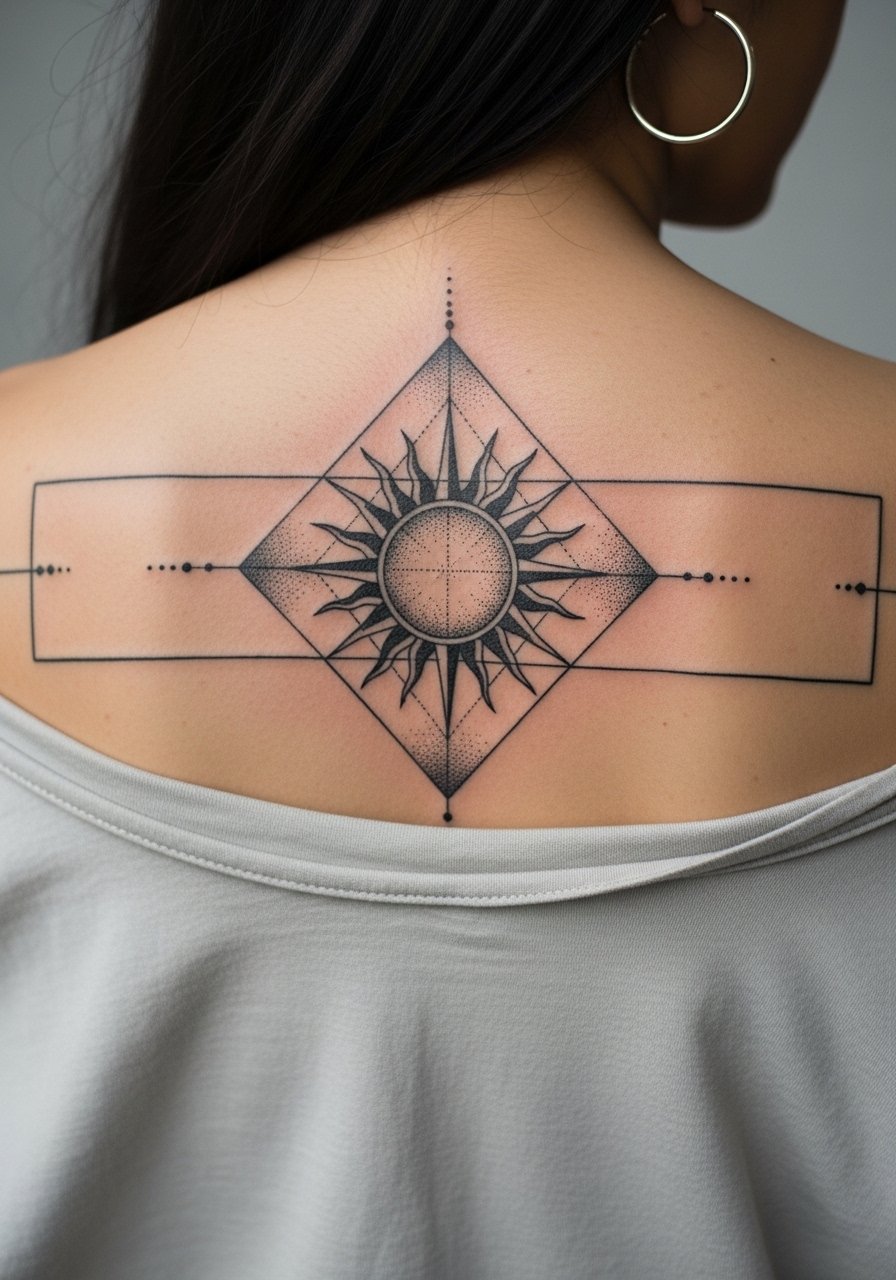
A solar motif gives a focal point with framing that keeps attention on the center. The usual mistake is tiny inner rays that blur and create an unwanted halo. Ask for thicker inner rays and lighter outer dots so the contrast remains intentional. This style ages evenly and is forgiving. Sessions are moderate and often allow for comfortable breaks. For warm-weather wear, a linen open-back shirt highlights the motif.
26. Geometric Knotwork Across the Upper Back

Knotwork benefits from planning overlap and depth. A common error is using equal line weight for all strands which flattens the illusion. Ask your artist to vary weights where strands appear to go over or under. The session can be long because the pattern repeats across a wide area. Expect a tight follow-up to correct any small alignment shifts. For showing it off casually, a scoop-back tee frames the interlace without crowding.
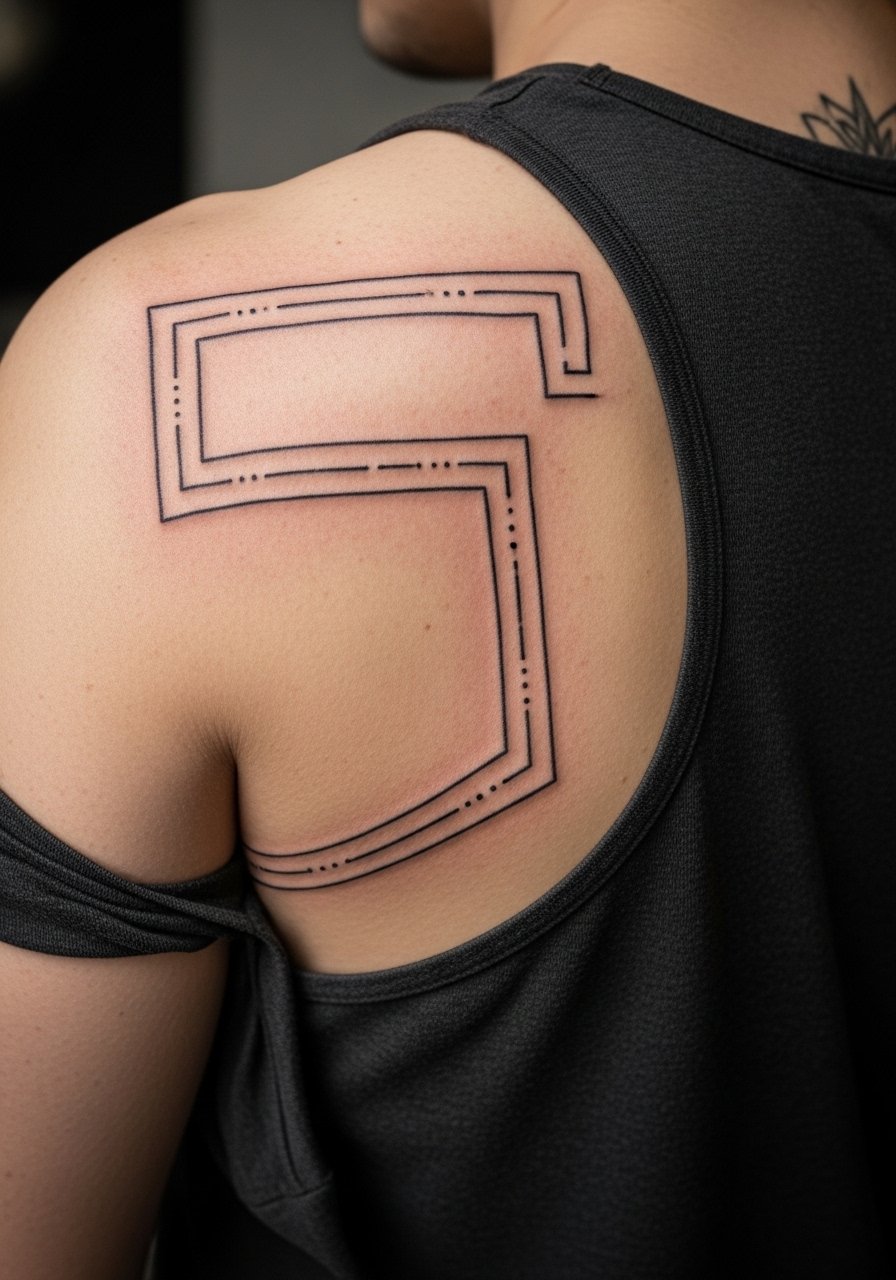
27. Angular Horizon Line That Tapers Toward the Spine
Ending with a horizon-style band gives a modern silhouette that pairs with broad shoulders. The big mistake is placing too many parallel lines too close together. Ask for tapered spacing that increases toward the center so the piece breathes. The session is relatively quick but demands exact stencil placement. For a clean daytime look, a low-back tee complements the horizon without revealing too much.
Frequently Asked Questions
Q: How does fine line geometry on the upper back hold up compared with bold blackwork?
A: From what I've seen, fine line geometry softens faster because thin lines lose definition under sun exposure and normal skin movement. Bold blackwork tends to age into a stable silhouette. If you want fine line, ask for slightly larger spacing and budget for a touch-up around year two to three.
Q: Will a centered mandala need a separate session for saturation or can it be completed in one go?
A: It depends on size and density. Smaller mandalas with open negative space can finish in one session. Dense mandalas with layered stipple or black fills often take two. Discuss staged saturation in the consult so you can book realistic chair time.
Q: Are asymmetric upper back designs harder to plan than centered pieces?
A: Yes, asymmetry demands more mapping because posture and shoulder height affect how the composition reads. I recommend photos of you both relaxed and flexed so the artist drafts a stencil that looks intentional in motion.
Q: Should I avoid getting geometric work that extends onto the neck or nape because of hair coverage?
A: If you wear long hair you might hide nape work unintentionally. Ask the artist to place elements slightly lower if you prefer occasional visibility. Hair length is part of the design decision and worth discussing before booking.
Q: How should I dress for an upper back session to make access easy and comfortable?
A: Wear a loose tank top or a wide-neck shirt you can pull aside. For longer sessions bring a light layer you can slip on and off easily. A travel pillow for neck support makes longer sits more comfortable.
Q: Do I need to worry about cultural sensitivity for geometric patterns inspired by traditional motifs?
A: Yes. Some geometric motifs tie to cultural or ceremonial contexts. If a design references a tradition, tell your artist you want a respectful interpretation and consider slight variations rather than direct replication.
