
Fine line tattoos dominate saved boards for a reason, but what looks delicate in a gallery sometimes blurs with daily wear. Pick designs that read well fresh and still read well after sun, sleeves, and time. These 17 illustrative Hunger Games ideas focus on lineweight, spacing, and placement so your tribute ages with the ink, not against it.
1. Minimal Bow and Arrow on the Inner Forearm
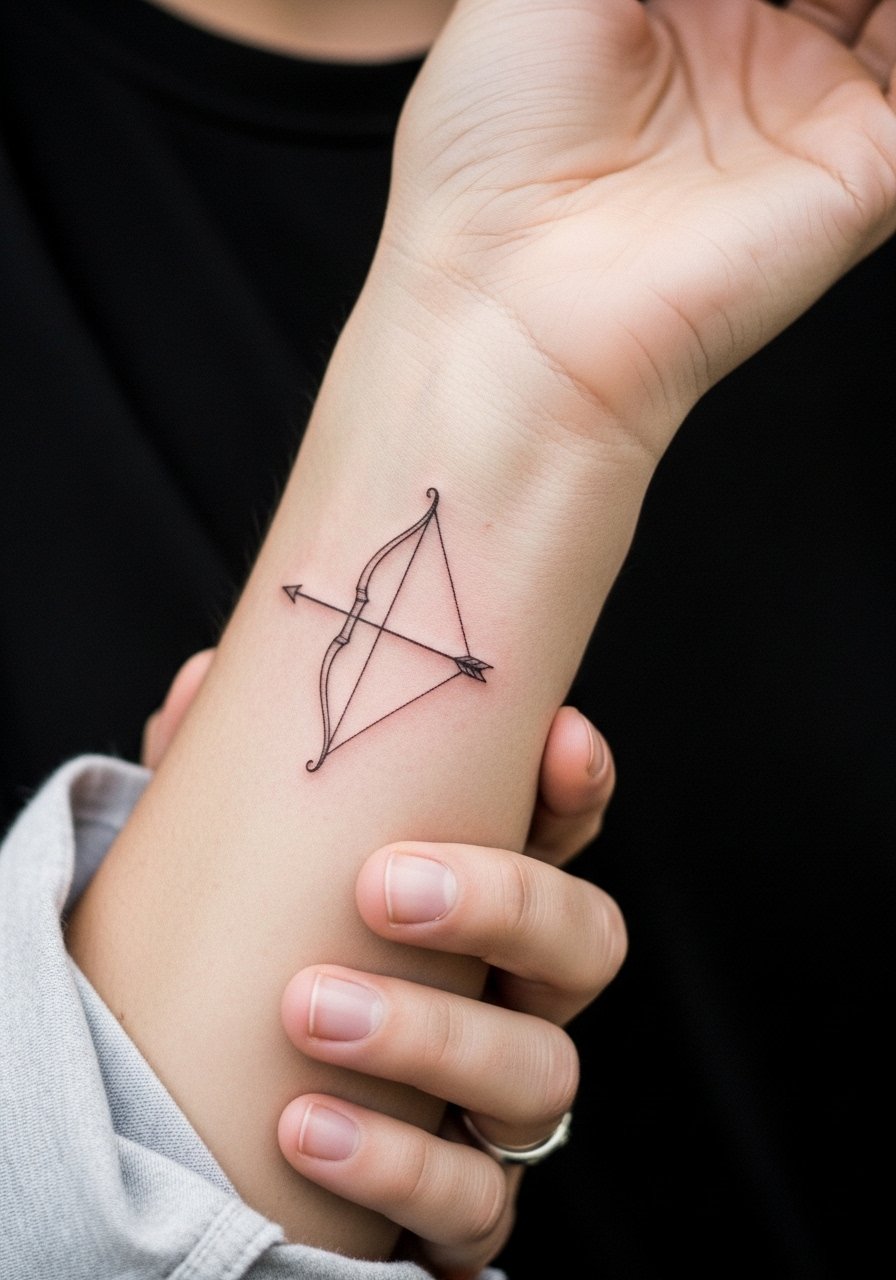
I recommend this as a first Hunger Games piece because the forearm gives room for spacing that protects fine line work. Tell your artist you want slightly heavier anchor points on the arrow so the tiniest lines around the fletching have room to breathe. Common mistake is asking for everything ultra-thin, which looks fragile at month six and merges by year three. Expect a low to moderate pain level and a short session under an hour. For the session, wear a loose button-down shirt you can roll or pull aside so the artist has unobstructed access. Light sun protection and a touch-up at year two are typical for fine work here.
2. Tiny Mockingjay Pin on the Wrist

Wrist tattoos show immediately but face more friction from sleeves and washing, so keep the pin compact and bold. A common aging issue is making the emblem too detailed for the wrist size. Ask for simplified silhouette shapes and heavier line anchors so the bird still reads after a year. Pain is mild to moderate and the session runs under an hour. Pair this with a thin chain pendant necklace when you want the wrist to peek through at events. Expect touch-up potential at year two for crispness.
3. Three-Finger Salute on the Side Ribcage

Fair warning: ribcage sessions are higher on pain and take concentration to sit through. Artists split on fine line here. One camp says the skin stretch and motion blur lines within two years. The other camp argues that proper needle depth and extra spacing make fine line settle fine on ribs. Ask your artist where they stand and how they will space the fingers. This placement reads striking under cropped tops, so for the session wear a cropped athletic top you can lift easily. Expect a longer single session and a potential touch-up window at year two or three.
4. Nightlock Berries Cluster on the Inner Bicep
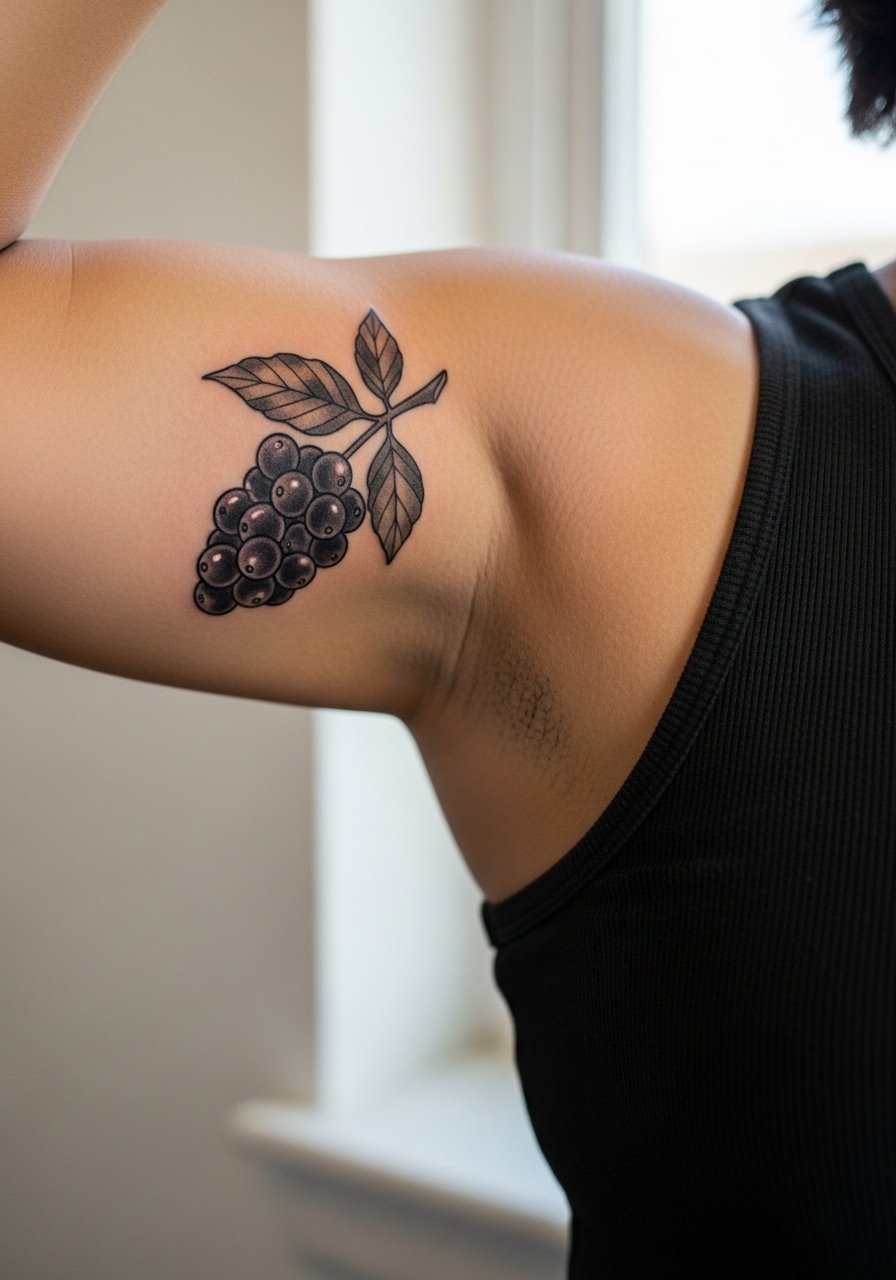
The inner bicep gives a soft canvas that flatters round, shaded shapes. Tell the artist you want stipple shading rather than heavy black fills so the berries maintain texture as they age. A common mistake is packing large black fills into a small cluster, which can look heavy after healing. The session feels odd because the arm is sensitive when held up, but it is manageable in under two hours. For show-off pairing, a racerback tank keeps the area visible without stretching the design. Touch-ups are uncommon if shading is airy.
5. Stylized Mockingjay with Flames on the Upper Back

Upper back pieces let you combine motion and scale without lining up too tightly. Ask your artist for heavier outlines where the wings meet the body to prevent blur in high-movement zones. The session can run two to three hours depending on color saturation. A common error is overloading tiny feather details, which softens into a wash after a year. For the appointment, wear a loose tank top you can pull aside for access. Expect solid longevity with saturated color and a touch-up option at year three.
6. Capitol Skyline Silhouette at the Collarbone

Collarbone pieces read bold even when small because of the bone contrast. Tell your artist you want the silhouette spaced so each building reads separately. Mistakes happen when designers compress many elements into a narrow band. Expect moderate pain and a session under 90 minutes. Pair it with open-back midi dresses or wide-neck shirts to let the skyline show naturally. For visibility concerns with work attire, put the placement conversation on the consultation table.
Studio Day Picks
The first six pieces above include wrists, collarbones, inner arms, and back placements that demand different prep and care during the studio visit.
-
Stencil transfer paper kit. Helps you preview placement on skin for fine emblems and collarbone silhouettes before any needle touches the area.
-
Topical numbing cream. Useful for rib and inner bicep sessions to manage the sharper pain spikes so you can sit through longer shading work.
-
Thin protective film roll. Keeps wrist and hand pieces protected from friction and frequent washing during the first few days.
-
Fragrance free gentle body wash. Cleanses healing skin without stripping inks on delicate fine line work like the bow and pin designs above.
-
Aquaphor healing ointment. Thin layer application in the initial days locks moisture for fine line and micro-realism pieces without clogging.
7. Three-Headed Coin in Micro-Realism on the Thumb Side

Hand and thumb pieces face heavy wear and faster fading, so scale and boldness matter more than tiny realism. Ask for simplified edges and slightly thicker line anchors so the coin stays readable after months of hand washing. The biggest mistake is asking for photorealism at a tiny scale on the hand. Pain is higher and sessions are quick but intense. Hand tattoos can affect certain job situations, so weigh visibility against meaning. Expect touch-ups sooner than forearm work, often within two years.
8. Katniss Silhouette with Loose Watercolor Aura on the Thigh
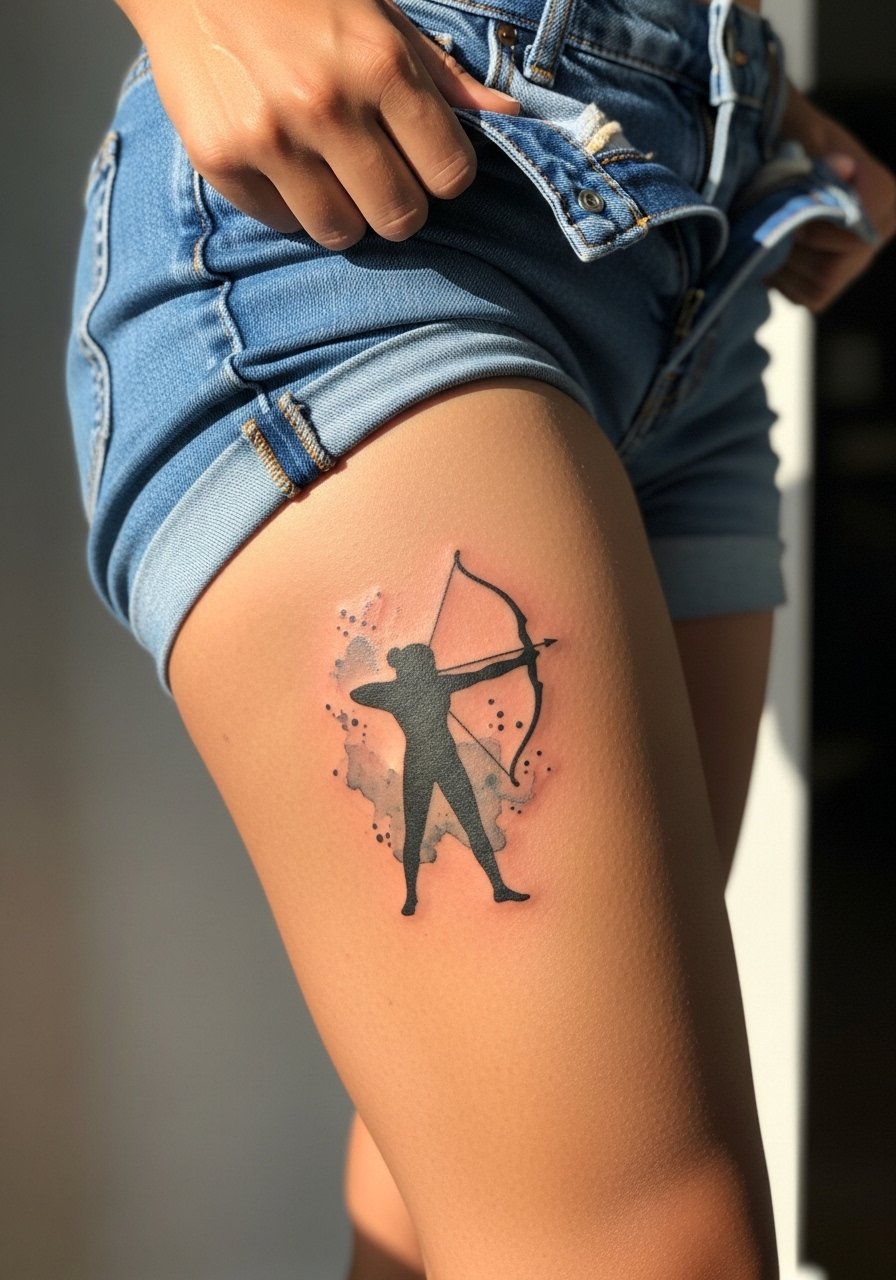
Thigh pieces let you play with larger scales and painterly color while keeping harsh linework spaced out. Tell your artist you want the watercolor as background only, not blasting over the silhouette, so the outline remains readable over time. A common aging issue is watercolor bleeding into thin outlines when the color is saturated too close to the edges. Session time can be longer, often multi-hour. For the appointment, wear high-waisted denim or shorts that allow the artist to expose the area without discomfort. Touch-up windows for color are common after a few years.
9. Tracker Jacker Stinger in Fine Line on the Ankle

Ankle tattoos see boots, socks, and friction, so keep the stinger design compact and include slightly heavier main lines. A frequent mistake is over-detailing the stinger and legs at an ankle scale. The session is short but the area is sensitive. For visibility, pair with sandals or cuffed jeans when you want it to show. For the session, roll your pant leg or wear jeans you can roll easily so the artist has full access. Expect touch-ups at year two if the piece takes a lot of wear.
10. District Number Roman Numerals on the Side Rib

Text on the ribs reads elegant but moves constantly with breathing, so space numerals and opt for slightly heavier type weight than you think you need. The biggest mistake is choosing ultra-thin lettering or ornate scripts for this mobile zone. Sessions are more uncomfortable and often slower. Discuss spacing and ask your artist to stencil and check in sitting and standing. Session wear should be a cropped tee or sports bra so the area is accessible. Expect a touch-up chance when healed.
11. Tracker Jacker Nest as a Low Back Piece

Lower back placements allow for focused compositions that curve with the body. Ask for a composition that follows the spine and hip line so the nest reads when you move. Avoid too much tiny stipple in areas that will rub against waistbands. Sessions can be medium length and the pain is moderate. For showing it off, an open-back dress works well. For the session keep your pants comfortable and loose. Longevity is good if the piece avoids constant waistband friction.
12. Mockingjay Portrait in Neo-Realism on the Outer Thigh

Outer thigh offers a forgiving canvas, which is why many artists recommend it for detailed portraits. Ask for a balance of stipple and whip shading so feathers keep texture without saturating into a block. A common mistake is packing too many micro details that lose clarity after a year. Session can be long and may require breaks. For the session, wear loose drawstring shorts like loose linen drawstring pants or shorts so the artist can roll the leg without pressure. Touch-ups for contrast are less frequent here.
13. Nightlock Seed Pod in Minimalist Line on the Sternum

Sternum pieces are intimate and require an artist experienced with chest curves. Keep designs narrow and centered so healing tension does not warp the linework. The common error is pushing a wide design across the sternum, which can separate during healing. Sessions are painful for many and the area needs extra attention during the first week. Wear a fitted sports bra for the appointment to allow easy access while staying covered. Expect that touch-ups might be needed as the chest moves with breathing and posture.
14. Arrow Cluster Down the Spine

Spine pieces look dramatic but are exposed to movement that can shift linework, so space arrows and avoid tiny cross-hatching. One common mistake is cramming too many directional accents into a narrow column. Pain ranges higher down the spine and sessions take focus. For showing it off, open-back tops reveal the column without exposing too much. Discuss needle depth with your artist and plan for a potential touch-up at year two for the narrow lines.
15. Peeta-Inspired Loaf of Bread Emblem on the Calf

Calf is a forgiving spot that handles linework and small solids well. For emblem pieces keep outlines confident and shading airy. A mistake is trying to make the icon too tiny for detailed shading, which flattens after healing. Sessions are moderate in length and pain is typically lower than ribs. For session ease, wear pants you can roll or a loose drawstring pant. Longevity is strong because the area sees less abrasion.
16. Mockingjay Feather with Script on the Side Rib

Text near delicate featherwork requires breathing room between elements. When text is included, specify exact lettering style and size so the generator and the artist render it legibly. Many make the error of pairing tiny cursive with feather stipple, which blurs in months. Rib spacing and depth choices by the artist matter, so discuss both. Session pain is high and a touch-up at year two is not unusual. For session wear, a sports bra or cropped top lets the artist access the side torso cleanly.
17. Arena Map Fragment on the Shoulder Blade

Shoulder blade pieces age well because the area is stable and rarely rubbed. Ask for simplified map lines and a few landmark dots rather than dense cartography so the layout holds up. A common mistake is over-detailing in a tight rectangle, which becomes unreadable after a year. Session is comfortable and can be done in one sitting. For the appointment wear a loose tank top you can slide aside. Expect long-term clarity with minimal touch-ups.
Frequently Asked Questions
Q: Will fine line Hunger Games motifs like the bow or pin blur faster than neo-traditional pieces?
A: From what I have seen, fine line motifs can soften sooner because they rely on tight spacing and tiny strokes. Neo-traditional pieces with heavier anchors and saturation tend to age into a readable form. Placement and sun exposure matter more than style alone, so plan for touch-ups around year two to three for fine line pieces.
Q: Are chest and sternum placements riskier for linework than forearms?
A: They are different challenges. The chest moves with breathing and sometimes heals under tension, which can shift thin lines. Forearms sit flatter and usually keep linework clearer. If you want chest placement, ask the artist about spacing and needle depth and plan for a short follow-up touch-up.
Q: How should I dress to show a collarbone skyline while staying workplace-appropriate?
A: A wide-neck blouse or a button-down with a few top buttons open shows the collarbone without full exposure. A wide-neck shirt pulled slightly aside or layered lightweight blazer keeps the skyline visible but subtle for professional settings.
Q: Do watercolor-style backgrounds hurt the longevity of a mockingjay silhouette?
A: They can if the color bleeds into linework. The safer approach is to ask for the watercolor to sit behind the silhouette with a small clear margin. Lighter washes and stipple edges preserve the silhouette longer and reduce the need for early touch-ups.
Q: What discovery pathways help me find artists who handle illustrative Hunger Games work well?
A: Search themed hashtags, local studio directories, convention guest lists, and community forums to see healed examples and process notes. Spend time in a few shops or message portfolios to ask how their healed work looks at year two rather than just fresh photos.
