
Fine line sibling tattoos are small commitments that read like private codes between two people. They work best when the design, placement, and sizing match both lives and routines rather than just matching aesthetics. These micro pieces should survive daily wear, occasional touch-ups, and the years when both of you change jobs, haircuts, and cities. Below are 17 compact ideas that balance meaning, longevity, and the realities of healed skin.
1. Matching Fine Line Initials on the Inner Wrist
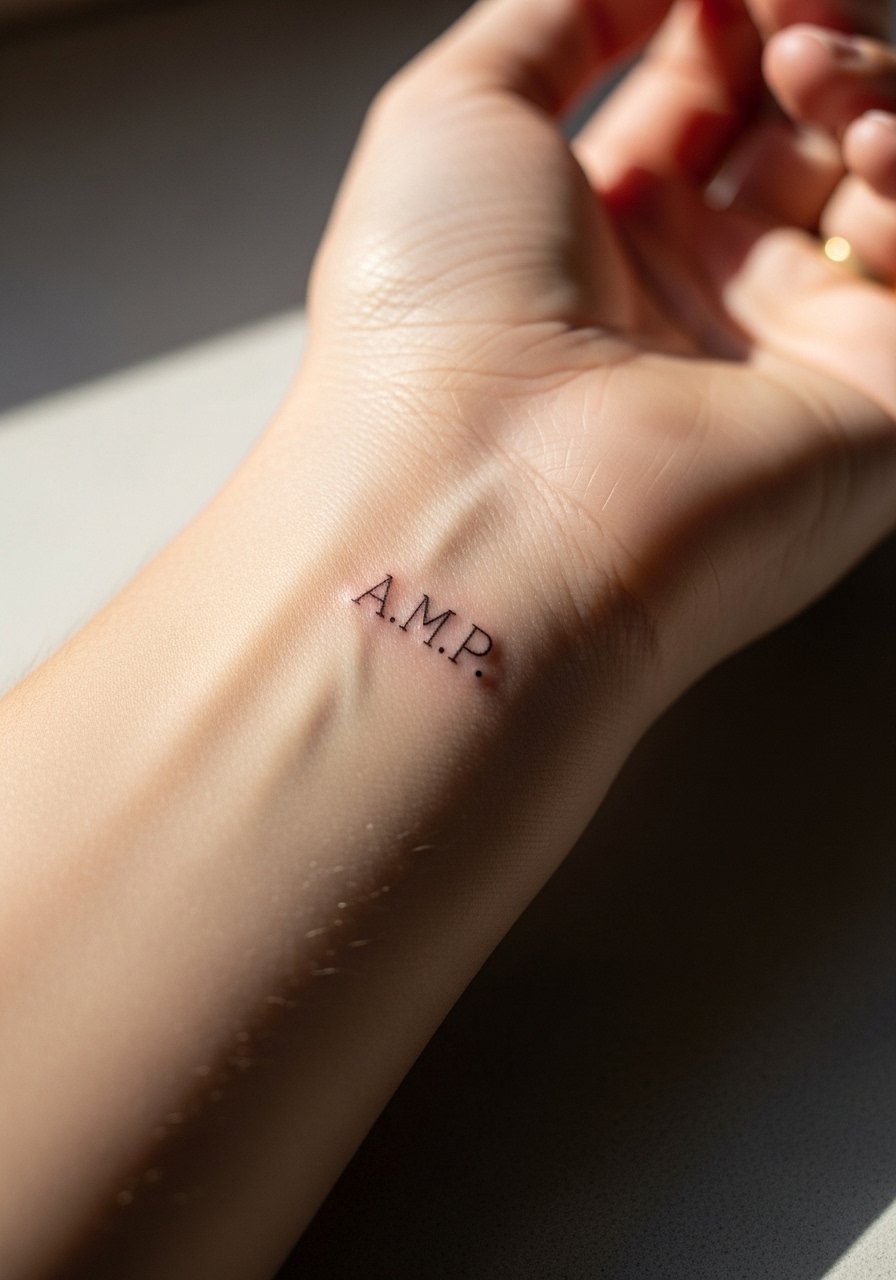
A tiny initial on the inner wrist reads intimate without shouting. Recommend keeping letters spaced and slightly larger than instinct so the strokes do not merge after two to three years. Tell your artist you want single-needle linework with a hairline weight that sits just deep enough to avoid blowout. Expect the wrist to be a medium pain area and plan a quick session under 30 minutes. Common mistake is asking for ultra-tiny script that blurs into a smudge. For showing it off, rolled-up sleeves and a minimalist watch frame the piece without crowding the tiny linework.
2. Tiny Constellation Chain Along the Collarbone
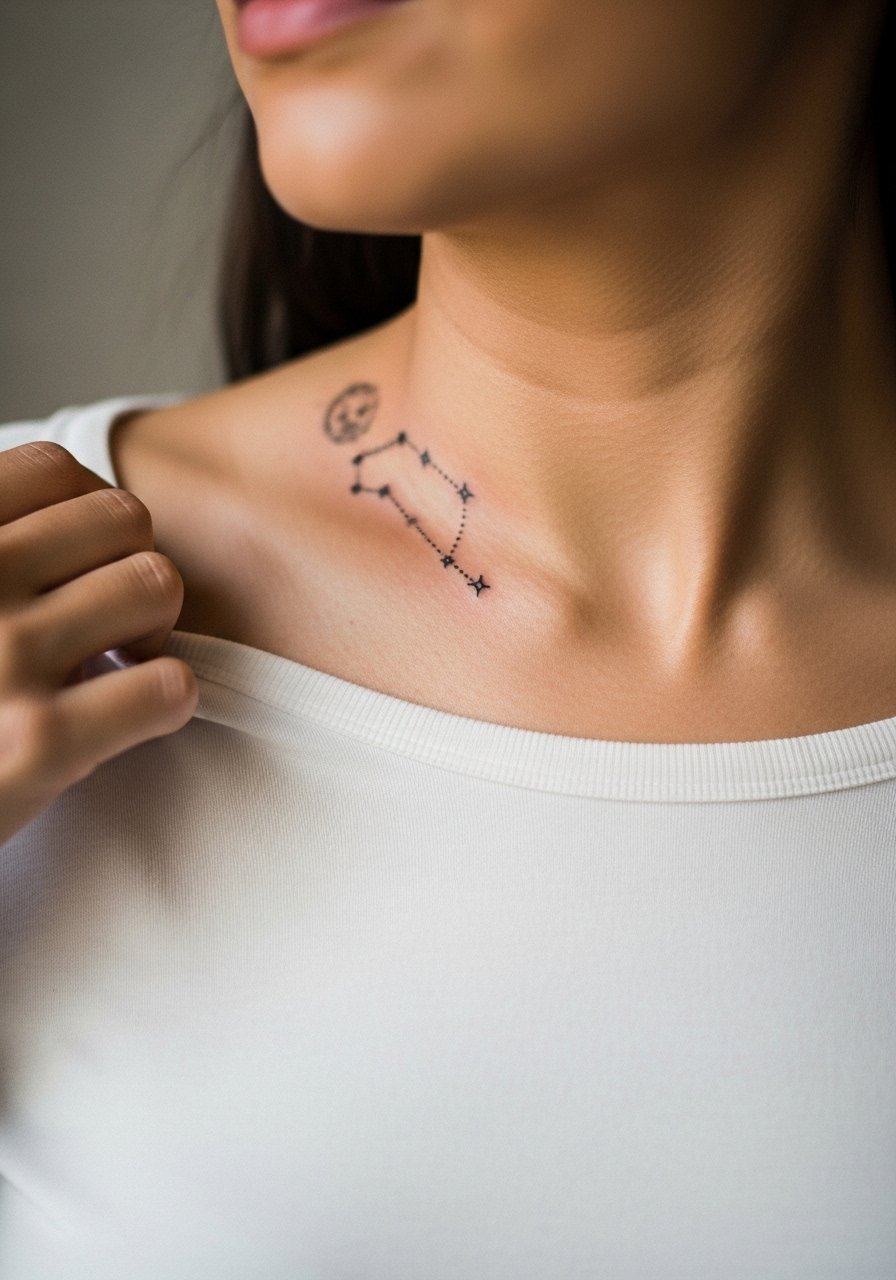
A linked constellation across the upper chest reads personal and pairs with low-cut necklines. The collarbone skin moves and stretches with posture, so ask the artist to space stars and connecting dots slightly more than your first instinct. This placement is a three out of ten on common pain scales but shows often, so design with longevity in mind. The common version that ages poorly packs dots too tight and uses barely-there dots that vanish. For session comfort, wear a wide-neck top you can pull aside without being fully exposed. If you plan evening looks, an open-back dress or a thin chain pendant sits above without competing.
3. Micro Botanical Sprig Behind the Ear, Below the Hairline
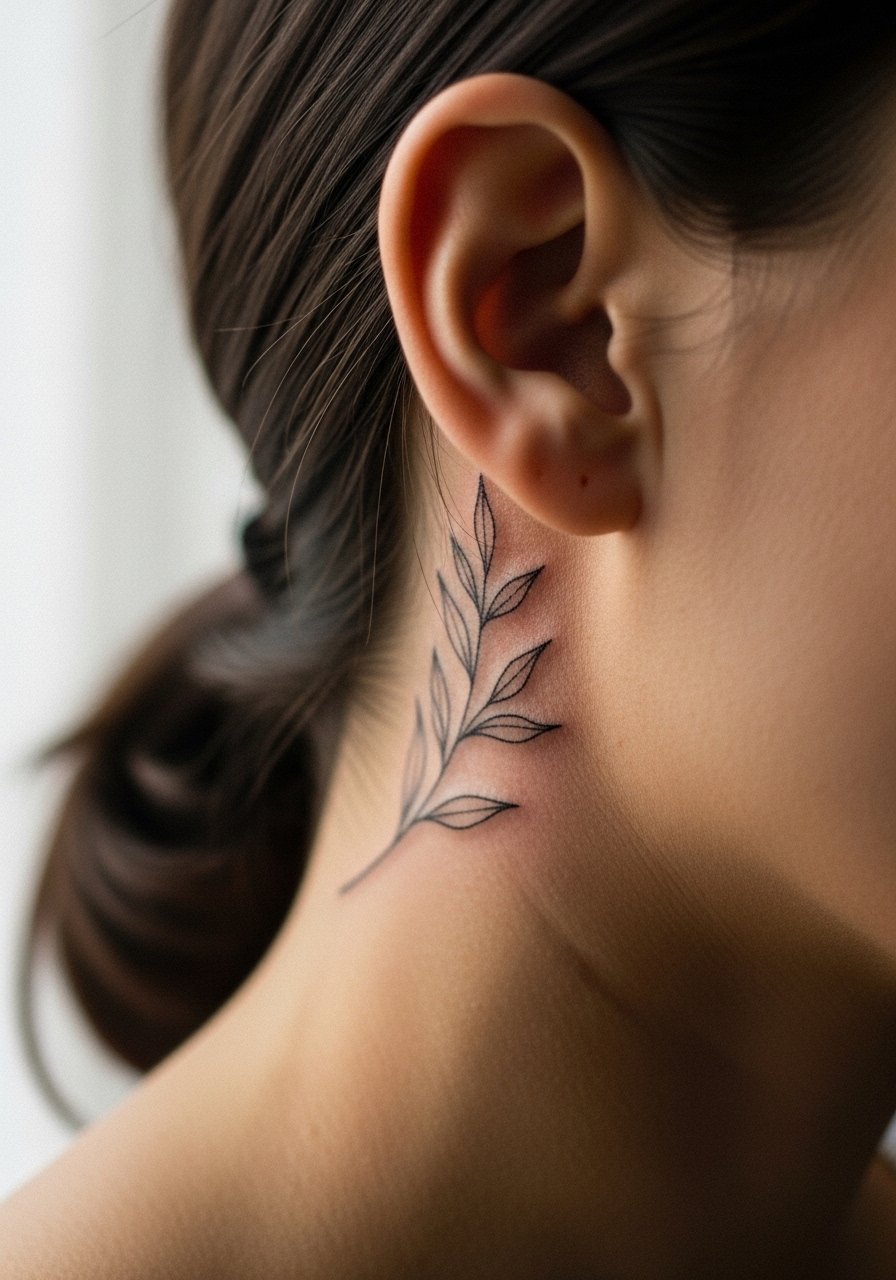
A tiny sprig tucked behind the ear is subtle and works for people who want a shared symbol that is not always visible. Because the area sits under hair, the session is quick and less likely to experience daily friction. Tell your artist to keep linework slightly bolder than typical fine line so the piece remains legible through hair regrowth and shampooing. One mistake is asking for ultra-fine curls that get lost under hair. For discovery, look through local shop portfolios, niche hashtags, and the tattoo directory pages that list micro work specialties. Note that for neck-adjacent pieces you may want an artist experienced with small placements.
4. Tiny Matching Coordinates on the Side of the Ribcage
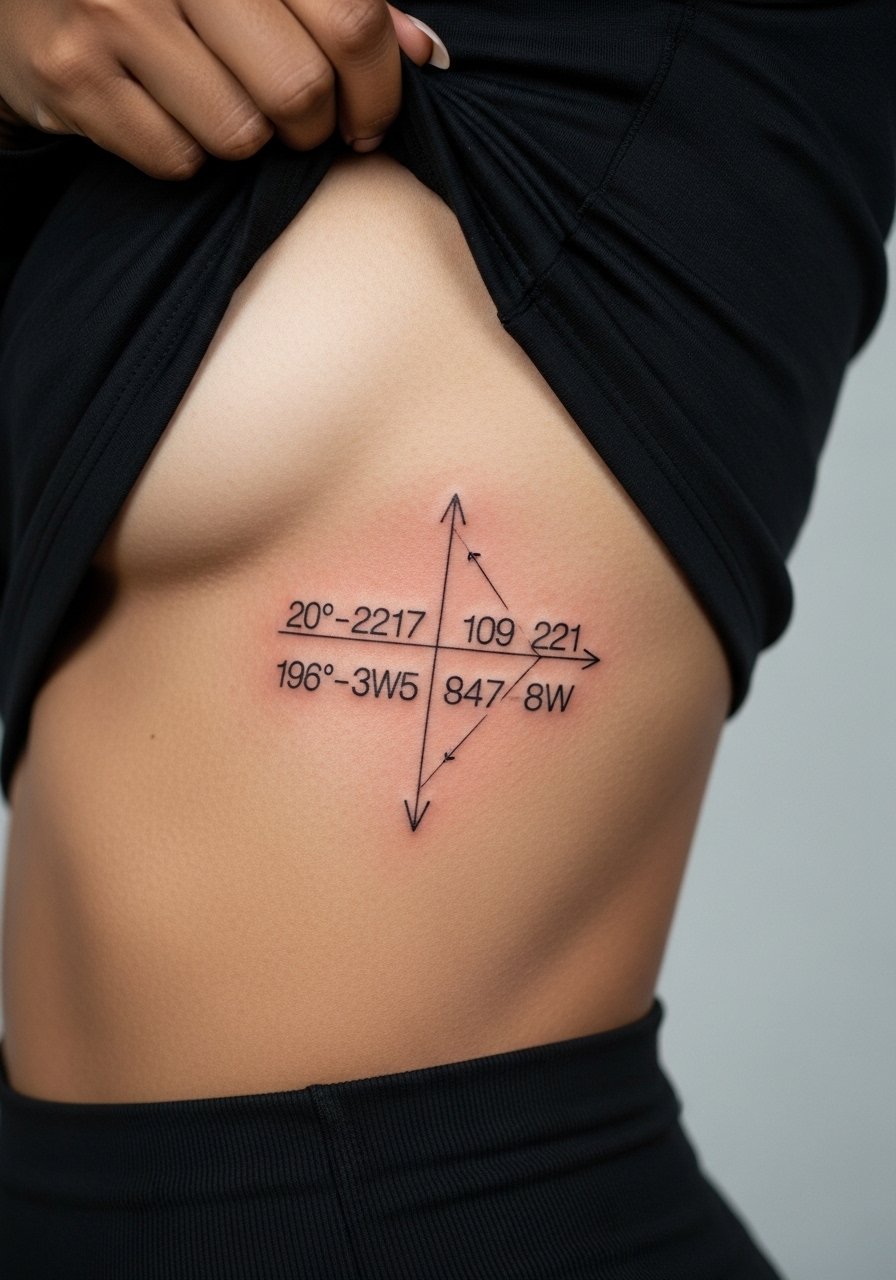
Coordinates are literal and durable symbols for a shared place or day. The ribcage is a sensitive area and often resolves with more movement during healing than arm placements. One camp of artists says fine line on ribs blurs fast because skin stretches and moves. The other camp argues that with intentional spacing and proper needle depth it settles well. Ask your artist where they stand and request designs with breathing room between numbers and separators. Expect higher pain and a longer session than wrist pieces. For session comfort, wear a cropped top you can lift easily. Consider a touch-up window around year two when skin settles.
5. Miniature Infinity Knot on the Side of the Finger
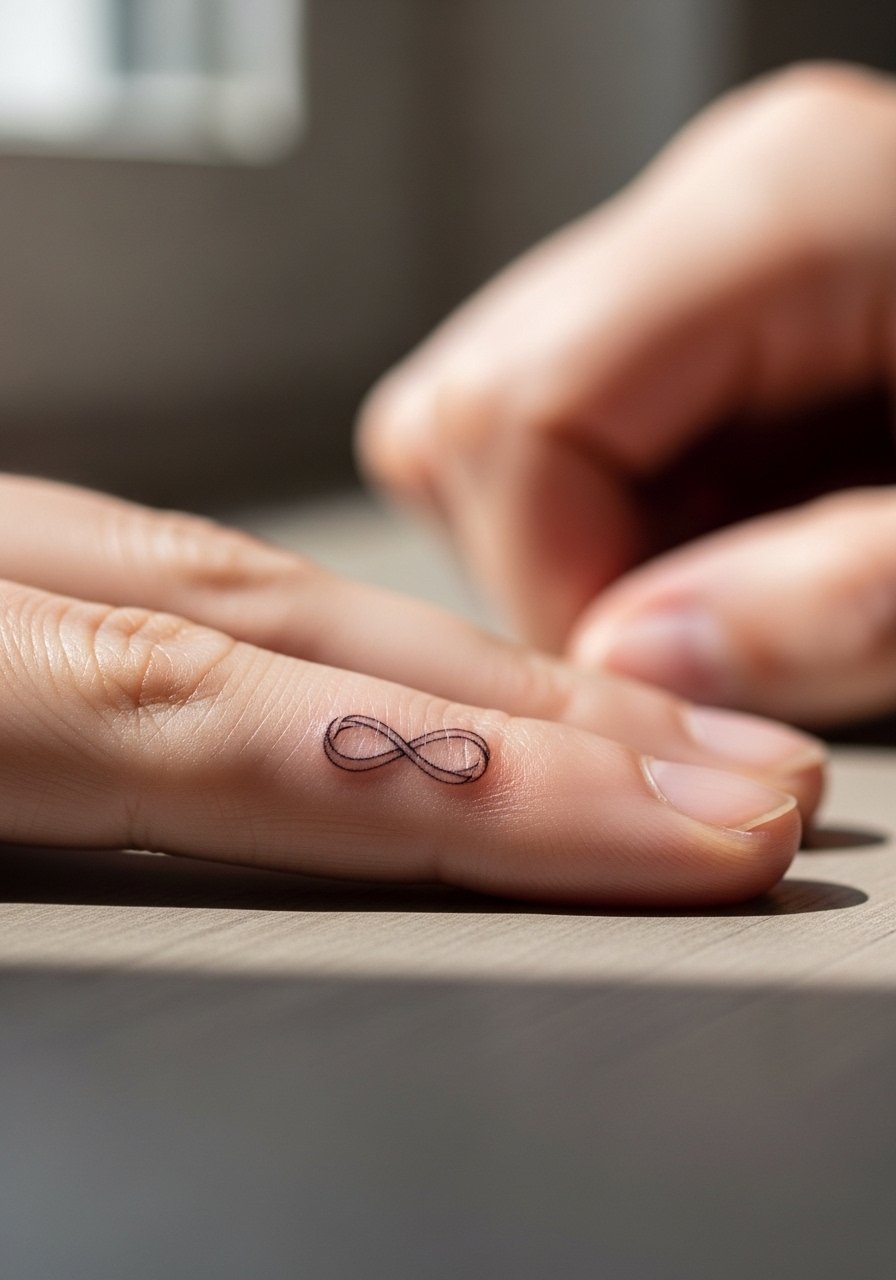
Finger and side-of-finger tattoos are instant symbol pieces but they carry risk from constant washing and friction. Note that many micro finger pieces fade faster than wrist work, so plan for touch-ups at year one or two. The common mistake is choosing too thin a line on a high-friction surface. During consultation ask for slightly heavier linework and expect sessions under 20 minutes for a single knot. Wear gloves sparingly while healing is not realistic, so protect the area with a thin protective film in the first week. For evening styling, a simple stackable ring set complements the tiny knot without covering it.
6. Mirrored Tiny Mountains on the Outer Ankle
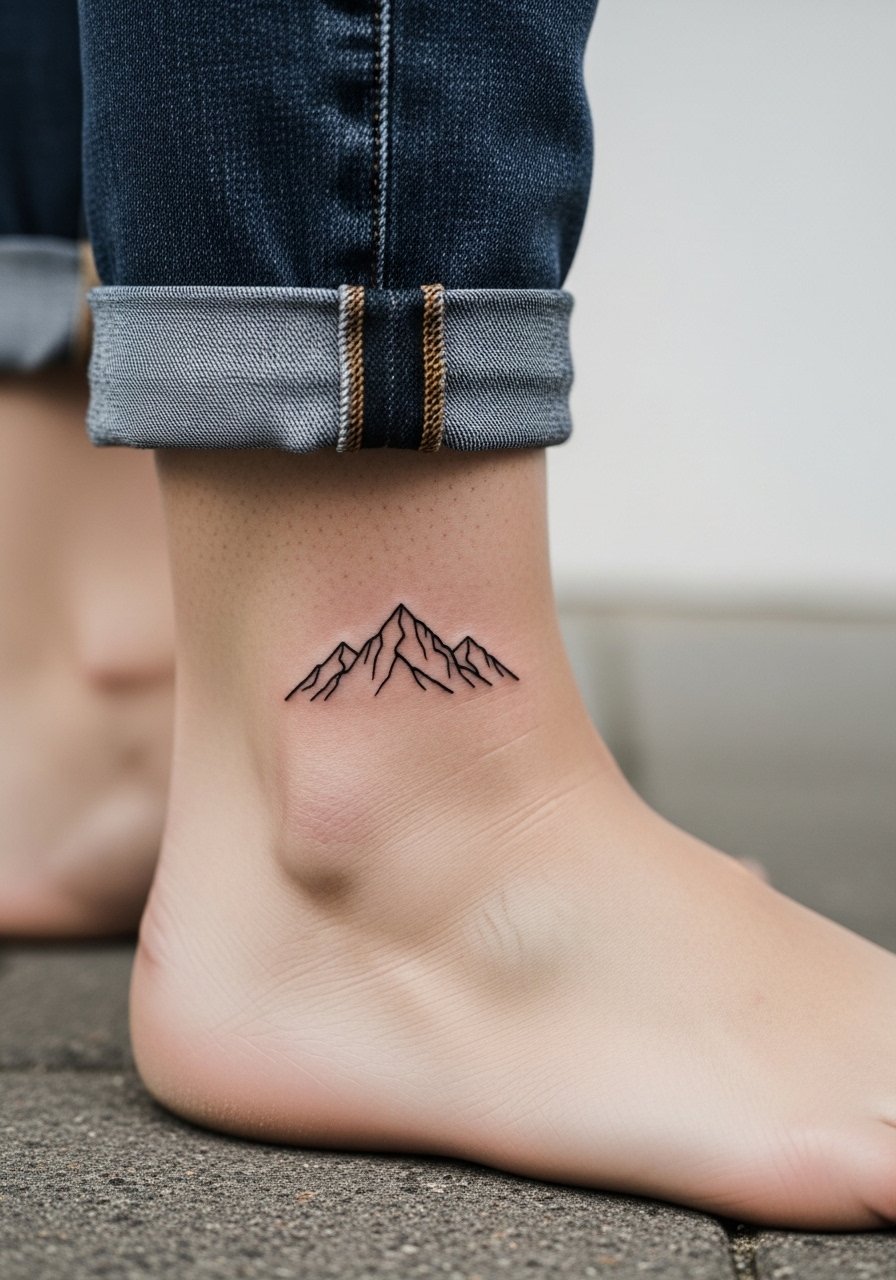
Ankle outlines read like shared journeys. The outer ankle is lower friction than the top of the foot and tends to keep linework cleaner over time. A common mistake is making the peaks so small the shape collapses as lines soften. Ask for slightly more spacing and subtle stipple shading where you want depth. Sessions are short and pain is low to medium. For the session, wear pants you can roll up easily and for show-off looks a pair of strappy sandals frames the art without hiding it.
Studio Day Picks
Those wrist, ankle, and finger micro pieces above heal differently from chest and rib work, and a few small items smooth the session and the first week.
-
Stencil transfer paper kit. Lets you preview the exact placement on skin before ink, especially useful for matching small scripts and coordinates on ideas above.
-
Topical numbing cream. Applied about 45 minutes before can ease the pain on ribcage and ankle sessions without altering the artist's linework.
-
Thin protective film roll. Keeps finger and wrist tattoos protected from frequent hand washing in the first week.
-
Breathable healing bandage strips. Handy for covering ankle and ribcage spots during early movement and showers.
-
Aquaphor healing ointment. A thin layer in the first days helps maintain moisture for fine line pieces without clogging the area.
7. Tiny Script Dates on the Inner Forearm

A small date in a clean, simple script on the inner forearm is easy to show and less likely to suffer blowout than fingers or hands. The best version spaces numbers and keeps a slightly stronger stroke weight so the characters age as a readable line rather than a blur. Tell the artist you want the numerals slightly larger than the reference from your phone. Forearm sessions are low pain and usually under 30 minutes. For outfits, rolled sleeves or a linen button-down showcase the script. Common mistake is requesting an ultra-tiny font used for body text that disappears over time.
8. Small Matching Paper Plane on the Upper Arm
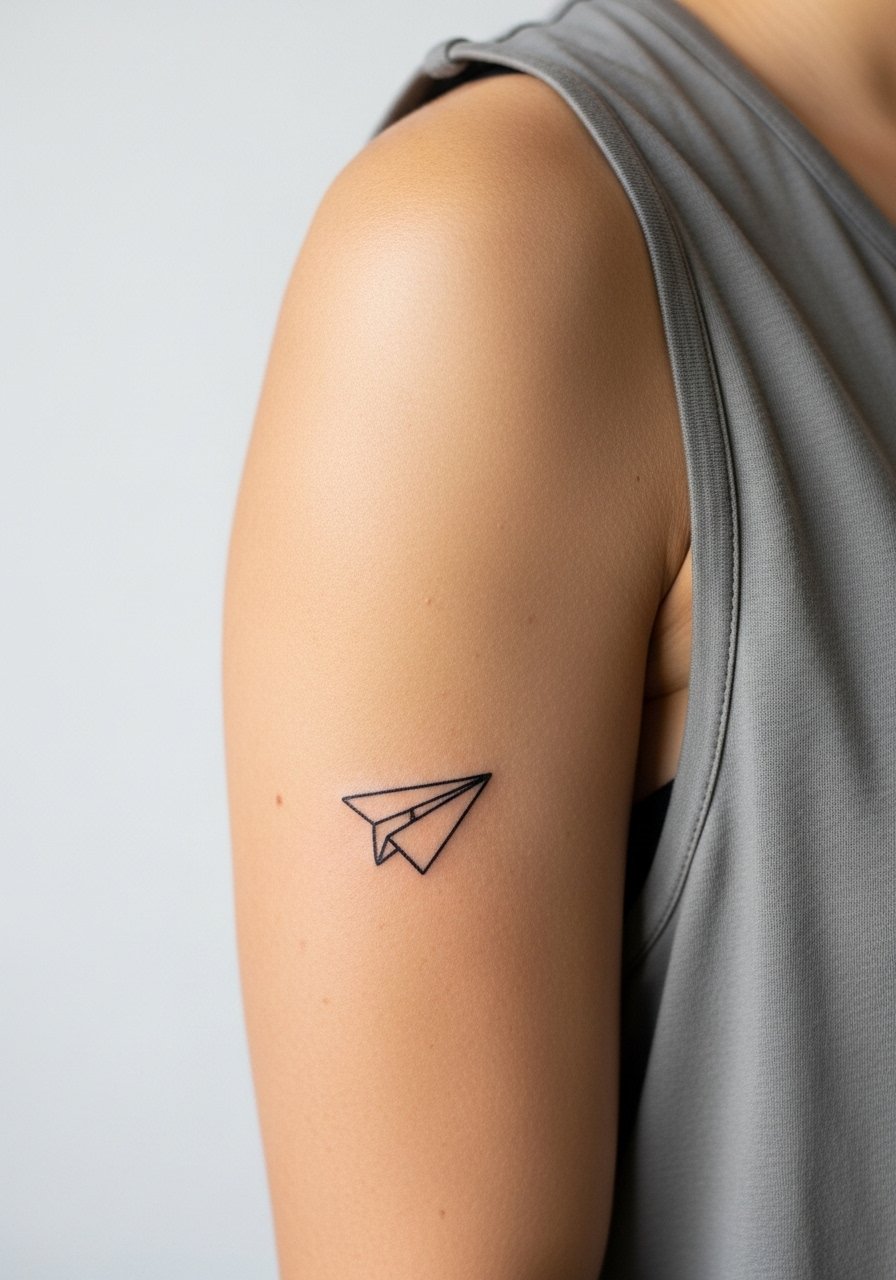
The upper arm offers forgiving skin and low friction, so tiny outline work keeps crisp longer. A paper plane can mean travel, escape, or a shared inside joke. Ask for a slightly bolder outline than you see in online references so the folds hold up. This placement hurts less and often fits into a short appointment. Avoid asking for extreme detail because small areas lose that nuance. For session clothing, bring a loose tank top so the artist has full access. If you want a bit of texture, ask for very light stipple shading behind the plane.
9. Petite Matching Roman Numerals on the Side of the Thumb
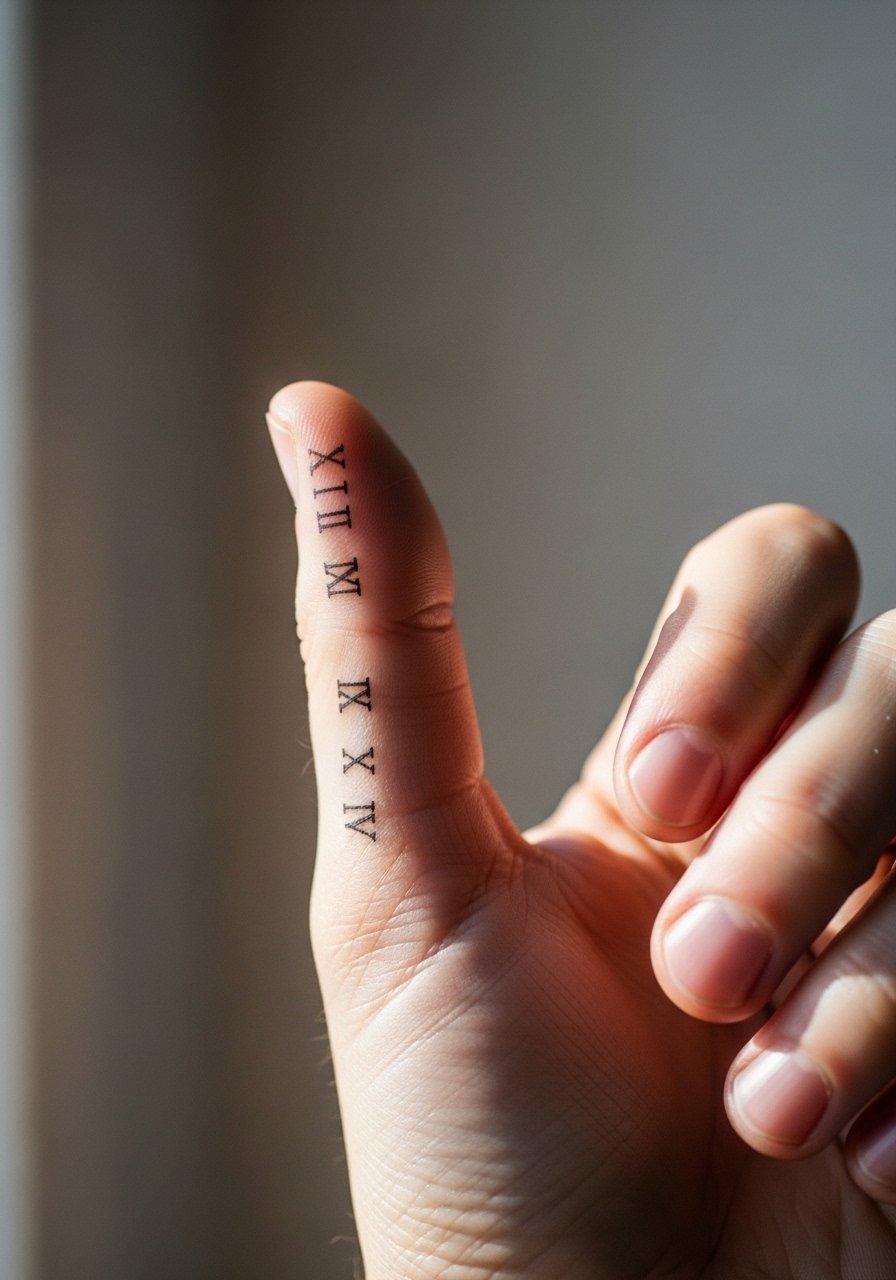
Thumb-side tattoos face a lot of hand motion, and Roman numerals work because their shapes read well at small scale. The risk is fading from frequent contact and washing. One realistic plan is to accept a touch-up at year one and to set slightly larger numerals than you imagine. Tell the artist you want compact but legible glyphs, not micro type. During the session expect short duration and moderate discomfort. For showing off, a simple thin chain bracelet keeps attention near the hand without rubbing the numeral.
10. Tiny Matching Wave Line Behind the Ear About the Neck
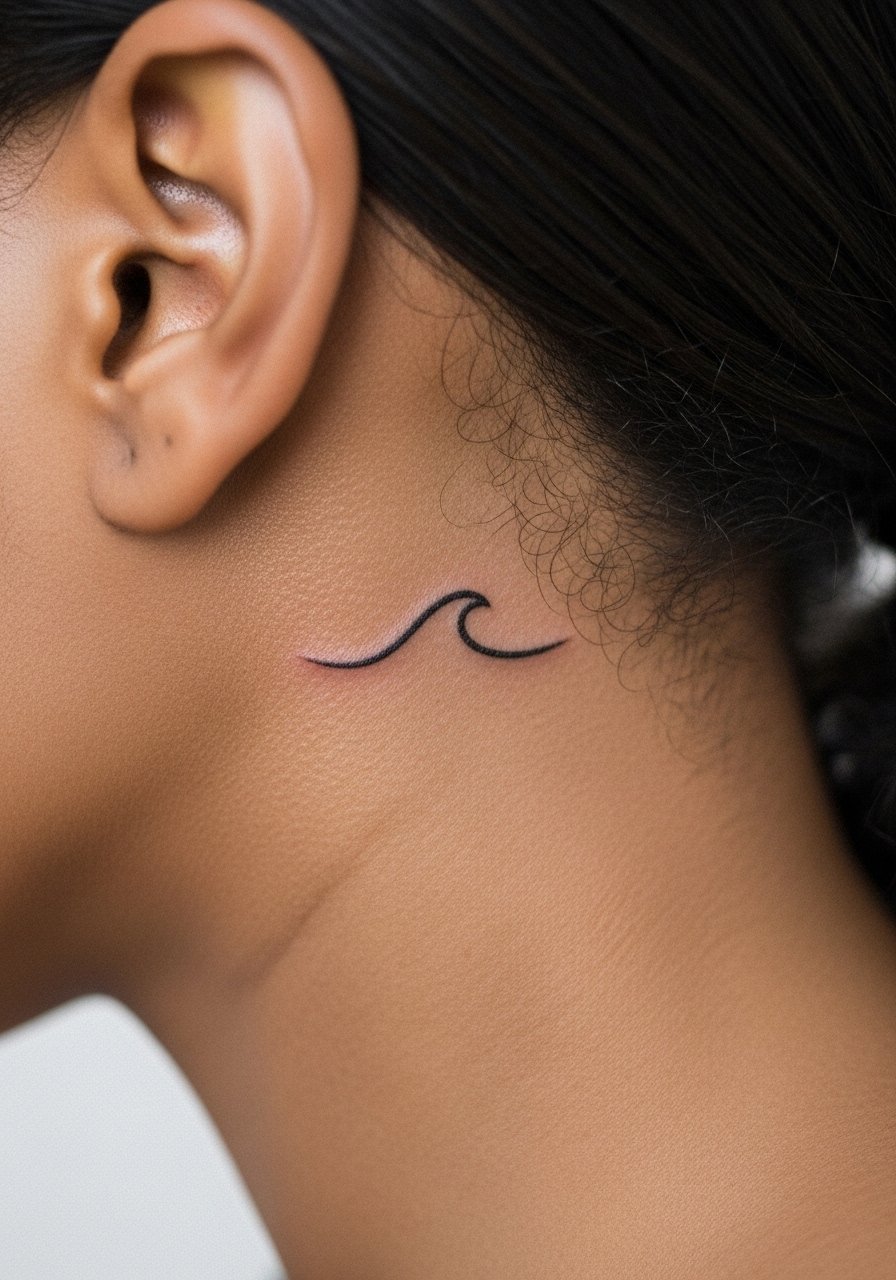
A small wave behind the ear reads like a private sign that is visible in specific hairstyles. Because the area is partly shielded by hair, it endures bathing and less sun exposure. A common aging issue is asking for linework too thin which disappears as hair follicles and shampooing slightly lift skin texture. Ask for a steady single-needle stroke with modest depth. This placement calls for an artist comfortable with tight curves and small skin areas. No full exposure is necessary for session images so wear a collared shirt or a top you can move aside.
11. Micro Heart Lock and Key on Opposite Ankles
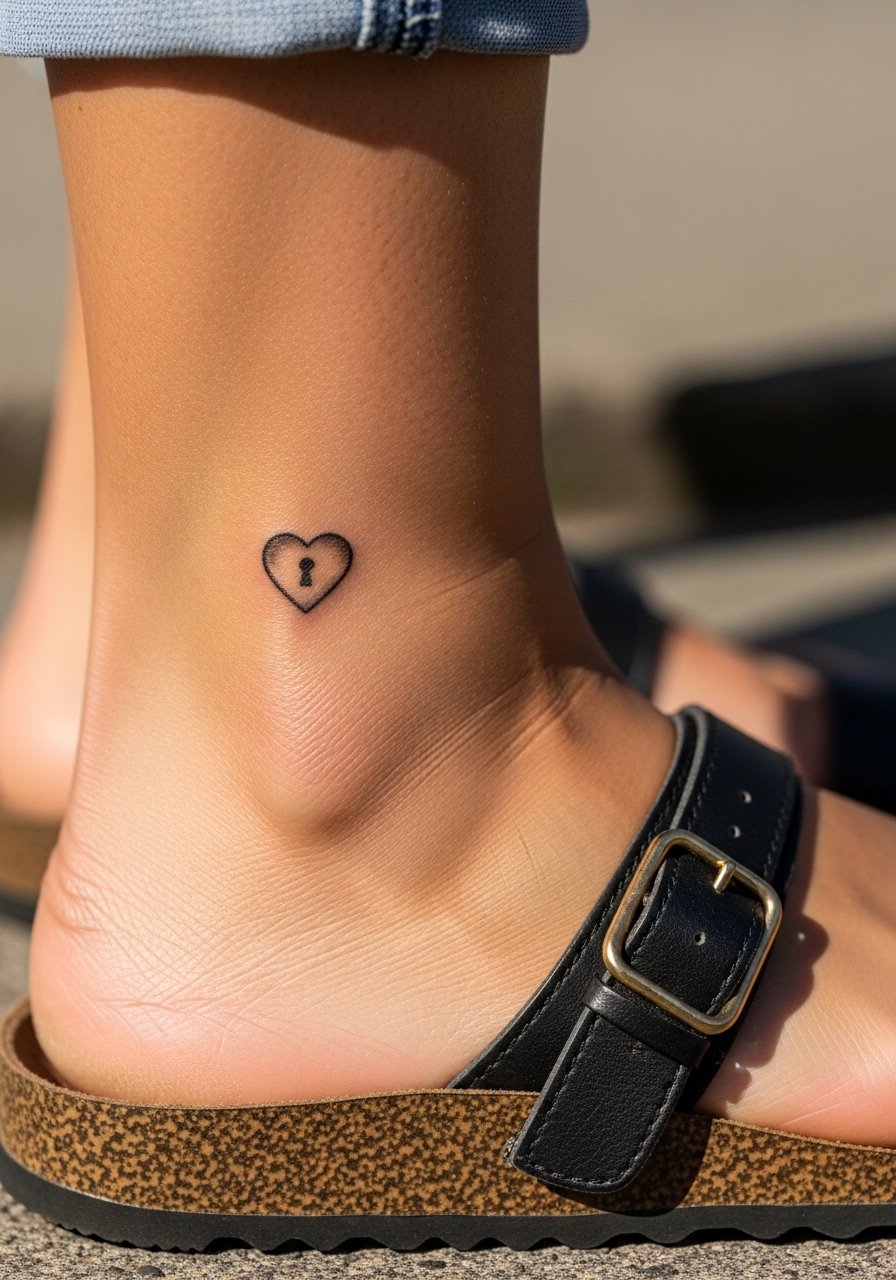
A lock on one ankle and a key on the other reads literal and sweet while staying practical. Ankles have less friction than toes but more than upper arms. Make the shapes bold enough to read from a short distance and avoid filigree that will blur. Tell your artist you want the lock and key scaled so small elements like key teeth remain distinct. Sessions are short and pain levels are low to medium. For footwear pairings, sandals or low-profile sneakers show the work. A common mistake is cramming too many decorative elements into these tiny symbols.
12. Tiny Matching Botanical Leaf on the Inner Bicep
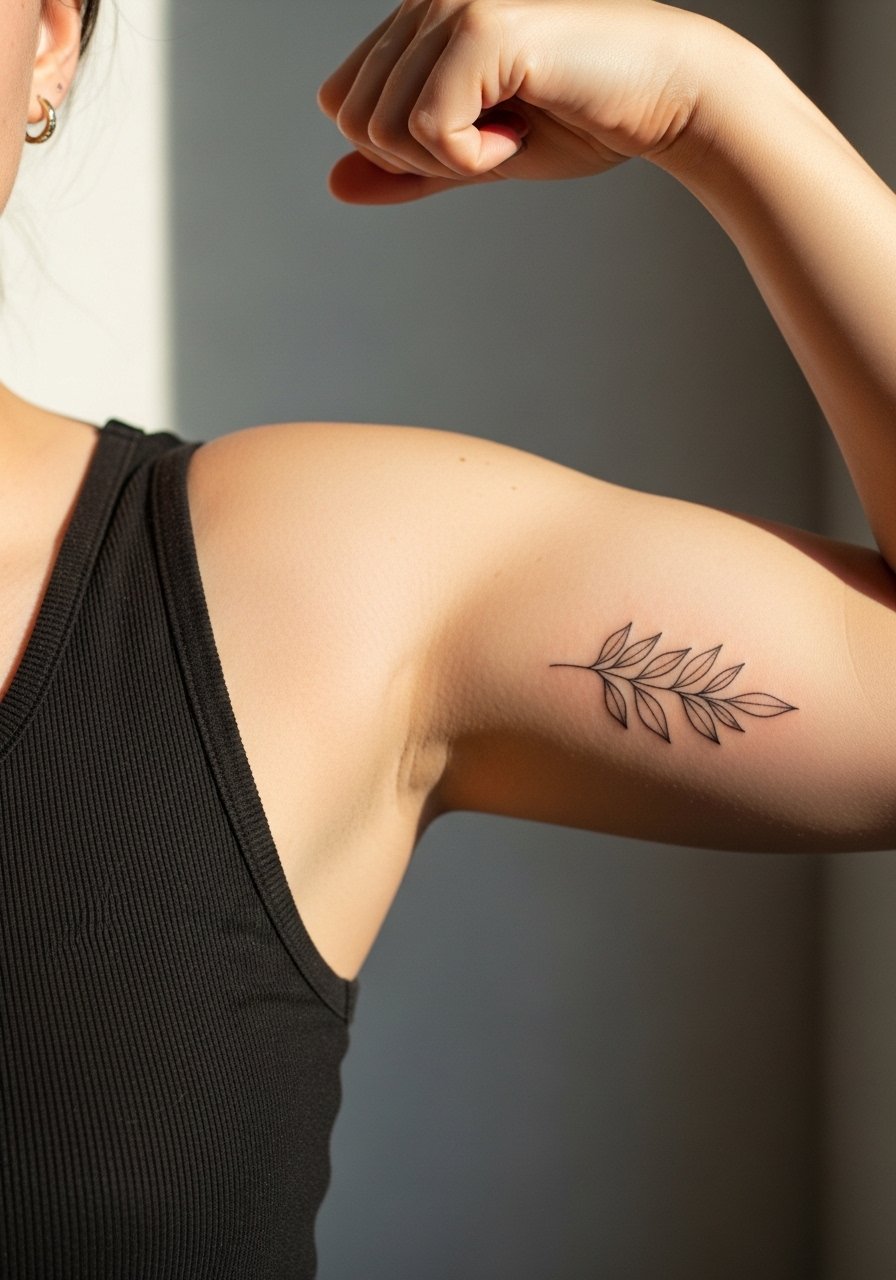
Inner bicep skin is pliable and accepts fine detail if the design is given room. A single leaf can be adapted to curve with the muscle so it still looks natural when your arm moves. Ask for a slightly more pronounced stem and for light stippling to add depth without heavy saturation. Pain on the inner bicep is medium. A mistake to avoid is trying to cram multiple tiny leaves into a space that needs breathing room. For the session wear a liftable tank top and afterwards consider rolled sleeves to frame the piece.
13. Minimalist Tiny Arrow on the Side of the Ribcage
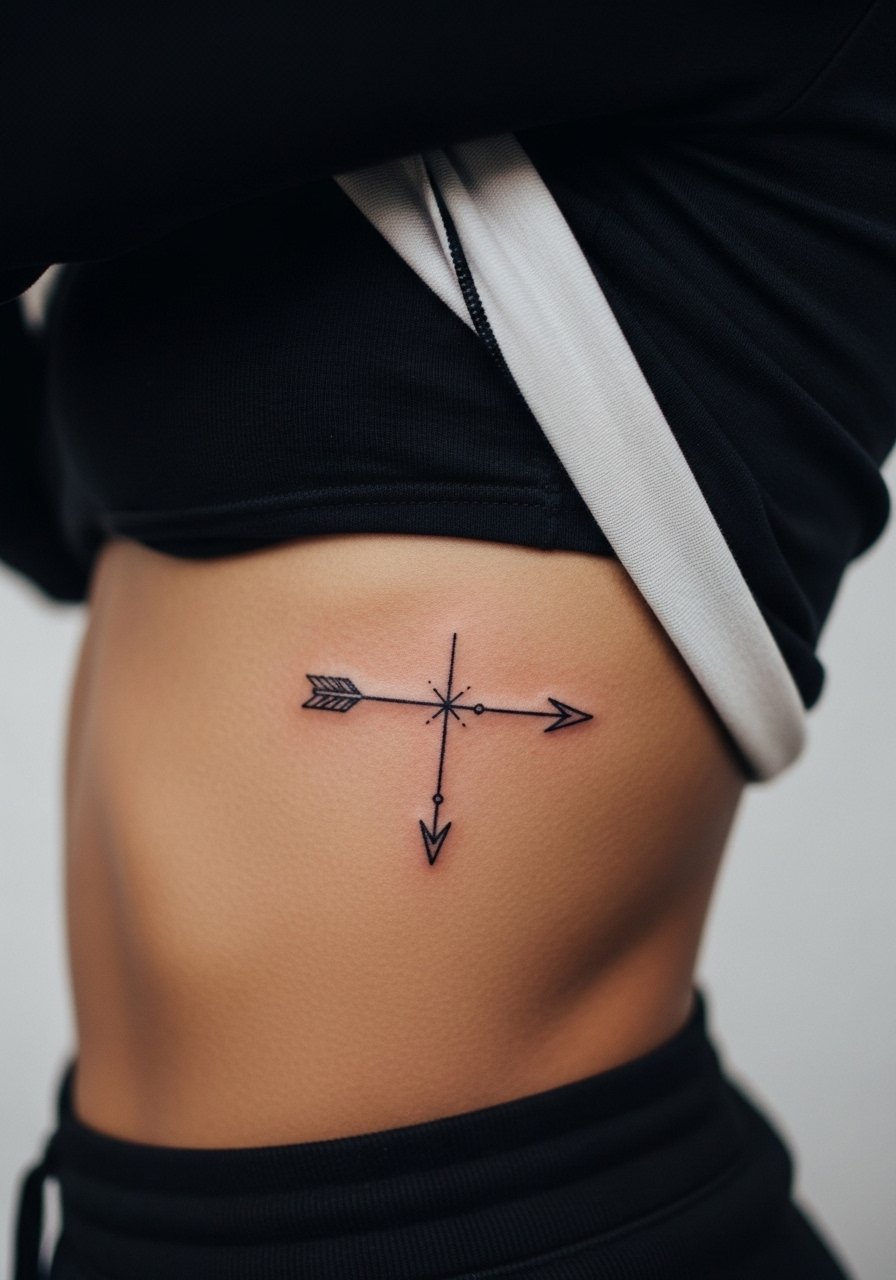
An arrow on the ribs reads private and directional. Ribs move a lot with breathing so artists crack into two camps on fine work here. One camp warns that fine line on ribs blurs within a couple of years because of stretch and movement. The other camp says that with deliberate spacing and slightly heavier line weight it can remain crisp. Ask your artist to explain which approach they use and why. Sessions will be more painful than forearm work. For session wear a cropped top you can lift and expect to schedule a touch-up depending on how your skin settles.
14. Small Matching Celestial Sun and Moon Behind the Wrist
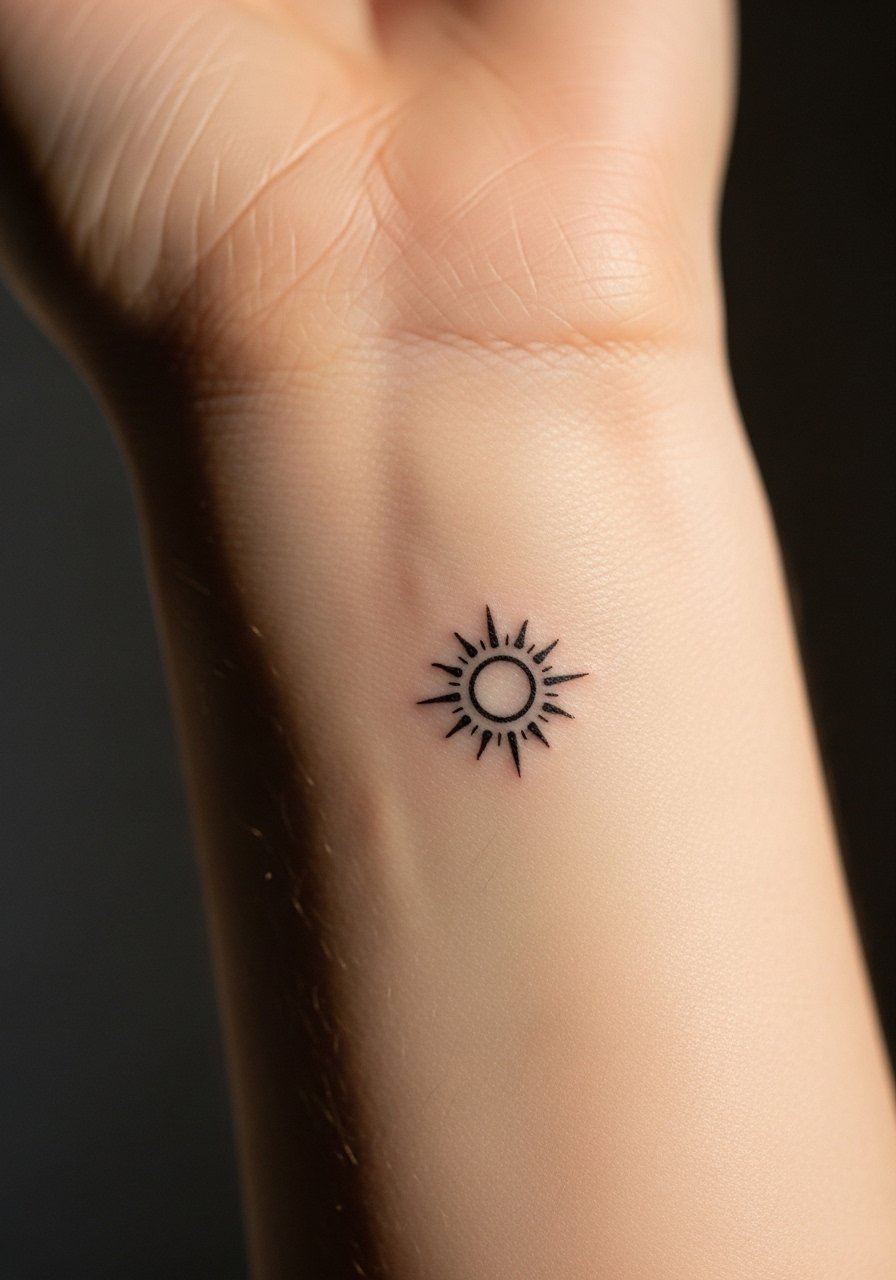
A small sun and moon pair keeps contrast between day and night themes. The inner wrist shows these designs often and they tend to hold well with slightly bolder outlines and minimal fill. The mistake to avoid is placing heavy shading into these micro symbols because small filled areas can age into blotches. Tell your artist you prefer an outline-forward approach with tiny dots for texture. Sessions are quick and the pain is manageable. For accessories, a thin bracelet or delicate pendant necklace keeps focus near the wrist and collar without covering the art.
15. Micro Paper Boat on the Outer Thigh
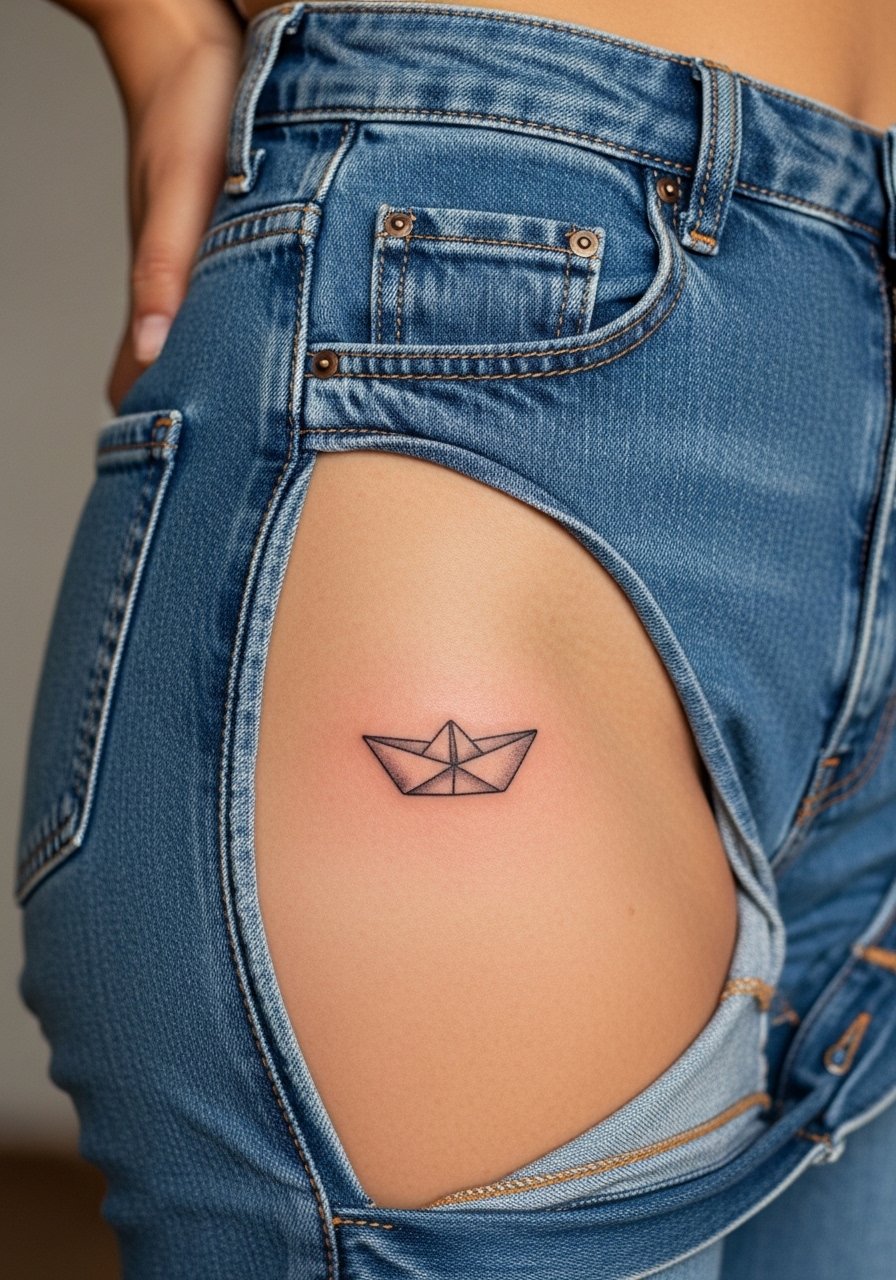
Upper outer thigh offers forgiving skin and larger canvas for slightly bigger micro ideas. A tiny paper boat there survives friction from most clothing and is easy to hide when needed. Size it so the folds are clear but not so detailed that the lines merge as the skin stretches. Tell your artist you want a compact silhouette with light negative space. Sessions here are low to medium pain. For the appointment wear high-waisted bottoms you can shift and afterwards a wrap skirt or shorts accentuate the placement when you want to show it.
16. Tiny Morse Code Bracelet on the Wrist
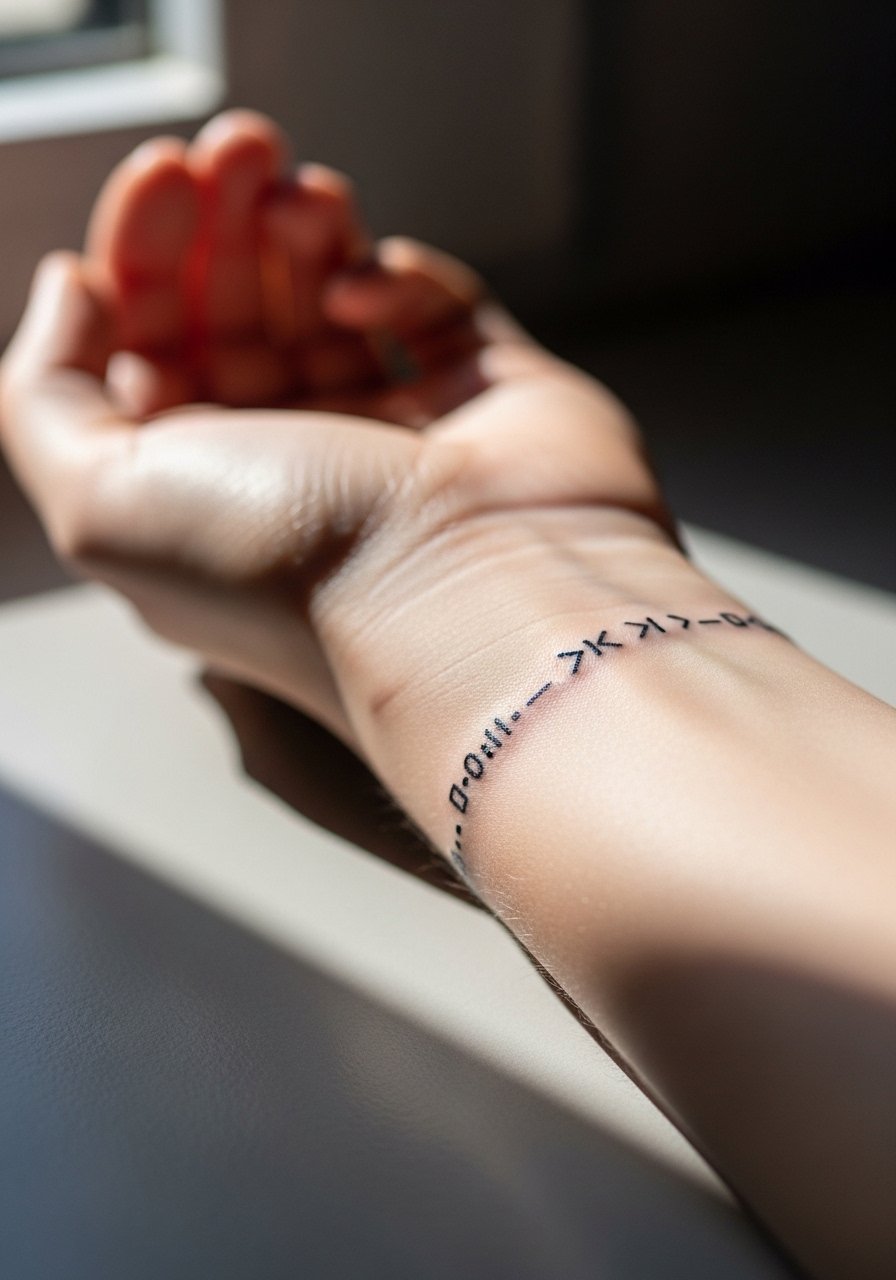
Morse code bracelets are discreet and can spell names, dates, or a phrase only you both know. The wrap-around effect works best with evenly spaced dots and dashes and a consistent gap so the pattern reads from any angle. A common mistake is shrinking the code so close that dots and dashes blend. Ask your artist to map the code on skin first with a pen. The session is short and pain is low. For styling, stackable bracelets layered above the code show it off without covering the actual line.
17. Tiny Matching Compass Point on the Back of the Neck

A small compass point at the nape reads like shared direction and sits in a spot that is easy to hide with hair or show with an updo. Neck skin needs an artist comfortable with small, crisp points and consistent linework. The risk is asking for minute arrowheads that softens into blurred tips, so pick slightly bolder points. Pain on the back of the neck is moderate. For session wear a wide-neck shirt you can pull to the side. If your workplace is conservative, consider placement or styling that keeps it covered during the workday.
Frequently Asked Questions
Q: Will fine line sibling tattoos blur into each other if we do matching pieces on different placements?
A: It depends on placement and line weight. Fine line on high-friction areas like fingers or hands will soften faster than on upper arms or the outer thigh. Ask your artist to map the designs with slightly increased spacing and modest stroke weight when matching across different areas.
Q: How often should we expect touch-ups for micro pieces like wrist scripts or finger knots?
A: Plan for a realistic touch-up window of one to three years depending on placement and sun exposure. Fingers and thumbs often need earlier touch-ups because of washing and abrasion. Keeping tattoos out of direct sun and using sunscreen after healing helps extend the time between touch-ups.
Q: Are there real hiring or career consequences to small hand or neck tattoos?
A: Some industries remain conservative and hand or neck tattoos can affect client-facing roles. Artists fall into two camps on visibility. One says avoid visible placements if you want maximum flexibility. The other says small, discreet work is manageable with styling and can still be professional. Think about career plans and whether you can cover tattoos when needed.
Q: What should we wear to the appointment for a sternum, rib, or hip micro piece?
A: For rib and hip work wear a cropped top or high-waisted bottoms you can shift. For sternum pick a fitted sports bra or bandeau so the artist has access without full exposure. A breathable top you can move aside removes friction and keeps the session comfortable. If you want a quick option just for the chair, try a fitted sports bra that gives access and modest coverage.
Q: How do we find artists who specialize in micro sibling tattoos without naming specific people?
A: Search regional tattoo directories, filter portfolios by terms like micro-realism and fine line, and scan hashtags that combine your city plus keywords. Spend time in shop portfolios and ask to see healed work in similar placements. Discovery through local conventions, community threads, and curated shop pages often yields portfolios with real healed examples.
