
Fine line minis are everywhere on boards right now, and the truth is they look gorgeous fresh and then test your patience. I've seen wrist pieces blur, prices jump at rush hours, and dark skin lose fine single-needle detail under bright sun. If you want small mother and son marks that still read well after a few years, start with placement, line weight, and a touch-up plan. First idea comes next.
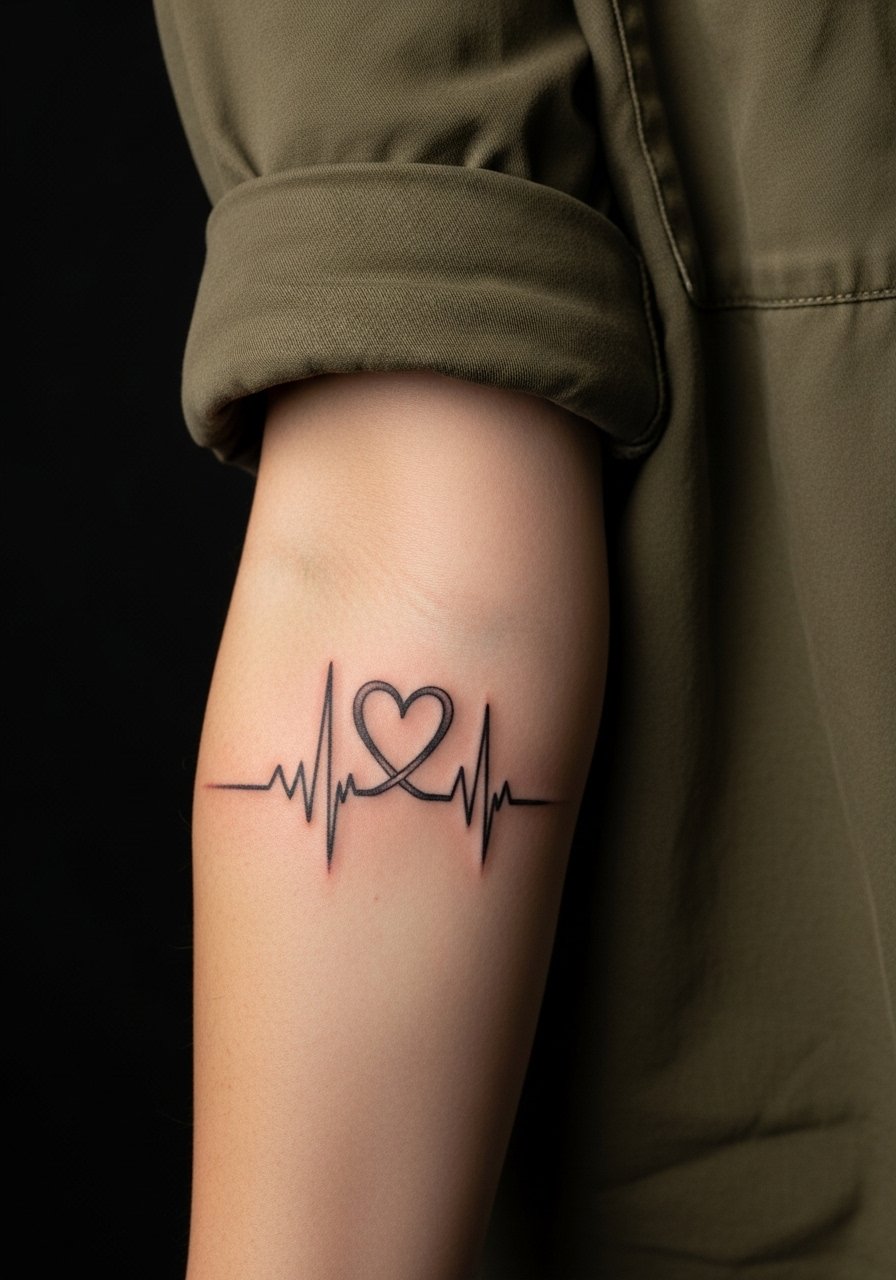
1. Minimalist Heartbeat Line on Inner Forearm
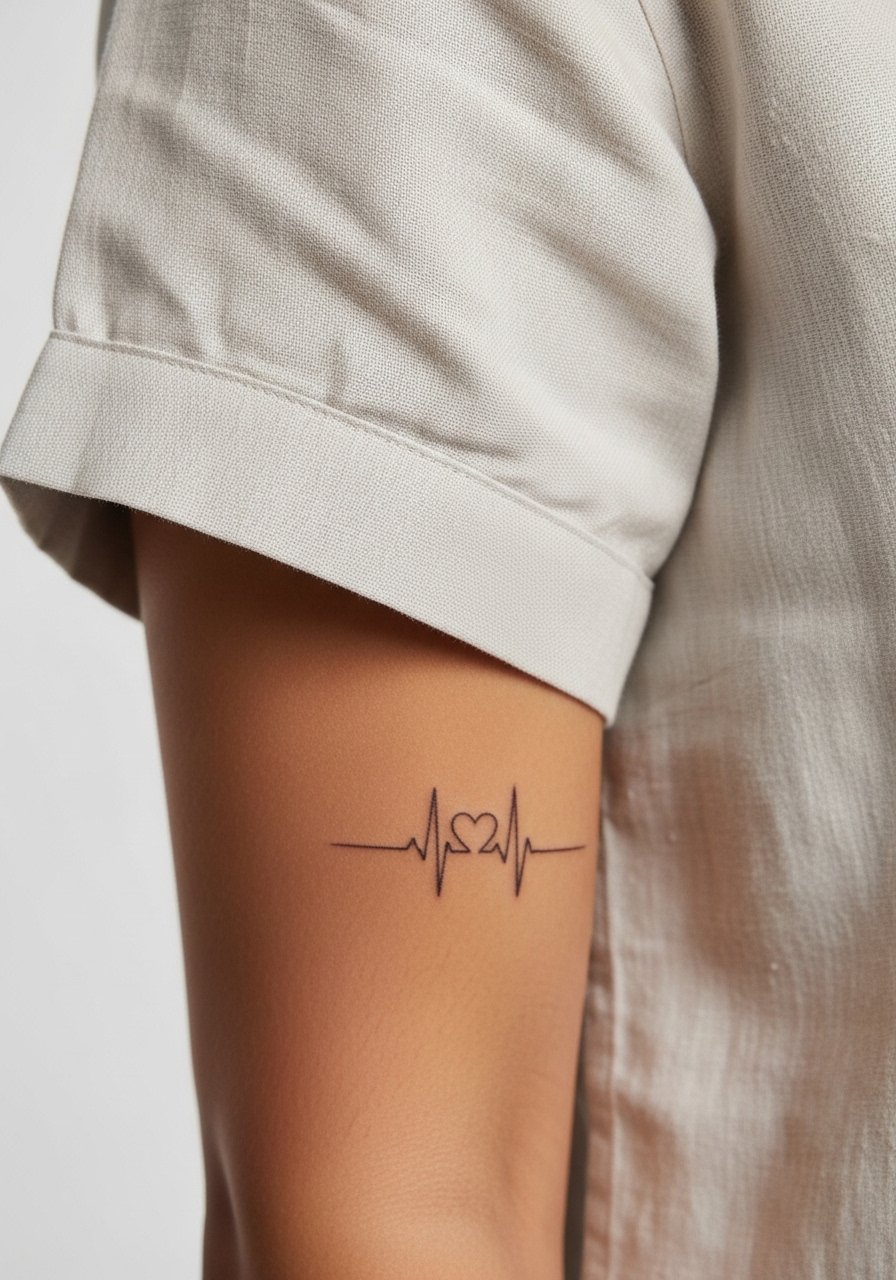
I've seen this one on more forearms than any other mini, and for good reason. Recommend it when you want a design that reads horizontally on the arm and leaves room for an extra son line later. Tell your artist to use slightly bolder linework than a single-needle flash for better longevity, and plan a touch-up at six to twelve months for crisp peaks. Common mistake is going too small near the wrist where motion and wash friction flatten peaks. Expect the session to feel like a steady hum, moderate pain for most people. For showing it off, roll up a cream linen shirt and pair with a linen short sleeve shirt to keep attention on the linework.
2. Intertwined Heartbeats for Multiple Sons
If you have more than one son, chaining heartbeat patterns into a single ribbon reads like a family rhythm. In consultation, show the artist the number of peaks you need and where to insert subtle spacing so the lines do not merge later. The aging reality is that too-tight peaks blur into each other by year three unless given breathing room at the design stage. A good rule is to make each son's segment at least two inches if you plan to add shading. This placement is moderate on pain and fast to tattoo. For a casual frame that does not compete, pair with a rolled sleeve look and an olive linen blouse when you want it visible.
3. Tiny Heart with Keyhole on the Wrist
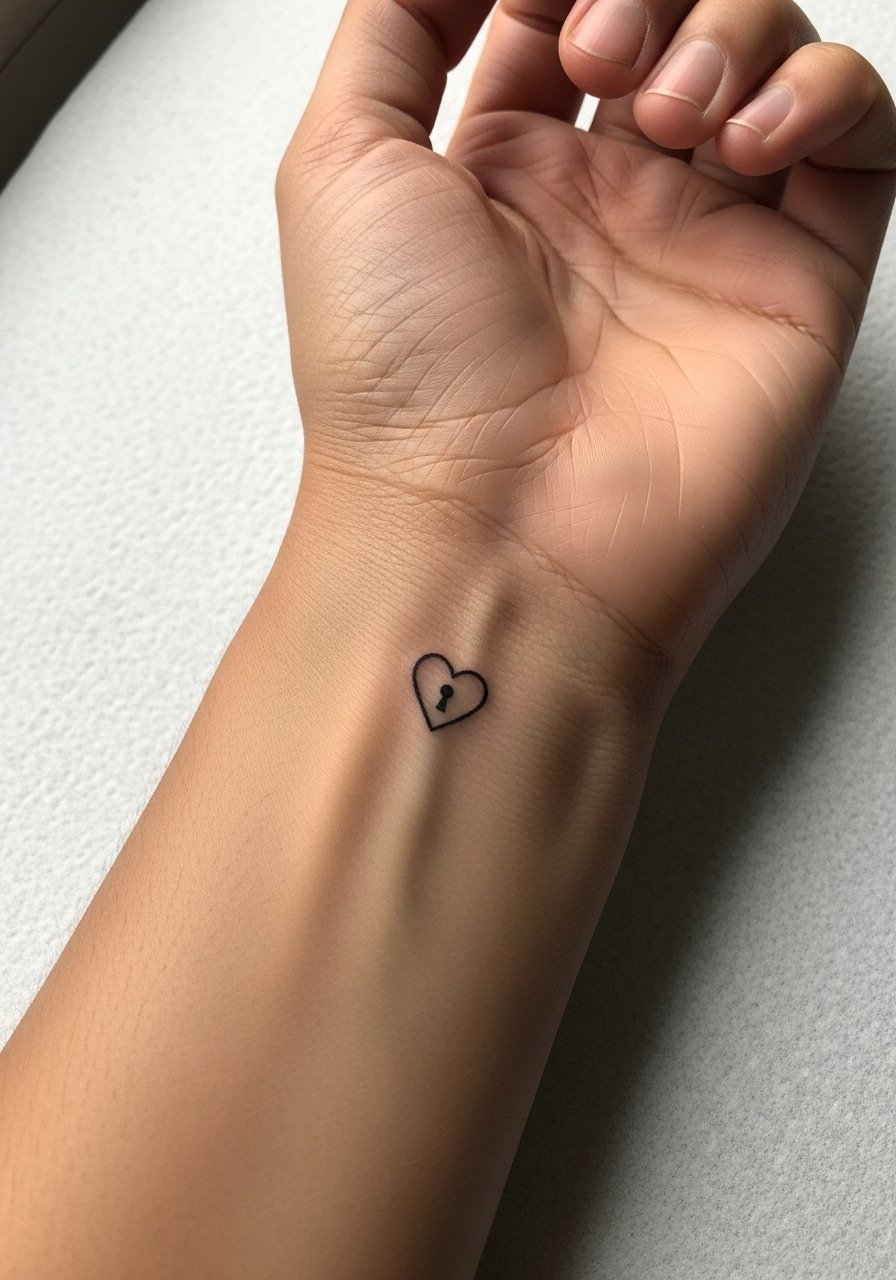
This compact lock motif works well for wrists or fingers when you want a shared secret motif. Say to your artist that you want a solid keyhole negative space inside a tiny heart and request a slightly thicker outline than typical single-needle flash. The wrist sees a lot of washing and friction, so expect some softening by year two on fine lines. The common mistake is asking for ultra-thin outlines that vanish on darker skin. Session feel is brief and sharp, with a tingle that fades quickly. Show-off pairing works with a thin chain bracelet on the opposite wrist, try a thin gold chain bracelet to keep focus on the tiny motif.
4. Initials Monogram Behind the Ear
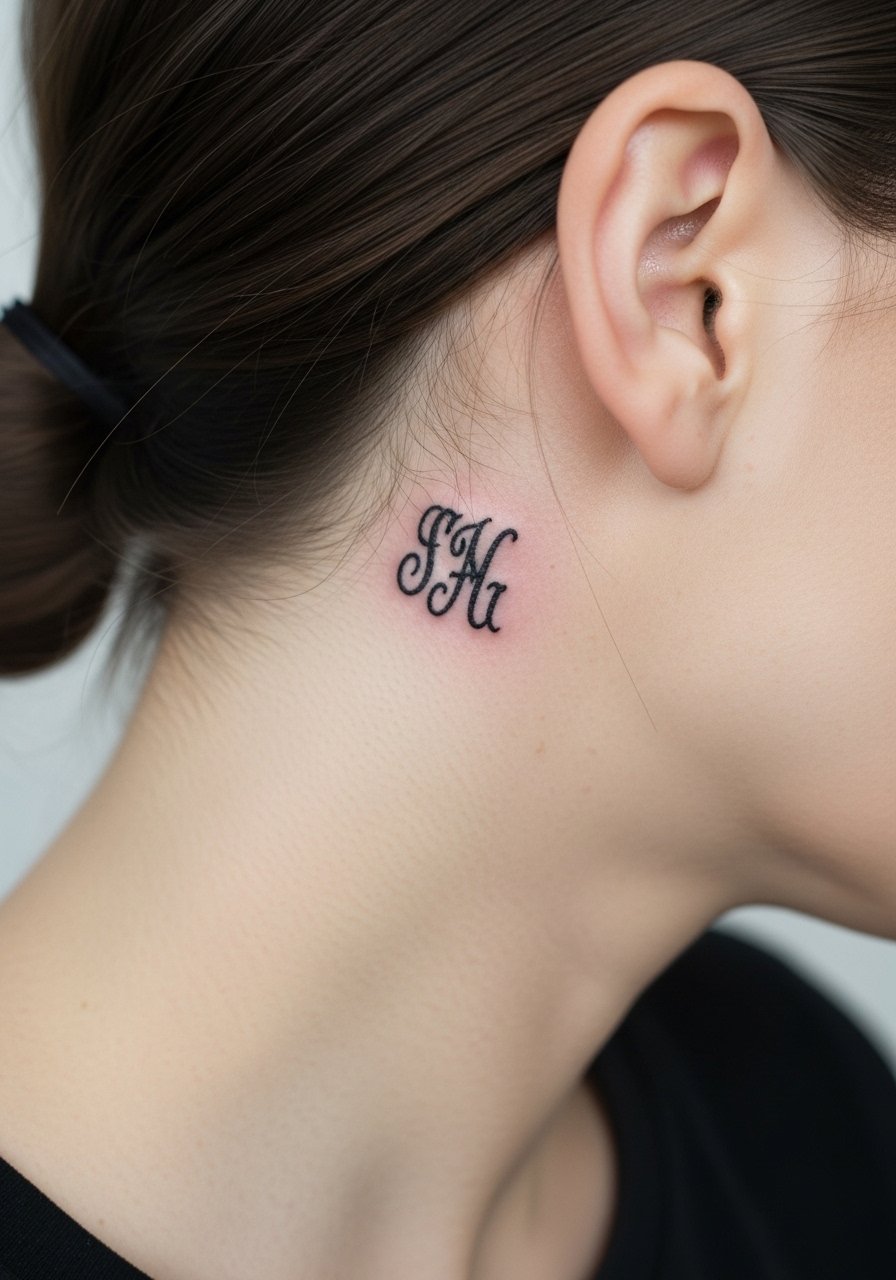
Behind-the-ear initials are discreet and age gently if kept to simple strokes. Ask the artist to design a compact circular monogram with slightly thicker counters so the negative space does not fill in over time. Real mistake is packing letters too close for the one-inch canvas, which makes the script unreadable after a couple of years. Pain is low, session time is short, and the piece is easy to hide with hair for professional settings. For appointment comfort, tuck hair back and bring a wide-neck top. If you like a delicate layer, try a thin chain pendant necklace that sits below the ear line.
5. Sun and Moon Duo on Opposing Wrists
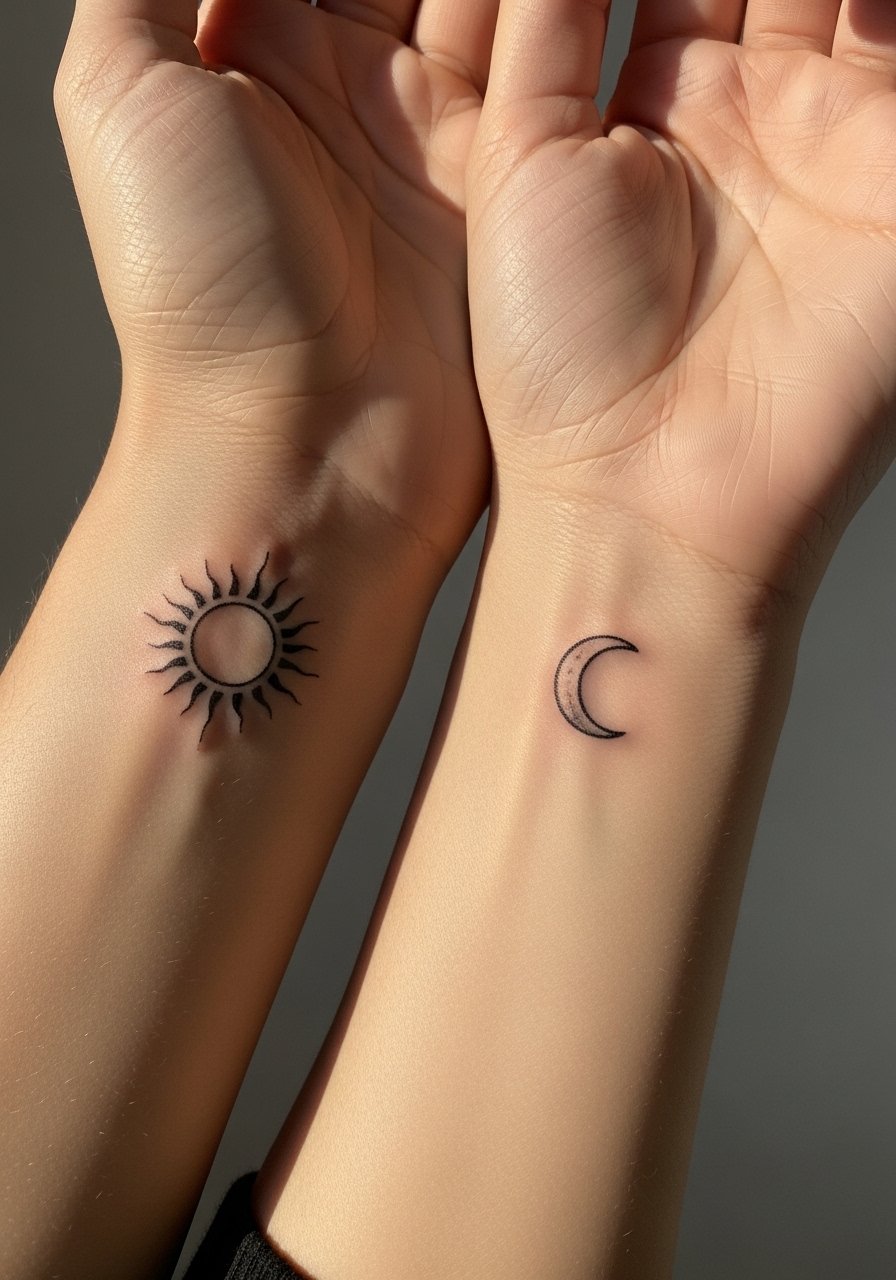
This pair reads like complementary energies when placed on opposing wrists. For a version that ages well, request bolder outlines for the sun and light stipple shading for the moon rather than super-fine rays. The wrist debate matters here because one camp says fine rays fade fast and another says careful spacing preserves them. Name the debate to your artist and ask which approach they prefer. Expect touch-ups at year two for the delicate crescent if you choose finer dotwork. Session pain is mild. Style it with stacked dainty bracelets, and consider a dainty bracelet stack for evenings out.
Pre-Session Essentials
The wrist and ear pieces above need different prep than collarbone or rib work, and a few targeted items smooth out the session and the first week.
-
Frida Ink Balm. Favored in forums for a non-greasy finish, it soaks in quickly and leaves fine wrist work readable during early healing.
-
Tattoo Goo. Lighter texture for dry climates, it helps prevent cracking on single-needle linework without suffocating the skin.
-
Green Sheep Balm. Lanolin-free option that artists recommend for sensitive skin near the ear and collarbone.
-
Australian Tea Tree Salve. Mild anti-inflammatory properties make it useful for inflamed spots after dense blackwork touch-ups.
-
Aquaphor healing ointment. A thin initial layer aids scab prevention on fine line wrist tattoos without clogging the needle channels.
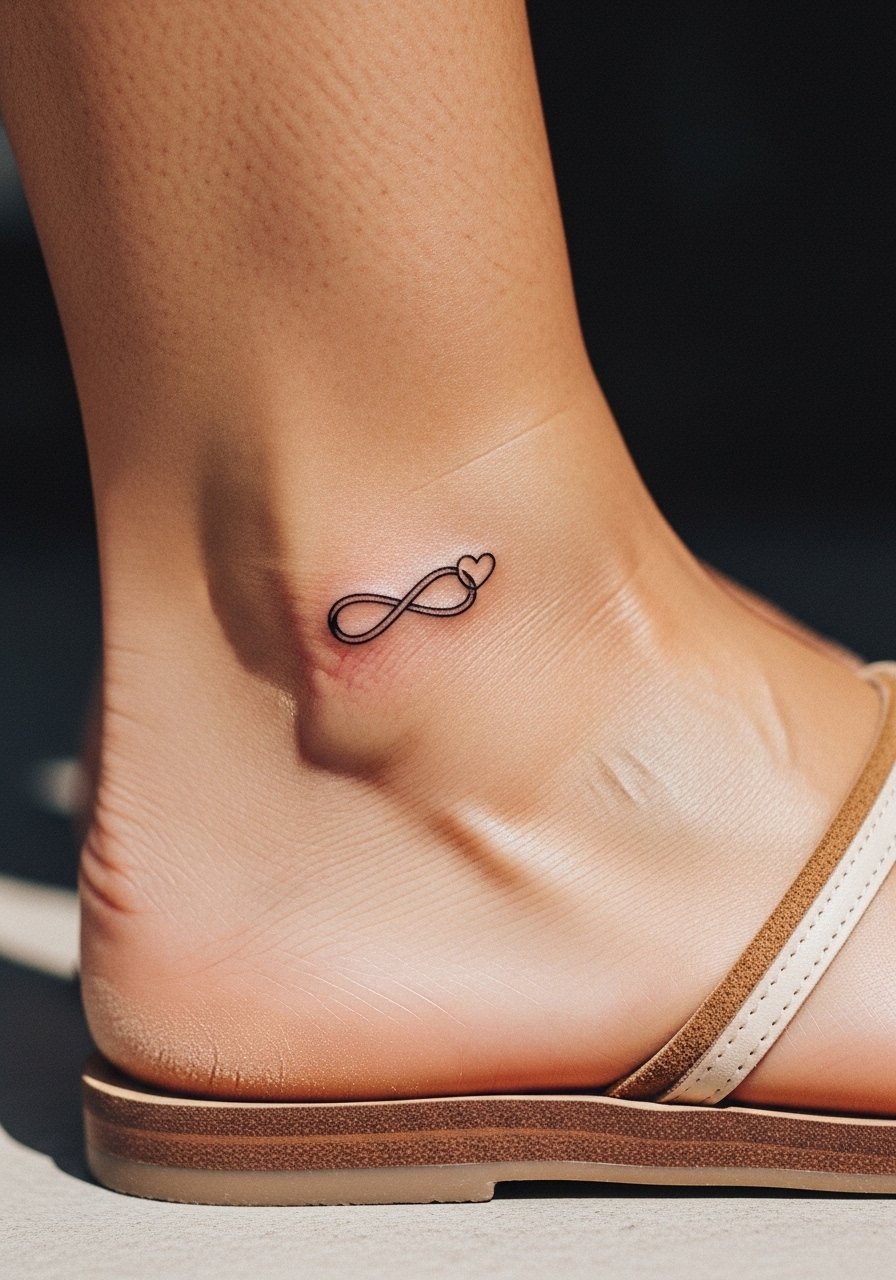
6. Tiny Infinity with Hearts on the Ankle
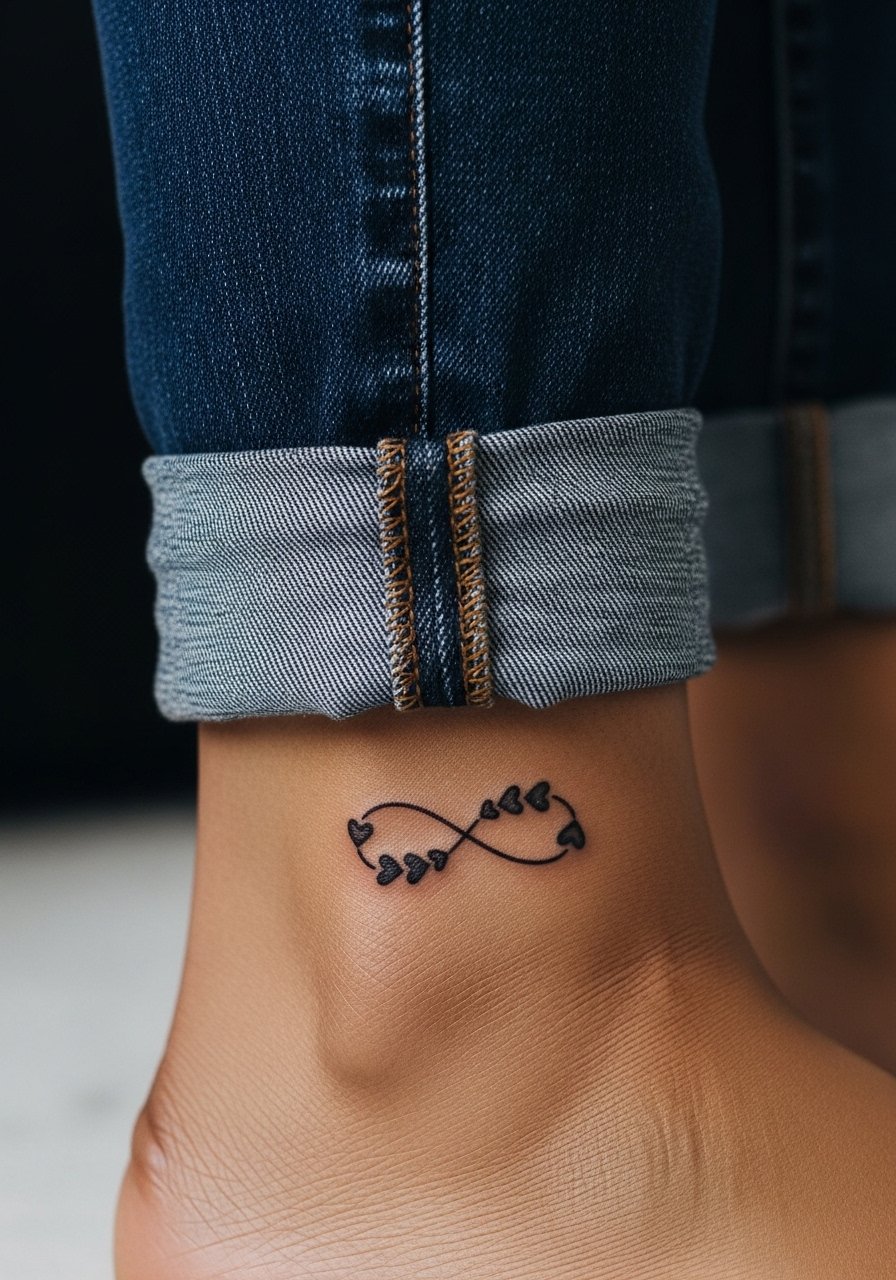
An ankle mini like an infinity with tiny hearts is subtle and summer-friendly. For visibility on darker skin, request bold outlines rather than whisper-thin loops. The biggest mistake people make is placing it where shoe straps or socks rub during healing. The ankle session is quick but sits close to bone so expect a sharper sting for a few minutes. Plan to wear sandals and roll pants up for the appointment. To show it off with a summery look, layer a slim ankle chain and choose strappy flat sandals when you want the design visible.
7. Morse Code Secret Word Along the Ribcage
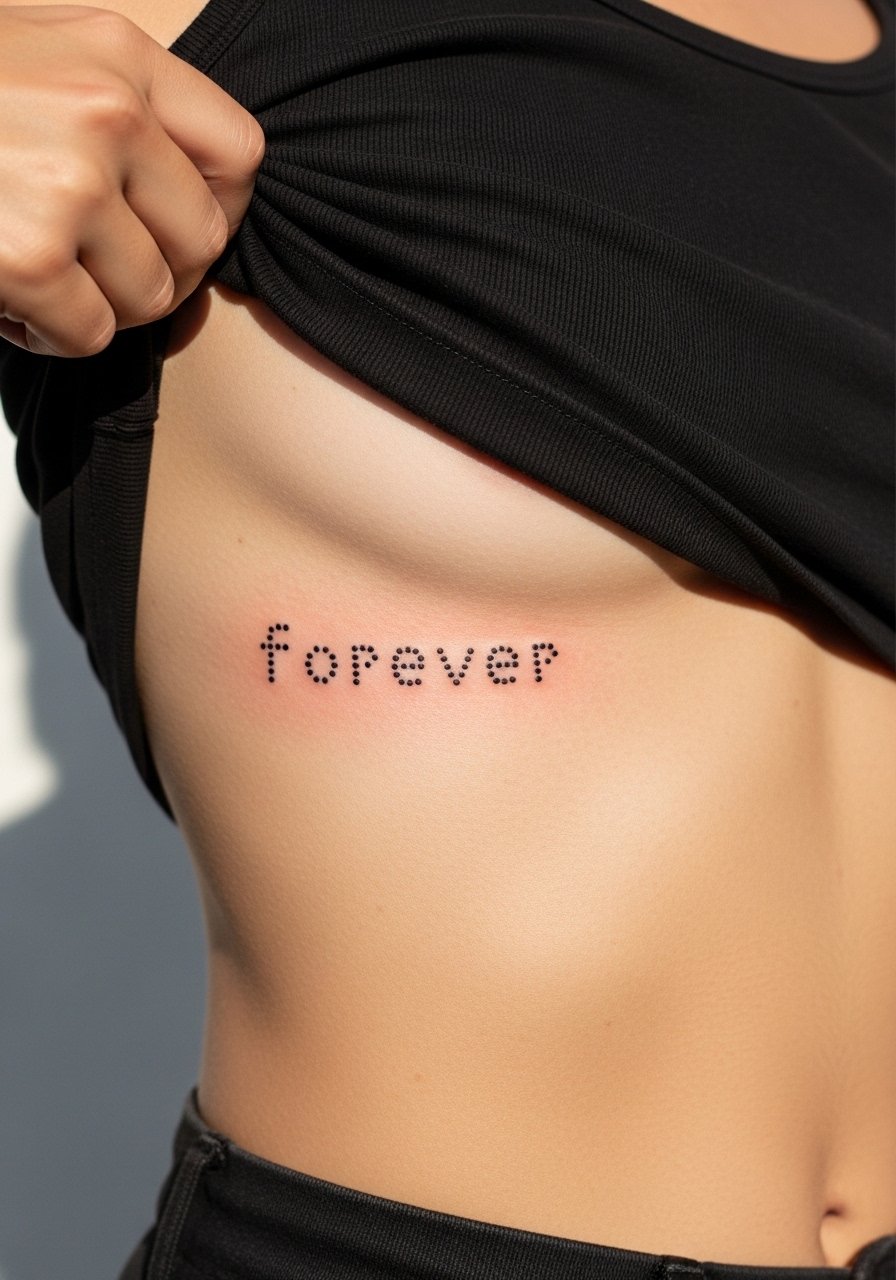
Fair warning, the rib is a high-pain zone and not the best place for first-timers seeking comfort. Morse code shines here because the linear dot-dash pattern reads private and compact when kept to two inches. Artists are split on fine line on ribs. One camp says the skin stretch blurs dots within two years. The other camp argues that with proper depth and spacing, dot work settles fine. Ask your artist where they land and request slightly larger dot spacing for longevity. Expect a slower healing window and a touch-up at year one if dots soften. For the session, wear a loose cropped tank you can lift without strain.
8. One-Line Holding Hands on the Shoulder Blade
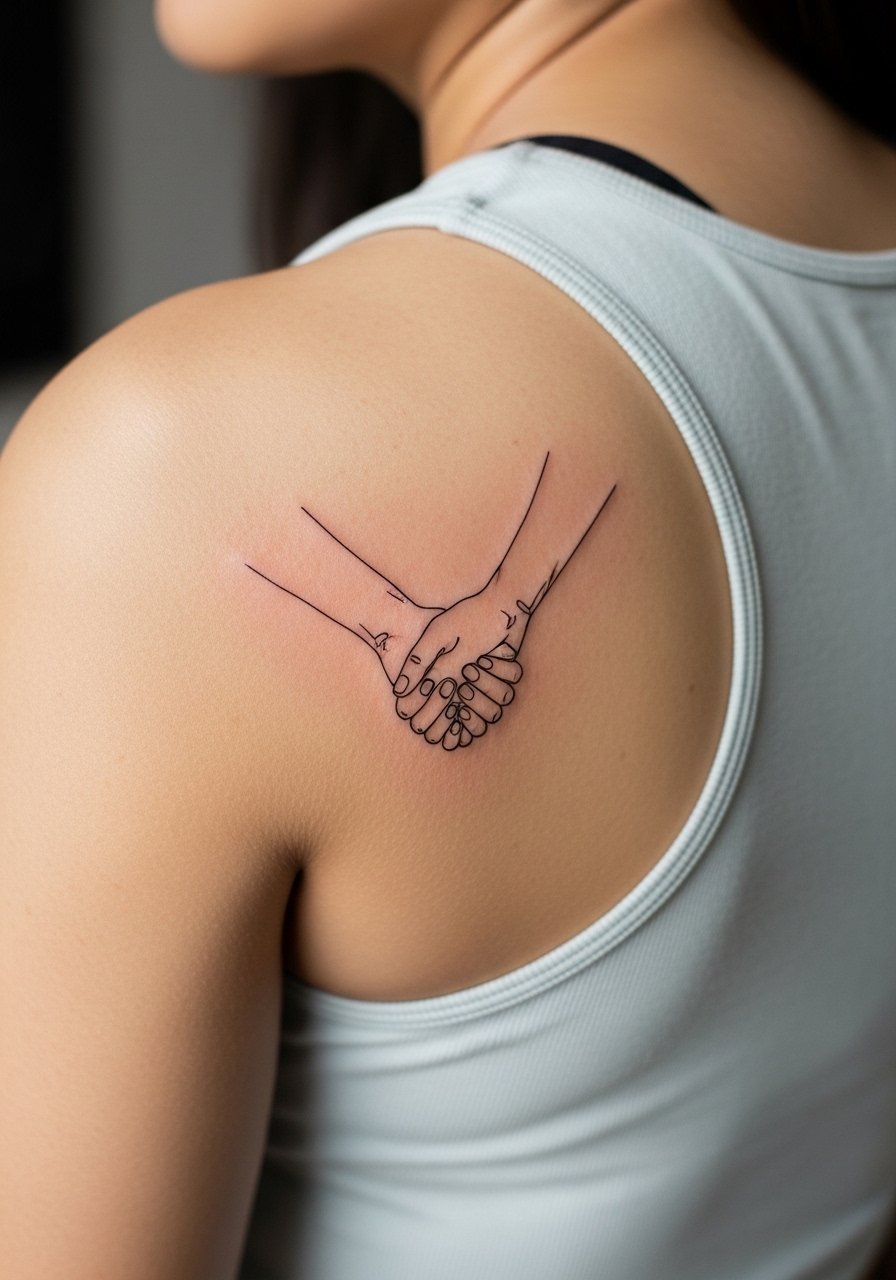
I've seen one-line hand motifs age cleanly on the shoulder blade because the skin there moves less than the wrist. Tell the artist you want a single-stroke look but with slightly heavier line weights at connection points so the hands stay readable after healing. The common mistake is asking for hairline single-needle everywhere, which can disappear in motion zones. The shoulder blade session is low to moderate pain and feels like long, precise strokes. Style with a backless halter or a racerback tank for nights out.
9. Matching Arrow Symbols on the Inner Arm

Arrows speak to direction and guidance, and small matching arrows look neat on the inner arm. Ask for a slightly thicker spine line so the arrow head does not soften into a wedge. A frequent mistake is making the arrow too tiny where the shaft blurs into a smudge after heavy lifting or muscle change. Inner arm placement is moderate in pain with some stretch. For the session, wear a loose short-sleeve button-down you can roll up. To keep the look cohesive, try a loose button-down shirt that frames the arm when you want it visible.
10. Birthdate Coordinates on the Collarbone
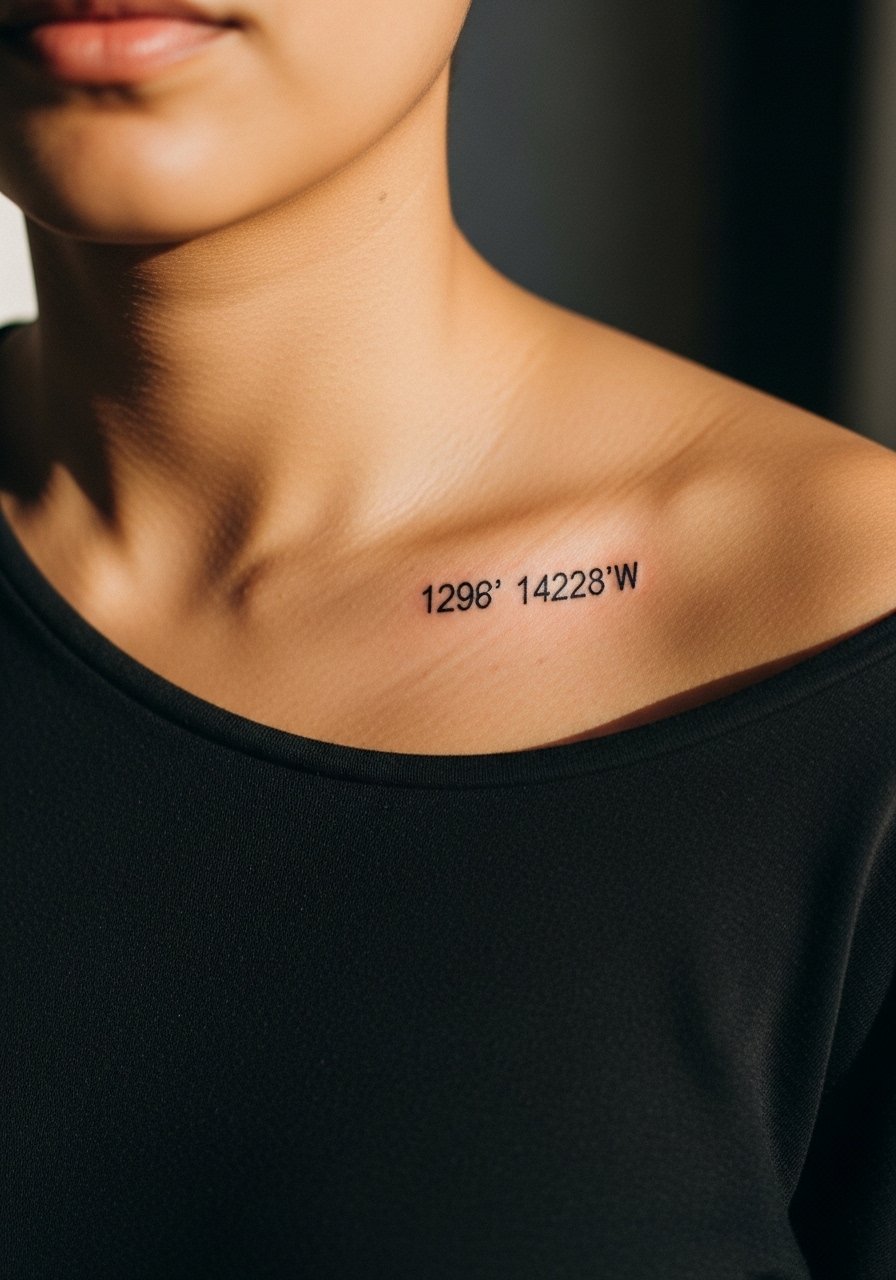
Coordinates are quiet and specific, and the collarbone gives them a low-profile gallery. Ask for monospace numerals with even kerning and test the stencil on both sides of the collarbone to confirm placement. The trap is getting numbers too small against the bone, which tends to blur faster. Collarbone skin can shift in summer sun, so avoid ultra-fine strokes there. Pain is moderate because the bone is close, and session time is short. Pair this placement with an off-shoulder top and a thin gold necklace layer to keep attention just below the collarbone.
11. Tiny Puzzle Piece Pair on the Shoulder
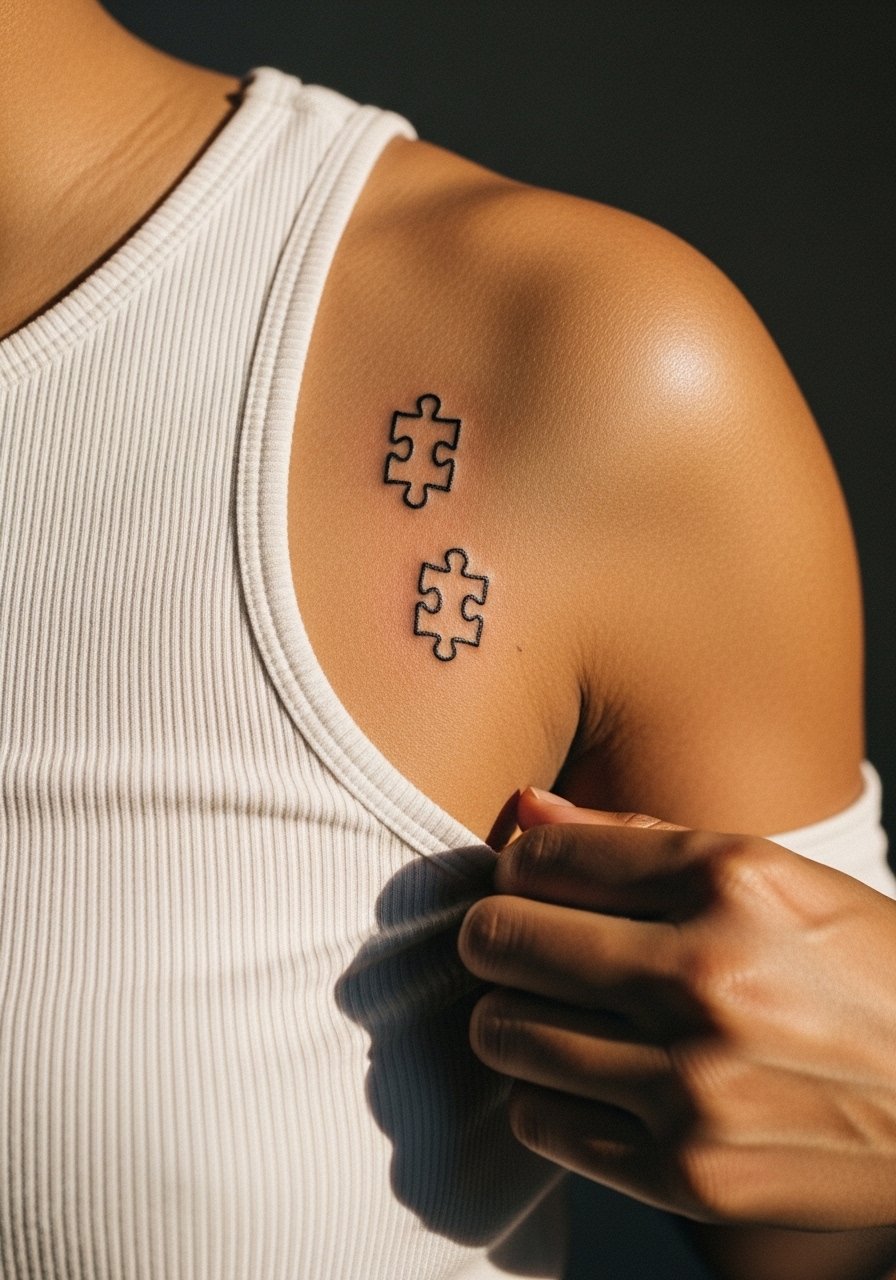
Puzzle pieces work well when you want matching parts that visually connect when you are together. Request slightly thicker outlines so the interlocking tabs stay legible on darker skin. Common mistake is placing pieces too close on curved areas where shape distorts with movement. Shoulder placement is low pain and easy to hide for work. The design is fast to complete. For showing off, try a backless halter top that reveals the shoulder blade area.
12. Tiny Compass Needle on the Ankle
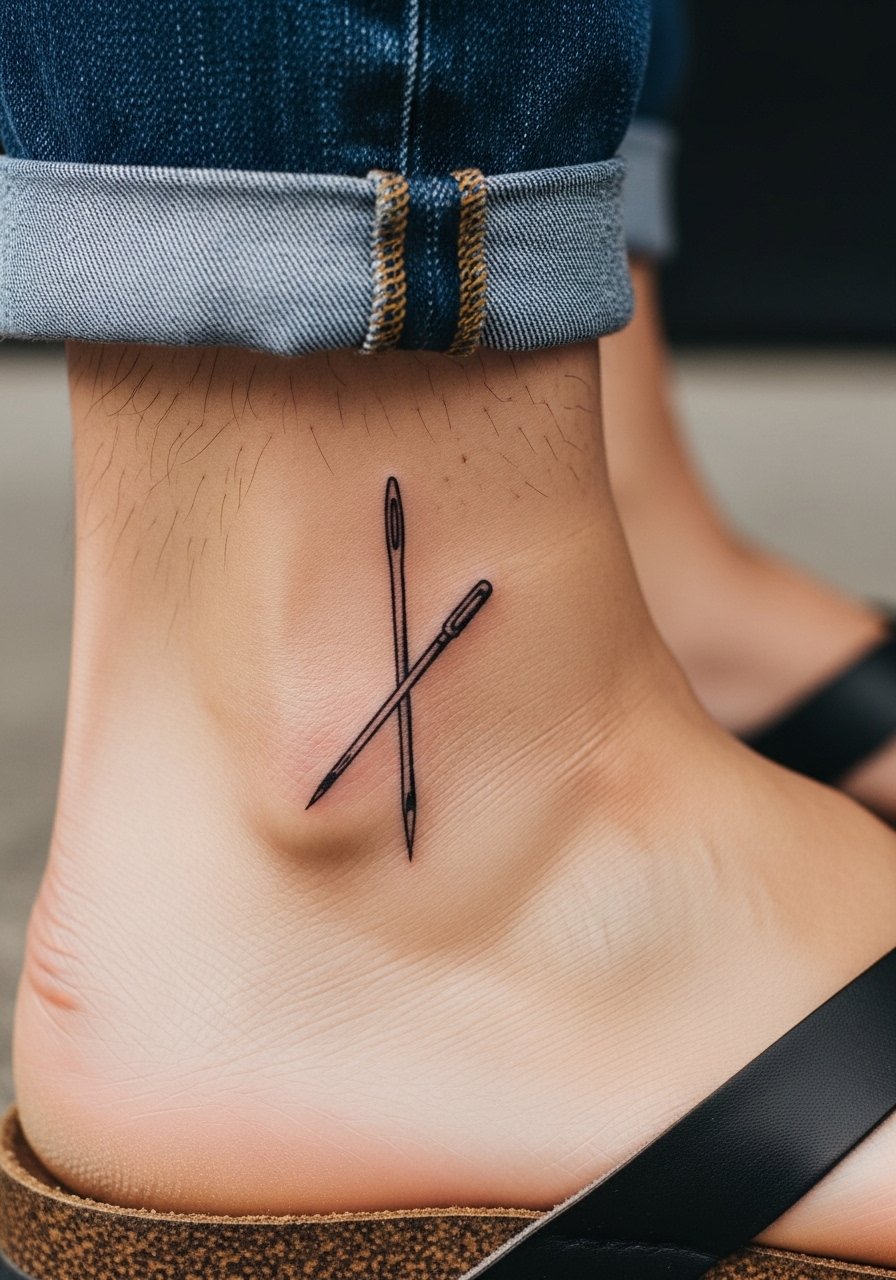
A small compass points to guidance and milestones and sits naturally on the ankle. Ask for a boldened needle center so that directional detail does not wash out with shoe friction. The common error is over-detailing a compass under an inch, which creates illegibility after a year. Ankle sessions are quick with sharp moments along bone. For summer show-off, pair with strappy flat sandals.
13. Micro-Script Initial on the Inner Wrist
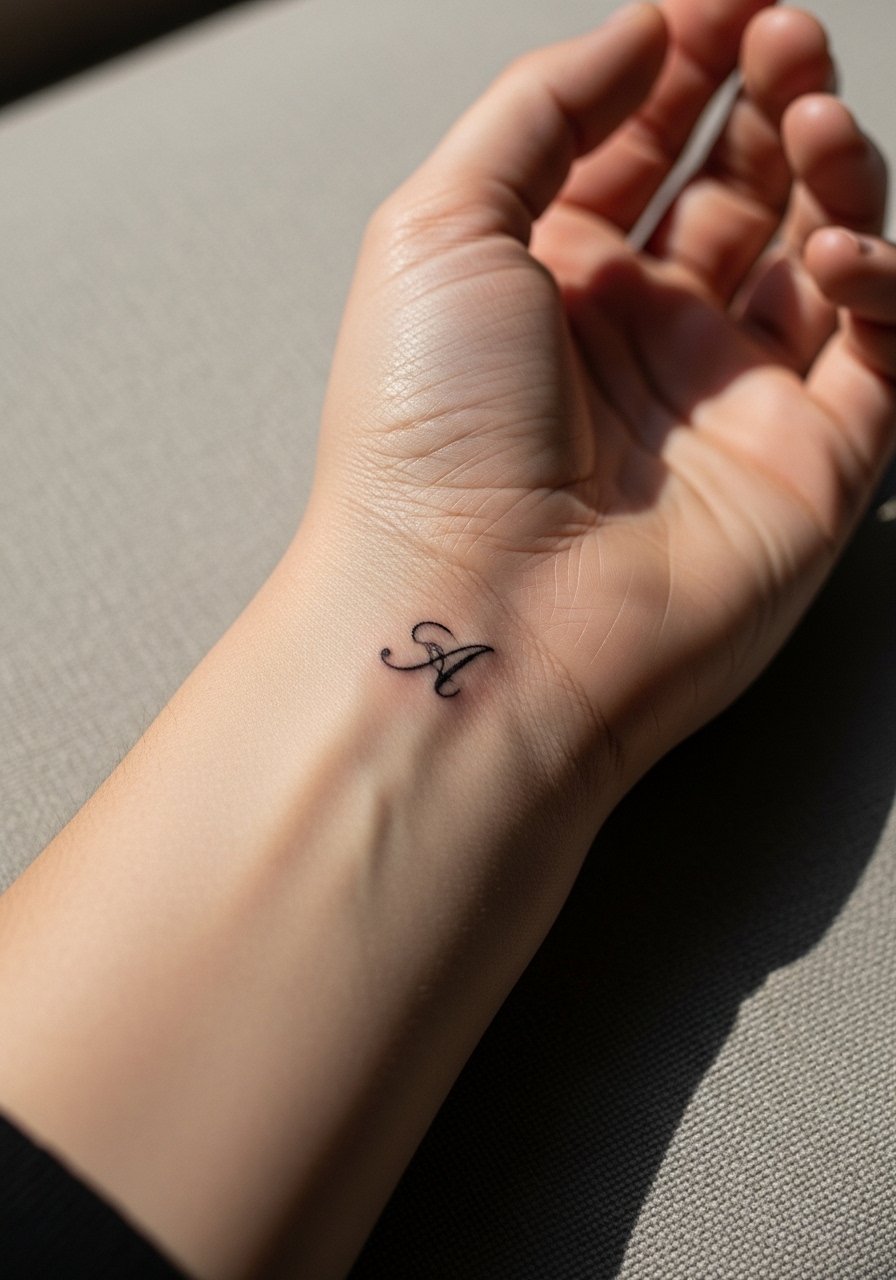
Inner wrist script is classic for first-timers but needs clear letter spacing. Tell the artist you want a script with small counters and slightly heavier downstrokes for contrast. The pitfall is choosing ultra-fine script that fades under constant hand washing and sunscreen. Expect a touch-up at year one for crispness. Session pain is low. For appointment ease, wear a sleeveless tank so the artist can access the wrist. To style it, a dainty bracelet stack on the opposite wrist keeps the look balanced.
14. Small Tree with Roots Silhouette on Upper Arm

A rooted tree compacted into a three-inch silhouette gives a solid, age-resistant blackwork option. This is a go-to if you worry about fine line fading on darker tones. Ask for solid black silhouettes and clear negative space for root separation so the shape does not become a blob when it settles. The upper arm is forgiving for minis and low on blowout risk if the artist spaces the roots correctly. Session is moderate and may take two passes if you want saturated black. For casual frames, roll up a sleeve or wear a loose drawstring linen pant when pairing with longer tops.
15. Small Constellation Matching Pair on the Ankle or Wrist
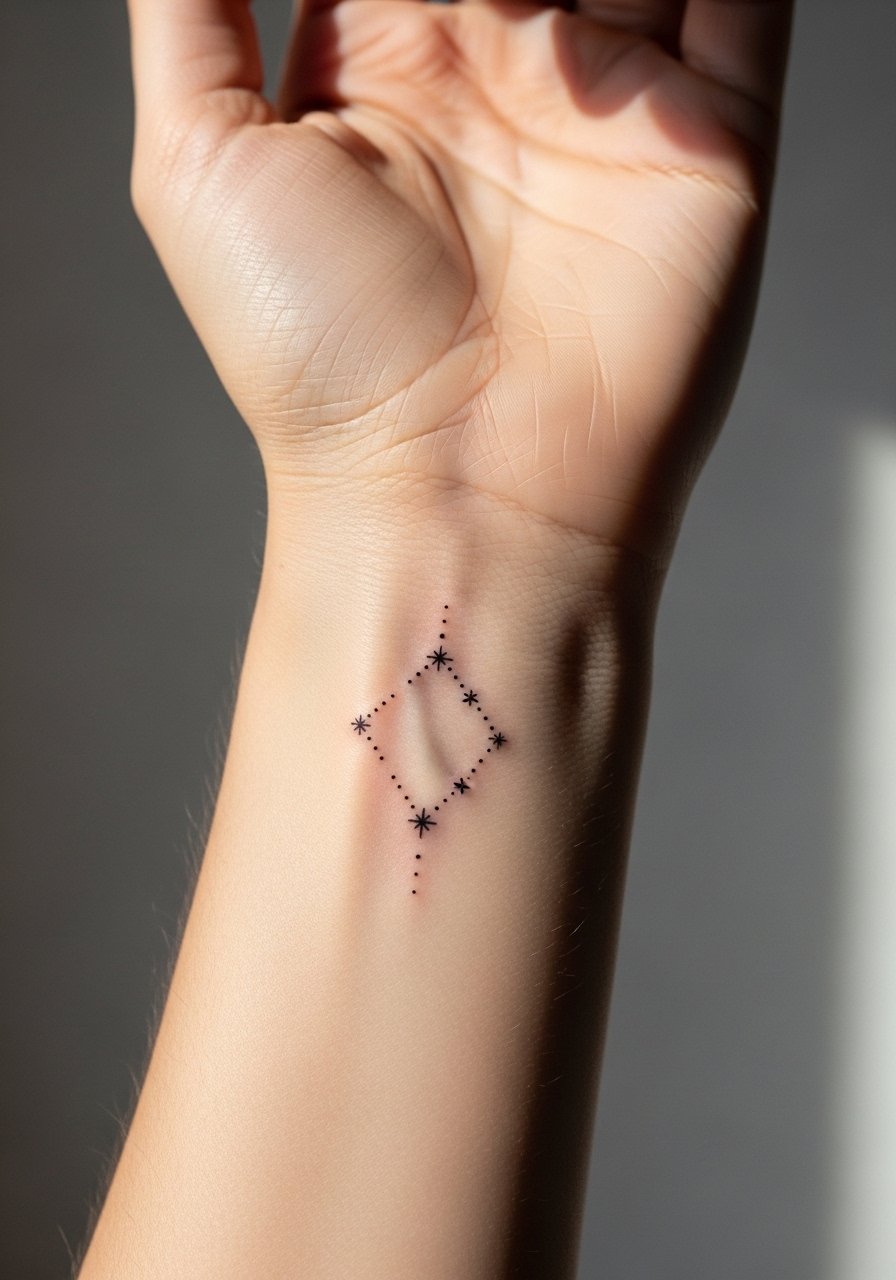
Constellations read private and compact and are ideal when you want shared symbolism without words. Tell the artist to use slightly larger dots for visibility on darker tones and avoid connecting lines that are too thin. A mistake is making the cluster too dense where dots merge into a dark patch with time. Pain is low on the wrist and ankle, and sessions are brief. Pair this with rolled sleeves and a thin chain bracelet for a subtle compliment.
16. Tiny Lock and Key Pair on Finger and Wrist
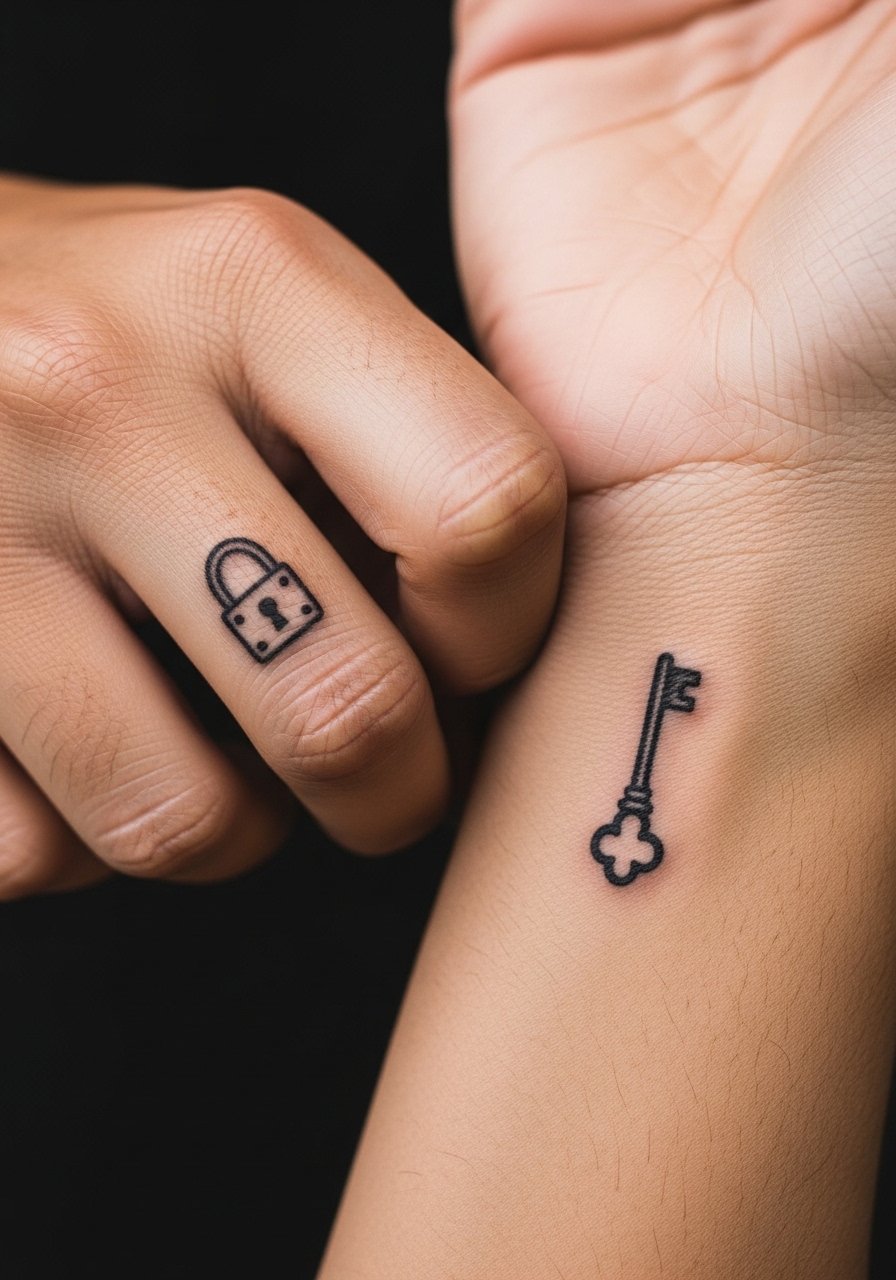
Split placements like a key on your wrist and lock on your son’s finger create an interactive set. Fingers are high-motion and often fade, so keep the lock bold and simple and accept faster touch-up cycles. The wrist key should have a sturdier stem so it does not thin out. Finger sessions sting more and may require yearly touch-ups. For the session, remove rings and wear a loose sleeve you can push up. A small thin gold chain bracelet keeps the wrist balanced without crowding the key.
17. Simple Geometric Mother-Son Dots on the Calf
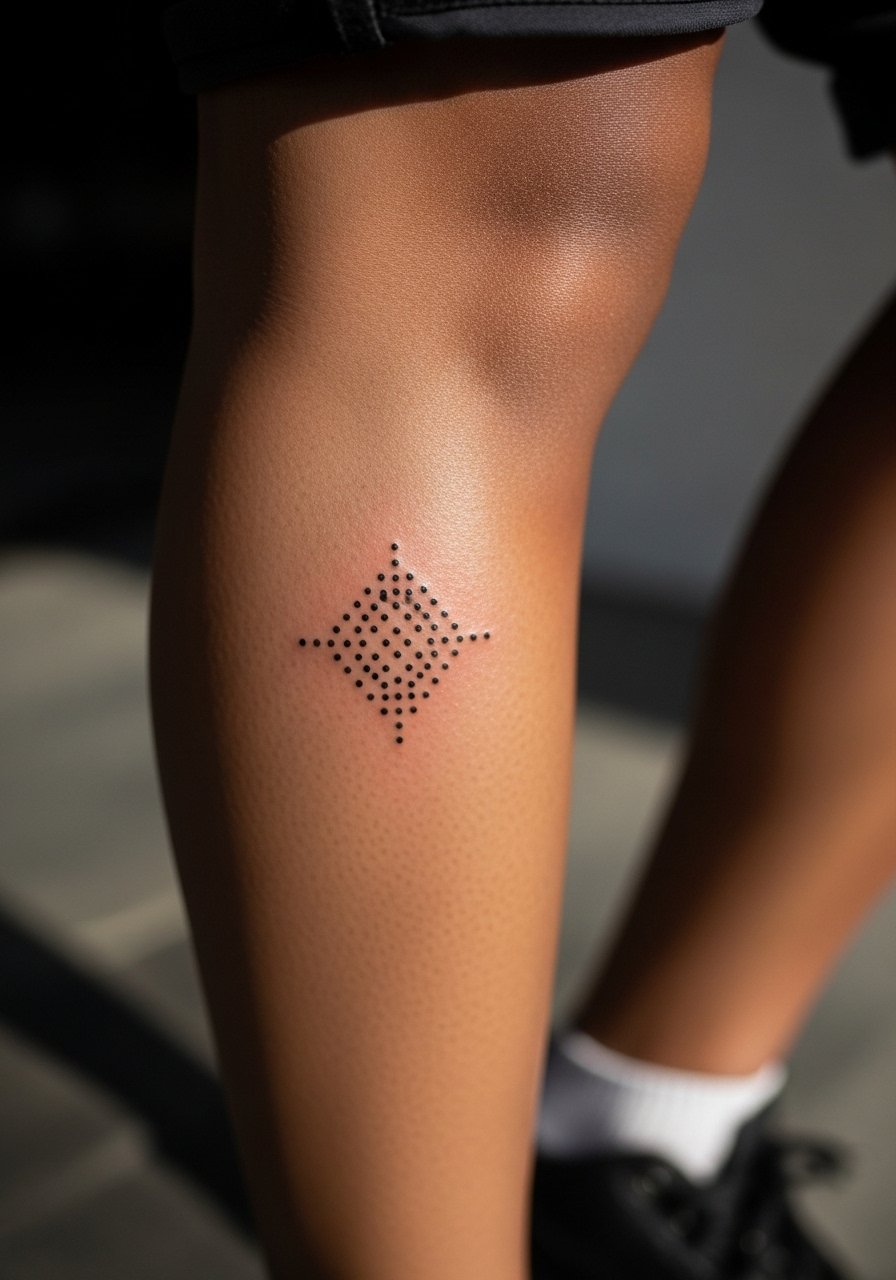
Calf pieces give enough canvas for tiny geometric symbols that maintain spacing and contrast. Request stipple spacing that allows each dot to breathe. Small dots too close together risk blurring into a shaded area after a few years. The calf is low pain for most and sits well under pants. For show-off, pull shorts up slightly and pair with a cropped tank top for a coordinated summer look.
18. Mini Portrait Silhouette on the Upper Arm
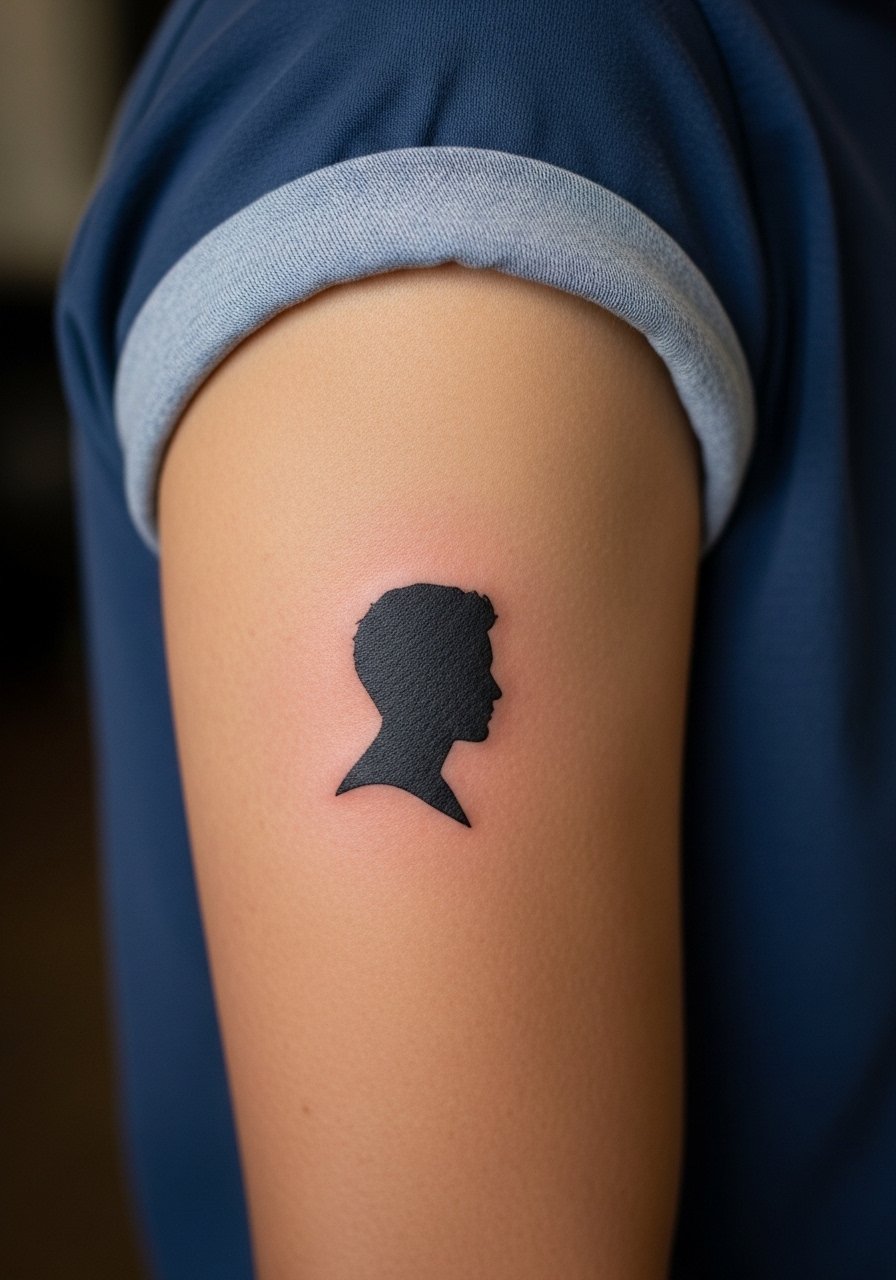
Micro portrait silhouettes can hold strong if simplified to high-contrast shapes rather than ultra-fine facial detail. Ask the artist for a negative-space profile and clear contour lines that read even at a small scale. The frequent error is over-detailing a tiny portrait which dissolves into an indistinct patch. Upper arm placement helps preserve the silhouette and reduces blowout risk. Expect a moderate session that may require a short refill. Pair with rolled sleeves and a linen short sleeve shirt for a relaxed reveal.
19. Mini Floral Stem Behind the Ear
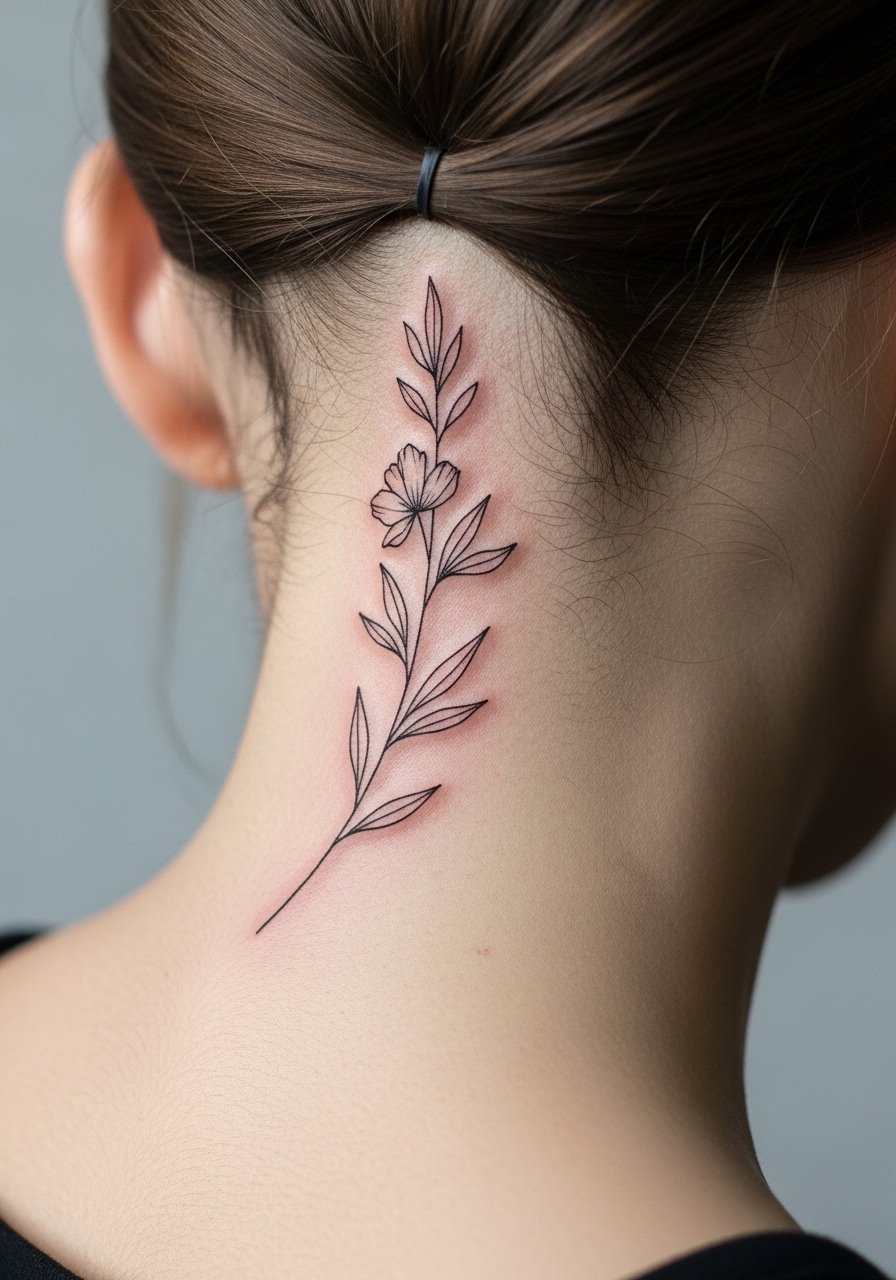
Behind-the-ear florals are delicate and private, and the key is simplified petals with a slightly stronger stem. Avoid dense detail that clumps on the small curved canvas. Pain is minimal and healing is quick. Because the area is sensitive, mention professional considerations and how visible it will be with different hairstyles. For the appointment, tuck hair back and wear a wide-neck top. A thin thin chain pendant necklace can sit below the line for balance.
20. Micro Arrow and Date Pair on the Rib Side
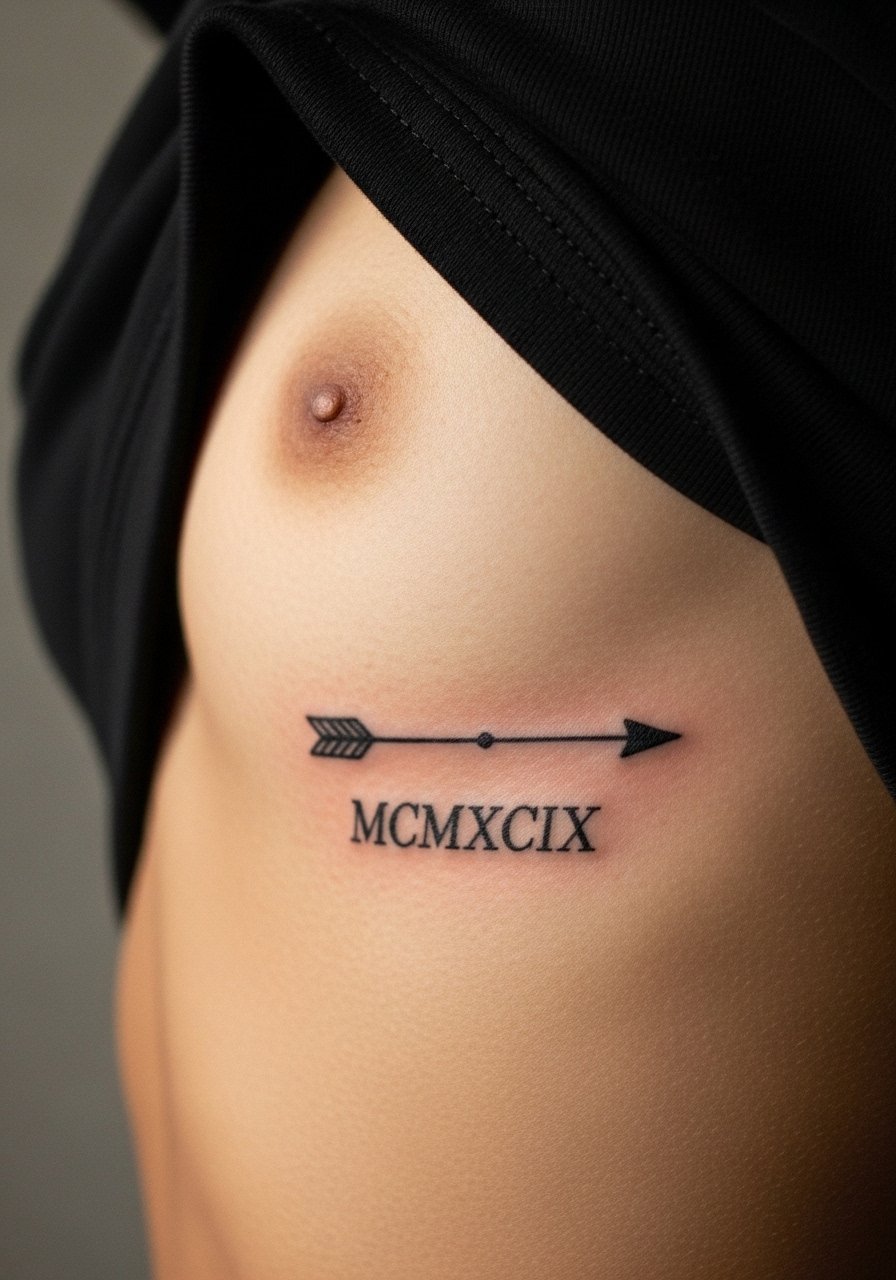
Side ribs are expressive but painful, so this is better if you can tolerate a high pain score for a short session. Keep arrow lines bold enough to resist stretch and request roman numerals with generous spacing. The core debate about fine line on ribs applies here as well. One camp warns of early blur, and the other notes technique and spacing can prevent it. Talk through the expected healing and ask about touch-up plans. Wear a loose cropped tee for the appointment.
21. Tiny Stippled Star Cluster on the Ankle or Inner Wrist
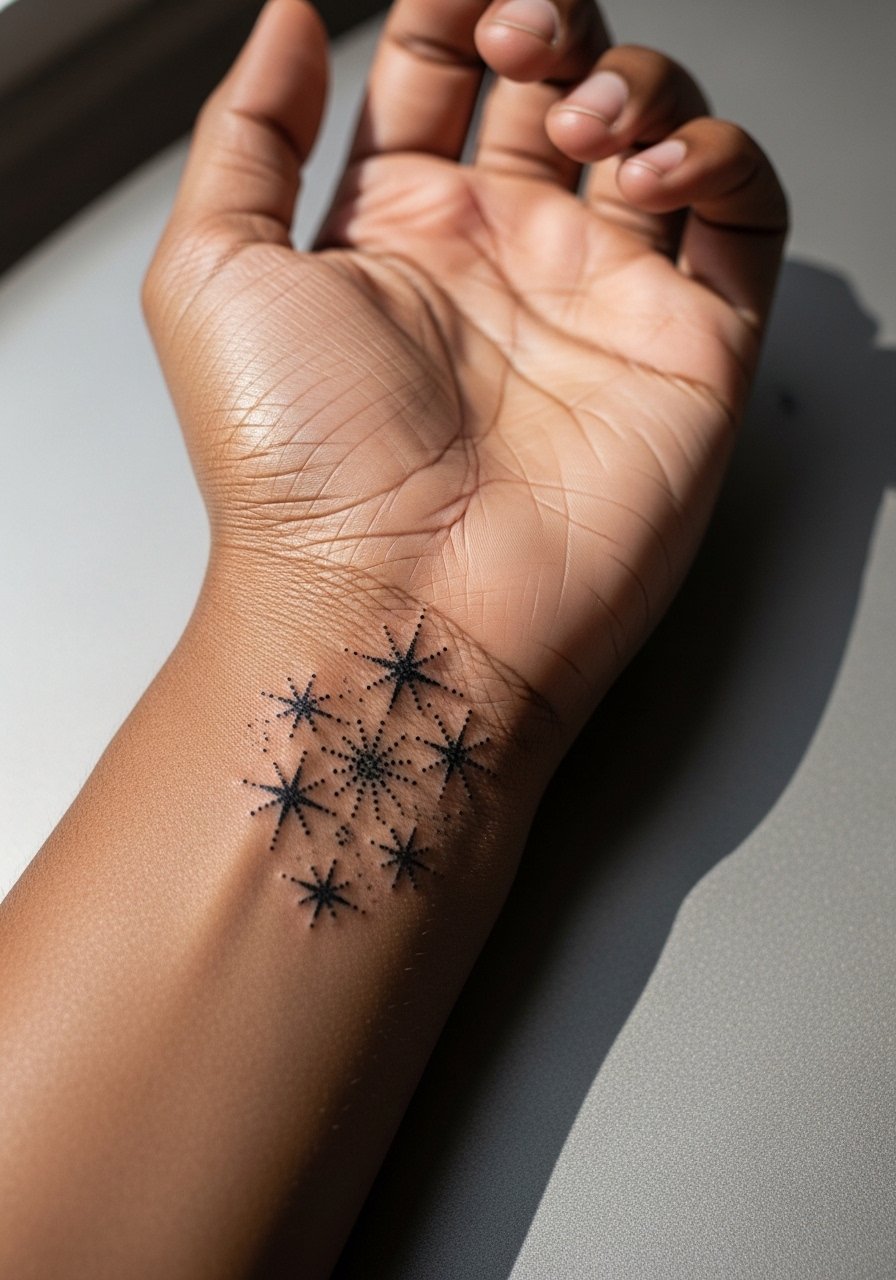
Dot work star clusters make for discreet matching tattoos and they translate well across skin tones when dots are slightly larger. Tell the artist to increase dot size for visibility on darker skin while keeping the cluster airy. The common mistake is over-concentration that becomes a gray patch after a few years. Inner wrist is more exposed and will need quicker touch-ups than the ankle. For the session, wear a sleeveless top so the artist can access the area. When showing it off, a dainty bracelet stack keeps the wrist from looking crowded.
Frequently Asked Questions
Q: Will fine line wrist tattoos fade faster than thicker work for a mother and son pair?
A: From what I've seen, yes, ultra-fine single-needle work on wrists tends to lose crispness sooner than bolder lines. Wrist motion and frequent washing accelerate softening. If you love the fine look, ask for slightly heavier line weight in key spots and plan a touch-up at six to twelve months.
Q: How should I prepare clothing-wise for a ribcage or sternum mini session?
A: Wear a cropped tank or a fitted sports bra you can lift or pull down slightly so the artist has clean access without you getting cold. Loose pants or a skirt that pulls down a bit are helpful for lower ribs when needed. Bring a zip-up hoodie to throw on after the session for comfort.
Q: Are Morse code minis visible on dark skin and do they age differently?
A: Morse code can work on darker skin if the dots and dashes are sized up a touch and given spacing. Tiny pinpricks may flatten into dots that lose contrast. Ask the artist to test a few dot sizes in the stencil phase so you can see how it will read.
Q: How often should I expect touch-ups for matching finger or hand pieces?
A: Fingers and hands move and experience high friction. Expect touch-ups possibly every one to three years for small motifs. Some people plan a light refresh at year one to maintain crisp edges, especially on shared lock-and-key or puzzle pieces.
Q: Is Saniderm better than dry healing for small wrist tattoos?
A: Artists and forums split on this. One camp says Saniderm reduces mess and bacterial exposure during the first days. Another camp argues that sealed films trap moisture and can cause issues if left too long. Follow your artist's aftercare plan and ask which method they prefer for fine line wrist work.
Q: What should I tell an artist during consultation to avoid a mini that blurs on the forearm?
A: Be explicit about desired line weight and long-term legibility. Request slightly larger spacing for repeating patterns like heartbeats and ask to see healed photos with similar skin tone and placement. If you get a clear answer on touch-up plans and stencil testing, you will leave the consult with a realistic expectation.
