
Fine line work is the look everyone pins, but what keeps a spine tattoo readable over time is less about how delicate the drawing is and more about placement, spacing, and realistic expectations. Pain, touch-up needs, and how the design will show under an open-back dress are the three things that change a great idea into a lasting piece. Below are 27 minimal line back and spine ideas with practical notes on aging, session feel, and how to show them off.
1. Vertical Crescent Moon Sequence Down the Spine
I notice moon phases along the spine read like a quiet personal timeline and they age predictably because the elements are spaced. Ask your artist for slightly increased spacing between crescents so the thin contours do not merge over time. Fair warning, the spine can be a sensitive place for a thin needle so expect a solid two-hour session if you want crisp continuity from nape to tailbone. Common mistake is shrinking the moons to fit into a short vertical run. For showing it off, wear an open-back midi dress or a racerback tank that reveals the center line and keeps attention on the negative space.

2. Single Continuous Line Spine Vine
Personal observation tells me a single-line botanical that follows the vertebrae reads elegant and modern when spaced correctly. In consultation, request a single continuous pass without breaks so the vine looks intentional and not like separate tattoos stacked. Most people underestimate how much the skin on the back moves when bending. Expect some tugging sensations during the session near the shoulder blades. The aging issue is simple. Keep the stems clean and avoid tiny leaf details that will blur by year three. Pair this with an open-back blouse to spotlight the vertical flow.

3. Micro-Dot Spine Column with Tiny Symbols
When I see dot work down the spine it often lasts because the spacing gives each dot breathing room. Tell your artist you want dot spacing that reads as its own negative rhythm rather than a filled-in column. Pain varies more at the lower back than the upper, so plan brief rests if needed. A common mistake is packing symbols too close to the dots. For longevity, leave more vertical space and expect touch-ups around year three for high-contrast tiny marks. This is perfect with a halter top for evenings that reveal the central line.

4. Tiny Script Down the Vertebrae
Consultation lead: bring the exact script weight you want and confirm the spacing between letters before the stencil hits skin. Small script along the vertebrae can look poetic when done in a single consistent typeface. Many artists split on whether very thin script holds on the mid-back. One camp says movement makes the letters merge. The other camp says proper depth and slightly heavier line weight keep it readable. Ask where your artist stands. Session time is usually under two hours, but plan for a touch-up at year two or three. For showing it off, a backless slip dress highlights the vertical script without distractions.

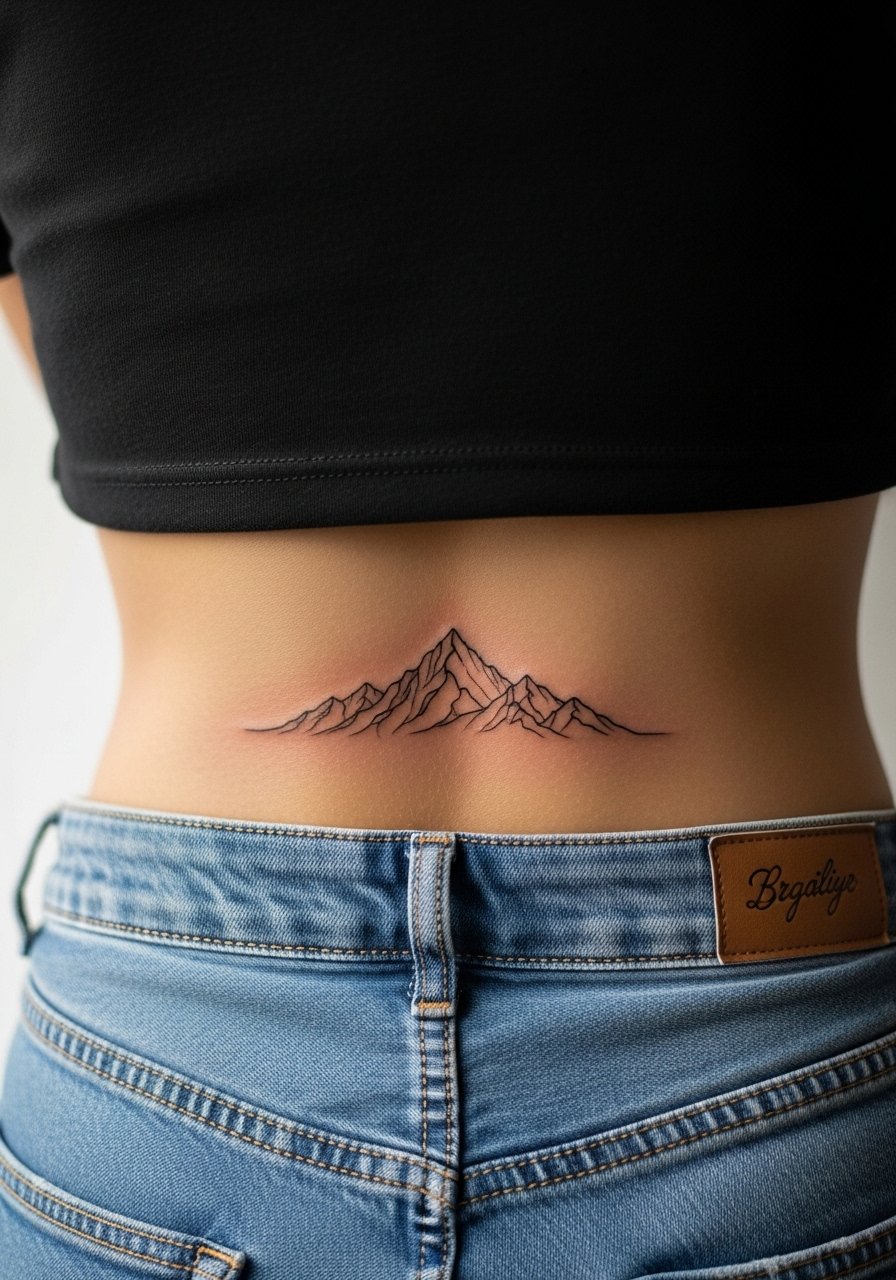
5. Minimalist Mountain Range Along the Lower Spine
Visual impact lead: a tiny continuous mountain silhouette that hugs the lower spine reads like a horizon line when you bend. Tell your artist to keep the peaks low and angular rather than adding tiny interior shading, because that detail blurs faster than a single clean outline. Lower back sessions are less painful than ribs but they can be awkward for position. Expect a one-hour session and possible soreness when sleeping on your back for a few nights. Pair with low rise jeans or a back-accented crop top to let the horizon show.
6. Stacked Roman Numerals Over the Spine
Mistake lead: people often compress dates into a neat block and forget the long-term blur. Ask for larger numerals with open counters so the vertical stack keeps legibility at year three and beyond. The spine placement gives a clean central column but does make the session feel more intense near the vertebrae. Expect pauses for comfort. If you want the numbers to remain crisp, plan a touch-up around year three. For a showing-off outfit, a backless gown or a slinky halter frames the vertical stack without overcrowding it.

Studio Day Picks
Those first six spine and lower-back ideas often need different prep than wider back pieces, so a few practical items smooth the session and the first week of healing.
- Stencil transfer paper kit. Lets you preview exact placement on the spine so you can confirm vertical alignment before the needle starts.
- Topical numbing cream. Applied per directions it eases the sharper vertebrae spots without changing how the ink sits.
- Thin protective film roll. Useful for lower-back pieces that risk friction from waistbands during the first few days.
- Fragrance-free body wash. Cleans the tattoo without stripping moisture from fine line work.
- Aquaphor healing ointment. A thin initial layer helps seal delicate linework through the first blistering window without clogging the channels.
7. Single Arrow Up the Spine
Pain warning lead: the spine has spots that are sharp and others that are just bony vibration, so a single arrow pointing upward can be quick but intense near the nape. Ask for a slightly thicker shaft than you think you need. Thin shafts tend to fuzz faster where the skin folds. The session is usually under an hour and touch-ups are uncommon if the line weight is bold enough. For showing it off casually, pair with a racerback tank top that makes the arrow read as a directional accent when you move.

8. Tiny Constellations Along the Spine
Aging/healing lead: constellations benefit from slightly larger star dots and more spacing than pins on a map. When you request this, show star patterns at the size you want and ask the artist to scale them up if necessary. The back tolerates small pointillist work well, but expect touch-ups sooner if the dots are very close. Session time depends on how many configurations you want. For evening wear, a backless slip dress lines up with the stars without clutter.

9. Spine Spine-Key Geometric Column
Consultation lead: specify exact geometry and ask the artist to print a life-size stencil so the spacing between shapes is clear on your skin. Geometric stacks can look too tight if scaled from a phone image. Most of these take one to two hours. The common aging problem is compressed shapes that become indistinct in five years. Avoid tiny fills and request open negative space inside each shape. Pair with a loose button-down shirt you can pull aside for the session and later wear to frame the column.

10. Tiny Wave Line Down the Lower Spine
Visual impact lead: a thin continuous wave that follows the lumbar curve can be subtle and very wearable. Tell the artist to avoid internal shading. The lower spine sees friction from waistbands so expect some early blurring if the line is placed too low under a waistline. Session time is short and pain is moderate. For both session ease and evening wear, a crop top with low back keeps the wave visible without rubbing.

11. Small Compass Spine Marker
Mistake lead: people often try to fit a full compass with tiny details and the points mush together. Request the simplified version with clear cardinal points and a small circle center. The upper-mid spine tolerates the shape well, but the deeper detailing is what fails first. Plan for a one to two hour session and expect a touch-up at year three if you want the pointers sharp. For travel mood outfits, a back-accented sundress or a halter top keeps attention on the central motif.

12. Spine Bar Code Line
Personal observation lead: barcode-style vertical lines create a modern, graphic column that reads well when the bars vary in thickness deliberately. Tell your artist you want deliberate negative gaps so it does not read like a solid block after healing. The nape area feels pricklier and lower back is more forgiving. Many people like the graphic with high-waist pants that keep the lower end peeking out. For sessions, a loose drawstring pant makes access easy and prevents waistband rubbing in the first week.

13. Tiny Heartbeat Line Over the Spine
Pain warning lead: the skinny rhythm line over the upper spine is delicate and the artist will often thicken peaks slightly to help longevity. Ask for a consistent rhythm and avoid tiny pulse ticks that disappear. Expect mild soreness near the scapula with a session under ninety minutes. This design looks great with a backless blouse that leaves a small center window, so the heartbeat reads like a hidden signature.

14. Vertical Floral Stem with Single Bloom
Aging/healing lead: a single bloom with a thin stem needs breathing room. When the stem is too slender and the bloom too detailed, the petals lose edge over the years. Ask for a slightly heavier outer contour on the bloom to protect definition. The session is calm but position near the shoulder blade can pinch. For immediate show-off, a backless dress places the bloom at eye level without competing patterns.

15. Linked Circle Spine Chain
Consultation lead: linked circle chains need equal spacing or the eye reads irregularity immediately. Have your artist mark the vertebrae reference so each circle centers on the bone if that is the aesthetic you want. The mid-spine area tolerates it but smaller circles risk merging at year four. Session time is short. For outfits, try a backless romper that frames the chain without heavy fabric brushing the links.

16. Tiny Zodiac Symbols Stacked
Mistake lead: packing every zodiac glyph in a tiny stack makes each symbol illegible later. Choose one or two glyphs spaced with negative space and ask your artist to scale each symbol so counters remain open. The procedure feels quicker than people expect and the upper spine placement is less painful than ribs. Expect a small touch-up for black density at year two. For a subtle reveal, a back-accented cami slides under jackets and shows the symbols when you want.

17. Spine Morse Code Message
Personal observation lead: a morse code line along the spine can be deeply private and it ages well when dots and dashes are spaced intentionally. Tell your artist to map the dots on skin before inking so the spacing translates from paper to body. The lower spine is less sensitive but can rub against waistbands, so plan clothing for the first week. This design pairs with a button-down worn backwards for photos, as it reveals the center line cleanly.

18. Tiny Female Silhouette in Single Line
Visual impact lead: a continuous single-line silhouette that tracks the spine reads modern and symbolic. Ask your artist for a life-size stencil to check proportions against your back curvature. The nape area may feel intense and the lower portion can be slower as the artist adapts to shape. Common mistake is adding interior shading that ages poorly. For nights out, a backless midi dress presents the silhouette without needing extra jewelry.

19. Tiny Cross Over a Vertebra
Consultation lead: a single small cross centered on a vertebra is straightforward but its size determines how it heals visually. Ask for a slightly larger glyph if you want the cross to remain crisp beyond year three. Placement over the upper lumbar vertebra can cause a sharper sensation during inking. This tattoo is session-brief and low maintenance. Wear a wide-neck shirt pulled aside for easy access during the session and for casual reveals after.

20. Minimalist DNA Helix Column
Controversy lead: artists split on curving detailed helix forms over the spine. One camp says the back moves too much and the twist blurs. The other camp says a simplified helix with bold outer lines holds if the spacing is increased. If you like a double-helix look, request simplification and slightly wider channels. The session can run longer to keep the twist consistent from top to bottom. This pairs subtly with a low-back bodysuit for an athletic reveal.

21. Single Line Mountain Spine Curve
Personal observation lead: a curved mountain ridge that follows the spine curve can sit low on the back and age well because it avoids dense internals. Ask for a bold outer contour and keep inner detail minimal. The lower-mid spine placement can feel awkward but usually finishes within an hour. For casual wear, a cropped tank with low back pairs with the ridge and keeps focus on the center line.

22. Tiny Palm Leaf Spine Accent
Aging/healing lead: palm leaves with too many fronds get muddy over time on the back. Request fewer fronds and a clear stem so each leaf has breathing room. Placement near the shoulder blade can be pinchy and may require short breaks. Expect a touch-up at year three if you want the leaf tips crisp. For warm-weather looks, a halter mini dress keeps the leaf visible without layered clothing.

23. Minimal Line Arrow Chain
Mistake lead: linking several tiny arrows along the spine can read messy if the arrowheads are too small. Ask your artist to enlarge heads subtly and keep consistent spacing. The mid-spine placement is usually steady to tattoo. Session time varies by length and you may need to shift positions. For a simple reveal, wear a backless crop top that shows the chain cleanly at the center.

24. Vertical Coordinates Down the Spine
Consultation lead: coordinates read best when set in one line with adequate letter spacing. Specify exact font and size on your skin before inking. The spine feels brisk near the top and more cushioned lower down. Many people like the private meaning and prefer a midline placement that tucks under most tops. Expect a short session and a touch-up around year three for ink density. For travel-inspired dressing, a back-accented cami that can be layered works well.

25. Single Line Wave with Dot Anchors
Visual impact lead: a sinuous wave punctuated by single-dot anchors at each end creates rhythm and shows movement when you turn. Tell the artist to keep the dots larger than you think so they hold. Session time is brief and the lower back position tolerates the flow. Common mistake is making the wave too intricate. For effortless showing, try a low-back bathing suit in summer or a backless blouse for layered looks.

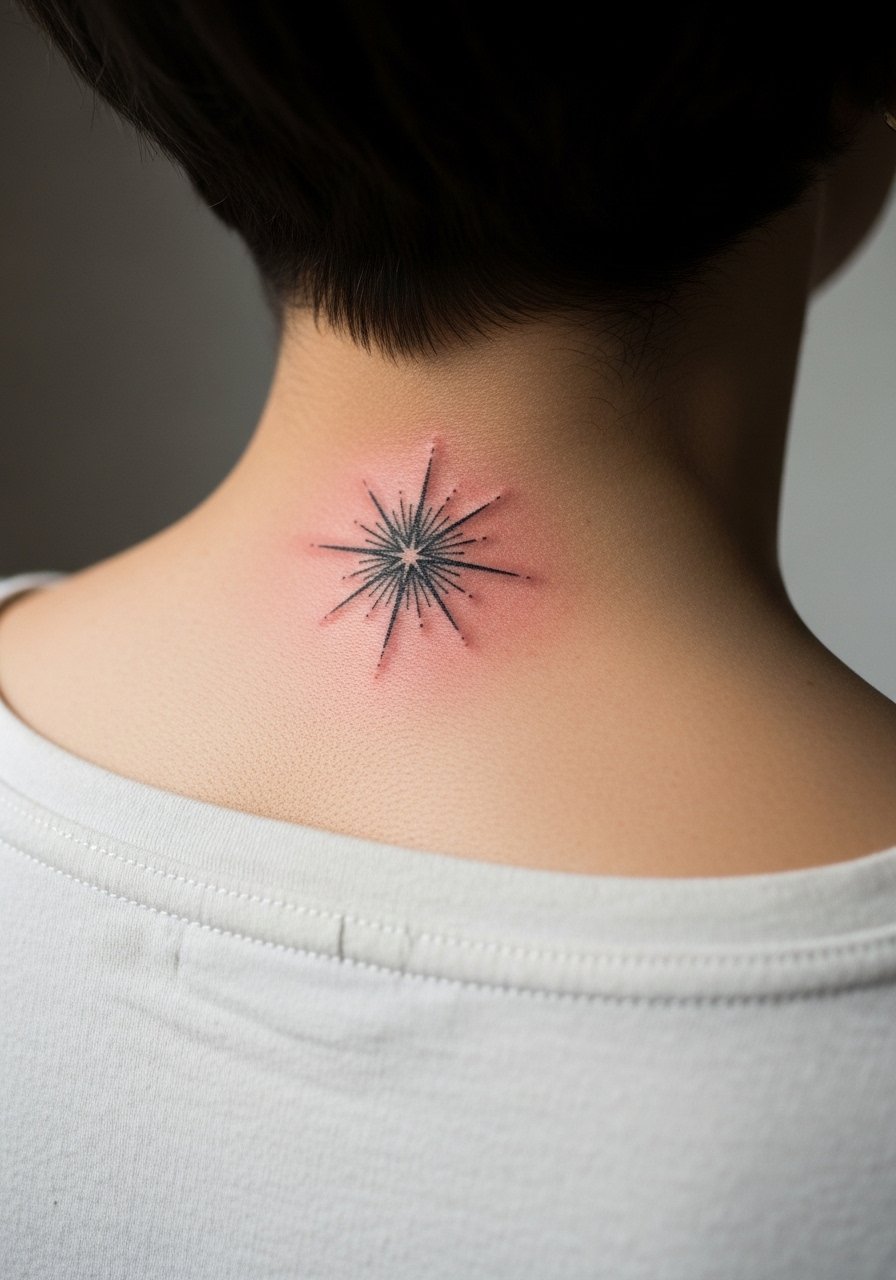
26. Tiny Starburst at the Nape
Pain warning lead: the nape is sensitive and thin lines there need careful depth control. Ask your artist for slightly bolder rays so the starburst remains readable after seasonal sun exposure. The session is short but can feel sharp close to the skull. Protect the area from sunlight after healing because UV will fade delicate rays faster. A wide-neck shirt pulled aside keeps the area accessible during the session and frames the nape when you wear it down.
27. Tiny Crescent and Dot Ladder
Styling lead: a vertical ladder of tiny crescents separated by dots reads like a punctuation mark and moves gracefully with the spine. For durability, ask the artist to slightly thicken the dots and use modest spacing between crescents. The mid-spine placement is relatively tolerant and the session is usually under an hour. For evenings, a backless midi dress shows the ladder in full without competing prints.

Frequently Asked Questions
Q: How much will a fine line spine tattoo hurt compared with other placements?
A: Pain varies by person and exact spot on the spine. The nape and midline over vertebrae often feel sharper. The lower back tends to be less intense. Plan for breaks and bring a supportive pillow for the chair to reduce tension. If you want numbing, mention it during booking and follow your artist's guidance.
Q: Will tiny spine designs need touch-ups more often than larger back pieces?
A: Yes, very small marks and ultra-thin lines generally need touch-ups sooner. The rule I see is that the finer the detail, the sooner a refresh is likely, often around year two to four depending on sun exposure, friction from clothing, and skin type. Spacing and slightly heavier outer lines help extend the interval between touch-ups.
Q: Are there styling tips for showing a spine tattoo without exposing too much skin?
A: Yes. Open-back dresses, halter tops, and racerback tanks let a vertical spine piece peek through without a fully bare back. For a subtle reveal, layer a back-accent cami under a light jacket. For sessions, choose clothing you can shift or remove easily so the artist has clear access.
Q: Do thin line spine tattoos blow out or fade faster than thicker back pieces?
A: Thin line tattoos can blur if placed where the skin stretches a lot or if the artist places ink too superficially. Blowout risk is higher with very fine lines near bony edges or where skin moves. Ask the artist about needle depth and spacing and consider slightly bolder outer contours to preserve clarity.
Q: Are there special professional or cultural considerations for visible spine tattoos?
A: Spine tattoos are usually easy to hide under shirts, so career impact tends to be low. For designs with cultural origin, like mandalas, consider respectful adaptation rather than direct replication. If you want a piece that references a tradition, discuss subtle variants with the artist so the work reads like personal interpretation rather than appropriation.
