
Fine line looks incredible fresh and trending, but what holds up is a trade-off between placement, line weight, and how you show it off. I have seen delicate scripts fade fast on wrists while slightly thicker blackwork on biceps stays legible for years. This list pulls the Hacker-inspired minimalism people copy on TikTok and maps it to real choices you can make at consultation, during the session, and when you dress to show it off.
1. Minimalist Fallen Angel on Outer Bicep
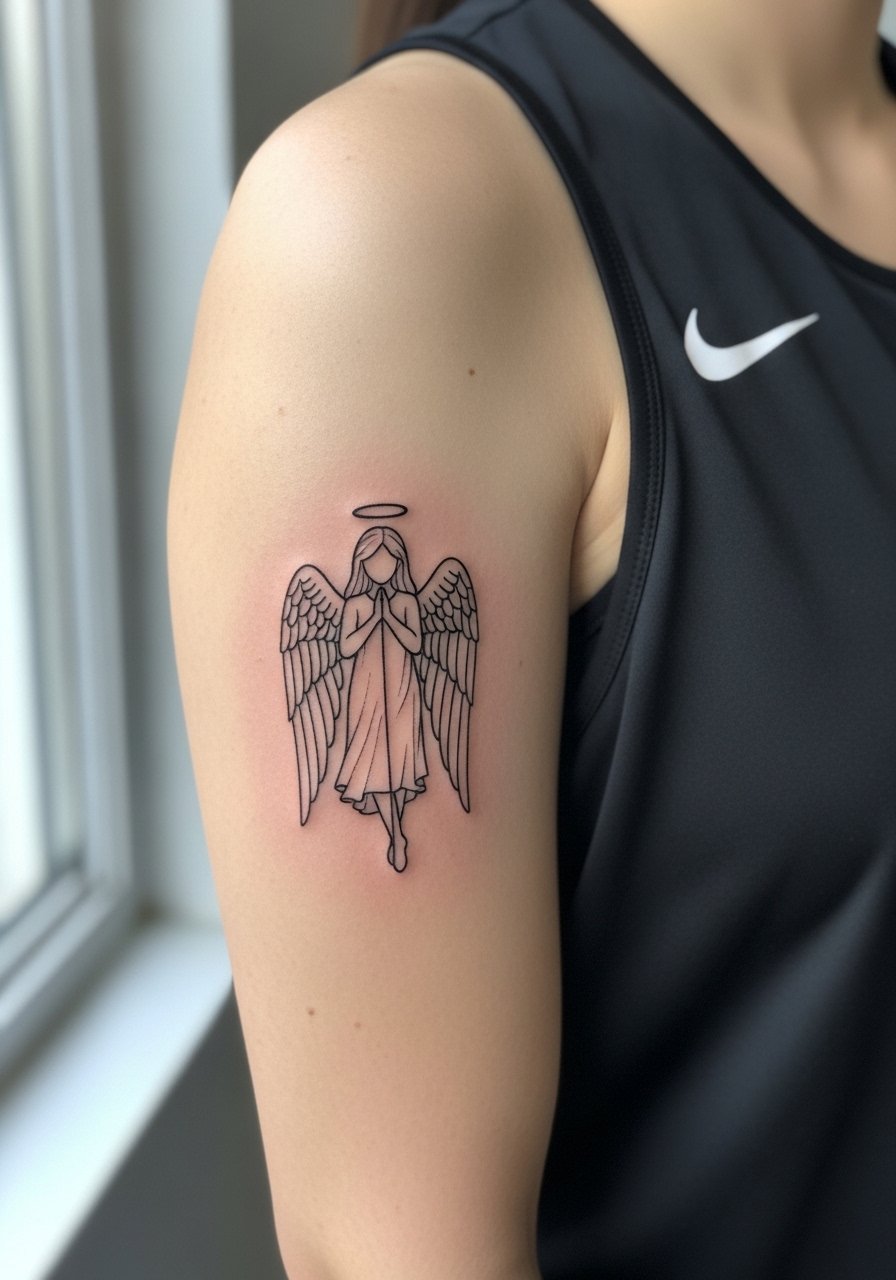
I've seen this piece age better when the wings use slightly bolder linework rather than ultra-fine needles. Tell your artist you want clear linework with sparing negative space so the silhouette reads at year two and year five. Common mistake is asking for a tiny, ultra-detailed angel that looks great fresh but loses wing definition as the skin moves. Pain for outer bicep sits in the mild to medium range and a single session usually covers a 2–3 inch piece. For showing it off, wear a fitted black tank top or layer with an open denim jacket so the contour frames the art.
2. Three Swords Family Stack on Inner Forearm
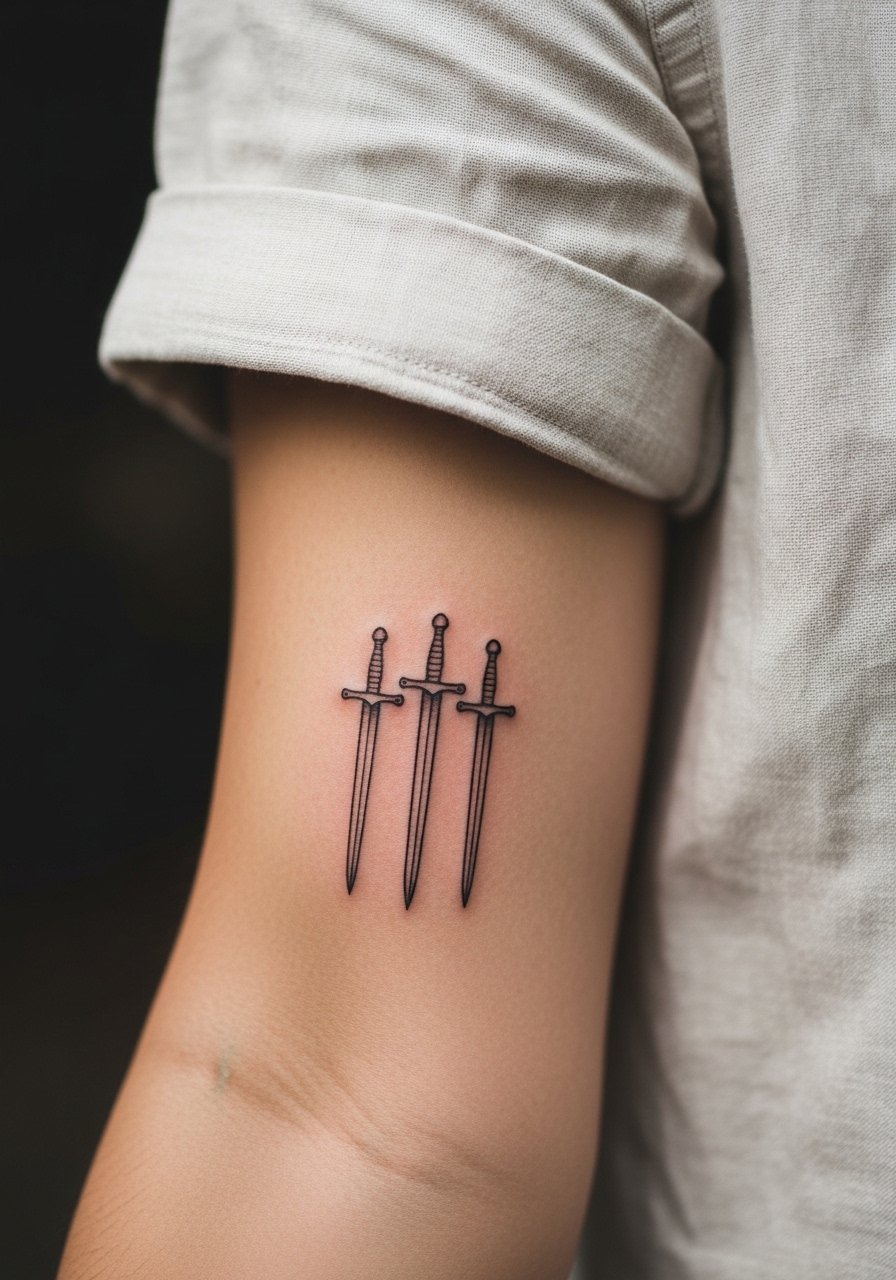
This is the family-tribute Hacker fans copy most. The inner forearm lets vertical motifs breathe and the design scales well at about three inches. Ask for a tiny amount of gray wash between the blades so the swords keep separation as they age. The biggest error is crowding the blades too close together which leads to merging at year two. Expect a quick single session and low to moderate pain. For daily wear, rolled-cuff button-downs highlight the stack, and a thin leather cuff on the opposite arm balances the visual weight, try a rolled cuff button down for shows.
3. "Break My Heart" Chest Script Over Heart
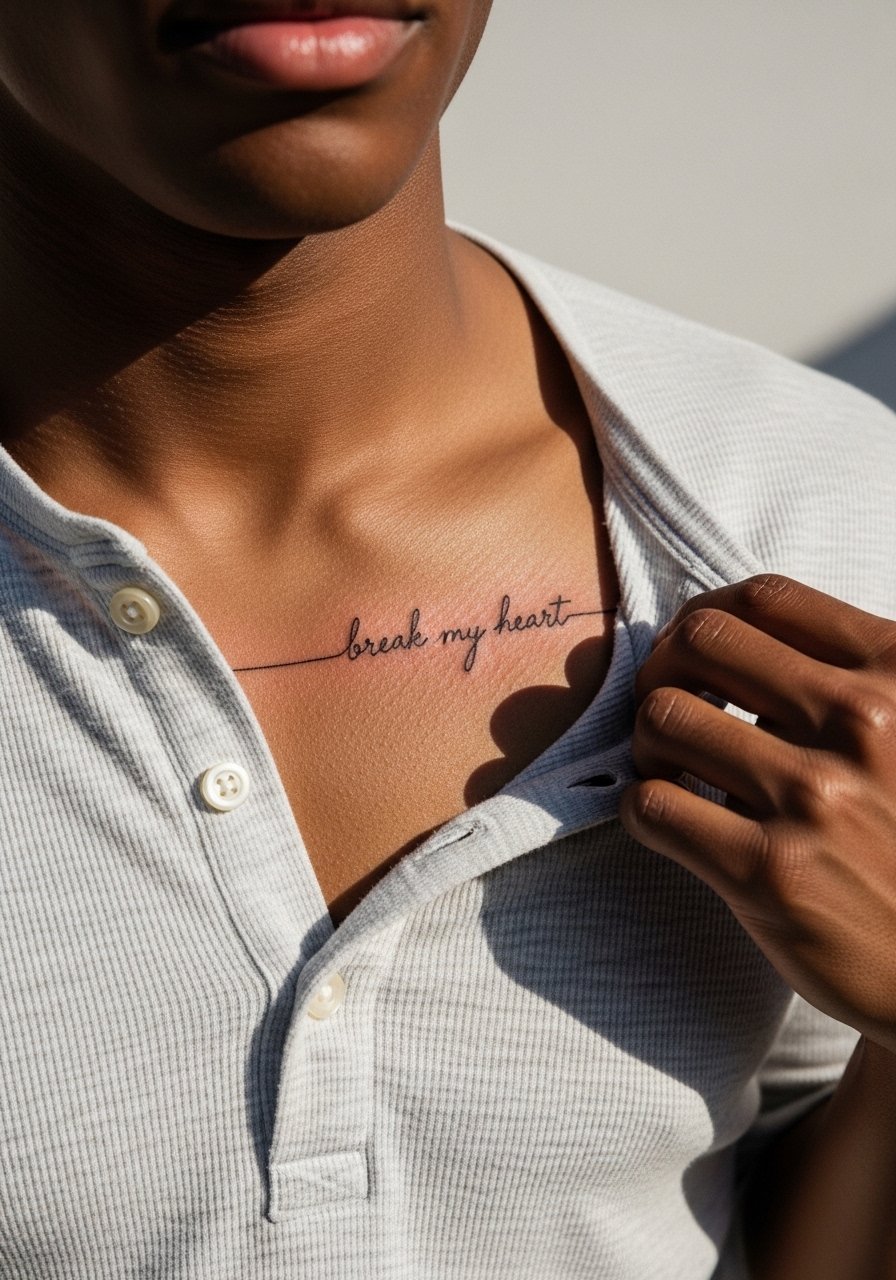
Chest text like this reads intimate, and the sternum area changes with weight and muscle shifts. During consult say you want a 2-inch horizontal script with generous letter spacing so the characters do not compress when the body moves. A common pain point is weight fluctuation stretching scripts, so I recommend scaling the text 10–20 percent smaller than the maximum area. Expect a single session and moderate pain. Pair with v-neck tees or an unbuttoned henley shirt to reveal just enough without exposing the whole chest.
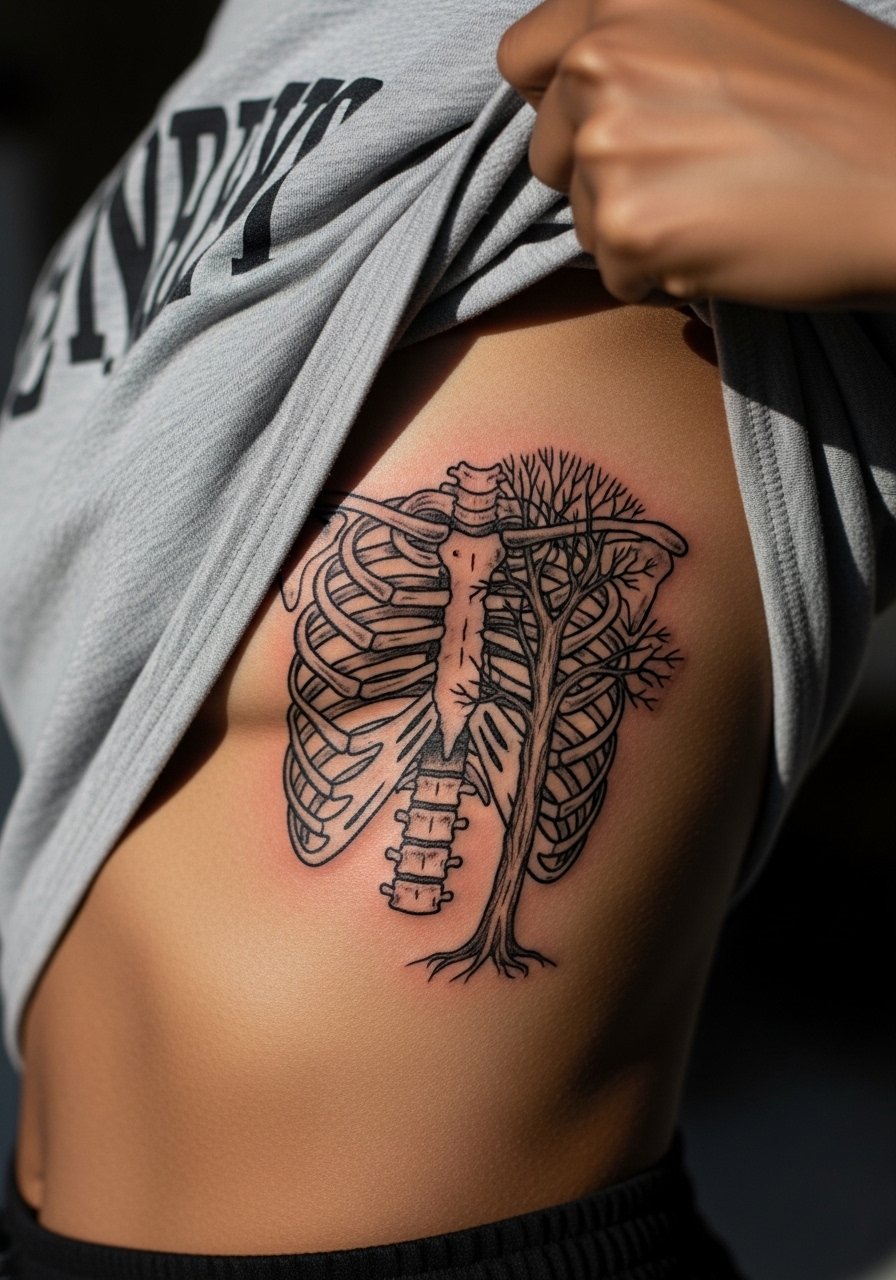
4. Flash-Tree on the Ribcage
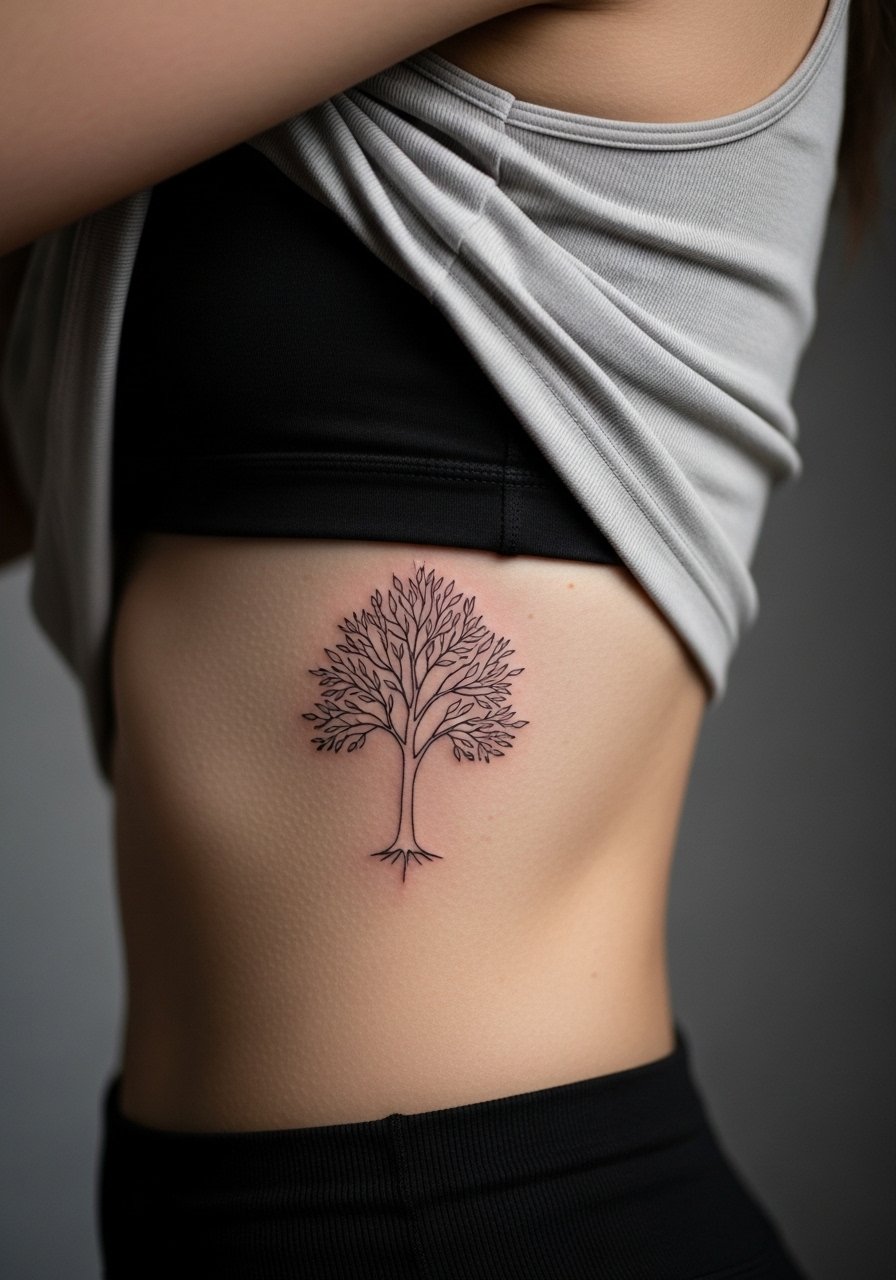
Fair warning, ribs are a high pain zone but they hide well under clothing. The standard mistake is going oversized on the ribs which makes stretching or weight change more obvious later. Ask for a 4-inch vertical design with spaced branches and firm primary lines so the branches do not blur into a shaded patch. Controversy exists about fine line on ribs. One camp says the skin stretch blurs lines within two years. The other camp says with correct depth and spacing it settles fine. Ask your artist where they stand and request healed examples on ribs. For sessions, prefer a loose tank top you can lift easily without exposing more than needed.
5. Cigarette and Booze Bottle Add-On Accent
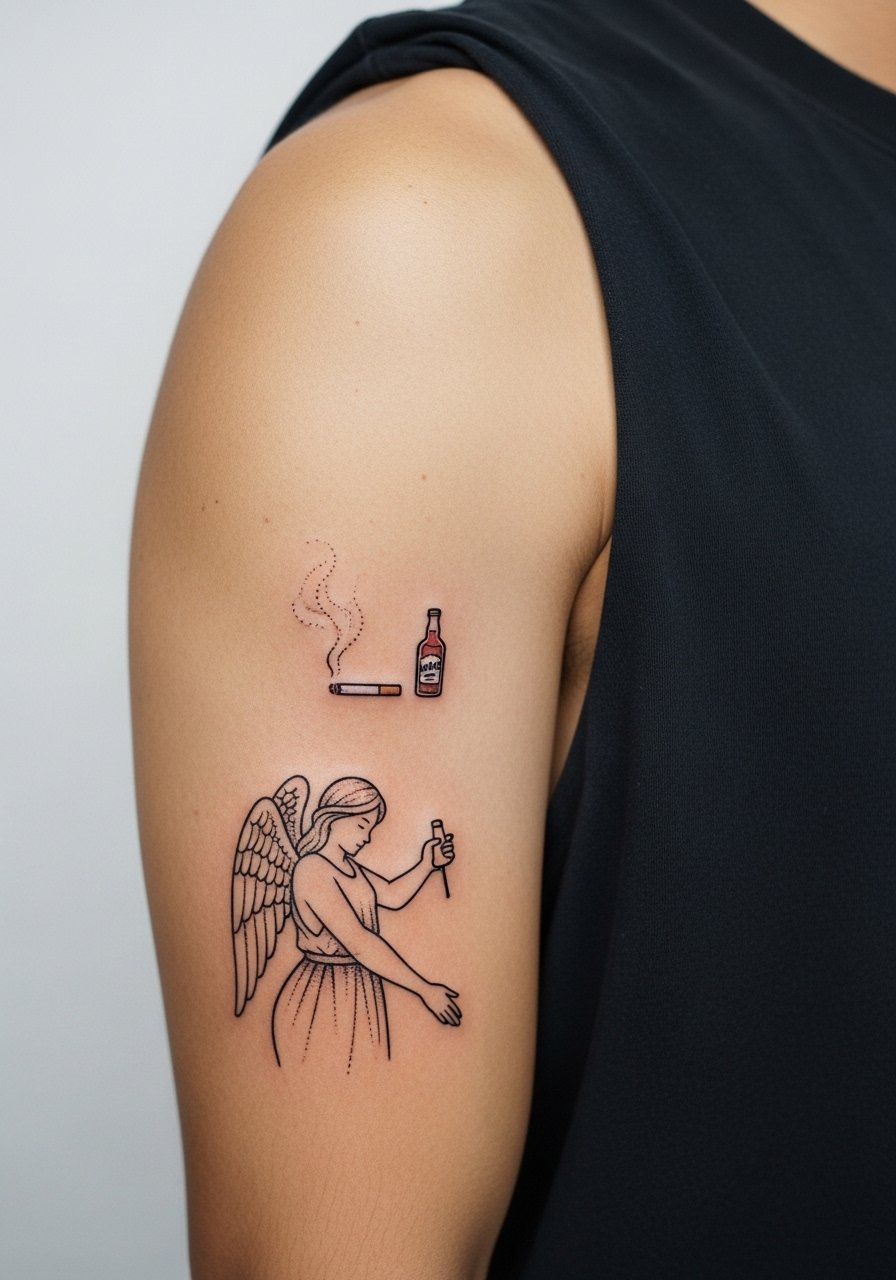
These cheeky micro accents are good as low-commitment add-ons to a larger arm piece. The trick is scale. Keep each accent at about one inch so they read as negative-space fillers rather than focal points. A frequent mistake is asking the artist to cram multiple party motifs into a small area, which looks cluttered once healed. Pain is minimal and you can usually get them as an add-on in the same session as a larger arm piece. For the appointment wear a sleeveless muscle tee so the artist can work without sleeve interference.
6. Anime-Inspired Upper Arm Outline
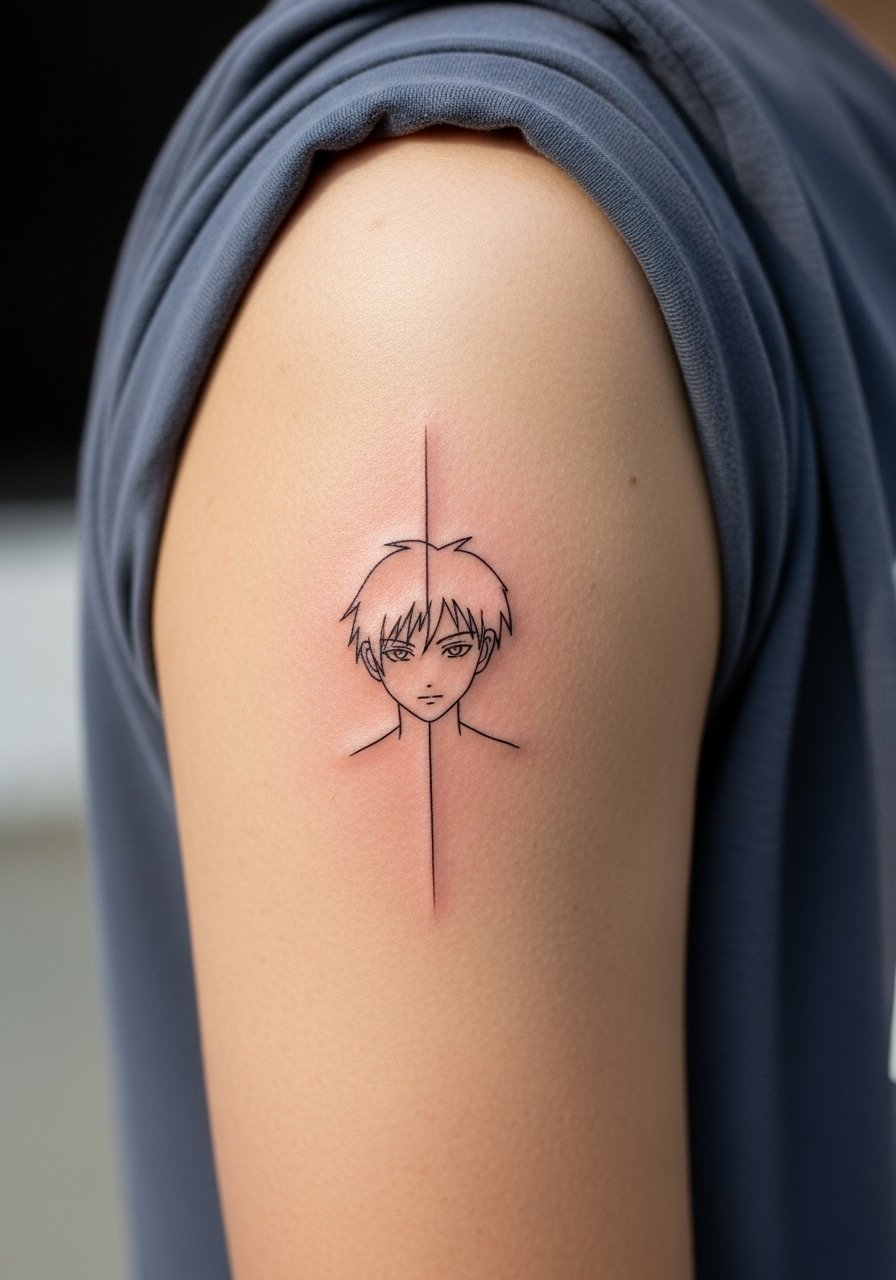
Anime outlines are currently trending with fans who want a subtle nod to favorite shows. The upper arm is forgiving and holds single-needle lines longer than wrist placements. Tell your artist to prioritize clean silhouette lines and avoid excessive interior detail that will blur. The usual mistake is asking for overly intricate facial features at a tiny scale. Expect one session and mild to moderate pain. For session comfort wear a short sleeve linen shirt you can roll up easily and keep the area accessible.
Studio Day Picks
Those first six pieces include wrist, forearm, chest, ribs, and upper arm work, so prep and a couple of specific tools make the session and the first week much easier.
-
Indie Sheep Milk Balm. A thinner texture than some heavier ointments, it helps with non-greasy moisture for fine line arm work without clogging pores.
-
Green Sheep Aftercare. Breathable balm noted by some for humid climates, useful for rib placements that sweat more during healing.
-
Australian Tea Tree Salve. A light anti-itch option that some people prefer on healed dotwork accents when irritation flares without heavy greasiness.
-
Thin protective film roll. Keeps small wrist and finger pieces cleaner during early wash cycles and reduces friction from clothing.
-
Aquaphor healing ointment. A thin layer for the first 48 hours can lock in moisture for tight single-needle work before switching to a breathable balm.
7. Music Lyric Curved Wrist Script
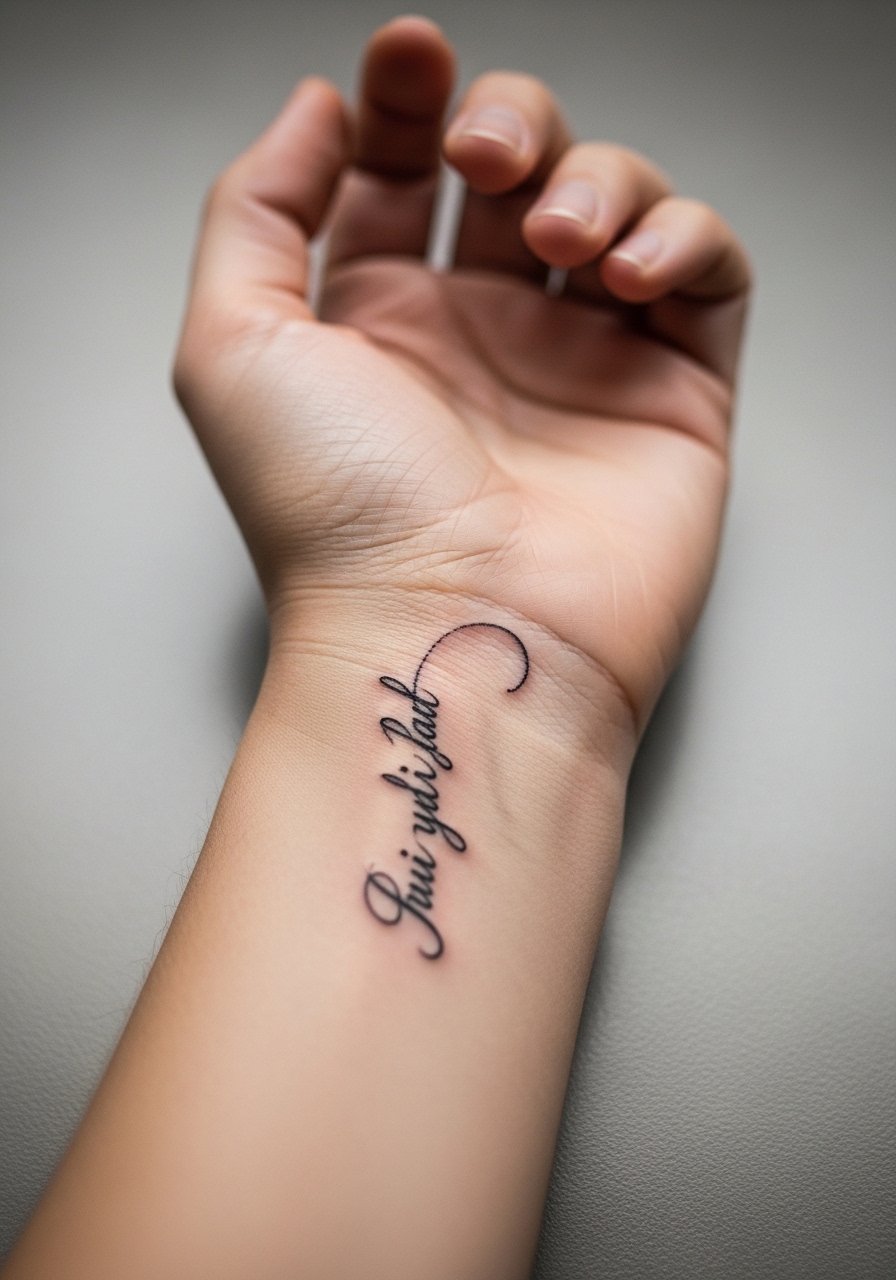
Wrist script is intimate but prone to fading because of constant movement and washing. The smart move is slightly wider letter spacing and a modest line weight so the characters do not merge after heavy use. A common complaint I hear is fast fading on darker skin tones when needle depth is inconsistent. Expect light to moderate pain and a short session. Style-wise, a minimalist leather strap watch on the opposite wrist frames this kind of text; try a minimalist leather watch to balance the look when you want to keep attention on the script.
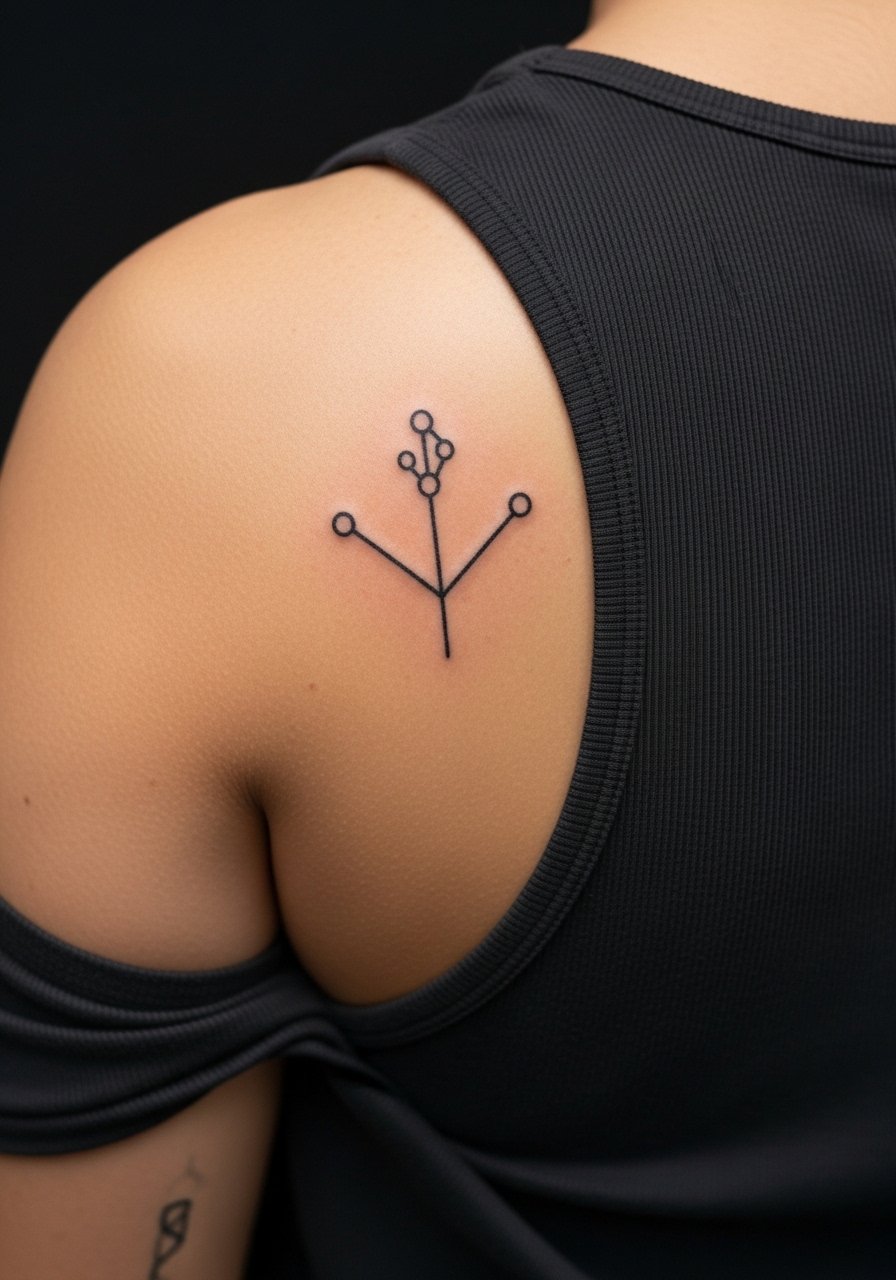
8. Back Flash Minimalist Tree
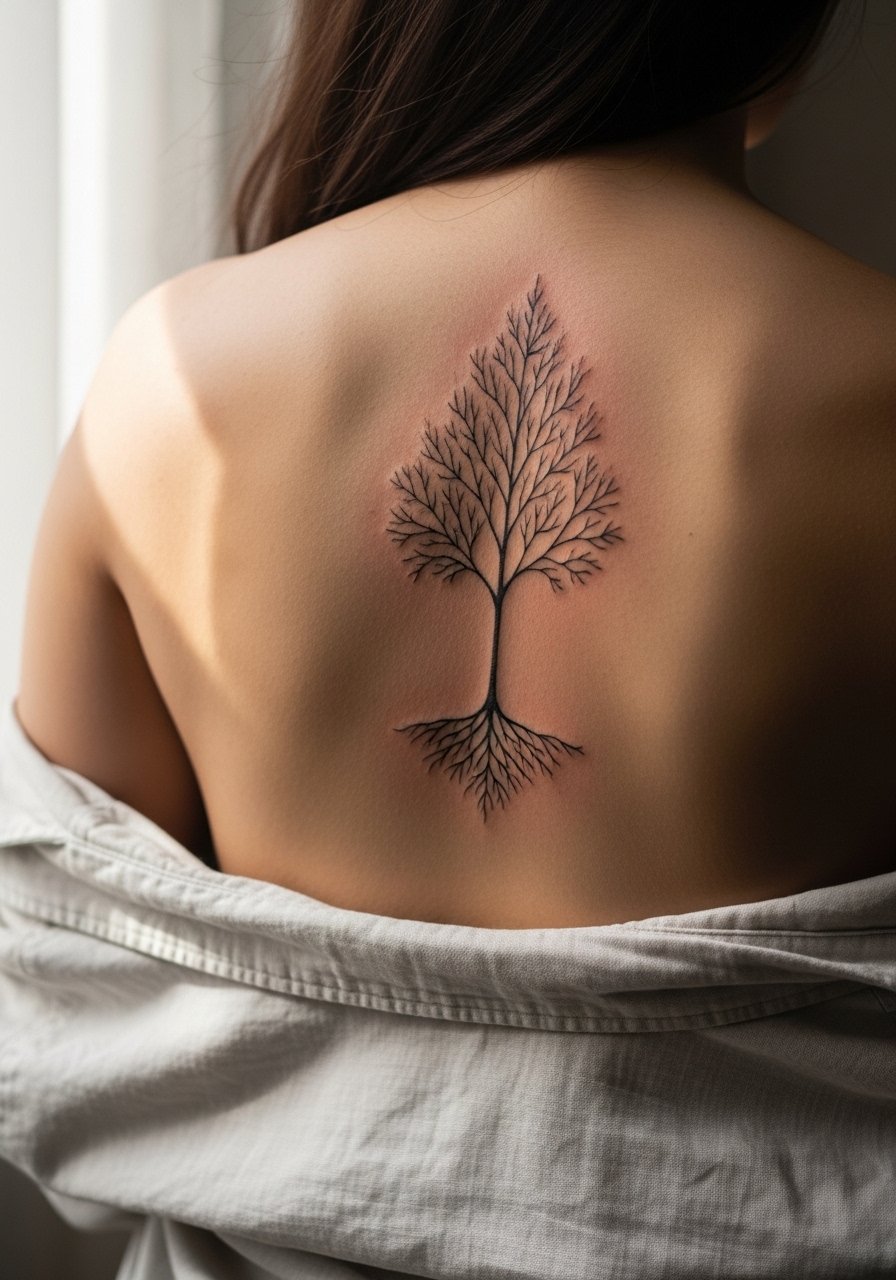
Upper back trees make great connective pieces for future patchwork and they tolerate slightly denser linework better than ribs. People often underestimate how much space a 5-inch back piece needs to avoid crowding future additions. A two-session approach often yields cleaner shading and more thoughtful branch spacing. Pain is low to moderate because the muscle cushions the needle. For shows, a backless tank or low-back crop frames the piece, and for the session wear a front-open loose shirt so you can lie down without smudging a fresh stencil.
9. Scaled Three Swords for Ankle Stack
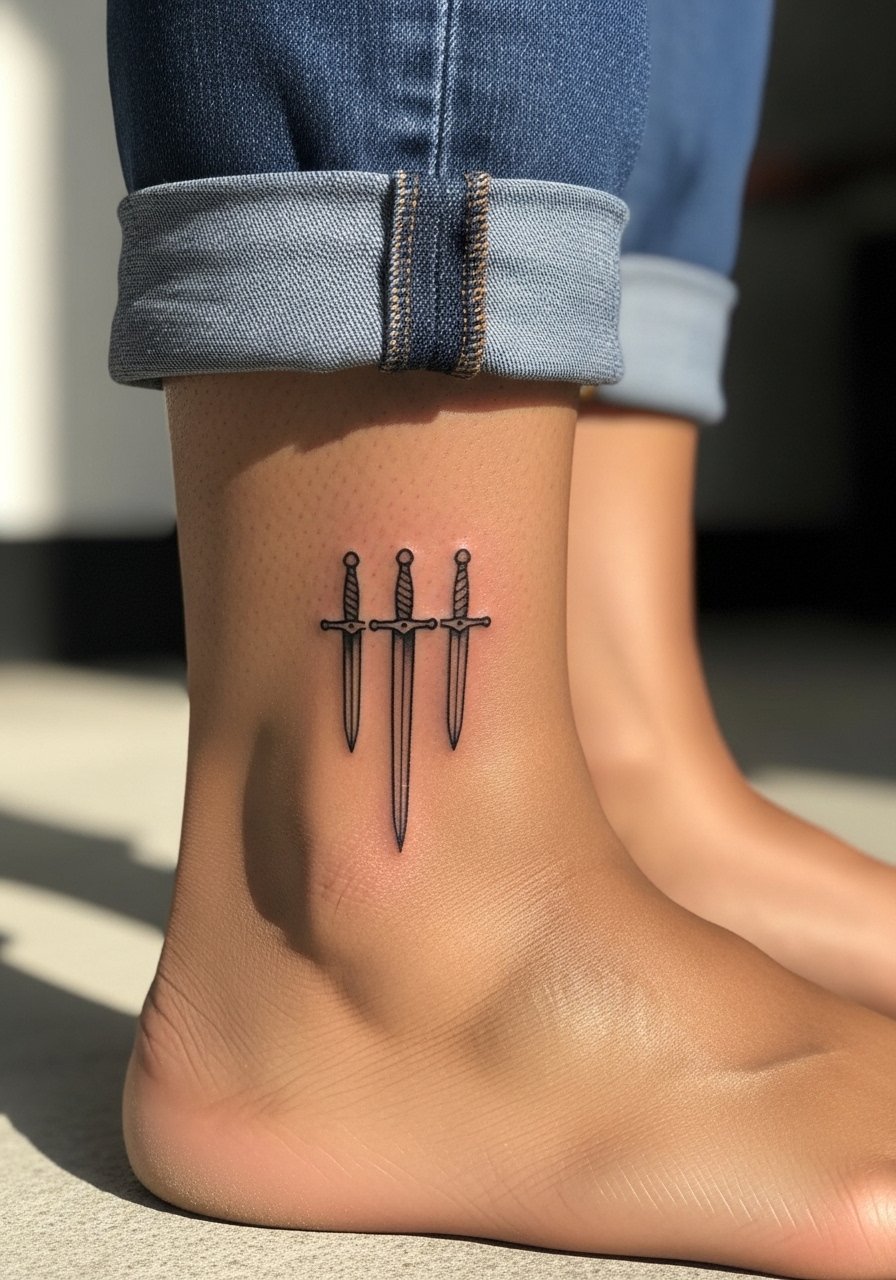
Scaling the three swords down for ankle placement tests family symbolism with lower commitment. Ankles see a lot of friction from shoes and socks so keep each sword small and spaced to avoid rubbing-induced blurring. A frequent error is matching forearm sizing for an ankle, which leads to cramped detail. Pain at the ankle tends to be higher than the forearm and healing needs attention to footwear. For showing it off wear jeans rolled up or sandals to keep the area visible and safe during the first week, try rolling with jeans rolled up to reveal ankle.
10. Dark Skin-Friendly Rib Flash with Thicker Lines
Dark skin adaptations matter. On melanin-rich tones, ultra-fine lines can wash out visually while slightly thicker lines maintain contrast. For a rib flash-tree, ask your artist to increase primary line weight and favor clear silhouettes over tiny interior detail. The controversy around fine line longevity is real. One camp says fine line fades fastest on high-movement areas. The other camp says technique matters more than needle size. For this placement, opt for the thicker minimalist option and plan a touch-up window at six to twelve months if needed. Wear a cropped tee for the session so only the necessary area is exposed.
11. Micro Dotwork Halo Behind the Ear
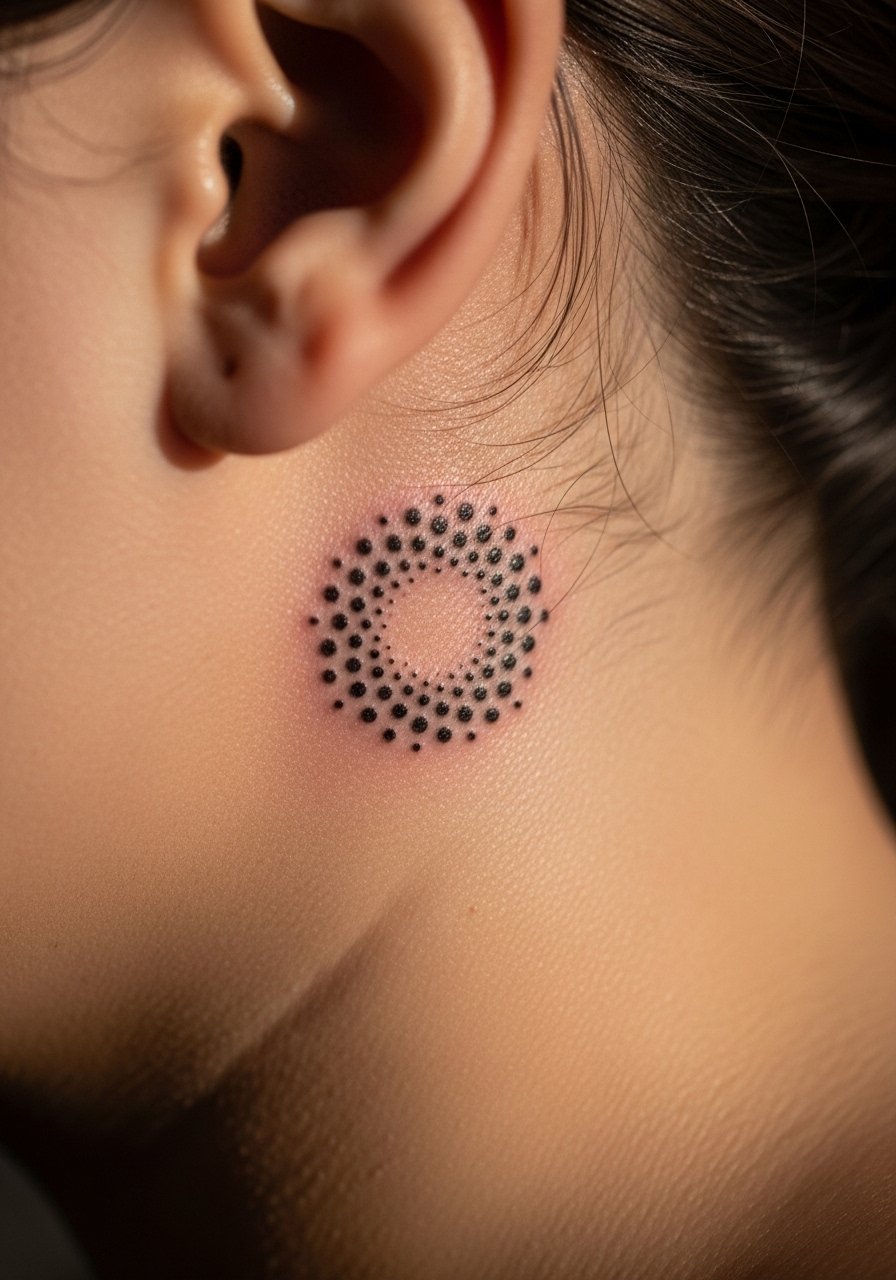
Behind-the-ear micro pieces sit close to hair and have a discreet reveal. Keep designs tiny and ask for dotwork instead of single-line script so the texture reads well at small scale. Sensitive placement means you need an artist experienced with tight anatomy. The session is quick but can be noisy because of proximity to bone. For booking, expect a focused single-needle approach and tell the artist you want the stencil placed a hairline lower or higher to avoid awkward overlap with hair. This area benefits from nape-covering shirts for the first day to reduce hair oils on fresh ink.
12. Minimalist Mountain Range Across Collarbone

Collarbone placements read well with horizontal simple geometry. The danger is placing too close to the bone where lines can bounce and heal patchy. Ask for soft spacing and slightly heavier anchor lines along the peaks so the silhouette remains crisp. Pain varies because the collarbone is bony, but most report manageable sharp moments. For showing it off choose wide-neck tees or a v neck tee that reveals the line naturally without pulling at the skin during healing.
13. Single-Needle Anime Eye on Inner Forearm
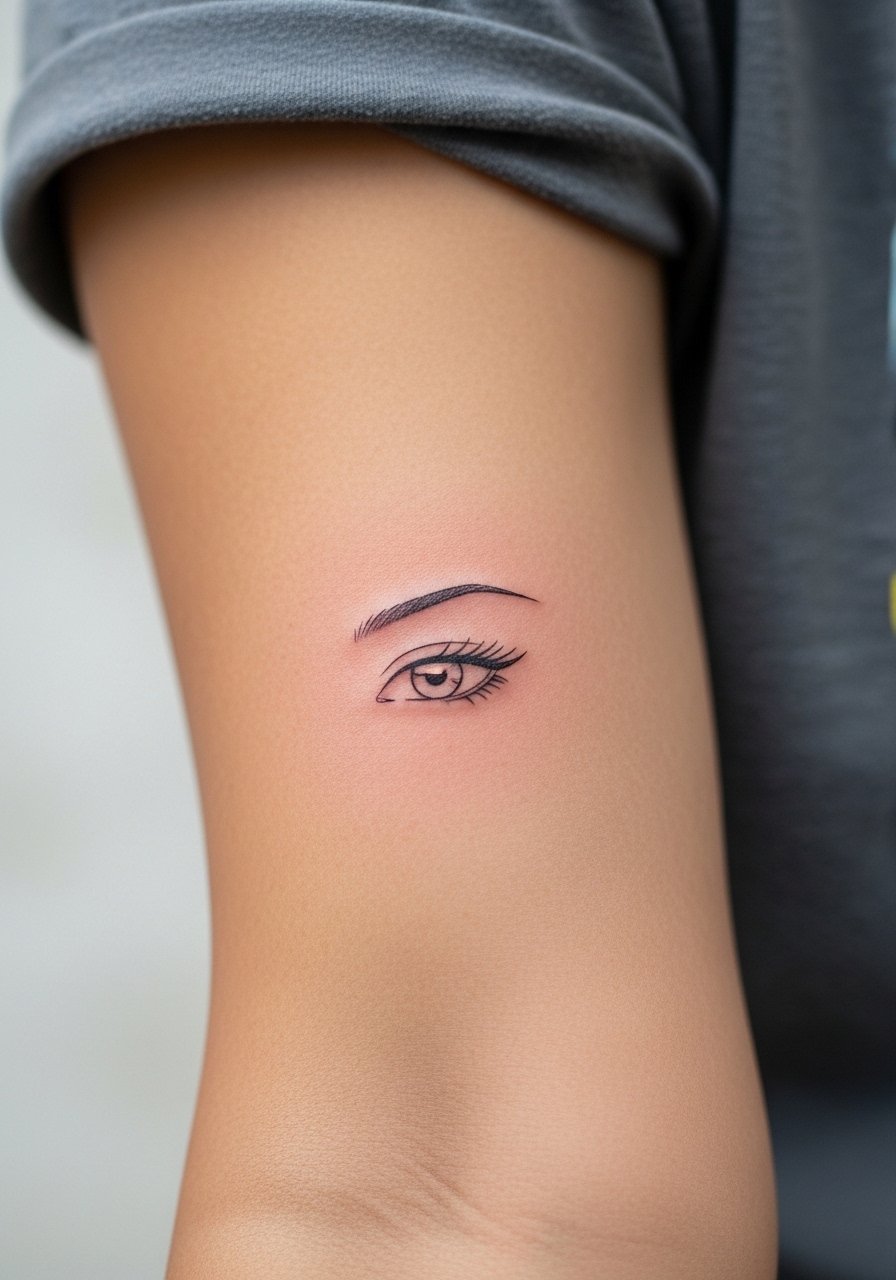
A single feature, like an eye, can age better than dense scenes if scaled correctly. Specify single-needle outline with minimal interior detail and ask the artist to avoid tiny lashes that will blur. Common mistake is requesting vignette shading inside at a tiny scale which becomes muddy. Expect a short session and mild discomfort. This placement pairs well with rolled sleeves and casual linen tops for a clean reveal, consider a short sleeve linen shirt for both session access and styling.
14. Minimalist Constellation on Ankle
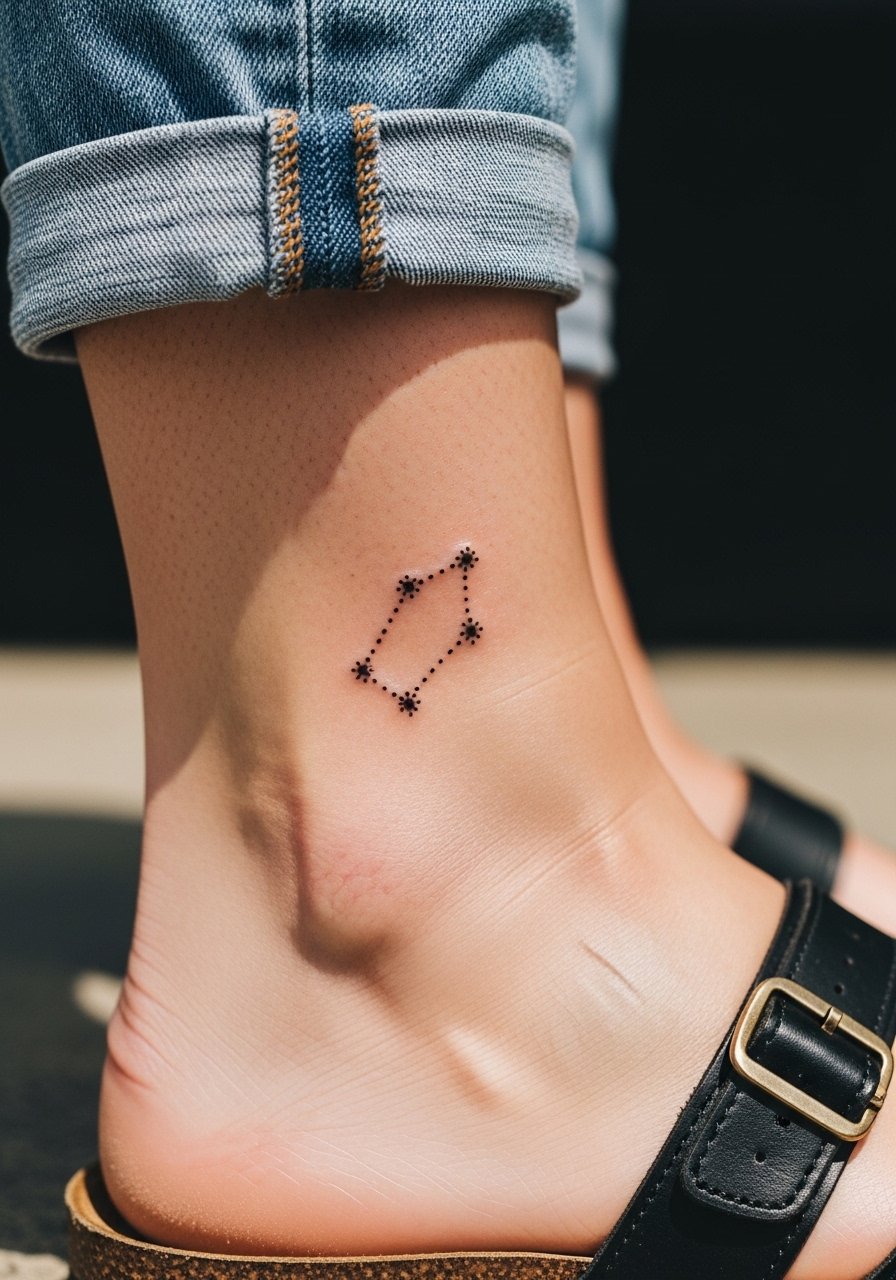
Constellations are low-commitment and translate well to the ankle if dots have space to breathe. The typical error is cramming stars too close together. Keep dot spacing wide and slightly increase dot size for longevity. Expect higher pain than forearm and watch footwear that rubs during the first two weeks. For summer shows, a long skirt or sandals reveals the piece; try lightweight jeans rolled up or simple sandals so the area avoids constant friction.
15. Stipple Shaded Mini Sleeve Starter on Outer Arm
If you want to grow a collection, a mini sleeve starter that leaves breathing room for future patches is smart. Ask for stipple shading and clear negative space lanes so new pieces slot in without clash. The common pitfall is filling the whole quadrant at once which limits future planning. Sessions can be split into short appointments and pain is moderate. For the session wear a sleeveless athletic shirt for easy access and to protect fresh ink from sleeve friction.
16. Upper Back Tree Connector for Patchwork
This version is explicitly designed to link future arm or back pieces over time. The design favors bold primary lines and open negative space to avoid future crowding. The mistake is starting with too much dense detail that blocks later additions. Two short sessions usually allow clean placement and room for touch-ups as your collection grows. For sessions wear a front-open shirt so you can lie on the table without smudging the stencil.
17. Micro-Realism Tiny Wolf on Calf
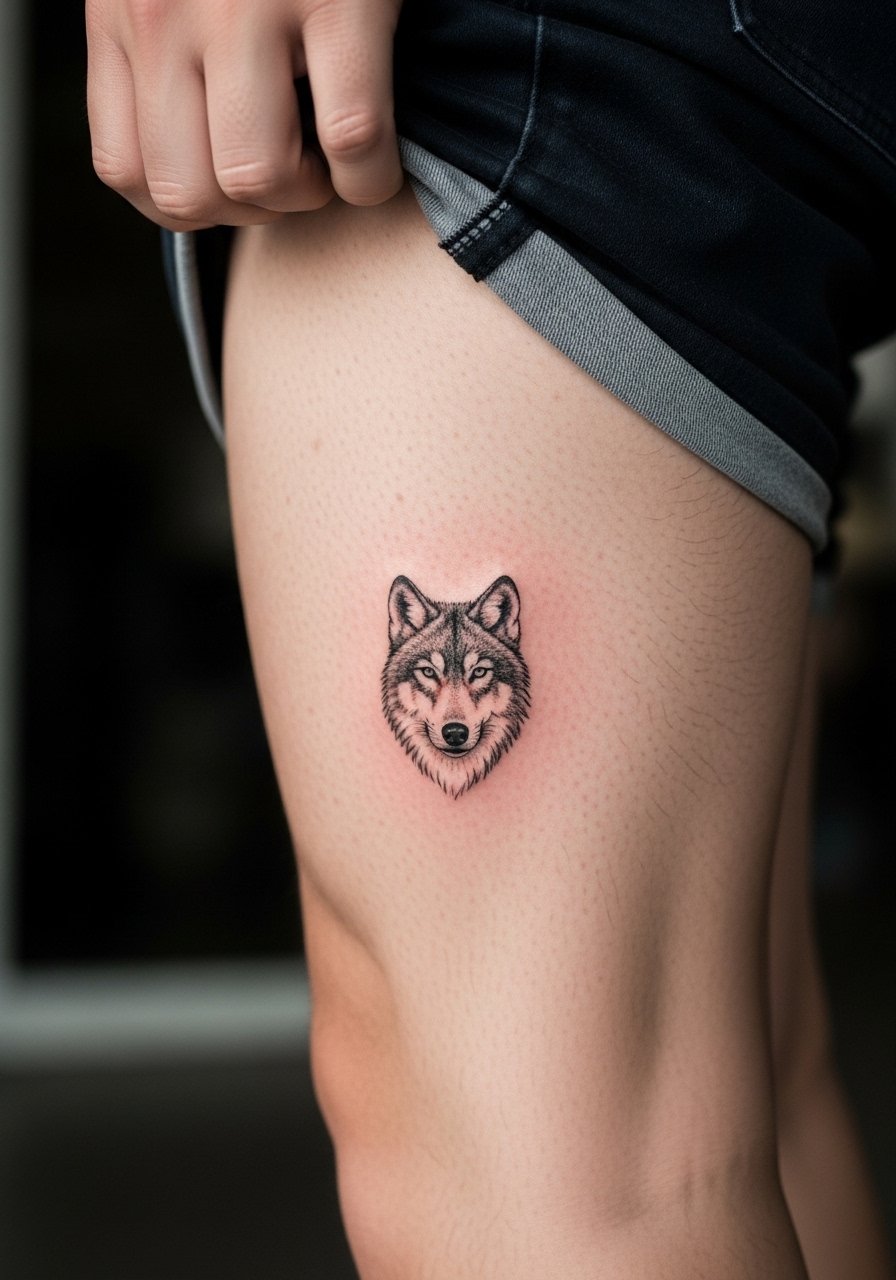
Calf placements tolerate slightly more contrast and micro-realism at a small scale, making them a good alternative to overly fragile wrist text. The error people make is packing micro detail into a space smaller than two inches. Specify that you want emphasis on silhouette and a restrained amount of internal shading. Pain is low to moderate and sessions are short. For showing it off, wear shorts or a skirt and avoid tight socks during the first week to prevent rubbing.
Frequently Asked Questions
Q: Will fine line scripts like the chest "break my heart" fade faster on the ribs or chest?
A: Fine line can soften faster on zones that stretch or rub a lot, like the ribs. One camp of artists says ribs blur within two years, another camp argues technique and spacing prevent that. For text, ask for slightly wider letter spacing and plan a touch-up window at six to twelve months.
Q: How should I adjust a Hacker-inspired forearm sword to hold up on darker skin?
A: On melanin-rich skin, thicker primary lines and less tiny interior detail usually preserve legibility. Ask your artist for stronger silhouette lines and a small amount of gray wash for depth rather than micro strokes that can disappear.
Q: Can ankle stacks survive daily shoe friction and still look crisp?
A: They can if you keep dot sizes and spacing generous and avoid placing the design where the sock cuff hits. Treat footwear as part of the healing plan. If you need to protect the area, slip on sandals for the first few days and avoid tight socks.
Q: What should I wear to a rib or chest session to make the process smoother?
A: Choose a front-open shirt or a cropped top that exposes only the area being tattooed so the artist has clean access without you feeling exposed. A loose tank top or an unbuttoned henley shirt works well.
Q: If I want a small anime outline, how do I avoid the "looks great fresh, fades quick" problem?
A: Ask for simplified silhouettes, avoid tiny interior detailing, and request a slightly thicker anchor line. Plan a single touch-up at six to twelve months if you want it to stay crisp.
