
Fine line tattoos dominate Pinterest and reels right now, but the tattoos that still read clean after a few years are often the ones with bold linework and smart placement. That gap between what looks amazing fresh and what still looks sharp after sun, sweat, and daily life is exactly why bite mark tattoos need style-by-style thinking. Below are 17 modern bite mark tattoo ideas that consider aging, placement, and how you actually wear them.
1. Realistic Human Bite Mark on Collarbone
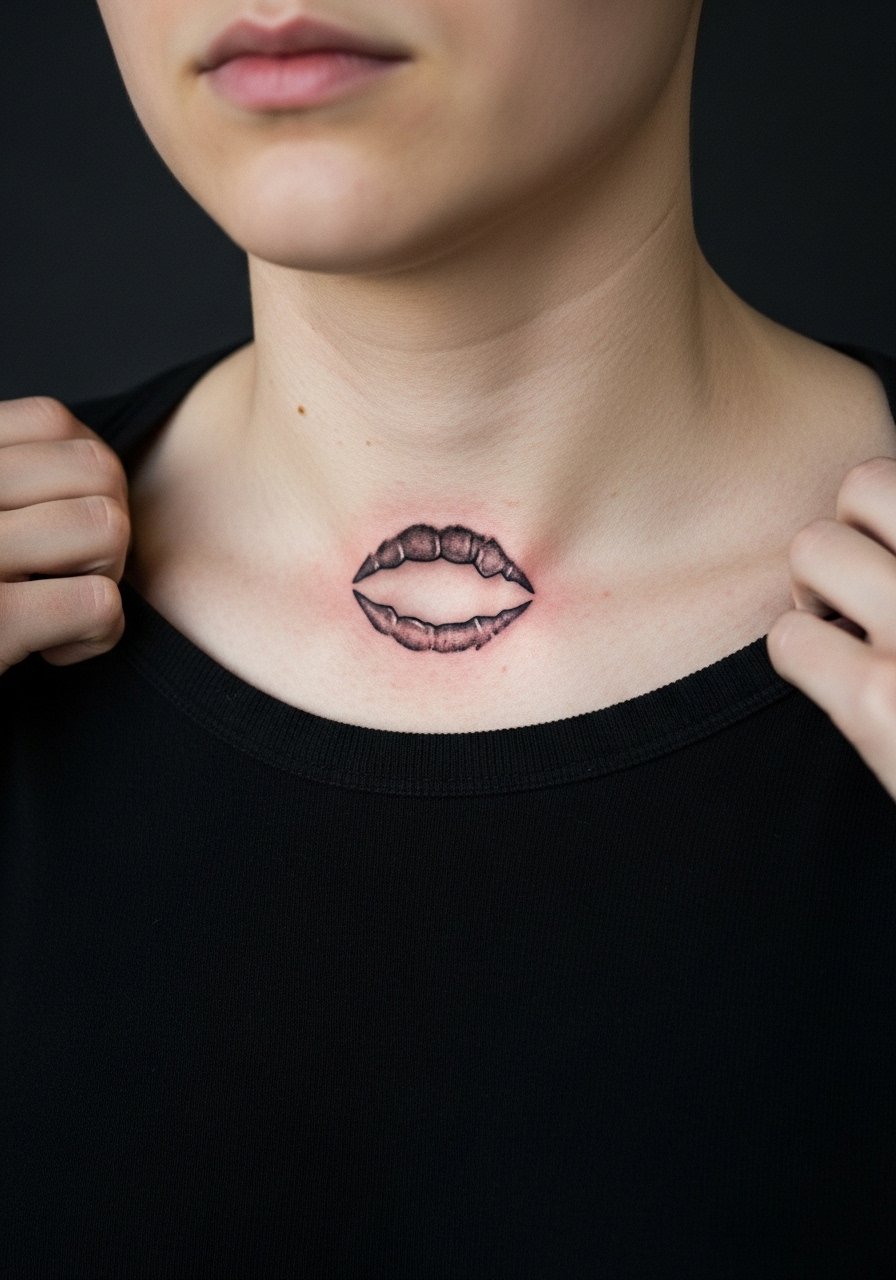
I recommend this if you want a dramatic piece that reads like a mark left in a single moment. I've seen collarbone bites hold up well when artists use deep but not heavy saturation and keep the size around two to three inches. Tell your artist you want clear tooth depressions and subtle scarring around the edges so the piece reads healed rather than raw. Pain is moderate to high because of thin tissue over bone. For sessions wear a loose v neck tank so the artist can expose the area without straps digging in. Expect a single two-hour session and a possible touch-up at year two if you want the micro-details crisp.
2. Minimalist Jawline Bite Outline on Neck
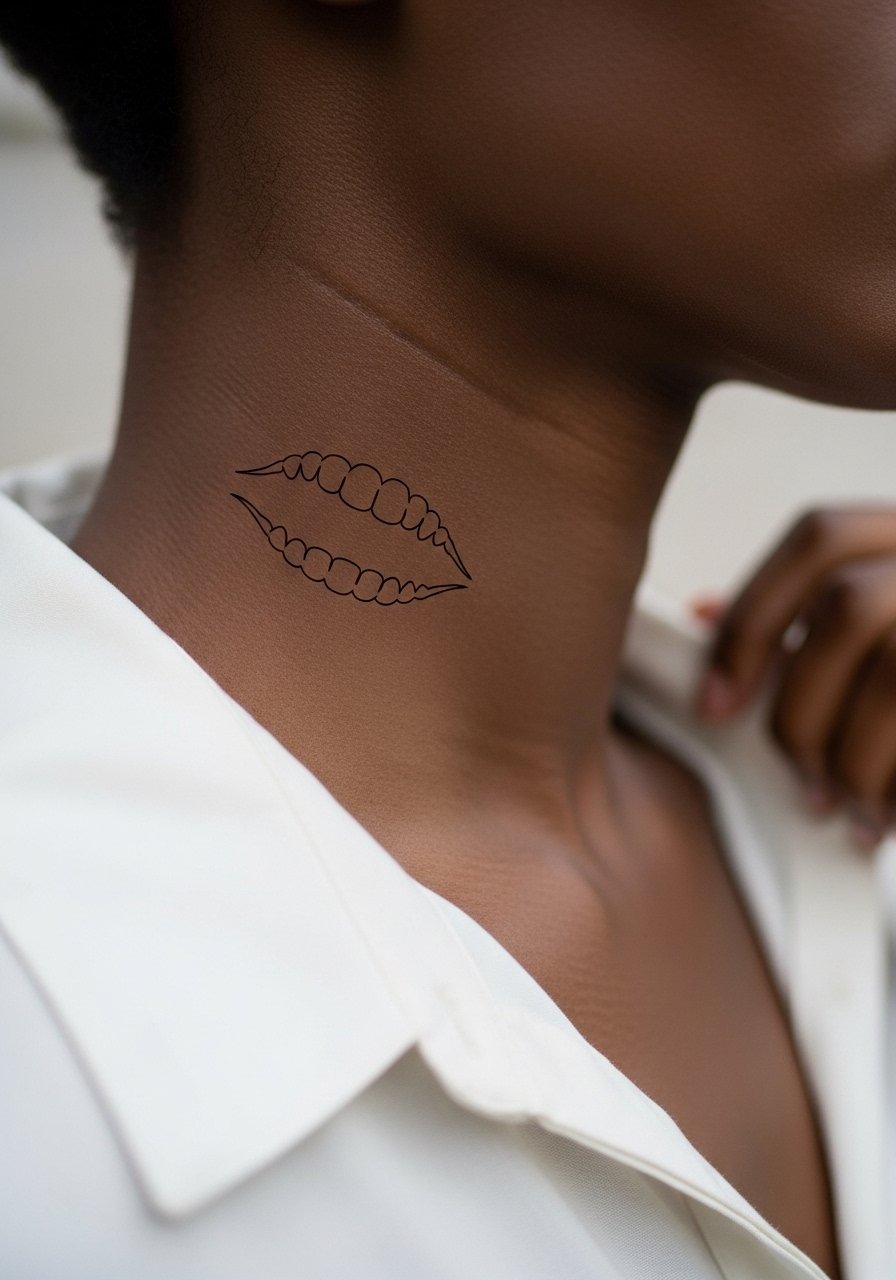
The neck reads as a bold placement even when the tattoo is tiny. This fine line jawline bite is ideal for someone who wants discreet edge with summer visibility. There is a real debate about fine line on necks. One camp says the thinner skin and movement make lines blur within a year. The other camp insists that with correct needle depth and spacing the lines settle fine. Ask the artist where they land on that before booking. Pain on the side neck is high. For showing it off try a high neck crop top pulled slightly lower for photos. Plan one session under two hours and budget for a touch-up at six to twelve months if you pick fine line.
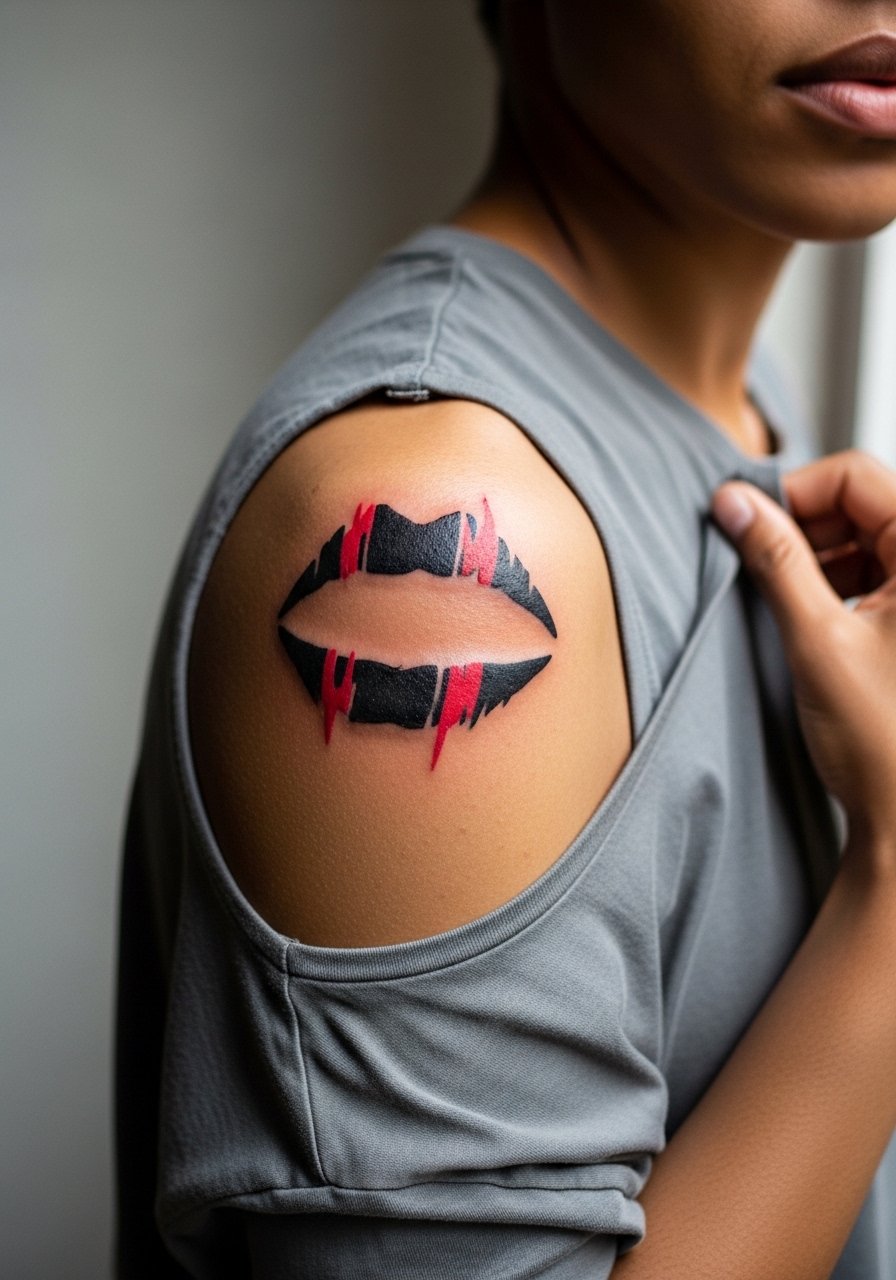
3. Neo-Traditional Vampire Bite with Drips on Forearm
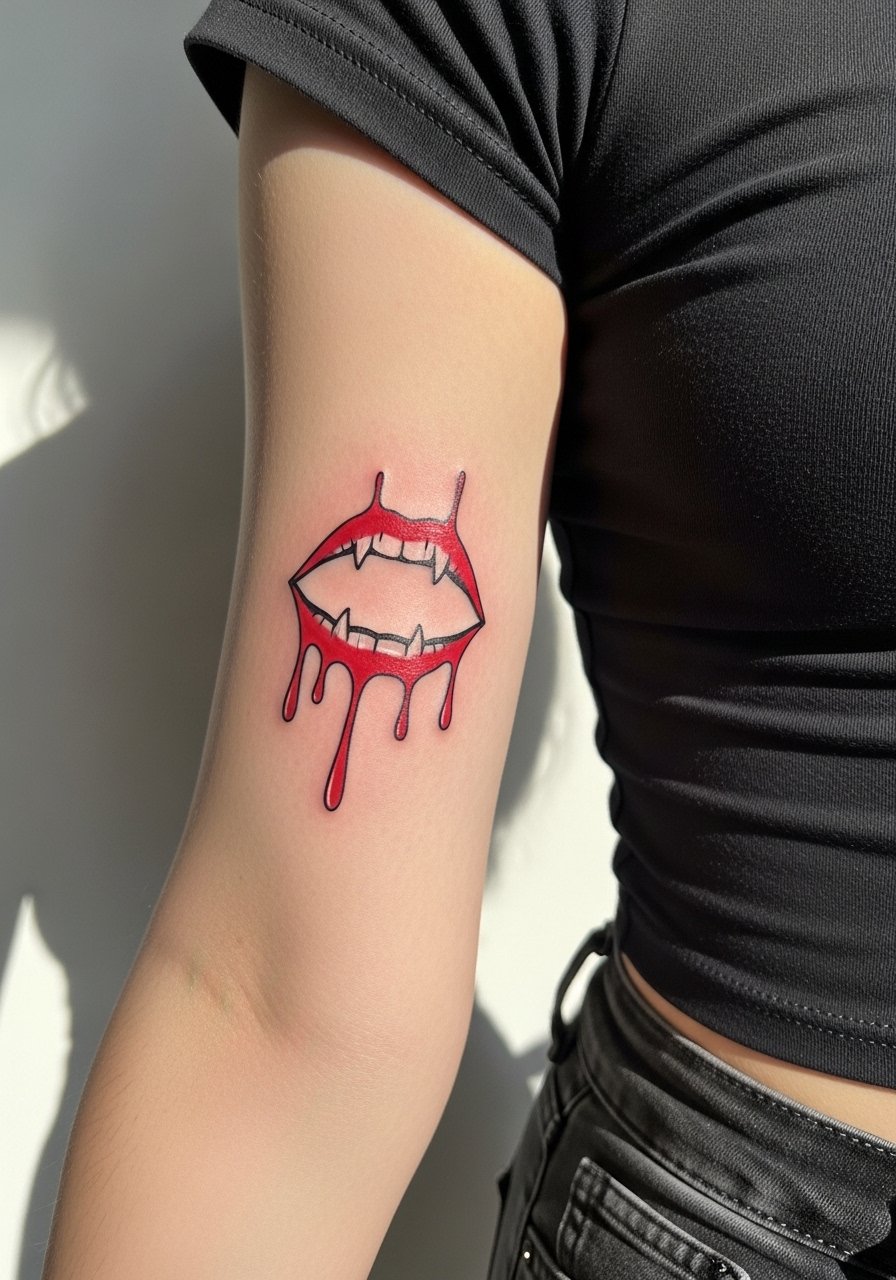
If you like theatrical work, this neo-trad option reads as a statement across an arm. The saturated red and black outline retain contrast better than pale washes. In my experience bright reds on forearms keep their punch if the artist lays down solid saturation and you protect it from sun after healing. Tell your artist you want crisp outlines for the drip details and moderate saturation rather than a painterly wash. Forearm pain is low to moderate and sessions usually take one to two hours. For casual wear, roll the sleeve on a rolled sleeve denim jacket to frame the piece. Expect color touch-ups at year two depending on sun exposure.
4. Blackwork Animal Bite Mark on Outer Thigh
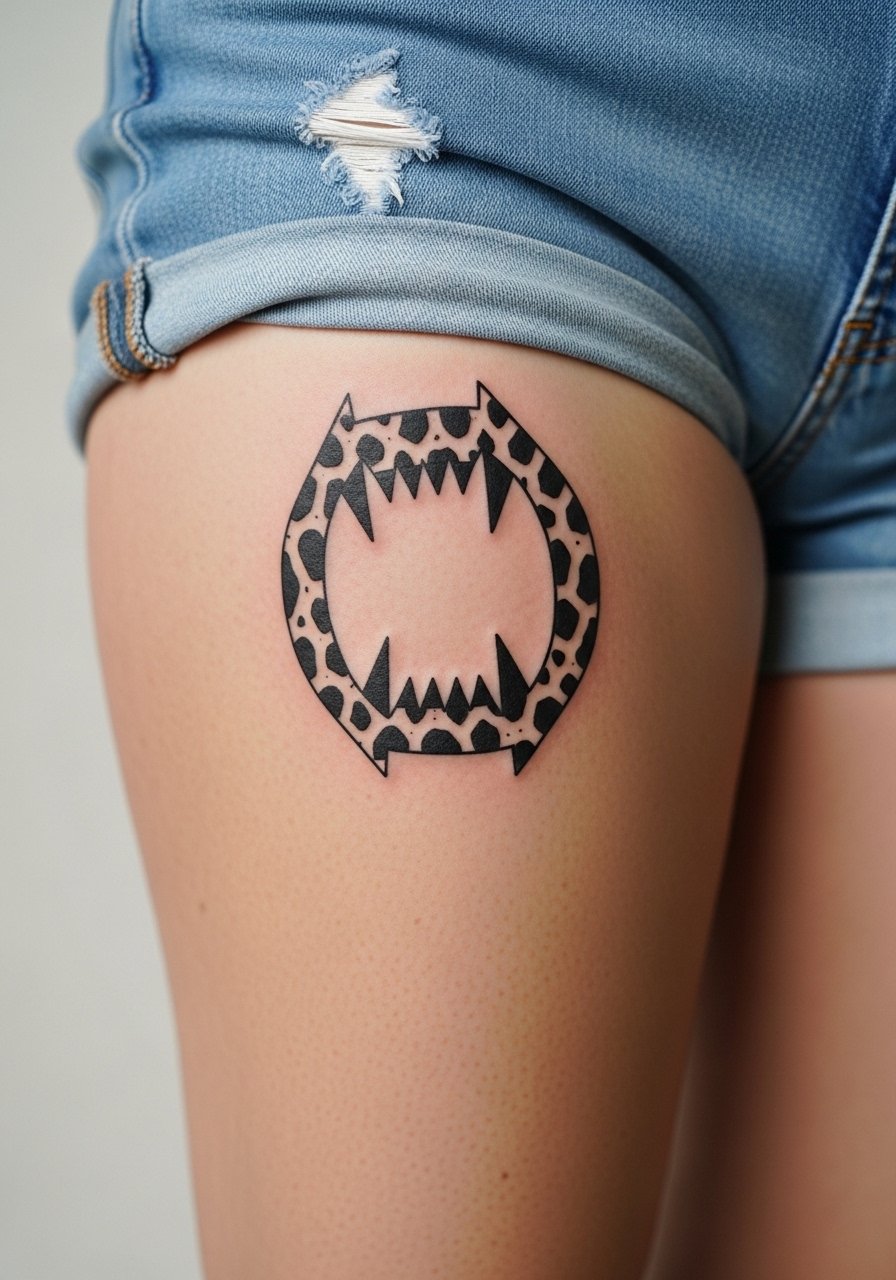
Blackwork is perfect on the outer thigh because the area tolerates heavy saturation and the skin stretches less than inner thigh zones. I often recommend blackwork here for anyone worried about fine line fading or post-weight changes. Tell your artist to keep the edges simple and the fill dense so the piece ages into a strong silhouette. Pain is low to moderate. Wear high waist leather shorts to show it off, and bring loose shorts for the session so nothing rubs the fresh ink. Two sessions may be needed for full saturation and a single touch-up at year one is common.
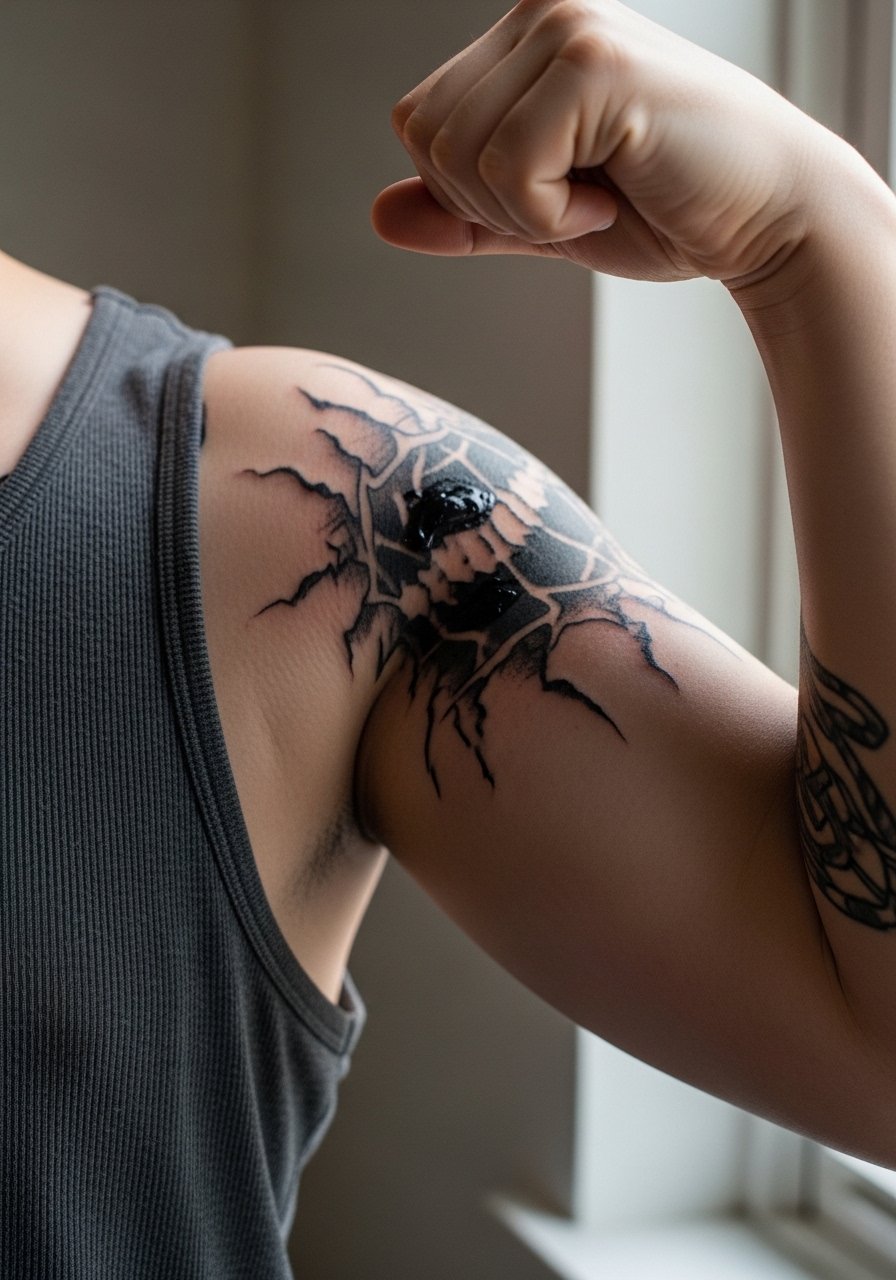
5. Trash Polka Abstract Bite Imprint on Shoulder
Trash polka thrives on contrast and motion, which makes the shoulder a solid canvas. The chaotic black strokes around a bite impression read like a scar rewritten into art. The biggest mistake is crowding detail too close to the bite impression. Ask for broad strokes and a few red accents kept deliberately saturated. Shoulder pain is low and sessions run one to two hours. For session wear a sleeveless loose tee you can pull down or aside. This style holds up well if saturation is dense and you avoid heavy sun exposure in the first year.
6. Fine Line Double Bite Marks on Inner Wrist
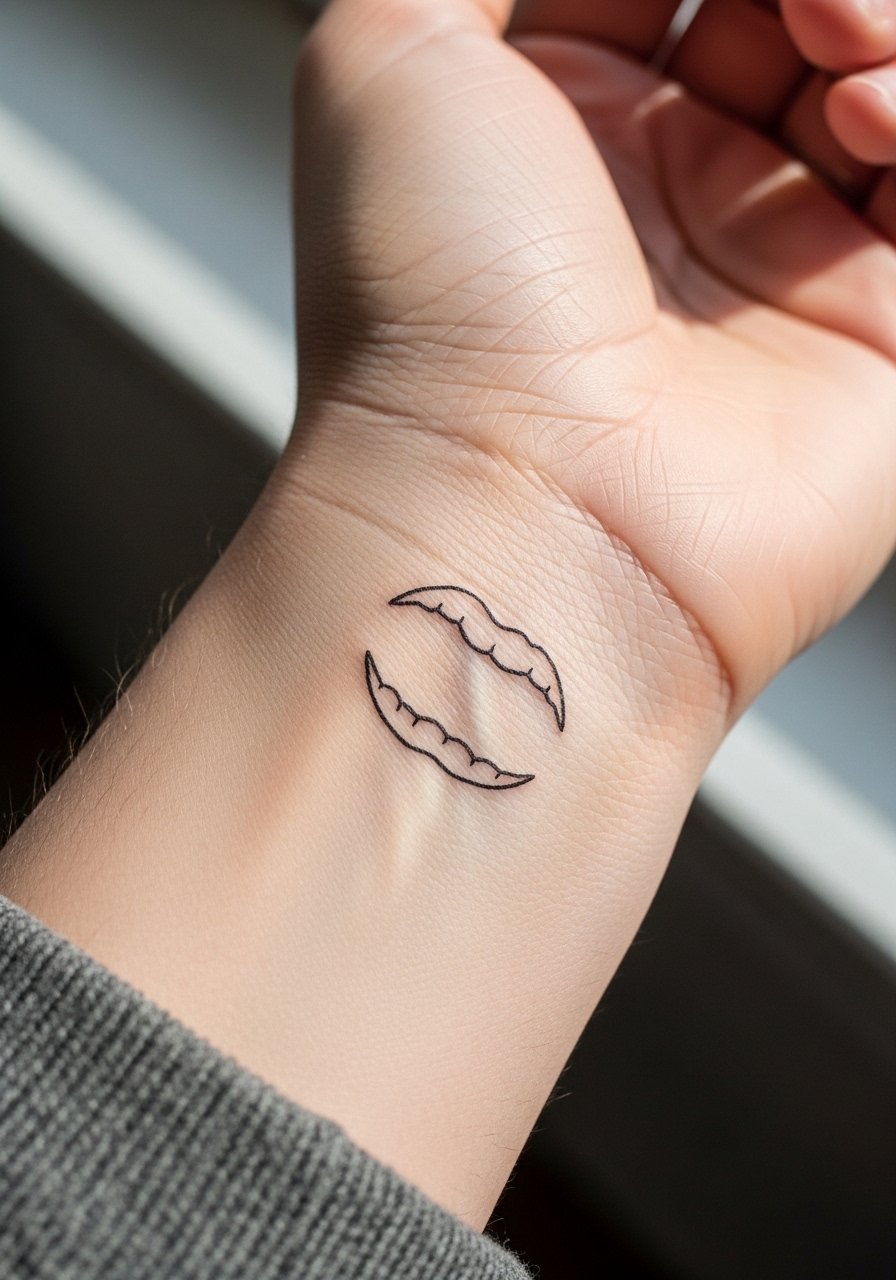
The wrist is delicate and shows aging fast. Fine line double bites are elegant when small, but they require precise spacing to prevent merging. The common failure is going too small or choosing a needle depth that rides too shallow. In my experience wrist lines need a confident hand and a touch-up plan at six to twelve months. Pain is low to moderate. For session comfort wear a flowy sleeve blouse you can push up without snagging. Expect a single short session and a possible touch-up to keep the twin marks crisp.
Studio Day Picks
The forearm, thigh, shoulder, collarbone, neck, and wrist pieces above each have different session and healing needs, so a few targeted items smooth the day and the first week.
-
Hildis Aftercare Balm. A thinner finish stops thick residue from pooling in tight tooth grooves on collarbone and wrist pieces while still locking in moisture.
-
Indie Blackwork Salve. Good for bold fills on thighs and shoulders since it helps prevent cracking along saturated edges.
-
Australian Tea Tree Gel. Lightweight and cooling for forearm and calf work during hot-weather sessions.
-
Fragrance Free Body Wash. Cleanses healing areas without leaving irritant residues, helpful for wrist and calf tattoos that rub against clothing.
-
Aquaphor Healing Ointment. Thin layer in the first few days helps protect fine line work on wrists and necks before switching to a balm.
7. Realistic Shark Bite Contour on Calf
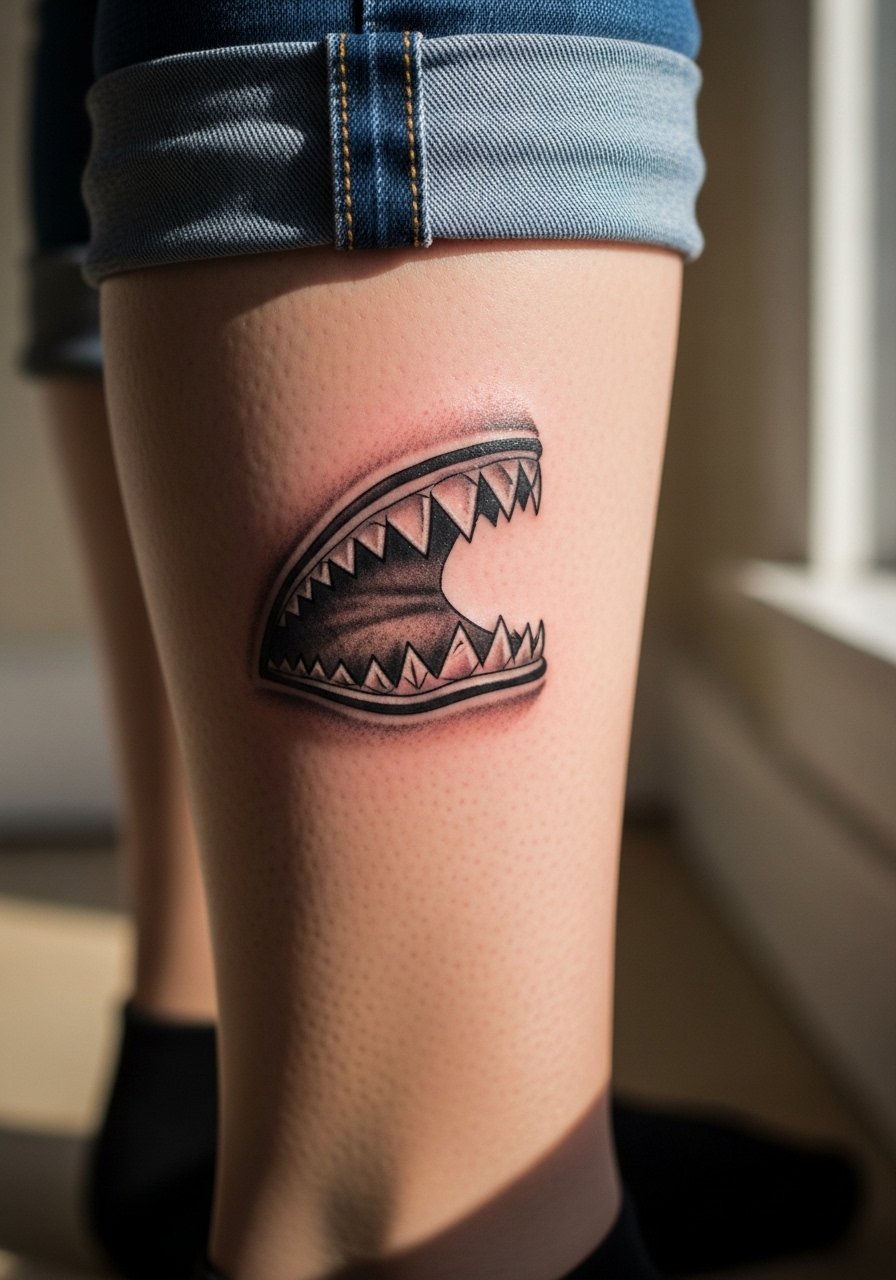
Calf work holds realism well because movement is moderate and skin is stable. A shark-bite contour with subtle depth cues reads as adventure without needing color. Tell the artist to emphasize the outer rim and keep inner shading airy so the impression does not become dense blotch after healing. Pain on the calf is moderate. For sessions wear rolled straight jeans or loose pants you can pull up without pressure. Two shorter sessions often get the detail right and a single touch-up at year two is common for realism.
8. Ornamental Bite Frame with Florals on Ribcage
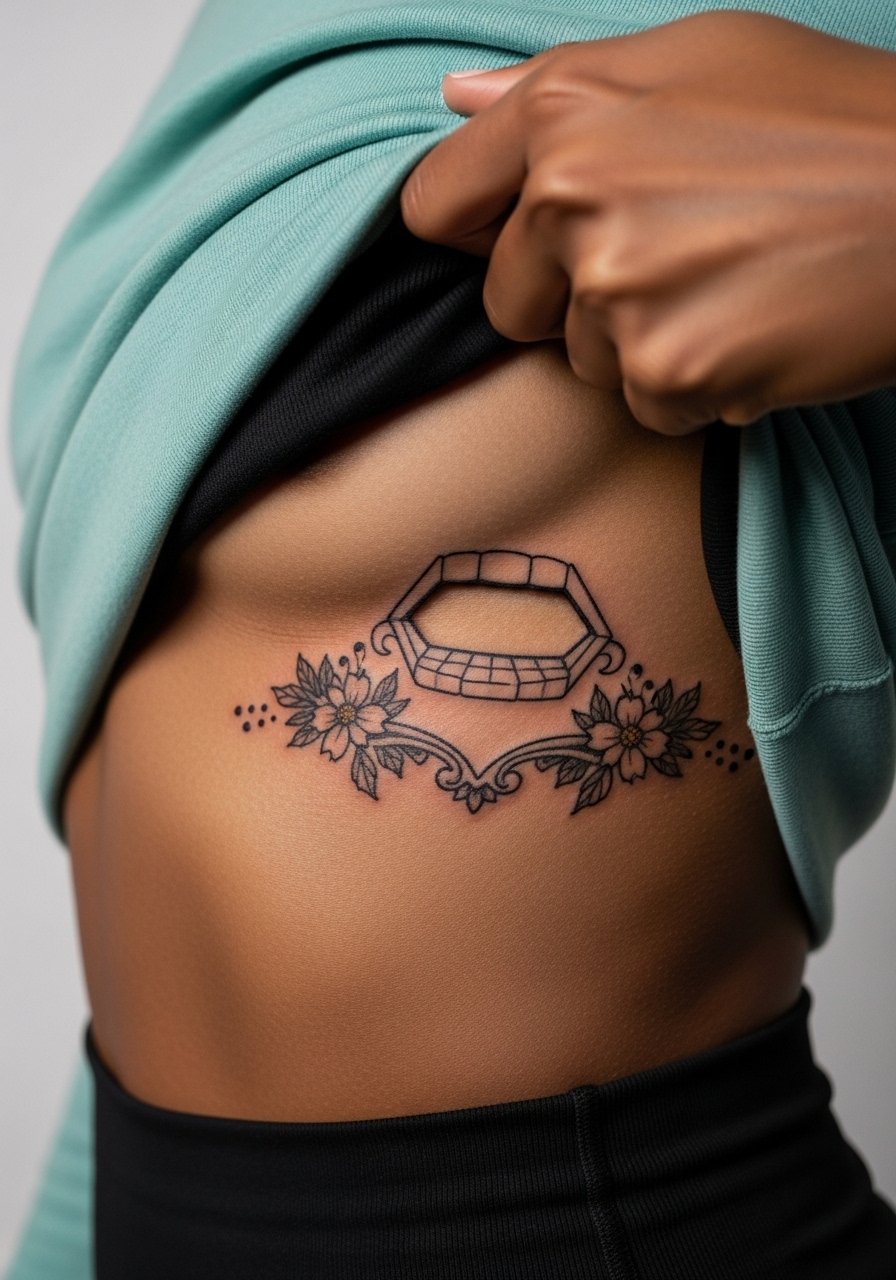
Fair warning: the ribcage is one of the highest pain areas. The ornamental frame softens the bite impression into an elegant piece that someone can hide easily for work. Artists split on whether fine line on ribs holds up. One camp warns the skin and breathing motion blur dense linework quickly. The other camp says with proper spacing and controlled needle depth the lines can remain legible for years. Bring reference photos that show the exact line weight you want. Wear a loose tank top for the session. Expect one to two sessions and plan for a touch-up if you choose delicate linework.
9. Ignorant Style Messy Bite on Inner Bicep
Raw, imperfect edges are the point here. The inner bicep has soft skin so heavy black shading reads bold rather than muddy if the artist spaces the marks correctly. The common mistake is trying to make an "authentic" messy bite by adding too many small strokes. Keep it bold and simple. Pain is moderate. Session time is usually an hour. For session wear a tank top so the artist has clear access. Expect the piece to age into a textured silhouette rather than a photo-real scar.
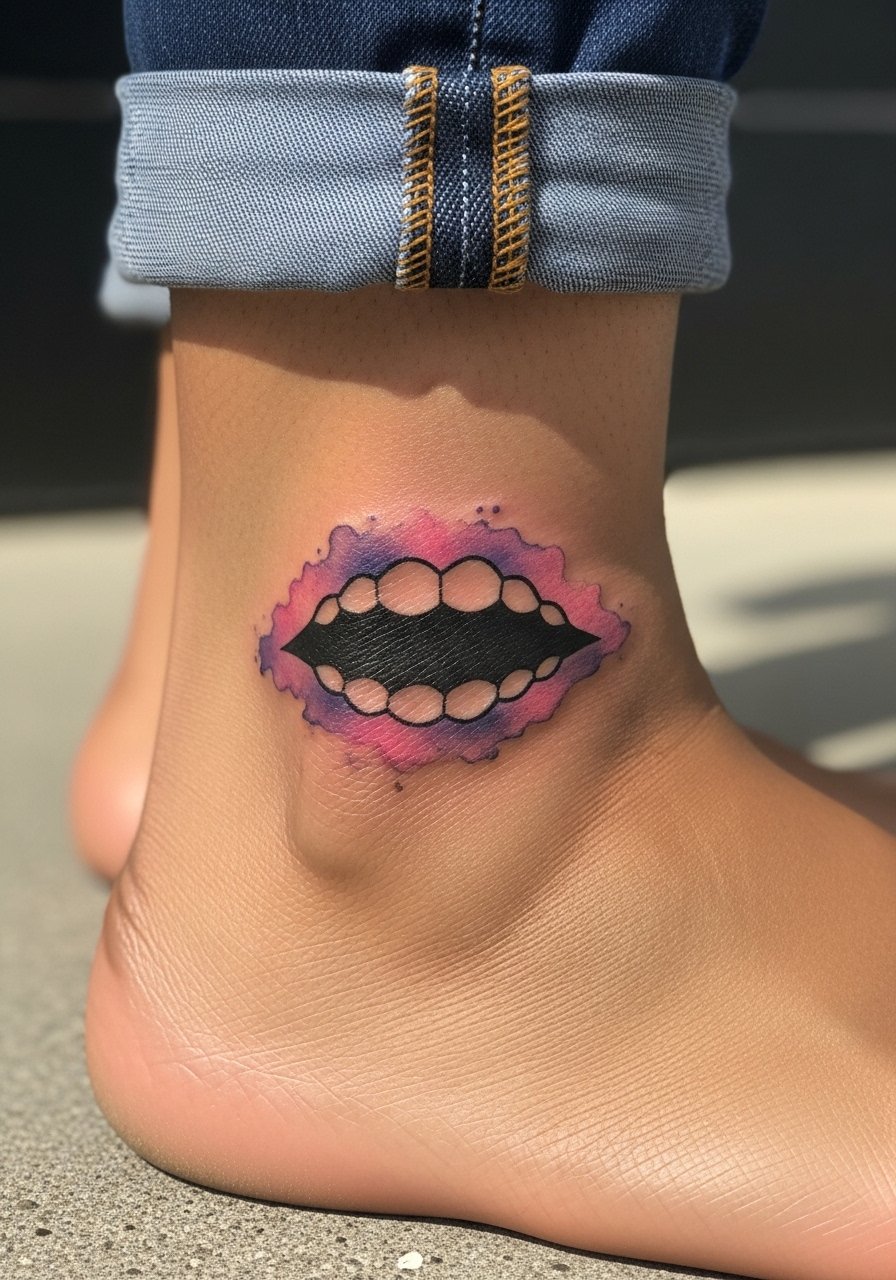
10. Watercolor Bite Mark Fade on Ankle
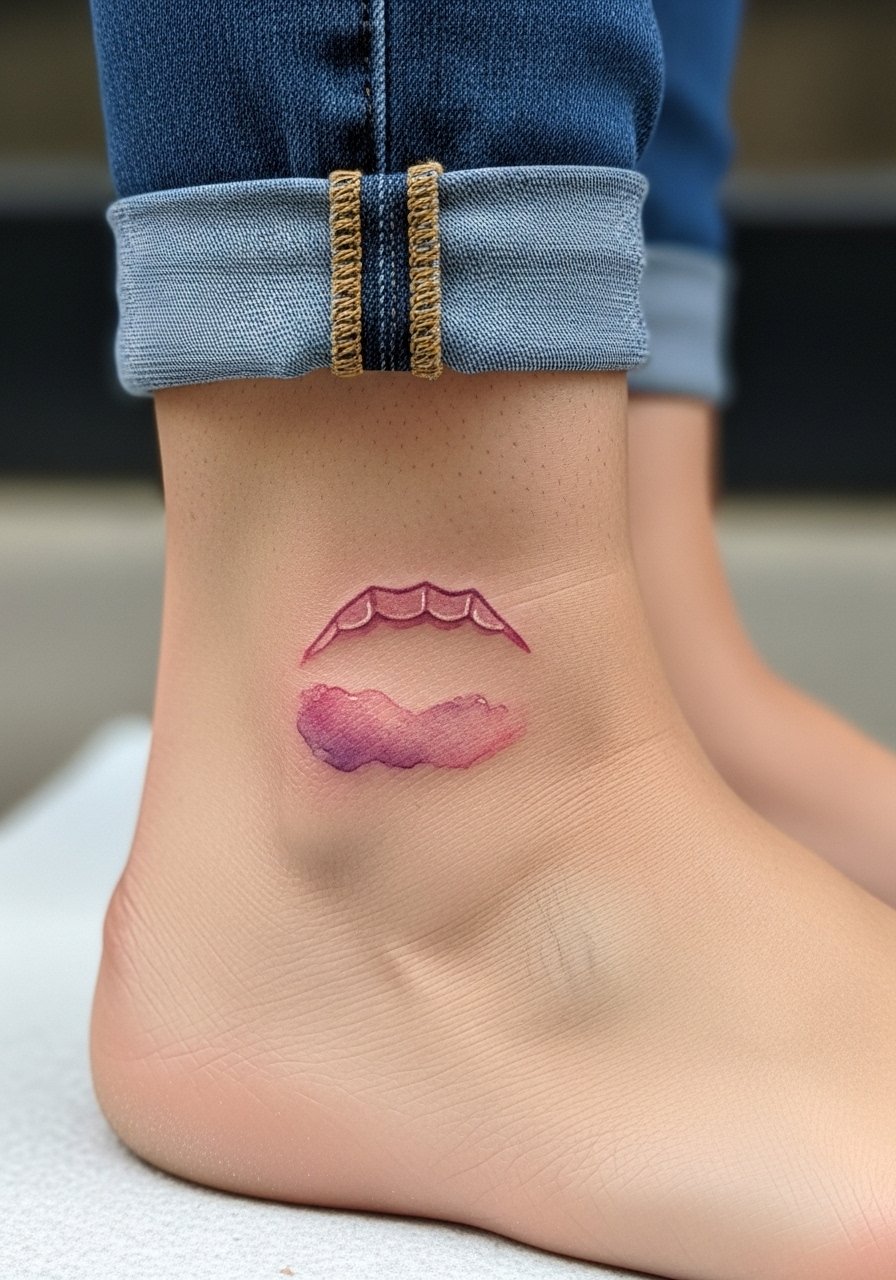
Watercolor washes look ethereal but age faster on high-friction spots like the ankle. Most watercolor bites blur into soft smudges unless the artist keeps the wash minimal and frames it with a gentle outline. If you want soft symbolism rather than hard detail, this is a good pick. Pain on the ankle is moderate to high. Wear jeans rolled up or minimal ankle boots for show-off styling. Expect color fade by year two and plan a refresh if you want the hues bright.
11. Black and Gray Healing Bite Scar on Back of Hand
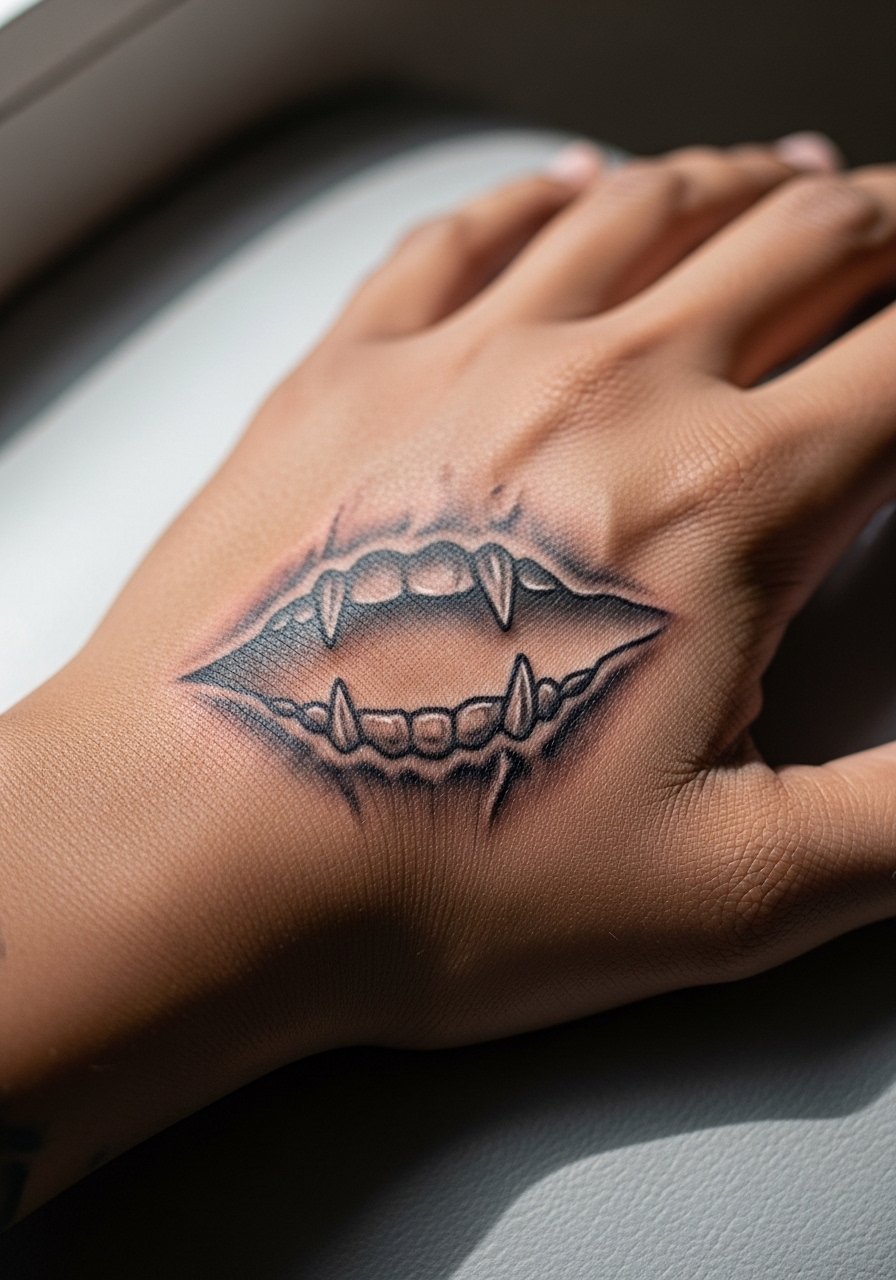
Hands are workhorse areas that see constant washing and rubbing. A black and gray scar effect can read powerful but needs very confident linework. The biggest mistake is relying on fine details on the hand. Ask for heavier linework near edges and softer gradients toward the center. Pain level is moderate. Session is short but healing is tricky because hands are exposed. Keep expectations realistic: touch-ups are common within the first year. Hand tattoos also still affect some hiring choices, so think about that before committing.
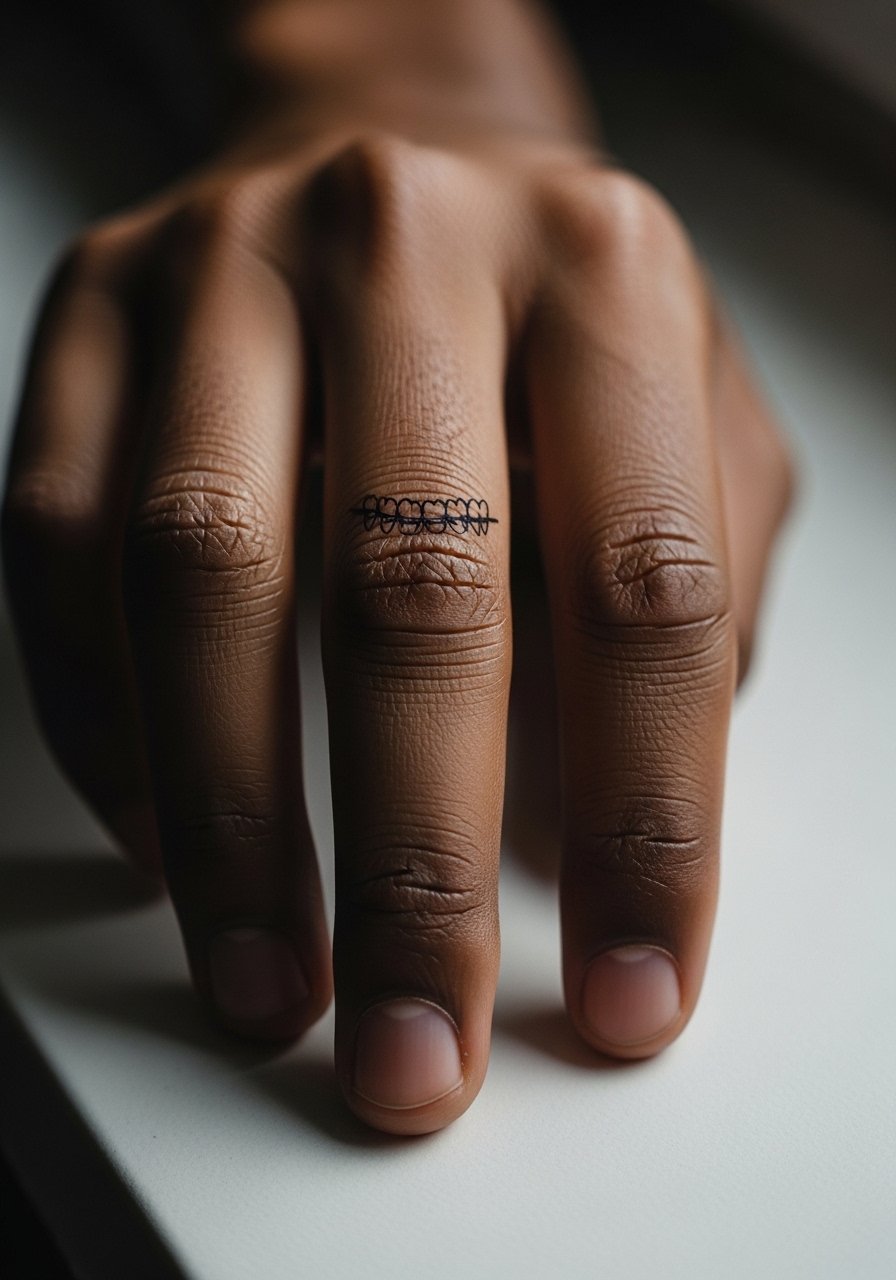
12. Minimal Geometric Teeth Imprint on Side Finger
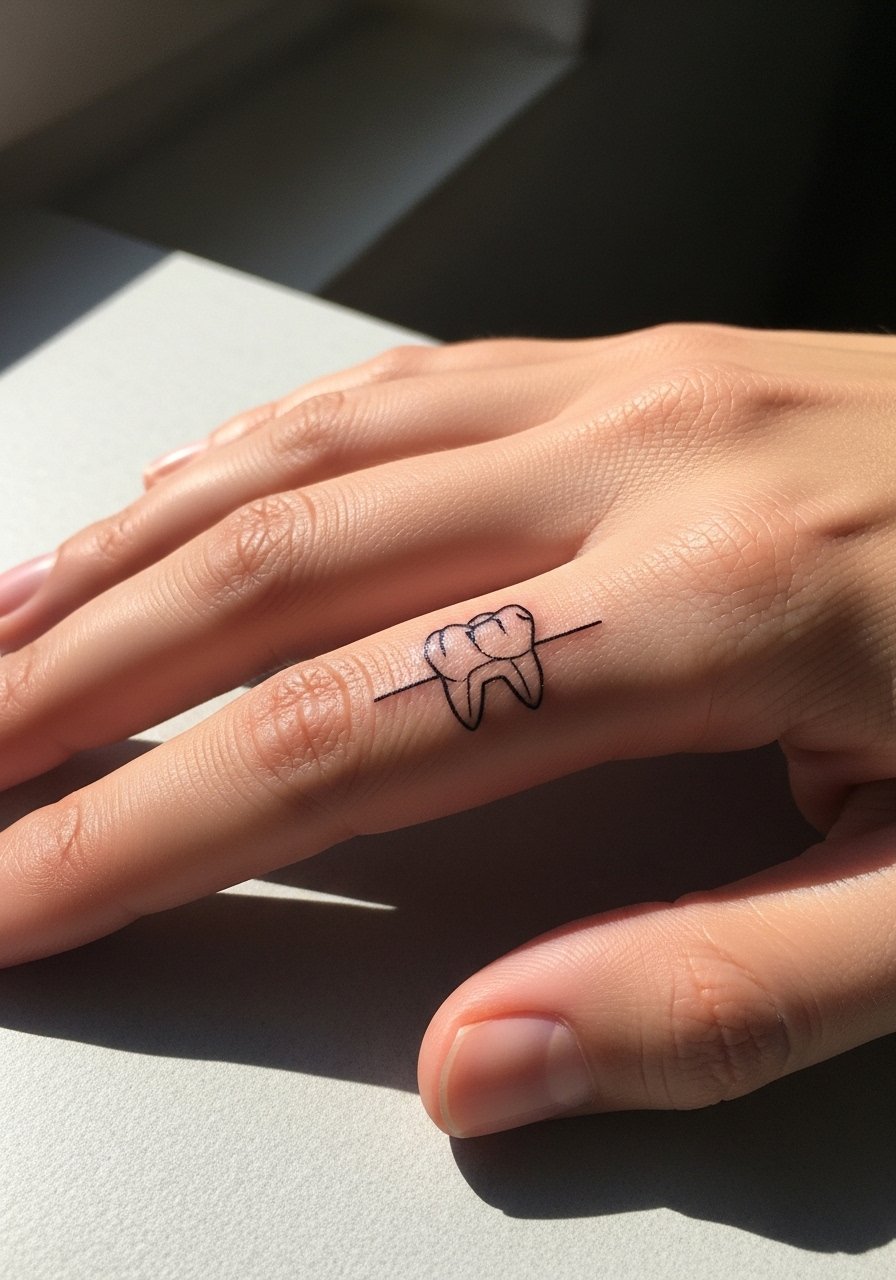
Finger tattoos are micro commitments that fade fast. The geometric teeth imprint reads like a ring and is ideal if you want tiny symbolism. The common failure is going too dense. For longevity choose bold linework and allow white space. Pain is moderate and touch-ups are almost always needed. Wear a thin chain bracelet on the opposite wrist when showing photos to balance the small scale. Plan for frequent touch-ups and accept the reality that finger ink ages differently than arm work.
13. Chain-Integrated Bite Mark for Bondage/Escape Motif
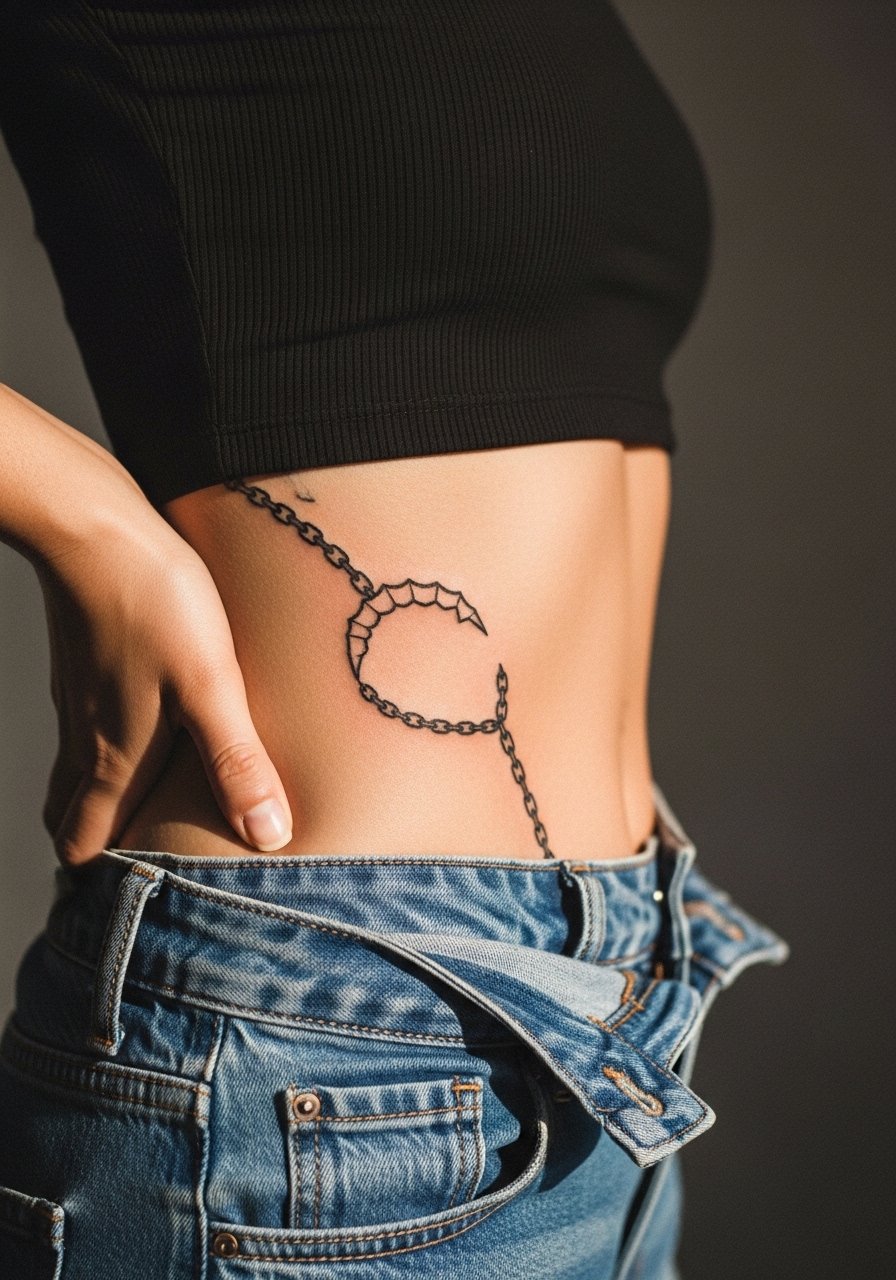
This is one of the less-covered ideas that reads as narrative without text. Chains weave into the bite impression to suggest restraint, release, or survival depending on the surrounding imagery. In consultation ask the artist how the chain links will curve with your body so nothing looks pinched when you move. Pain varies with placement. Session wear should be loose bottoms so the artist can adjust without friction. Expect the piece to age like other blackwork if the saturation is solid and touch-ups are minimal.
14. Geometric Teeth Ring on Inner Finger (Micro-Ring Style)
This variation treats the teeth imprint as jewelry. The challenge is scale. Too small and the geometry melts into blur. Ask for slightly thicker linework than you think you need and for the artist to center the design so the geometry sits on top of the finger bone. Pain is moderate. Show-off styling is minimal. For sessions wear clothing that lets you place your hand flat on the table. Expect the same finger tattoo realities: quick fade and likely touch-ups.
15. Wolf Jaw Bite Filled on Outer Thigh
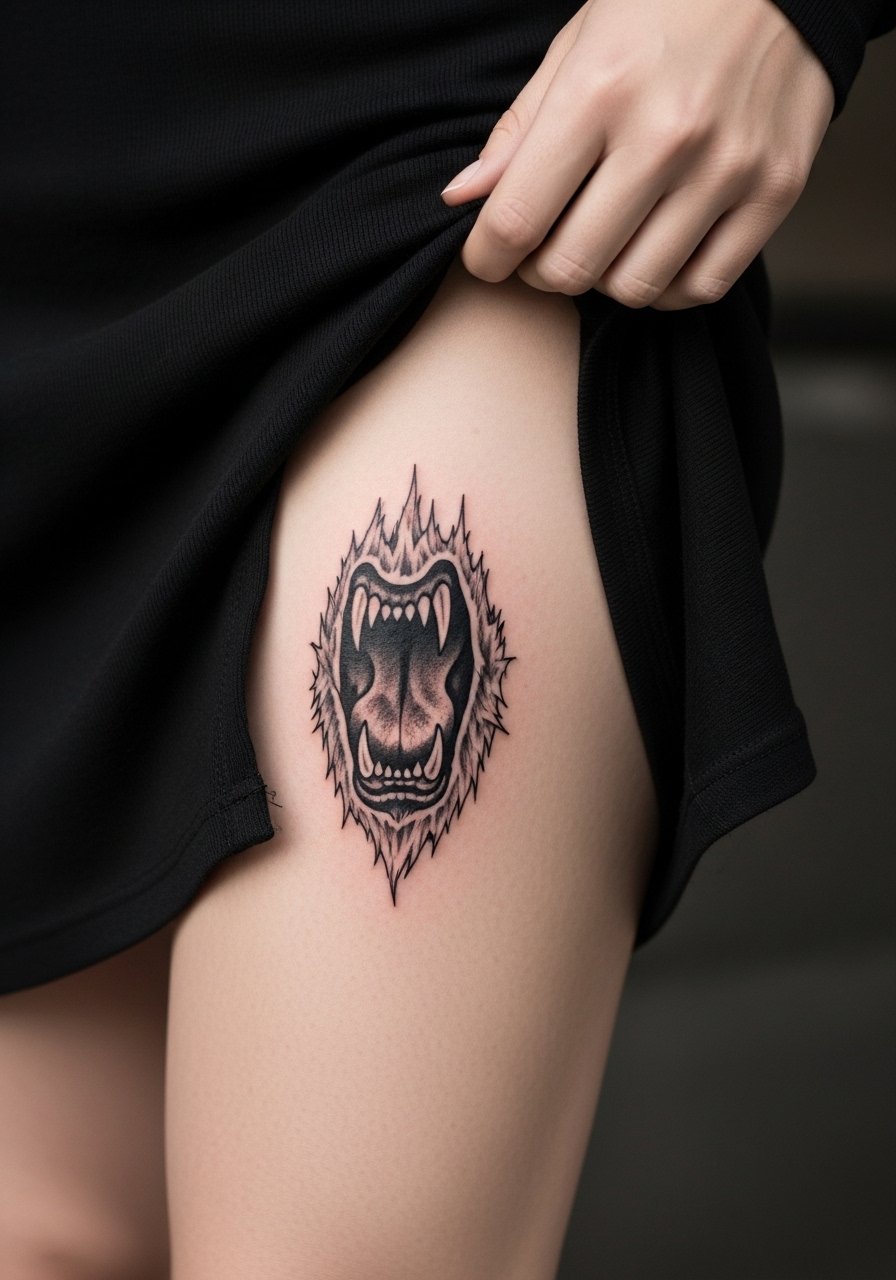
Filling a bite mark with an animal jaw turns a simple scar motif into a storytelling piece. Outer thigh is forgiving for saturation and aging. Avoid tiny fur details that can muddle after healing. Ask for bold texturing and high-contrast negative space. Pain is low to moderate and two sessions might be needed for layered fills. For nights out pair with a midi skirt side slit to frame the artwork. This placement handles changes in body composition better than inner thigh.
16. Subtle Stipple Healing Scar on Sternum
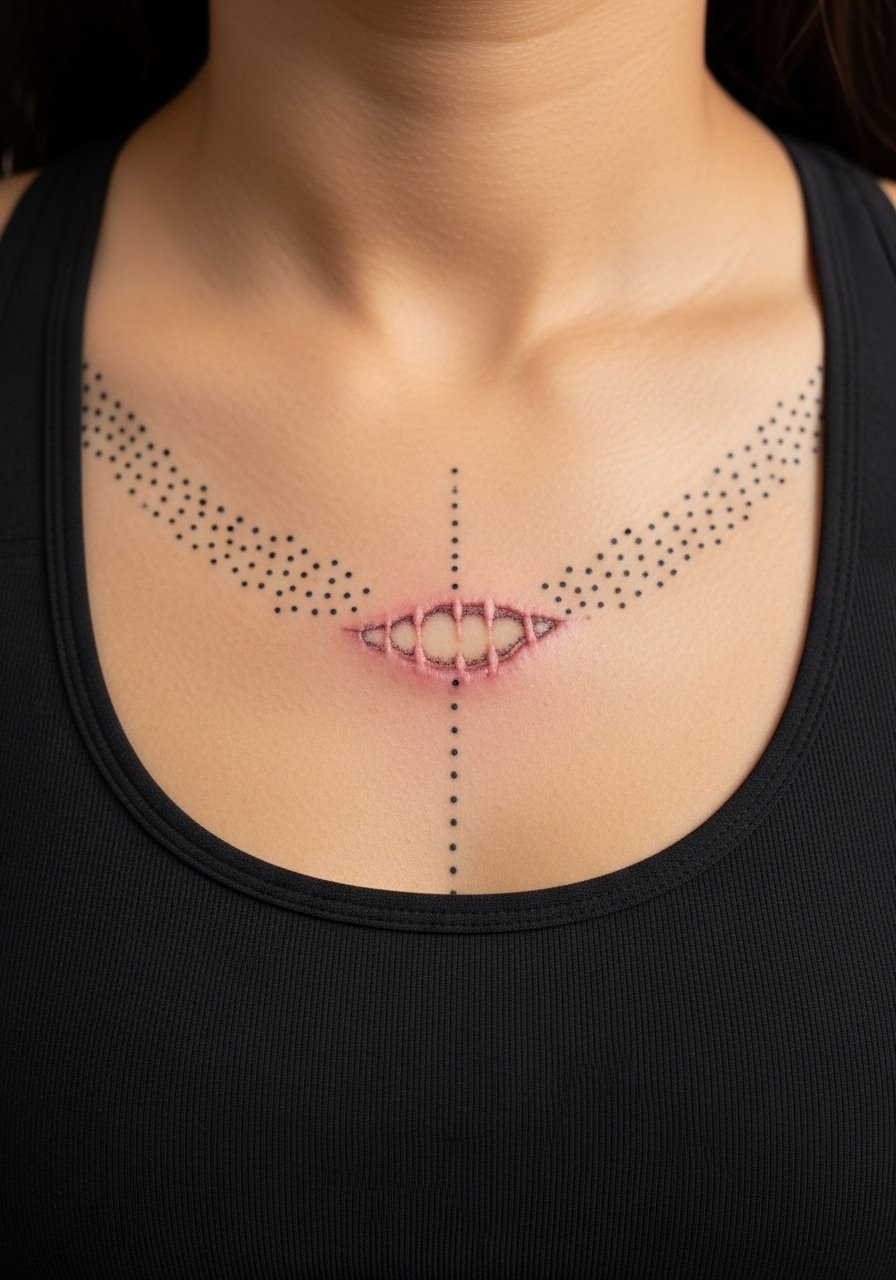
Sternum work reads intimate and delicate. Stipple shading can suggest healed texture without heavy lines. Expect high pain and sensitive sessions. Artists split on numbing use here, with some folks encouraging it for comfort and others saying it reduces tactile feedback. Mention your pain tolerance in consult and ask if they use topical numbing. Wear a fitted sports bra to the session for modest exposure. Plan for a careful touch-up schedule if you want the dot work to remain distinct.
17. Watercolor Fade Around a Blackwork Bite for Contrast on Ankle
Combining a solid black bite with a soft watercolor halo gives a layered look that reads crisp from across a room while still feeling painterly up close. The ankle is high friction, so the watercolor should be used sparingly. The typical mistake is too much wash that disappears after a year. Ask for a bold black core and minimal pigment washes around it. Pain is moderate to high. Wear pants you can roll up easily when showing it off. Expect the watercolor to need refreshing sooner than the black core.
Frequently Asked Questions
Q: Will a fine line bite mark on the neck blur faster than a bold blackwork version?
A: It depends on spacing and needle depth. Fine line on the neck is more vulnerable to movement and sun. One group of artists will recommend thicker line weight and spacing to avoid early blurring. Another group will do very precise shallow work and plan quick touch-ups. Ask any artist you consult how they handle neck mobility and what their touch-up policy is.
Q: How much does placement affect pain and healing for bite mark tattoos like ribs versus thigh?
A: Placement changes both pain and healing. Ribs score high on pain and require careful aftercare because skin moves with breathing. Thigh sessions tend to be less painful and heal with fewer surface issues. Prepare differently for each: bring loose clothing for ribs and thigh-friendly bottoms for leg work.
Q: Are chain-integrated or animal-filled bite marks harder to photograph and style than single bite impressions?
A: They can be if the composition is busy. Simpler silhouettes photograph easier. For show-off outfits consider pieces that frame the design instead of competing with it. For example, an outer thigh animal fill pairs well with a high waist leather shorts look that keeps focus on the art.
Q: Do watercolor bite tattoos need different aftercare than black and gray ones?
A: The early aftercare steps are the same. The difference is long-term color retention. Watercolor areas are less saturated and will fade faster with sun and abrasion. Plan on more frequent touch-ups if maintaining hue intensity matters to you.
Q: How should I approach finding an artist for a realistic collarbone bite?
A: Look for portfolios showing healed collarbone realism on similar skin tones. Search local tags and apps, then ask for healed photos in consultations. Bring clear references and describe the exact tooth impressions and scarring you want. If the artist is reluctant about placement or technique, take that as useful feedback.
Q: Does Saniderm help bite mark textures or does dry healing work better?
A: Artists and community members split into two camps. One camp says protective film like Saniderm keeps the area clean and reduces scabbing. The other camp worries that trapped moisture can affect textured grooves like bite impressions. Follow the artist's recommended method and if you have textured work ask them which approach they prefer for that style.
