
Fine line scripts dominate saved boards, but what keeps a "love yourself" phrase legible after five years is often less glamorous than the trend. Line weight, placement, and how the stencil sits on movement points decide whether an affirmation reads as crisp or blurs into a smudge. Start with a wrist option that balances subtlety and longevity, then work through florals, symbols, and placement picks that age better in real life.
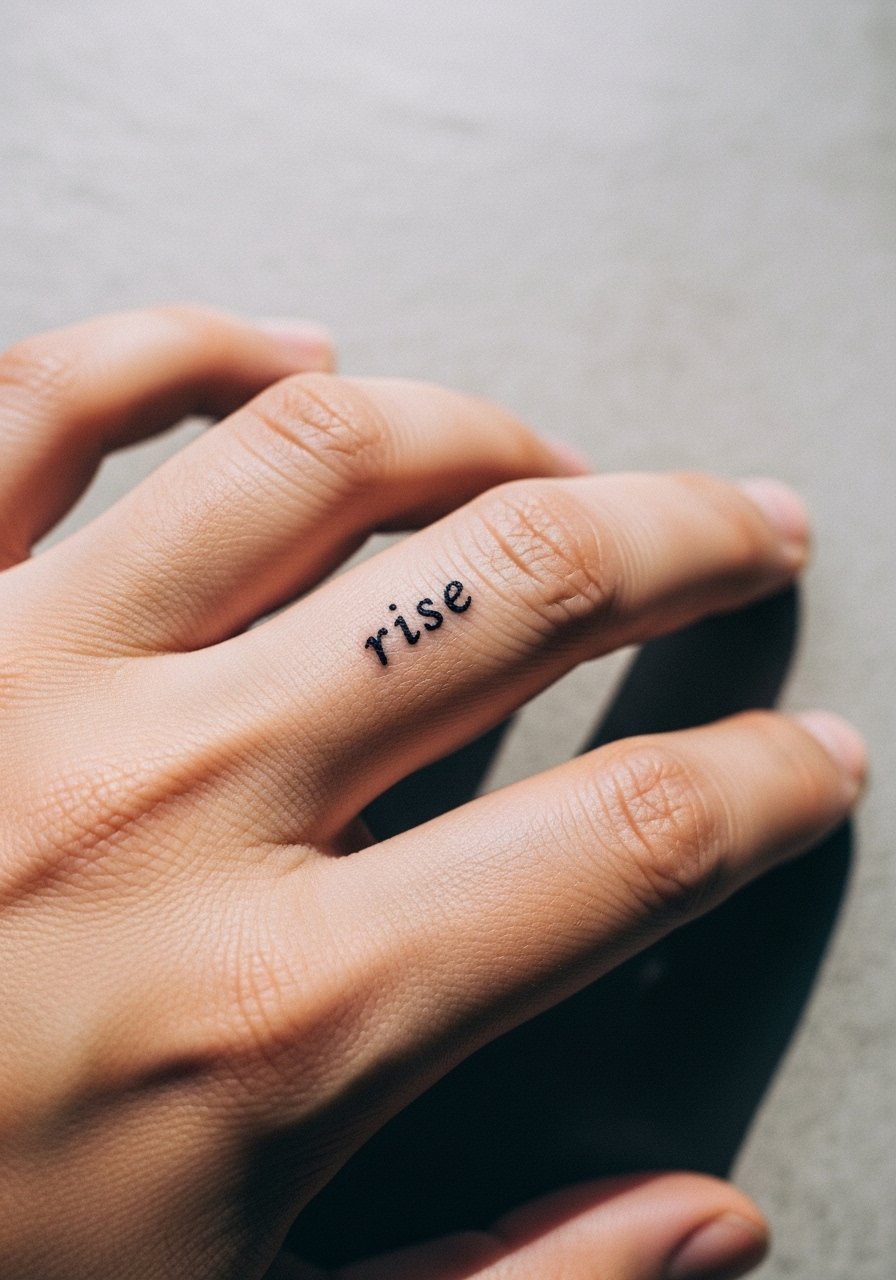
1. Fine Line "Love Yourself" Script on Inner Wrist
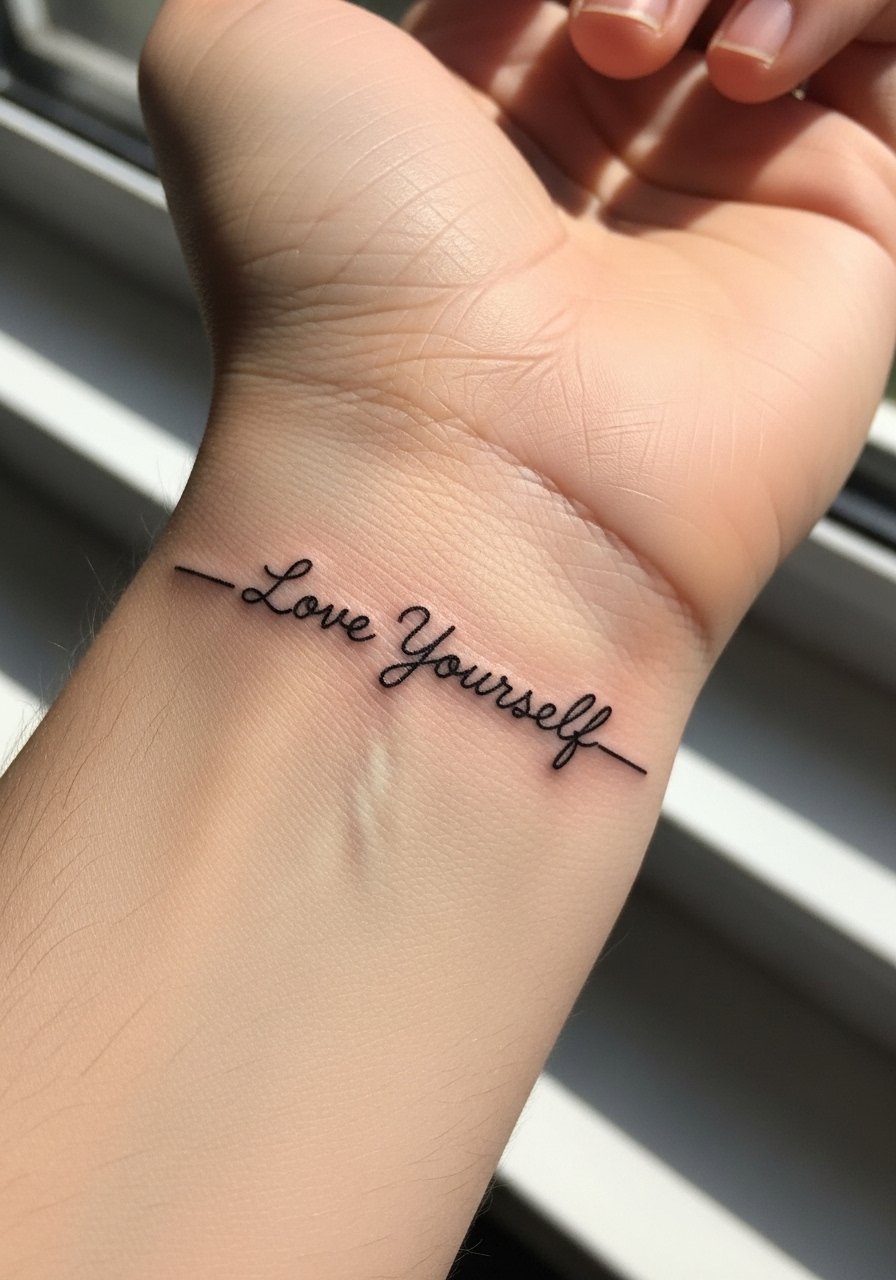
I recommend this if you want a daily visual cue without heavy commitment. Fair warning, wrists see a lot of sun and washing so the finest hairlines fade faster. Tell your artist you want slightly heavier single-stroke linework rather than an ultra-hairline. Ask for 1-2 mm spacing between letters and a steady baseline so touch-ups are straightforward. Session time is usually under an hour and pain rates low to moderate. A common mistake is asking for script so tiny it merges after a year. For showing it off, pair with a rolled-cuff linen blouse and a thin chain bracelet during reveals. Wear a linen blouse rolled cuff to frame the wrist.
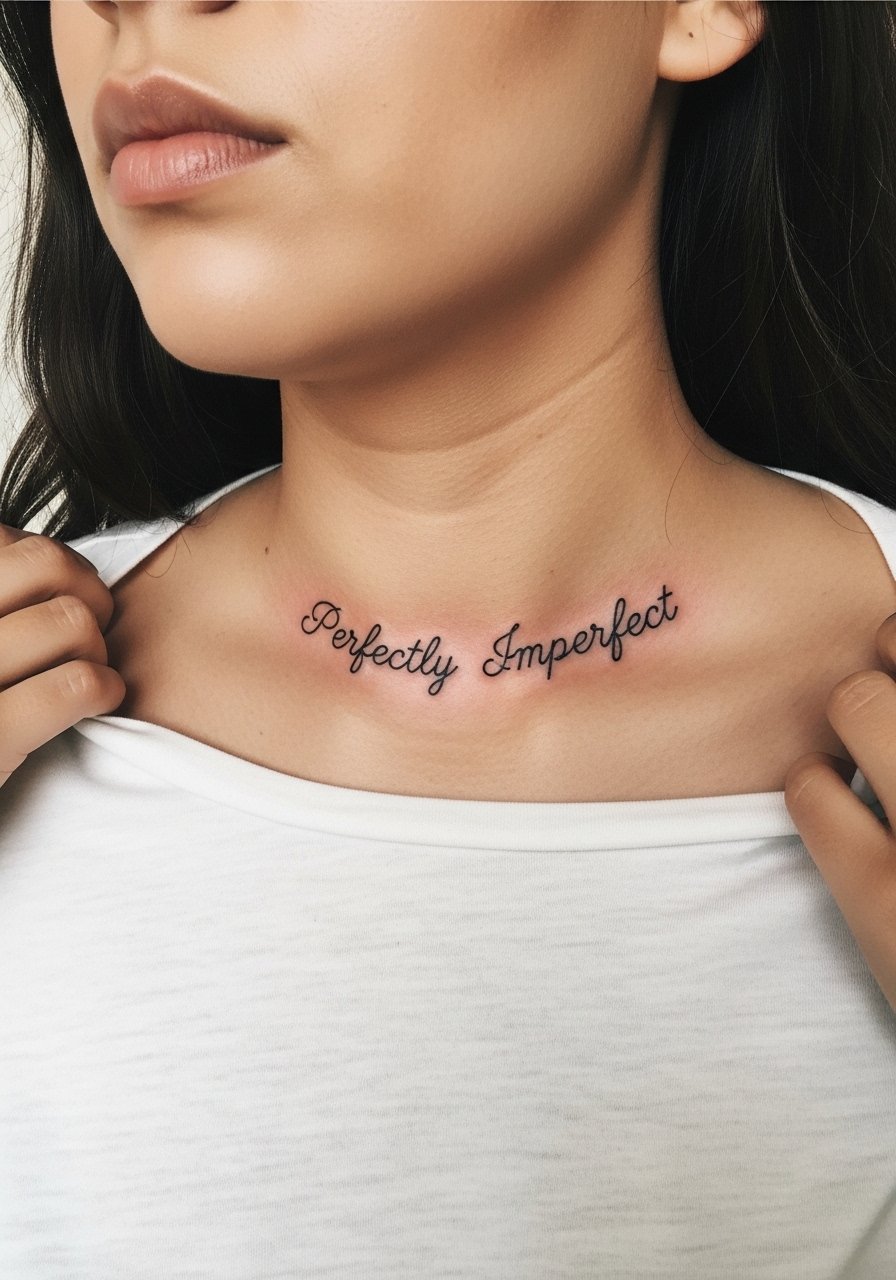
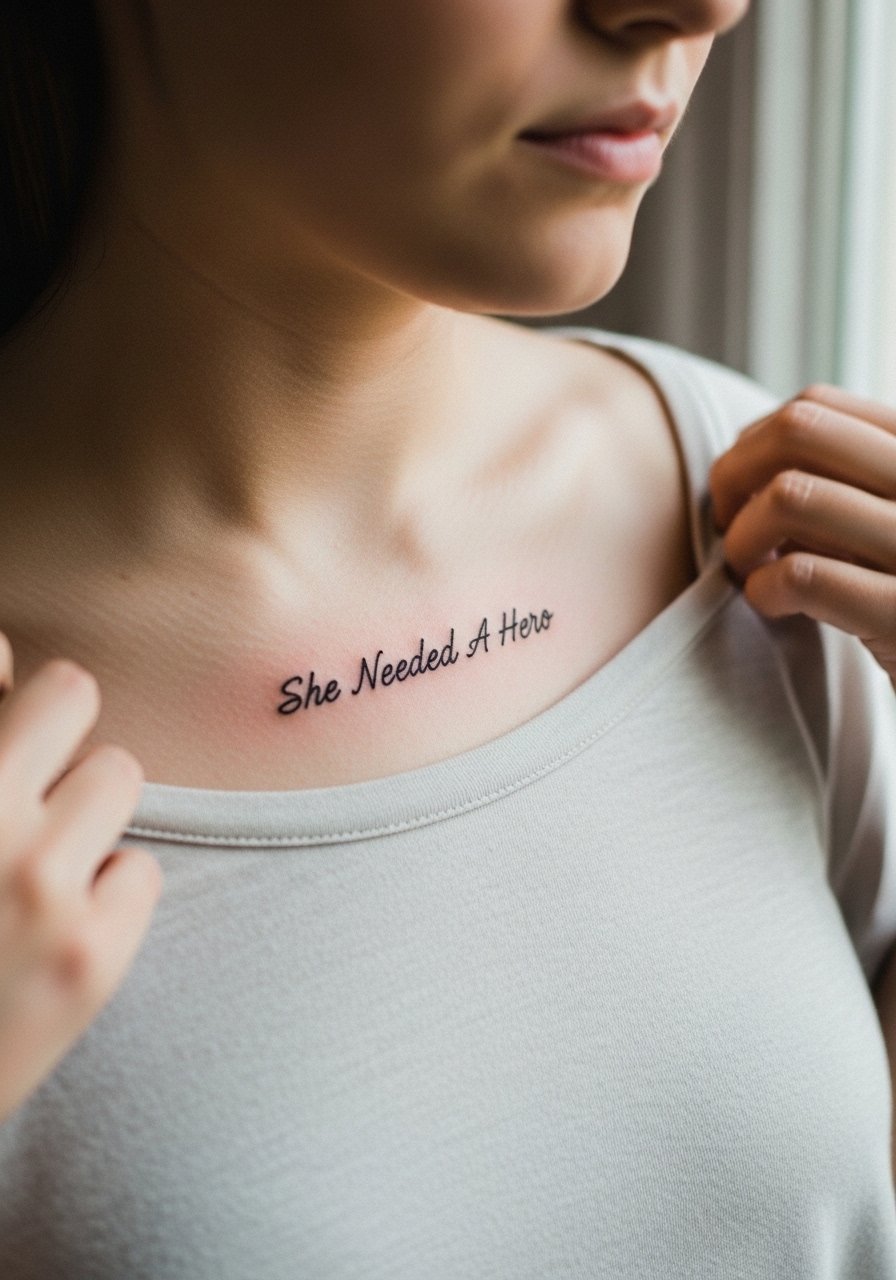
2. Minimalist "I Am Enough" Text on Collarbone
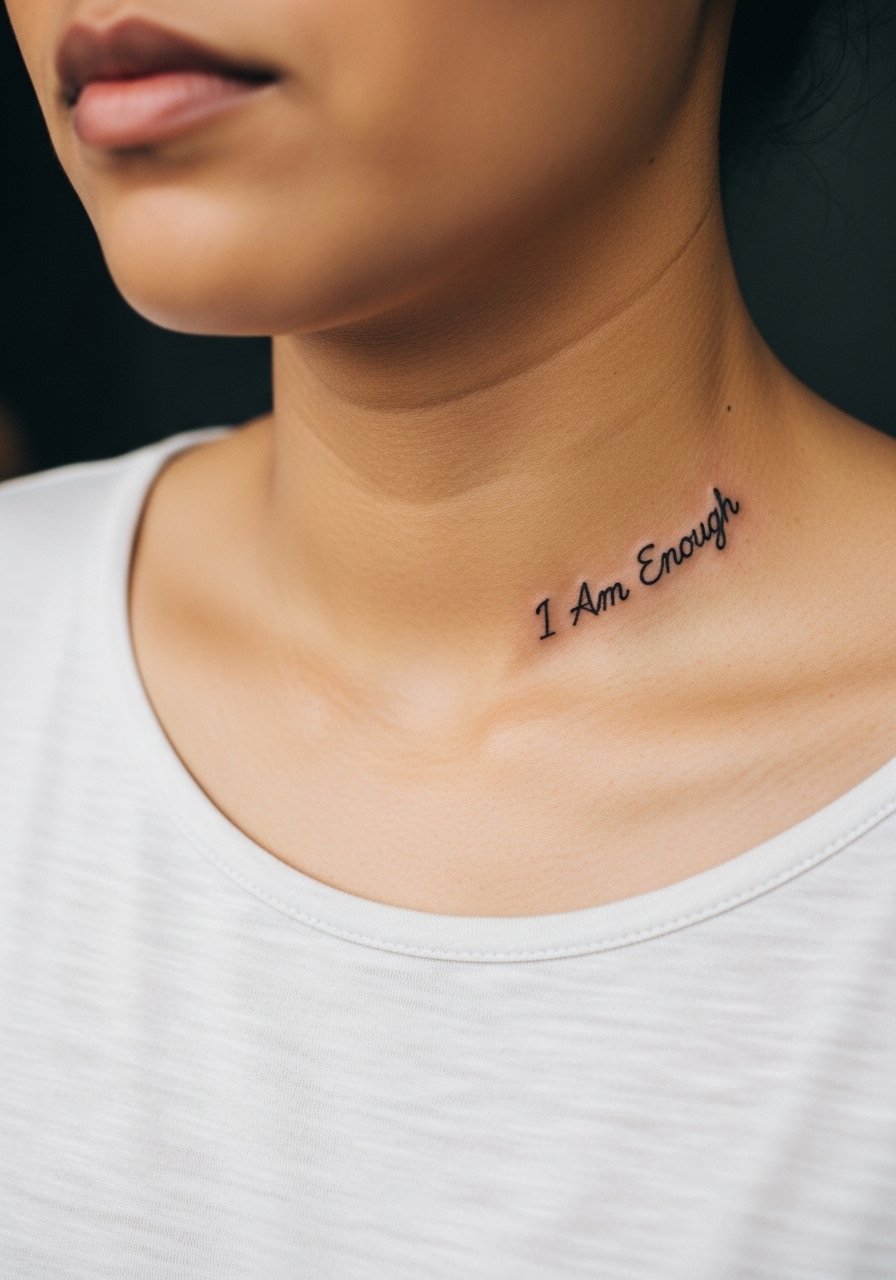
The collarbone gives a graceful curve for short affirmations. Expect a session under an hour and a higher visibility for photos. Pain is mild to moderate depending on proximity to bone. During consultation, request the script follow the collarbone slope so letters sit naturally and do not wrap awkwardly. A mistake is placing text too low where clothing rubs it constantly. This placement pairs well with off-shoulder tops. For showing the line, try an off shoulder blouse cream that exposes the area without competing with the script.
3. Orange Lily Outline with Banner on Outer Forearm
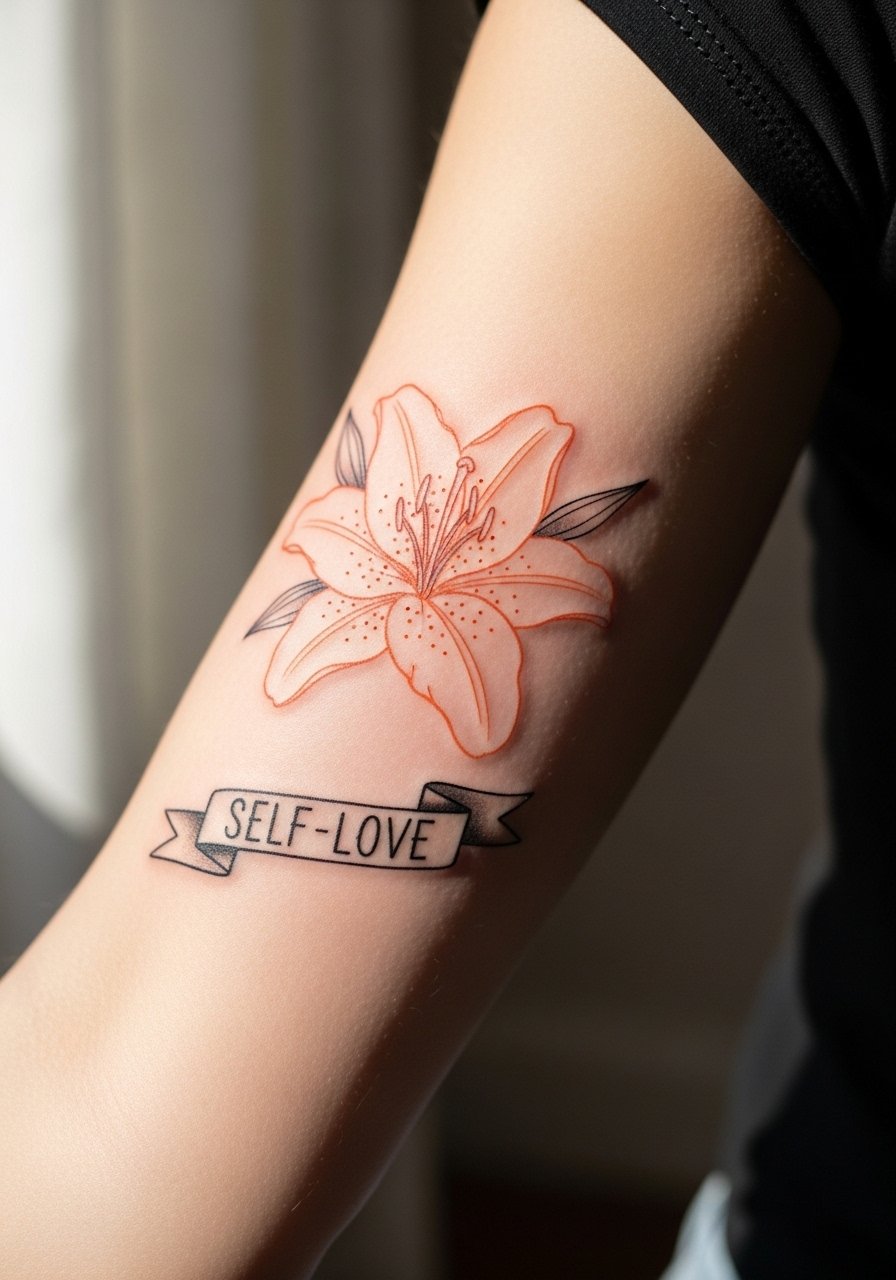
Botanical pieces like lilies carry clear symbolism for confidence while staying delicate. For forearm work, plan 1 to 2 sessions depending on banner detail. Tell your artist you want the flower outline crisp and the banner bold enough to keep legibility when the skin stretches. Many people ask for thin banners that later lose letter definition. Forearms hold up well if lines are not tiny. Show-off pairing works with rolled sleeves and a slim cuff on the opposite arm. Try a linen button down olive when you want to frame the forearm.
4. Jasmine Vine Wrapping "Believe in Yourself" on Ribcage
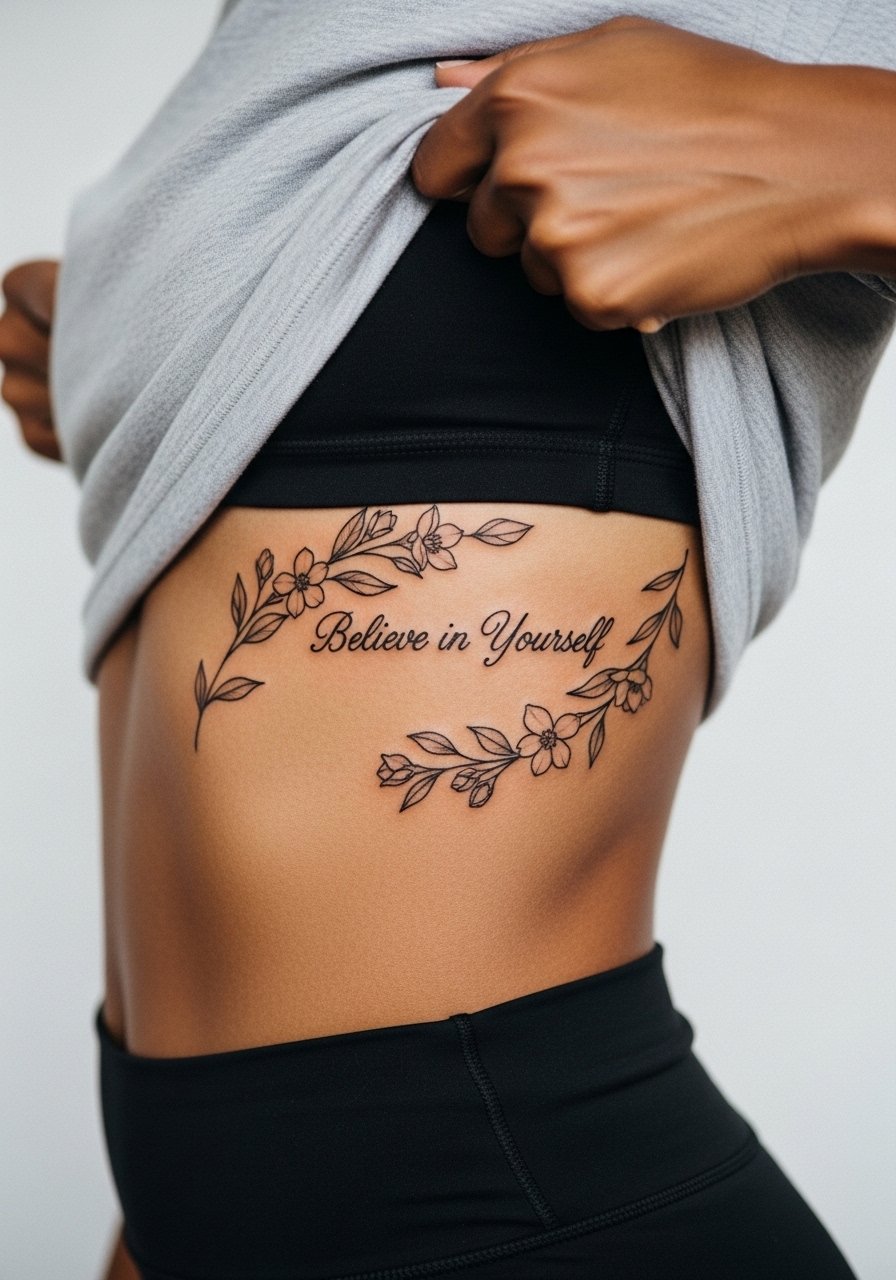
Ribcage pieces are intimate and can be sensual. Fair warning: the ribs are a high pain area and sessions may be split. Artists debate fine line on ribs. One camp says the skin there stretches and blurs thin lines within two years. The other camp says that with correct needle depth and gentle spacing, fine line settles fine. Ask your artist where they stand and plan a touch-up at year two. Avoid dense script hugging the curve; let the vine breathe. For showing off, high-waisted pants with side cutouts or a cropped top works well. For the session wear, pick a loose ribbed tank you can lift without wrestling.
5. Watercolor Rose with "Put Yourself First" on Shoulder
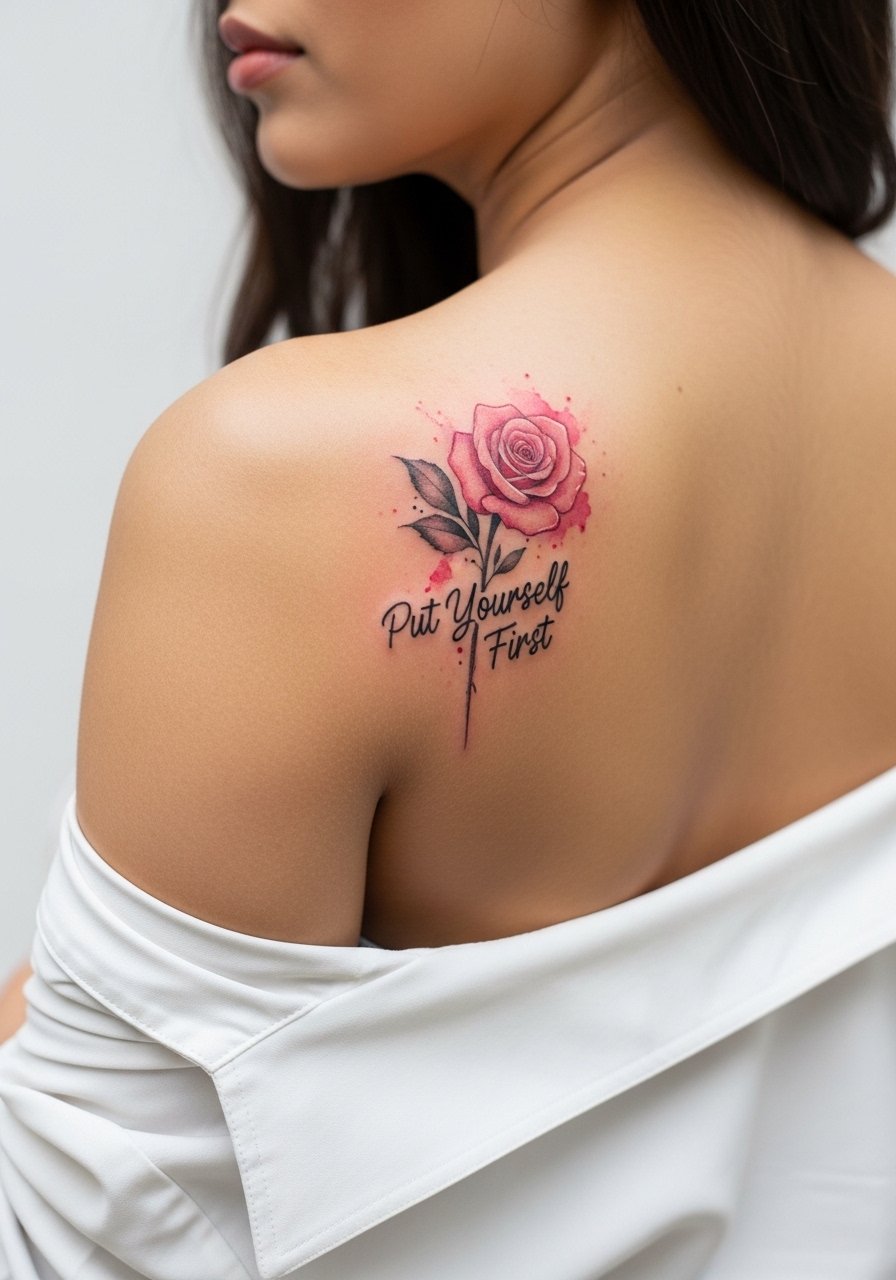
Watercolor washes look gorgeous fresh but tend to lose saturation faster than solid black lines. If you love the soft palette, ask for slightly denser pigment saturation around petals so the color reads better at 2 to 5 years healed. Sessions are typically 1 to 2 hours and pain is mild to moderate on the shoulder. A common error is asking for no outline at all which can turn the piece into a soft bruise look over time. For evenings out, pair the piece with a strapless tank pastel so the colors peek through without competing jewelry.
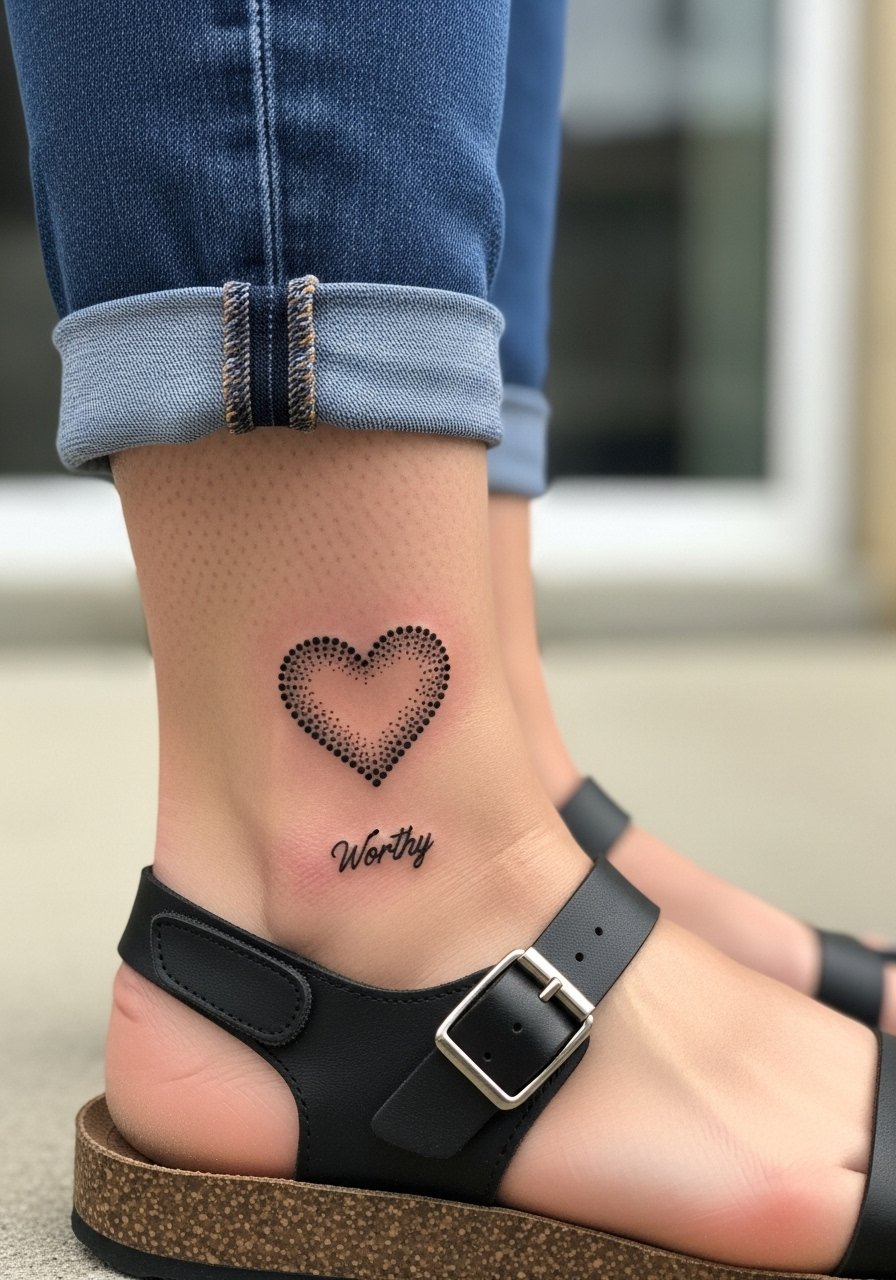
6. Blackwork Heart Infinity with "You Are Worthy" on Ankle
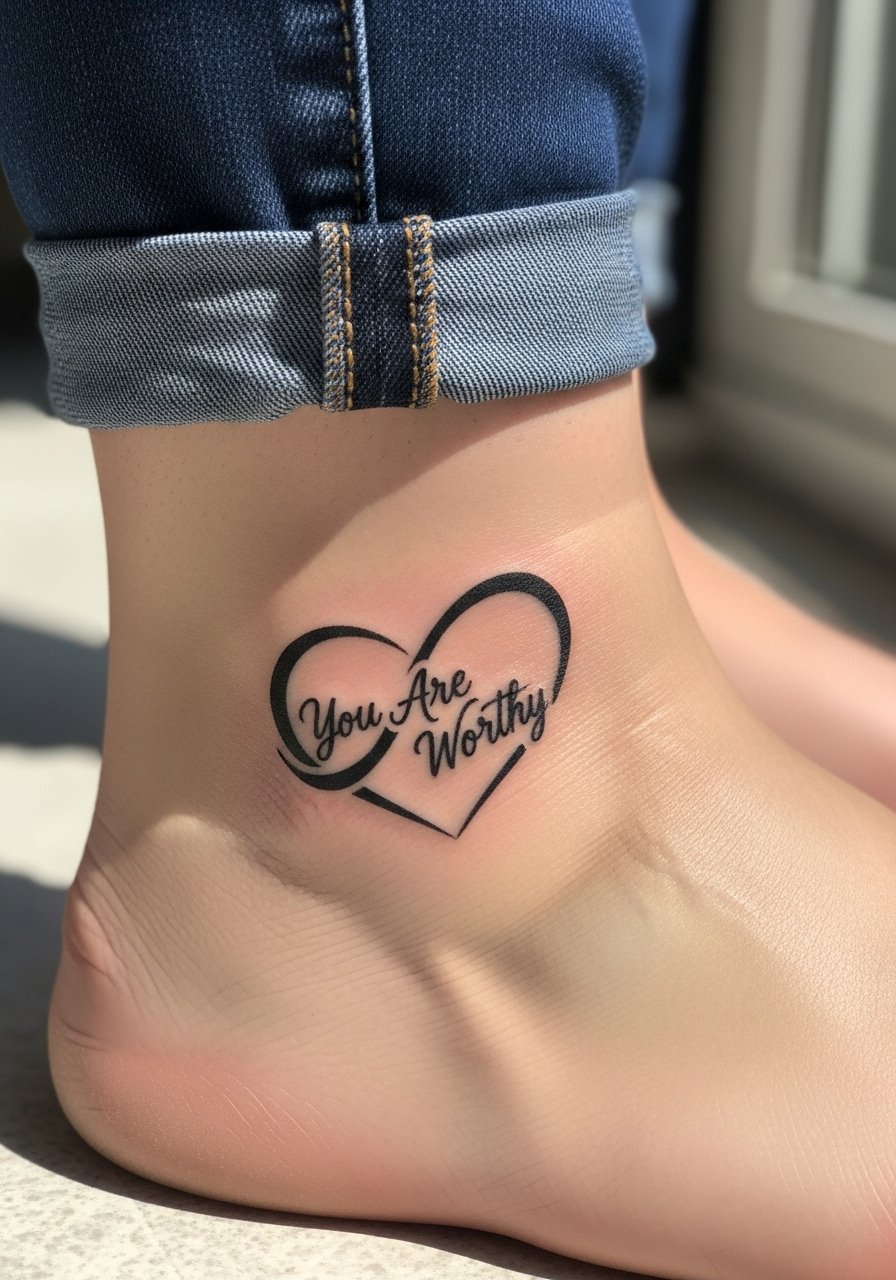
Ankle pieces take friction from socks and shoes, so solid blackwork holds up better than tiny scripts. Expect a single session under an hour. Tell the artist to set the design slightly above the ankle bone to reduce rubbing from shoe tongues. Common mistakes include placing text directly on bone where touch-ups become frequent. For showing it off, cuffed jeans or a midi skirt read well. A delicate anklet complements the spot. Pair this look with cuffed ankle jeans when you want the design visible.
Studio Day Picks
The wrist, collarbone, forearm, ribcage, shoulder, and ankle all ask for slightly different prep and first-week care, so a handful of gear smooths the session and the first days of healing.
-
Stencil transfer paper kit. Lets you preview placement on moving skin, which matters for collarbone and wrist text that follows curves.
-
Topical numbing cream. Applied before a ribcage or sternum session it can shave off the sharpest moments without compromising linework when used as directed.
-
Thin protective film roll. Keeps ankle and wrist pieces cleaner during the first week when friction and hand washing are unavoidable.
-
Fragrance-free gentle body wash. Cleanses healing zones without irritating delicate fine line work on forearms and shoulders.
-
Aquaphor healing ointment. Thin layers in the first few days help retain moisture for fine line scripts that need consistent healing without heavy clogging.
7. Micro-Realism Lotus "Give Yourself a Hug" on Inner Bicep
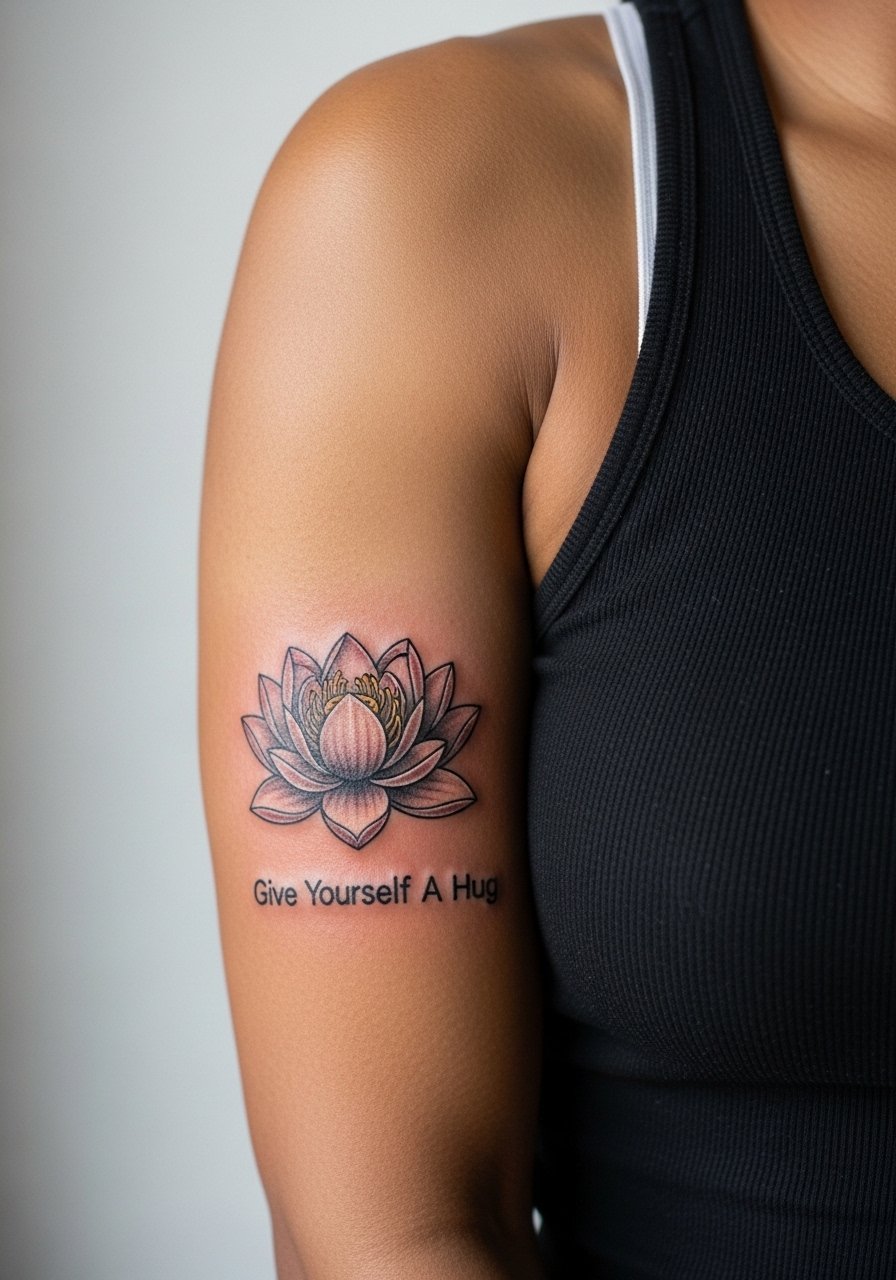
Inner bicep pieces settle into skin differently because of movement and sweat. Micro-realism shows detail best on medium to light skin tones but skilled shading works across tones. Expect two sessions and moderate pain. Tell your artist you want clean petal texture and avoid overly dense black near the fold. A mistake many make is compressing too much detail into a tiny area. For the session wear, pick a loose tank so the artist can access the arm easily. When showing it off, a racerback tank keeps the arm visible without tugging the area.
8. Neo-Traditional Crown "Perfectly Imperfect" on Thigh
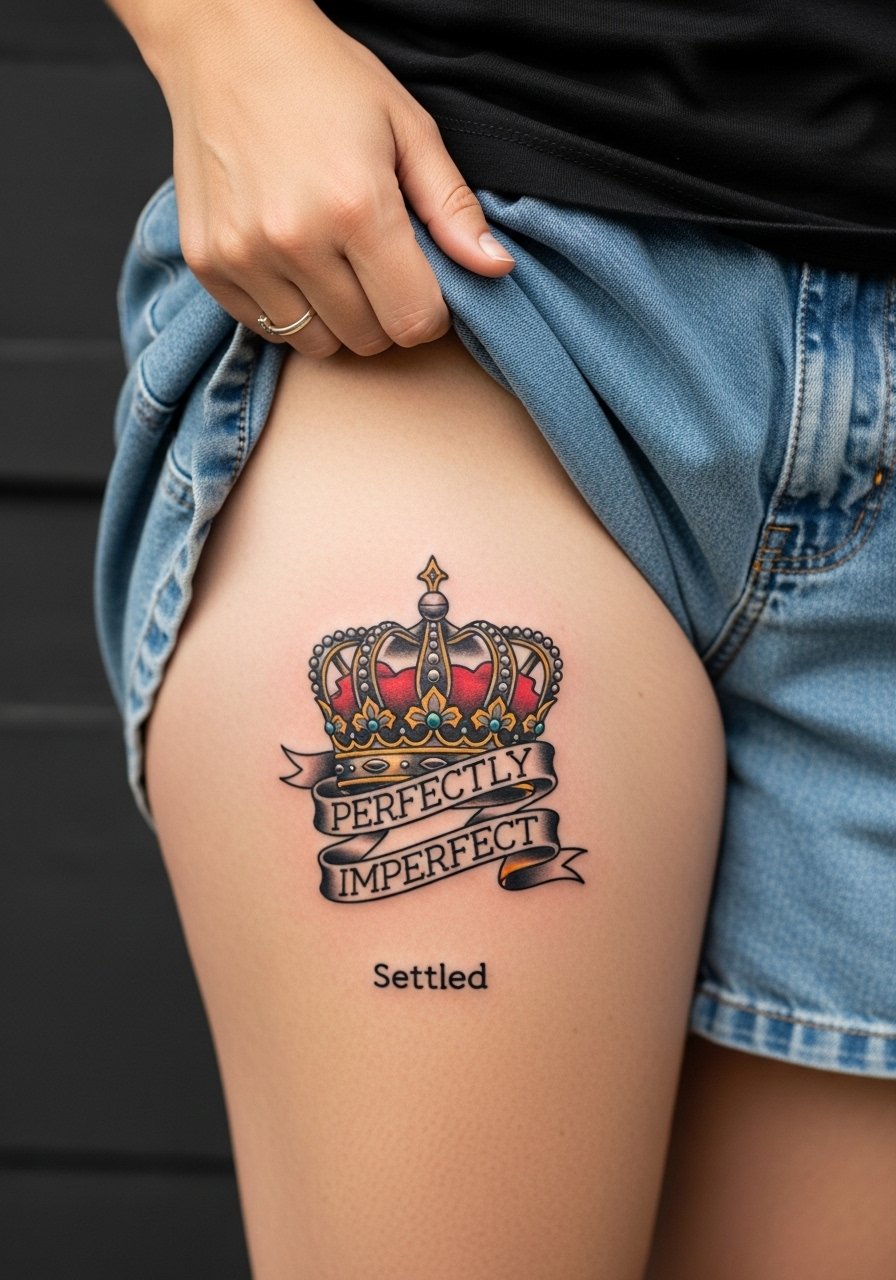
Thighs tolerate larger neo-traditional pieces beautifully and allow for color saturation. Sessions run 2 to 3 hours for a 4-inch crown. Pain is moderate and usually more comfortable for most clients than ribs. During consultation, request bold outlines and mid-tone saturation to avoid premature washout. A common regret is making the crown too small; size gives the style room to age well. Pair this design with high-slit dresses or loose shorts for a dramatic reveal. For the appointment, wear loose thigh shorts so the artist can work without fabric pressure.
9. Ornamental Mandala "Trust Yourself" on Upper Back

Mandala geometry depends on spacing. Small mandalas on the upper back can blur if lines are too tight. Plan 2 to 3 sessions for a 5-inch piece. Tell your artist you want negative space in the dense zones so stipple shading does not merge over time. A mistake is compressing too many concentric rings into a compact diameter. Upper back holds well and photographs nicely with open-back dresses. For showing the pattern, try an open-back midi dress to reveal just the central motif.
10. Ignorant Style Script "I Speak My Truth" on Calf
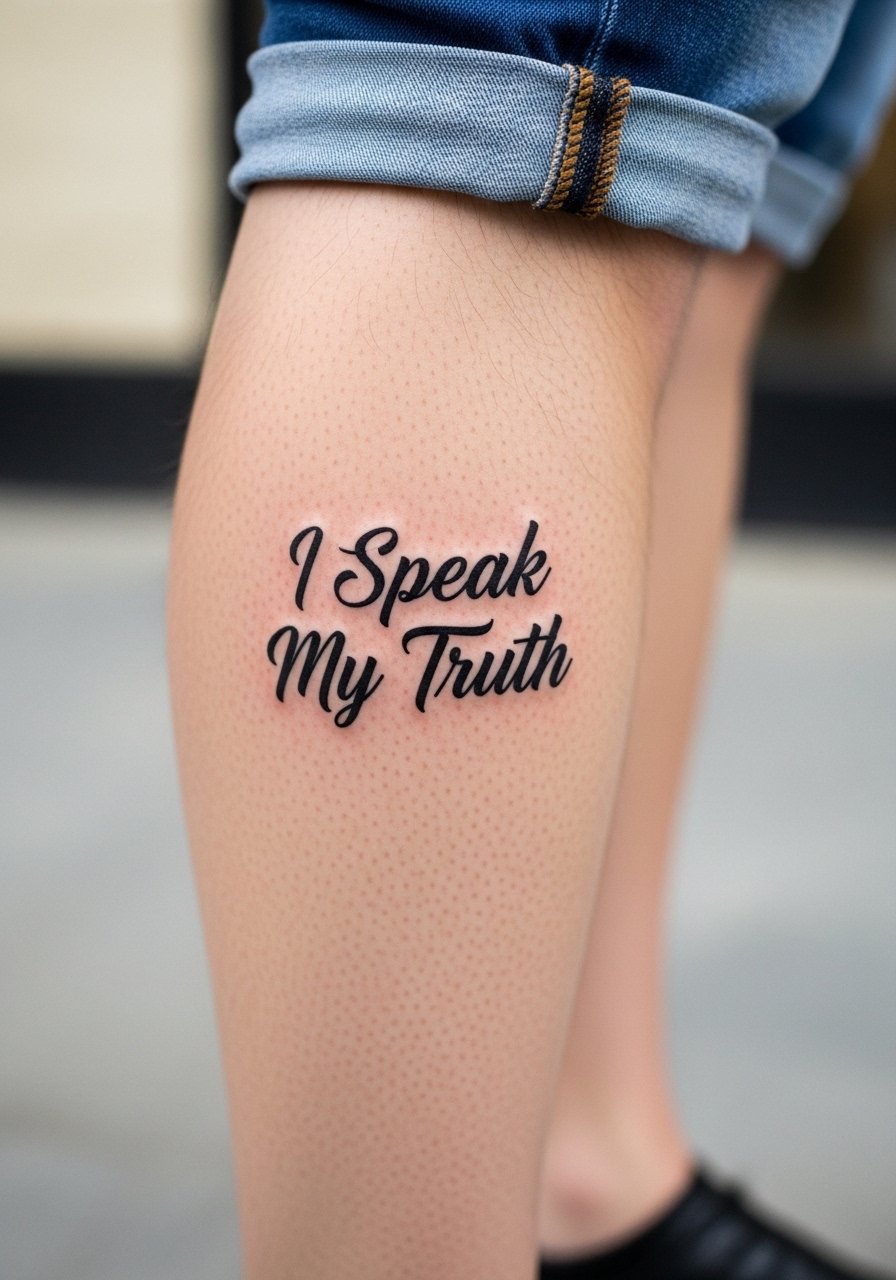
Calf placements accommodate bold letters and graphic scripts that read from a distance. Expect two sessions for complex lettering and moderate discomfort. Request thick single-pass strokes so the type holds up against leg movement. A common error is choosing a font with tight counters that fill over time. Calves are visible with shorts and boots. Pair with a midi skirt flowy for a balanced look.
11. Minimalist Star Cluster on Finger Side
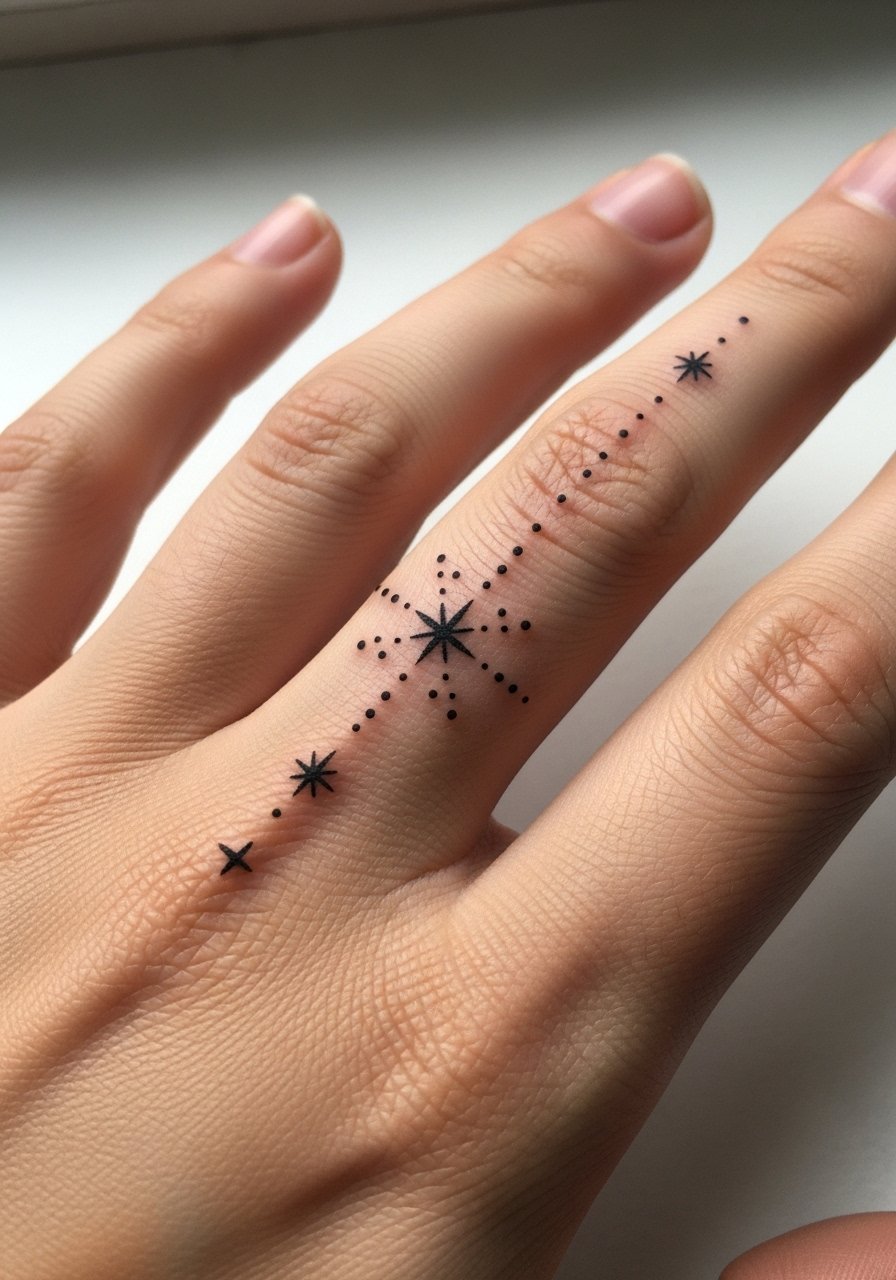
Finger skin is thin and undergoes a lot of touch. These micro pieces are charming but need yearly touch-ups more often than forearm work. If you want longevity, ask for slightly larger dots and clean negative space rather than micro hairline stars. Sessions are short but expect more fading. A mistake is choosing the joint itself where flex creates early distortion. For everyday wear, keep rings minimal so metal does not rub the new work. A slim, thin band works well with this placement.
12. Fine Line Jasmine Sprig on Side Neck
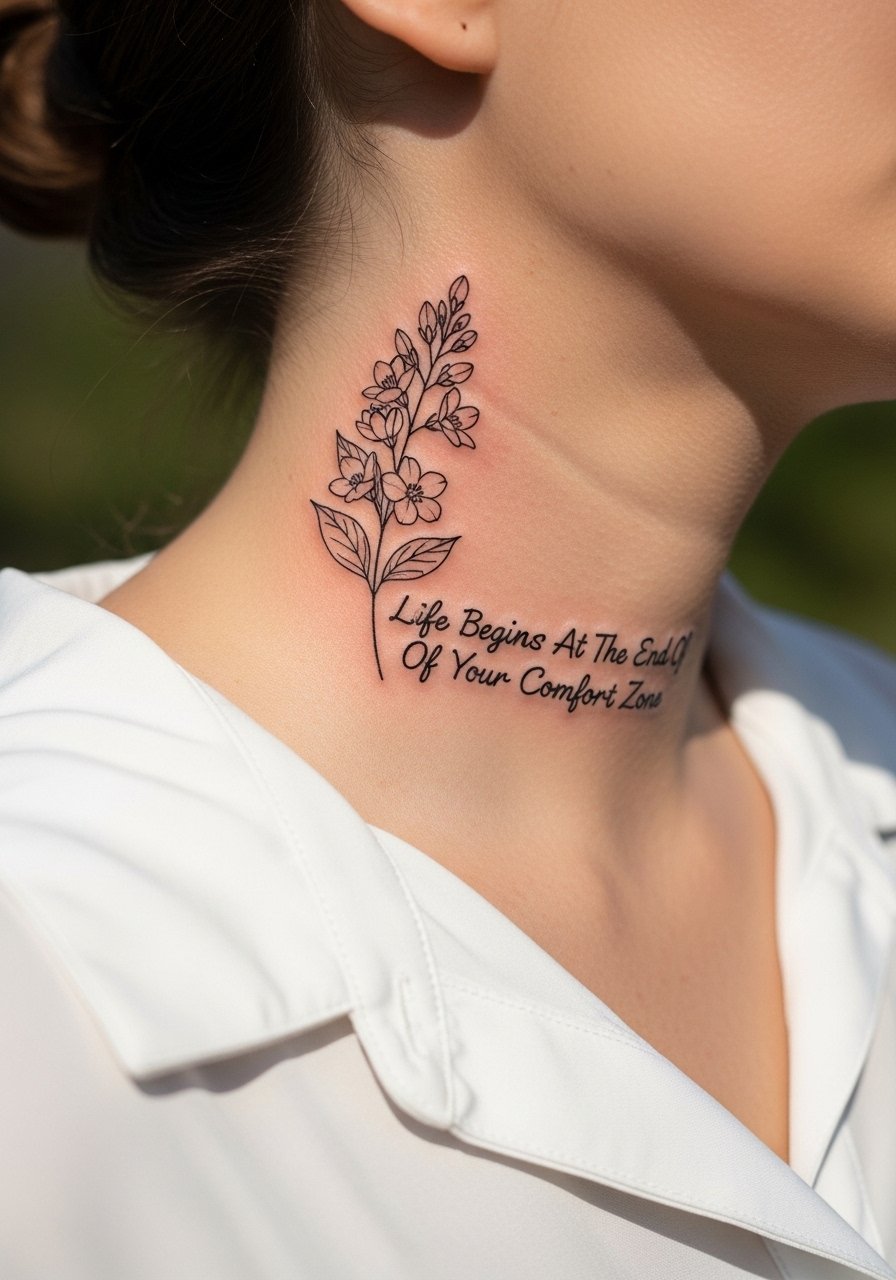
Neck pieces age in public ways because they are hard to hide. Pain on the side neck is moderate and sessions are usually under an hour for small sprigs. Artists disagree about fine line on necks. One group warns about blurring; another says careful depth keeps lines crisp. Ask where your artist stands. A common error is overloading text length along a thin neck curve. For session wear, pick a wide-neck shirt you can tug aside without tugging the skin.
13. Small Constellation on Sternum
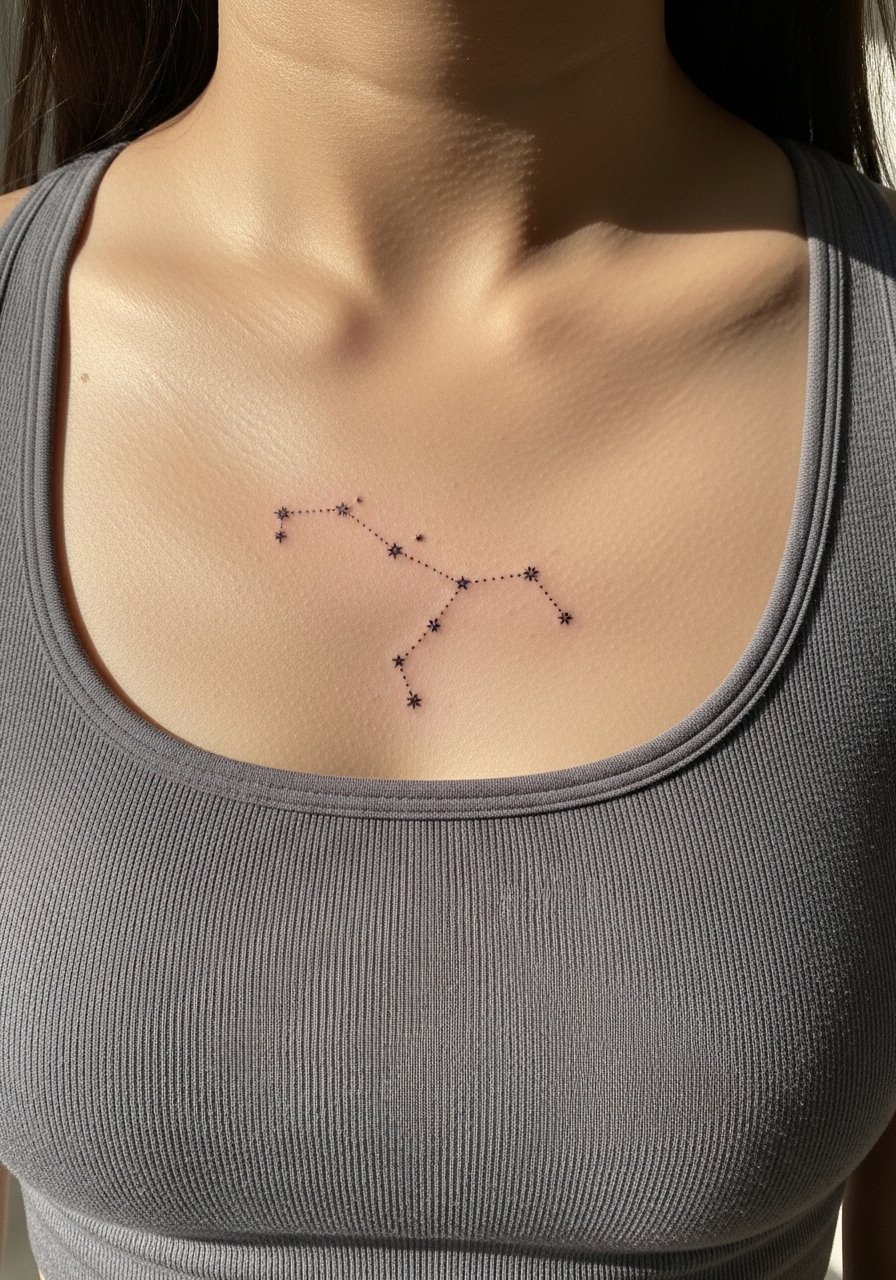
Sternum work sits in a sensitive zone and often needs an artist experienced with chest contours. Pain is high and sessions may be split. Ask for slightly bolder dots to prevent merging where the skin flexes. Many clients forget that underwire bras can rub and delay healing. For the appointment, wear a fitted sports bra so the area is accessible without full exposure. If you want to show it later, halter tops work best.
14. Tiny Script "Enough" on Finger Side
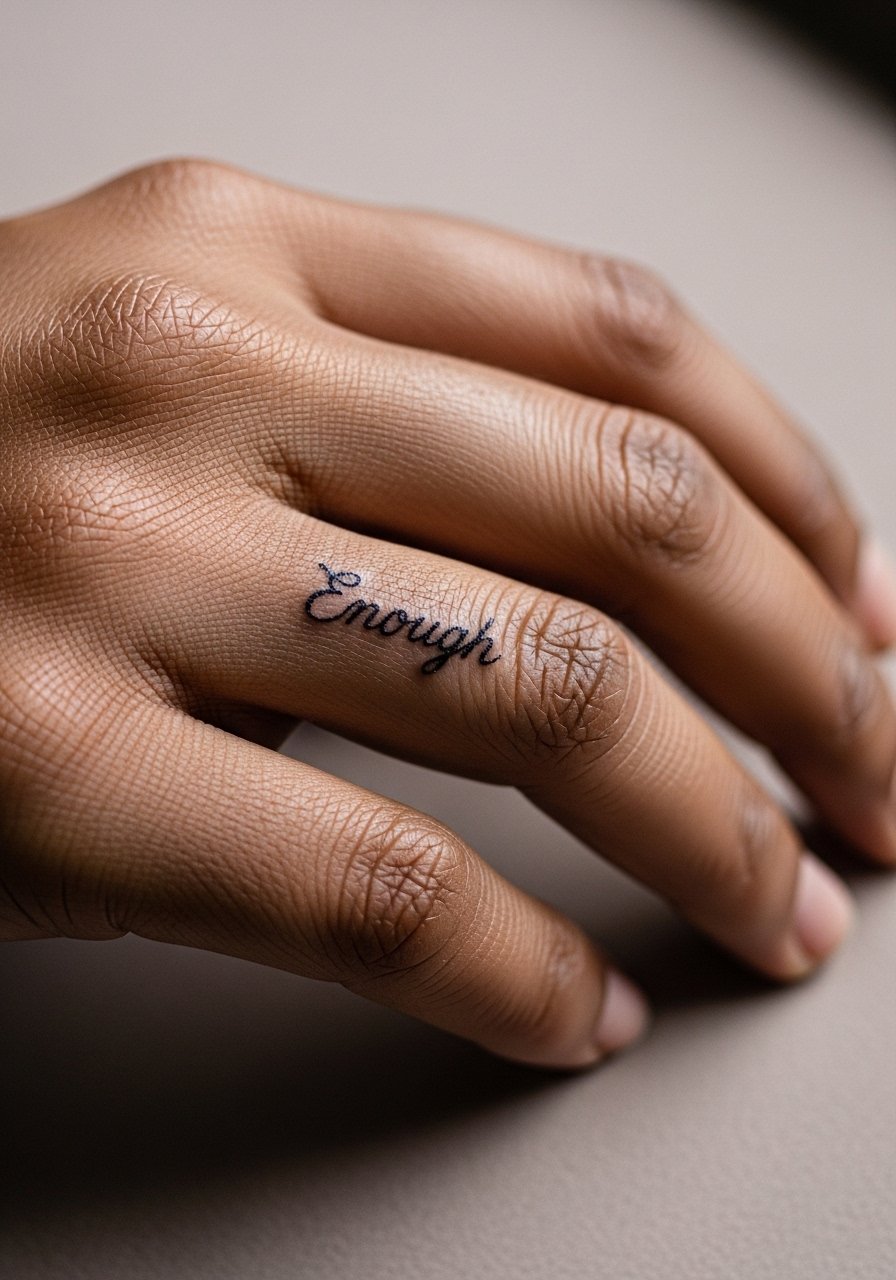
Tiny side-of-finger scripts are a discreet daily prompt. Fingers fade fast because of constant washing and oils. Plan for touch-ups possibly every 12 to 18 months. Request slightly bolder letterforms and ask the artist to avoid the knuckle crease. A common mistake is a script too thin that disappears quickly. Keep rings minimal to reduce rubbing during healing.
15. Geometric Heart Lock on Inner Wrist
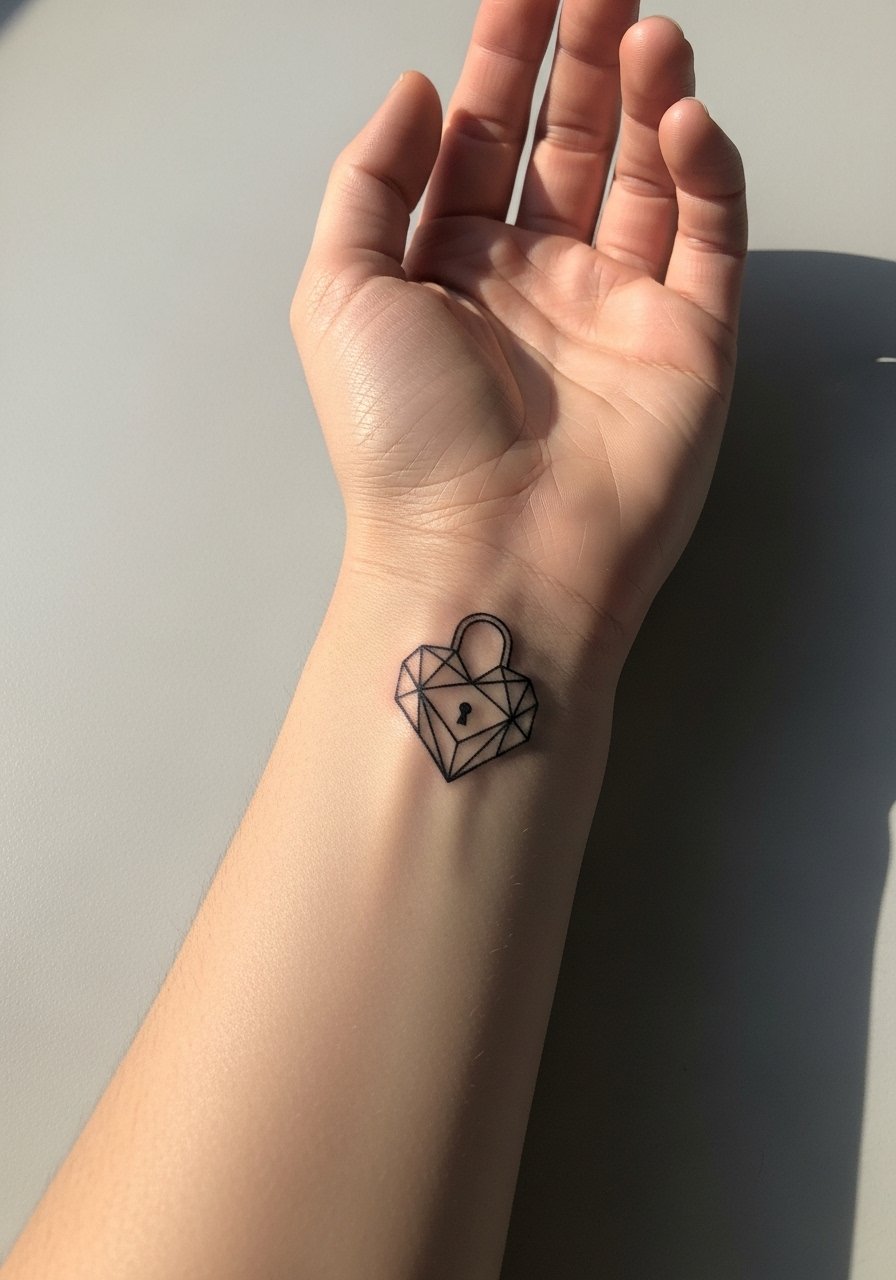
Inner wrist works for small geometric icons that rely on clear linework. Geometric pieces need spacing so triangles and lines do not merge. This session is short and pain is mild. Tell your artist you want consistent line weight and clear negative space inside shapes. Avoid ultra-fine cross-hatching in a tiny area. For showing it off, stack with a thin gold chain bracelet on the opposite wrist to balance attention.
16. Scripted Phrase on Lower Ribcage
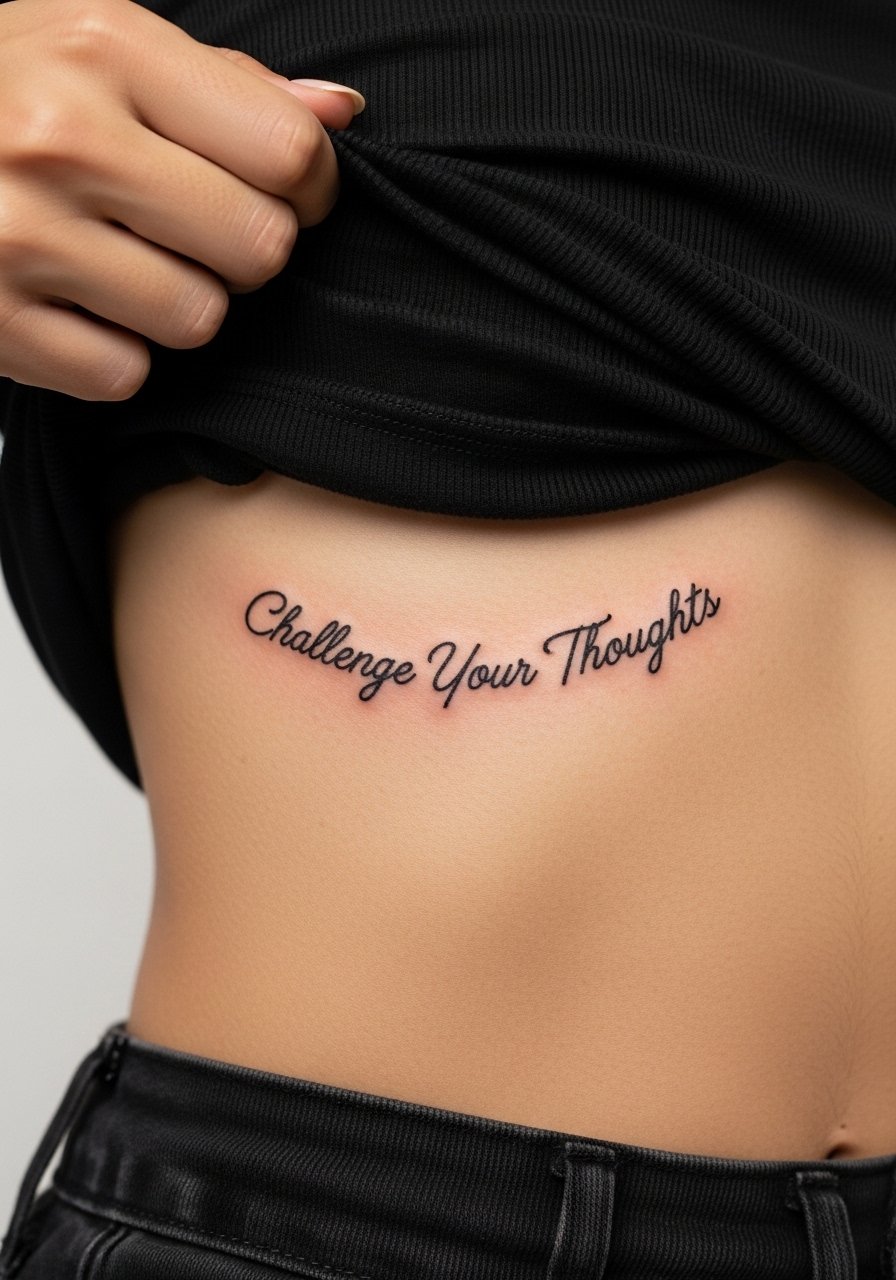
Lower rib phrases are very personal and sit where clothing can irritate them. The pain is high and sessions may be two-part. Artists differ on fine line outcomes on ribs. If you choose this area, ask for slightly heavier strokes with consistent spacing. A mistake is wrapping a long sentence too tightly around the curve. For the session, a side cutout crop top makes access simple and modest.
17. Blackwork Script Bar on Forearm
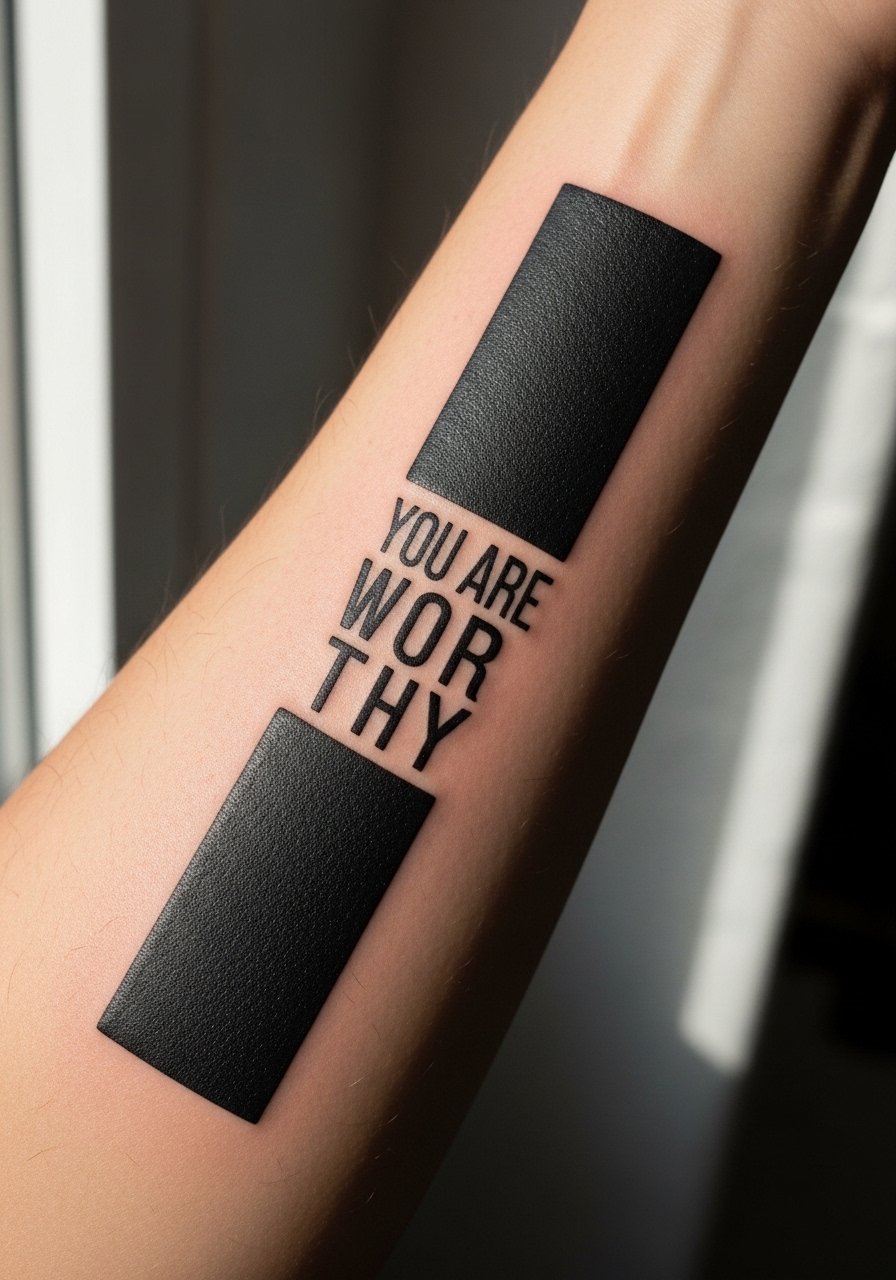
Blackwork text is forgiving for aging and photos. Forearm placement tolerates saturation and shows well. Sessions are usually under an hour. Ask for single-pass solid fills and avoid tiny internal serifs that fill with time. A common mistake is requesting thin caps that lose contrast. For a casual reveal, a short-sleeve button-up rolled at the cuff frames the forearm without covering the piece.
18. Waxing Crescent and Script Behind Ear

Behind-the-ear pieces are discreet and need delicate placement just below the hairline. Pain is mild but the area is sensitive. Keep designs small and avoid dense dots that can look like scabbing. The big debate here is visibility. Some choose bold contrast to photograph, others keep it whisper-thin. For the session, have hair tucked and bring a small clip to hold it away. If your work includes a tiny script, name the exact short word during consultation to ensure clarity.
19. Stacked Collarbone Lines "Perfectly Imperfect"
Stacked phrases along the collarbone add depth without a single long line. Pain is mild to moderate and the session is usually short. Ask for consistent leading between lines and test the layout with a stencil while standing. Mistakes include stacking with too-small leading which causes overlap as skin moves. Off-shoulder blouses show the layers well. Consider a silk camisole women for evenings when you want subtle exposure.
20. Dotwork Heart with Tiny Script on Ankle
Dotwork holds up differently than linework because it relies on spacing of points. Ankle friction calls for slightly larger dots and more negative space so the stipple does not merge. Sessions vary by complexity. The common error is making stipple too tight in a small area. For wear, midi skirts and sandals keep the ankle visible and safe.
21. Watercolor Petal Cluster on Shoulder Blade

Shoulder blades are forgiving for watercolor because fabric rarely rubs directly. Ask your artist to envelope petals in slight outlines to prolong definition. Sessions are usually 1 to 2 hours and pain is mild. A mistake is relying solely on wash without any anchor lines. Pair the piece with a sleeveless blouse to show off the sweep of color.
22. Minimal Serif Text on Calf
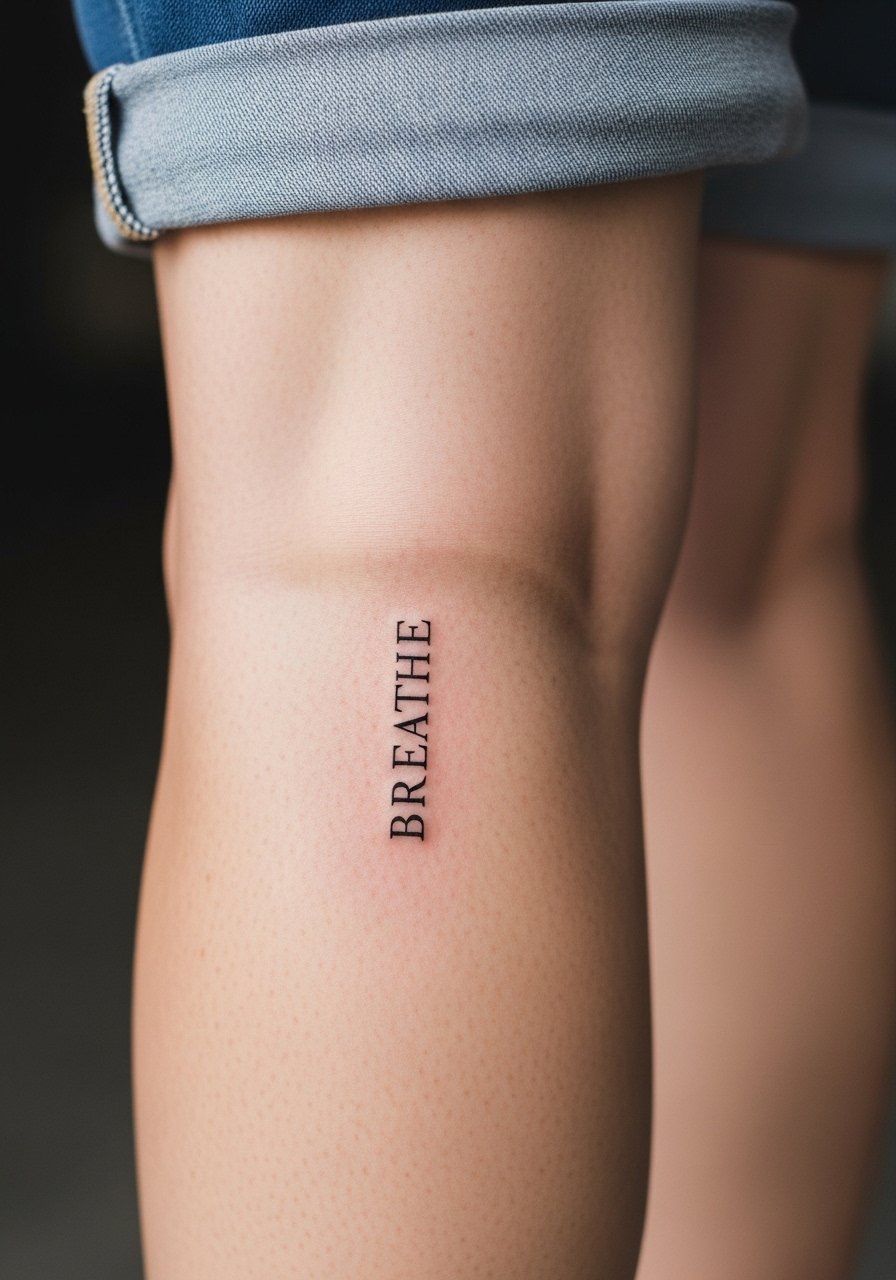
Vertical calf text reads strongly and tolerates cleaner terminals than thinner scripts. Sessions are short and pain is moderate. Tell the artist you want slightly wider counters to preserve negative space over time. Avoid super thin strokes or tiny punctuation. Boots and skirts frame calf work well. A midi skirt flowy shows off calf placement.
23. Simple Infinity with Tiny Banner on Wrist
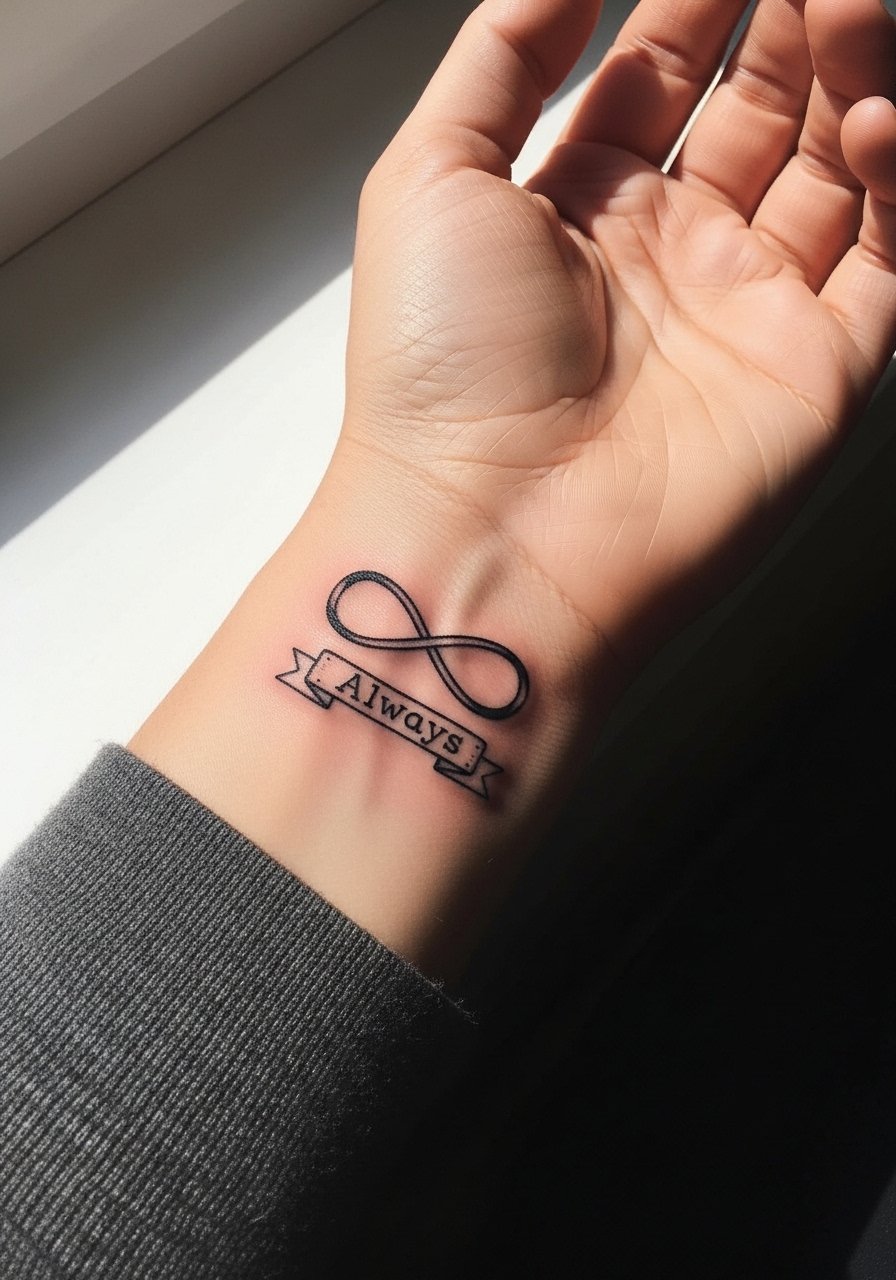
Infinity motifs are timeless when scaled properly. For wrists, prefer solid single-pass lines instead of dotted fills. Sessions are quick and pain is low to moderate. A common mistake is making the loop too small so it blurs with time. Wear a thin chain pendant necklace when you want subtle coordination without crowding the wrist area.
24. Tiny Script Along Finger Knuckle
Knuckle work is high maintenance because of constant motion. Expect quicker fading and plan touch-ups. Ask for slightly bolder letters and avoid complex flourishes that fill with time. Sessions are short but healing requires care. Many regret choosing long words here. Keep the word short and meaningful to you.
25. Botanical Ankle Band with Small Words
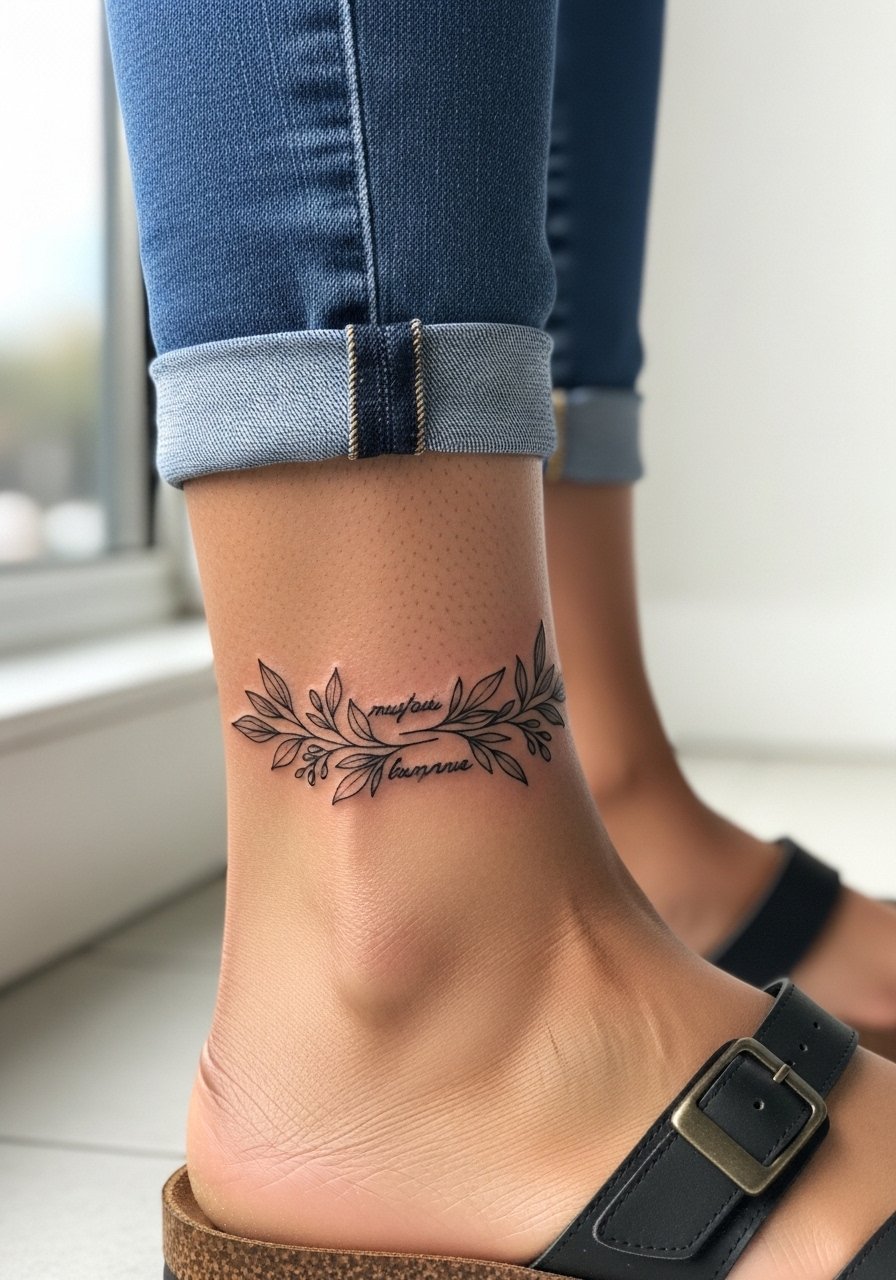
Ankle bands read well when the foliage has clear gaps. The band should not be perfectly tight so skin movement does not distort the pattern. Session time varies. Ask for slightly simplified foliage on the underside where shoes might rub. Cuffed pants and anklets show the band without friction. Consider a dainty anklet chain for summer displays.
26. Chest-Side Minimalist Script Under Collar
Upper chest scripts sit where bras and collars can irritate them. Pain is moderate and sessions are usually short. Ask for placement that stays above typical fabric lines. A common mistake is placing script where underwires hit during movement. When dressing, a silk camisole women gives access while protecting the area.
27. Minimalist Wrist Cluster with Tiny Affirmation
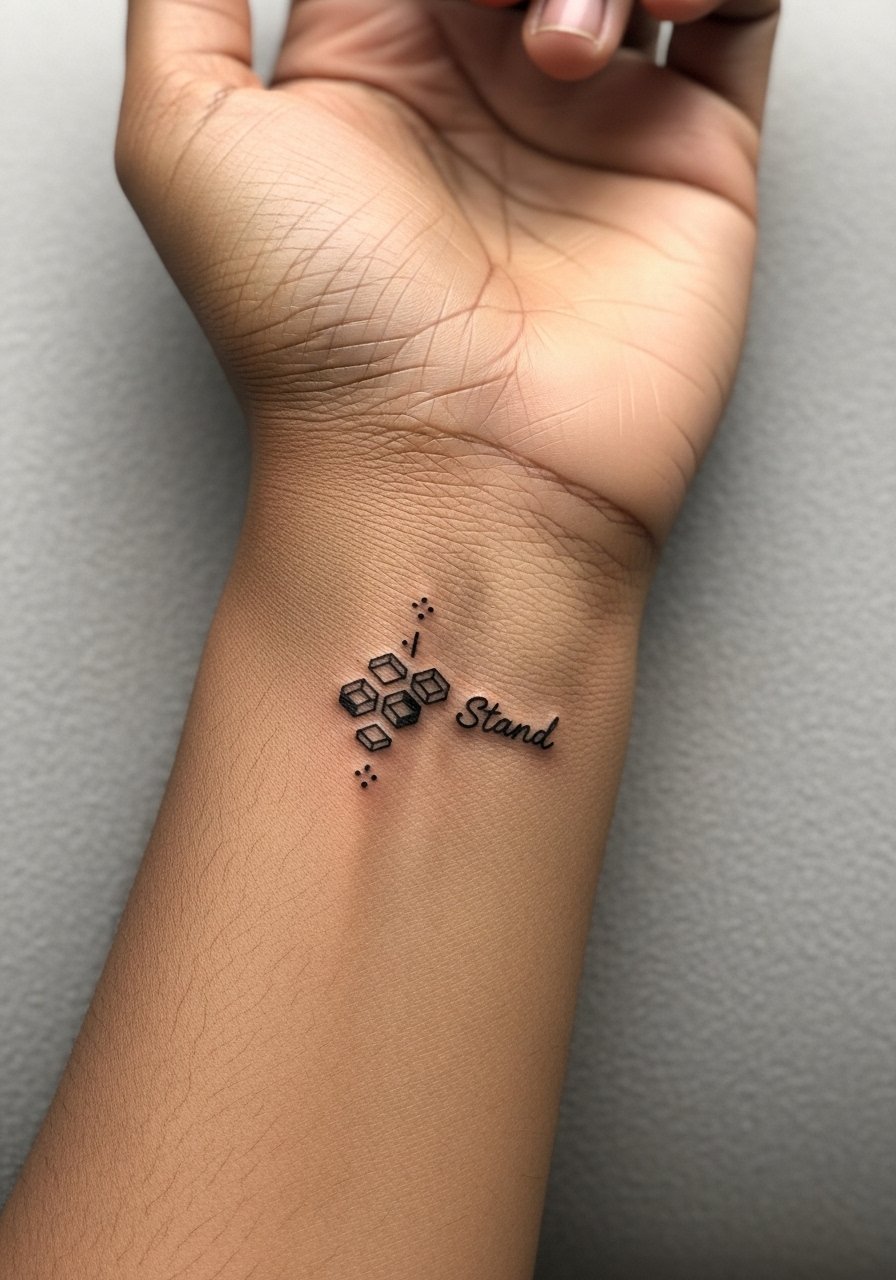
Clusters like this combine symbol and single-word affirmations for low-commitment statements. For wrists, pick slightly bolder shapes so the geometry reads at year two. Sessions are under an hour. A common mistake is packing too many tiny elements into a wrist band. For casual reveals, a thin gold chain bracelet on the opposite wrist balances attention without crowding the cluster.
Frequently Asked Questions
Q: Will a fine line wrist script need touch-ups sooner than a bold wrist piece?
A: Yes, in my experience fine line scripts on wrists usually need touch-ups sooner than bold pieces. Wrists get more sun and washing, which thins delicate strokes. If longevity worries you, ask for slightly heavier strokes at the consult and plan a touch-up around year two.
Q: How do I make text show well on darker skin tones?
A: Choose high-contrast approaches like blackwork outlines or bolder fills and avoid ultra-thin hairlines. Discuss ink saturation and test small patches if you are unsure. Lighting for photos matters a lot, so try natural window light when previewing placement.
Q: Is a ribcage fine line script worth the pain for a phrase?
A: It can be, but the trade-offs are real. Ribs give privacy and a sensual canvas yet they are painful and fine lines can blur if placed across high-movement zones. Talk to your artist about spacing and expect a possible touch-up at year two.
Q: What should I wear to a shoulder or ribcage session for comfort and access?
A: Pick easy layers. For shoulders, a loose button-down you can pull aside works well. For ribs, a loose tank you can lift is best. A loose ribbed tank is a practical session choice that keeps you comfortable and modest.
Q: Are hand and finger placements professional risk areas?
A: They can be in some industries because these areas are highly visible. If workplace appearance matters, think about placement and size. Finger and hand pieces also need more frequent touch-ups, so factor that into your decision.
Q: How do I avoid a fine line piece blurring at year three?
A: Don’t go ultra-tiny with line spacing. Ask the artist for a slightly stronger single-pass line and schedule a yearly check-in. Limit sun exposure and moisturize around the area during healing to keep skin healthy.
Q: Should I try a temporary version first for a phrase I might change my mind about?
A: Trying a temporary is a smart move for any text affirmation. It gives you real-world feedback on how the placement feels with clothing and how the phrase sits when you move. If you want low-commitment testing, use a clear temporary that matches the intended size and placement.
