
Fine line samurai imagery dominates feeds right now, but what holds up past the first year is often not what goes viral. The modern takes that age best balance bold silhouette, careful spacing, and simplified armor details so the face and sword stay readable. Below are 21 modern samurai designs that work on different body canvases, with notes on consultation cues, how they age, and what to wear the day of the session.
1. Miniature Fine Line Samurai on the Inner Forearm
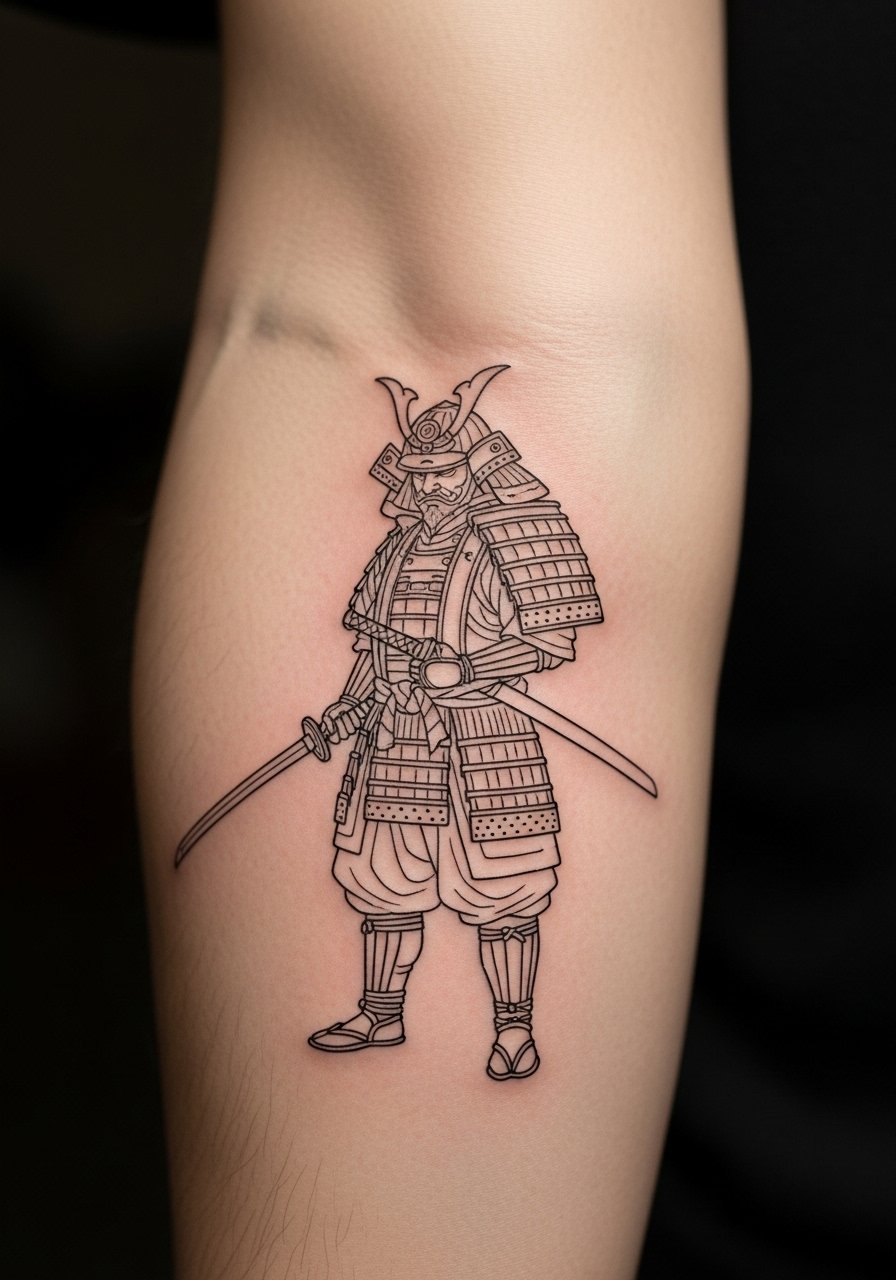
I've seen this small forearm take three ways and the one that lasts pairs simplified armor with negative space. Fair warning, the inner forearm is lower pain and ideal for a two-hour session. Tell your artist you want the face and sword at larger scale than the armor details, so shading stays open. Common mistake is asking for ultra-fine detail that blurs after a couple of years. Expect six-month crispness then slight softening by year two. For the session wear a loose button-down shirt you can pull aside so the artist has clean access to the area. This placement shows well with rolled sleeves and a minimalist watch.
2. Traditional Irezumi Samurai Half-Sleeve

There is a clear split in the community about faithful Irezumi versus modern reinterpretations. One camp prefers strict adherence to traditional motifs and dense background waves. The other camp argues for pared-back compositions so the main figure reads longer. I recommend the pared-back route for a half-sleeve if longevity matters. This placement is a 4 out of 10 on most pain scales and usually booked as a multi-session piece. During consultation ask the artist to lock the silhouette with heavier black outlines and keep textures to stippling rather than tiny lines. A common mistake is overloading the sleeve with background detail that turns into a single dark mass when healed. For showing off, a short-sleeve linen shirt keeps the arm visible without hiding the silhouette.
3. Minimalist Samurai Crest on the Chest
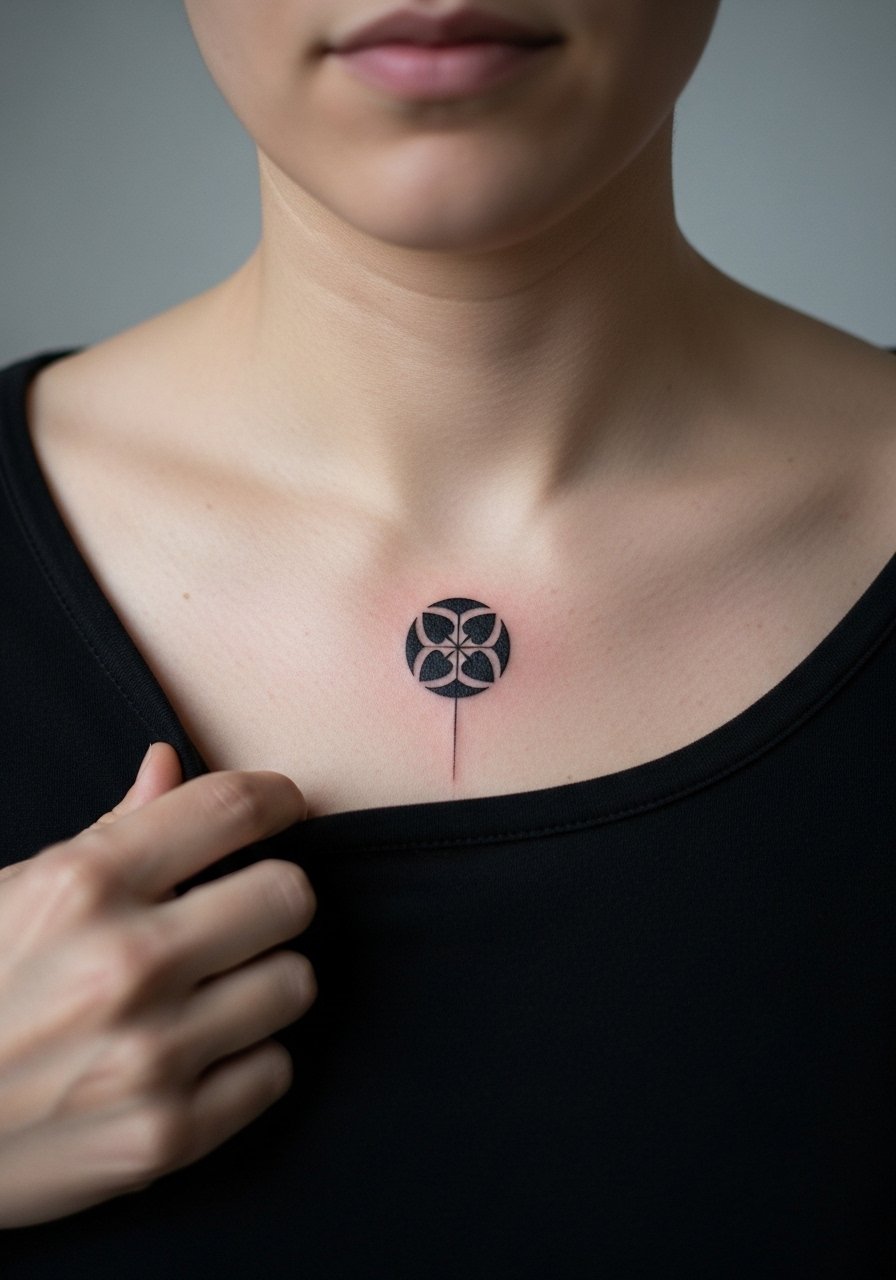
Most chest pieces read larger on the body than on a screen, so this minimalist crest is perfect for someone who wants chest placement without a full plate of armor. Pain here is moderate. Bring reference showing exactly how wide you want the negative space around the crest. The mistake is asking for tightly packed micro-lines next to the collarbone. That tends to soften into an indistinct gray patch by year three. Expect one session under two hours for this size and a touch-up at year two if you want crisp edges. For the session, wear a wide-neck tee so the artist can expose only the collarbone area. The crest pairs well with a thin chain necklace.
4. Samurai Mask Wrist Band
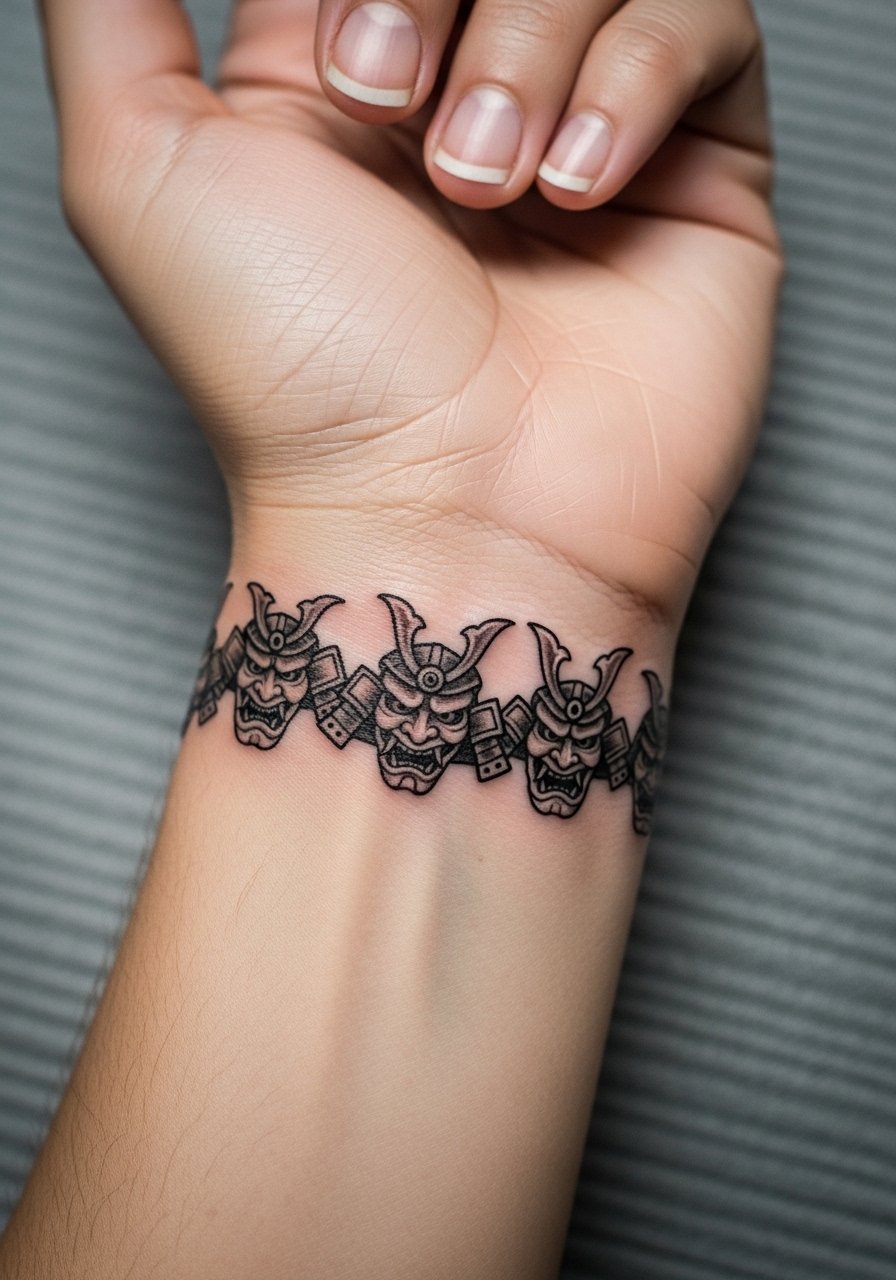
The wrist is a high-friction zone so design choices matter. This band works when the mask is simplified and given breathing room between repeating elements. Pain is low but healing is fussy because of constant washing. Tell your artist you want slightly thicker linework for outlines so the motif stays legible. People who ask for super-fine lines here often need a touch-up sooner. Expect frequent touch-ups around year two. For showing it off wear rolled sleeves or stack with a minimalist leather bracelet that does not sit on top of the ink. Session time is short, often under an hour.
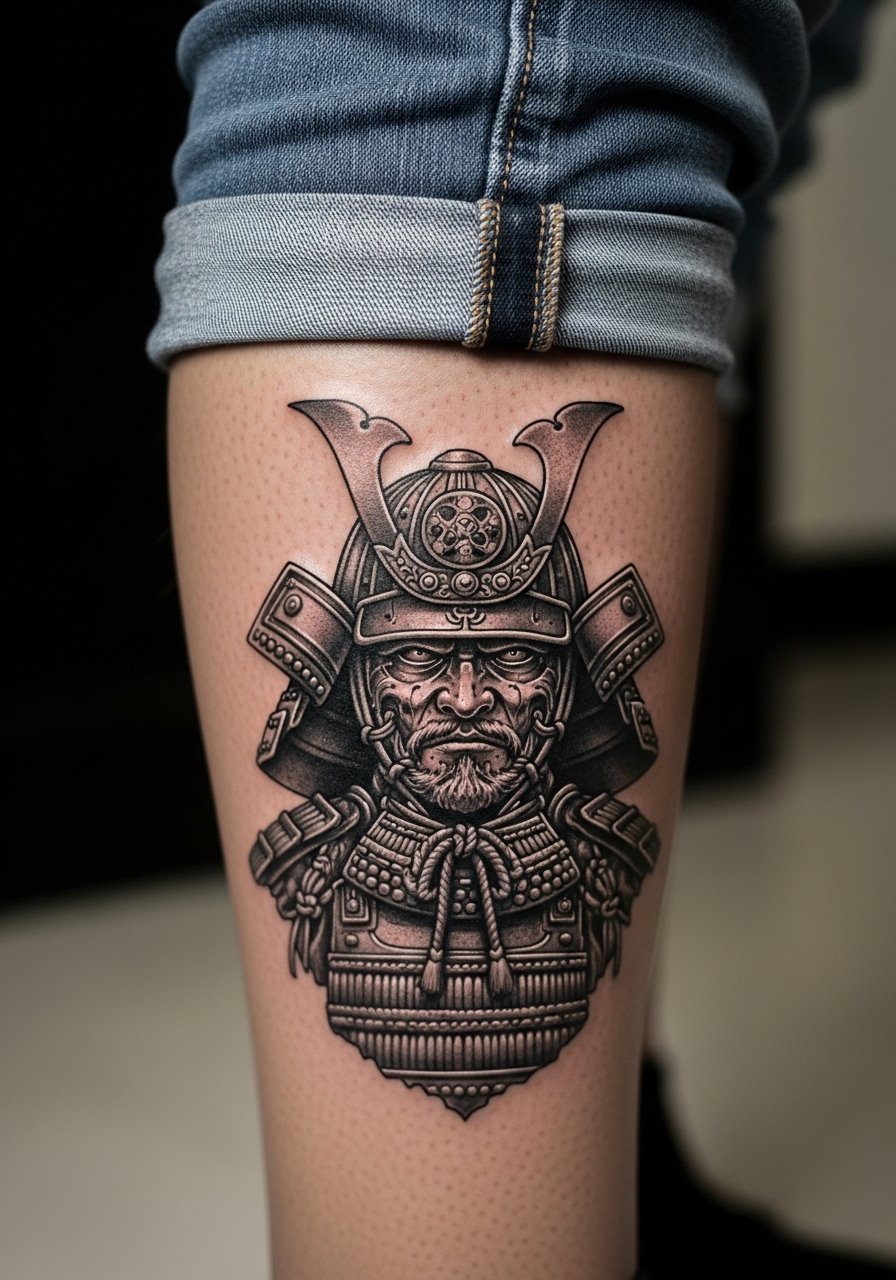
5. Samurai in Motion on the Calf

I've noticed calf pieces age well because the skin there shifts less with movement. The silhouette-driven samurai in motion reads clearly at distance and holds detail across years if the artist focuses on strong negative space. Pain is moderate and a single-session piece often runs two to three hours. Avoid tiny cross-hatching in the armor or it will fill in. For the appointment wear loose drawstring shorts that let the artist roll the leg without torque. Calf work pairs nicely with boots or shorts in summer.
6. Micro-Realism Samurai Head on the Nape
For nape tattoos most artists recommend keeping portraits slightly larger than you think. The nape skin moves and small faces can warp. Expect a 3 out of 10 pain level. In consultation ask for depth from stipple shading rather than tiny engraved lines. A frequent mistake is packing facial detail into too small a space. For the session wear a wide-neck shirt you can shift so the artist has clean access. This placement can be discreet or shown off with an updo.
Studio Day Picks
These first six designs include wrist, calf, nape, and chest spots that need slightly different session prep and first-week care.
- Stencil transfer paper kit. Lets you preview placement and scale on skin before the needle hits, especially helpful for the chest crest and nape portrait.
- Non-greasy topical numbing cream. Applied per instruction about 45 minutes before helps with sensitive areas like the wrist and chest without smearing stencil lines.
- Thin protective film roll. Useful for wrist and calf pieces that rub against clothing during the first few days.
- Fragrance-free gentle body wash. Cleans the healing area without irritating fine line work on the forearm or nape.
- Aquaphor healing ointment. Thin layers help lock in moisture over high-friction spots like the wrist and calf during the initial healing window.
7. Monochrome Samurai Sleeve with Negative Space
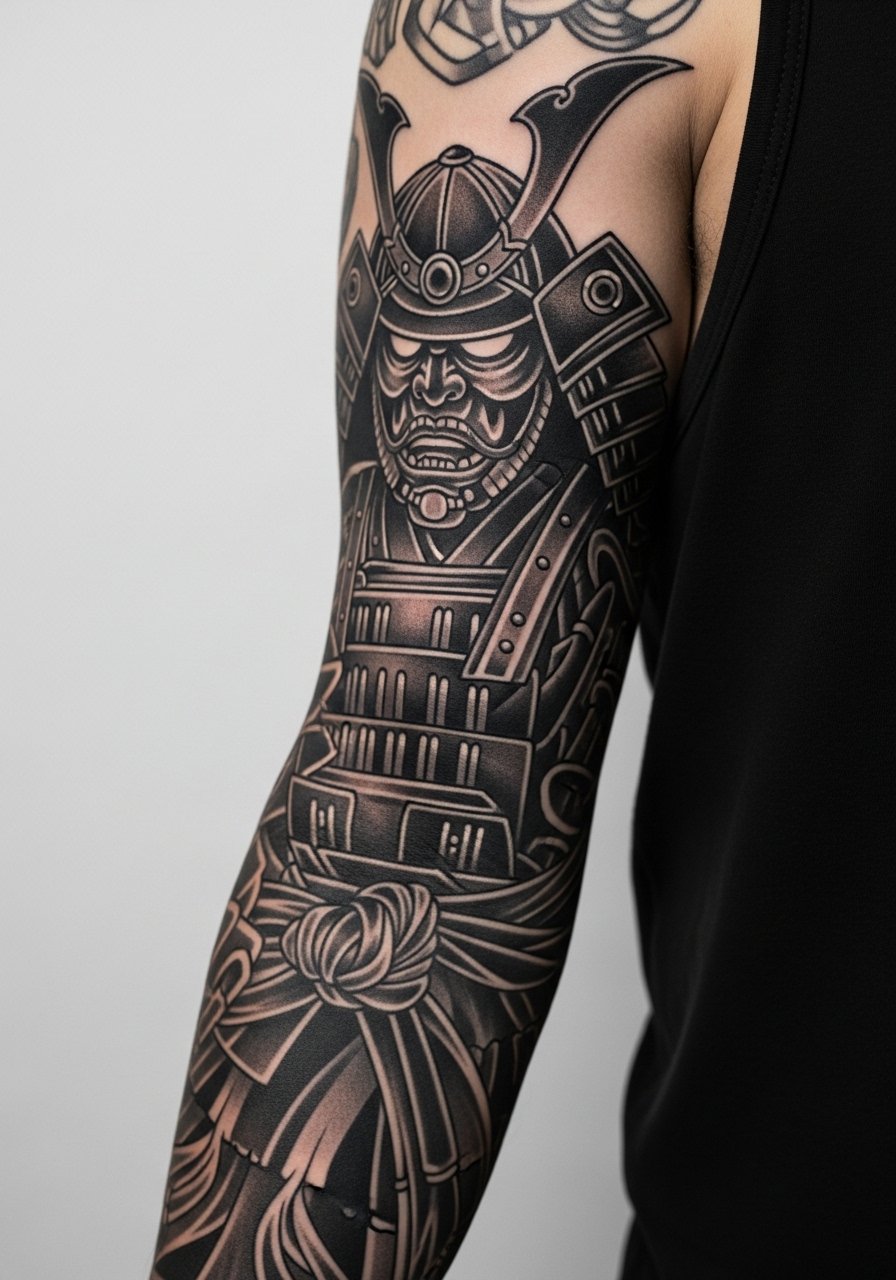
There's real visual power in a monochrome sleeve that relies on silhouette instead of micro-detail. Visual impact lead applies here because this approach reads across distance and ages predictably. Expect multiple sessions totaling six to ten hours. Ask for blocked-in silhouettes and strategic skin breaks so the design breathes as it heals. The common mistake is excessive tiny patterning inside the blacks that disappears into a single dark mass. This sleeve needs bold blackwork and occasional stipple shading for texture. For showing it off, cuffed shirts or a short-sleeve linen shirt keep the composition visible without competing elements.
8. Samurai and Koi Flow Across the Ribcage
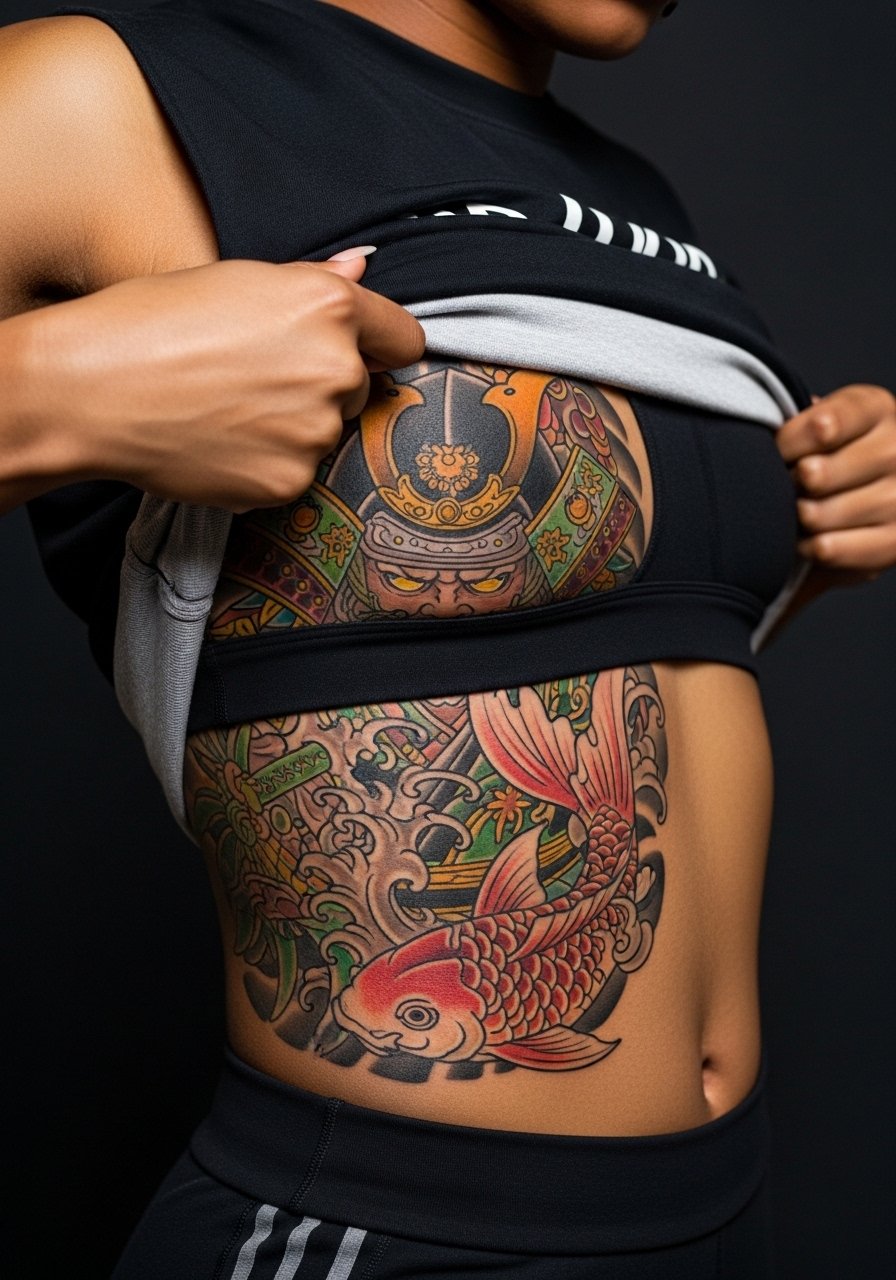
Fair warning, ribs are one of the more painful placements and they test your commitment. There is a two-way debate in the community about fine line on ribs. One camp says the skin there stretches and creases so tiny lines blur within two years. The other camp insists that with proper needle depth and spacing, fine line can settle cleanly. My suggestion is to scale up line weight slightly from what you would request on a forearm and plan for a touch-up at year two. The session can run long because of stops and starts between breaths. For the appointment wear a cropped top you can lift so the artist has clear access.
9. Samurai Helmet Bracelet Around the Upper Arm

This upper arm band is a quick-hit statement that still reads like a significant piece from across the room. Pain here is low and session time is often under two hours. Ask for simplified plating and a clear top-to-bottom focal point so the helmet does not read as a repeating blob when healed. A common mistake is asking the artist to fill the entire band with micro-patterns. Leave breathing room and expect one touch-up around year three if you want razor-sharp edges. For showing it off, sleeveless tops or a tank top make the band visible.
10. Samurai Portrait Over the Shoulder Blade
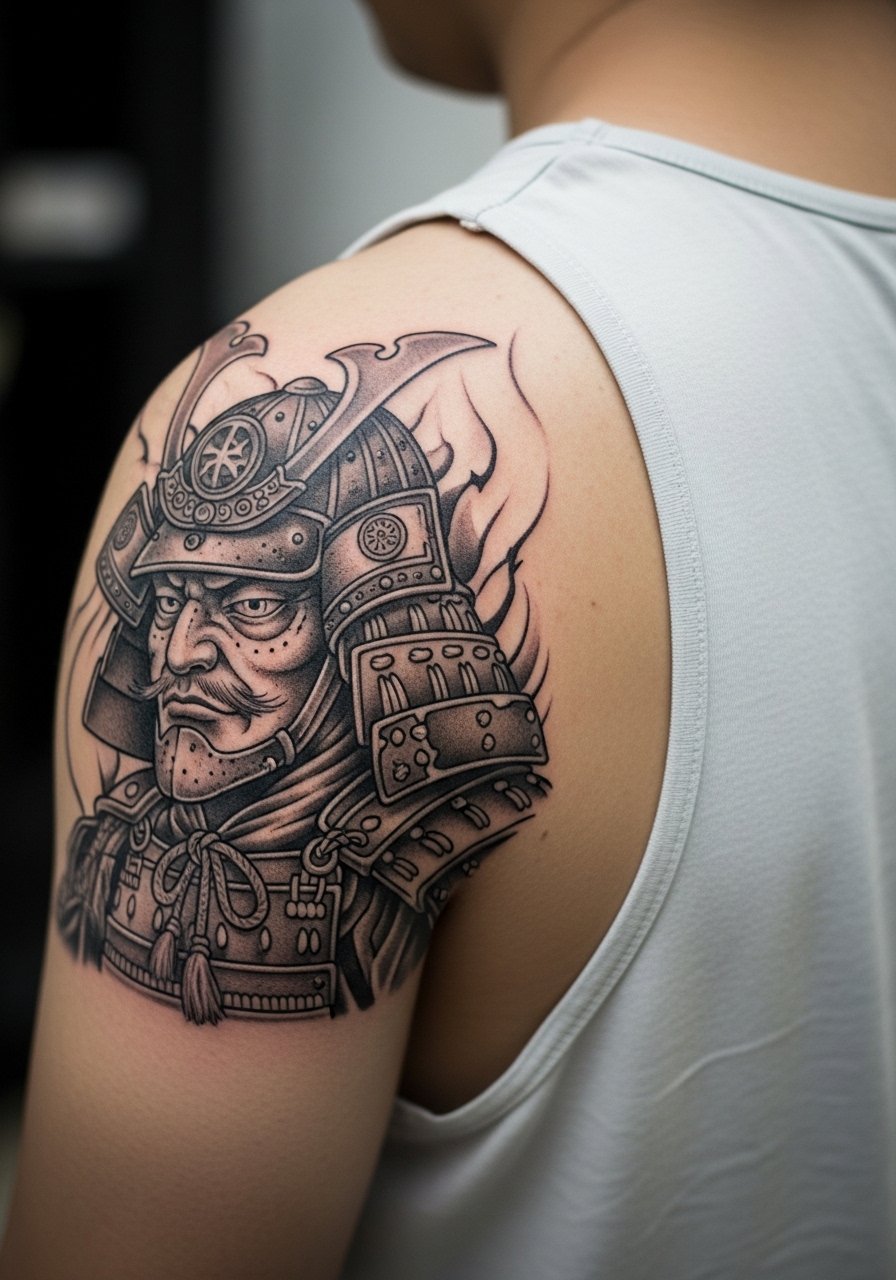
A shoulder blade portrait reads elegantly because the canvas is large and relatively stable. Visual impact is high and aging is forgiving if the artist spaces out facial features. This placement hits a 3 out of 10 on most pain scales and often finishes in one medium session. Tell the artist you want the helmet and face given different saturation so the helmet holds as a backdrop. Avoid asking for ultra-realistic tiny pupils. They tend to become indistinct in a couple of years. For showing it off, open-back tops or a thin strap dress frame the piece without covering the shoulder blade.
11. Geometric Samurai Silhouette on the Sternum
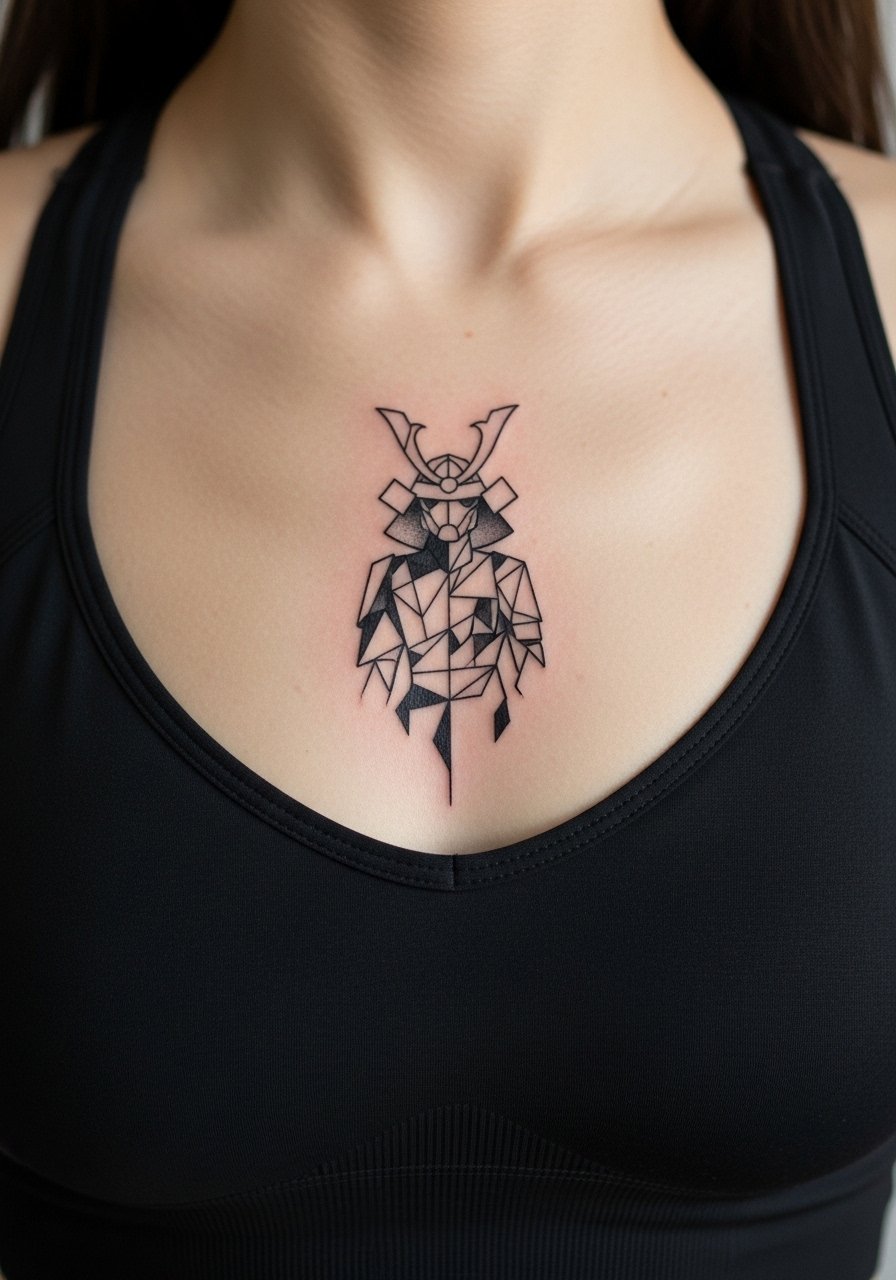
Sternum placements require specialized attention because the skin flexes and contours. An aging/healing lead applies here since dense tiny geometry in that zone can blur. One camp supports dense geometric fills for strong graphic effect. The other camp argues for larger planes and negative space to prevent muddiness. I side with larger planes for sternum work. Session pain is moderate to high and usually one focused appointment. Wear a fitted sports bra for the session so the artist has clear access. Many people pair sternum pieces with layered necklaces that sit just above the design.
12. Neo-Traditional Samurai on the Thigh
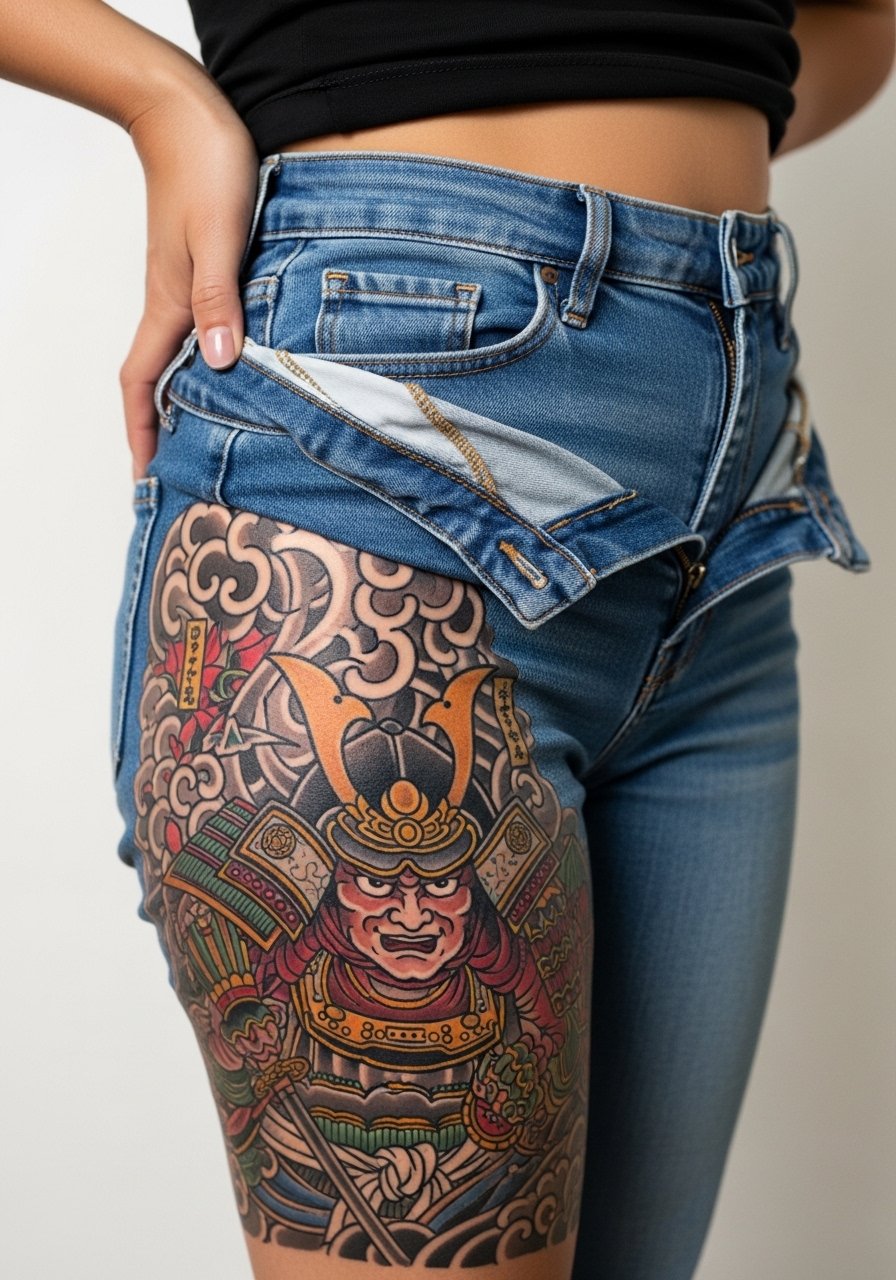
The outer thigh is forgiving for color saturation and larger compositions. A personal observation lead fits because I've seen neo-traditional color age gracefully there, especially with solid saturation and bold outlines. Pain is moderate and sessions tend to be comfortable due to muscle tissue. Tell the artist to use larger color fields rather than tiny gradients. A common mistake is tiny stipple gradients that disappear into flat color later. During the session wear high-waisted bottoms that can be shifted so only the tattoo area is exposed. For showing it off, high-cut shorts or a swimsuit bottom complement the placement.
13. Samurai with Dragon on the Full Back
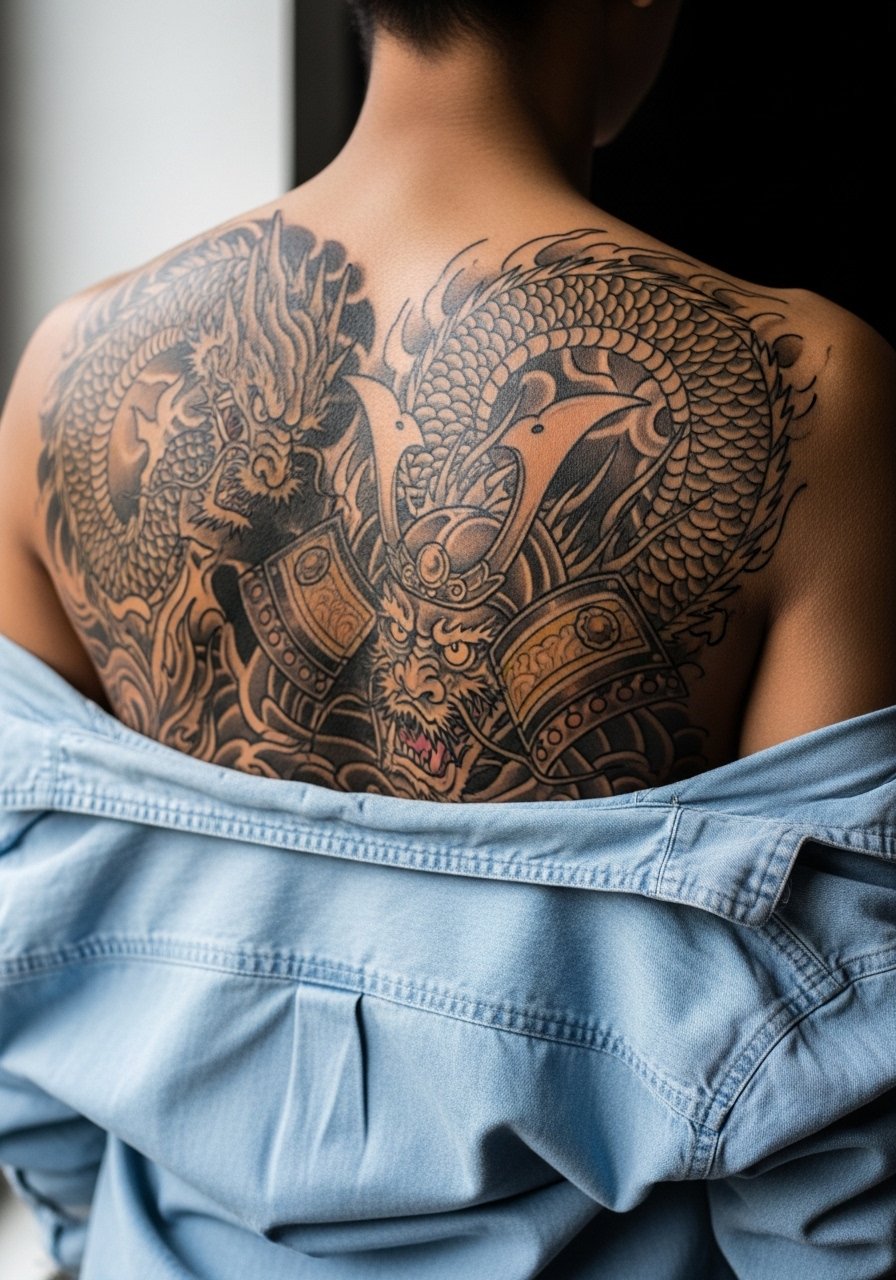
This is one of the classic statements in modern samurai work. It requires long sessions and a clear narrative so the figure and the dragon do not compete. The consultation should focus on where you want the eyes and sword to sit when clothed. A common mistake is overcrowding the back with too many secondary motifs. For durability, ask for stable black outlines and larger swathes of color for the dragon scales rather than tiny shaded dots. Multi-session planning is essential, and touch-ups at year three are common for vivid color retention. For showing it off, open-back garments or a loose button-down shirt let the composition breathe.
14. Minimal Samurai Script Along the Collarbone
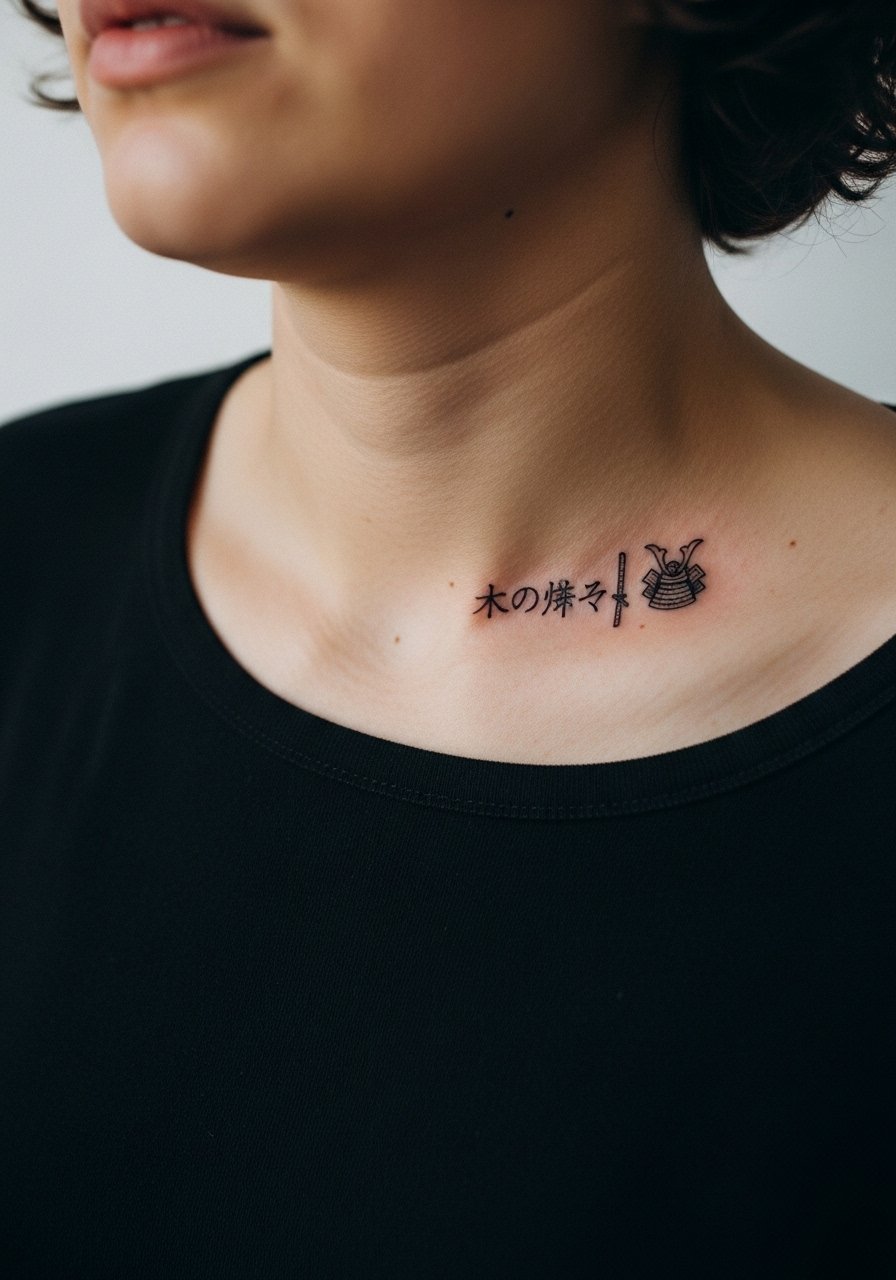
The collarbone is visually impactful but unforgiving of micro-lettering. A consultation lead helps here because you need to show exactly how tall and spaced you want each character. Pain is moderate and a single focused session usually suffices. The common mistake is asking for letters too small. Tiny strokes in that spot blur faster than on the forearm. For the session wear a wide-neck shirt you can shift. Pair this placement with a thin chain pendant necklace that sits just above the script without crowding the ink.
15. Samurai Sword Wrist Accent with Negative Space
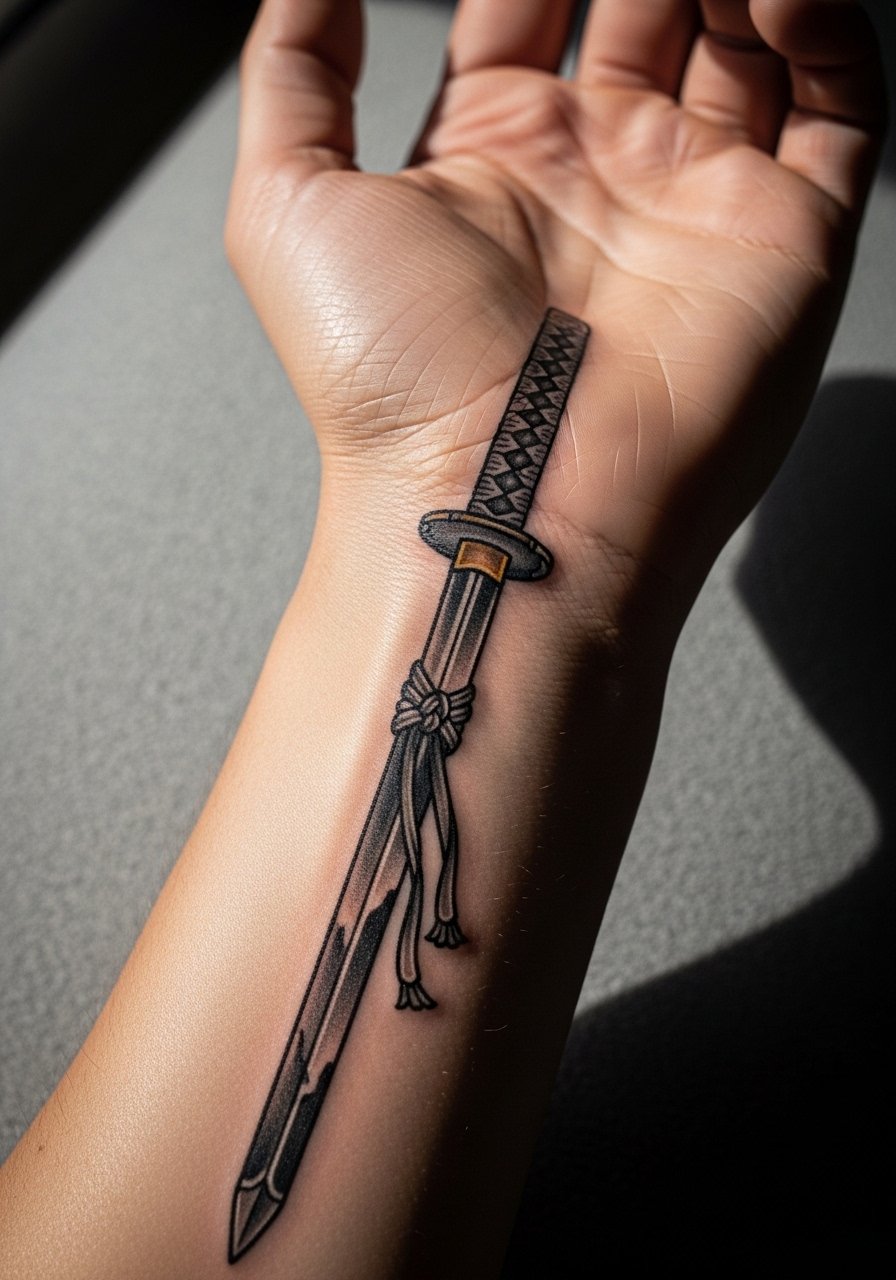
A vertical sword on the inner wrist is elegant but suffers from friction and washing. The visual impact lead fits because a single clean silhouette will outlast busy decorative elements. Pain is low to moderate and session time is short. Ask for slightly heavier outline so the blade reads when healed. People who request ultra-thin edges often need touch-ups within two years. For showing it off, stack with a minimalist leather bracelet worn below the tattoo rather than across it.
16. Samurai Bust in Micro-Realism on the Calf
A micro-realism bust looks fantastic on the calf because the skin holds detail better than thin areas. When aging, micro-realism maintains depth if the artist spaces the tiny highlights and shadows properly. Pain is moderate. The consultation should stress how prominent you want facial features versus armor texture. The mistake is requesting photoreal levels of tiny highlights that will flatten as the work ages. For the session wear jeans you can roll up, or loose drawstring shorts so the artist can access the calf easily.
17. Samurai with Rising Sun on the Upper Arm
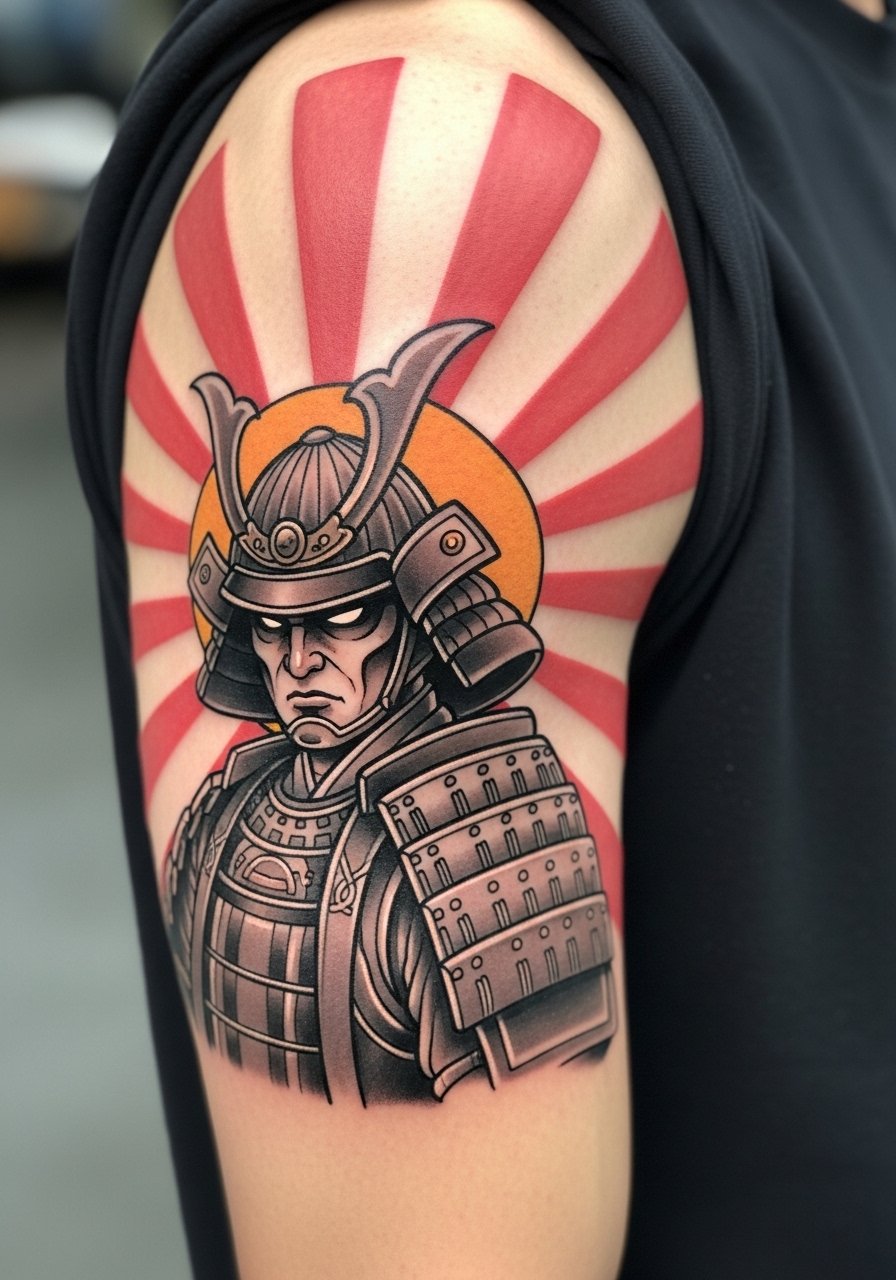
There's a cultural sensitivity angle to pieces that incorporate national symbols. Some people view the rising sun motif as cultural homage, while others see it as territory that requires careful context. Be explicit in consultation about your intent and consider subtle variations rather than literal historic flags. This design ages well on the upper arm if the sun is graphic and not overly textured. Pain is low and session time is moderate. For showing it off, sleeveless shirts or a tank top keep the motif visible.
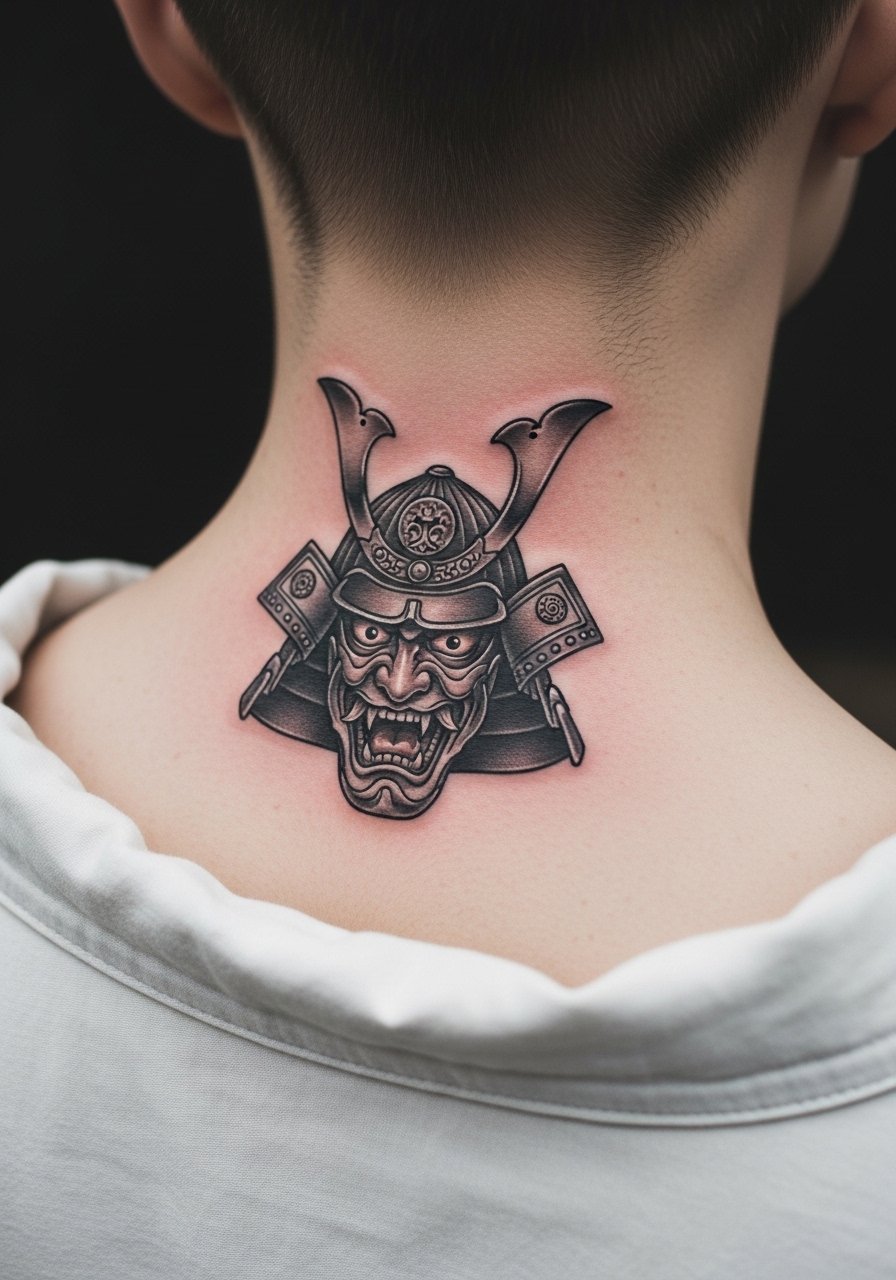
18. Samurai Skull Hybrid on the Throat Side
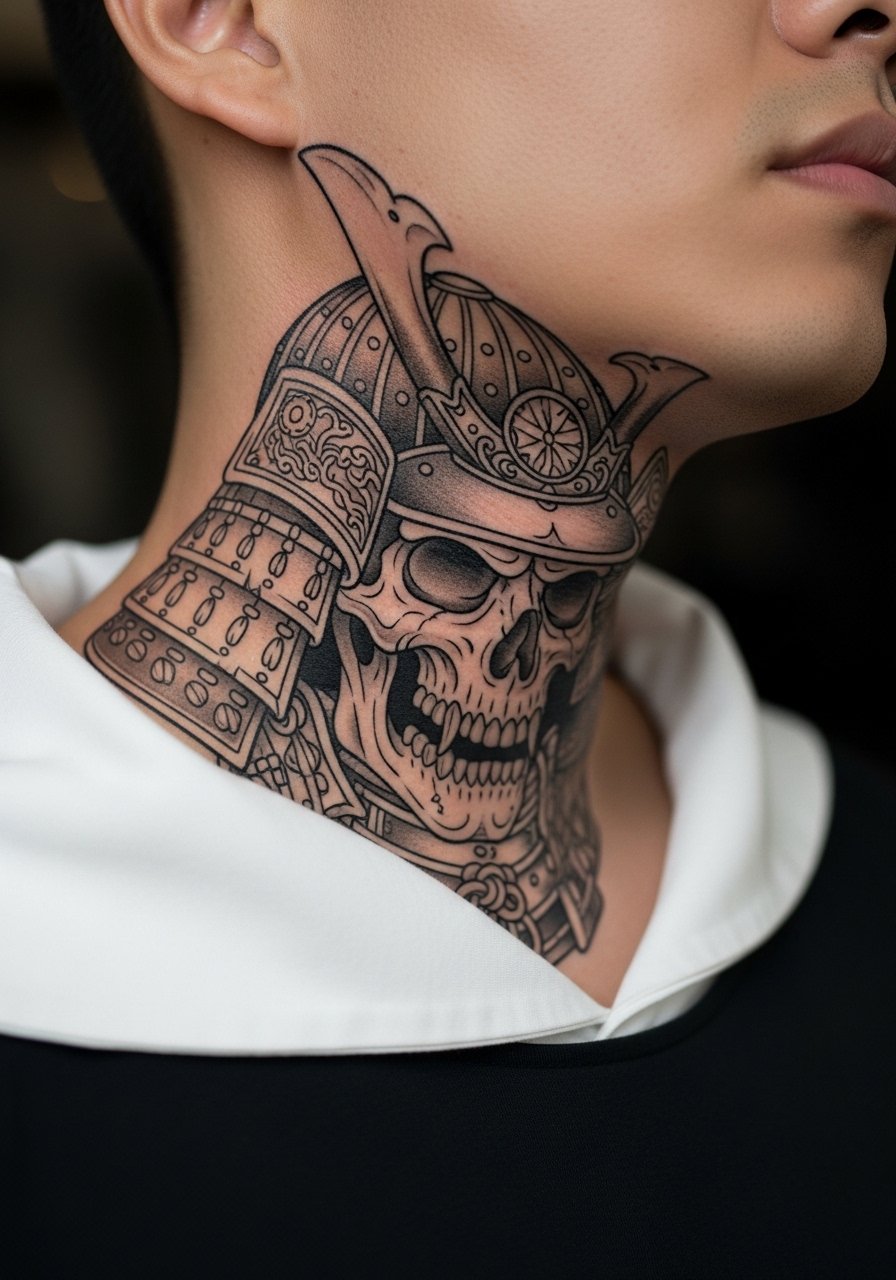
Neck work carries social signals and sometimes professional consequences, so think about visibility. Pain is higher and the skin is thin, which makes very fine detail risky. A consultation lead matters because you must be clear whether you want bold contrast or small detailing. One camp argues for bold graphic silhouettes on the neck. The other prefers small, subtle marks that can be hidden. I advise bold but simple forms for longevity. For the appointment wear a wide-neck shirt that can be shifted so the artist has access.
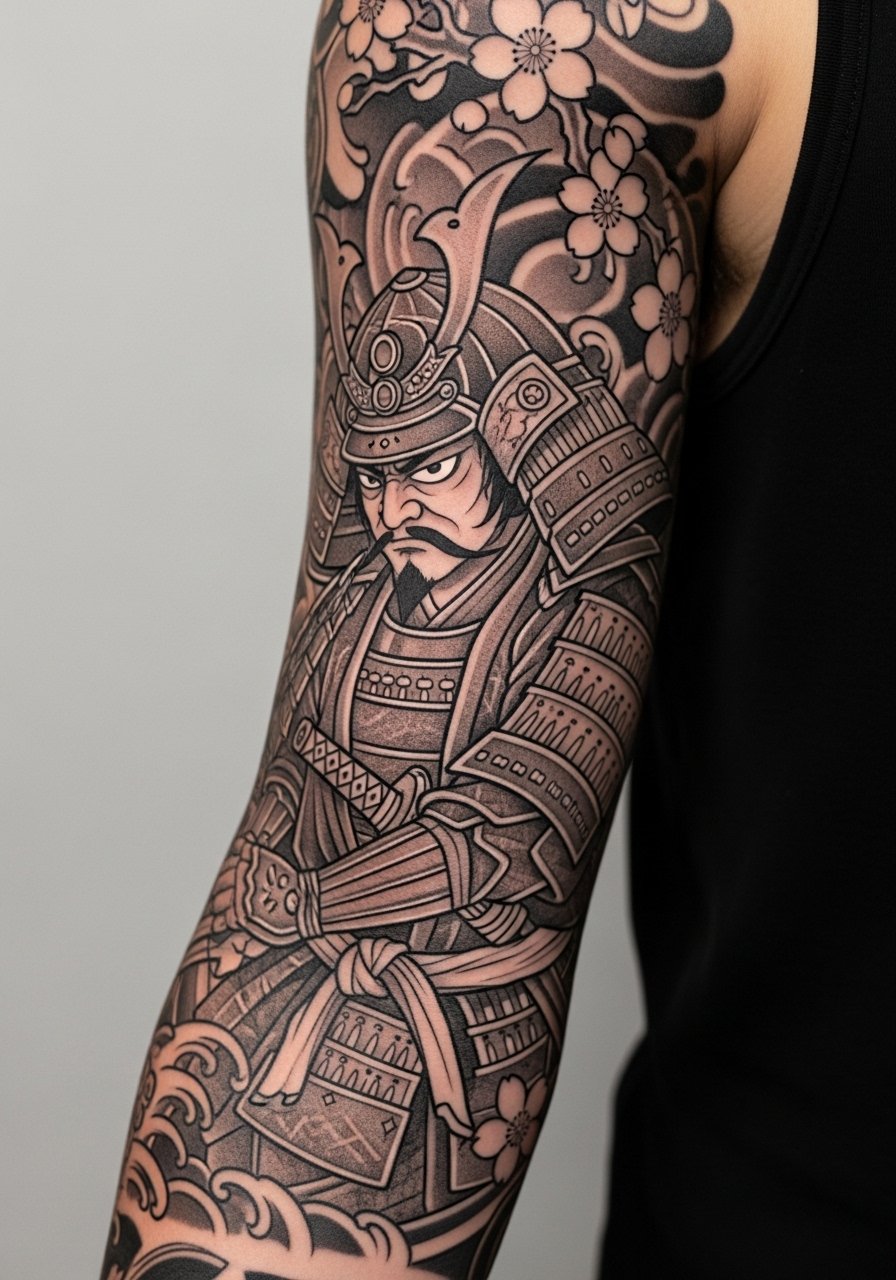
19. Samurai and Cherry Blossom Sleeve Accent
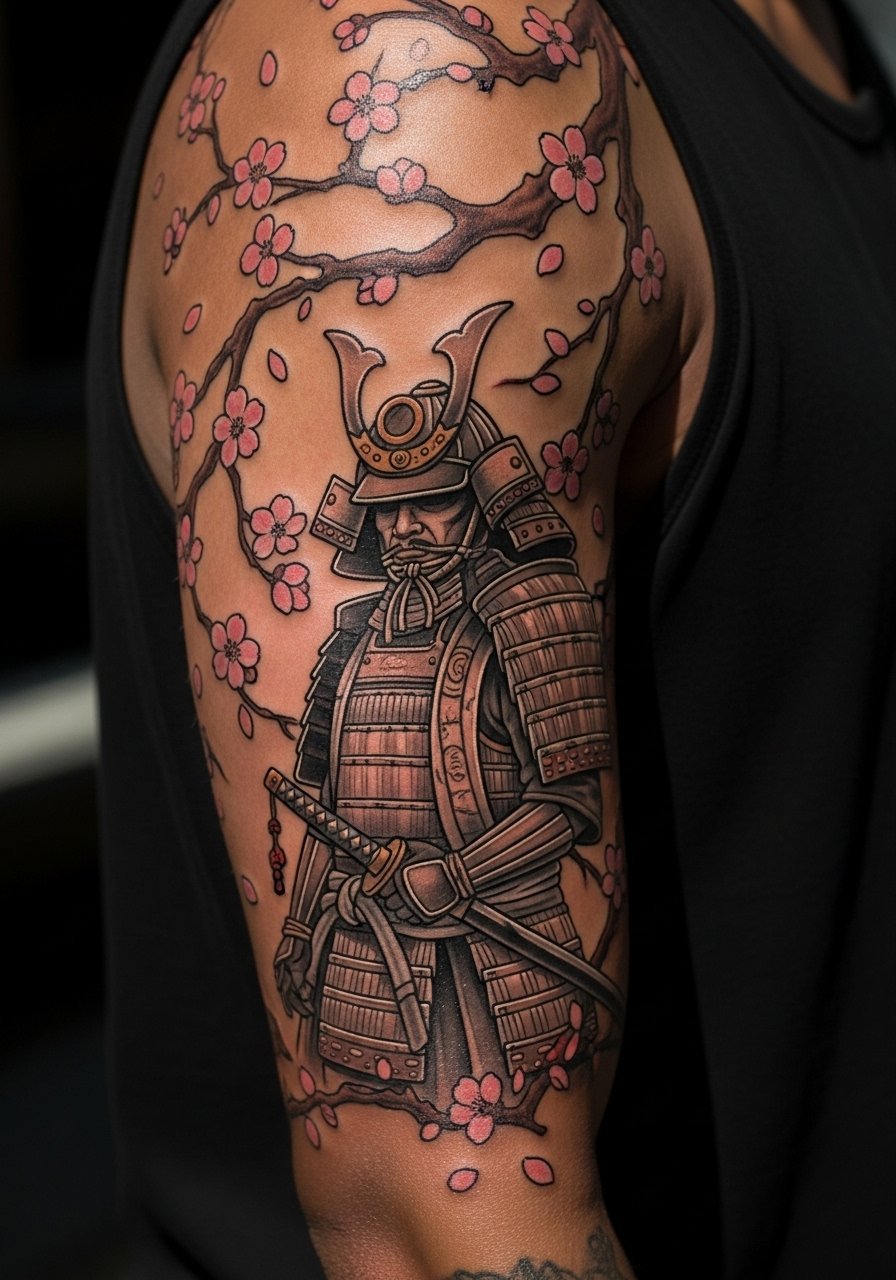
There is real payoff in pairing dynamic figure work with botanical elements if you plan spacing intentionally. A visual-impact lead applies because open blossoms give the samurai room to breathe and prevent the sleeve from becoming a single mass. Expect multiple sessions. Tell your artist to leave negative space around blossoms so petals do not merge over time. A common mistake is requesting hundreds of tiny petals closely packed together. For showing it off, a short-sleeve linen shirt keeps the sleeve readable.
20. Tiny Samurai on the Side of the Finger
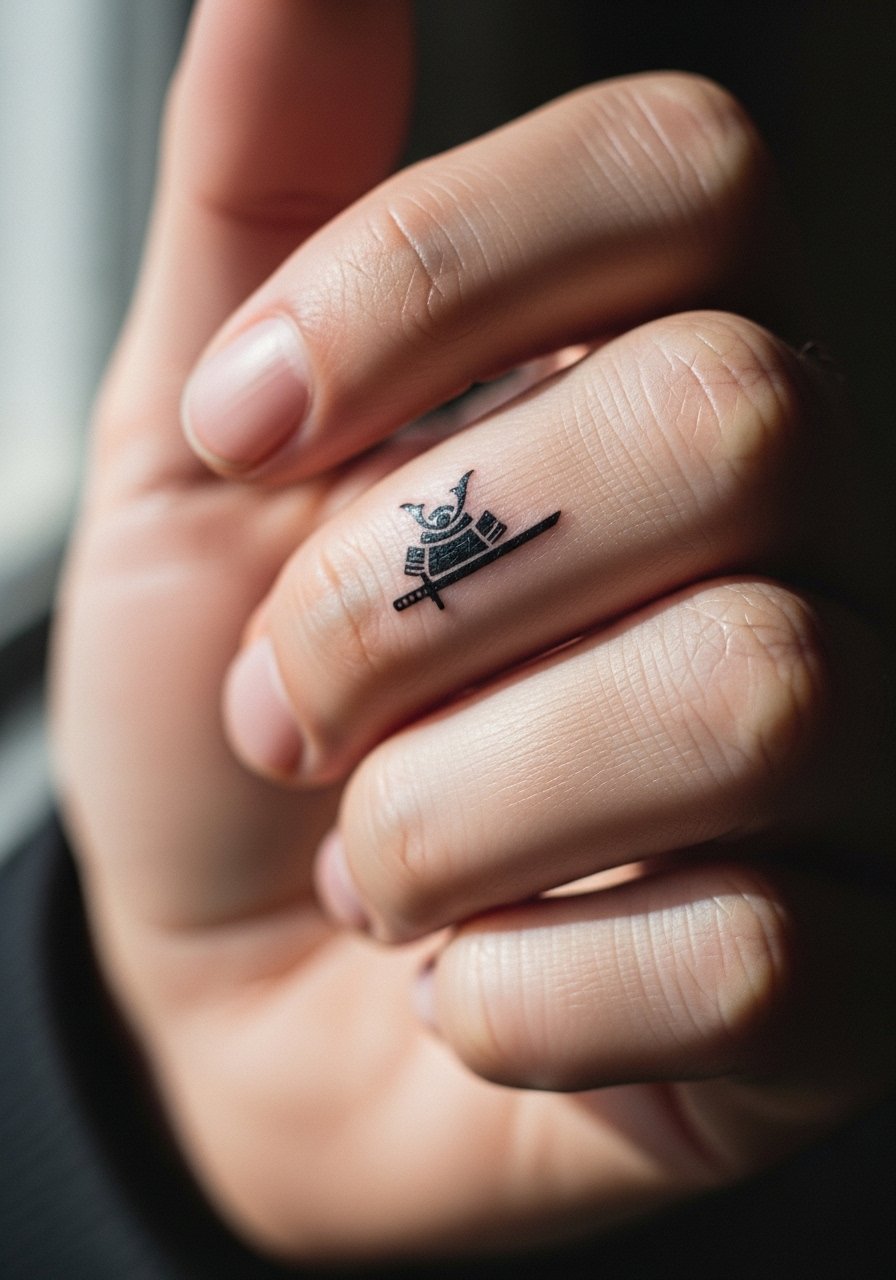
Finger tattoos age differently because skin there regenerates rapidly and experiences constant friction. The mistake is trying to cram detail into a tiny space. For this placement scale down to a single silhouette or icon and expect touch-ups more frequently. Pain is sharp but short. Session time is brief. For healing, be prepared for quicker fading and consider the finger as a high maintenance placement. For showing it off, choose minimal rings that do not sit over the tattoo.
21. Contemporary Samurai Sleeve Using Whip and Stipple Shading
When you want texture without busy cross-hatching, stipple and whip shading deliver depth while avoiding dense black blocks. Consultation should include notes on where to keep stipple versus solid black so the face and sword remain focal points. Expect multiple sessions totaling eight to twelve hours. The common mistake is over-stippling the entire sleeve which can read muddy when healed. For showing it off, roll sleeves or choose short-sleeve shirts like a short-sleeve linen shirt to reveal the tonal work without distraction.
Frequently Asked Questions
Q: How do fine line samurai tattoos fare compared to bold traditional Irezumi over time on areas like the ribs and forearm?
A: From what I've seen, fine line pieces can look exquisite at first but often blur faster on high-movement or thin-skin areas like the ribs. Bold traditional blackwork and heavier outlines usually hold longer on those spots. If you love fine line, scale up the line weight slightly for ribs and plan a touch-up window at year two to three.
Q: Are samurai designs with cultural symbols risky to get if I am not from that culture?
A: There are two camps. One sees such work as homage when done respectfully. The other warns about appropriation without context. A practical step is to discuss symbolism with your artist, choose variations instead of direct replicas, and explain your intent during consultation so the piece reads informed rather than copied.
Q: Which placements need the most session prep I should plan for in advance?
A: Ribs, sternum, and neck typically demand more prep because of pain and breathing. Wear clothing that gives clear access like a fitted sports bra for sternum or a wide-neck shirt for the nape. Bring snacks and be ready for breaks during longer sessions.
Q: How often should I expect touch-ups for samurai pieces on hands, fingers, and wrists?
A: Those high-friction spots usually need attention more often. Expect potential touch-ups by year two to three for fingers and wrists. Hands sometimes need work every couple of years. It depends on your lifestyle, sun exposure, and how well you protect the area after healing.
Q: What should I ask an artist in consultation to get a samurai tattoo that ages well?
A: Ask how they handle line weight for your chosen placement, whether they prefer stipple or gradient shading for longevity, and how they plan negative space. Also ask about realistic session time and touch-up policies. Discovery pathways like studio directories or convention portfolios help you find artists who post healed photos, which is the best indicator.
Q: How should I plan wardrobe if I want to show off a samurai shoulder blade or back piece after healing?
A: Open-back tops and loose button-down shirts frame those areas without covering them. For evenings, an open-back midi dress displays upper back work elegantly while protecting healed ink from rubbing.
