
Fine line Throne of Glass pieces look amazing in saved boards, but what holds up on real skin is a different story. Forearm linework that blurs, sticker-shock session prices, and blackwork that vanishes on darker tones are common headaches I keep hearing in consult rooms. These 27 traditional Throne of Glass tattoo ideas focus on longevity, placement choices, and simple wardrobe moves that help your ink read right now and years from now.
1. Neo-Traditional Celaena Portrait on Outer Forearm
I recommend a neo-traditional approach for a Celaena portrait because the bolder outlines and saturated fills resist the softening that ruins micro-detail after two years. In consultation ask for slightly thicker linework around the jaw and crown so facial detail reads after healing. Common mistake is asking for hyper-real small portraiting on forearms, which loses definition. Expect moderate pain and a one to two hour session for a 4 to 6 inch piece. For showing it off, roll the sleeve of a graphic tee to frame the portrait and avoid fabric rubbing during early healing.
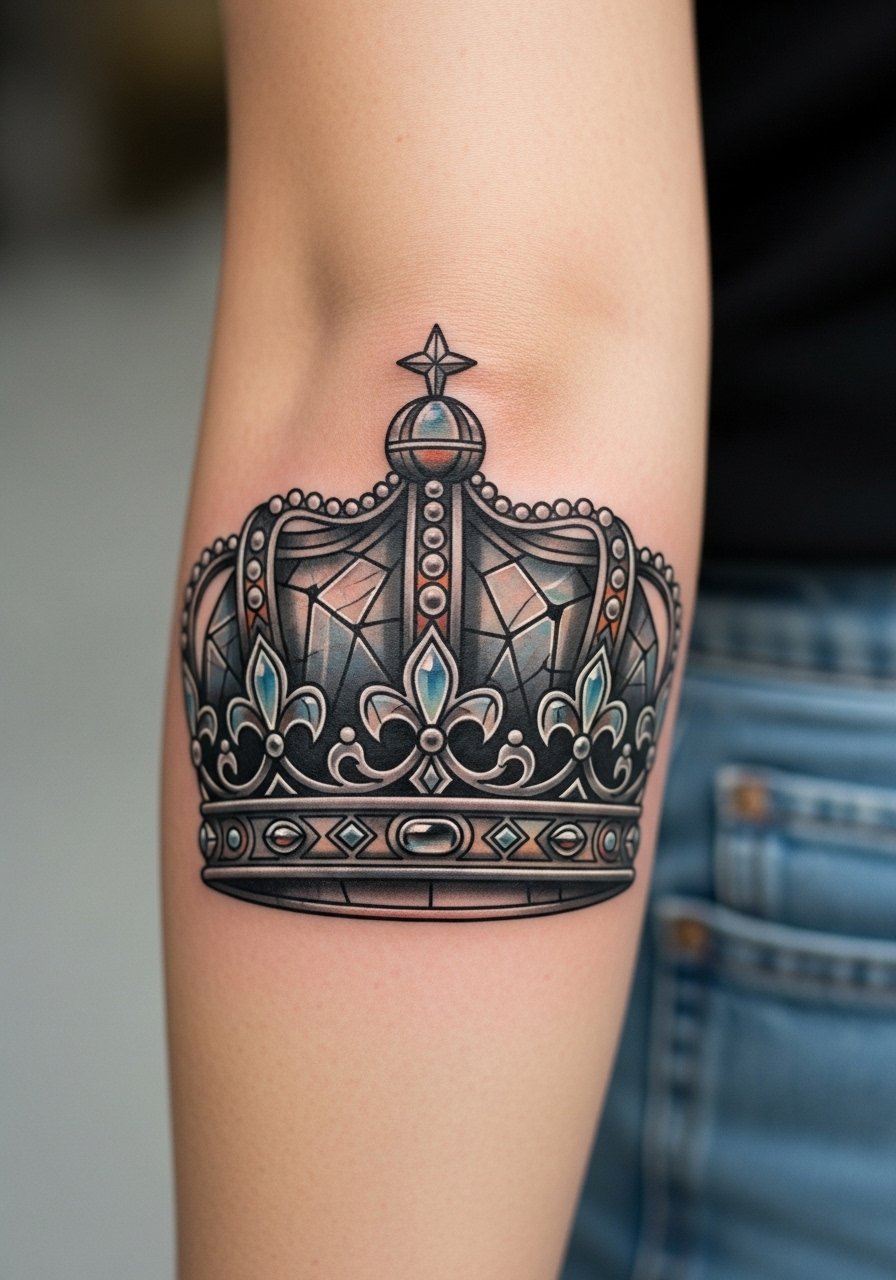
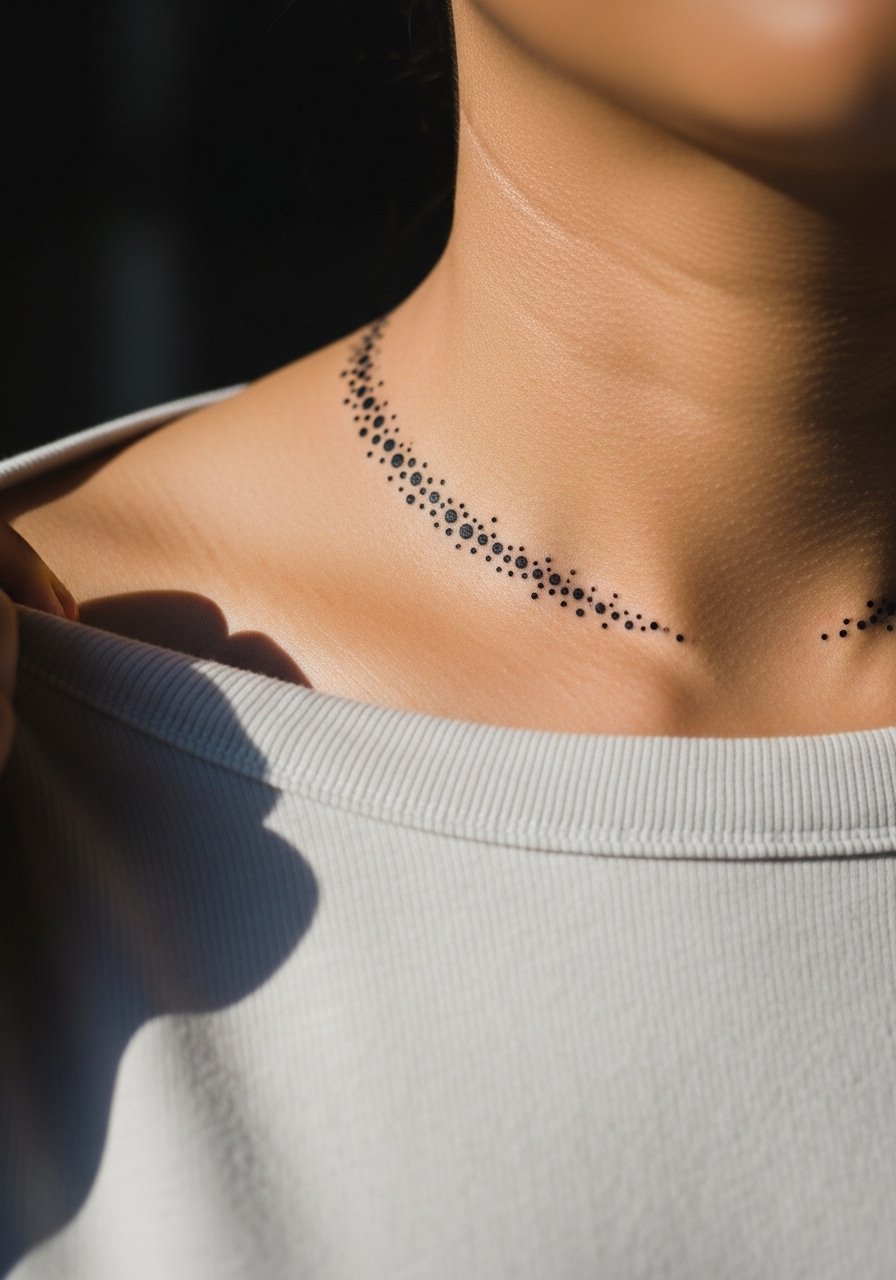
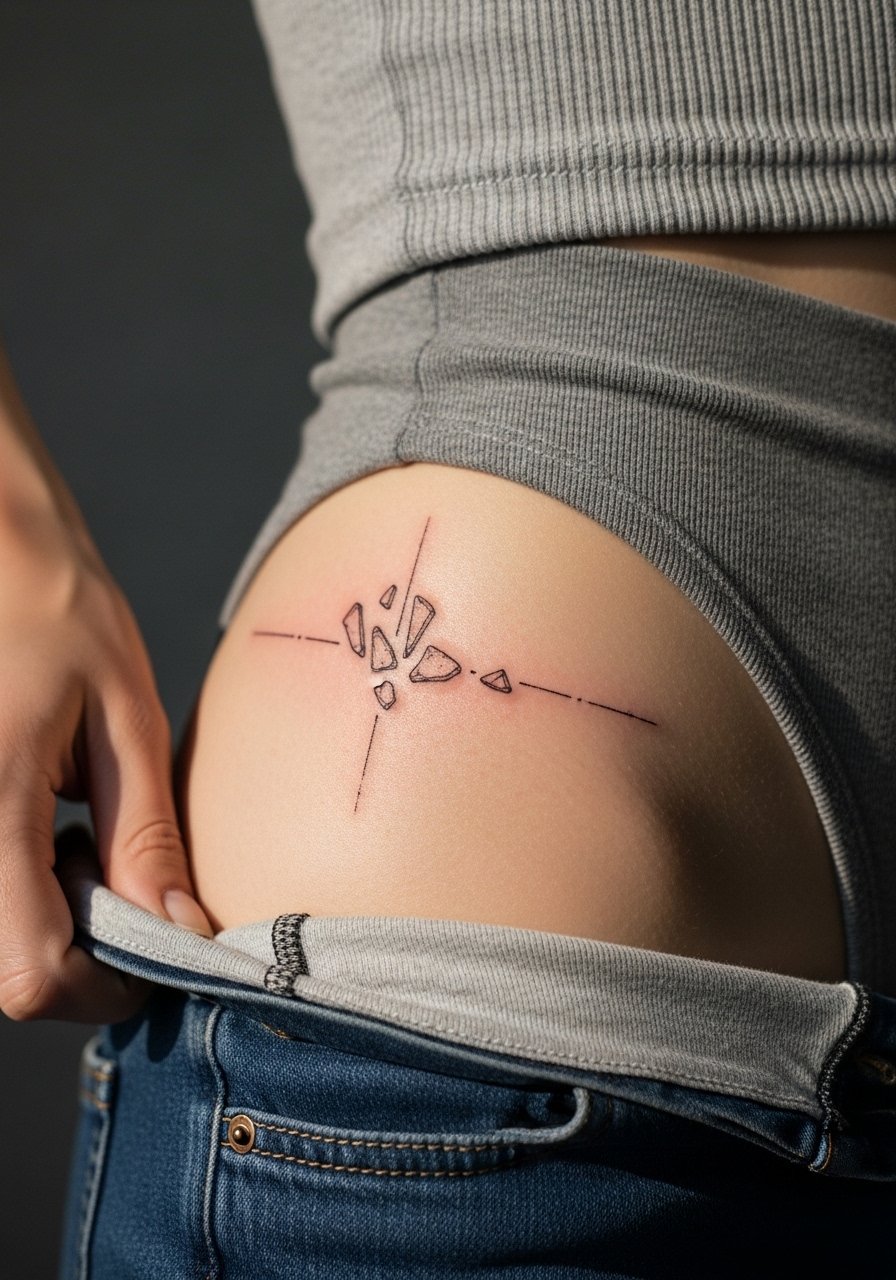
2. Blackwork Glass Throne on Collarbone
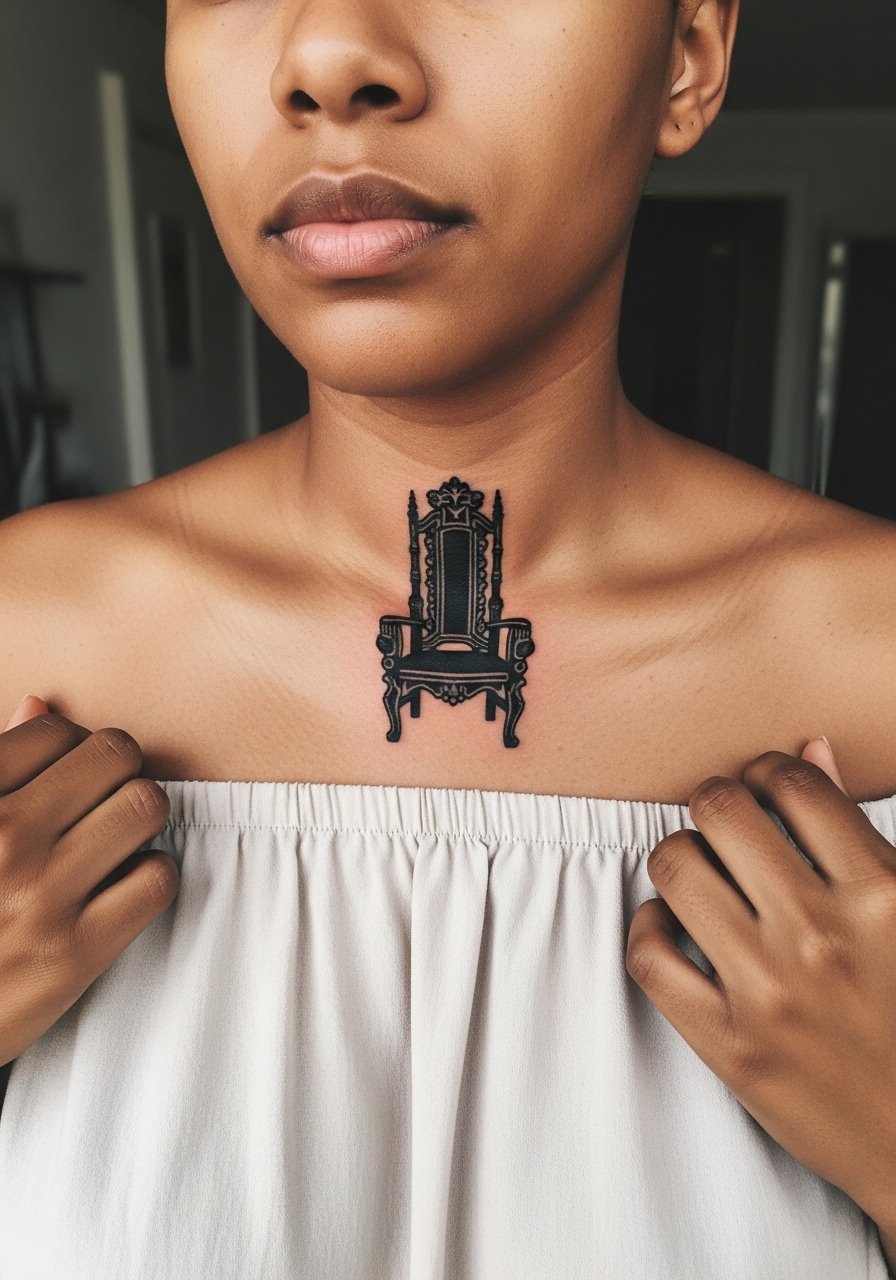
A collarbone throne in full blackwork reads bold and ages predictably compared to delicate shading in the same spot. Fair warning, collarbone sessions can sting because the bone is close to the skin, but most people tolerate a single session for a 3 to 5 inch stencil. Tell your artist you want strong negative space for the shattered edges so the silhouette holds up and does not compact into a muddled block after a few years. Pair this with an off-shoulder blouse when you want to show the throne without necklaces overlapping the design.
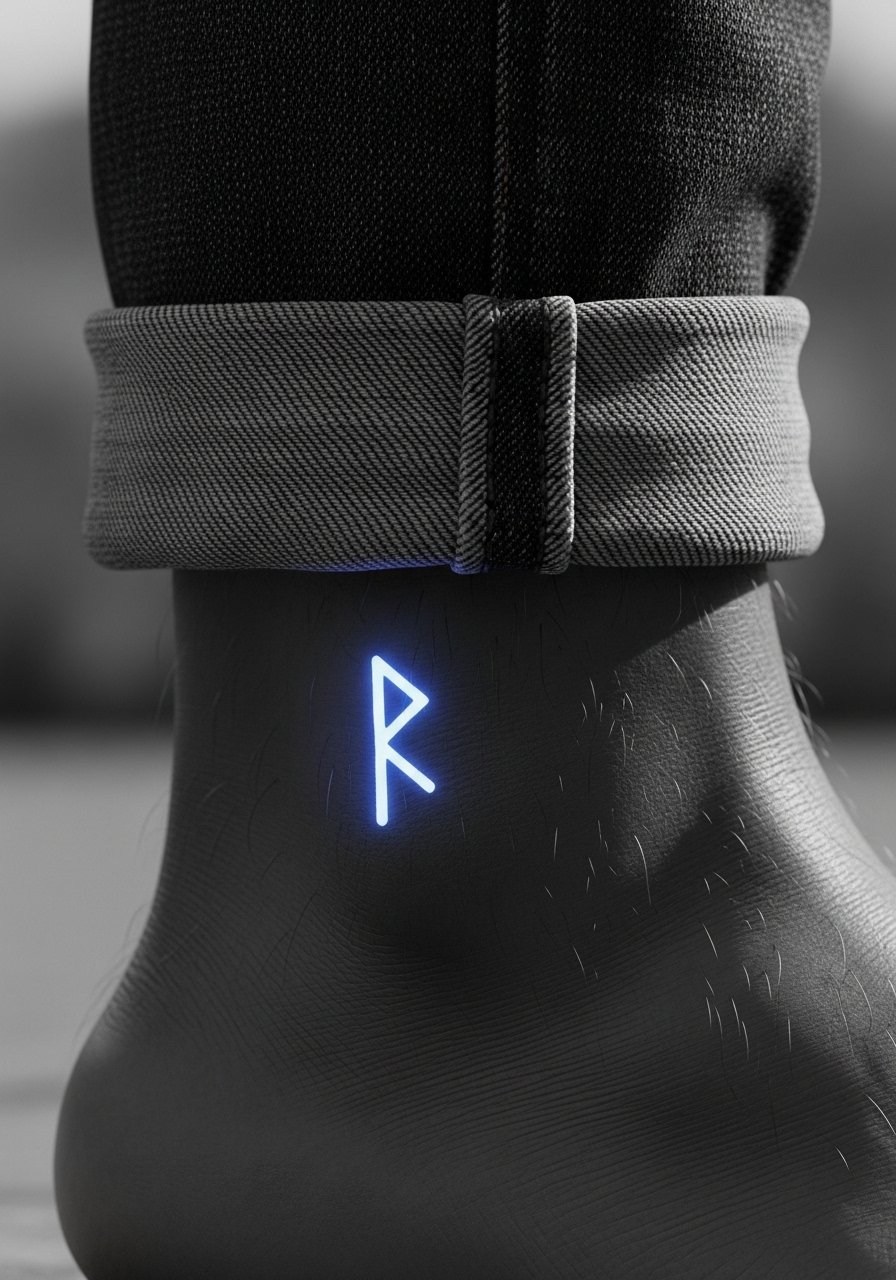
3. Wyrdmark Spiral on Inner Wrist
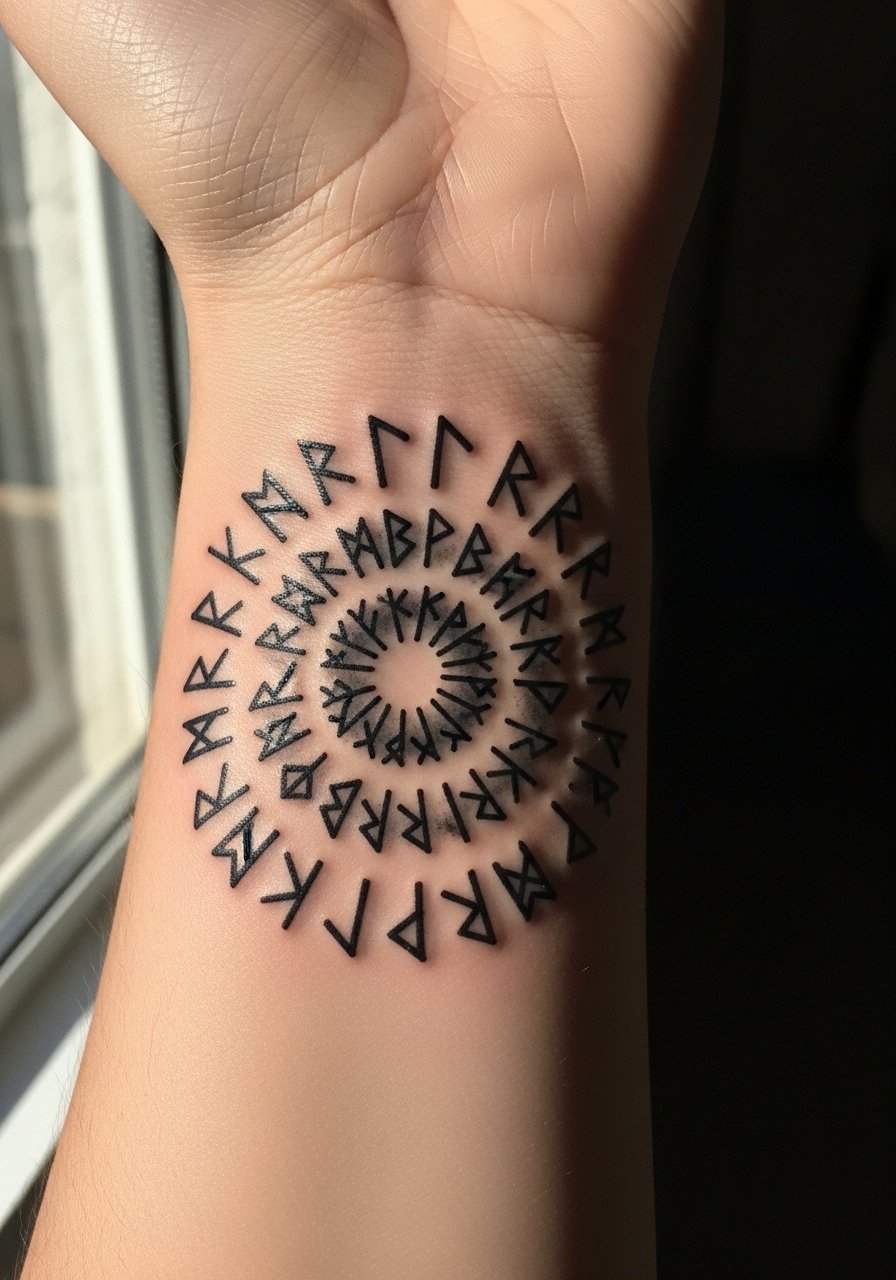
Wrist wyrdmarks are a classic first-time choice but they need space and contrast to survive years of washes. I suggest 2 to 4 inch sizing with slightly heavier black where lines meet so dots do not disappear. A common complaint is tiny, too-fine runes that look crisp day one and ghost by year three. For the session wear a sleeveless shirt so the artist can access the wrist without jewelry in the way. Expect minimal downtime and a touch-up at 18 to 24 months if you want the spiral tight.
4. Fine Line Raven and Crown on Inner Bicep

Inner bicep placements hide well and heal with less sun exposure, but they also see stretch from movement. The fine line raven works here because the area is sheltered, yet ask your artist to avoid hairline-only strokes in dense feathers. Pain is moderate because of skin thickness and session time is usually under two hours. The biggest mistake is requesting feather detail that is too dense for fine line. During the session wear a loose tank top so you can lift the arm and keep skin relaxed for the artist.
5. Traditional Assassin’s Dagger Piercing Glass on Outer Forearm
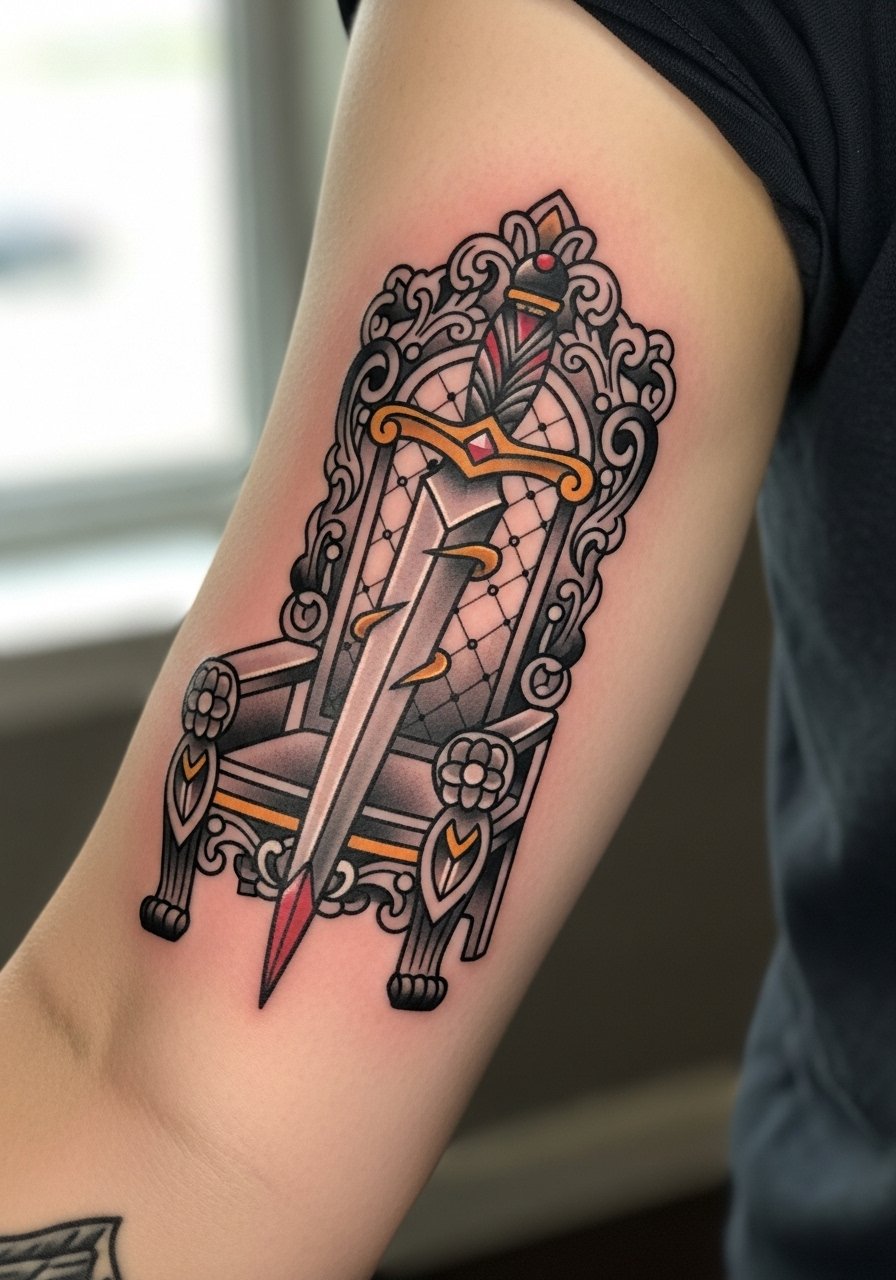
If you want a piece that still reads at a distance, this traditional dagger through glass is a strong pick. Saturation and bold outline keep the dagger crisp while the glass shards use negative space to suggest breakage without over-detailing. People often request too many tiny chips in the glass and end up with a muddy patch. This design usually takes two sessions for a 5 inch piece because of color layering. For showing it off, roll the sleeve of a graphic tee and tie a vintage bandana on the opposite arm to echo the assassin aesthetic.
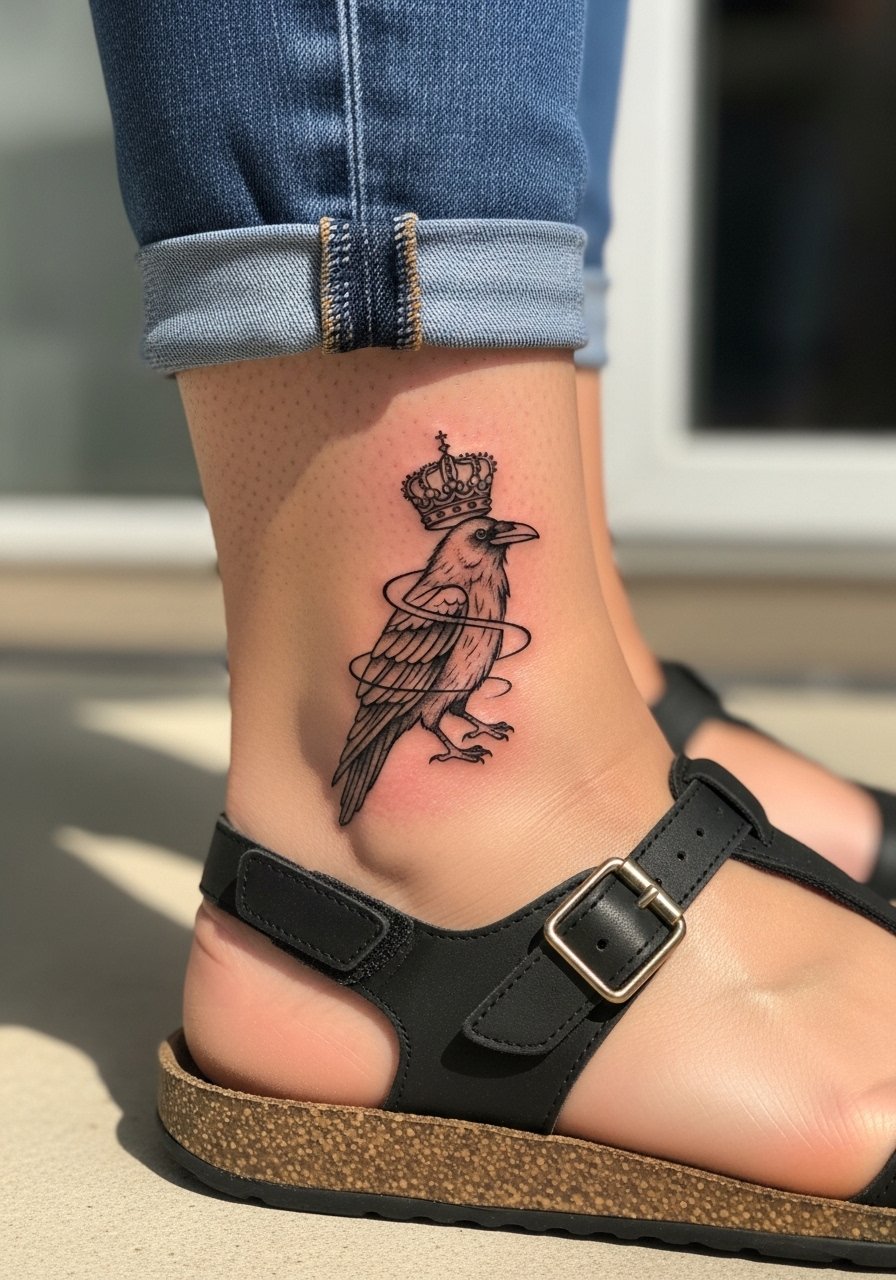
6. Micro-Realism Eye of Elena on Ankle
Ankle micro-realism looks striking but it is one of the places most prone to friction and wear. Expect one to two sessions for a 2.5 inch piece and avoid overly subtle highlights that will vanish after a year. The anti and pro camps about fine detail on small areas are both loud. One group says micro-realism thrives on contrast and careful placement. The other says tiny realism on ankles fades quickly because of constant rubbing and movement. Ask your artist which side they fall on and plan for a touch-up at year two. For footwear pairing try cuffed ankle jeans or ankle strap flats to put the eye on display.
Studio Day Picks
The forearm portrait, glass collarbone throne, and wrist wyrdmark above each ask for different prep and a small pack of essentials smooths the day.
-
Badger Balm Healing Ointment. A non-greasy balm that keeps blackwork matte during winter heals and avoids the heavy shine that can hide crisp linework on forearm pieces.
-
CeraVe Healing Ointment. Fragrance-free and fast-absorbing for collarbone and ankle tattoos where too much surface moisture can trap lint.
-
Green People Aftercare Balm. Plant-based and lightweight, helpful for sensitive rib or thigh sessions when you expect heat and sweat during travel days.
-
Hada Labo Hydrating Lotion. Hydrates around fine line work without adding oil that could blur tiny rune detail in the first month.
-
Second Skin Protective Film. A thin protective film that reduces friction on ankle and wrist tattoos during the first 48 to 72 hours, especially useful for pieces where rubbing kills sharp edges.
7. Thirteen Stars Constellation on Ribcage
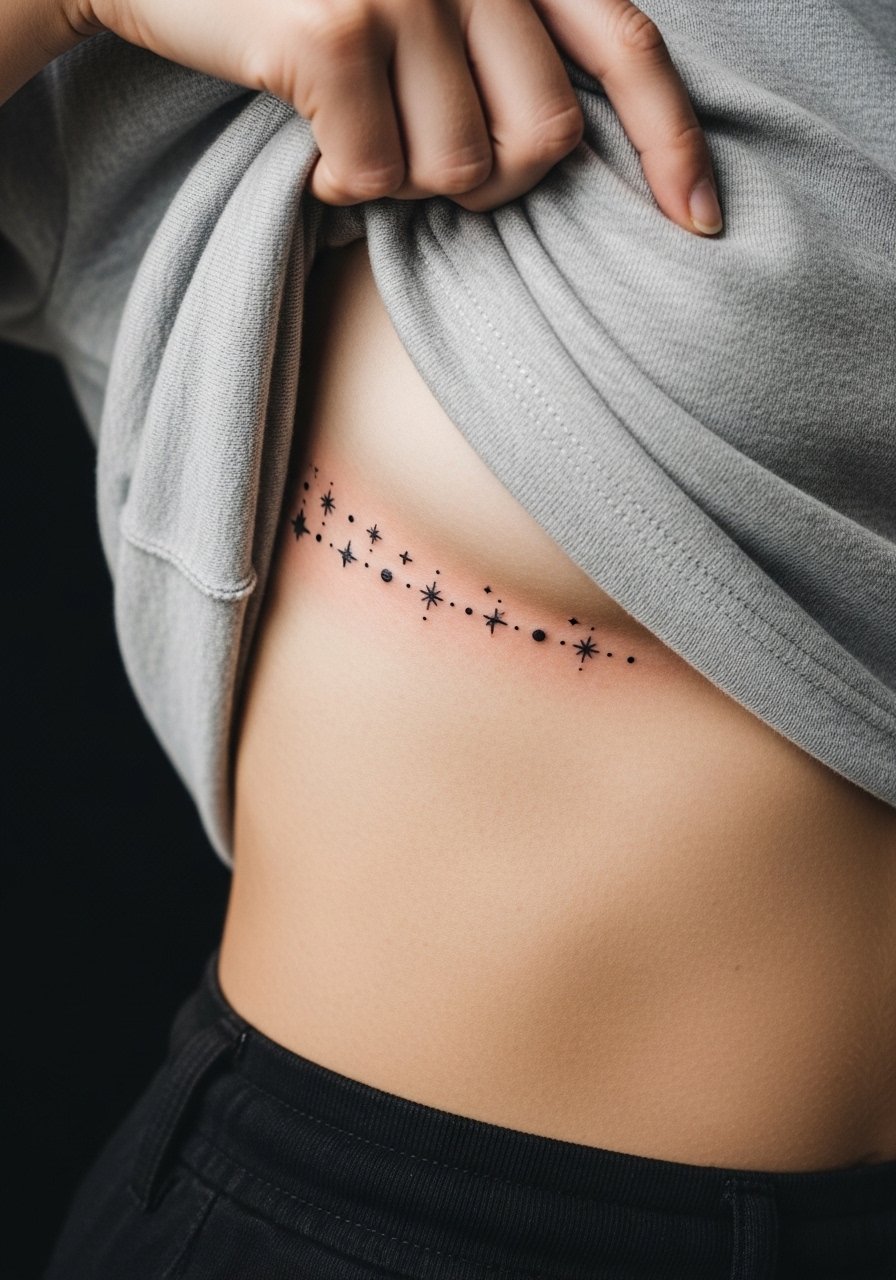
Ribcage tattoos sting more than most placements, so expect a higher pain rating and a single careful session for a 4 inch span. Minimalist stars look best when spaced so each dot has breathing room. A common mistake is compressing the constellation into a narrow band that blurs with movement or weight change. Because ribs shift with breathing and body changes, choose bolder dots than you might for a wrist piece. For show-off wear a crop top fitted that reveals the art and protects the surrounding skin while it finishes settling.
8. Manon-Style Watercolor Witch Wings on Shoulder Blade
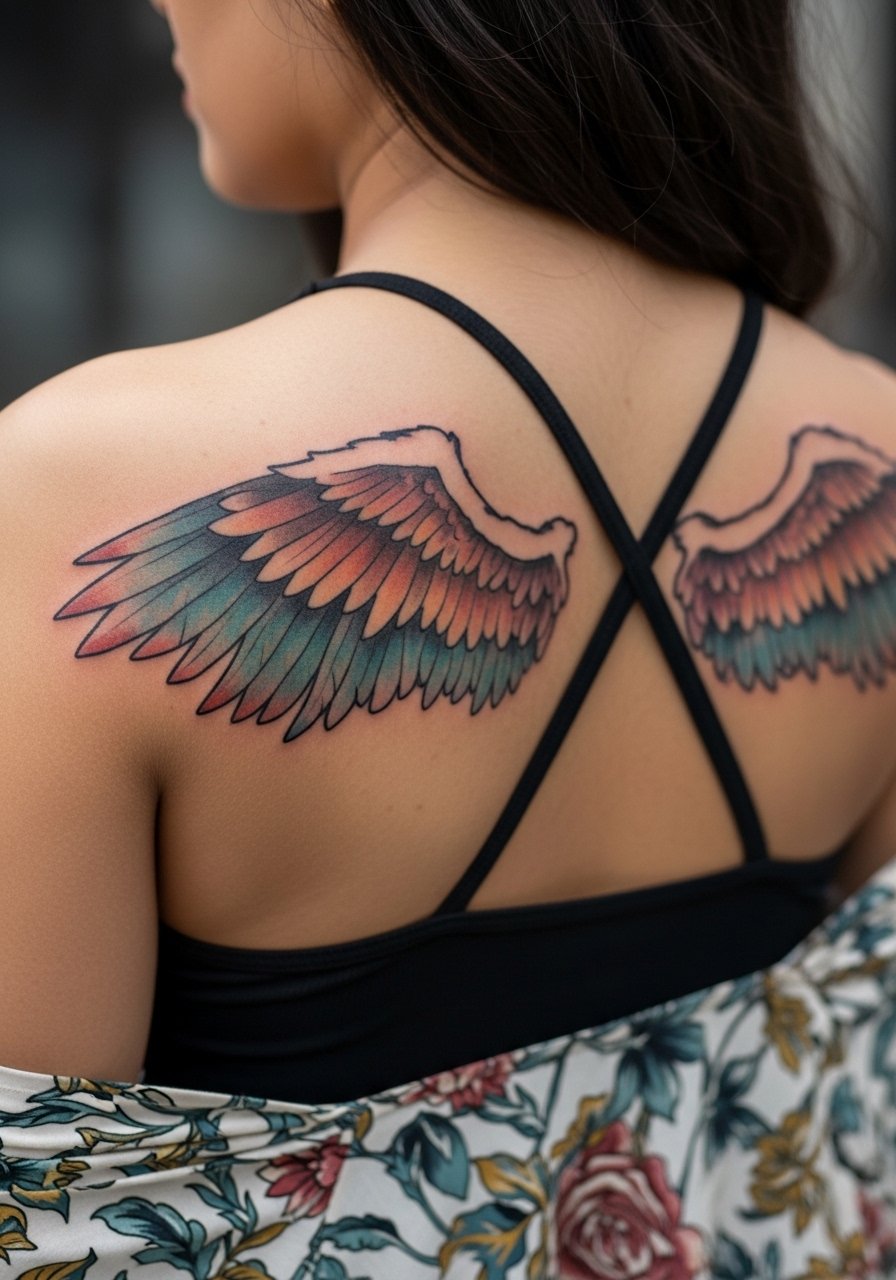
Watercolor wings read dramatic on the shoulder blade and the broader canvas lets color breathe so blending does not compress. Expect two to three sessions for a 6 inch span because of layering and healing checks. The main mistake is pushing watercolor into thin lines. If you want the wing to age well, ask for a slightly stronger outline or stipple shading where color meets skin. This placement pairs well with a strappy tank top and an open back kimono for stages when you want the art visible without stressing healing skin.
9. Throne Splinter with Blood Drops on Calf
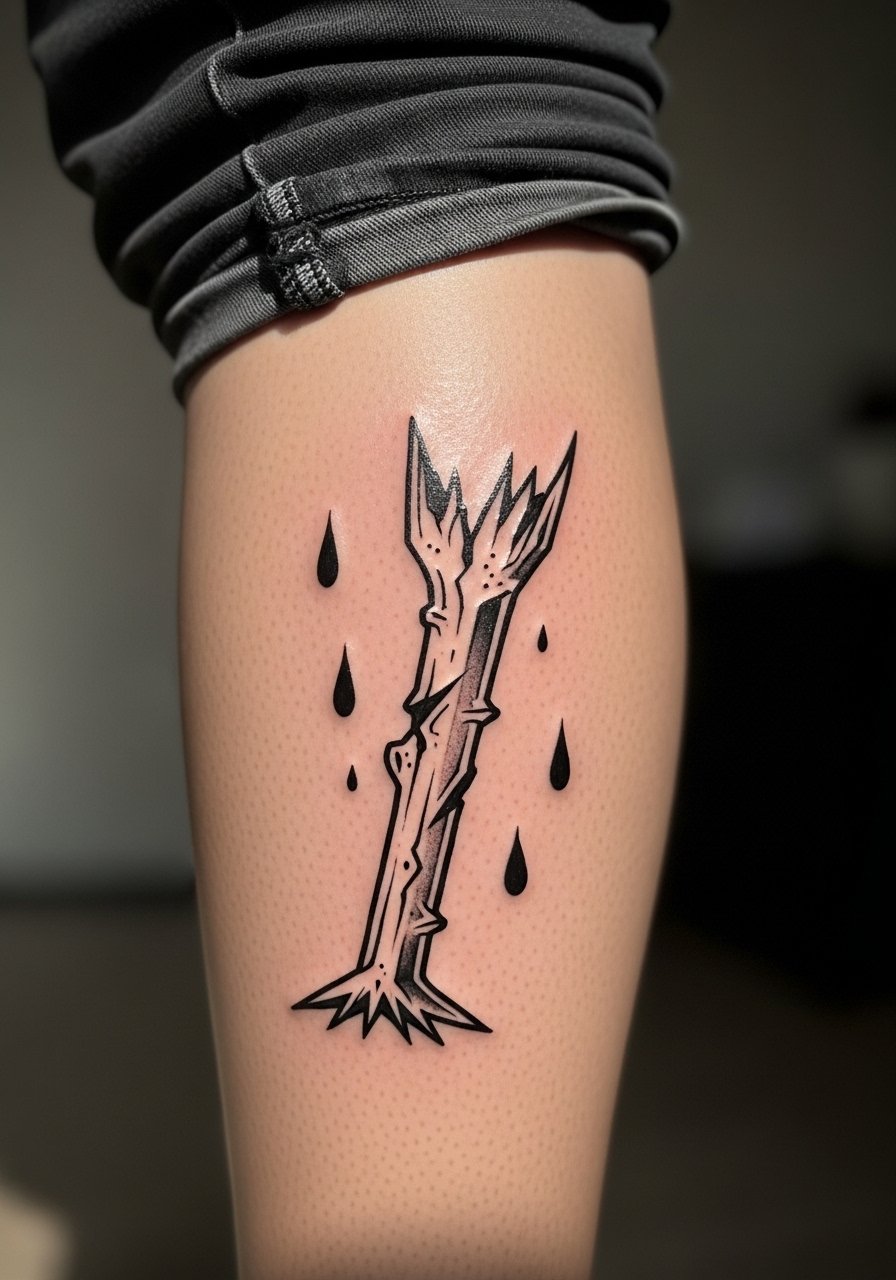
Calf work tolerates shading and heavy black, which makes this splinter design an excellent pick for a gritty look that lasts. The ignorance style's bold black fields resist the softening that ruins fine detail. A single session usually finishes a 4 inch calf piece. Watch for the common error of tiny splatter details that disappear with contact from clothing. For session comfort wear loose drawstring shorts or linen pants you can roll up so the artist can access the area without pinch.
10. Cracked Mask Revealing Crown on Thigh
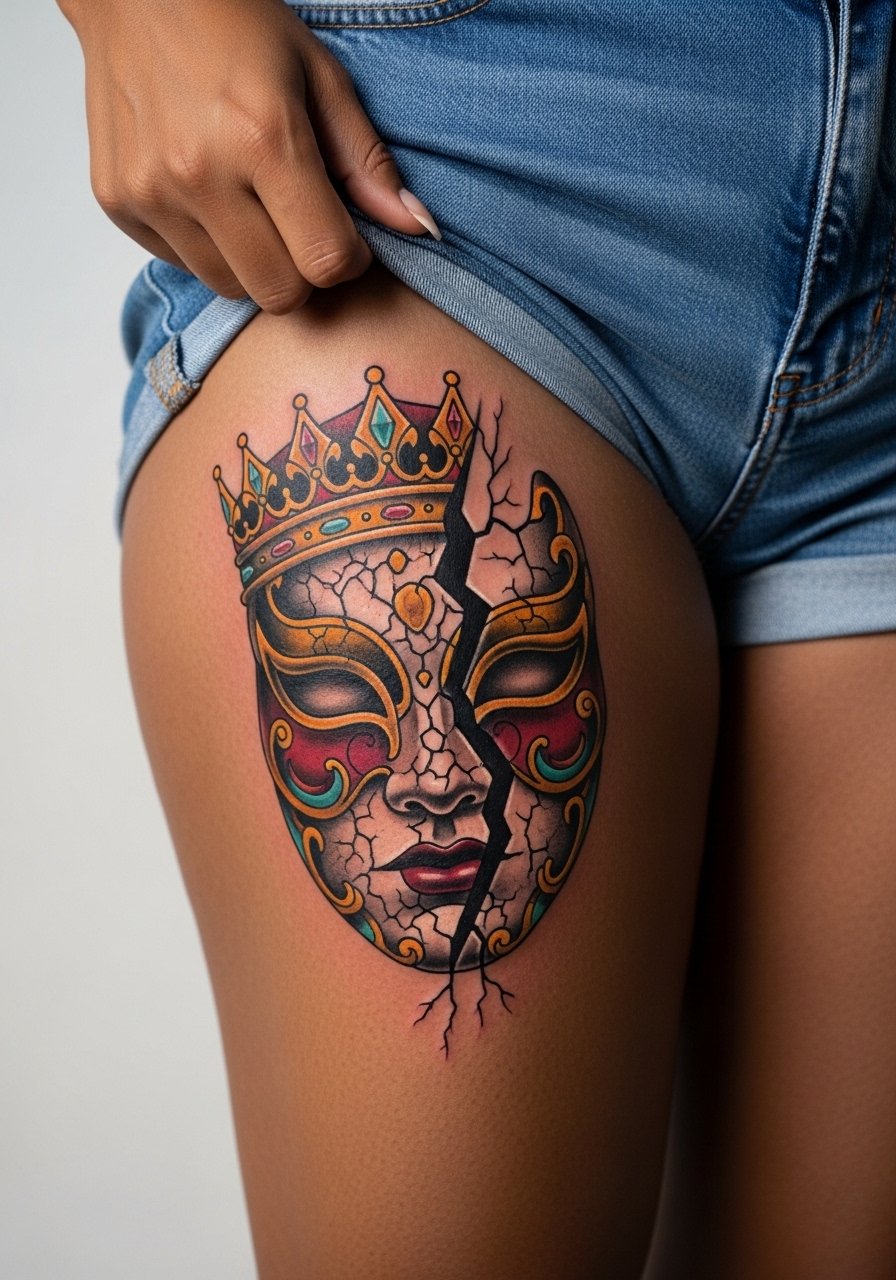
Thigh placements handle larger scale and pain varies based on tissue, but they are forgiving on aging. A mask-to-crown transition benefits from color that accents the crown while keeping mask shadows bold. People often compress facial features into too-small spaces on thighs, which loses impact. Expect multiple sessions for a 7 inch piece and plan clothing that avoids tight waistbands over the tattoo while it heals. For showing it off later, high-waist shorts or A-line skirts frame the art and keep it visible without rubbing.
11. Valg Demon Eyes Encircled by Wyrdstone on Upper Back
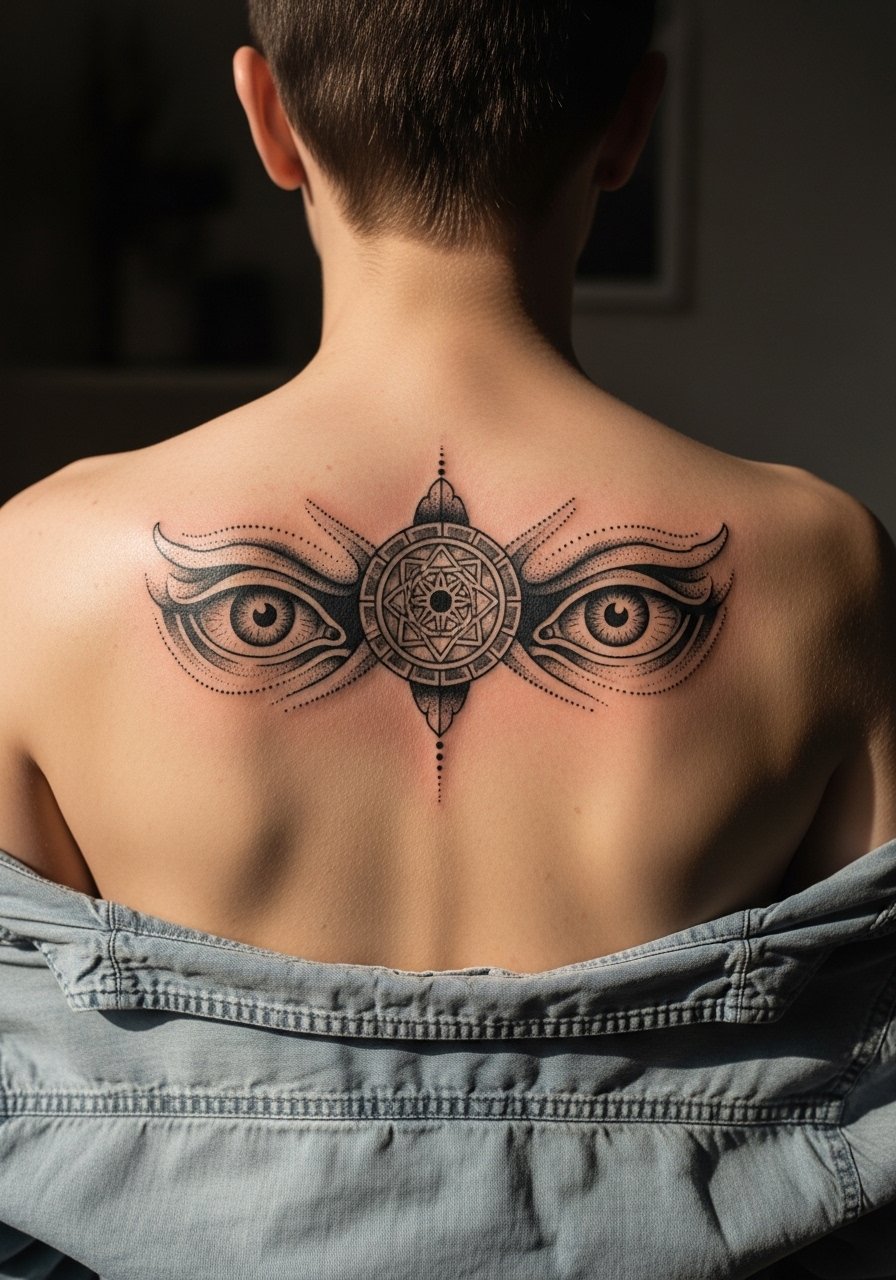
Upper back pieces can be dense and bold, which suits horror-fantasy elements like Valg eyes. Solid blackwork here won't fade into patchy shading if the saturation is correct. The mistake is asking for micro-detail in the pupil area that will compress as skin moves. One session can do a 3 inch motif, but plan for a touch-up if you sit in the sun a lot. For session day wear a button-back shirt you can pull slightly aside so the artist has clean access without full exposure.
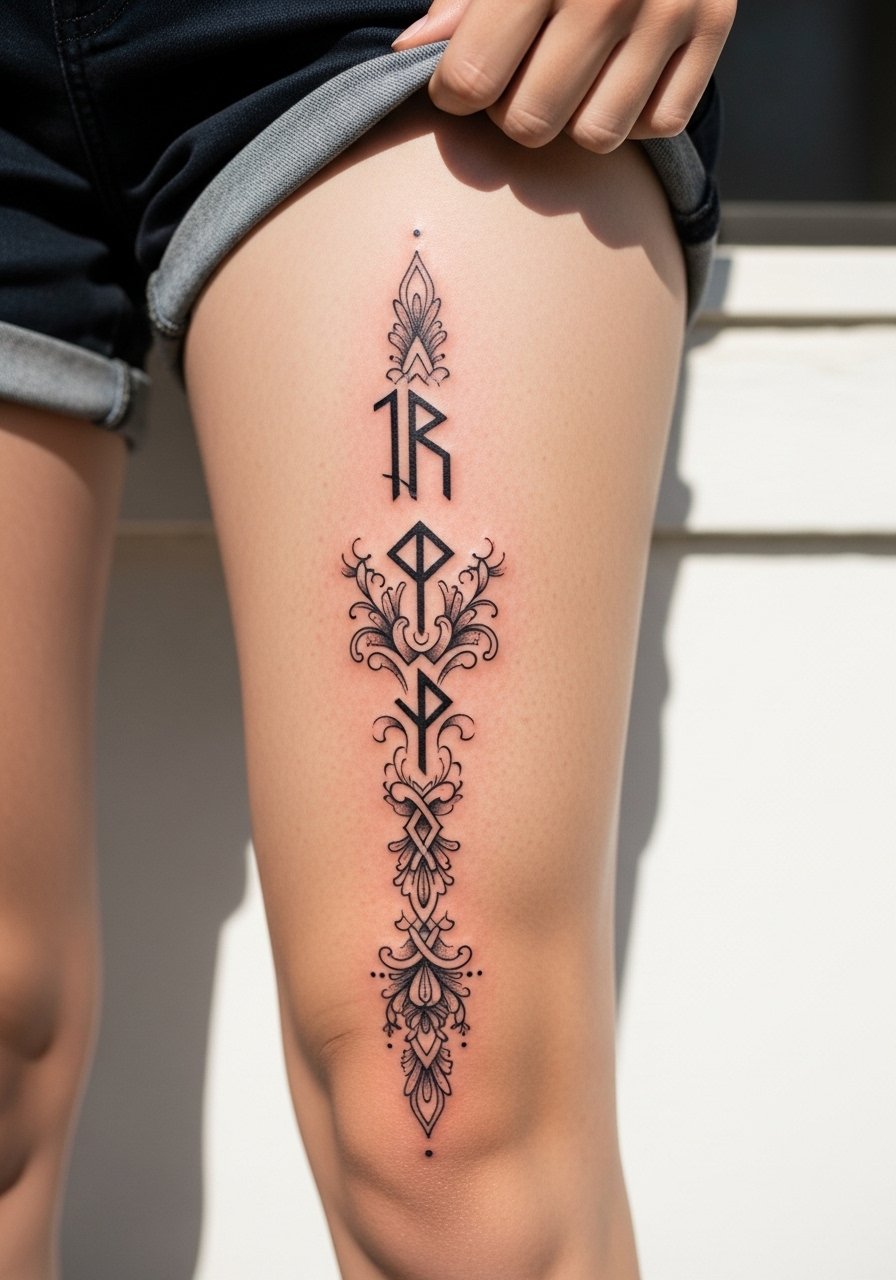
12. Rowan-Inspired Rune Armband on Upper Arm
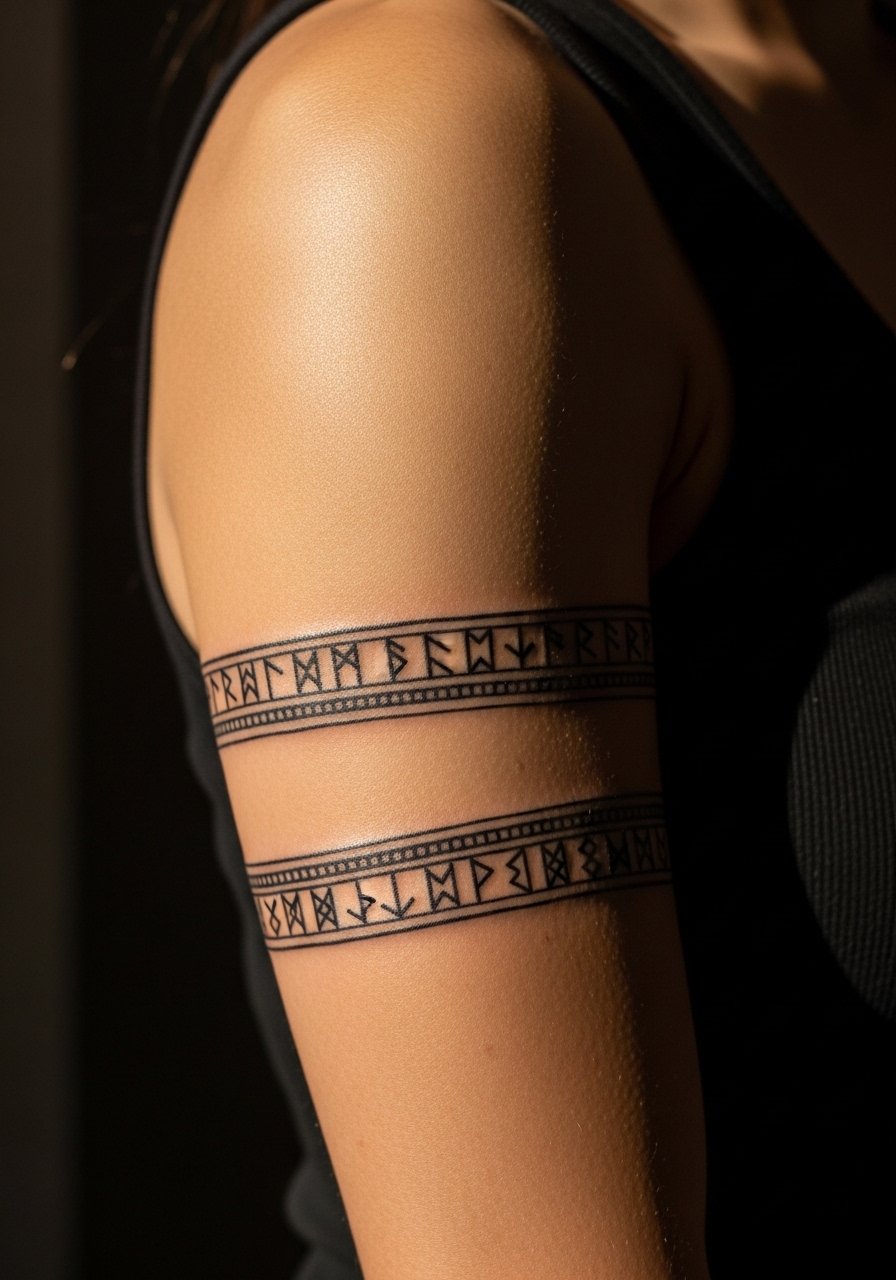
An armband with Celtic-inspired runes sits well on the upper arm and benefits from clear spacing so each rune reads after healing. People sometimes ask for ultra-tight bands that stretch and warp with muscle changes. Ask for a small gap between runes and slightly heavier vertical strokes so lines do not merge. Expect two sessions if you want a wrap that follows muscle contours. For showing and session wear a strappy tank top so the artist can see the shoulder and upper arm curve while you stay comfortable.
13. Glass Castle Crumbling with Phoenix Rising Along Spine
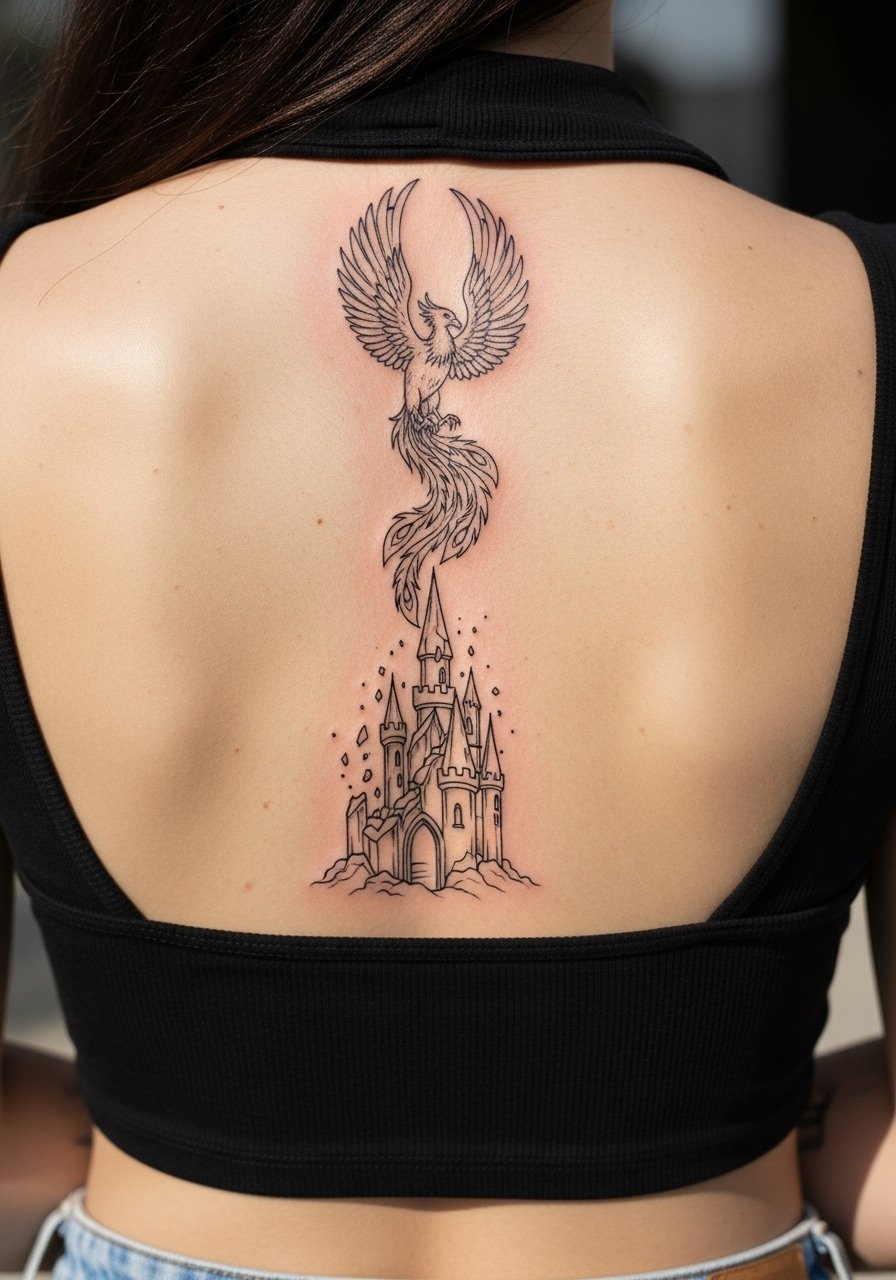
Spine placements have higher pain and require an artist comfortable working vertically. Fine line castles work here because the skin along the spine stays relatively flat, but be cautious with density. The usual error is packing too many tiny bricks that collapse into a gray mass over time. Two sessions are common for a 6 inch vertical piece and plan to avoid heavy backpacks while it heals. For evenings out pair the piece with a backless crop top so the vertical composition reads uninterrupted.
14. Raven and Crown Hybrid on Ankle Wrap
An ankle wrap can be subtle and personal, but the trade-off is friction from shoes that wears the ink down. Ask your artist for slightly bolder outer lines to protect the crown and wing tips. One common mistake is placing the wrap too low where socks or shoes rub constantly. Session times are short but expect touch-ups sooner than on protected torso work. Pair with ankle strap flats and rolled jeans to display the art without subjecting it to constant abrasion.
15. Minimalist Glass Shard Behind Ear Alternate on Neck
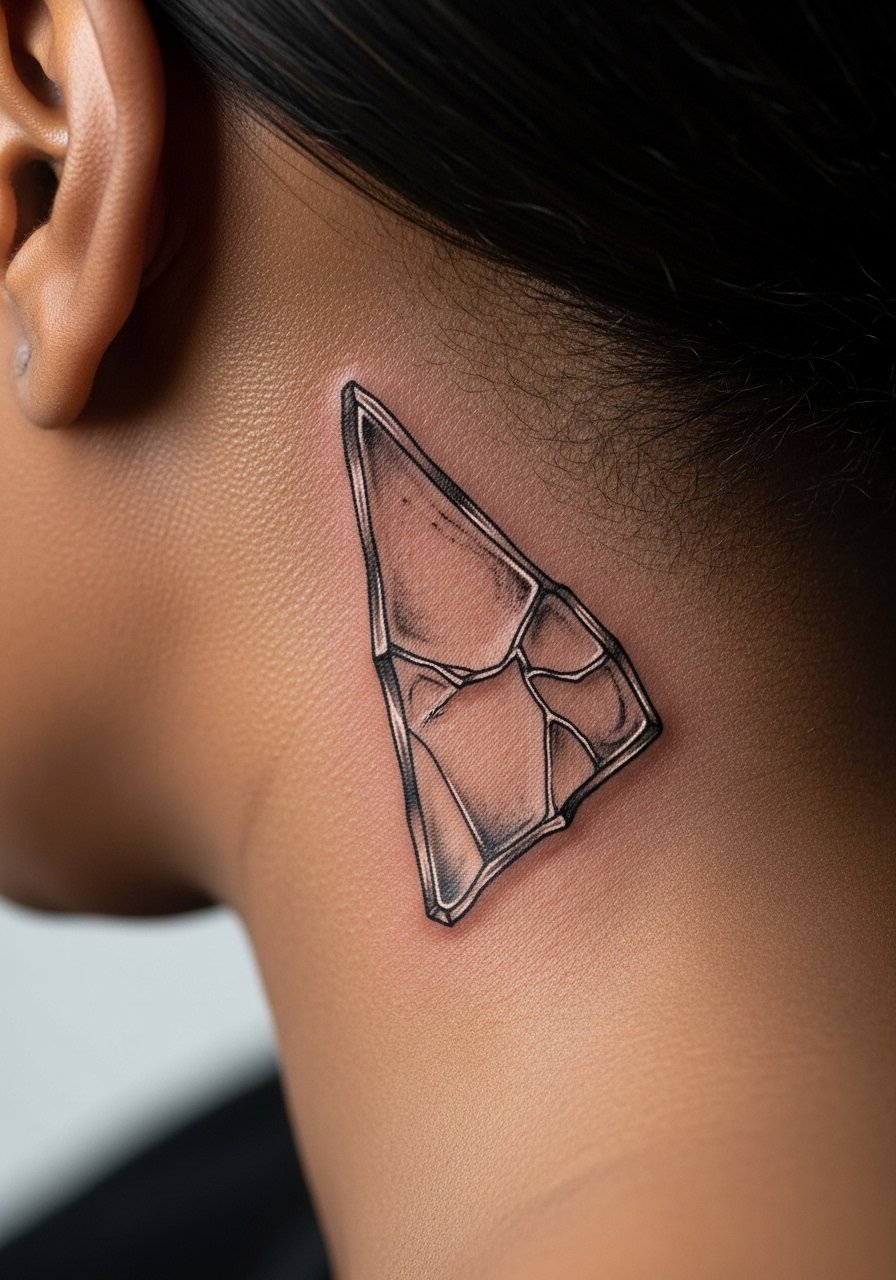
Behind-the-ear pieces are discreet and heal quickly, but artists must place the design just below the hairline to avoid hair interference. The frequently seen mistake is requesting micro-detail that the area cannot hold. Pain is low to moderate and session times are brief. If your workplace is conservative, this is a spot you can hide under hair as it grows. Because the area is small, ask the artist about spacing and whether a slightly bolder outline would be better for long-term visibility.
16. Micro-Realism Dagger Point on Hand Side
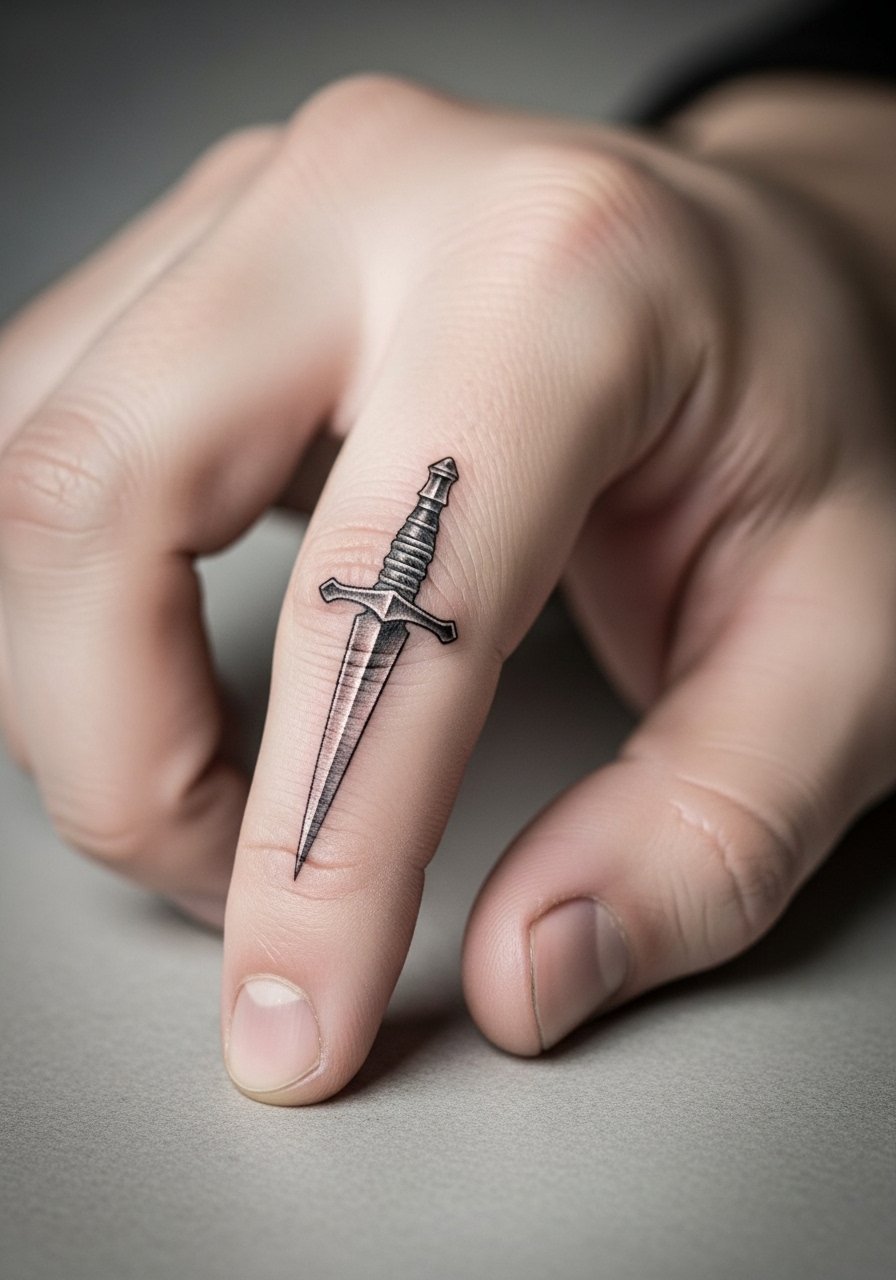
Hand tattoos take a beating from washing and work tasks, so micro-realism here may blur fast. One camp says hands are fine with bold blackwork. The other camp warns that constant washing and sun exposure fade fine detail within a year. If you want a dagger on the hand, lean into a stronger outline and minimal tiny shading. Pain is high and touch-ups are common. For session prep, avoid gloves or rings until fully healed and plan your job considerations.
17. Eye of Elena on Inner Ankle with Glow Accents
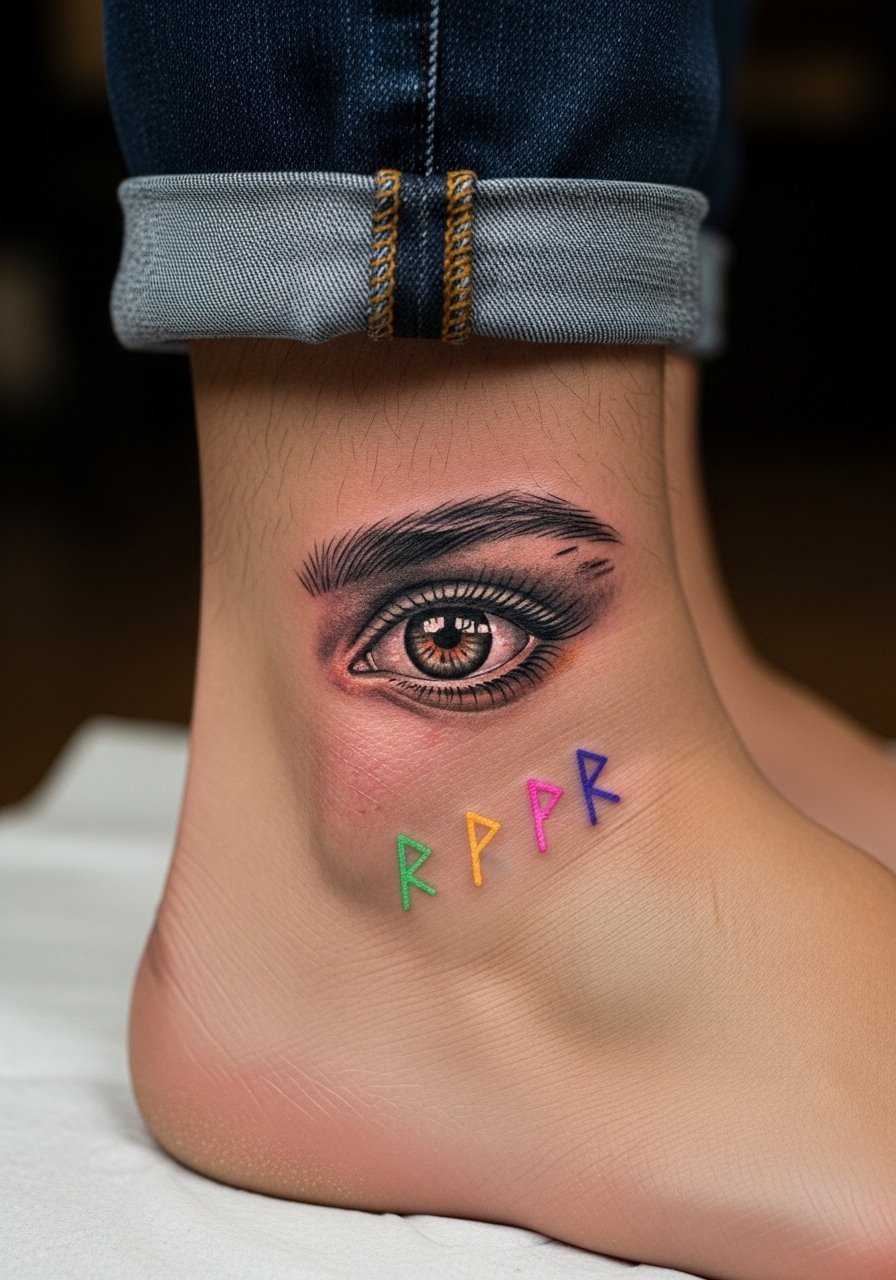
Inner ankle pieces sit in a lower-friction zone compared to outer ankle, which helps small realism last longer. The error is adding tiny color flecks that simply fade when exposed to footwear rubbing. One session often handles a small piece, but expect a color touch-up if you favor the glow accents. For visibility pair with midi skirt or rolled pants so the subtle color reads in photos without the bulk of boots.
18. Thirteen Stars Bracelet Cluster on Wrist
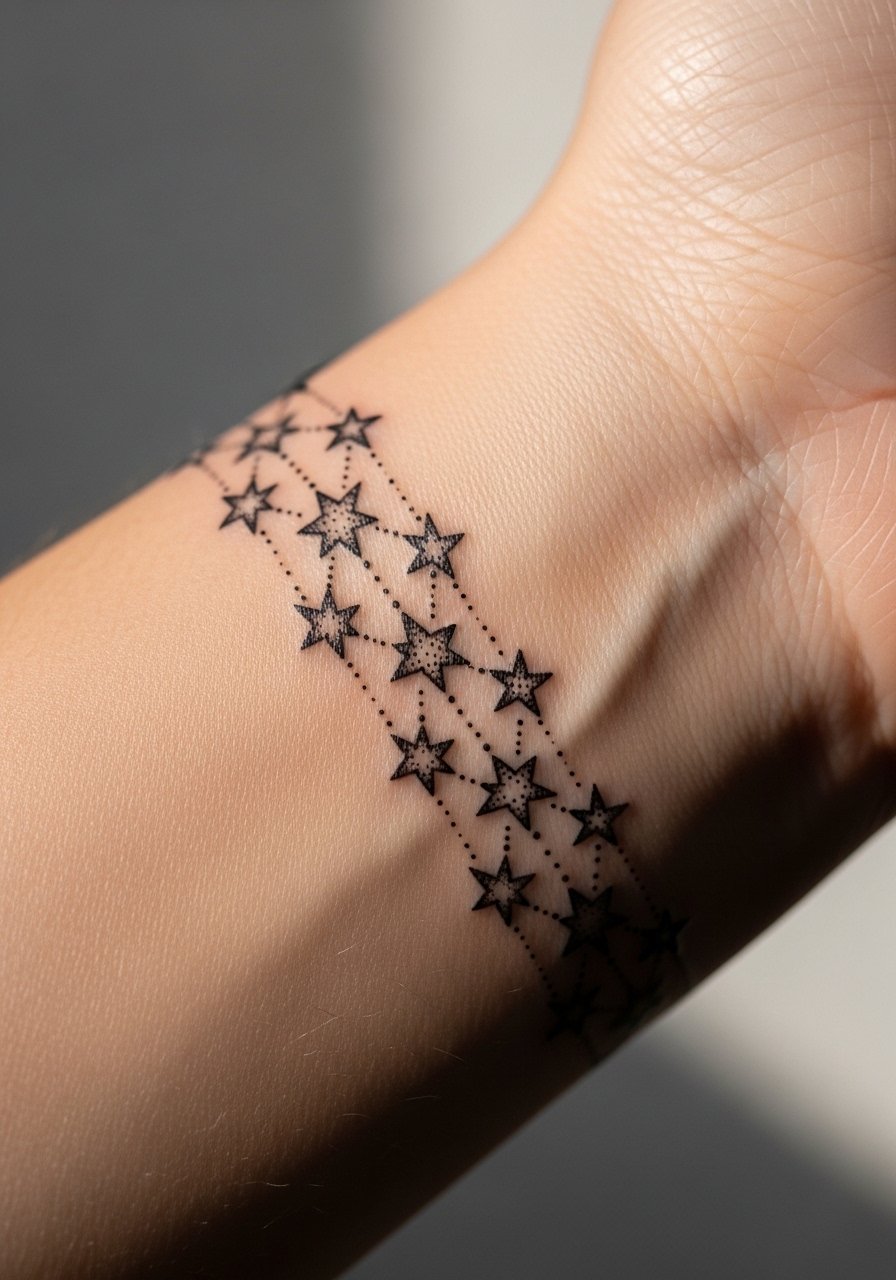
A wrist cluster that wraps like a bracelet works well for people who want subtle group symbolism. Keep the stars spaced and use dot work or slightly heavier anchor dots so the bracelet does not blur into a band. Don’t invert the balance by adding too many tiny connectors. Sessions are short but expect the usual wrist touch-up timeline. For showing it off try a thin leather cuff bracelet on the opposite wrist to avoid crowding the ink.
19. Glass Crown Memorial with Custom Runes on Sternum
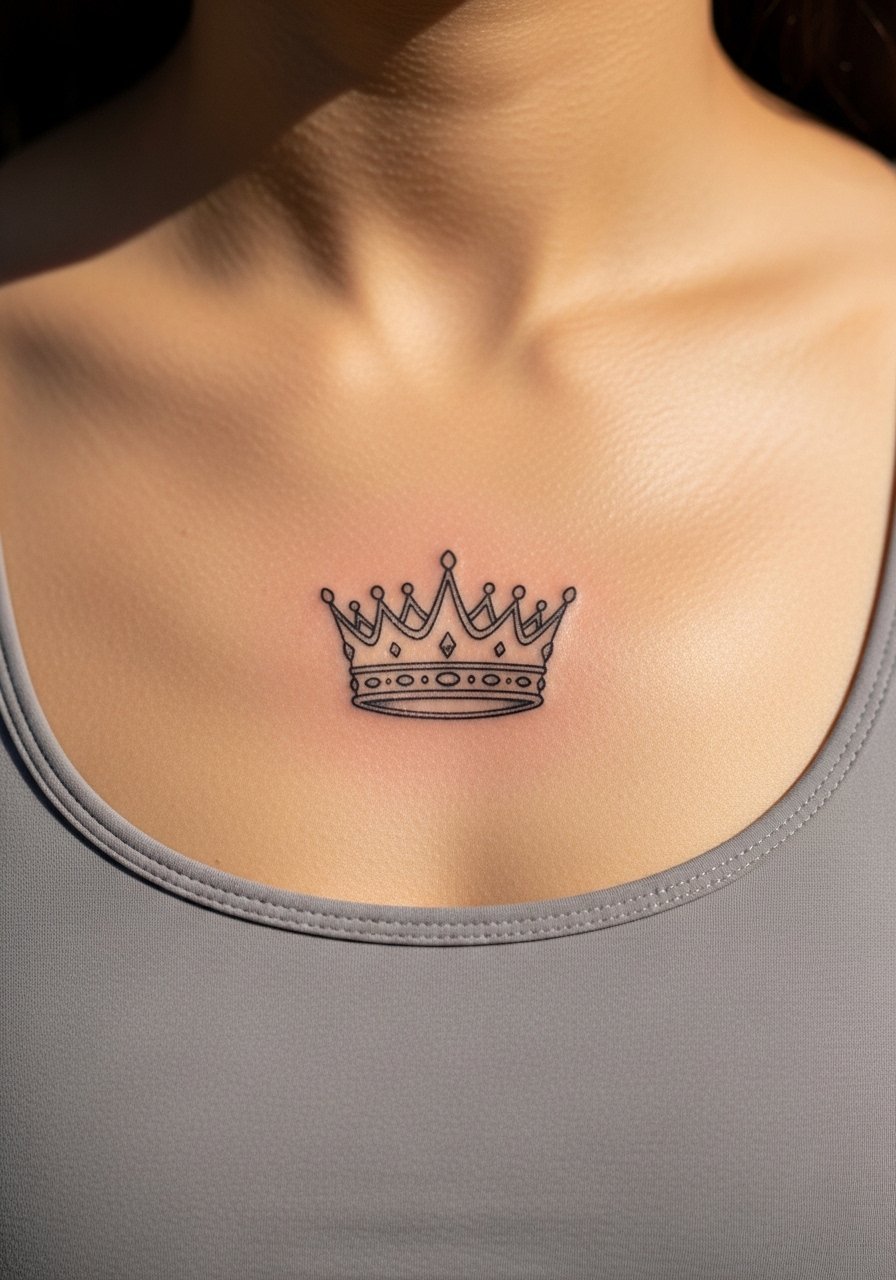
Sternum tattoos are painful and need an artist experienced with the area to avoid uneven depth. For memorial crowns with custom rune additions, ask for slightly bolder framework around the crown so the central motif reads as your body shifts. Artists split on numbing cream use for these sessions. One side says numbing helps long sessions. The other believes numbness blunts artist feedback about where tension pulls. Discuss this in consult and know both views. Wear a fitted sports bra to the appointment so the artist can work with clean access.
20. Glass Throne Silhouette with Negative Space Shards on Chest
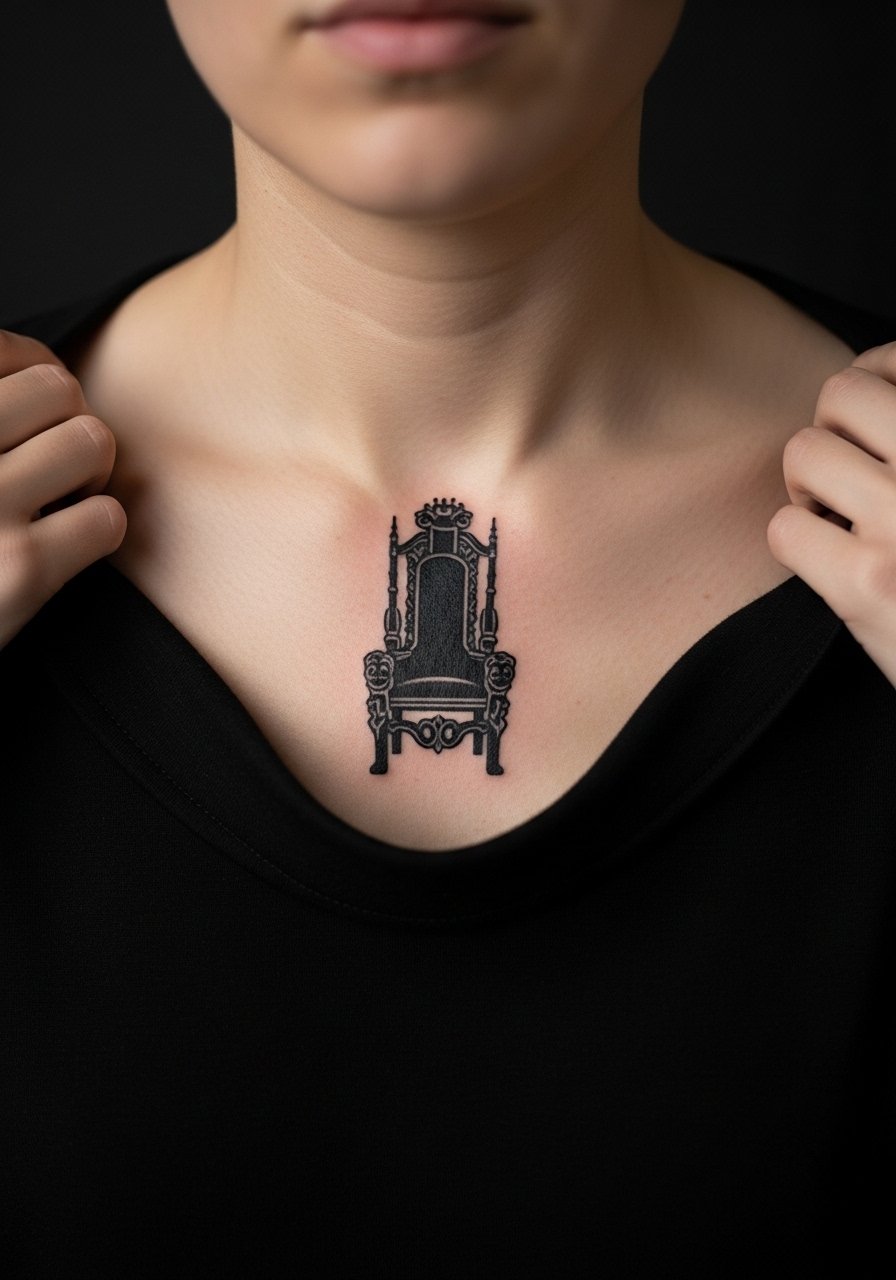
Upper chest silhouettes benefit from negative space for shard details to prevent overworking the area. The collarbone’s proximity to bone means more sensitivity during the session. Avoid asking for hairline internal shards that the chest skin will not maintain. One session usually does this size well. For showing the silhouette try a dainty chain necklace that sits below the crown and does not overlap the throne.
21. Phoenix Rising from Crumbled Glass on Side Torso
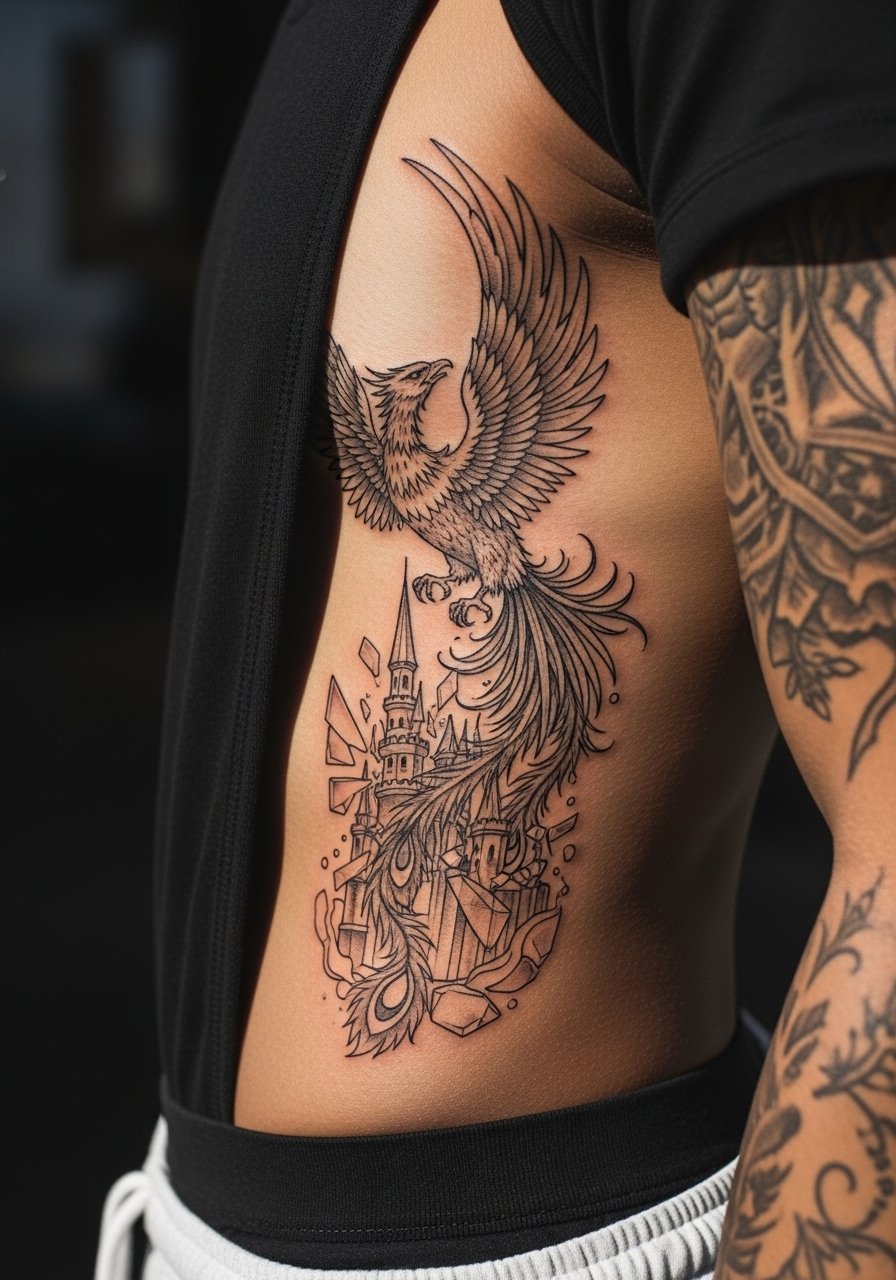
Side-torso placements can be dramatic but are affected by body changes and movement. Ask for slightly increased spacing in feather details so the phoenix reads at year two. Many people compress flames and feathers into tight areas, which then becomes a gray patch. Rib pain is high, so plan a longer session or staged visits. For recovery, choose loose high-waist bottoms so waistbands do not press on healing skin.
22. Tiny Wyrdstone Dot Work Along Collarbone Edge
Tiny dot-work wyrdstones near the collarbone look delicate but need intentional spacing or they merge. The mistake is placing a cluster too tight to the bone where skin movement compresses the dots. Expect short session time and possible touch-up at 18 months. For display, pair with an open shoulder blouse that reveals the line without necklaces.
23. Hybrid ToG and ACOTAR Rune Pairing on Calf
If you want a subtle crossover between series, a calf placement is forgiving and keeps the designs bold. The common error is literal mash-ups that crowd each rune. Ask for a rhythm in spacing and a consistent lineweight so the hybrid reads as a single band. One session will often suffice for a 4 inch vertical piece. For sessions wear shorts or pants you can adjust easily so the artist can work efficiently.
24. Stipple-Shaded Wyrdmark Crest on Upper Thigh
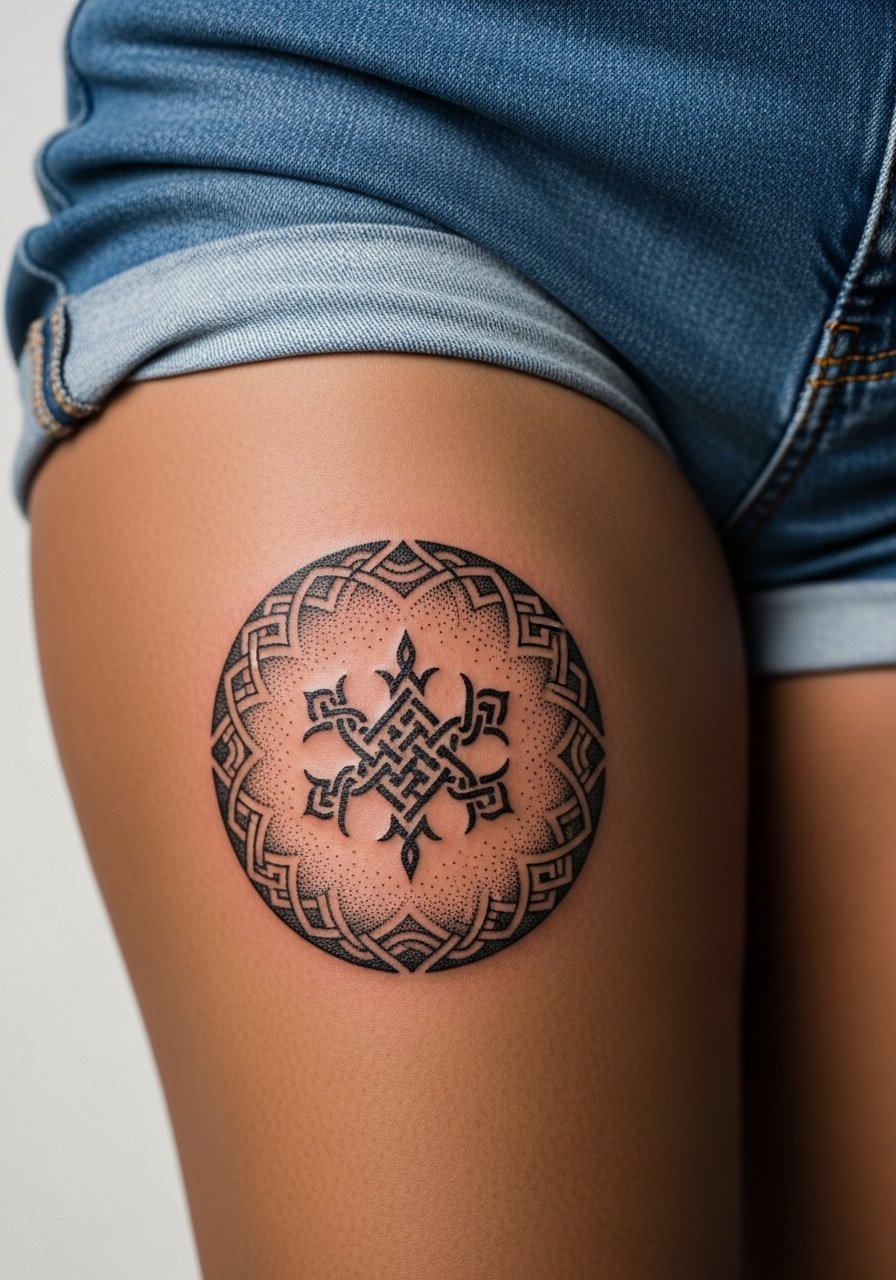
Upper thigh tolerates stipple shading beautifully and the area is less exposed to sun than lower limbs, which helps longevity. Avoid asking for ultra-fine dot clusters too close together because they can clump during healing. Two sessions might be needed for a highly detailed crest. Session wear of high waist denim shorts that you can shift aside makes the process smoother and prevents fabric from rubbing the fresh ink.
25. Ignorant-Style Throne Fragment on Lower Back
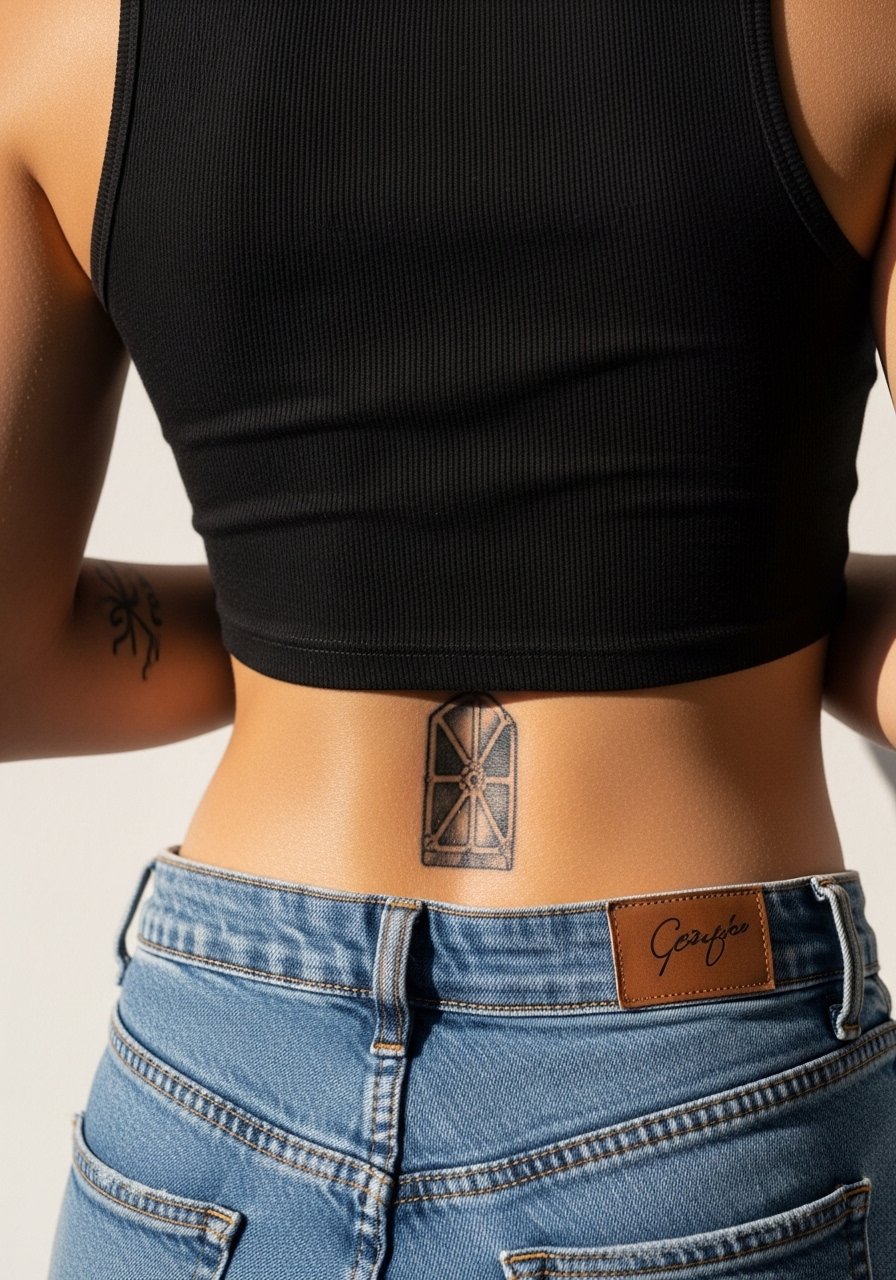
Lower back pieces hold heavy, dense blackwork well and are usually protected from daily sun. The common mistake is trying to cram tiny detail into a space that reads better with bold fields. One session usually covers a modest lower back fragment. For healing, wear pants with waistbands below the area so nothing rubs at the site. This placement ages well if you plan wardrobe around it during the first month.
26. Small Glass Shard Cluster on Hip
Hip tattoos look great and remain private when needed, but the area can shift with weight changes. Ask for a touch of negative space between shards so the cluster does not collapse into a single patch later. One short session can deliver a small cluster. For session comfort wear high-cut shorts or swim bottoms you can adjust so only the tattoo zone is exposed.
27. Glass Throne Silhouette Finger Accent
Finger pieces are convenient for micro-symbols but are among the fastest to fade because of constant washing and skin turnover. A common mistake is expecting finger ink to behave like chest or back work. If you choose a tiny throne accent, accept an annual touch-up schedule and keep the design simple. Session time is brief but expect quicker fading. For minimal everyday care, avoid heavy rings on the tattooed finger while it settles.
Frequently Asked Questions
Q: Will fine line wyrdmarks blur if I place them on a forearm versus a ribcage?
A: Forearms are more forgiving because skin there moves less dramatically than the ribcage. On forearms, slightly heavier anchor dots and open spacing help fine line last longer. On ribs, expect the skin to stretch with breathing and weight changes, so many artists advise bolder spacing or putting tiny runes on a different surface.
Q: How should I pick between blackwork crowns and colored crowns for longevity?
A: Blackwork holds up best over time because solid saturation resists fading. Color crowns can be vibrant, but they need careful sun protection and sometimes earlier touch-ups. If you love color, ask for a mix: strong black outlines with selective color accents so the core shape reads even if pigments soften.
Q: I have dark skin. How do I make a small wyrdmark or crown pop in photos?
A: High-contrast blackwork and slightly thicker line weights often read better on darker tones. Some people discuss subtle white ink highlights under blackwork, but that is a specialized technique and not a guaranteed fix. Bring reference photos and ask your artist to test a small flash on your skin tone during consult.
Q: What should I wear to a thigh or shoulder blade session to stay comfortable?
A: For thigh work, loose shorts or a skirt you can adjust help the artist access the area without tight fabric pressing on fresh ink. For shoulder blade work, a button-down or a tank you can pull aside keeps you covered and gives the artist clear access while you avoid awkward undressing.
Q: Are Saniderm-style wraps better than dry healing for glass crown color pieces?
A: There are two camps. One camp says protective film speeds color retention and reduces scabbing. The other camp warns that occlusive film can trap moisture and increase infection risk if not changed correctly. Talk to your artist about their experience and follow the specific timing they recommend for removal so you get the healing style they prefer.
