
Fine line tattoos are everywhere online right now, and they look incredible fresh. The truth is the pieces that age best are usually the ones planned around how skin moves and how sleeves already sit. People complain that fillers look like an afterthought, or that a quick session ends up costing more than expected, or that fine line on darker skin disappears too fast. Read on for ideas that actually bridge gaps and the practical notes to make them last.
1. Fine Line Floral Sprig for the Inner Forearm

I recommend a single floral sprig when a sleeve has larger pieces but needs a delicate connector. Tell your artist you want airy linework with small breaks between petal veins so the design breathes instead of filling in over time. Pain is mild to moderate on the inner forearm and a typical session runs 30 to 60 minutes. The common mistake is asking for pencil-thin lines on skin that moves a lot. Ask for slightly heavier linework up front to avoid touch-ups at year two. For showing it off, roll up a rolled cuff chambray shirt so the forearm reads like an intentional element of your outfit.
2. Neo-Traditional Rose Cluster on the Outer Bicep
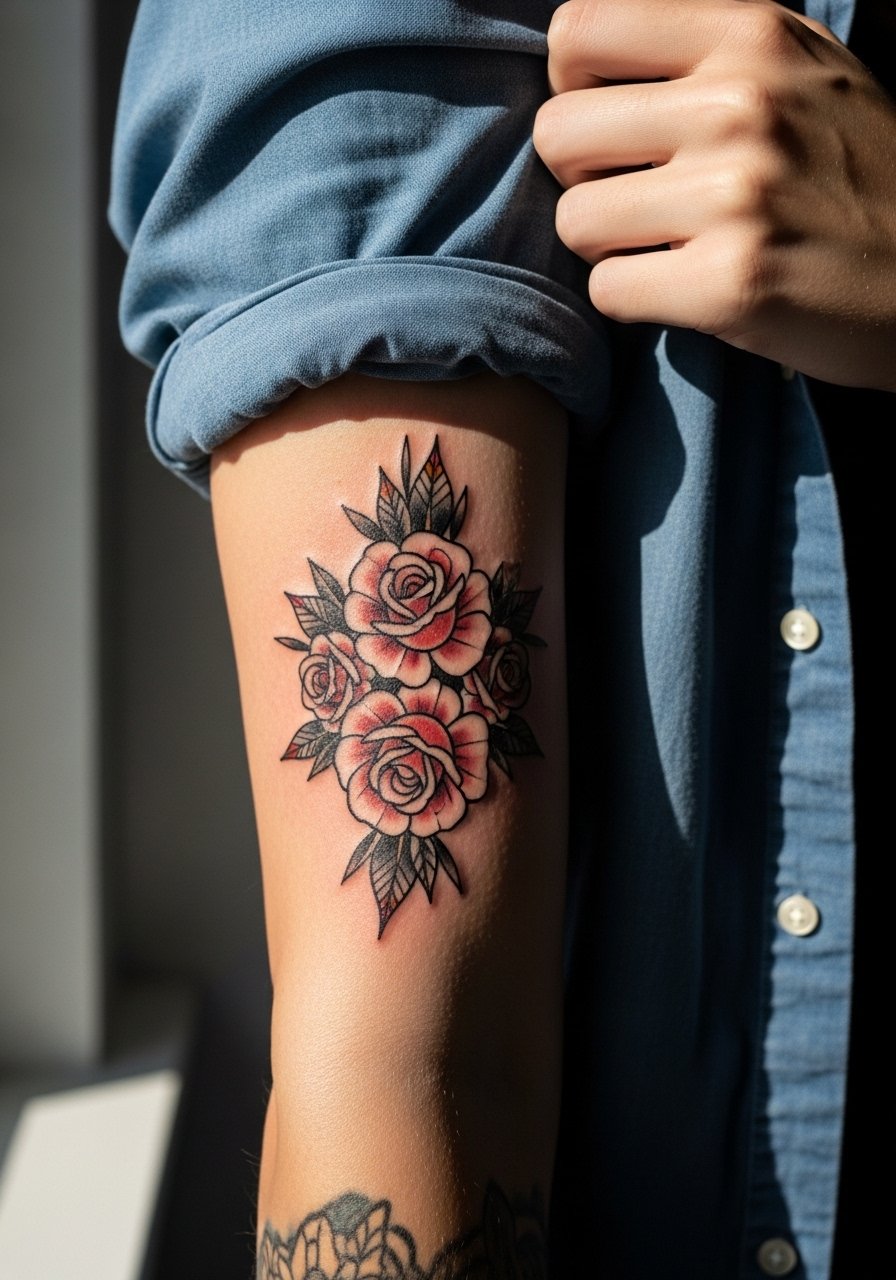
This is the filler I suggest when you need bold contrast next to older blackwork. Ask for heavy outlines and saturated color that reads from a distance. The session feels like moderate pressure, and the outer bicep is forgiving for color work. A common error is shrinking the design too small to save time. Smaller roses lose the neo-traditional punch and need more touch-ups. Mention you want the piece to read as a standalone nod to vintage tattooing so it bridges darker neighbors. Pair the finished bicep with a fitted black tank top to highlight the color contrast.
3. Geometric Mandala Segment for the Shoulder
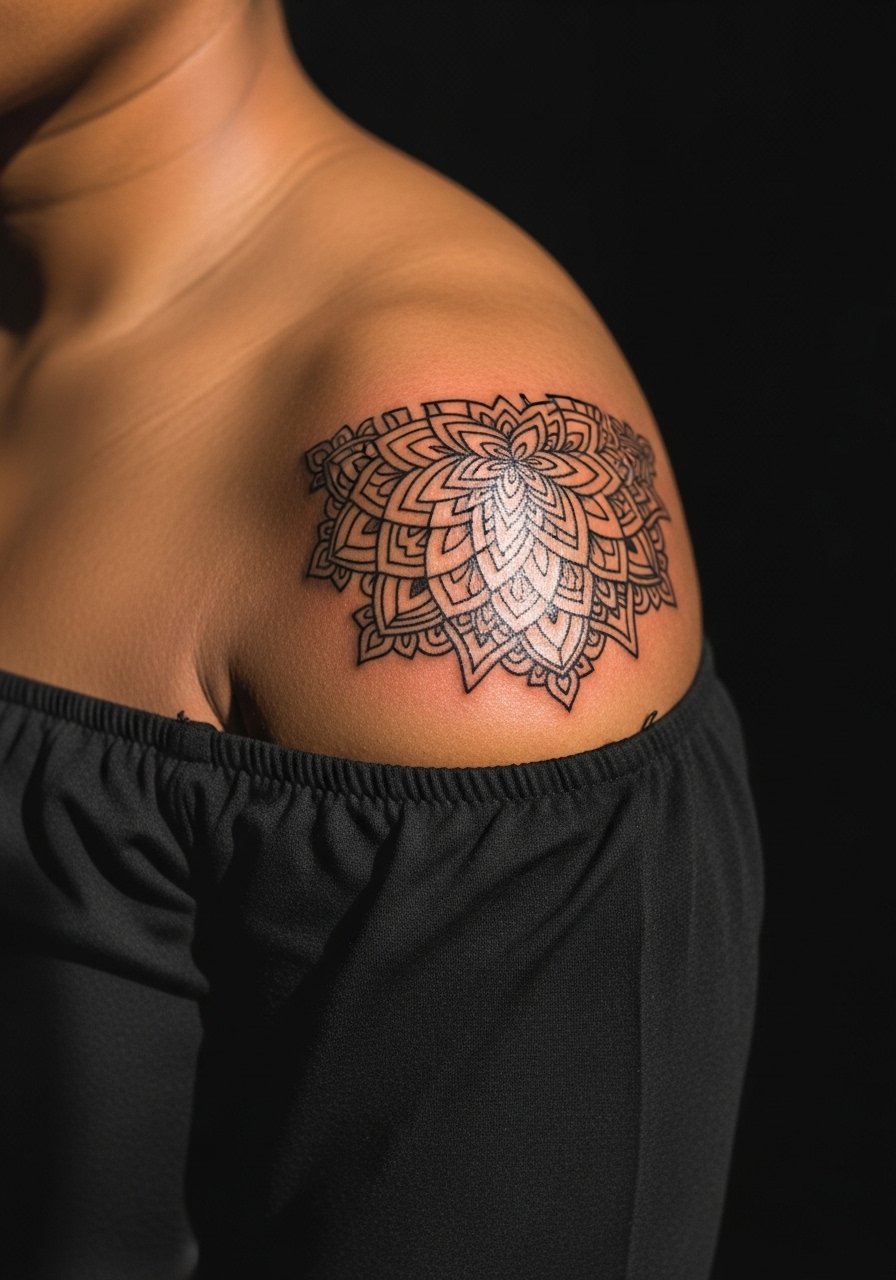
A mandala segment is perfect when asymmetrical pieces need a visual anchor. Tell the artist you want negative space between petals so the pattern does not collapse as it settles. Shoulder placement is lower on the pain chart and usually done in one session. The biggest mistake is cramming dense geometry too small. Over time the close lines can merge, so give the design breathing room. For evenings out, an off shoulder blouse frames the pattern without competing with the linework.
4. Micro-Realism Feather Along the Ribcage
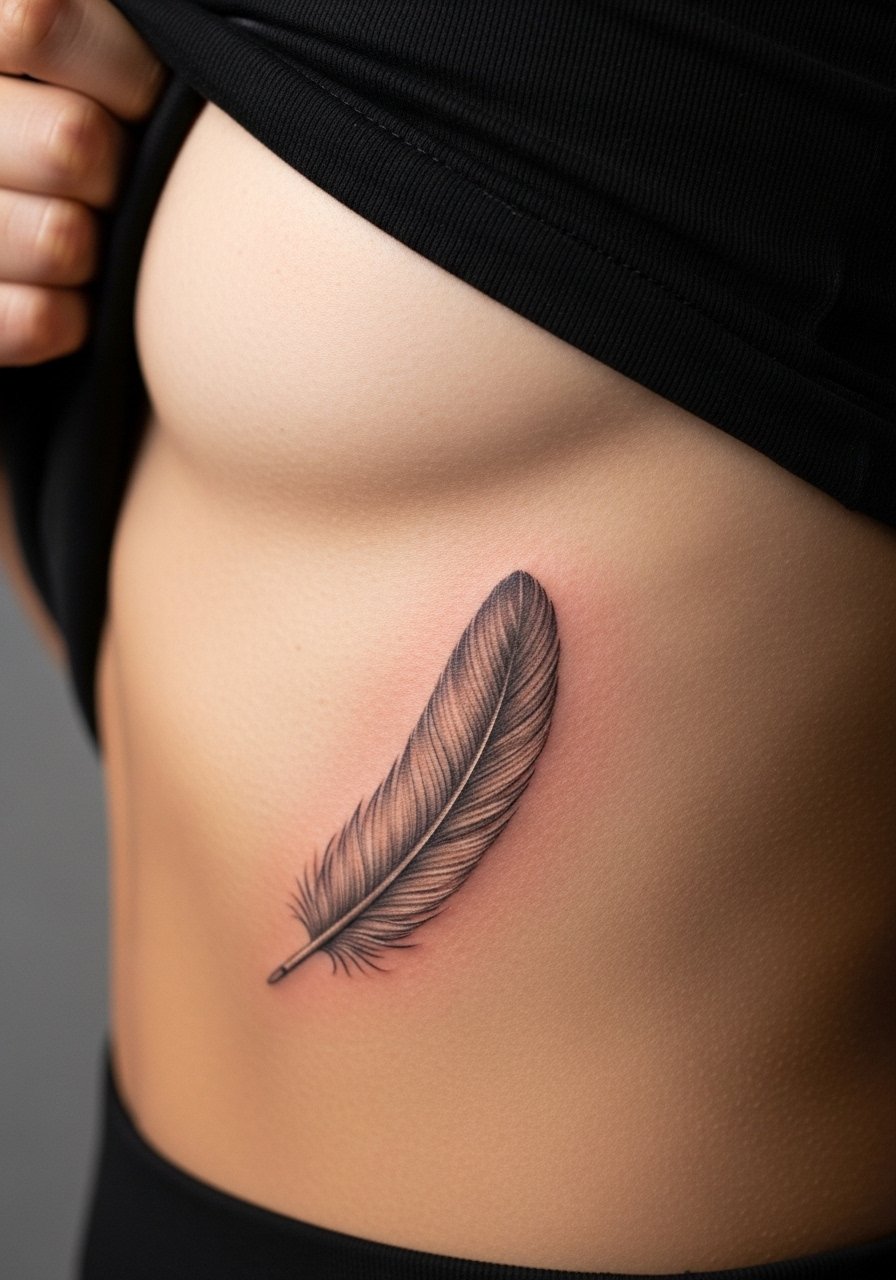
Fair warning, ribs are a tougher spot on the pain scale. Micro-realism adds texture without overwhelming nearby work, and it is a good choice when you need a subtle bridge. When you consult, ask for stipple shading rather than dense gray wash to avoid early pooling in that zone. Artists split on fine line on ribs. One camp says the skin stretch blurs delicate lines within two years. The other camp says proper depth and spacing makes fine line hold up. Ask your artist which camp they practice with and plan touch-ups at around six months if needed. For the session, wear a loose crop top in a neutral tone so only the area you need is revealed.
5. Blackwork Wave Connector for the Inner Forearm

If your sleeve has heavy black areas, a wave-style connector reads intentional instead of patched. I prefer solid saturation here because the inner forearm sees friction and detail can soften fast. Tell your artist you want solid fills with clean edges to avoid blowout in thin-line zones. Expect moderate pain and two sessions for larger connectors. A typical mistake is using stipple on a stretch-prone forearm. For a clean reveal, roll sleeves and pair the finished piece with a sleeveless chambray top.
6. Watercolor Splash for Elbow or Knee Gaps

Watercolor patches look amazing fresh but they can migrate into nearby lines, especially on joints that bend. The controversy around wrapped healing versus dry healing matters here. One group says protective film like second skin reduces scabbing and preserves washes. The other group argues bandaging traps moisture and risks maceration. If you choose watercolor at a joint, plan for touch-ups and ask your artist whether they prefer dry aftercare or a short-term protective film. The session is short but expect awkward positioning for the elbow. Avoid tiny watercolor blobs that will blur, and consider a subtle outline to contain the wash.
Studio Day Picks
The elbow and forearm pieces above require different prep than chest and rib work, so these items smooth the session and early healing.
-
Ink-Oil balm. A non-greasy finish users report keeps blackwork matte during the first week without the shine that clogs detail on fine line pieces.
-
Australian Tattoo Goo balm. Breathable formula that helps in humid summer sessions when sweat can bother elbow and thigh work.
-
UK CeraVe Healing Ointment. Fragrance-free and gentle, handy if you are touching up healed portraits on the chest without irritating surrounding skin.
-
Hada Labo moisturizing lotion. Lightweight moisture after removing protective film keeps healed color from drying out without greasiness.
-
Hustle Butter. A thin balm many people use during sessions and the first days of healing for smoother application and less pore clogging than heavier ointments.
7. Ignorant-Style Skull for the Outer Thigh
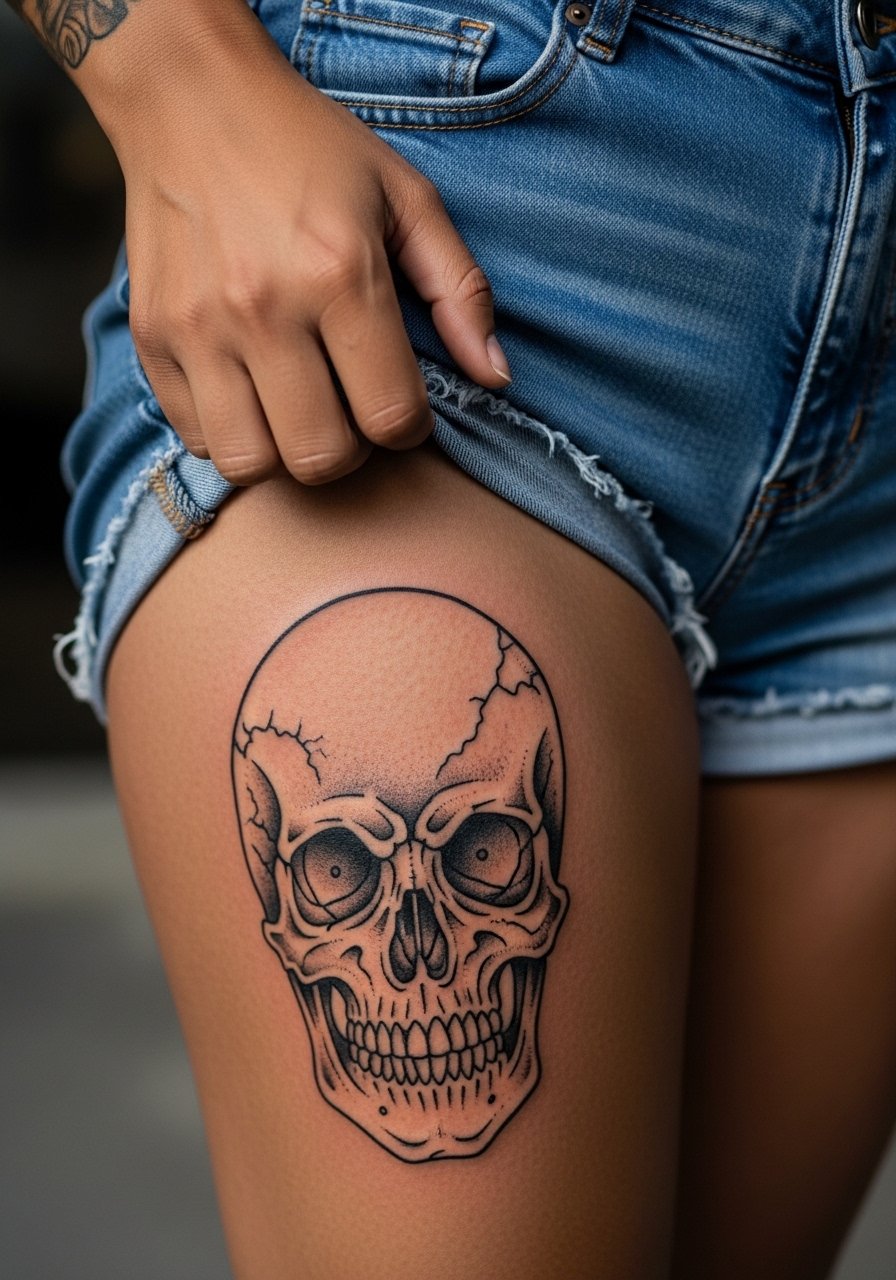
Ignorant style fills bring a hand-drawn, punk aesthetic and they age into their own when placed on the outer thigh. This area is forgiving for rougher linework, and a typical session is 30 to 90 minutes. Tell your artist you want confident, sketchy strokes rather than refined shading. A common mistake is over-detailing a small skull. Thigh flesh can change with weight, so ask for expandable shapes like waves around the skull if you expect fluctuation. Show it off with high-waisted shorts or ripped denim for a grit-forward look.
8. Minimalist Dots and Lines for the Wrist

Wrist fillers are low-commitment and low-session time, ideal for someone nervous about a long appointment. The wrist is high on visibility but gets a lot of washing and rubbing, so I often advise slightly bolder dots. The mistake is asking for the thinnest possible single-needle dots on busy wrists. Expect touch-ups sooner than on the forearm. For showing it off, wear a linen long sleeve shirt rolled to the elbow so the wrist reads intentional without clutter.
9. Traditional Anchor on the Calf

Calf pieces are durable and handle color saturation well. Anchors work as clean filler against lower-leg gaps and survive summer sweat better than delicate shading. Ask your artist for bold outlines and compact color blocks so the design keeps definition when skin stretches. The session is comfortable since your leg sits easily. A common mistake is making the anchor too tall, which reads awkwardly when wearing shorts. Pair it with cuffed joggers or shorts so it shows at the right height and feels intentional when you walk around.
10. Ornamental Vine Wrap for the Shoulder Blade

Vines are a go-to when you want flow across the upper back and shoulder. They bridge different motifs with gentle curves and they help mask mismatched edges from older pieces. Tell your artist you want negative spacing between tendrils and leaves to avoid tight black masses. Shoulder blade sessions are low on the pain scale and usually completed in one visit. The mistake is wrapping too tightly around the shoulder joint, which can warp the motif when you move. For evenings, an off shoulder top frames the vine without competing.
11. Fine Line Mushroom Cluster on the Outer Forearm
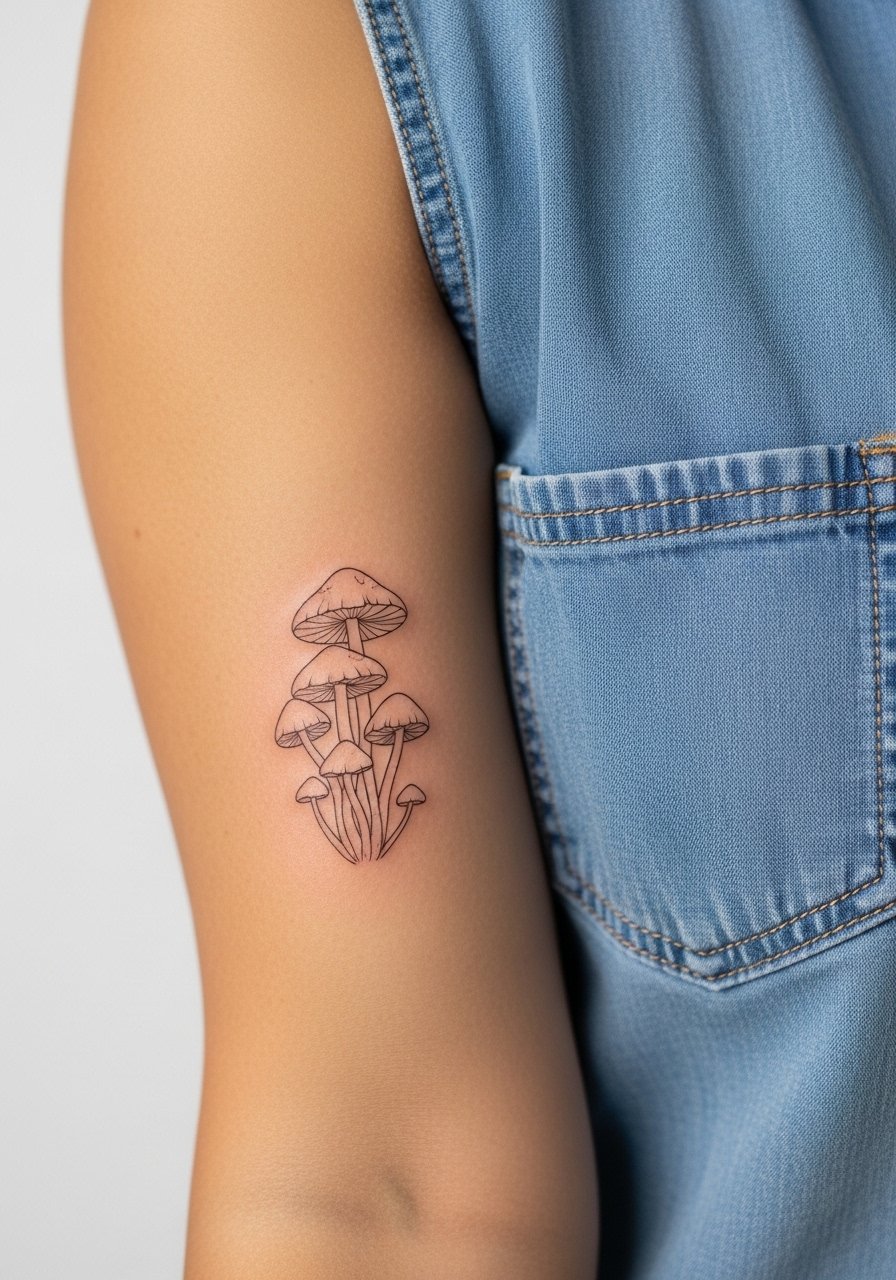
Small mushroom clusters add whimsy and act as subtle bridges between larger nature pieces. I usually recommend slightly bolder caps and minimal internal detail so they do not dissolve on textured skin. The outer forearm tolerates fine work nicely but expect touch-ups at around the two-year mark if lines are ultra-fine. Avoid asking for tiny stipple inside each cap, which can fill in. After the session, pair the look with a rolled cuff chambray shirt and thin silver rings to direct attention without crowding the design.
12. Black and Gray Portrait Patch for the Chest
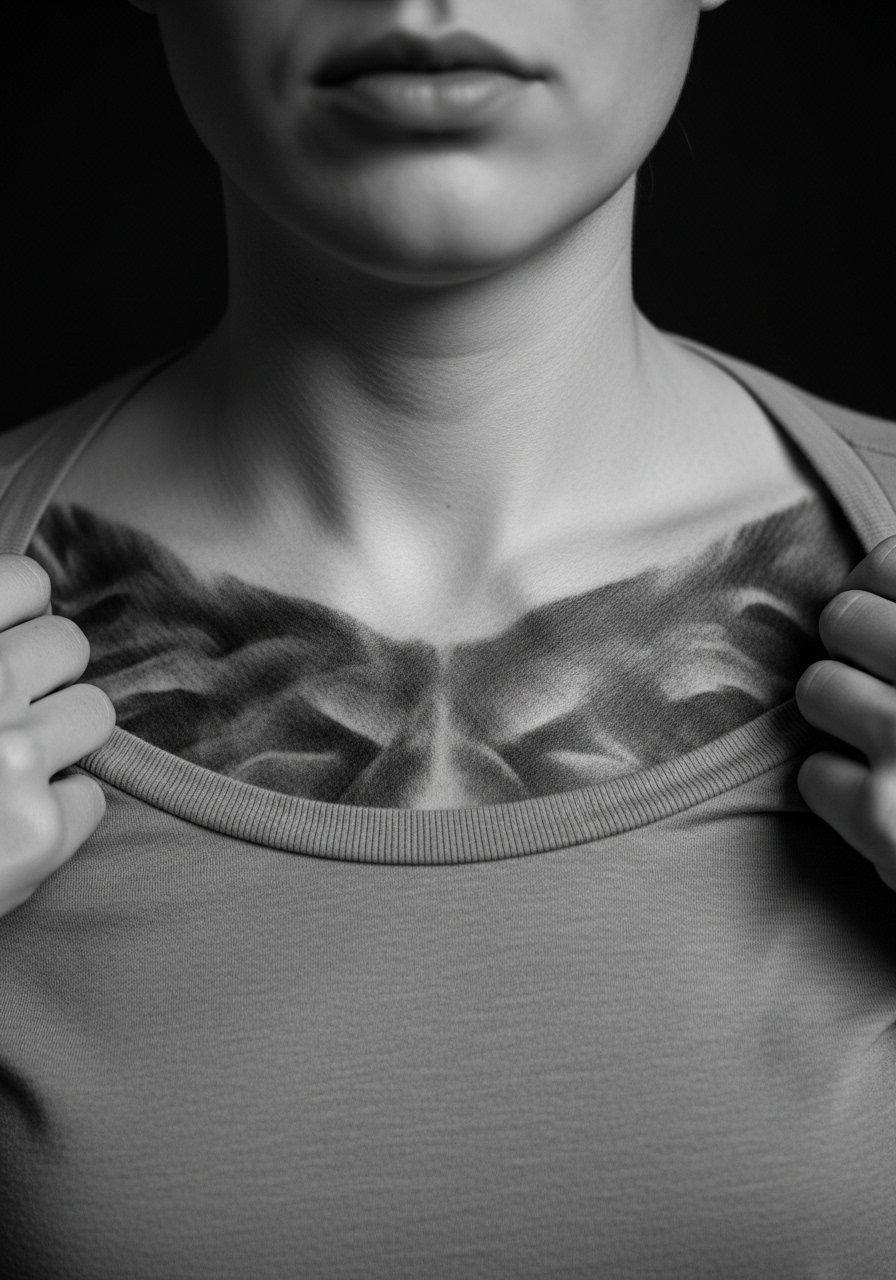
Portrait fillers on the chest are emotional and demand a skilled hand; they are best when used sparingly to fill larger negative zones near existing memorial pieces. Tell your artist you want contrast in the mid-tones to keep facial features readable as the work ages. The chest accepts heavy shading well, but expect longer sessions and multiple sittings. A frequent error is shrinking the portrait to a size that loses expression once healed. For the appointment, a wide-neck shirt pulled aside gives access while keeping things discreet.
13. Neo-Traditional Swallow Above the Inner Bicep

Swallows add motion and work well above the inner bicep to lift surrounding pieces. The inner bicep can be chatty during sessions because of sensitivity, so topical numbing is reasonable if you prefer. The main mistake is using tiny, detailed feathers in a place that rubs against shirts; those details can fade quickly. Ask for slightly larger feather shapes and color accents that hold up. For casual reveal, an open button shirt or fitted tank makes the swallow feel like part of your daily look.
14. UV-Reactive Ink Accent for Hidden Glow
UV-reactive ink is a rare but fun filler when you want a hidden element that glows under blacklight. It works best paired with a small black anchor or dot that grounds the glow in daytime. Be explicit with your artist about placement and the exact glow color you expect because visibility varies. The controversy here is the long-term stability of specialty inks, so plan this as an optional accent rather than the core of a sleeve. The wrist is a visible spot so consider a small, test-sized accent first to see how it heals on your skin tone.
15. Expandable Wave Pattern for Fluctuating Thighs
If you expect weight changes, choose modular, expandable patterns like waves or stripes that stretch gracefully. The outer thigh is ideal for this because the skin gives and the pattern can be scaled later without breaking composition. Ask your artist for repeating motifs with silent gaps between elements so the design stretches without compressing. Avoid intricate micro-detail that will warp with body changes. For summer wear, pair the placement with high waist denim shorts so the tattoo peeks in an intentional way.
16. Scar-Integrated Texture for Patchwork Fill

Using scar tissue as texture turns a problem into a design feature. When you bring scars into a filler plan, ask the artist to map the scar and draft a pattern that follows its lines. Expect slower ink uptake in scar tissue and plan for an extra touch-up session. The common mistake is trying to tattoo over heavy scars without testing a small patch. This approach also needs a sensitive consultation because scar tissue behaves differently. For session wear, a cropped tee and high-waisted bottoms keep the area accessible while you check how the ink takes.
17. Minimal Geometric Connector for Forearm Gaps

When you want symmetry without overpowering existing art, small geometric connectors are ideal. The key is spacing, so ask your artist to plan negative space between parallel lines to avoid merging over time. The forearm tolerates geometry well, but too many thin parallels is a mistake. If your skin tone favors bolder marks, request slightly thicker strokes. For a casual reveal, pair the design with a sleeveless chambray top to let the geometry function like an accessory.
18. Stippled Dotwork Crescent on the Ankle
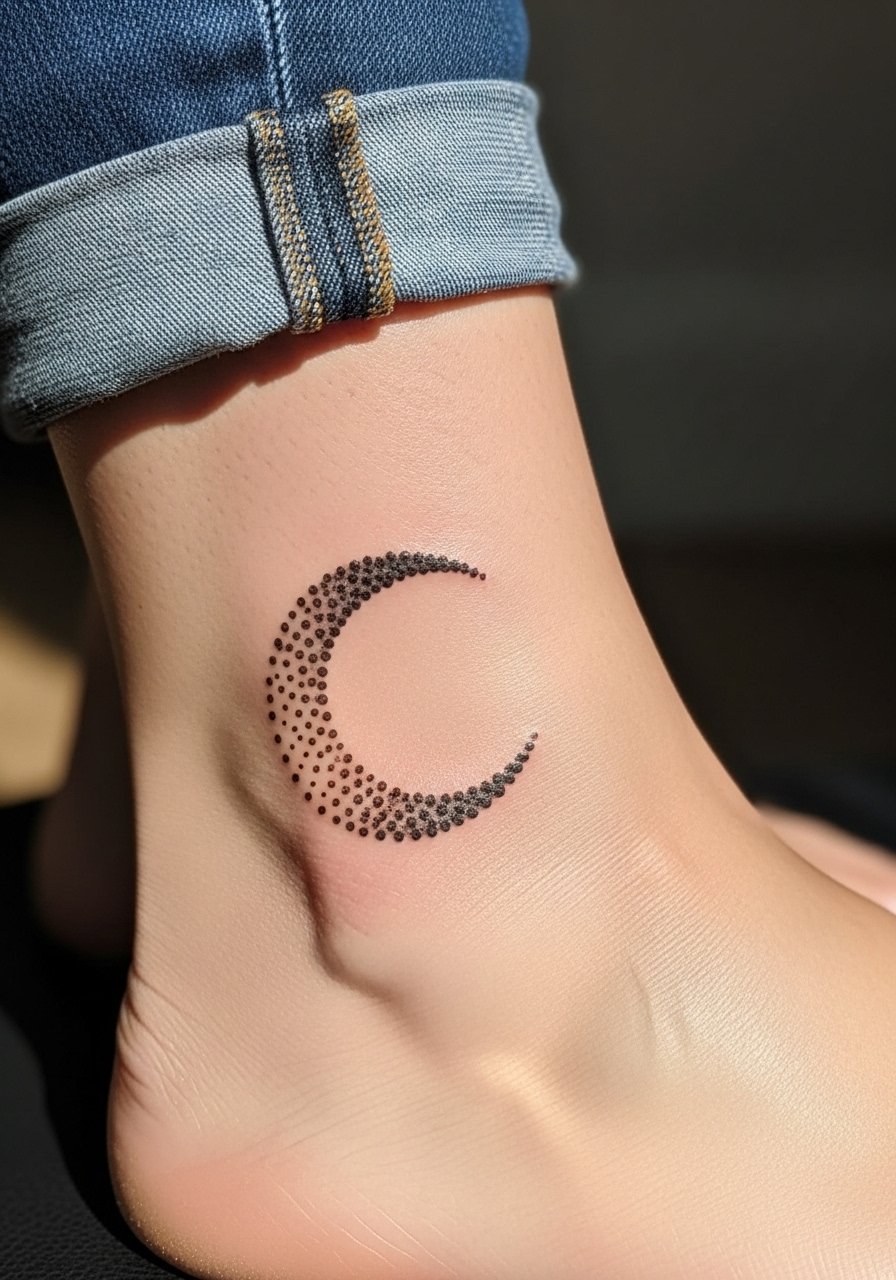
Ankle fillers need to handle repeated friction from socks and shoes, so stipple dotwork is a smart choice for texture that ages softly. Ask for graduated density so the central form remains readable as dots soften. The main mistake is placing tight dot clusters where shoe straps will rub them away. Expect quick sessions but potential touch-ups after heavy activity seasons. Show it off with rolled jeans or sandals so the ankle reads like deliberate styling.
19. Script Ribbon Under the Collarbone
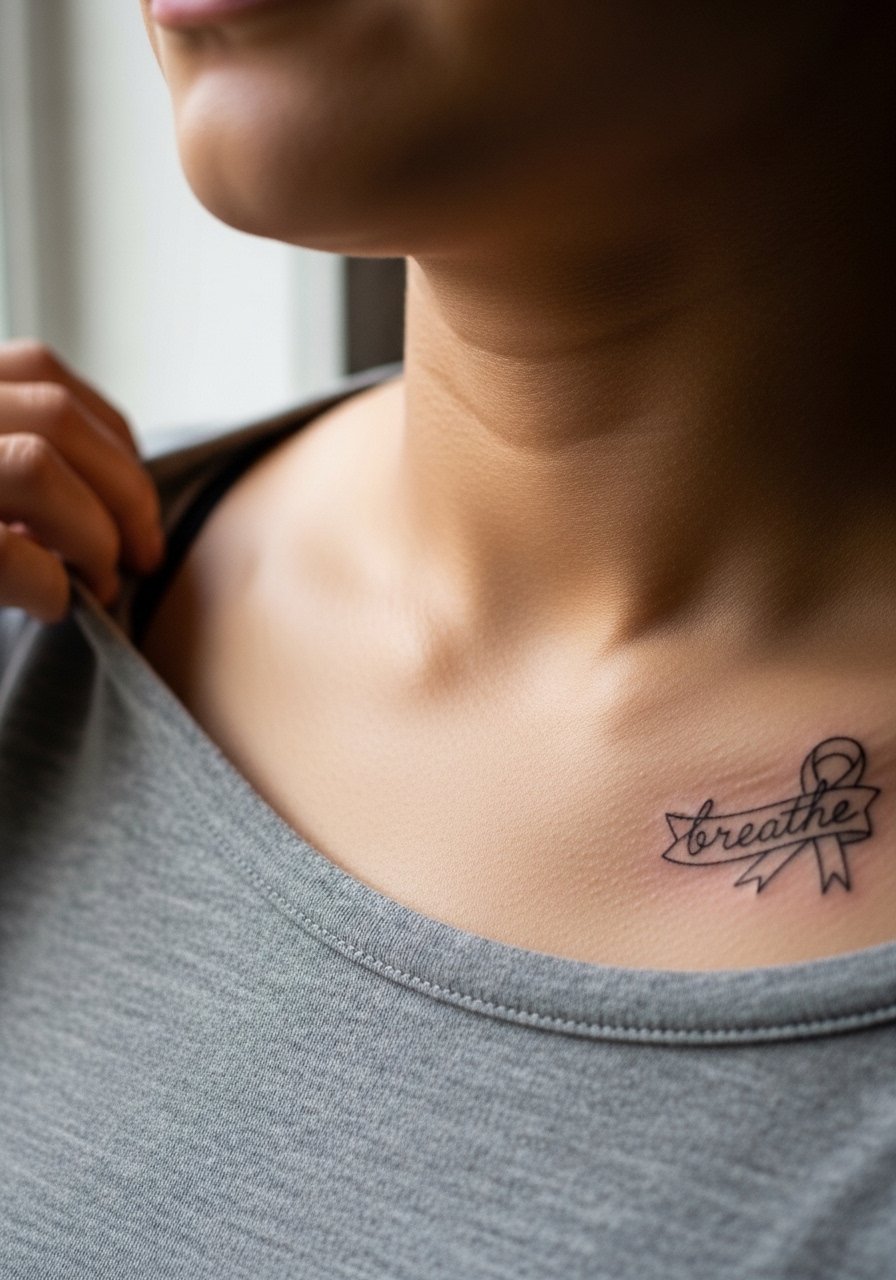
Delicate script ribbons bridge gap areas near the chest and collarbone. When requesting lettering, specify exact text and font so the artist can place it with the right scale. The upper chest tolerates thin script if characters are spaced generously. A common error is squeezing long phrases into a very short strip. For session ease, wear a wide-neck shirt you can tug aside and plan on a touch-up if the letters are very small.
20. Tiny Anchor Trio for Calf Gaps

Small classic anchors can be arranged to fill narrow vertical gaps on the calf. Ask your artist to keep the anchors compact but bold so the negative space stays clean. The calf is forgiving for saturated outlines, but the mistake is shrinking symbols until the anchor looks like a blob from distance. For casual wear, cuffed joggers or shorts make the anchors pop when you want them to.
21. Mandala Edge to Unify Upper Arm Pieces

A mandala edge is subtle and works when you need to unify eclectic upper arm elements. Ask the artist to plan a repeating motif that aligns with existing piece borders so everything reads planned. The upper arm is comfortable for longer sessions and usually holds detail well. The mistake is trying to mirror complex mandalas exactly across an arm without accounting for muscle shape. For showing it off, a strapless top or off-shoulder piece keeps the area visible without competing details.
22. Micro-Realism Insect Between Shoulder and Back

Tiny insects in micro-realism give a whisper of realism that helps stitch pieces together. They need crisp stipple and careful contrast to stay readable in small scale. Placement between shoulder and back is low on the pain scale. The mistake is packing too much tiny texture into a tiny subject. Ask for clear separation between foreground and background so the bug remains a focal point as the skin ages.
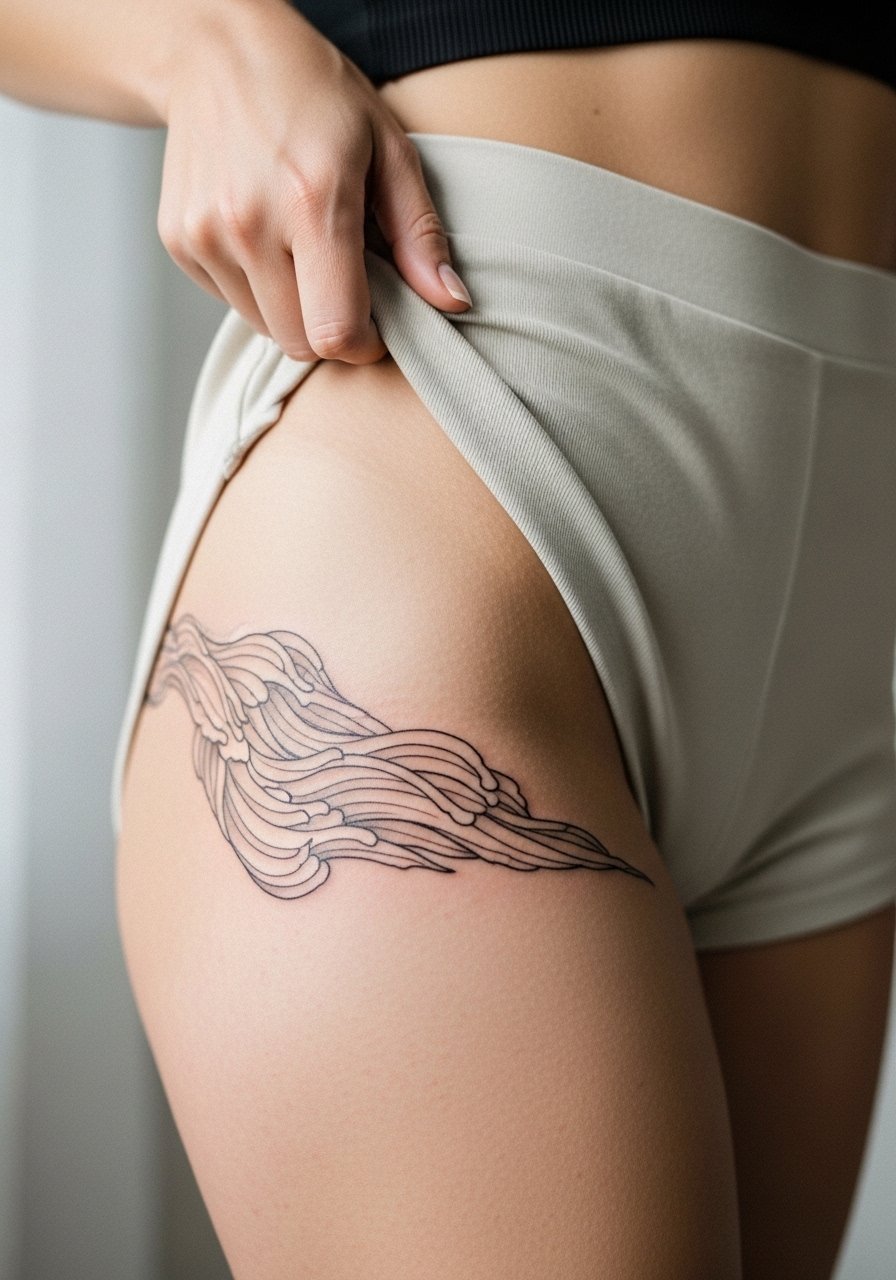
23. Thin Wave Band That Adapts to Thigh Shape

A simple wave band wrapped across the thigh is forgiving for body changes and acts as a visual seam across patchwork collections. Tell the artist you want modular breaks in the wave so you can add pieces later without fighting the band. The session is short and usually comfortable. Avoid tight continuous lines with no breaks because they show stretch more obviously. For summer wear, high-waisted shorts make the band peek in a curated way.
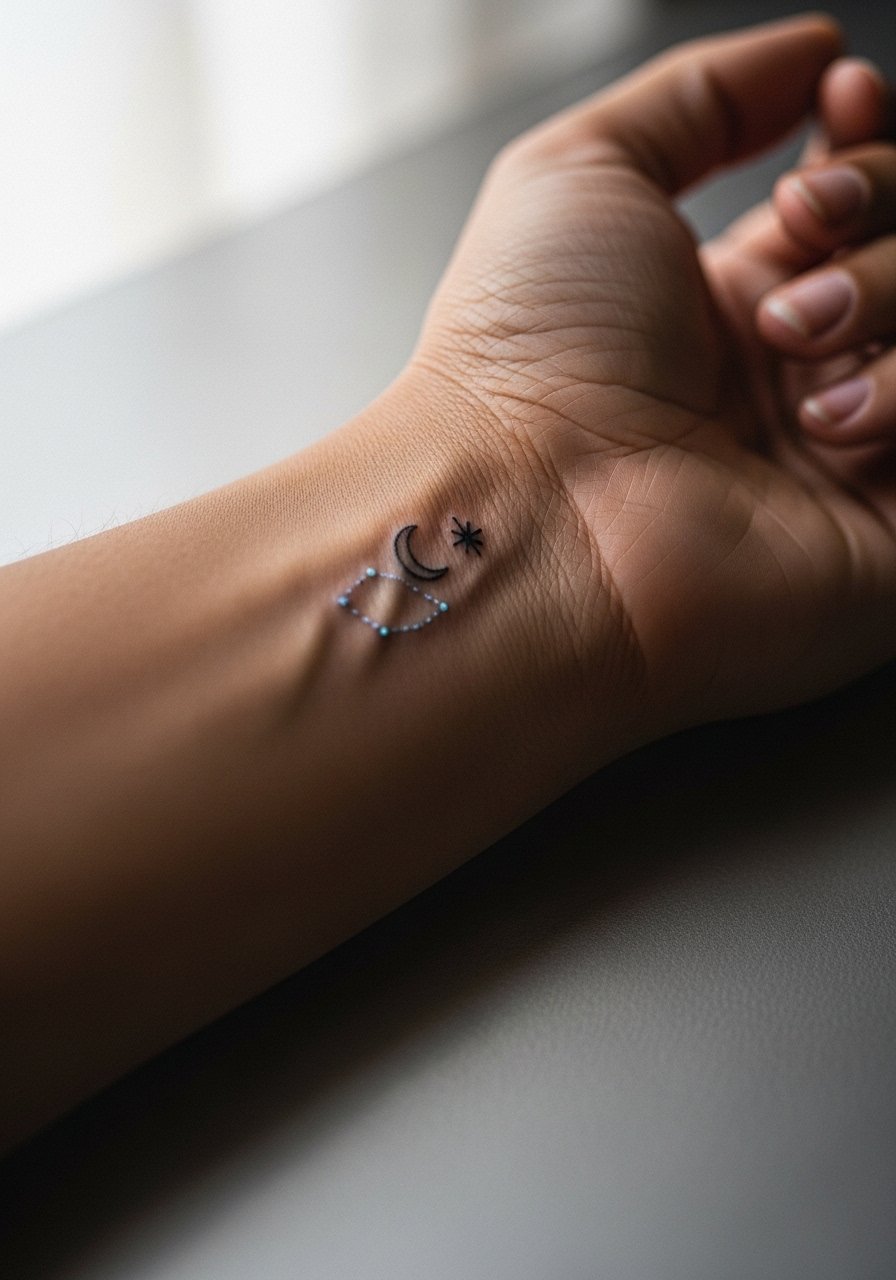
24. Tiny Compass Cluster Near the Wrist

Compasses in small clusters bridge travel-themed pieces and work well where space is limited. Request simplified directional points and reduce inner detail to keep the motifs legible when washed by daily wear. The lower forearm is tolerant, but the main error is cramming navigational text into tiny rings. Wear a linen long sleeve shirt rolled at the elbow when you want the cluster to read like an accessory.
25. Dot-Connected Constellation on the Ankle

Constellations bridge small gaps with linear flow that can wrap around shoes and straps. Keep dot size slightly larger than the tiniest single-needle point so they do not vanish under friction. A mistake is mapping star lines over areas that catch socks or straps. The ankle heals fast but needs care for the first two weeks. Pair with cuffed pants or sandals to show it off with intention.
26. Floral Half-Mandala Filling the Upper Thigh

Half-mandalas on the upper thigh are great for filling large vertical gaps without committing to full wrap work. Ask for bold petal outlines and measured stipple so the inner shapes keep depth. If you expect weight fluctuation, design with concentric breaks that keep visual rhythm. The mistake is over-detailing inner petals that will blur into a single tone. For casual display, pair with high-waisted shorts or swimwear so the mandala looks intentional not accidental.
27. Modular Mini Pieces for Incremental Fill

Modular fillers let you add small units over years so a sleeve evolves rather than being forced in one session. Tell your artist you want a grid or repeating anchor points where new modules can snap in. Expect shorter sessions for each mini, and accept that integrating styles requires careful planning. A common error is mixing too many styles without a unifying element. When you start, choose a palette or line weight and stick to it so future additions match.
Frequently Asked Questions
Q: Will fine line fillers on medium to dark skin fade or blur faster than on light skin?
A: From what I have seen, ultra-thin single-needle work can be less visible on darker tones, and very fine lines tend to lose crispness sooner. Ask your artist to increase line weight slightly and to plan for a touch-up at six to twelve months. A small test spot can also show how a style behaves on your skin.
Q: How do I avoid a filler that looks like an afterthought next to older work?
A: Bring clear photos of the surrounding pieces and ask the artist to mock up the filler over photos of your actual arm. Request matching linework weight and similar saturation or contrast so the new piece visually links existing elements. If possible, discuss whether negative space can be used as a deliberate bridge rather than cramming in a new motif.
Q: Are blackwork connectors better than watercolor for sleeve longevity?
A: Blackwork usually holds up longer because saturation resists fading and shows clearly in photos and in person. Watercolor looks great fresh but often needs touch-ups, especially at joints. If longevity is the priority, opt for black outline or black shading anchors and keep watercolor accents minimal.
Q: How should I dress for a ribcage or sternum session to make the artist's life easier?
A: Wear a wide-neck shirt or a sports bra you can slide so only the tattoo zone is exposed. A loose crop top that you can pull to the side works well. Comfort matters because these sessions can be longer and positions may change.
Q: Is Saniderm better than dry healing for small gap fillers like wrist dots?
A: People are split. One group finds protective film reduces scabbing and keeps lines crisp in high-friction spots. The other group says trapping moisture risks maceration and strange peeling. For tiny wrist dots, short-term film can help if you remove it promptly and follow the artist's timing. Ask the artist which approach they use and why.
Q: How do I keep costs reasonable for small filler sessions without sacrificing quality?
A: Get three quotes and compare portfolios not just prices. Smaller studios may charge less hourly, but the priority is matching style. For true quick fixes, ask for a quoted flat rate for the exact size you want and confirm whether touch-ups are included. If a guest spot is too expensive, consider booking with a local artist who shows strong examples of the exact style you want.
