
Fine line watercolor one line tattoos are peak low-effort, high-personality ink. They look effortless in photos, but the reality is more complex. Placement, spacing, and a tiny bit of color choice decide whether that single continuous stroke still reads as intent after a few years. Read the first idea and you will see the concrete changes that keep these pieces tidy over time.
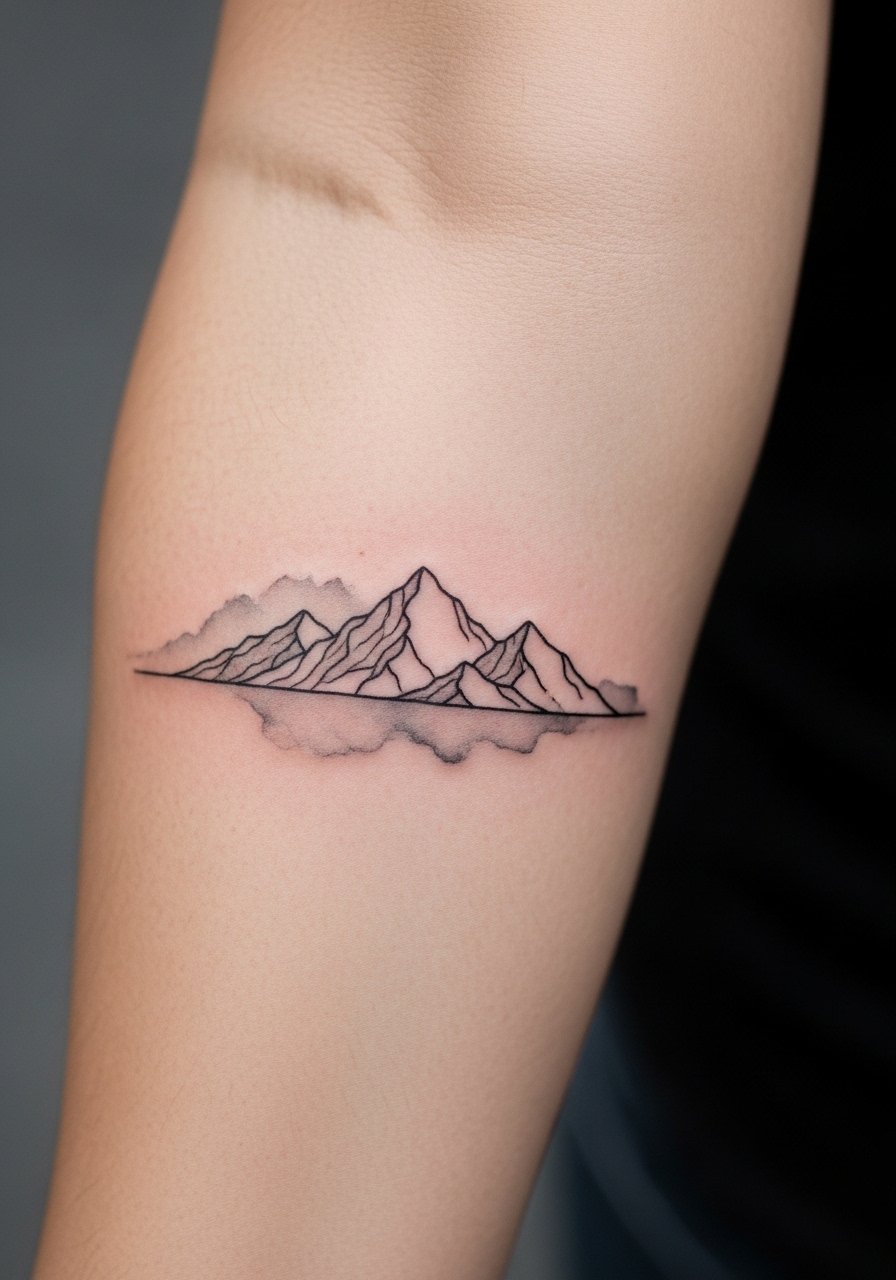
1. Single-Line Mountain with Watercolor Wash on Inner Forearm
I've seen this one age well on people who asked for space between peaks. The continuous mountain silhouette holds because the artist left breathing room in the valleys, and the loose watercolor wash sits behind the linework instead of on top. Pain is low on the inner forearm and a session runs about 30 to 60 minutes. Tell your artist you want a single pass for the linework and a light wash layered beneath. Common mistake is asking for too many tiny peaks, which merge after a year. Pairs well with rolled cuffs and a loose button-down shirt to show the forearm without crowding the line.
2. One-Line Floral Stem with Pastel Splash on the Wrist
Fair warning: the wrist sees constant washing and friction. Expect a touch-up window earlier than for arm pieces. This single-line stem looks delicate fresh. At six months the linework reads crisp if placed slightly above the wrist crease. Ask your artist for slightly heavier lineweight where the stem curves so it survives daily wear. Session time is short, usually under 45 minutes. For showing off, stacked dainty bracelets work best and they sit well next to a thin chain pendant necklace if you want a coordinated neckpiece.

3. Continuous Wave Outline with Blue Wash on the Ankle
There is a visual lightness to a single-line wave that makes ankles ideal. The trade-off is shoe friction and socks rubbing the area. Plan a two-week wardrobe adjustment after the session. The session is quick and pain is moderate. A common mistake is placing the design too low on the ankle where athletic socks will scrub it. During consultation, ask for the line to terminate above the high-sock line. Pair this with rolled-up jeans or a pair of sandals when you want to show the tiny wash without compromising healing.

4. One-Continuous-Loop Heart with Rose Tint on the Sternum
When you sit down for a sternum piece plan clothing for access and modesty. Wear a fitted sports bra or bandeau so the artist can work with a neat edge. The sternum is sensitive so expect a longer session and more aftercare attention. The controversy about fine line on the sternum exists. One camp says the thin skin and movement blur the lines fast. The other camp argues that with careful depth and spacing the lines can hold for years. Ask your artist which camp they belong to before booking. This design looks best with a narrow watercolor wash under the heart shape.

5. Continuous Scripted Word with Watercolor Shadow on the Collarbone
Most collarbone script looks delicate when placed too small. Make the letters a touch larger than you think so the counter space survives. Pain on the collarbone is moderate and session time is often 30 to 50 minutes. Tell your artist the exact script weight you prefer and provide an example of spacing. A common aging issue is blurred counters in tight cursive, so request slightly more open letterforms. For evenings out, pair it with an open-back midi dress or a wide-neck top that frames the collarbone.

6. One-Line Botanical Wrist Cuff with Green Wash
This one reads well if the linework circles the wrist with intentional gaps. The mistake I see a lot is wrapping too tightly which creates visual muddiness when the skin moves. Session time is under an hour and the wrist is on the more sensitive side. Ask for a single needle pass for the main line and a light stipple for the wash areas. For showing it off, a stack of thin bracelets works, or choose a minimalist watch that sits above the cuff so both elements breathe.

Pack Smart
The forearm and collarbone pieces above are easy to access on chair day, but the sternum and ankle designs ask for different prep. A few targeted items streamline the session and help the first week.
-
Stencil transfer sheet kit. Lets you check exact placement for the collarbone and forearm pieces before the needle goes down.
-
Topical numbing cream. Use per artist guidance for sensitive sternum or ankle sessions to reduce the edge without affecting linework.
-
Thin protective film roll. Helpful for wrist and ankle tattoos that face friction during the first week.
-
Fragrance-free gentle body wash. Cleans the area during showers without harming fine line saturation.
-
Aquaphor healing ointment. Thin layers in the first days keep fine line pieces from drying out while still allowing the needle channels to clear.
7. Continuous Bird Silhouette with Sunset Wash on the Shoulder Blade
This placement sits visually well under tops and looks striking when exposed. I've seen shoulder blade pieces stay readable for years because the skin there moves less than the ribs. Pain is mild to moderate depending on proximity to the spine. A common mistake is making the silhouette too dense. Ask for airy negative space and a watercolor wash that does not cross the linework. Session time is often 45 to 75 minutes. For the session wear, a loose button-down shirt you can slide off one shoulder keeps the area accessible without complete exposure.

8. One-Line Abstract Face with Blush Wash on the Upper Arm
There is something about single-stroke faces that ages well because they can be simplified if a touch-up is ever needed. The upper arm is a forgiving canvas so the line can be finer here than on hands or ribs. Session runs 30 to 60 minutes and pain is low. A mistake I see is trying to cram facial detail into a tiny area. Ask the artist to prioritize gesture over detail. The piece pairs with rolled sleeves and a loose drawstring linen pant for the casual look that keeps attention on the arm.

9. Continuous Constellation with Blue-Grey Wash on the Ankle Bone
Visual impact lead applies here. From across a room the constellation reads clear because the line connects the stars in an open rhythm. The ankle bone is sensitive and the line should sit above where shoes rub. Sessions are short. A typical mistake is crowding stars too close which causes them to bleed together in time. For a showing-off outfit, choose jeans rolled above the ankle or a pair of sandals so the tiny wash can be seen.

10. Single-Line Wave Band with Teal Splash Around the Wrist
Mistake lead. The biggest error is wrapping the band too tight so it compresses when the wrist bends. Ask for breaks near the wrist crease so the design does not vanish when you move. Pain is moderate. Session is under an hour. Aging is predictable for this placement and typically a light touch-up around year two keeps it crisp. For a day look that highlights the band, try cuffing a sleeve or wearing a minimalist watch just above it.

11. Continuous Palm Leaf with Emerald Wash on the Calf
Personal observation lead. I have seen single-line botanical calves hold up well because calf tissue is thick and the area avoids constant abrasion. Pain is low to moderate. Sessions run around an hour. The common mistake is cramming too many small leaves into the curve which creates merging after a few years. Tell your artist you want each leaf to breathe. This placement looks good with cropped trousers or when worn with a pair of ankle boots that reveal the calf line.

12. One-Continuous Line Bicycle with Yellow Wash on the Outer Forearm
Consultation lead. When you sit with your artist bring a few references that show the exact line weight you want. The outer forearm is forgiving and the shape reads well across shirts. Session time is often 30 to 50 minutes. A common mistake is asking for tiny wheels and too much interior detail. Keep it schematic. For casual styling, rolled sleeves or a loose button-down shirt frame the piece without hiding it.

13. Single-Stroke Leaf Circle with Olive Wash Behind the Ear
Styling lead. Behind the ear pieces look intimate but they can peek out when your hair is tucked. Pain is moderate and the area needs a steady hand. For safety use the phrasing "on the skin behind the ear below the hairline on the neck" in your consultation reference. A common mistake is making the circle too dense so it looks like a smudge after a year. Ask for airy negative space. Plan a hairstyle that shows the piece when you want it, like a half-up do.

14. Continuous Map Outline with Soft Gray Wash on the Ribs
Pain warning. The ribs rank high on pain scales and sessions may need breaks. The ribs are also where controversy about fine line holds up loudly. One camp says thin ribs lines blur in two years because the skin stretches. The other camp says proper depth and spacing can keep lines legible. If you are set on ribs, ask about needle depth and spacing in the consultation. Expect the session to take longer and plan clothing like a cropped top that can be lifted slightly for access.

15. One-Line Paper Plane with Light Blue Wash on the Side of the Neck
Pain warning lead. The side neck can be sensitive and visible. Plan clothing like a wide-neck shirt that you can pull aside for the session. The piece is small so session time is brief. A mistake is using hair-thin lines that fade into stubble or collar friction. Ask the artist for slightly bolder start and stop points. This placement has career visibility implications for some industries so consider that in your decision.

16. Continuous Ocean Horizon with Color Gradient on the Lower Back
Visual impact lead. A horizon line with a watercolor gradient holds because the eye reads the composition as whole. Lower back placement needs minimal daily friction if you wear high-waisted bottoms. Session time varies from 45 minutes to 90 minutes depending on wash complexity. The mistake is adding small tightly packed detail which softens into a blur. Pair this with high-waisted jeans or a tank top pulled slightly up during the session so the artist has clear access.

17. Single-Line Anchor with Navy Wash on the Inner Bicep
Pain warning. The inner bicep can be uncomfortable as the skin is thinner and the needle pressure feels sharper. Sessions are short but require careful positioning. A common mistake is choosing too small a scale which makes the anchor lose shape when the arm moves. Ask for a slightly more robust silhouette. For the session wear, a sleeveless shirt or tank top with the arm raised is best so the artist has a clean canvas.

18. Continuous Crescent Moon with Lavender Wash on the Rib Side
Aging/healing lead. Small crescent moons on the ribs can lose crispness if placed where skin stretches during movement. Ask your artist to place the curve where the skin lies relatively flat when standing. Pain is high and sessions can be broken into smaller passes. A common mistake is expecting the tiny crescent to stay as a needle-fine stroke for five years. Plan for a touch-up at year two. For the session pick a top you can lift slightly like a cropped tee.

19. One-Line Tiny Fox with Orange Wash on the Ankle
Mistake lead. Many people choose tiny animal silhouettes and then place them where socks and shoes grind at them. Place this slightly higher above the ankle bone to reduce wear. The ankle is sensitive so expect a short, sharp session. The piece ages predictably if given that extra millimeter. For an effortless reveal, wear cropped jeans or a pair of sandals.

20. Continuous Floral Garland with Rose Wash Around the Wrist Crease
Visual impact lead. A garland that breaks at the wrist crease instead of crossing it will last longer. The wrist crease is a high-movement zone that will soften fine detail. Session time is moderate and pain is noticeable. The common mistake is continued decoration on the crease itself which disappears when you flex. Ask for breaks and for the watercolor to sit off the line so the garland reads as planned. Pair with stacked thin bracelets and a minimalist watch to show the piece intentionally.

21. Single-Line Kite with Sunset Gradient on the Calf
Personal observation lead. Calf placements hold color and linework well because they avoid daily abrasion. A small kite with a watercolor gradient can last years without major touch-ups. Sessions are quick and pain is low. A typical mistake is making the tail too thin. Ask your artist to leave slight thickness variance so the tail reads as motion. For showing it off, a pair of ankle boots or cropped shorts frame the calf.

22. Continuous Minimalist Paw Print with Brown Wash Behind the Ear
Styling lead. Behind the ear pieces are subtle and can be shown by sweeping hair back. The area requires a precise hand. Pain is moderate and session time short. A mistake is replicating a full paw detail in a tiny zone which blurs. Ask for simplified shapes. For a practical session wear your hair up and plan gentle styling afterward to reveal the piece when you want.

23. One-Continuous Scripted Latitude Coordinates with Blue Tint on the Rib Side
Consultation lead. Coordinates need precise spacing and exact text, so bring the precise numerals you want inked. The ribs will be sensitive and the session may be a bit longer. A common mistake is asking for tiny numerals in dense type which blur. Ask for simple monospace or thin serif and test a stencil on skin first. For the session choose a cropped top so the artist can work without exposing the torso fully.

24. Continuous Tree Silhouette with Autumn Wash on the Side Hip
Pain warning lead. Hip pieces can be tricky because of clothing friction and sitting. The inner hip area sees less exposure than the outer hip so placement matters. Sessions are moderate in length. A frequent mistake is asking for heavy watercolor that sits on top of fine line. Request the wash to be feathered behind the silhouette. For the appointment wear high-cut shorts or jeans you can shift slightly to reveal just the hip patch.

25. Continuous Minimal Wave on the Side of the Hand with Aquatic Wash
Hand tattoos still affect hiring in some industries so think about career visibility before committing. The side of the hand is high risk for fading and blowout because of thin skin and heavy use. If you choose this area expect touch-ups sooner than for the forearm. A good approach is to make the line slightly bolder at the outset and to accept a yearly touch-up rhythm. Session time is short but intense. For the session keep the hand relaxed and bring a cushion to rest it on.

26. One-Continuous Feather with Pale Blue Wash Along the Spine
Visual impact lead. A vertical feather along the spine reads elegantly when scaled to the body's line. The spine can be painful at midline, expect breaks and a longer session. The mistake is placing too much micro detail that will merge along the spine in time. Ask for clear silhouette and a soft wash offset to the side. For showing off choose an open-back dress or a racerback tank.

27. Continuous Geometric Sun with Orange-Red Wash on the Calf
Mistake lead. Geometric suns can look busy if the rays are too close together. The calf tolerates stronger geometry so this is a safe spot for more structure. Session time is moderate and pain is low. Ask for separated rays and a watercolor wash that sits behind the geometry. For casual wear, cropped jeans and a pair of ankle boots reveal the design without forcing exposure.

Frequently Asked Questions
Q: Will watercolor one line tattoos fade faster than regular black linework on areas like the wrist or ankle?
A: In my experience the watercolor component can fade faster than black linework because pigments sit differently in the skin. Wear and friction on wrists and ankles accelerate that. Plan for a lighter touch-up schedule for color than for the line itself.
Q: How do I tell an artist I want a single continuous line but also want the watercolor to stay subtle?
A: Bring references that separate the line from the wash and ask the artist to layer the wash behind the line instead of on top. During consultation ask to see a stencil on skin so you can confirm placement and relative opacity.
Q: Are there placements where one-line watercolor is a bad idea due to blowout risk?
A: Hands, fingers, and the sides of the feet carry higher blowout risk because of thin skin and constant movement. Some artists avoid ultra-fine lines in those zones. If you still want one there, accept thicker lineweight and an earlier touch-up timeline.
Q: How should I dress for a sternum or ribcage session to make it easy for the artist?
A: Wear a fitted sports bra or bandeau for sternum work and a cropped tee or buttoned top for ribs so the artist can expose only the area needed. Comfort and modesty in session wear speeds the process and keeps the site clean.
Q: Will a single-line script become illegible over time on the collarbone?
A: It depends on scale and spacing. Tight cursive can lose its counters, so larger letterforms with open spacing hold better. Ask for a slightly wider kerning and test the stencil before you commit.
